


YOLOv3训练模型搭建过程
YOLOv3和YOLOv1,YOLOv2比起来,有了较大的改变,后面的v4和v5都是在v3的基础上进行改进的。要想学会如何使用YOLOv3很简单,只需要在github上按照readme.md操作一遍就行,但想彻底搞明白YOLOv3的实现过程,单单将程序debug一遍还是不够的,最好的方式就是自己动手把整个模型给实现一遍。
本文做的就是这样一个工作,阅读本文之前,必须对YOLOv3的主体结构、大致过程有基本的了解,知道配置文件yolov3.cfg中的conventional、route、shortcut、upsample、yolo等这些模块各代表什么。
好的,让我们开始复现之旅。
1 解析模型的配置文件
先建立如图所示的目录结构

config中存放YOLOv3的配置文件,utils存放搭建模型所需的零部件
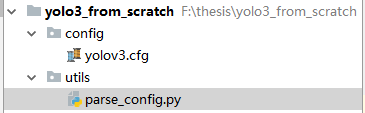
yolov3.cfg是yolov3的配置文件,parse_config.py用于解析配置文件
先在parse_config.py中写入下面的解析方法
def parse_model_config(path):
    """Parses the yolo-v3 layer configuration file and returns module definitions
    该函数以配置文件作为输入,即解析配置文件
    解析时将每个块存储为字典,这些块的属性和值都以键值对的形式存储在字典中。
    解析过程中,我们将这些字典(由代码中的变量 block 表示)添加到列表 blocks 中。
    我们的函数将返回该 blocks。"""

    file = open(path, 'r')
    lines = file.read().split('\n')
    lines = [x for x in lines if x and not x.startswith('#')]   # 去掉空行和注释
    lines = [x.rstrip().lstrip() for x in lines] # get rid of fringe whitespaces
    module_defs = []
    for line in lines:
        if line.startswith('['): # This marks the start of a new block
            module_defs.append({})  # 往列表里添加一个空字典
            module_defs[-1]['type'] = line[1:-1].rstrip()   # module_defs[-1]是一个字典,
            # 上面这条语句的意思是去掉空字符,并加入到字典里,因为方括号开头的行是像这个样子的:[convolutional]

            if module_defs[-1]['type'] == 'convolutional':
                module_defs[-1]['batch_normalize'] = 0      # TODO 为何这里BN要预先设为0?
        else:
            # 如果不是模块开始的标志,那么就直接去掉两侧的空字符,然后用等号将一行分割成键值对加入到字典中
            key, value = line.split("=")
            value = value.strip()
            module_defs[-1][key.rstrip()] = value.strip()

    return module_defs
可以写一个测试函数测试一下上面的解释函数:
if __name__ == '__main__':
    config_path = "../config/yolov3.cfg"
    module_defs = parse_model_config(config_path)
    print(module_defs)
输出:

2 搭建模型
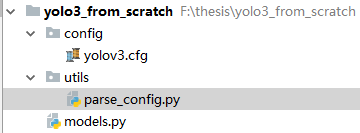
在当前目录下建立一个名为 models.py的文件
在models.py的开头,导入需要的模块
import numpy as np
import torch
import torch.nn as nn
from utils.parse_config import parse_model_config
当然,除了上面这些,还需要一些模块,后面会讲
建立Darknet类,此为YOLOv3模型的主干,先在初始化函数中,写出模型所需要的属性
class Darknet(nn.Module):
    """YOLOv3 object detection model"""

    def __init__(self, config_path, img_size=416):
        super(Darknet, self).__init__()
        self.module_defs = parse_model_config(config_path)     # 解析配置文件,返回由block构成的列表
        self.hyperparams, self.module_list = create_modules(self.module_defs)
        # create_modules方法是将每个block转化为nn.Sequential()对象,然后再加入到nn.ModuleList()对象中

        self.yolo_layers = [layer[0] for layer in self.module_list if hasattr(layer[0], "metrics")]
        self.img_size = img_size
        self.seen = 0               #
        self.header_info = np.array([0, 0, 0, self.seen, 0], dtype=np.int32)
这里, config_path是配置文件的路径,img_size是图像的尺寸,self.yolo_layers,self.seen和self.header_info后面会将,这里先讲讲create_modules方法
在models.py文件中,加入下面的函数
def create_modules(blocks):
    """
    将blocks中的模块,都转换为模型,存入到nn.ModuleList()对象中
    其中shortcut和route模块,使用的都是EmptyLayer类,yolo模块使用的是DetectionLayer类

    :param blocks: cfg文件被解析后,每个模块的属性和值,都以键值对的形式存储在一个字典中,
            然后这些字典又被装入一个列表中,blocks就是这个列表
    :return:返回模型的超参数信息,和nn.ModuleList()对象(因为模型的输入尺寸、学习率、
            batch_size等,也都被存储在了cfg文件中)
    """
    net_info = blocks[0]        # Captures the information about the input and pre-processing,即[net]层
    module_list = nn.ModuleList()   #
    prev_filters = 3                # 初始通道数,因为彩色图片是RGB三通道,所以这里是3
    output_filters = []             # 每一层的输出通道,方便路由层(route层)追踪

    for index, x in enumerate(blocks[1:]):  # 之所以从第1块开始,是因为第0块是[net]层
        module = nn.Sequential()
        # 之所以要在这里建立一个nn.Sequential对象,是因为一个模块可能有卷积层、BN层、激活层等,
        # 所以需要先统一装到一个容器中,这样才能装入到模型列表里面

        # check the type of block
        # create a new module for the block
        # append to module_list

        if (x["type"] == "convolutional"):  # 如果是卷积模块
            # Get the info about the layer

            # 获取卷积层(Conv2d)的相关参数
            try:
                batch_normalize = int(x["batch_normalize"])
                # 为了防止卷积模块没有BN层,所以加入到try当中
                bias = False    # 只要有BN,那么就相当于没有偏置,因为即便有,也会被BN给抹平
            except:
                batch_normalize = 0
                bias = True

            filters = int(x["filters"])
            padding = int(x["pad"])     # backbone中只要是卷积模块,就都会设置pad
            kernel_size = int(x["size"])
            stride = int(x["stride"])

            if padding:
                # 如果设置 pad=0,那么padding就是0,说明没有填充
                pad = (kernel_size - 1) // 2
            else:
                pad = 0

            # Add the convolutional layer
            conv = nn.Conv2d(prev_filters, filters, kernel_size, stride, pad, bias=bias)
            module.add_module("conv_{0}".format(index), conv)       # 将卷积层加入到容器中

            # Add the Batch Norm Layer
            if batch_normalize:
                bn = nn.BatchNorm2d(filters)
                module.add_module("batch_norm_{0}".format(index), bn)   # 将BN层加入到容器中


            # Check the activation.
            # It is either Linear or a Leaky ReLU for YOLO
            activation = x["activation"]
            if activation == "leaky":
                activn = nn.LeakyReLU(0.1, inplace=True)
                module.add_module("leaky_{0}".format(index), activn)    # 将激活层加入到容器中

        # If it's an upsampling layer
        # We use Bilinear2dUpsampling
        elif (x["type"] == "upsample"):
            stride = int(x["stride"])
            upsample = nn.Upsample(scale_factor=2, mode="bilinear")     # TODO 这里会出现警告
            module.add_module("upsample_{}".format(index), upsample)

        # If it is a route layer
        elif (x["type"] == "route"):
            x["layers"] = x["layers"].split(',')

            # Start of a route
            start = int(x["layers"][0])     # 路由层可能从前面第4层牵出一条线
            # end, if there exists one.如果只有一条线,那么到这里就结束了

            # 因为也有可能存在第二条线,所以这里使用异常机制
            try:
                end = int(x["layers"][1])
            except:
                end = 0

            # Positive annotation,如果route定位用的数字是正的,比如61,那么说明是第61层
            if start > 0:
                start = start - index   # 第一条线的层数,减当前层数,得到的start为第一条线相对于本层的相对位置
            if end > 0:
                end = end - index       # 第二条线的层数,减当前层数,得到的start为第二条线相对于本层的相对位置

            route = EmptyLayer()        # 一个空层对象,在其他文件中定义
            module.add_module("route_{0}".format(index), route)

            # 获得route层的输出通道
            if end < 0:
                # 说明存在第二条线,因为当存在第二条线时,
                # 如果为绝对层数(位置),那么必然已经执行了end = end - index的操作,end必然已变为为负
                # 如果为相对层数(位置),那么end本身就是负的
                filters = output_filters[index + start] + output_filters[index + end]
            else:
                # 如果不存在第二条线
                # 如果不是负的,那么必然为0,因为不可能是正的,end为0说明不存在第二条线
                filters = output_filters[index + start]

        # shortcut corresponds to skip connection
        elif x["type"] == "shortcut":
            shortcut = EmptyLayer()
            module.add_module("shortcut_{}".format(index), shortcut)

        # Yolo is the detection layer
        elif x["type"] == "yolo":
            mask = x["mask"].split(",")
            mask = [int(x) for x in mask]
            # 比如yolo1,mask = 0,1,2,经过上面的命令之后,变为[0, 1, 2]

            anchors = x["anchors"].split(",")
            anchors = [int(a) for a in anchors]
            anchors = [(anchors[i], anchors[i + 1]) for i in range(0, len(anchors), 2)]
            anchors = [anchors[i] for i in mask]
            # 最初anchors = 10,13,  16,30,  33,23,  30,61,  62,45,  59,119,  116,90,  156,198,  373,326
            # yolo1的mask为[0, 1, 2],经过上面的操作
            # yolo1的anchors为[[10,13], [16,30], [30,61]]

            detection = DetectionLayer(anchors)
            module.add_module("Detection_{}".format(index), detection)

        # 将上面解析得到的模块加入到module_list(即循环之前定义的nn.ModuleList对象)中
        module_list.append(module)

        # 上面的各个模块,只有拼接模块和卷积模块会改变通道,
        # 所以只在 route 和 convolutional 中有给 filters 赋值
        # 其他模块仍然使用上一轮循环得到的通道
        output_filters.append(filters)          # 将当前模块的输出通道数存入output_filters中

        # 将当前模块的输出通道赋值给 prev_filters,用于下一轮循环
        prev_filters = filters

    return (net_info, module_list)
create_modules方法中,有三个地方需要注意一下,分别是EmptyLayer、Upsample和YOLOLayer
我们先来说说EmptyLayer,因为整个backbone模型被整合成了一个nn.Model_list()对象,而route模块做的仅仅是级联(torch.cat操作),shortcut模块做的仅仅是将不同模块的结果进行相加,它们的共同特点是:未必需要上一个模块的输出,但需要上好几个模块的输出,至于需要的是第几个模块,一个模块还是多个模块,这个暂时无法知道,所以直接在create_modules方法中,很难实习这个功能。
这个问题暂时先不处理,而是先定义一个空层来占位,由于nn.ModuleList中的元素必须为nn.Module的子类,所以在models.py中,可以这么定义EmptyLayer
class EmptyLayer(nn.Module):    # 这个类是用来给route和shortcut模块凑数的,解析cfg文件时用到
    def __init__(self):
        super(EmptyLayer, self).__init__()
    # 为何没有forward函数?请仔细看Darknet类forward方法中的module_type == "route"的实现代码
    # 相当于将EmptyLayer的forward放到了Darknet类的forward中
    # 无论是route模块还是shortcut模块,都需要获得前面层的输出,这个在这里不太好实现
    # 所以这里写了一个加模块凑数,因为nn.ModuleList中的元素必须为nn.Module的子类
我们再来说说Upsample模块,要实现特征融合,那么必须将不同分支的网格处理成一样,这样才能进行级联,即torch.cat操作,对于backbone后面的分支,假设其网格为13×13,那么要和26×26的的分支进行级联,那么必须进行上采样,即Upsample操作。
下面是Upsample的实现代码:
import torch.nn.functional as F
class Upsample(nn.Module):
    """ nn.Upsample is deprecated """

    def __init__(self, scale_factor, mode="nearest"):
        super(Upsample, self).__init__()
        self.scale_factor = scale_factor
        self.mode = mode

    def forward(self, x):
        # 通过插值实现上采样
        x = F.interpolate(x, scale_factor=self.scale_factor, mode=self.mode)
        return x
关于F.interpolate用法,可以看这两个连接:
https://www.jianshu.com/p/0a30b2a3c103
https://www.cnblogs.com/wanghui-garcia/p/11399034.html
我们再来说一下YOLOLayer模块。我们要先明白,YOLOLayer模块到底在干什么?YOLO层主要干了两件事:
(1)解码;
(2)计算损失函数;
数据经过卷积模块后,在数据输入到YOLOLayer之前,其维度为(batch_size, 3*(5+num_classes), grid_size, grid_size),要将其转化为(batch_size, 3grid_sizegrid_size, 5+num_classes),不单单是维度的变换,还要讲目标框中心点坐标、高宽,置信度,各个类别的概率解析出来。比如,目标置信度、各个类别的概率,不在0-1之间,必须使用sigmoid函数将其转化到0-1之间。
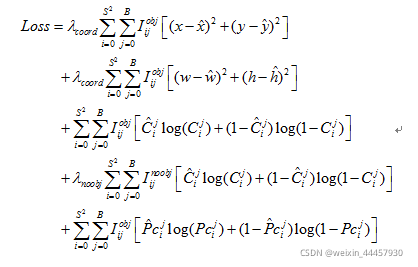
解码的目的是为了计算损失函数,Redmon J在论文中并没有进行讲解YOLOv3的损失函数,不同版本的YOLOv3实现代码,其损失函数也不一样,这里我们选用教程代码的损失函数(暂时不管损失函数是什么,这个对我们搭建模型不影响):
YOLOLayer类的定义如下:
class YOLOLayer(nn.Module):
    """Detection layer"""

    def __init__(self, anchors, num_classes, img_dim=416):
        super(YOLOLayer, self).__init__()
        self.anchors = anchors
        self.num_anchors = len(anchors)     # anchors的数量,一般是3
        self.num_classes = num_classes      # 类别数量
        self.ignore_thres = 0.5             # 置信度阈值
        self.mse_loss = nn.MSELoss()        # 均方差损失计算器
        self.bce_loss = nn.BCELoss()        # 二分类交叉熵损失计算器
        self.obj_scale = 1                  # 有目标的权重
        self.noobj_scale = 100              # TODO 无目标的权重,这么大不会导致样本不均衡吗?
        self.metrics = {}                   # 度量指标
        self.img_dim = img_dim              # 输入图像的尺寸
        self.grid_size = 0                  # 网格的长宽
接下来是forward函数,
def forward(self, x, targets=None, img_dim=None):
"""
yolo模块的功能主要有两个,一是对前面的模块进行解码,二是将不同分值的解码结果进行级联
:param x: 其维度为(batch_size, num_anchors*anchor_attr, grid_size, grid_size)
:param targets:其维度为(6, 6)
:param img_dim:320
:return: 维度为(batch_size, num_anchors*anchor_attr, grid_size, grid_size)
"""
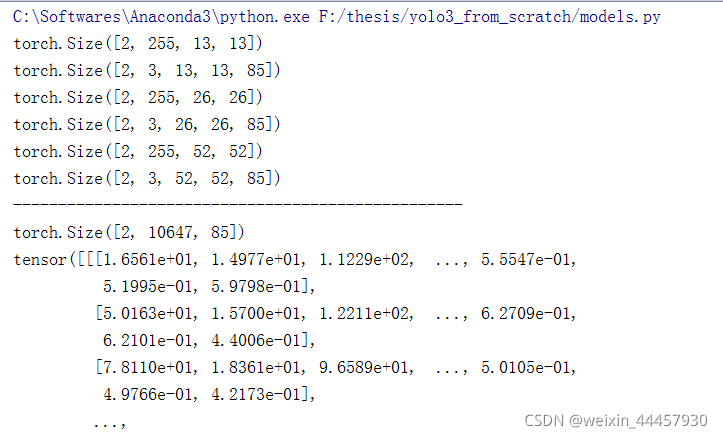
print (x.shape) # 查看x的维度
# Tensors for cuda support
FloatTensor = torch.cuda.FloatTensor if x.is_cuda else torch.FloatTensor
LongTensor = torch.cuda.LongTensor if x.is_cuda else torch.LongTensor
ByteTensor = torch.cuda.ByteTensor if x.is_cuda else torch.ByteTensor
self.img_dim = img_dim
num_samples = x.size(0) # 一个batch中样本的数量,即batch_size
grid_size = x.size(2) # 获得输入数据的网格大小
prediction = (
x.view(num_samples, self.num_anchors, self.num_classes + 5, grid_size, grid_size)
.permute(0, 1, 3, 4, 2)
.contiguous()
)
# (batch_size, 3, grid_size, grid_size, 85)
print (prediction.shape) # 输出prediction的维度
# Get outputs,注意,是在最后一个维度取切片
x = torch.sigmoid(prediction[..., 0]) # Center x,维度为(batch_size, 3, grid_size, grid_size)
y = torch.sigmoid(prediction[..., 1]) # Center y,维度为(batch_size, 3, grid_size, grid_size)
w = prediction[..., 2] # Width,维度为(batch_size, 3, grid_size, grid_size)
h = prediction[..., 3] # Height,维度为(batch_size, 3, grid_size, grid_size)
pred_conf = torch.sigmoid(prediction[..., 4]) # Conf,维度为(batch_size, 3, grid_size, grid_size)
pred_cls = torch.sigmoid(prediction[..., 5:]) # Cls pred.,维度为(batch_size, 3, grid_size, grid_size, 80)
# If grid size does not match current we compute new offsets
if grid_size != self.grid_size:
self.compute_grid_offsets(grid_size, cuda=x.is_cuda)
这里出现了一个self.compute_grid_offsets,这是在输入图片上加上网格,它的代码如下
    def compute_grid_offsets(self, grid_size, cuda=True):
        """该方法是给原图打上网格,
        该方法得到调用之后,将会多出如下属性:
        self.stride,self.grid_x,self.grid_y,self.scaled_anchors,self.anchor_h,self.anchor_w
        这里self.stride是一个数字,self.grid_x和self.grid_y的维度为(1, 1, g, g),g就是gred_size
        self.scaled_anchors的维度为(self.num_anchors,2),通常是(3, 2)
        self.anchor_h和self.anchor_w的维度均为(1, self.num_anchors, 1, 1)"""

        FloatTensor = torch.cuda.FloatTensor if cuda else torch.FloatTensor

        # 确定网格数量
        self.grid_size = grid_size
        g = self.grid_size

        # 计算步长
        self.stride = self.img_dim / self.grid_size

        # 生成一个网格矩阵
        self.grid_x = torch.arange(g).repeat(g, 1).view([1, 1, g, g]).type(FloatTensor)
        # torch.arange(g)生成一个一维数组,.repeat(g, 1)将其维度变成(g, g)
        # .view([1, 1, g, g])将其变成维度为[1, 1, g, g]的张量
        # .type(FloatTensor),张量转换

        # 将y方向的网格像上面一样处理
        self.grid_y = torch.arange(g).repeat(g, 1).t().view([1, 1, g, g]).type(FloatTensor)

        # 将anchor的高宽除以步长,即转化为相对于网格的长度
        self.scaled_anchors = FloatTensor([(a_w / self.stride, a_h / self.stride) for a_w, a_h in self.anchors])
        # 经过上述转化后,self.scaled_anchors的维度为(self.num_anchors,2),
        # 因为self.num_anchors通常为3,因此self.scaled_anchors的维度为(3,2)

        # 获得缩放后的anchor的宽和高,并变维
        self.anchor_w = self.scaled_anchors[:, 0:1].view((1, self.num_anchors, 1, 1))
        self.anchor_h = self.scaled_anchors[:, 1:2].view((1, self.num_anchors, 1, 1))
        # 上述两条命令字后,self.anchor_w和self.anchor_h的维度都是(1, self.num_anchors, 1, 1)
现在回到YOLOLayer类的forward的函数中
        # Add offset and scale with anchors #特征图中的实际位置
        pred_boxes = FloatTensor(prediction[..., :4].shape)
        # pred_boxes的维度为(batch_size, 3, grid_size, grid_size, 4)

        # 将相对网格的位置转化为相对于整个特征图的位置,比如将0.5,0.5变为 11.5,11.5这样
        pred_boxes[..., 0] = x.data + self.grid_x
        # 维度为(batch_size, 3, grid_size, grid_size)的张量与维度为(1, 1, g, g)的张量之和
        # g等于grid_size
        # x.data的维度为(batch_size, 3, grid_size, grid_size)
        # x.data+self.grid_x 是为了把预测边框(阈值筛选和NMS前的预测结果)的中心坐标
        # 加上所在的网格数,得到每个边框相当于特征层的位置

        # 将边框中心点的纵坐标也作相似的处理
        pred_boxes[..., 1] = y.data + self.grid_y

        # 根据映射信息得到边框相对于特征图的高宽
        pred_boxes[..., 2] = torch.exp(w.data) * self.anchor_w
        pred_boxes[..., 3] = torch.exp(h.data) * self.anchor_h

        # 将边框、置信度、分类信息进行级联
        output = torch.cat(
            (
                pred_boxes.view(num_samples, -1, 4) * self.stride, #还原到原始图中
                pred_conf.view(num_samples, -1, 1),
                pred_cls.view(num_samples, -1, self.num_classes),
            ),
            -1,
        )

        if targets is None:
            # 如果输入的参数中没有标签,那么就可以直接返回了
            return output, 0
        else:
            # 如果有标签,那么需要计算损失函数

            iou_scores, class_mask, obj_mask, noobj_mask, tx, ty, tw, th, tcls, tconf = build_targets(
                pred_boxes=pred_boxes,
                pred_cls=pred_cls,
                target=targets,
                anchors=self.scaled_anchors,
                ignore_thres=self.ignore_thres,
            )
            # iou_scores:真实值与最匹配的anchor的IOU得分值 class_mask:分类正确的索引  obj_mask:目标框所在位置的最好anchor置为1 noobj_mask obj_mask那里置0,还有计算的iou大于阈值的也置0,其他都为1 tx, ty, tw, th, 对应的对于该大小的特征图的xywh目标值也就是我们需要拟合的值 tconf 目标置信度
            # Loss : Mask outputs to ignore non-existing objects (except with conf. loss)
这里出现了build_targets,这是标签转化函数,我们在utils文件夹中,新建一个utils.py文件,如下图所示:
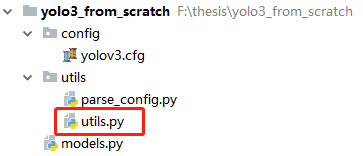
在这里,我们写入 标签转化函数(关于 标签转化函数,这个我们在训练的时候再详细讨论,这里先把函数的贴过来,不让IDE报错),函数体仅用pass表示
import torch

def build_targets(pred_boxes, pred_cls, target, anchors, ignore_thres):
   pass
让我们回到forward函数中,现在可以计算损失函数和评价指标了
            loss_x = self.mse_loss(x[obj_mask], tx[obj_mask])       # 只计算有目标的
            # self.mse_loss是一个nn.MSELoss()对象,其可以像函数一样调用

            loss_y = self.mse_loss(y[obj_mask], ty[obj_mask])
            loss_w = self.mse_loss(w[obj_mask], tw[obj_mask])
            loss_h = self.mse_loss(h[obj_mask], th[obj_mask])
            loss_conf_obj = self.bce_loss(pred_conf[obj_mask], tconf[obj_mask])
            loss_conf_noobj = self.bce_loss(pred_conf[noobj_mask], tconf[noobj_mask])
            loss_conf = self.obj_scale * loss_conf_obj + self.noobj_scale * loss_conf_noobj #
            loss_cls = self.bce_loss(pred_cls[obj_mask], tcls[obj_mask]) #分类损失
            total_loss = loss_x + loss_y + loss_w + loss_h + loss_conf + loss_cls #总损失

            # Metrics度量指标
            cls_acc = 100 * class_mask[obj_mask].mean()     # 平均准确率,在乘100之前,class_mask就在0-1区间
            conf_obj = pred_conf[obj_mask].mean()           # 平均置信度(有目标)
            conf_noobj = pred_conf[noobj_mask].mean()
            conf50 = (pred_conf > 0.5).float()
            iou50 = (iou_scores > 0.5).float()
            iou75 = (iou_scores > 0.75).float()
            detected_mask = conf50 * class_mask * tconf
            precision = torch.sum(iou50 * detected_mask) / (conf50.sum() + 1e-16)
            recall50 = torch.sum(iou50 * detected_mask) / (obj_mask.sum() + 1e-16)
            recall75 = torch.sum(iou75 * detected_mask) / (obj_mask.sum() + 1e-16)

            self.metrics = {
                "loss": to_cpu(total_loss).item(),
                "x": to_cpu(loss_x).item(),
                "y": to_cpu(loss_y).item(),
                "w": to_cpu(loss_w).item(),
                "h": to_cpu(loss_h).item(),
                "conf": to_cpu(loss_conf).item(),
                "cls": to_cpu(loss_cls).item(),
                "cls_acc": to_cpu(cls_acc).item(),
                "recall50": to_cpu(recall50).item(),
                "recall75": to_cpu(recall75).item(),
                "precision": to_cpu(precision).item(),
                "conf_obj": to_cpu(conf_obj).item(),
                "conf_noobj": to_cpu(conf_noobj).item(),
                "grid_size": grid_size,
            }

            return output, total_loss
上面的代码中,出现了to_cpu,可以把这个函数写在utils/utils.py中,其定义如下:
def to_cpu(tensor):
    return tensor.detach().cpu()
让我们回到Darknet类中,刚刚在create_modules方法中,仅仅是将各个子模块放入到了nn.Module_List中,但并没有将各个具体子模块串联起来,当传入数据之后,数据是如何流动的,这个需要在forward中实现,在Darknet类中加入下面的函数:
    def forward(self, x, targets=None):
        img_dim = x.shape[2]
        loss = 0
        layer_outputs = []      # 记录每一个模块的输出,方面route和shortcut模块的追踪
        yolo_outputs = []       # 记录每一个yolo模块的输出,方便将不同yolo模块的输出进行级联
        for i, (module_def, module) in enumerate(zip(self.module_defs, self.module_list)):
            # 这里module_def是一个解析cfg文件后的块,module是一个module_list对象
            if module_def["type"] in ["convolutional", "upsample", "maxpool"]:
                x = module(x)
            elif module_def["type"] == "route":
                x = torch.cat([layer_outputs[int(layer_i)] for layer_i in module_def["layers"].split(",")], 1)
            elif module_def["type"] == "shortcut":
                layer_i = int(module_def["from"])
                x = layer_outputs[-1] + layer_outputs[layer_i]
            elif module_def["type"] == "yolo":
                x, layer_loss = module[0](x, targets, img_dim)  # 计算输出和损失函数
                loss += layer_loss
                yolo_outputs.append(x)
            layer_outputs.append(x)
        yolo_outputs = to_cpu(torch.cat(yolo_outputs, 1))       # 将几个yolo_outputs进行级联,yolo_ouput是列表
        return yolo_outputs if targets is None else (loss, yolo_outputs)
好了,到此为止,模型的搭建已经完成,这里可以写一个测试函数:
if __name__ == '__main__':
    file_path = r"config/yolov3.cfg"
    model = Darknet(file_path)
    test_input = torch.rand((2, 3, 416, 416))
    pred = model(test_input)
    print('-'*50)
    print(pred.shape)
    print(pred)
输出
至此,模型的搭建部分讲解完毕,下一章我们将介绍用数据的处理和导入。


 3315
3315


 被折叠的 条评论
为什么被折叠?
被折叠的 条评论
为什么被折叠?
 到【灌水乐园】发言


