


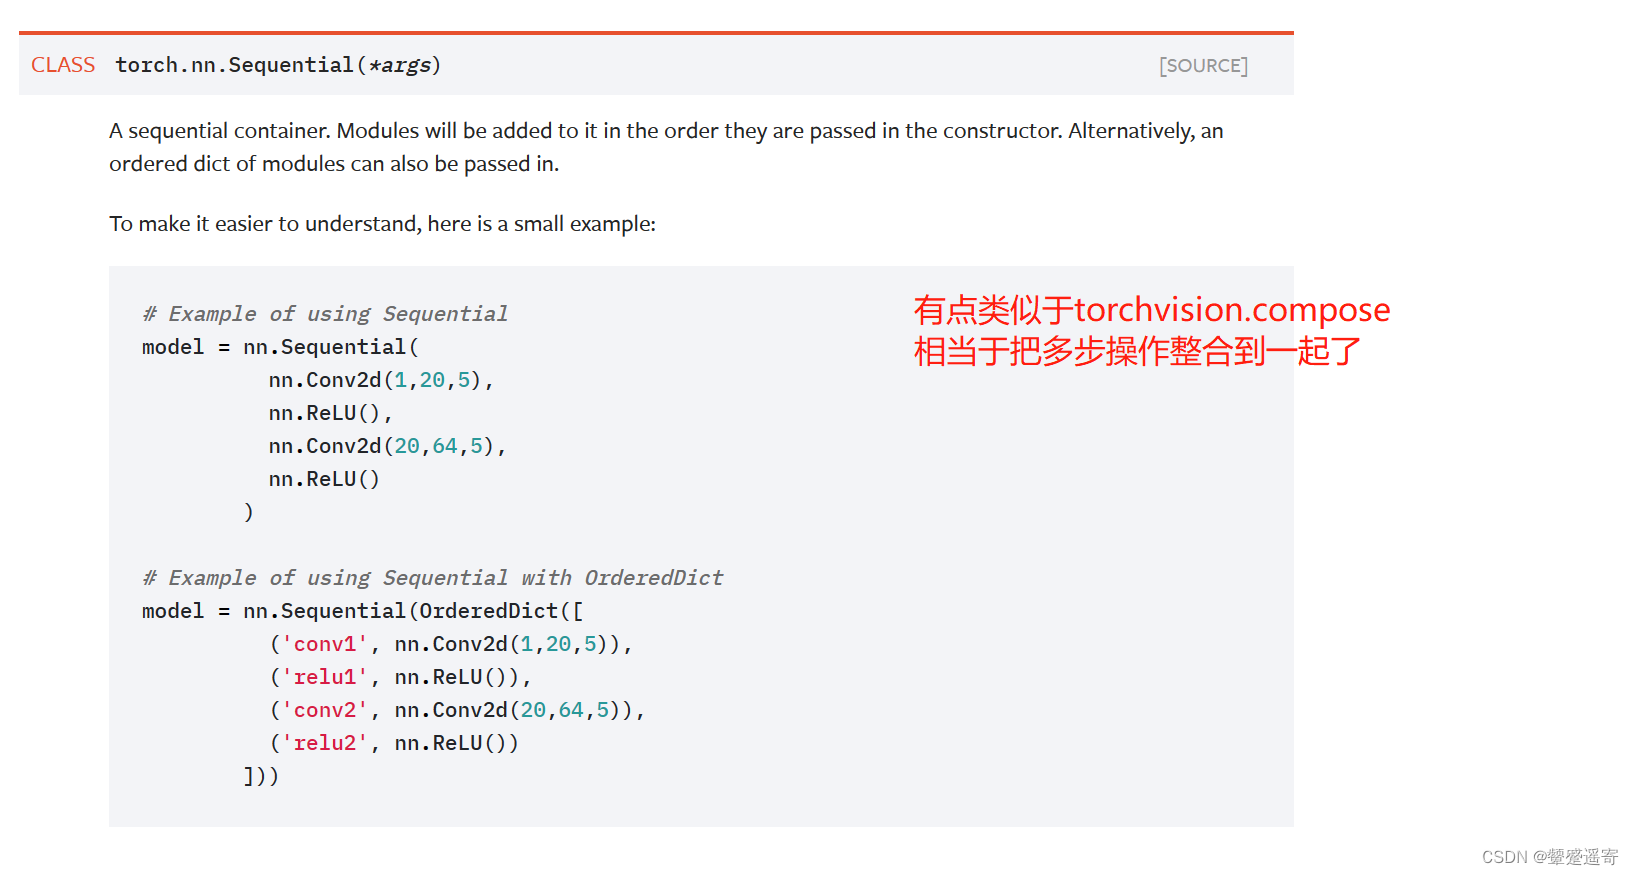
关于sequential
老样子先看官方文档
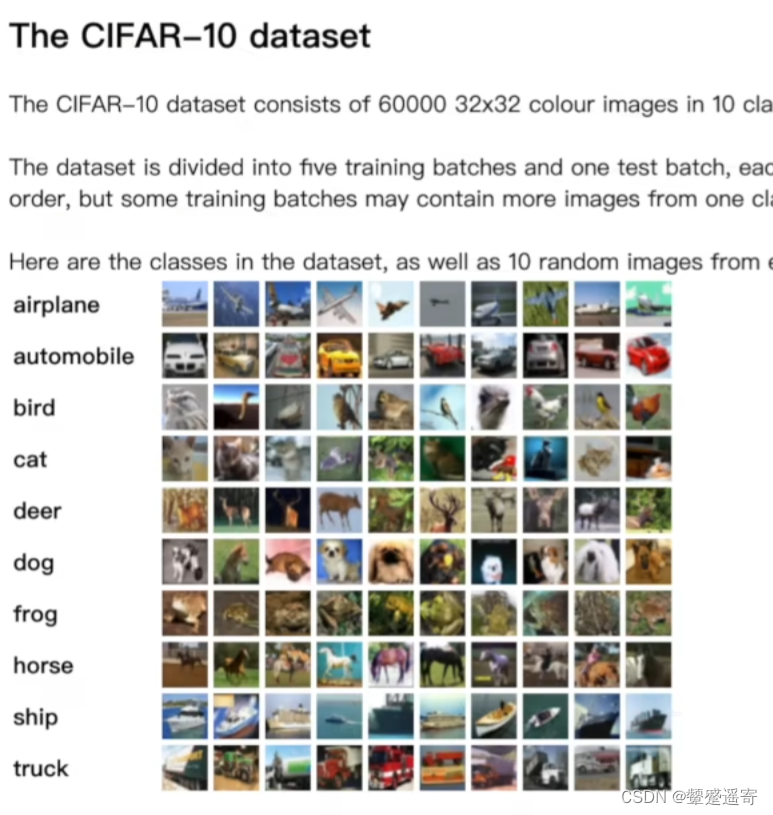
写一个对CIFAR10数据集做一个简单分类的神经网络:
这是关于CIFAR10数据集的介绍:
一共10类
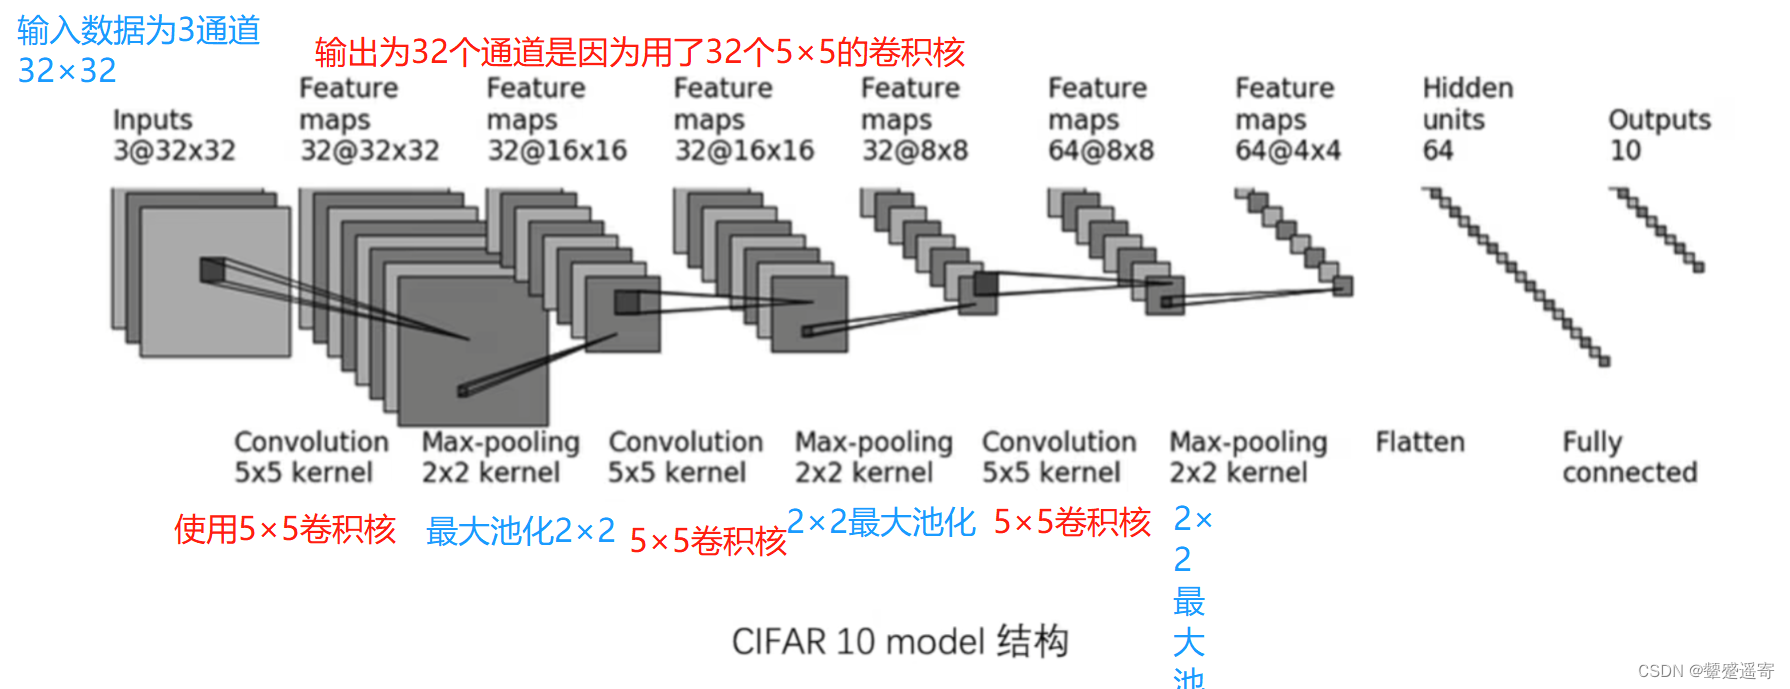
一、模型结构:
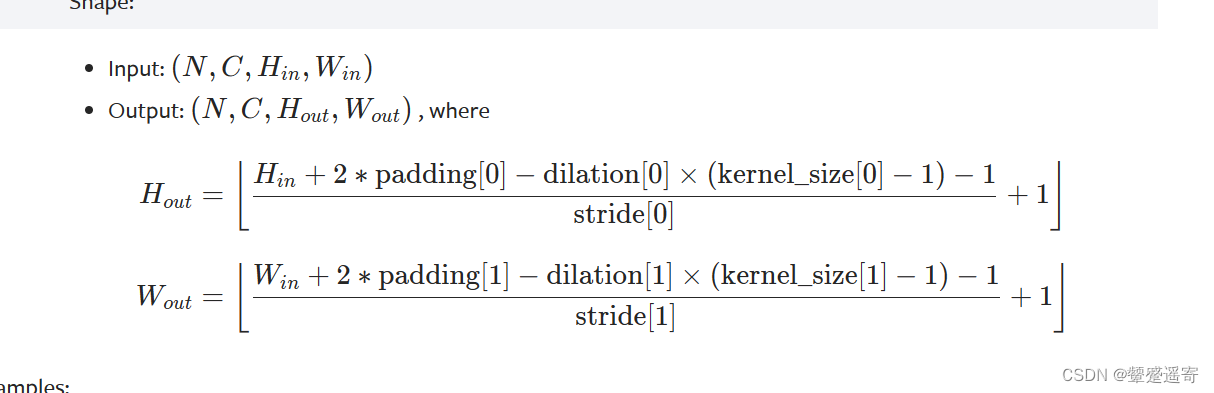
关于卷积和池化后图像大小的计算公式见连接
https://blog.csdn.net/u014453898/article/details/85126733
二、逐步代码实现
1、写第一步卷积
conv2d需要输入的参数:

根据模型结构
(1)输入通道:3
(2)输出通道:32
(3)卷积核大小:5 (因为是5×5)
from torch import nn
from torch.nn import Conv2d


class Tudui(nn.Module):
    def __init__(self):
        super(Tudui, self).__init__()
        self.conv1=Conv2d(3,32,5) //输入通道:3  输出通道:32  卷积核大小:5 (因为是5×5)
(4)我们看需不需要加padding
由公式:
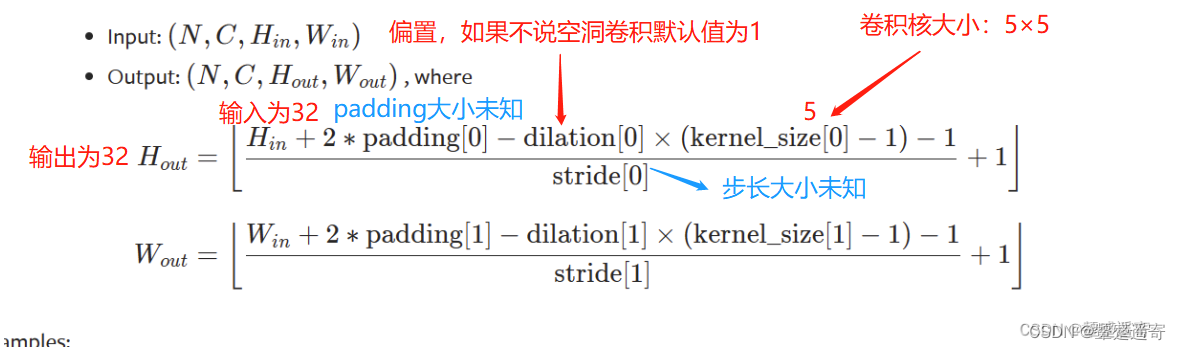
32=(32+2*padding-1*(5-1)-1)/stride    +1
31=(32+2*padding-4-1)/stride
31=(27+2*padding)/stride
我们假设stride=1
则padding=2
若stride=2 那padding太大了就离谱了
因此
padding=2
stride=1
from torch import nn
from torch.nn import Conv2d


class Tudui(nn.Module):
    def __init__(self):
        super(Tudui, self).__init__()
        self.conv1=Conv2d(in_channels=3,out_channels=32,kernel_size=5,stride=1,padding=2)
2、写第一步池化
# self.conv1=Conv2d(in_channels=3,out_channels=32,kernel_size=5,stride=1,padding=2)
  self.maxpool1=MaxPool2d(2) 池化核大小2×2
3、写第二步卷积
(1)输入通道:32
(2)输出通道:32
(3)卷积核大小:5 (因为是5×5)
(4)计算padding和stride
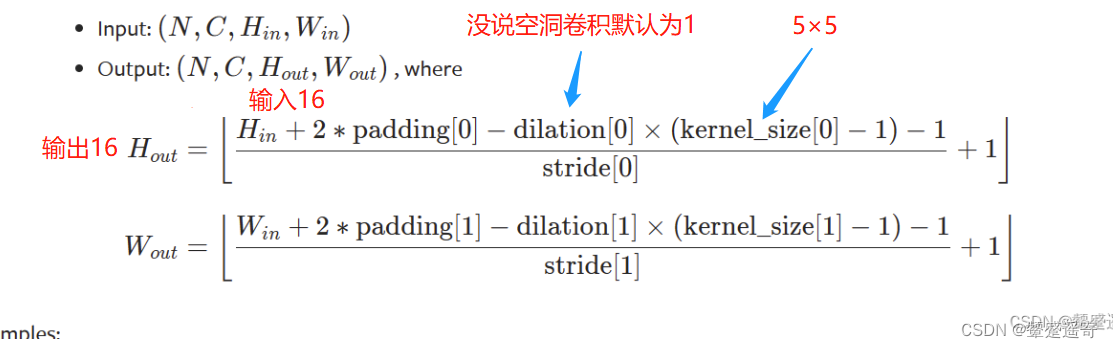
16=(16+2*padding-1*(5-1)-1)/stride +1
15=(11+2*padding)/stride
这里设stride=1
padding=2
所以:“
self.conv2=Conv2d(32,32,5,1,2)
4、写第二步池化
self.maxpool2=MaxPool2d(2)
5、第三步卷积
(1)输入通道:32
(2)输出通道:64
(3)卷积核大小:5 (因为是5×5)
(4)计算padding和stride
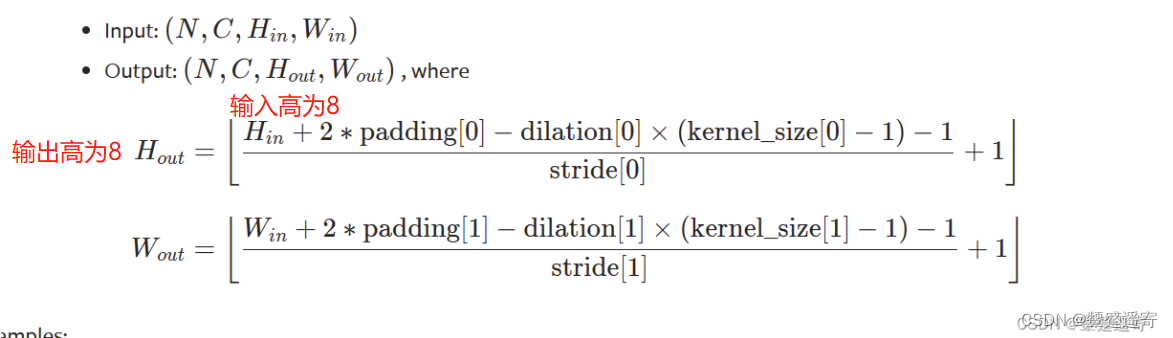
(5)padding=2
(6)stride=1
self.conv3=Conv2d(32,64,5,1,2)
6、第三步池化
self.maxpool3=MaxPool2d(2)
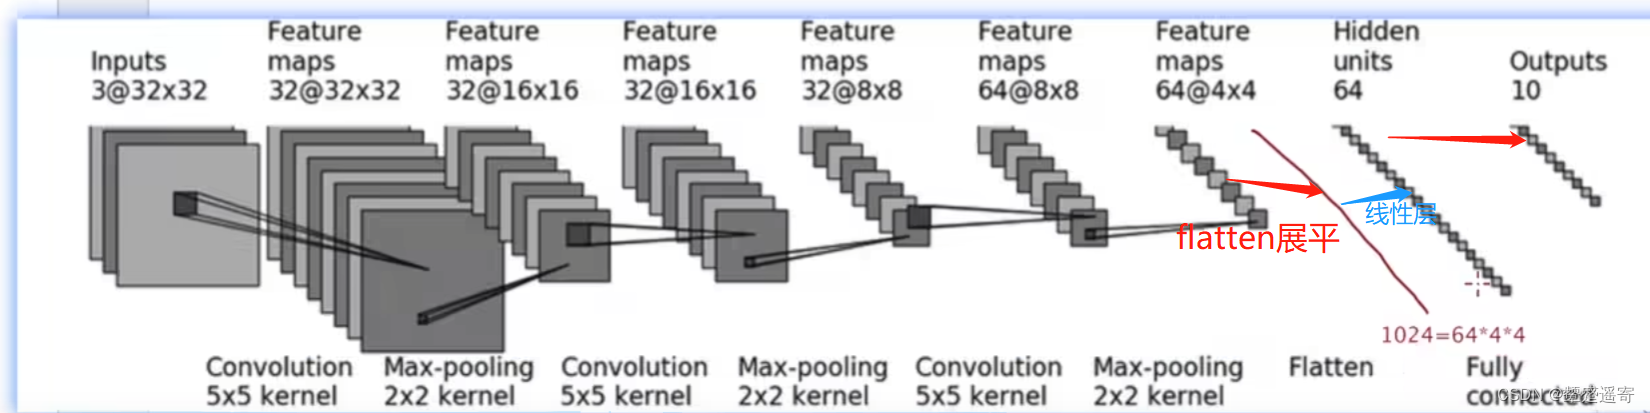
7、最后数据展平
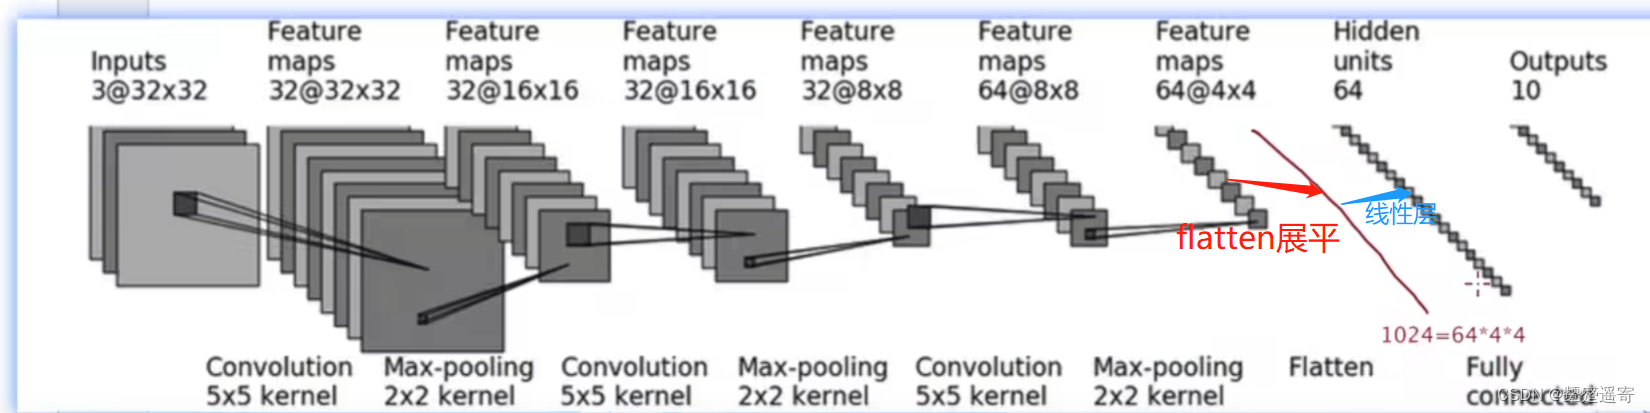
注意!这里会展平为1024 因为64×4×4=1024
8、第一个线性层
self.linear1=Linear(1024,64)
9、第二个线性层
self.linear2=Linear(64,10)
10、最终init定义函数如下
from torch import nn
from torch.nn import Conv2d
from torch.nn import MaxPool2d
from torch.nn import  Flatten
from torch.nn import Linear
//这里为了方便可以写成 from toch.nn import Conv2d,MaxPool2d,Flatten,linear

class Tudui(nn.Module):
    def __init__(self):
        super(Tudui, self).__init__()
        self.conv1=Conv2d(in_channels=3,out_channels=32,kernel_size=5,stride=1,padding=2)
        self.maxpool1=MaxPool2d(2)
        self.conv2=Conv2d(32,32,5,1,2)
        self.maxpool2=MaxPool2d(2)
        self.conv3=Conv2d(32,64,5,1,2)
        self.maxpool3=MaxPool2d(2)
        self.flatten=Flatten()
        self.linear1=Linear(1024,64)
        self.linear2=Linear(64,10)
11、写forward
    def forward(self,x):
        x=self.conv1(x)
        x=self.maxpool1(x)
        x=self.conv2(x)
        x=self.maxpool2(x)
        x=self.conv3(x)
        x=self.maxpool3(x)
        x=self.flatten(x)
        x=self.linear1(x)
        x=self.linear2(x)
        return x

tudui=Tudui()
print(tudui)
12、最后代码:
from torch import nn
from torch.nn import Conv2d
from torch.nn import MaxPool2d
from torch.nn import  Flatten
from torch.nn import Linear

class Tudui(nn.Module):
    def __init__(self):
        super(Tudui, self).__init__()
        self.conv1=Conv2d(in_channels=3,out_channels=32,kernel_size=5,stride=1,padding=2)
        self.maxpool1=MaxPool2d(2)
        self.conv2=Conv2d(32,32,5,1,2)
        self.maxpool2=MaxPool2d(2)
        self.conv3=Conv2d(32,64,5,1,2)
        self.maxpool3=MaxPool2d(2)
        self.flatten=Flatten()
        self.linear1=Linear(1024,64)
        self.linear2=Linear(64,10)

    def forward(self,x):
        x=self.conv1(x)
        x=self.maxpool1(x)
        x=self.conv2(x)
        x=self.maxpool2(x)
        x=self.conv3(x)
        x=self.maxpool3(x)
        x=self.flatten(x)
        x=self.linear1(x)
        x=self.linear2(x)
        return x

tudui=Tudui()
print(tudui)
没问题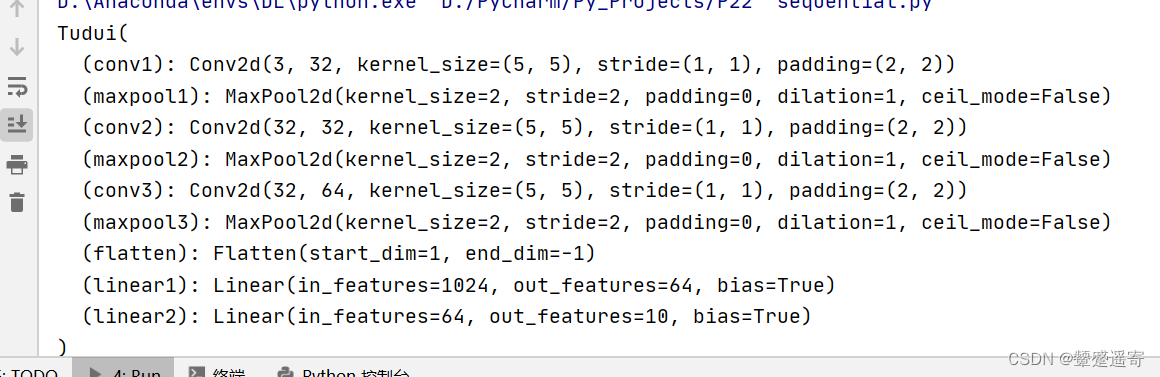
三、检验网络正确性的方法:
借助一个模块
torch.onse表述数据内都是1
根据上面的结构图片:
我们设定他的shape(batchsize=64,inchannel=3,h2,w2)
input=torch.ones((64,3,32,32))
output=tudui(input)
print(output.shape)
最终输出结果:
torch.Size([64, 10])
如果我们前面写错了比如linear2设置为Linear(10244444,64)
那就会报错
另外,假设我们没有算出1024
不知道flatten那里输出的结果是几
我们可以注释掉后面的步骤看输出结果:
from torch import nn
from torch.nn import Conv2d
from torch.nn import MaxPool2d
from torch.nn import  Flatten
from torch.nn import Linear
import torch

class Tudui(nn.Module):
    def __init__(self):
        super(Tudui, self).__init__()
        self.conv1=Conv2d(in_channels=3,out_channels=32,kernel_size=5,stride=1,padding=2)
        self.maxpool1=MaxPool2d(2)
        self.conv2=Conv2d(32,32,5,1,2)
        self.maxpool2=MaxPool2d(2)
        self.conv3=Conv2d(32,64,5,1,2)
        self.maxpool3=MaxPool2d(2)
        self.flatten=Flatten()
        self.linear1=Linear(1024,64)
        self.linear2=Linear(64,10)

    def forward(self,x):
        x=self.conv1(x)
        x=self.maxpool1(x)
        x=self.conv2(x)
        x=self.maxpool2(x)
        x=self.conv3(x)
        x=self.maxpool3(x)
        x=self.flatten(x)
        //从这里注释掉,最后输出的就是flatten后的结果了。//
        # x=self.linear1(x)
        # x=self.linear2(x)
        return x

tudui=Tudui()
print(tudui)

input=torch.ones((64,3,32,32))
output=tudui(input)
print(output.shape)
torch.Size([64, 1024])
四、sequential的用法,代码实现:
之前是:
class Tudui(nn.Module):
    def __init__(self):
        super(Tudui, self).__init__()
        self.conv1=Conv2d(in_channels=3,out_channels=32,kernel_size=5,stride=1,padding=2)
        self.maxpool1=MaxPool2d(2)
        self.conv2=Conv2d(32,32,5,1,2)
        self.maxpool2=MaxPool2d(2)
        self.conv3=Conv2d(32,64,5,1,2)
        self.maxpool3=MaxPool2d(2)
        self.flatten=Flatten()
        self.linear1=Linear(1024,64)
        self.linear2=Linear(64,10)

    def forward(self,x):
        x=self.conv1(x)
        x=self.maxpool1(x)
        x=self.conv2(x)
        x=self.maxpool2(x)
        x=self.conv3(x)
        x=self.maxpool3(x)
        x=self.flatten(x)
        x=self.linear1(x)
        x=self.linear2(x)
        return x
现在我们可以直接:
class Tudui(nn.Module):
    def __init__(self):
        super(Tudui, self).__init__()
        self.model1=Sequential(
            Conv2d(in_channels=3,out_channels=32,kernel_size=5,stride=1,padding=2),
            MaxPool2d(2),
            Conv2d(32, 32, 5, 1, 2),
            MaxPool2d(2),
            Conv2d(32, 64, 5, 1, 2),
            MaxPool2d(2),
            Flatten(),
            Linear(1024, 64),
            Linear(64, 10)
        )
def forward(self,x):
        x=self.model1(x)
        return x
类似于compose****每一步操作之间用逗号隔开
后面forward也省事**
输出结果为:
Tudui(
  (model1): Sequential(
    (0): Conv2d(3, 32, kernel_size=(5, 5), stride=(1, 1), padding=(2, 2))
    (1): MaxPool2d(kernel_size=2, stride=2, padding=0, dilation=1, ceil_mode=False)
    (2): Conv2d(32, 32, kernel_size=(5, 5), stride=(1, 1), padding=(2, 2))
    (3): MaxPool2d(kernel_size=2, stride=2, padding=0, dilation=1, ceil_mode=False)
    (4): Conv2d(32, 64, kernel_size=(5, 5), stride=(1, 1), padding=(2, 2))
    (5): MaxPool2d(kernel_size=2, stride=2, padding=0, dilation=1, ceil_mode=False)
    (6): Flatten(start_dim=1, end_dim=-1)
    (7): Linear(in_features=1024, out_features=64, bias=True)
    (8): Linear(in_features=64, out_features=10, bias=True)
  )
)
torch.Size([64, 10])
五、通过tensorboard 的add_graph可视化:
writer=SummaryWriter("./P22_sequential")
writer.add_graph()
writer.close()
add_graph中需要输入的参数:模型、传入模型的数据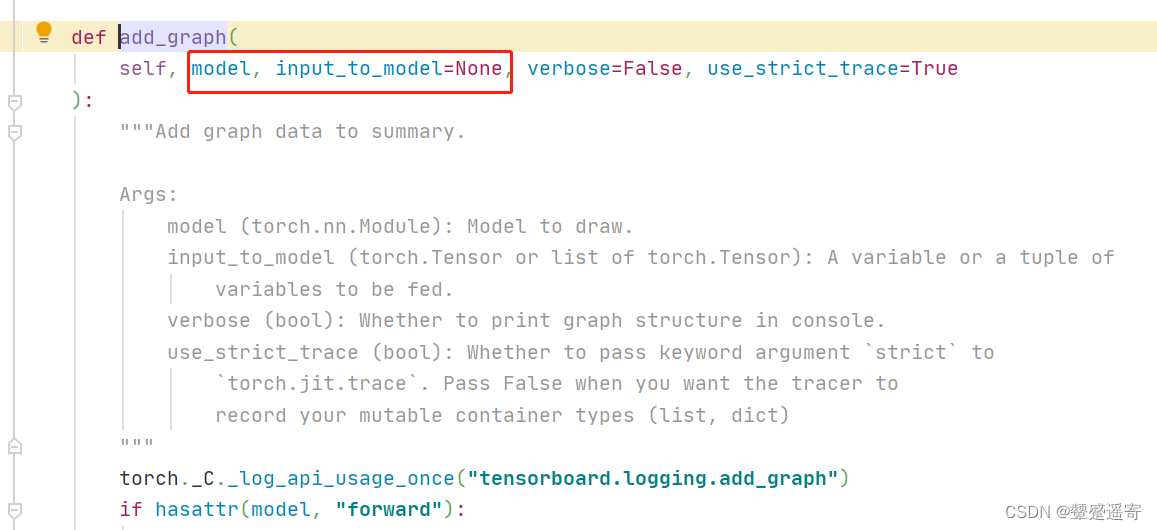
from torch import nn
from torch.nn import Conv2d
from torch.nn import MaxPool2d
from torch.nn import  Flatten
from torch.nn import Linear
from torch.nn import Sequential
import torch
from torch.utils.tensorboard import SummaryWriter


class Tudui(nn.Module):
    def __init__(self):
        super(Tudui, self).__init__()
        self.model1=Sequential(
            Conv2d(in_channels=3,out_channels=32,kernel_size=5,stride=1,padding=2),
            MaxPool2d(2),
            Conv2d(32, 32, 5, 1, 2),
            MaxPool2d(2),
            Conv2d(32, 64, 5, 1, 2),
            MaxPool2d(2),
            Flatten(),
            Linear(1024, 64),
            Linear(64, 10)
        )

    def forward(self,x):
        x=self.model1(x)
        return x

tudui=Tudui()
print(tudui)

input=torch.ones((64,3,32,32))
output=tudui(input)
print(output.shape)

writer=SummaryWriter("./P22_sequential")
writer.add_graph(tudui,input)
writer.close()
终端输入:
(DL) D:\PyCharm\Py_Projects>cd XiaoTuDui
//另外终端这里输入X 按TAB键 可以自动补全
(DL) D:\PyCharm\Py_Projects\XiaoTuDui>tensorboard --logdir=P22_sequential
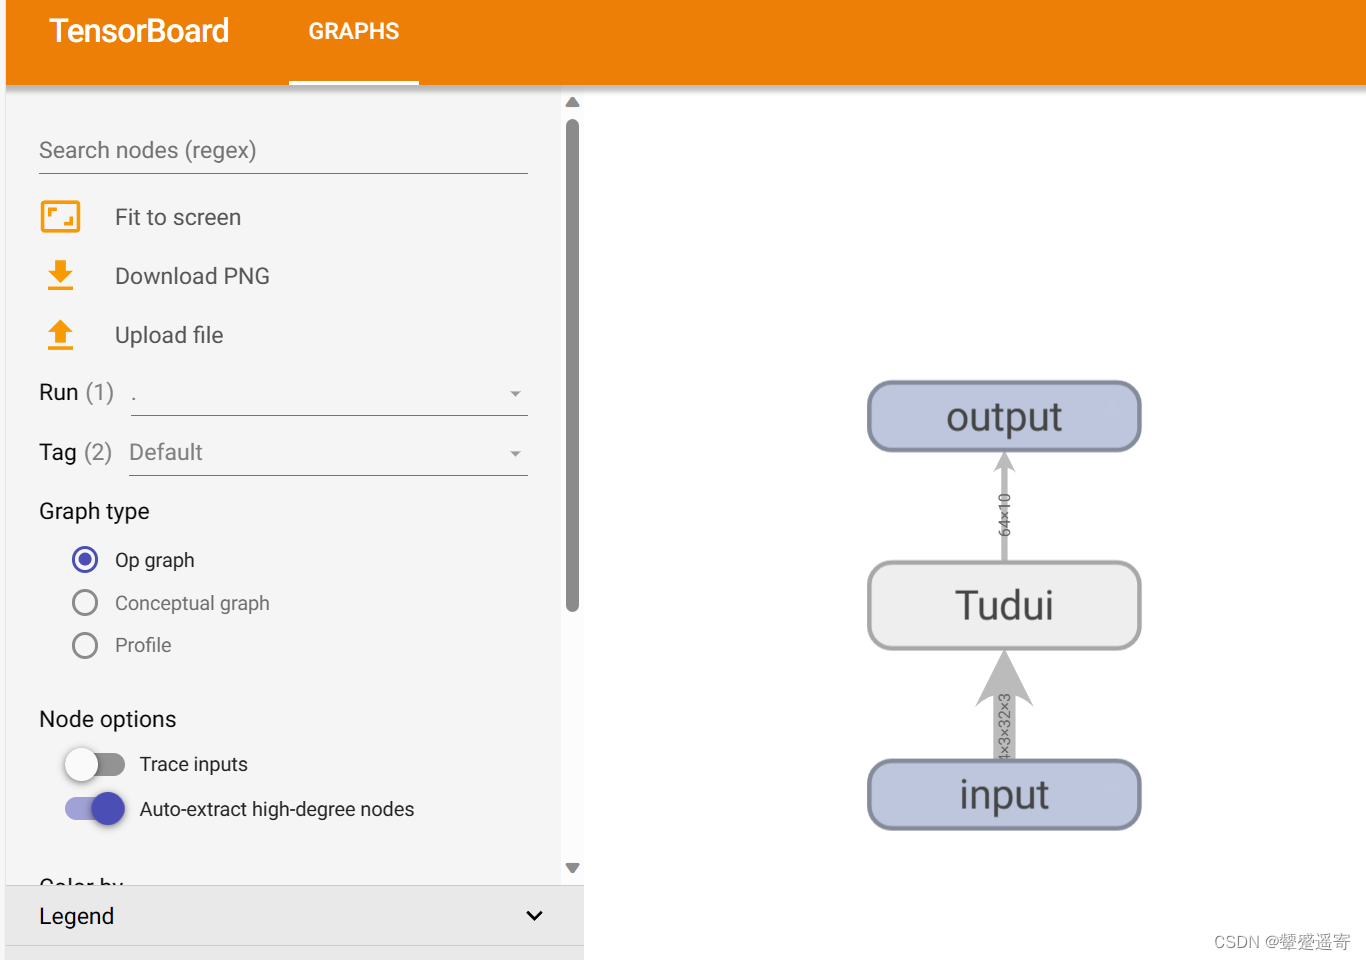
双击sequential
网络层就出现啦
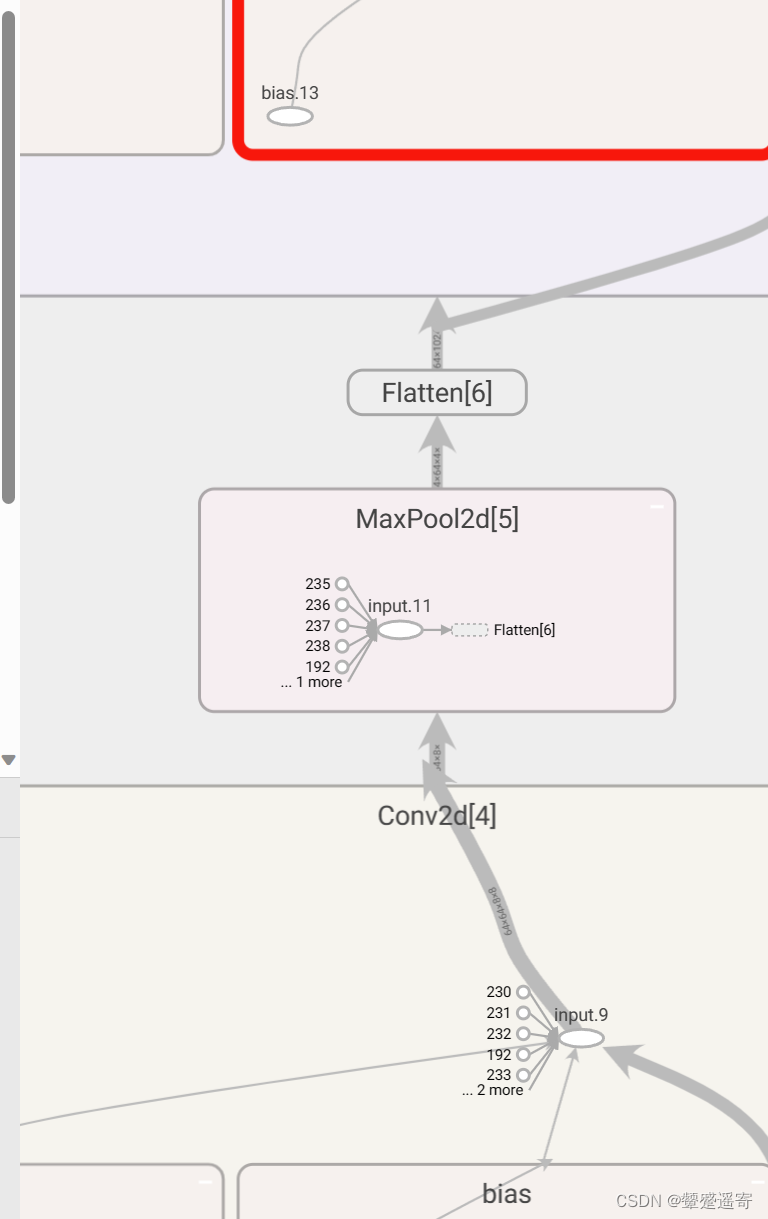
可以看到箭头上显示网络的一些参数


 292
292


 被折叠的 条评论
为什么被折叠?
被折叠的 条评论
为什么被折叠?
 到【灌水乐园】发言


