


前言
用于 echarts 的小伙伴都知道,他使用的渐变色写法和 css 的写法不一样。css 中直接使用角度定义渐变的方向,而 echarts 使用的是两个坐标点来进行标识方向(线性渐变)。
本文主要针对线性渐变的转换
那怎么在 css 中使用 echarts 的渐变色呢🤔? 也就是需要相互转换,下文将对此进行实现。
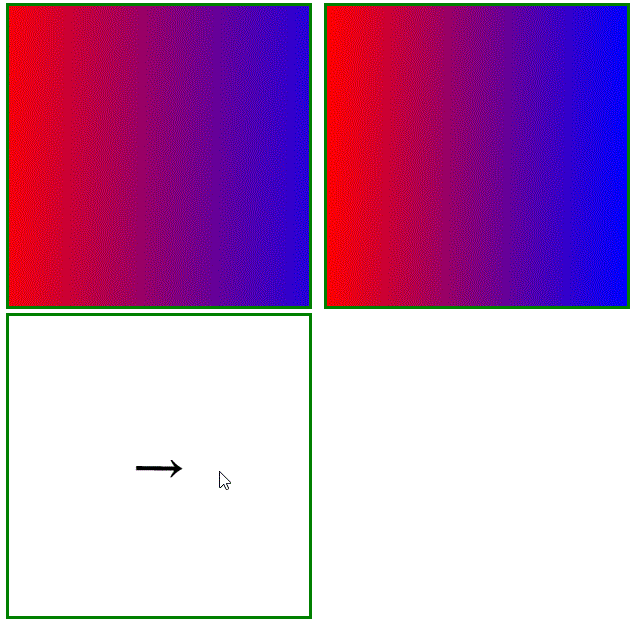
最终实现目标如下图演示:
左边是 echarts 柱状图,右边是 div
两种渐变色格式
css 线性渐变使用方法 linear-gradient
<div
     style={{
        backgroundImage: `linear-gradient(90deg, red, blue)`
    }}
></div>
echarts 线性渐变使用方法
// echarts 颜色
const color = {
    type: "linear",
    x: 0,
    y: 0.5,
    x2: 1,
    y2: 0.5,
    colorStops: [
        {
                offset: 0,
                color: "red", // 0% 处的颜色
        },
        {
                offset: 1,
                color: "blue", // 100% 处的颜色
        },
    ]
};

const options = {
     // ...
    series: [
        {
            // ...
            itemStyle: {
                 color,
            },
        },
    ],
};
代码目标
从上面可以看出来,其实就是 echarts 用了坐标的形式,而 css 使用的角度。所以针对坐标和角度进行转换即可
实现代码
具体实现见下面代码即可,懒得写了~
import React, { useEffect, useState, useRef } from "react";
// import Test from './views/Test';

/**
 * 线性渐变,前四个参数分别是 x0, y0, x2, y2
 * x y 语义
 *
 * x=0.5 y=0,     x2=0.5, y2=1   从上到下
 * x=1   y=0.5,   x2=0.5,   y2=0   从下到上
 * x=0   y=0.5,   x2=1,   y2=0.5 从左到右
 * x=1   y=0.5,   x2=0,   y2=0.5 从右到左
 *
 * css 中 0deg 是从上到下,顺时针方向是从左到右渐变(90deg => 左到右)
 *
 * */

function App() {
	const pointArr = useRef();
	const myChart = useRef();
	const [deg, setDeg] = useState();

	// echarts 颜色
	const color = {
		type: "linear",
		// 左到右  90 deg
		x: 0,
		y: 0.5,
		x2: 1,
		y2: 0.5,

		colorStops: [
			{
				offset: 0,
				color: "red", // 0% 处的颜色
			},
			{
				offset: 1,
				color: "blue", // 100% 处的颜色
			},
		],
		global: false, // 缺省为 false
	};

	useEffect(() => {
		const format = ({ x: x1, y: y1, x2, y2 }) => {
			var getYAngle = function (cx, cy, x2, y2) {
				var x = Math.abs(cx - x2);
				var y = Math.abs(cy - y2);
				var tan = x / y;
				var radina = Math.atan(tan); //用反三角函数求弧度
				var angle = Math.floor(180 / (Math.PI / radina)) || 0; //将弧度转换成角度
				console.log("angle", angle);
				/**
				 * 根据目标点判断象限(注意是笛卡尔坐标)
				 * 一: +,+
				 * 二: -,+
				 * 三: -,+
				 * 一: +,-
				 */

				//  * 二、三象限要加 180°
				if (x2 < 0 && y2 >= 0) {
					angle = 180 + angle;
				}
				if (x2 < 0 && y2 < 0) {
					angle = 180 + angle;
				}

				// 一、二象限 === 0 就是 180°
				if (angle === 0) {
					if ((x2 >= 0 && y2 > 0) || (x2 <= 0 && y2 > 0)) {
						angle = 180 + angle;
					}
				}

				return angle;
			};

			/**
			 * 1、将 二维 坐标看成一个正方形([0, 0],[1, 0],[1, 1],[0, 1]), 坐落于一象限
			 * 2、根据二维坐标转一个新的坐标(相对于正方形中心点的,所以线段会贯穿正方形),
			 *    把相对于笛卡尔坐标系中心点的坐标,转为相对于正方形中心点的坐标
			 *    eg: x 0.5 => 0,
			 *        y 0   => -0.5
			 *
			 *        其实就是  x - 0.5,  y - 0.5
			 */
			const deg = getYAngle(color.x - 0.5, color.y - 0.5, color.x2 - 0.5, color.y2 - 0.5);
		};
		const deg = format(color);

		// 计算成 css 渐变
		setDeg(deg);

		const options = {
			grid: {
				left: -100,
				top: 0,
				right: 0,
				bottom: 0,
				width: "180%",
			},
			xAxis: { show: false, data: ["数据"], boundaryGap: false },
			yAxis: { show: false },
			series: [
				{
					data: [100],
					type: "bar",
					itemStyle: {
						color,
					},
				},
			],
		};
		myChart.current = echarts.init(document.getElementById("main"));
		myChart.current.setOption(options);
	}, []);

	// 是否按下
	const isDwon = useRef();
	const onMouseDown = () => {
		isDwon.current = true;
	};
	const onMouseUp = () => {
		isDwon.current = false;
	};
	const onMouseMove = (event) => {
		if (!isDwon.current) return;
		const rece = pointArr.current.getBoundingClientRect();
		// 中心点
		const center = {
			x: rece.left + (rece.right - rece.left) / 2,
			y: rece.top + (rece.bottom - rece.top) / 2,
		};
		const rad = Math.atan2(center.y - event.pageY, center.x - event.pageX);
		let deg = rad / (Math.PI / 180) - 90;
		if (deg < 0) {
			deg += 360;
		}
		setDeg(deg);

		// 角度转坐标
		const format2 = (deg) => {

			// 假定旋转半径 0.5
			const start = { x: 0, y: -0.5 };
			const end = {};
			end.x2 = start.x * Math.cos((deg * Math.PI) / 180) - start.y * Math.sin((deg * Math.PI) / 180);
			end.y2 = start.x * Math.sin((deg * Math.PI) / 180) + start.y * Math.cos((deg * Math.PI) / 180);

      // 算出对应其他象限中对应的点
      end.x = 0 - end.x2;
      end.y = 0 - end.y2;

      // console.log(deg, end);
      return end;
		};
		const { x, y, x2, y2 } = format2(deg);

		myChart.current.setOption({
			series: [
				{
					data: [100],
					type: "bar",
					itemStyle: {
						color: {
							...color,
							x: x + 0.5,
							y: y + 0.5,
							x2: x2 + 0.5,
							y2: y2 + 0.5,
						},
					},
				},
			],
		});
	};

	return (
		<>
			<div id="main" style={{ width: 300, height: 300, display: "inline-block", border: "3px solid green" }}></div>
			<div
				style={{
					backgroundImage: `linear-gradient(${deg}deg, red, blue)`,
					width: 300,
					height: 300,
					display: "inline-block",
					border: "3px solid green",
					marginLeft: 12,
				}}
			></div>

			<div onMouseDown={onMouseDown} onMouseUp={onMouseUp} onMouseMove={onMouseMove} style={{ width: 300, height: 300, position: "relative", border: "3px solid green" }}>
				<div
					ref={pointArr}
					style={{
						position: "absolute",
						fontSize: 50,
						textAlign: "center",
						display: "flex",
						justifyContent: "center",
						alignContent: "center",
						left: "0px",
						right: "0px",
						top: "0px",
						bottom: "0px",
						margin: "auto",
						height: 60,
						width: 60,
						transform: `rotate(${deg - 90}deg)`,
					}}
				>
					<span>→</span>
				</div>
			</div>
		</>
	);
}

export default App;


 7357
7357


 被折叠的 条评论
为什么被折叠?
被折叠的 条评论
为什么被折叠?
 到【灌水乐园】发言


