


 本文详细介绍了如何使用Yolov8框架对VOC和COCO格式的数据集进行预处理、训练模型,并处理onnx导出问题。步骤包括下载项目、环境配置、数据格式转换、训练数据设置、模型推理和导出等。
1. 下载项目
git clone https://github.com/ultralytics/ultralytics.git
2. 搭建环境
conda create --name ultralytics python==3.8
conda activate ultralytics
# 电脑是CUDA11.1的
pip install torch==1.8.0+cu111 torchvision==0.9.0+cu111 torchaudio==0.8.0 -f https://download.pytorch.org/whl/torch_stable.html

pip install ultralytics
3. 数据集格式转换
3.1 VOC格式转YOLO格式
- VOC格式
── VOCdevkit
└── VOC2007
   ├── Annotations	# 存放图片对应的xml文件,与JPEGImages图片一一对应
   ├── ImageSets
   │   └── Main	# 存放train.txt、val.txt
   └── JPEGImages	# 存放所有图片文件
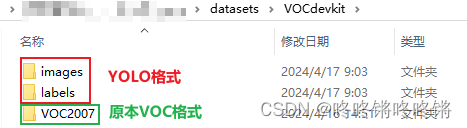
- YOLO格式
── VOCdevkit
├── images
│   ├── train	# 存放训练集图片
│   └── val	# 存放验证集图片
└── labels
    ├── train	# 存放训练集标注文件
    └── val	# 存放验证集标注文件
- 转换脚本
from tqdm import tqdm
import shutil
from pathlib import Path
import xml.etree.ElementTree as ET

def convert_label(path, lb_path, year, image_id, names):
    def convert_box(size, box):
        dw, dh = 1. / size[0], 1. / size[1]
        x, y, w, h = (box[0] + box[1]) / 2.0 - 1, (box[2] + box[3]) / 2.0 - 1, box[1] - box[0], box[3] - box[2]
        return x * dw, y * dh, w * dw, h * dh

    in_file = open(path / f'VOC{year}/Annotations/{image_id}.xml')
    out_file = open(lb_path, 'w')
    tree = ET.parse(in_file)
    root = tree.getroot()
    size = root.find('size')
    w = int(size.find('width').text)
    h = int(size.find('height').text)

    for obj in root.iter('object'):
        cls = obj.find('name').text
        if cls in names:
            xmlbox = obj.find('bndbox')
            bb = convert_box((w, h), [float(xmlbox.find(x).text) for x in ('xmin', 'xmax', 'ymin', 'ymax')])
            cls_id = names.index(cls)  # class id
            out_file.write(" ".join(str(a) for a in (cls_id, *bb)) + '\n')
        else:
            print("category error: ", cls)

year = "2007"
image_sets = ["train", "val"]
path = Path("F:/vsCode/ultralytics/datasets/VOCdevkit/")
class_names = ["apple"]

for image_set in image_sets:
    imgs_path = path / 'images' / f'{image_set}'
    lbs_path = path / 'labels' / f'{image_set}'
    imgs_path.mkdir(exist_ok=True, parents=True)
    lbs_path.mkdir(exist_ok=True, parents=True)

    with open(path / f'VOC{year}/ImageSets/Main/{image_set}.txt') as f:
        image_ids = f.read().strip().split()
    for id in tqdm(image_ids, desc=f'{image_set}'):
        f = path / f'VOC{year}/JPEGImages/{id}.jpg'  # old img path
        lb_path = (lbs_path / f.name).with_suffix('.txt')  # new label path
        # f.rename(imgs_path / f.name)  # move image
        shutil.copyfile(f, imgs_path / f.name) # copy image
        convert_label(path, lb_path, year, id, class_names)  # convert labels to YOLO format
数据集文件夹目录如下
3.2 COCO格式转YOLO格式
- COCO格式
── Apple
├── train
│   ├── _annotations.coco.json	# 训练集标注文件
│   ├── 00001.jpg
│   ├── 00003.jpg
│   └── ...
└── valid
    ├── _annotations.coco.json	# 验证集标注文件
    ├── 00002.jpg
    ├── 00004.jpg
    └── ...
- 转换脚本
import json
import os
import shutil
from tqdm import tqdm

coco_path = "F:/datasets/Apple_Detection_Swift-YOLO_192"
output_path = "F:/vsCode/ultralytics/datasets/Apple"

os.makedirs(os.path.join(output_path, "images", "train"), exist_ok=True)
os.makedirs(os.path.join(output_path, "images", "val"), exist_ok=True)
os.makedirs(os.path.join(output_path, "labels", "train"), exist_ok=True)
os.makedirs(os.path.join(output_path, "labels", "val"), exist_ok=True)

with open(os.path.join(coco_path, "train", "_annotations.coco.json"), "r") as f:
    train_annotations = json.load(f)

with open(os.path.join(coco_path, "valid", "_annotations.coco.json"), "r") as f:
    val_annotations = json.load(f)

# Iterate over the training images
for image in tqdm(train_annotations["images"]):
    width, height = image["width"], image["height"]
    scale_x = 1.0 / width
    scale_y = 1.0 / height

    label = ""
    for annotation in train_annotations["annotations"]:
        if annotation["image_id"] == image["id"]:
            # Convert the annotation to YOLO format
            x, y, w, h = annotation["bbox"]
            x_center = x + w / 2.0
            y_center = y + h / 2.0
            x_center *= scale_x
            y_center *= scale_y
            w *= scale_x
            h *= scale_y
            class_id = annotation["category_id"]
            label += "{} {} {} {} {}\n".format(class_id, x_center, y_center, w, h)

    # Save the image and label
    shutil.copy(os.path.join(coco_path, "train", image["file_name"]), os.path.join(output_path, "images", "train", image["file_name"]))
    with open(os.path.join(output_path, "labels", "train", image["file_name"].replace(".jpg", ".txt")), "w") as f:
        f.write(label)

# Iterate over the validation images
for image in tqdm(val_annotations["images"]):
    width, height = image["width"], image["height"]
    scale_x = 1.0 / width
    scale_y = 1.0 / height

    label = ""
    for annotation in val_annotations["annotations"]:
        if annotation["image_id"] == image["id"]:
            # Convert the annotation to YOLO format
            x, y, w, h = annotation["bbox"]
            x_center = x + w / 2.0
            y_center = y + h / 2.0
            x_center *= scale_x
            y_center *= scale_y
            w *= scale_x
            h *= scale_y
            class_id = annotation["category_id"]
            label += "{} {} {} {} {}\n".format(class_id, x_center, y_center, w, h)

    # Save the image and label
    shutil.copy(os.path.join(coco_path, "valid", image["file_name"]), os.path.join(output_path, "images", "val", image["file_name"]))
    with open(os.path.join(output_path, "labels", "val", image["file_name"].replace(".jpg", ".txt")), "w") as f:
        f.write(label)
4. 训练数据
找到ultralytics/cfg/datasets/VOC.yaml,复制一份命名为VOC_self.yaml。
# Train/val/test sets as 1) dir: path/to/imgs, 2) file: path/to/imgs.txt, or 3) list: [path/to/imgs1, path/to/imgs2, ..]
path: F:/vsCode/ultralytics/datasets/VOCdevkit
train: # train images (relative to 'path')  16551 images
  - images/train
val: # val images (relative to 'path')  4952 images
  - images/val
test: # test images (optional)
  - images/val

# Classes
names:
  0: apple
根据README文件选择预训练模型,最好先手动下载放置在项目主目录下。

训练命令:
yolo task=detect mode=train model=yolov8x.pt data=f:/ultralytics/ultralytics/cfg/datasets/VOC_self.yaml epochs=100 batch=4 device=0
- 如果想从头开始构建新模型,则model参数设置为yolov8x.yaml
- 使用自己的数据集,则data参数最好使用绝对路径
- 如果数据集进行了修改,比如标注文件调整了、图片增多了等等,那么在训练前一定要先把labels文件夹下面的train.cache和val.cache删掉再运行训练命令
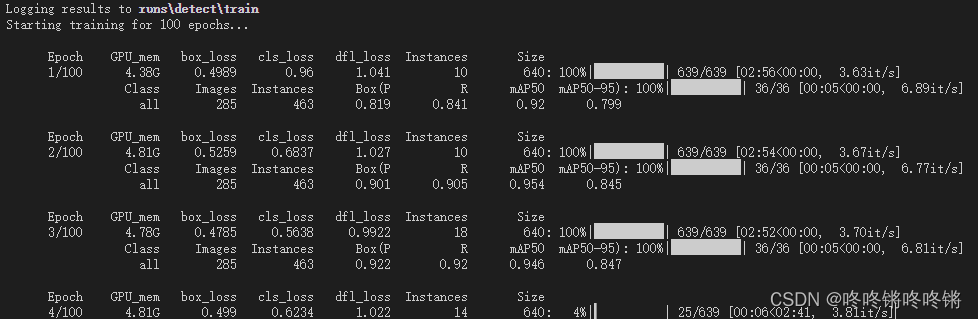
训练得到的模型保存到runs/detect/train文件夹下
5. 推理预测
yolo task=detect mode=predict model=runs\detect\train\weights\best.pt source=datasets\VOCdevkit\images\val device=0
6. 模型导出
将训练好的pt模型文件导出为onnx格式的
yolo task=detect mode=export model=runs\detect\train\weights\best.pt format=onnx
- 遇到的问题
由于没提前安装onnx,运行后会自动下载最新版本的onnx,接着就会报错max() arg is an empty sequence

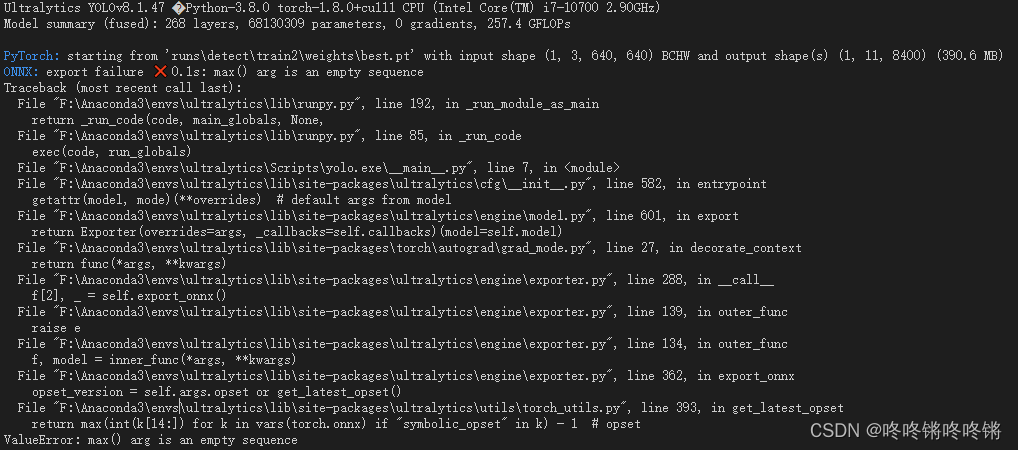
- 解决方法
1)按照输出可以知道Ultralytics要求的onnx>=1.12.0,最好就是直接安装1.12.0版本的,所以pip install onnx==1.12.0;
2)直接使用上方的CLI命令导出onnx还是会报max() arg is an empty sequence,需要改用python脚本来导出,并指定onnx的opset设置为13;
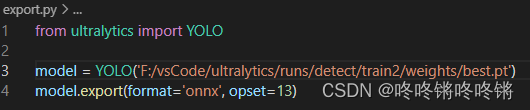
from ultralytics import YOLO

model = YOLO('F:/vsCode/ultralytics/runs/detect/train2/weights/best.pt')
model.export(format='onnx', opset=13)
3)运行该导出脚本即可导出成功


 16万+
16万+

 被折叠的 条评论
为什么被折叠?
被折叠的 条评论
为什么被折叠?
 到【灌水乐园】发言


