


使用PlotNeuralNet绘制深度学习网络图的基本操作(二)
接下来我们利用pycharm来绘制当中我们的神经网络模型架构,目标是直接将.tex文件生成为pdf和png。我在学习的过程中参考了一些学习视频,觉得这个up主讲的还不错:
1.PlotNeuralNet_1_环境搭建与演示
2.PlotNeuralNet_2_概览与优化
3.PlotNeuralNet_3_分析与自定义绘图(完结)
视频会教你如何使用和修改当中的很多函数,并且直接将模型生成.pdf文件,我这里还进行了一些配置可以用代码将.pdf文件直接转化成为.png,希望能给大家提供一些帮助。
要想将pdf转换成png,需要你到官网下载这个文件:Ghostscript releases,配置完成后,我们就可以进行绘图啦。
代码中都有注释,大家可以仔细看看。
1.cnn网络框架
import sys
import os
import subprocess
sys.path.append('../')
from pycore.tikzeng import *


# 定义神经网络架构
arch = [
    to_head('..'),
    to_cor(),
    to_begin(),
    # 输入图像的名字
    to_input("1.jpeg", to='(-5,0,0)', width=6, height=6, name="temp"),
    to_input("2.jpeg", to='(-4,0,0)', width=6, height=6, name="temp"),
    to_input("3.jpeg", to='(-3,0,0)', width=6, height=6, name="temp"),
    to_input("4.jpeg", to='(-2,0,0)', width=6, height=6, name="temp"),
    to_input("5.jpeg", to='(-1,0,0)', width=6, height=6, name="temp"),

    # 调用当中的函数绘画模型的内容
    to_Conv("conv1", s_filer=256, n_filer=3, offset="(0,0,0)", to="(0,0,0)", height=50, depth=50, width=3, caption='CONV1'),
    to_Pool("pool1", offset="(0,0,0)", to="(conv1-east)", height=32, depth=32, width=3, caption="MaxPool1"),

    to_Conv("conv2", s_filer=63, n_filer=16, offset="(3,0,0)", to="(pool1-east)", height=32, depth=32, width=3, caption='CONV2'),
    to_connection("pool1", "conv2"),
    to_Pool("pool2", offset="(0,0,0)", to="(conv2-east)", height=16, depth=16, width=3, caption="MaxPool2"),

    to_Conv("conv3", s_filer=15, n_filer=64, offset="(3,0,0)", to="(pool2-east)", height=16, depth=16, width=3, caption='CONV3'),
    to_connection("pool2", "conv3"),
    to_Pool("pool3", offset="(0,0,0)", to="(conv3-east)", height=10, depth=10, width=3, caption="MaxPool3"),

    to_SoftMax(name='fc1', s_filer=64, offset="(4,0,0)", to="(pool3-east)", width=1.5, height=1.5, depth=100,
               opacity=0.8, caption='FC1'),
    to_connection("pool3", "fc1"),

    to_SoftMax(name='fc2', s_filer=10, offset="(2,0,0)", to="(fc1-east)", width=1.5, height=1.5, depth=50,
               opacity=0.8, caption='FC2'),
    to_connection("fc1", "fc2"),

    to_SoftMax(name='fc3', s_filer=5, offset="(2,0,0)", to="(fc2-east)", width=1.5, height=1.5, depth=5,
               opacity=0.8, caption='FC3'),
    to_connection("fc2", "fc3"),

    to_end()
]


def main():
    # 获取文件名
    namefile = str(sys.argv[0]).split('.')[0]

    # 转换成为.tex文件
    to_generate(arch, namefile + '.tex')

    # 使用 LaTeX 编译器将 .tex 文件转换为 .pdf 文件
    subprocess.call([r'D:\MiKTeX\install\miktex\bin\x64\pdflatex.exe', namefile + '.tex'])

    # 生成pdf
    pdf_file = namefile + '.pdf'
    # 生成png
    image_file = namefile + '.png'

    # 将pdf转化成为png
    subprocess.call([r'D:\ghostscript\gs10.01.1\bin\gswin64c.exe', '-sDEVICE=pngalpha', '-o', image_file, '-r300', pdf_file])

    # 删除中间生成的文件
    cleanup(namefile)


# 删除中间生成的文件
def cleanup(namefile):
    extensions = ['.aux', '.log', '.tex']
    for ext in extensions:
        filename = namefile + ext
        if os.path.exists(filename):
            os.remove(filename)


if __name__ == '__main__':
    main()

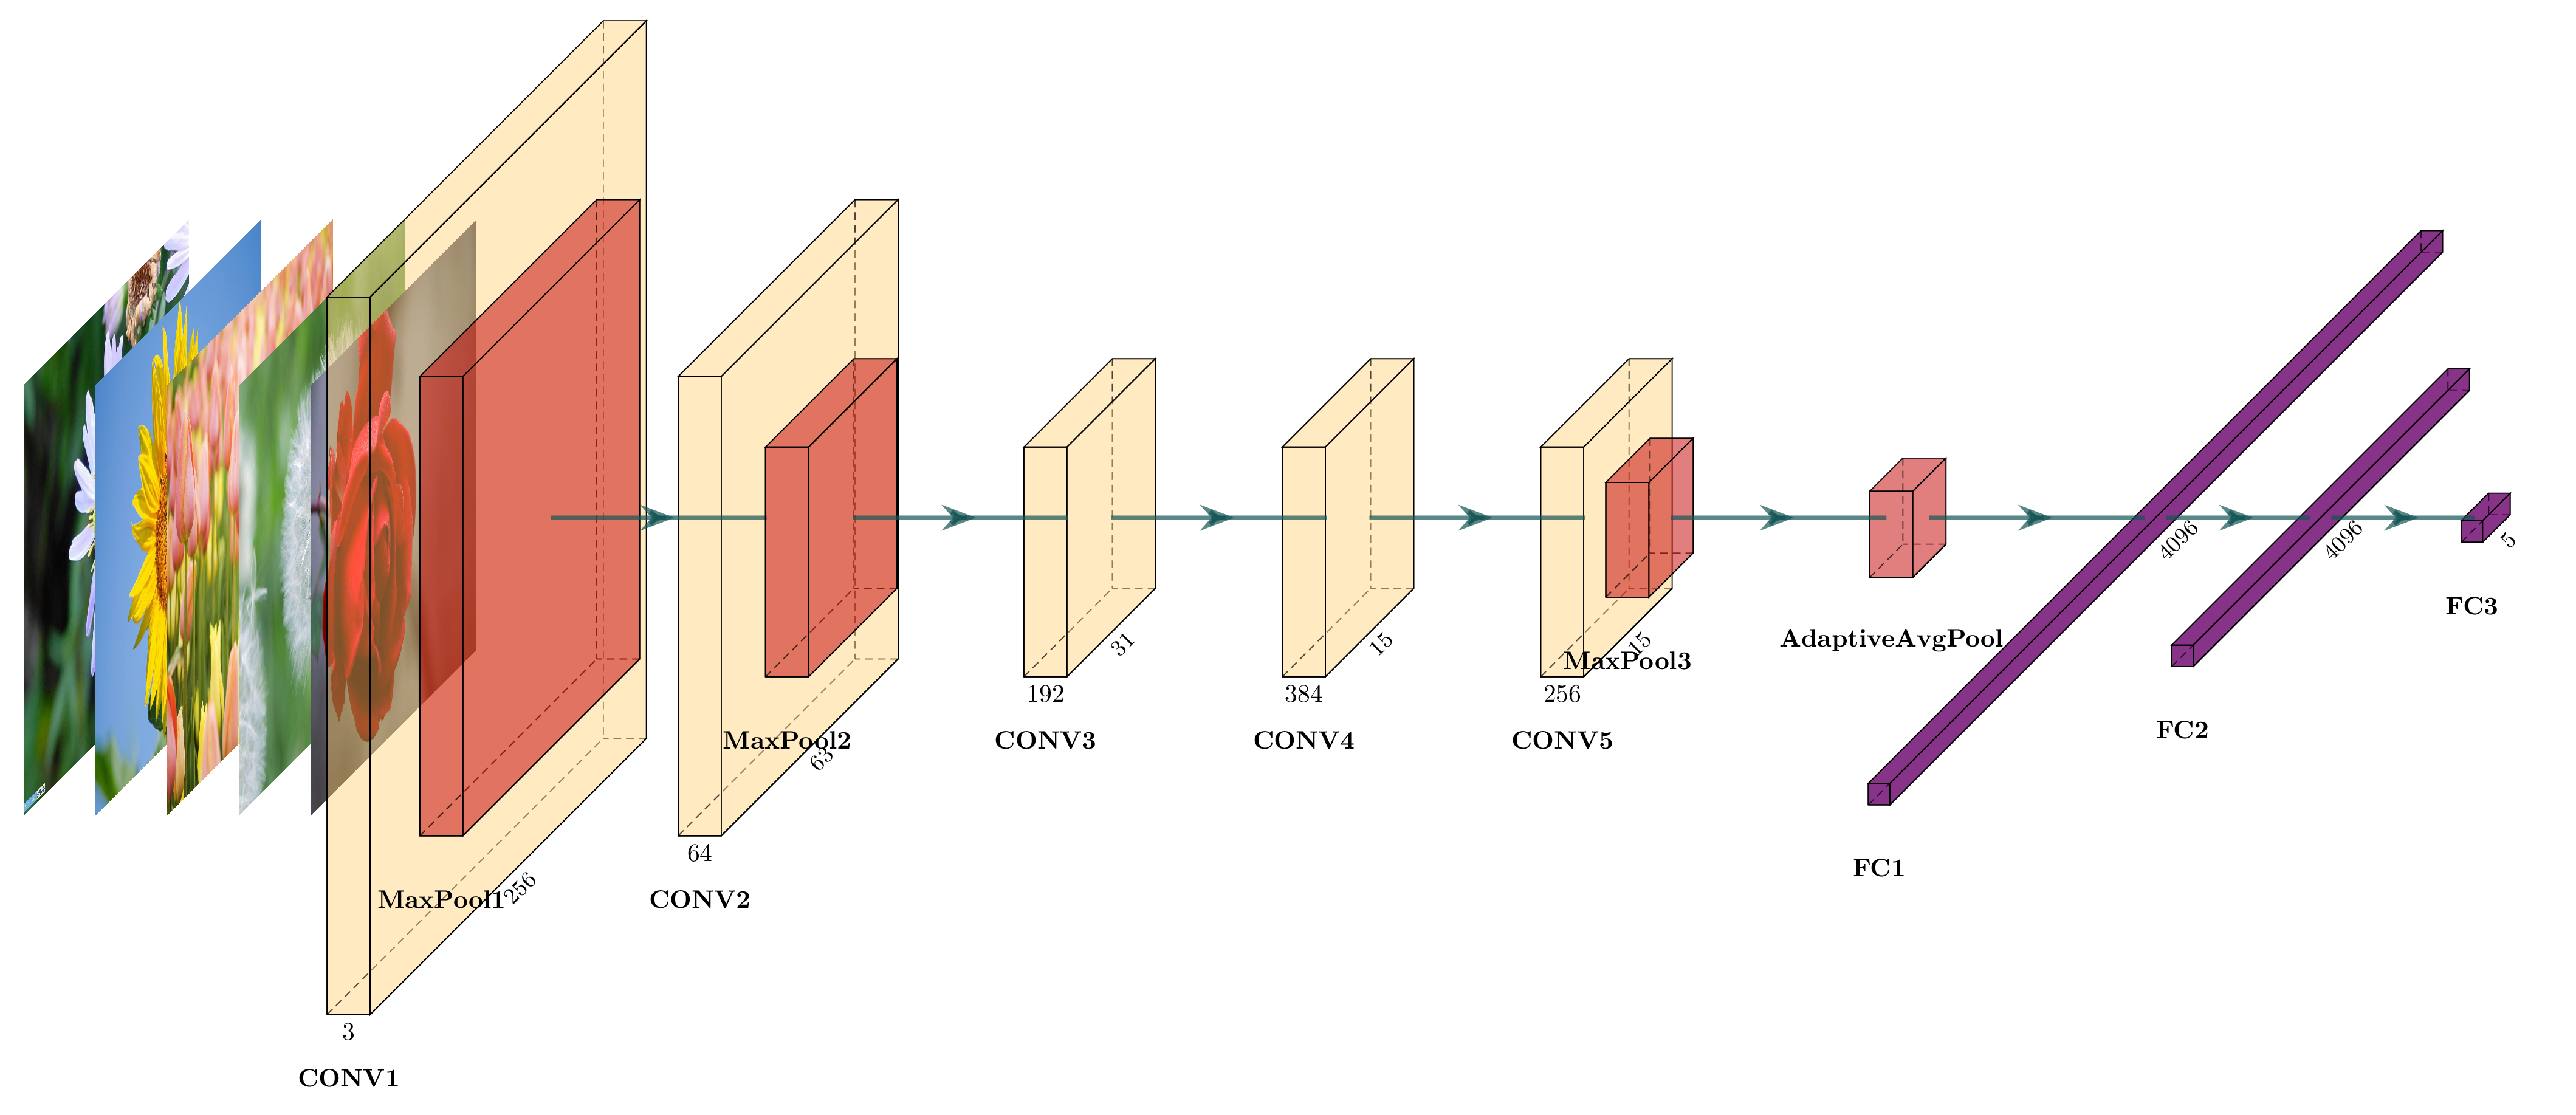
AlexNet网络框架
import sys
import os
import subprocess
sys.path.append('../')
from pycore.tikzeng import *


# 定义神经网络架构
arch = [
    to_head('..'),
    to_cor(),
    to_begin(),
    to_input("1.jpeg", to='(-5,0,0)', width=6, height=6, name="temp"),
    to_input("2.jpeg", to='(-4,0,0)', width=6, height=6, name="temp"),
    to_input("3.jpeg", to='(-3,0,0)', width=6, height=6, name="temp"),
    to_input("4.jpeg", to='(-2,0,0)', width=6, height=6, name="temp"),
    to_input("5.jpeg", to='(-1,0,0)', width=6, height=6, name="temp"),

    # s_filer表示该层的图像大小 (需要自己计算),n_filer表示输入通道和输出通道大小 (自己设定)
    to_Conv("conv1", s_filer=256, n_filer=3, offset="(0,0,0)", to="(0,0,0)", height=50, depth=50, width=3, caption='CONV1'),
    to_Pool("pool1", offset="(0,0,0)", to="(conv1-east)", height=32, depth=32, width=3, caption="MaxPool1"),

    to_Conv("conv2", s_filer=63, n_filer=64, offset="(3,0,0)", to="(pool1-east)", height=32, depth=32, width=3, caption='CONV2'),
    to_connection("pool1", "conv2"),
    to_Pool("pool2", offset="(0,0,0)", to="(conv2-east)", height=16, depth=16, width=3, caption="MaxPool2"),

    to_Conv("conv3", s_filer=31, n_filer=192, offset="(3,0,0)", to="(pool2-east)", height=16, depth=16, width=3, caption='CONV3'),
    to_connection("pool2", "conv3"),

    to_Conv("conv4", s_filer=15, n_filer=384, offset="(3,0,0)", to="(conv3-east)", height=16, depth=16, width=3,caption='CONV4'),
    to_connection("conv3", "conv4"),

    to_Conv("conv5", s_filer=15, n_filer=256, offset="(3,0,0)", to="(conv4-east)", height=16, depth=16, width=3,caption='CONV5'),
    to_connection("conv4", "conv5"),
    to_Pool("pool3", offset="(0,0,0)", to="(conv5-east)", height=8, depth=8, width=3, caption="MaxPool3"),

    to_Pool("pool4", offset="(3,0,0)", to="(pool3-east)", height=6, depth=6, width=3, caption="AdaptiveAvgPool"),
    to_connection("pool3", "pool4"),

    to_SoftMax(name='fc1', s_filer=4096, offset="(3,0,0)", to="(pool4-east)", width=1.5, height=1.5, depth=100,
               opacity=0.8, caption='FC1'),
    to_connection("pool4", "fc1"),

    to_SoftMax(name='fc2', s_filer=4096, offset="(2,0,0)", to="(fc1-east)", width=1.5, height=1.5, depth=50,
               opacity=0.8, caption='FC2'),
    to_connection("fc1", "fc2"),

    to_SoftMax(name='fc3', s_filer=5, offset="(2,0,0)", to="(fc2-east)", width=1.5, height=1.5, depth=5,
               opacity=0.8, caption='FC3'),
    to_connection("fc2", "fc3"),

    to_end()
]


def main():
    namefile = str(sys.argv[0]).split('.')[0]
    to_generate(arch, namefile + '.tex')

    # 使用 LaTeX 编译器将 .tex 文件转换为 .pdf 文件
    subprocess.call([r'D:\MiKTeX\install\miktex\bin\x64\pdflatex.exe', namefile + '.tex'])

    pdf_file = namefile + '.pdf'
    image_file = namefile + '.png'

    subprocess.call([r'D:\ghostscript\gs10.01.1\bin\gswin64c.exe', '-sDEVICE=pngalpha', '-o', image_file, '-r300', pdf_file])

    # 删除中间生成的文件
    cleanup(namefile)


def cleanup(namefile):
    # 删除中间生成的文件
    extensions = ['.aux', '.log', '.tex']
    for ext in extensions:
        filename = namefile + ext
        if os.path.exists(filename):
            os.remove(filename)


if __name__ == '__main__':
    main()
3.VGG16网络框架
import sys
import os
import subprocess
sys.path.append('../')
from pycore.tikzeng import *


# 定义神经网络架构
arch = [
    to_head('..'),
    to_cor(),
    to_begin(),
    to_input("1.jpeg", to='(-5,0,0)', width=6, height=6, name="temp"),
    to_input("2.jpeg", to='(-4,0,0)', width=6, height=6, name="temp"),
    to_input("3.jpeg", to='(-3,0,0)', width=6, height=6, name="temp"),
    to_input("4.jpeg", to='(-2,0,0)', width=6, height=6, name="temp"),
    to_input("5.jpeg", to='(-1,0,0)', width=6, height=6, name="temp"),

    # s_filer表示该层的图像大小 (需要自己计算),n_filer表示输入通道和输出通道大小 (自己设定)
    to_Conv("conv1", s_filer=256, n_filer=3, offset="(0,0,0)", to="(0,0,0)", height=50, depth=50, width=3, caption='CONV1'),
    to_Conv("conv2", s_filer=256, n_filer=64, offset="(0,0,0)", to="(conv1-east)", height=50, depth=50, width=3, caption=''),
    to_Pool("pool1", offset="(0,0,0)", to="(conv2-east)", height=30, depth=30, width=3, caption=""),

    to_Conv("conv3", s_filer=128, n_filer=64, offset="(3,0,0)", to="(pool1-east)", height=30, depth=30, width=3,caption='CONV2'),
    to_connection("pool1", "conv3"),
    to_Conv("conv4", s_filer=128, n_filer=128, offset="(0,0,0)", to="(conv3-east)", height=30, depth=30, width=3,caption=''),
    to_Pool("pool2", offset="(0,0,0)", to="(conv4-east)", height=18, depth=18, width=3, caption=""),

    to_Conv("conv5", s_filer=64, n_filer=128, offset="(3,0,0)", to="(pool2-east)", height=30, depth=30, width=3,caption=''),
    to_connection("pool2", "conv5"),
    to_Conv("conv6", s_filer=64, n_filer=256, offset="(0,0,0)", to="(conv5-east)", height=30, depth=30, width=3,caption='CONV3'),
    to_Conv("conv7", s_filer=64, n_filer=256, offset="(0,0,0)", to="(conv6-east)", height=30, depth=30, width=3,caption=''),
    to_Pool("pool3", offset="(0,0,0)", to="(conv7-east)", height=16, depth=16, width=3, caption=""),

    to_Conv("conv8", s_filer=32, n_filer=256, offset="(3,0,0)", to="(pool3-east)", height=16, depth=16, width=3,caption=''),
    to_connection("pool3", "conv8"),
    to_Conv("conv9", s_filer=32, n_filer=512, offset="(0,0,0)", to="(conv8-east)", height=16, depth=16, width=3,caption='CONV4'),
    to_Conv("conv10", s_filer=32, n_filer=512, offset="(0,0,0)", to="(conv9-east)", height=16, depth=16, width=3,caption=''),
    to_Pool("pool4", offset="(0,0,0)", to="(conv10-east)", height=8, depth=8, width=3, caption=""),

    to_Conv("conv11", s_filer=16, n_filer=512, offset="(3,0,0)", to="(pool4-east)", height=8, depth=8, width=3,caption=''),
    to_connection("pool4", "conv11"),
    to_Conv("conv12", s_filer=16, n_filer=512, offset="(0,0,0)", to="(conv11-east)", height=8, depth=8, width=3, caption='CONV5'),
    to_Conv("conv13", s_filer=16, n_filer=512, offset="(0,0,0)", to="(conv12-east)", height=8, depth=8, width=3, caption=''),
    to_Pool("pool5", offset="(0,0,0)", to="(conv13-east)", height=6, depth=6, width=3, caption=""),

    to_Pool("pool6", offset="(2,0,0)", to="(pool5-east)", height=6, depth=6, width=3, caption="AdaptiveAvgPool"),
    to_connection("pool5", "pool6"),

    to_SoftMax(name='fc1', s_filer=4096, offset="(4,0,0)", to="(pool6-east)", width=1.5, height=1.5, depth=100,
               opacity=0.8, caption='FC1'),
    to_connection("pool6", "fc1"),

    to_SoftMax(name='fc2', s_filer=4096, offset="(2,0,0)", to="(fc1-east)", width=1.5, height=1.5, depth=50,
               opacity=0.8, caption='FC2'),
    to_connection("fc1", "fc2"),

    to_SoftMax(name='fc3', s_filer=5, offset="(2,0,0)", to="(fc2-east)", width=1.5, height=1.5, depth=5,
               opacity=0.8, caption='FC3'),
    to_connection("fc2", "fc3"),

    to_end()
]


def main():
    namefile = str(sys.argv[0]).split('.')[0]
    to_generate(arch, namefile + '.tex')

    # 使用 LaTeX 编译器将 .tex 文件转换为 .pdf 文件
    subprocess.call([r'D:\MiKTeX\install\miktex\bin\x64\pdflatex.exe', namefile + '.tex'])

    pdf_file = namefile + '.pdf'
    image_file = namefile + '.png'

    subprocess.call([r'D:\ghostscript\gs10.01.1\bin\gswin64c.exe', '-sDEVICE=pngalpha', '-o', image_file, '-r300', pdf_file])

    # 删除中间生成的文件
    cleanup(namefile)


def cleanup(namefile):
    # 删除中间生成的文件
    extensions = ['.aux', '.log', '.tex']
    for ext in extensions:
        filename = namefile + ext
        if os.path.exists(filename):
            os.remove(filename)


if __name__ == '__main__':
    main()

4.ResNet网络框架
import sys
import os
import subprocess
sys.path.append('../')
from pycore.tikzeng import *


def main():
    namefile = str(sys.argv[0]).split('.')[0]  # 获取当前文件名

    # 使用 LaTeX 编译器将 .tex 文件转换为 .pdf 文件
    subprocess.call([r'D:\MiKTeX\install\miktex\bin\x64\pdflatex.exe', namefile + '.tex'])

    pdf_file = namefile + '.pdf'
    image_file = namefile + '.png'

    subprocess.call([r'D:\ghostscript\gs10.01.1\bin\gswin64c.exe', '-sDEVICE=pngalpha', '-o', image_file, '-r300', pdf_file])

    # 删除中间生成的文件
    cleanup(namefile)


def cleanup(namefile):
    # 删除中间生成的文件
    # extensions = ['.aux', '.log', '.tex']
    extensions = ['.aux', '.log']
    for ext in extensions:
        filename = namefile + ext
        if os.path.exists(filename):
            os.remove(filename)


if __name__ == '__main__':
    main()

5.DenseNet网络框架
import sys
import os
import subprocess
sys.path.append('../')
from pycore.tikzeng import *


def main():
    namefile = str(sys.argv[0]).split('.')[0]  # 获取当前文件名

    # 使用 LaTeX 编译器将 .tex 文件转换为 .pdf 文件
    subprocess.call([r'D:\MiKTeX\install\miktex\bin\x64\pdflatex.exe', namefile + '.tex'])

    pdf_file = namefile + '.pdf'
    image_file = namefile + '.png'

    subprocess.call([r'D:\ghostscript\gs10.01.1\bin\gswin64c.exe', '-sDEVICE=pngalpha', '-o', image_file, '-r300', pdf_file])

    # 删除中间生成的文件
    cleanup(namefile)


def cleanup(namefile):
    # 删除中间生成的文件
    # extensions = ['.aux', '.log', '.tex']
    extensions = ['.aux', '.log']
    for ext in extensions:
        filename = namefile + ext
        if os.path.exists(filename):
            os.remove(filename)


if __name__ == '__main__':
    main()
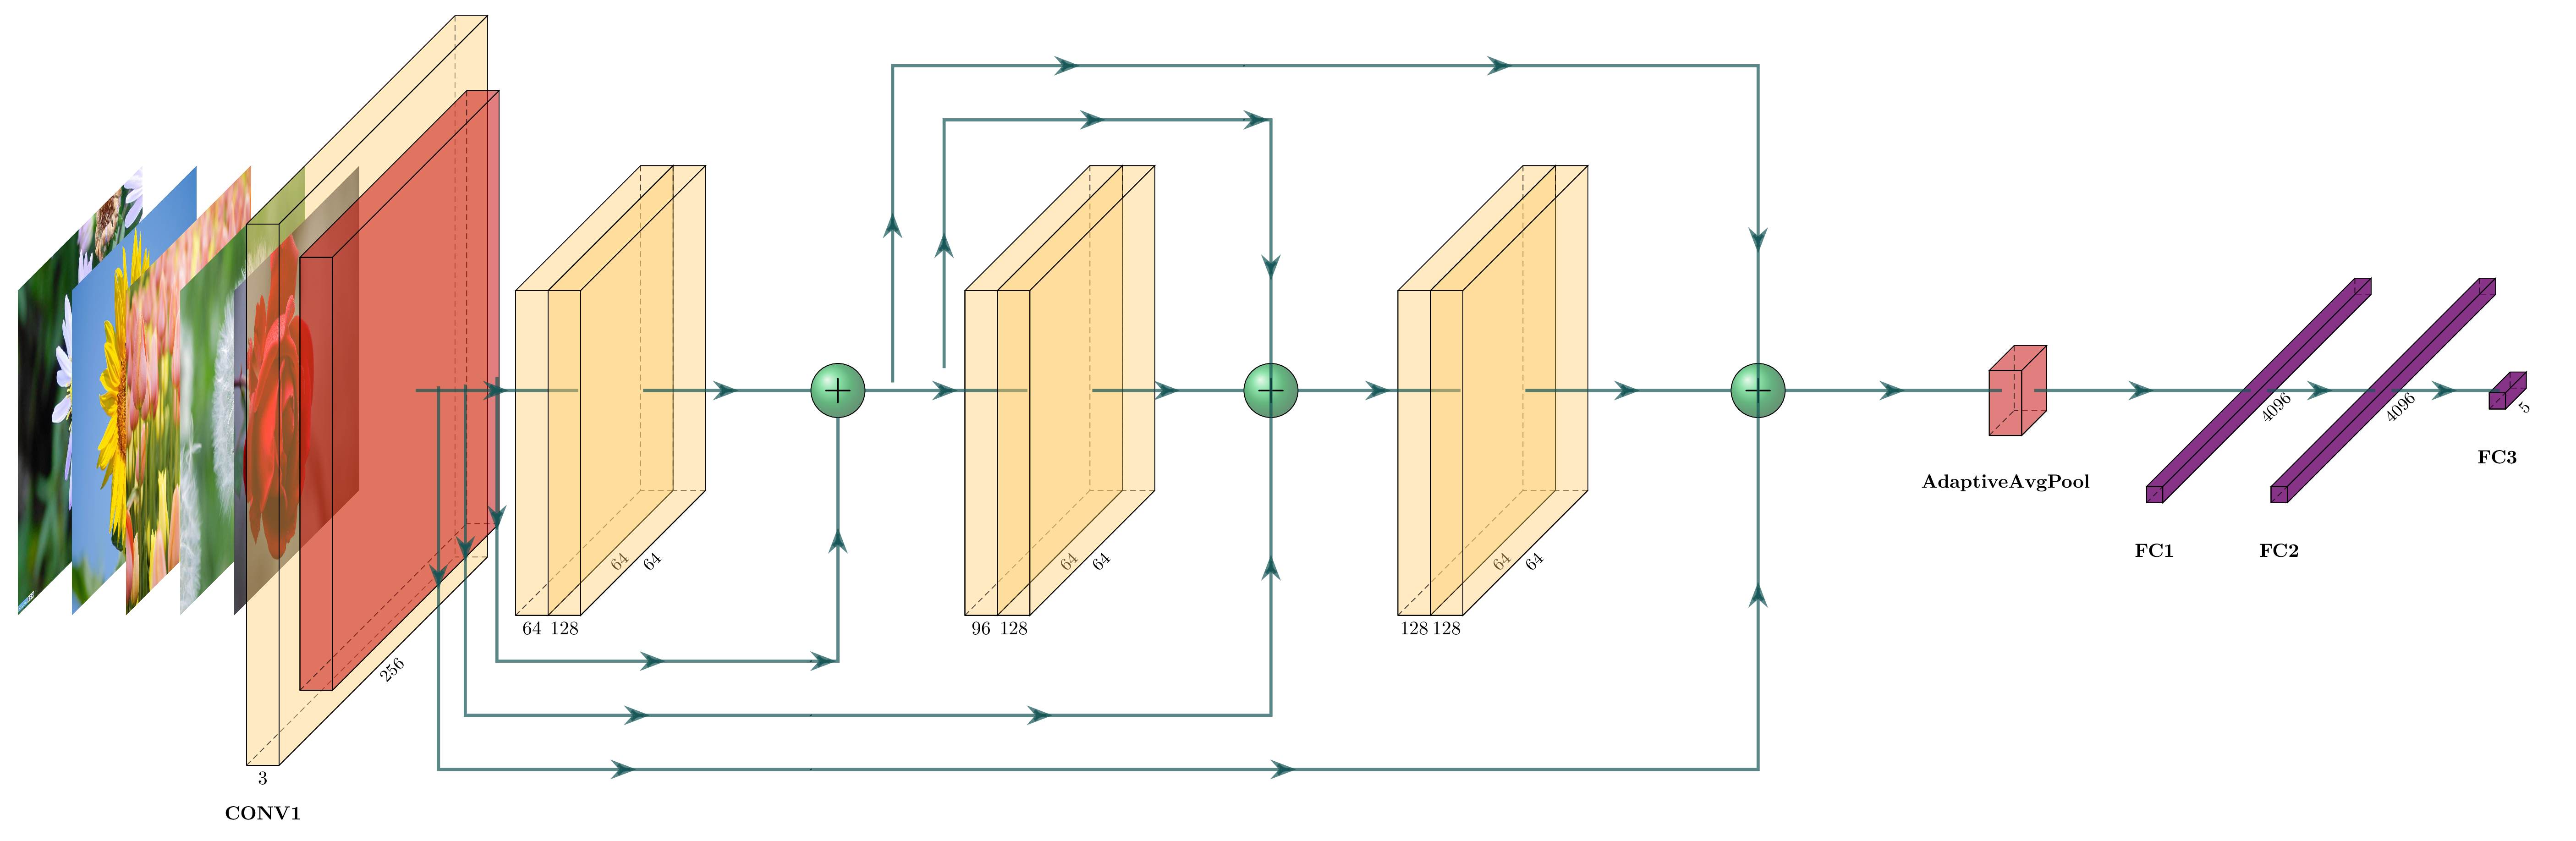
注意:ResNet和DenseNet中一些划线的操作,需要你在.tex文件中进行修改和定义,这需要自行去学习latex的一些操作。
%定位
\pic[shift={(0,-5,0)}] at (sum1-west)
{
	Box={
		name=score1,%
		fill=\PoolColor,%
		opacity=0,height=0.01,width=0.01,depth=0.01
	}
};


% 划线
\path (conv2-east) -- (sum1-south) coordinate[pos=-0.5] (between4_5) ;
\draw [connection]  (between4_5)    -- node {\midarrow} (score1-west-|between4_5) -- node {\midarrow} (score1-west);
\draw [connection]  (score1-east) -- node {\midarrow} (score1-east -| sum1-south) -- node {\midarrow} (sum1-south);


 3437
3437


 被折叠的 条评论
为什么被折叠?
被折叠的 条评论
为什么被折叠?
 到【灌水乐园】发言


