


实现目标检测与发布话题的功能包
实现的结果 :
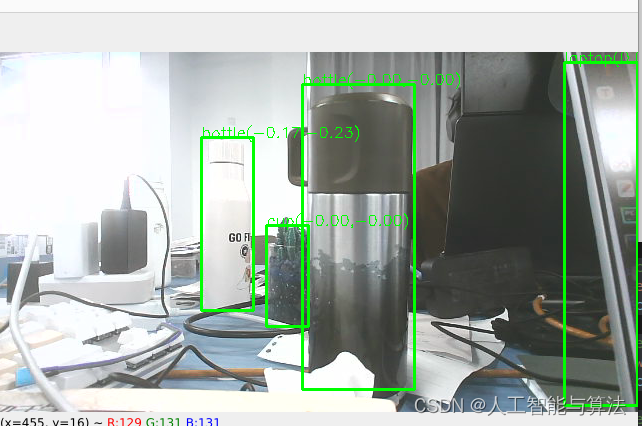
position 里面的x,y,z分别对应于检测出来的物体的基于相机坐标系的实际的三维坐标检测 ,目前是基于相机的坐标系要实现机械臂的自动抓取,还需要手眼标定。
目标检测使用的是YOLOv5的模型
二YOLO工作空间的配置
安装依赖
sudo apt update
sudo apt install python3-pip ros-$ROS_DISTRO-vision-msgs
pip3 install -i https://pypi.tuna.tsinghua.edu.cn/simple yolov5
配置工作空间
sudo -p mkdir yolo_ros2_3d/src
cd yolo_ros2_3d/src
源码包
conlcon git -i 网址.git
编译
cd yolo_ros2_3d
source /opt/ros/humble/setup.bash
colcon build
source install/setup.bash
三运行程序
首先需要启动相机发布话题
cd ~/YOLO/ros2_ws
. ./install/setup.bash
ros2 launch orbbec_camera dabai_dcw.launch.py
查看话题
ros2 topic list
在运行程序之前首先需要启动深度相机方便获取话题
运行程序
cd ~/YOLO/yolo_ros2_3d
. ./install/setup.bash
ros2 run yolov5_ros2 yolo_detect_2d --ros-args -p device:=cpu -p image_topic:=/camera/color/image_raw -p show_result:=True -p image_topic_depth:=/camera/depth/image_raw -p  camera_info:=/camera/depth/camera_info
参数说明
device  设备默认cpu
model   加载的识别的模型
imag_topic  彩色图像的话题
image_topic_depth  深度图像的话题
camera_info_topic 输入相机的参数
camera_info        可自定义在文件内部
show_result   是否展示结果默认是flase
pub_result_img 是否发布结果 默认是true
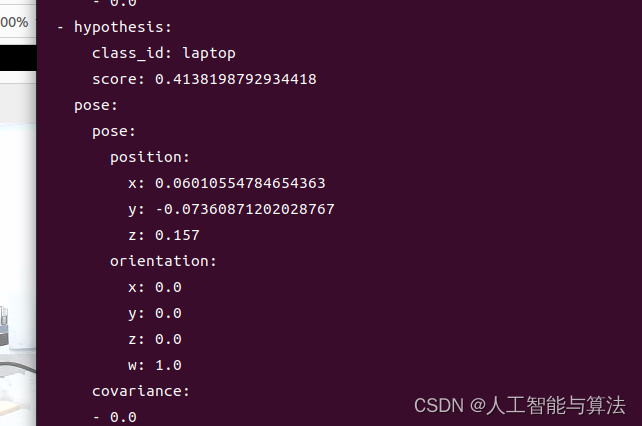
查看发布出来的数据
ros2 topic echo /yolo_result
yolo_result话题
 self.yolo_result_pub = self.create_publisher(Detection2DArray, "yolo_result", 10)
        self.result_msg = Detection2DArray()
yolo_result 的数据类型是 Detection2DArray()
# yolo_result层次关系是
    self.result_msg.detections.clear()
	self.result_msg.header.frame_id = "camera"
    self.result_msg.header.stamp = self.get_clock().now().to_msg()#时间戳stamp


         detection2d = Detection2D()# 检测框的对象处理检测数据
            #detection2d的层次
              # 以像数坐标系检测的物体的中心位置
                detection2d.bbox.center.x = center_x
                detection2d.bbox.center.y = center_y
              # 以像数坐标系检测的物体的框的大小
                detection2d.bbox.size_x = float(x2-x1)
                detection2d.bbox.size_y = float(y2-y1)
         obj_pose 对象是  obj_pose = ObjectHypothesisWithPose()「#存储detection2d处理后的数据

          # obj_pose的层次
                obj_pose.hypothesis.class_id = name #识别到的类别
                obj_pose.hypothesis.score = float(scores[index])#识别物体的得分

             #具体的位置坐标信息在:
            #相机坐标系下的实际物体的三维坐标以米为单位
				obj_pose.pose.pose.position.x = world_x
                obj_pose.pose.pose.position.y = world_y
                obj_pose.pose.pose.position.z = depth_value_in_meters

 detection2d.results.append(obj_pose)#对象obj_pose添加进detection2d的result里
 self.result_msg.detections.append(detection2d)#detection添加进话题里
源代码
首先是获取识别物体然后通过识别的框去计算出以物体中心点的坐标去获取深度图像的深度值。
cv_tool.py
# 导入所需的库
# Import the required libraries
import cv2  # OpenCV library for image processing
import numpy as np  # NumPy library for array and matrix operations

# 相机内参矩阵K,包括相机的焦距和主点坐标
# Camera intrinsic matrix K, including camera's focal length and principal point coordinates
K = [[360.2007751464844, 0, 323.737548828125],
     [0, 360.2007751464844, 176.65692138671875],
     [0, 0, 1]]

# 相机畸变参数D,用于校正图像畸变
# Camera distortion parameters D, used for correcting image distortion
D = [-0.019475774839520454, 0.003557757008820772,
     0, 0, 0]

# 定义一个函数px2xy,用于将像素坐标转换为相机坐标系下的二维坐标
# Define a function px2xy to convert pixel coordinates to 2D coordinates in camera coordinate system
def px2xy(point, camera_k, camera_d, z=1.0):
    # 将相机内参矩阵K和相机畸变参数D转换为NumPy数组
    # Convert camera intrinsic matrix K and camera distortion parameters D to NumPy arrays
    MK = np.array(camera_k, dtype=float).reshape(3, 3)
    MD = np.array(camera_d, dtype=float)

    # 将输入的像素坐标点转换为NumPy数组
    # Convert the input pixel coordinate point to a NumPy array
    point = np.array(point, dtype=float)

    # 使用OpenCV的cv2.undistortPoints函数对输入点进行畸变矫正,并乘以深度值z
    # Use OpenCV's cv2.undistortPoints function to correct distortion of input points and multiply by depth value z
    pts_uv = cv2.undistortPoints(point, MK, MD) * z

    # 返回相机坐标系下的二维坐标
    # Return 2D coordinates in the camera coordinate system
    return pts_uv[0][0]

# 调用函数并打印结果(如果需要)
# Call the function and print the result (if needed)
# print(px2xy([0, 0], K, D, 1))
K的值是相机内参,一般相机出厂都会只带标定好的相机内参k以及畸变系数矩阵d想要仔细将明白可能得花点时间,如果后面看的人比较多会出一个相机四个坐标系的系列。简短说, 相机畸变参数D,用于校正图像畸变,相机内参数K是可以通过它来计算出实际的物体基于相机坐标系下归一化平面上的实际坐标(归一化平面上的实际坐标,就是没有深度值的平面坐标)要想得到实际的三维坐标可以乘以深度(也是基于相机坐标系下)
def px2xy()函数就是传入像数坐标系与内参K,与畸变系数D就可以得到归一化平面上的实际坐标
from math import frexp
from traceback import print_tb
from torch import imag
from yolov5 import YOLOv5
import rclpy
from rclpy.node import Node
from ament_index_python.packages import get_package_share_directory
from rcl_interfaces.msg import ParameterDescriptor
from vision_msgs.msg import Detection2DArray, ObjectHypothesisWithPose, Detection2D
from sensor_msgs.msg import Image, CameraInfo
from cv_bridge import CvBridge
import cv2
import yaml
from yolov5_ros2.cv_tool import px2xy
import os

###################
import numpy as np
####################

# Get the ROS distribution version and set the shared directory for YoloV5 configuration files.
ros_distribution = os.environ.get("ROS_DISTRO")
package_share_directory = get_package_share_directory('yolov5_ros2')

# Create a ROS 2 Node class YoloV5Ros2.
class YoloV5Ros2(Node):
    def __init__(self):
        super().__init__('yolov5_ros2')
        self.get_logger().info(f"Current ROS 2 distribution: {ros_distribution}")

        # Declare ROS parameters.
        self.declare_parameter("device", "cuda", ParameterDescriptor(
            name="device", description="Compute device selection, default: cpu, options: cuda:0"))

        self.declare_parameter("model", "yolov5s", ParameterDescriptor(
            name="model", description="Default model selection: yolov5s"))

        self.declare_parameter("image_topic", "/camera/color/image_raw", ParameterDescriptor(
            name="image_topic", description="Image topic, default: /image_raw"))
        ####################################################################################
        #定义深度信息的话题
        self.declare_parameter("image_topic_depth", "/camera/depth/image_raw", ParameterDescriptor(
            name="image_topic_depth", description="Image topic, default: /image_raw"))
        #############################################################################3###

        self.declare_parameter("camera_info_topic", "/camera/camera_info", ParameterDescriptor(
            name="camera_info_topic", description="Camera information topic, default: /camera/camera_info"))

        # Read parameters from the camera_info topic if available, otherwise, use the file-defined parameters.
        self.declare_parameter("camera_info_file", f"{package_share_directory}/config/camera_info.yaml", ParameterDescriptor(
            name="camera_info", description=f"Camera information file path, default: {package_share_directory}/config/camera_info.yaml"))

        # Default to displaying detection results.
        self.declare_parameter("show_result", False, ParameterDescriptor(
            name="show_result", description="Whether to display detection results, default: False"))

        # Default to publishing detection result images.
        self.declare_parameter("pub_result_img", False, ParameterDescriptor(
            name="pub_result_img", description="Whether to publish detection result images, default: False"))

        #####################################################################################
        #定义全局变量
        self.color_image = None
        self.depth_image = None
        self.last_timestamp = None
        ########################################################################################
        # 1. Load the model.
        model_path = package_share_directory + "/config/" + self.get_parameter('model').value + ".pt"
        device = self.get_parameter('device').value
        self.yolov5 = YOLOv5(model_path=model_path, device=device)

        # 2. Create publishers.
        self.yolo_result_pub = self.create_publisher(
            Detection2DArray, "yolo_result", 10)
        self.result_msg = Detection2DArray()

        self.result_img_pub = self.create_publisher(Image, "result_img", 10)

        # 3. Create an image subscriber (subscribe to depth information for 3D cameras, load camera info for 2D cameras).
        image_topic = self.get_parameter('image_topic').value
        self.image_sub = self.create_subscription(
            Image, image_topic, self.image_callback, 10)

        camera_info_topic = self.get_parameter('camera_info_topic').value
        self.camera_info_sub = self.create_subscription(
            CameraInfo, camera_info_topic, self.camera_info_callback, 1)
        ####################################################################################
        #创建深度摄像头图像订阅信息
        image_topic_depth = self.get_parameter('image_topic_depth').value
        self.image_sub_depth = self.create_subscription(
            Image, image_topic_depth, self.image_callback_depth, 10)
        #####################################################################################

        # Get camera information.
        with open(self.get_parameter('camera_info_file').value) as f:
            self.camera_info = yaml.full_load(f.read())
            self.get_logger().info(f"default_camera_info: {self.camera_info['k']} \n {self.camera_info['d']}")

        # 4. Image format conversion (using cv_bridge).
        self.bridge = CvBridge()

        self.show_result = self.get_parameter('show_result').value
        self.pub_result_img = self.get_parameter('pub_result_img').value

    def camera_info_callback(self, msg: CameraInfo):
        """
        Get camera parameters through a callback function.
        """
        self.camera_info['k'] = msg.k
        self.camera_info['p'] = msg.p
        self.camera_info['d'] = msg.d
        self.camera_info['r'] = msg.r
        self.camera_info['roi'] = msg.roi

        self.camera_info_sub.destroy()
    #########################################################################################
    #设置深度图像的回调函数
    def image_callback_depth(self, msg: Image ):
        #1self.depth_image = self.bridge.imgmsg_to_cv2(msg, "passthrough")  # 对于深度图像,通常使用passthrough模式
        # self.depth_image = self.depth_image.astype(np.float32) / 1000.0  # 转换为浮点型并转换为米(如果原始单位是毫米)
        #1self.depth_image = self.depth_image.astype(np.float32)   # 转换为浮点型并转换为米(如果原始单位是毫米)
        #1self.last_timestamp = msg.header.stamp

        bridge = CvBridge()
        self.depth_image = bridge.imgmsg_to_cv2(msg, "32FC1")

        # 假设我们要获取(100, 200)坐标处的深度值
        # x, y = 100,200
        # if 0 <= x < depth_image.shape[1] and 0 <= y < depth_image.shape[0]:
        #     depth_value = depth_image[y, x]  # 注意OpenCV的坐标顺序是(y, x)
        #     print(f"Depth at ({x}, {y}) is: {depth_value*0.001}")
        # return  depth_image
    #####################################################################3


    def image_callback(self, msg: Image):
        #####################################################################
        #if self.depth_image is not None and abs(msg.header.stamp.to_sec() - self.depth_image.header.stamp.to_sec()) < 0.01:  # 假设时间戳相差小于0.01秒是同步的
        #####################################################################
        # 5. Detect and publish results.
        image = self.bridge.imgmsg_to_cv2(msg)
        detect_result = self.yolov5.predict(image)
        self.get_logger().info(str(detect_result))

        self.result_msg.detections.clear()
        self.result_msg.header.frame_id = "camera"
        self.result_msg.header.stamp = self.get_clock().now().to_msg()

        # Parse the results.
        predictions = detect_result.pred[0]
        boxes = predictions[:, :4]  # x1, y1, x2, y2
        scores = predictions[:, 4]
        categories = predictions[:, 5]

        for index in range(len(categories)):
            name = detect_result.names[int(categories[index])]
            detection2d = Detection2D()
            detection2d.id = name
            x1, y1, x2, y2 = boxes[index]
            x1 = int(x1)
            y1 = int(y1)
            x2 = int(x2)
            y2 = int(y2)
            center_x = (x1+x2)/2.0
            center_y = (y1+y2)/2.0

            if ros_distribution=='galactic':#ros2的版本
                detection2d.bbox.center.x = center_x
                detection2d.bbox.center.y = center_y
            else:
                detection2d.bbox.center.position.x = center_x
                detection2d.bbox.center.position.y = center_y

            detection2d.bbox.size_x = float(x2-x1)
            detection2d.bbox.size_y = float(y2-y1)

            obj_pose = ObjectHypothesisWithPose()
            obj_pose.hypothesis.class_id = name
            obj_pose.hypothesis.score = float(scores[index])
            ##############################################################
            #加上深度值
            if self.depth_image is not None:
                depthvalue=self.depth_image[int(center_y), int(center_x)]
                depth_value_in_meters = depthvalue / 1000.0  # 转换为米
                world_x, world_y = px2xy(
                    [center_x, center_y], self.camera_info["k"], self.camera_info["d"], depth_value_in_meters)
                obj_pose.pose.pose.position.x = world_x
                obj_pose.pose.pose.position.y = world_y
                obj_pose.pose.pose.position.z = depth_value_in_meters
                detection2d.results.append(obj_pose)
                self.result_msg.detections.append(detection2d)
            else:
                 world_x, world_y = px2xy(
                [center_x, center_y], self.camera_info["k"], self.camera_info["d"], 1)#那个点没有深度值但是要得到归一化平面设置的z的深度值为1
            obj_pose.pose.pose.position.x = world_x
            obj_pose.pose.pose.position.y = world_y
            # obj_pose.pose.pose.position.z = 1
            detection2d.results.append(obj_pose)
            self.result_msg.detections.append(detection2d)
            ################################################################

            # px2xy
            # world_x, world_y = px2xy(
            #     [center_x, center_y], self.camera_info["k"], self.camera_info["d"], 1)
            # obj_pose.pose.pose.position.x = world_x
            # obj_pose.pose.pose.position.y = world_y
            # detection2d.results.append(obj_pose)
            # self.result_msg.detections.append(detection2d)

            # Draw results.
            if self.show_result or self.pub_result_img:
                cv2.rectangle(image, (x1, y1), (x2, y2), (0, 255, 0), 2)
                cv2.putText(image, f"{name}({world_x:.2f},{world_y:.2f})", (x1, y1),
                            cv2.FONT_HERSHEY_SIMPLEX, 0.5, (0, 255, 0), 1)
                cv2.waitKey(1)

        # Display results if needed.
        if self.show_result:
            cv2.imshow('result', image)
            cv2.waitKey(1)

        # Publish result images if needed.
        if self.pub_result_img:
            result_img_msg = self.bridge.cv2_to_imgmsg(image, encoding="bgr8")
            result_img_msg.header = msg.header
            self.result_img_pub.publish(result_img_msg)

        if len(categories) > 0:
            self.yolo_result_pub.publish(self.result_msg)

def main():
    rclpy.init()
    rclpy.spin(YoloV5Ros2())
    rclpy.shutdown()

if __name__ == "__main__":
    main()
参数说明
device  设备默认cpu
model   加载的识别的模型
imag_topic  彩色图像的话题
image_topic_depth  深度图像的话题
camera_info_topic 输入相机的参数
camera_info        可自定义在文件内部
show_result   是否展示结果默认是flase
pub_result_img 是否发布结果 默认是true


 455
455


 被折叠的 条评论
为什么被折叠?
被折叠的 条评论
为什么被折叠?
 到【灌水乐园】发言


