


引言
在计算机视觉领域,目标检测是至关重要的任务之一。YOLO(You Only Look Once)系列算法因其高效性和准确性而广受欢迎。YOLOv8 作为稳定版本,在目标检测领域取得了显著成果,依旧能打。本文将深入探讨 YOLOv8 OBB(Oriented Bounding Box,定向边界框) 模型的结构、损失函数、关键代码以及如何进行自定义 OBB 对象检测的完整流程。
在开始之前,弥补上节YOLOV8不同精度模型解析:


旋转对象模型 OBB
1. 旋转对象检测模型结构拆解
YOLOv8 OBB 模型的结构主要分为两个部分:Backbone 和 Head。其中:
以YOLOV8n为例


Backbone 部分
- 使用 C2f(Cross Convolutional Layer) 和 SPPF(Spatial Pyramid Pooling - Fast) 等模块来增强特征提取能力。
- 通过多次卷积和下采样操作,逐步提取图像的高级特征。
Head 部分
- 包含了上采样、Concat 操作以及 C2f 模块,用于融合不同层级的特征。
- 最终通过 OBB 模块生成定向边界框的预测。
2. 旋转对象损失函数
YOLO OBB 模型使用了三种主要的损失函数:cls(分类)、box(边界框)和 df1(分布焦点损失)。
Cls - BCE(Binary Cross Entropy)
- 用于分类任务,衡量预测类别与真实类别之间的差异。
Box - ProbIOU
- 衡量预测边界框与真实边界框之间的 IOU(Intersection over Union),并结合概率进行损失计算。

论文地址:https://arxiv.org/pdf/2106.06072v1.pdf
1. 数据准备
进行自定义 OBB 目标检测的第一步是准备数据集,数据集应包含图像文件和对应的标签文件。
OBB 数据集格式
- YOLO OBB 格式通过 四个角点 指定边界框,其坐标在 0 和 1 之间归一化。
- 标签文件格式如下:
class_index, x1, y1, x2, y2, x3, y3, x4, y4

2. 模型训练与测试
使用准备好的数据集,可以开始模型的训练过程。
训练命令
yolo obb train data=pen_dataset.yaml model=yolov8s-obbb.pt epochs=25 imgsz=640
测试命令
yolo obb predict model=yolov8n-obbb.pt source=plane_03.jpg
3. 模型导出与推理
训练完成后,可以将模型导出为 ONNX 格式,以便在其他平台进行部署。
导出命令
yolo export model=yolov8s-obbb.pt format=onnx
推理格式
- 输入格式:
NCHW=1x3x640x640 - 输出格式:
1x6x8400,包含xywhcr(中心坐标、宽度、高度、旋转角度和置信度)信息。
数据标注与说明
1. 标注工具
为了生成符合 YOLO OBB 格式的标签文件,需要使用专门的标注工具,例如:
- LabelImg
- Roboflow
- CVAT
2. 数据集生成
通过编写代码,可以将标注好的数据转换为 YOLO OBB 格式,包括:
- 统一不同格式的标注数据。
- 进行数据增强,如旋转、缩放、裁剪等。
3. 旋转矩阵
在处理旋转目标时,旋转矩阵 是必不可少的。通过旋转矩阵,可以将原始坐标转换为旋转后的坐标,从而准确表示目标的位置和方向。
不同旋转的标注格式:

模型推理与部署
1. 输入输出格式
进行模型推理时,需要明确输入和输出格式:
- 输入格式:
1x3x640x640的张量,NCHW=1x3x640x640。 - 输出格式:包含检测到目标的 边界框信息,1x6x8400。
-
• xywhcr 只有一个类别
2. 部署实践
模型部署到实际应用时,需要考虑性能优化 和 兼容性,可以采用:
- 量化(Quantization):减少计算量,提高推理速度。
- 剪枝(Pruning):去除冗余权重,优化模型大小。

3.旋转中心-角度正负
•得到四个点坐标


旋转检测pen的demo代码如下:
import cv2 as cv
import time
import numpy as np
from openvino.runtime import Core
def get_rotate_point(curr_pts, M, d1, box):
rpts = []
M[:, :] = 0
alpha = np.cos(d1)
beta = np.sin(d1)
M[0, 0] = alpha
M[1, 1] = alpha
M[0, 1] = beta
M[1, 0] = -beta
cx = box[0] + box[2] / 2
cy = box[1] + box[3] / 2
tx = (1 - alpha) * cx - beta * cy
ty = beta * cx + (1 - alpha) * cy
M[0, 2] = tx
M[1, 2] = ty
for pt in curr_pts:
x0 = pt[0];
y0 = pt[1];
x = M[0, 0] * x0 + M[0, 1] * y0 + M[0, 2];
y = M[1, 0] * x0 + M[1, 1] * y0 + M[1, 2];
rpts.append((x, y))
return rpts
def format_yolov8(frame):
row, col, _ = frame.shape
_max = max(col, row)
result = np.zeros((_max, _max, 3), np.uint8)
result[0:row, 0:col] = frame
return result
def post_process(rows):
class_ids = []
confidences = []
boxes = []
angles = []
x_factor = img_w / 640
y_factor = img_h / 640
for r in range(rows.shape[0]):
row = rows[r]
classes_scores = row[4:5]
_, _, _, max_indx = cv.minMaxLoc(classes_scores)
class_id = max_indx[1]
if (classes_scores[class_id] > .25):
angles.append(row[5])
confidences.append(classes_scores[class_id])
class_ids.append(class_id)
x, y, w, h = row[0].item(), row[1].item(), row[2].item(), row[3].item()
left = int((x - 0.5 * w) * x_factor)
top = int((y - 0.5 * h) * y_factor)
width = int(w * x_factor)
height = int(h * y_factor)
box = np.array([left, top, width, height])
boxes.append(box)
return boxes, confidences, angles, class_ids
class_list = ["pen"]
colors = [(255, 255, 0), (0, 255, 0), (0, 255, 255), (255, 0, 0)]
ie = Core()
for device in ie.available_devices:
print(device)
# Read IR
model = ie.read_model(model=pen_obb_best.onnx)
compiled_model = ie.compile_model(model=model, device_name="CPU")
output_layer = compiled_model.output(0)
## xywhr
frame = cv.imread(code/four_pen.jpg)
bgr = format_yolov8(frame)
img_h, img_w, img_c = bgr.shape
start = time.time()
image = cv.dnn.blobFromImage(bgr, 1 / 255.0, (640, 640), swapRB=True, crop=False)
res = compiled_model([image])[output_layer] # 1x25x8400
rows = np.squeeze(res, 0).T
boxes, confidences, angles, class_ids = post_process(rows)
indexes = cv.dnn.NMSBoxes(boxes, confidences, 0.25, 0.45)
M = np.zeros((2, 3), dtype=np.float32)
for index in indexes:
box = boxes[index]
d1 = -angles[index]
color = colors[int(class_ids[index]) % len(colors)]
pts = [(box[0], box[1]), (box[0]+box[2], box[1]), (box[0]+box[2], box[1]+box[3]), (box[0], box[1]+box[3])]
rrt_pts = get_rotate_point(pts, M, d1, box)
cv.drawContours(frame, [np.asarray(rrt_pts).astype(np.int32)], 0, (255, 0, 255), 2)
cv.putText(frame, class_list[class_ids[index]], (int(box[0]+box[2]/2), int(box[1]+box[3]/2)), cv.FONT_HERSHEY_SIMPLEX, 1.0, (0, 0, 255), 2)
end = time.time()
inf_end = end - start
fps = 1 / inf_end
fps_label = "FPS: %.2f" % fps
cv.putText(frame, fps_label, (20, 45), cv.FONT_HERSHEY_SIMPLEX, 1, (0, 0, 255), 2)
cv.imshow("YOLOv8-OBB Rotate Object Detection", frame)
cv.imwrite("D:/pen_result.jpg", frame)
# 新增自动退出逻辑
while True:
# 检查窗口是否关闭
if cv.getWindowProperty("YOLOv8-OBB Rotate Object Detection", cv.WND_PROP_VISIBLE) < 1:
break
# 检查是否按下q键
if cv.waitKey(1) & 0xFF == ord('q'):
break
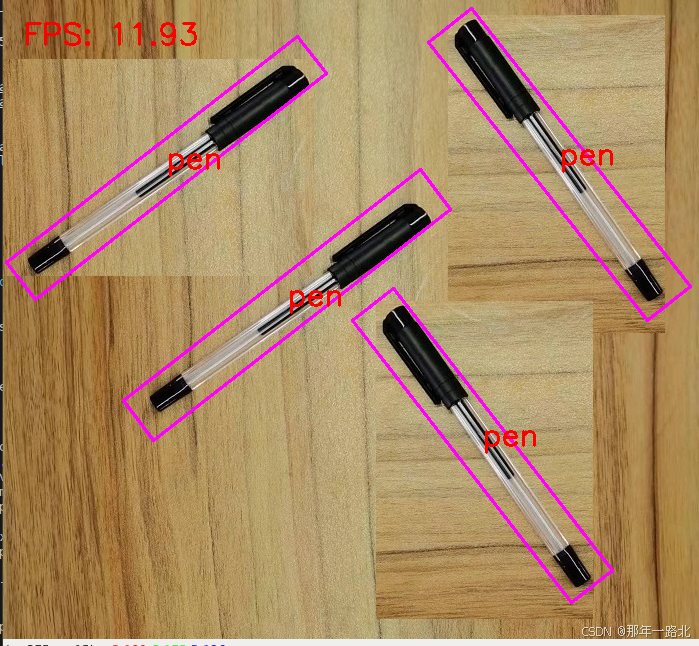
cv.destroyAllWindows()测试结果如图所示:
总结
本文详细介绍了 YOLOv8 OBB 模型的结构、损失函数、关键代码以及 自定义 OBB 目标检测 的完整流程。旨在深入理解 YOLOv8 OBB 的工作原理,并应用到实际旋转目标检测任务中。
未来展望
随着计算机视觉技术的发展,旋转目标检测在 无人机监测、遥感图像分析 等领域有广阔的应用前景。YOLOv8 OBB 作为高效检测工具,将在这些领域发挥重要作用。欢迎继续交流!😊🚀


 3238
3238

 被折叠的 条评论
为什么被折叠?
被折叠的 条评论
为什么被折叠?
 到【灌水乐园】发言


