


UE4输入系统和UE5的增强输入系统
本文主要解析关键内容 因此忽略了部分细节
尽管增强输入系统更加复杂 但是两者核心的代码没太大区别
UE4 输入系统
首先介绍虚幻4的输入系统
1.项目设置添加轴映射和操作映射
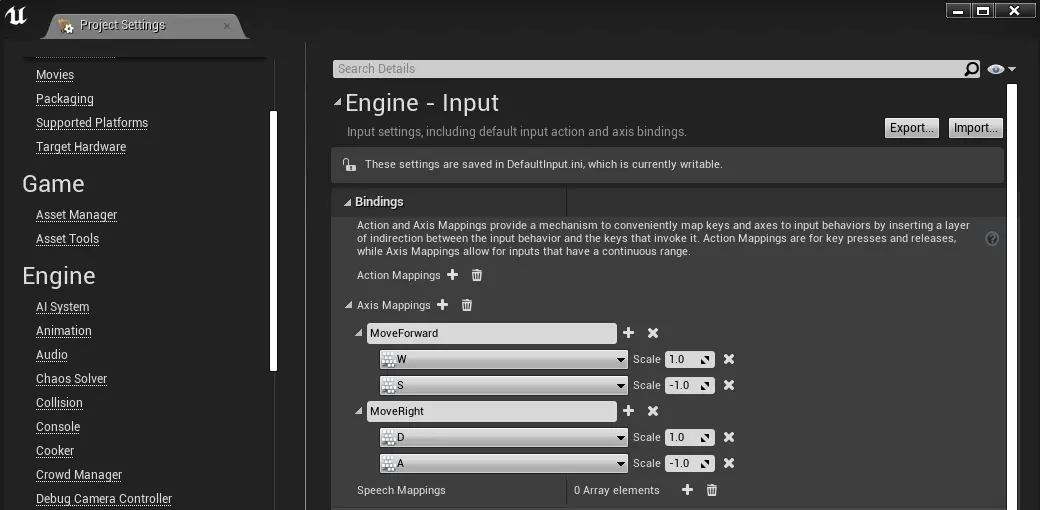
2.编写函数 (角色移动、跳跃等等功能具体实现的地方)
//前后移动
void AFPSCharacter::MoveForward(float Value)
{
    FVector Direction=FRotationMatrix(Controller->GetControlRotation()).GetScaledAxis(EAxis::X);
    AddMovementInput(Direction, Value);
}
//跳跃
void AFPSCharacter::StartJump()
{
     bPressedJump = true;
}
3.绑定轴和操作
//SetupPlayerInputComponent是ACharacter中的虚函数
void AFPSCharacter::SetupPlayerInputComponent(UInputComponent* PlayerInputComponent)
{
    // 绑定轴。
    PlayerInputComponent->BindAxis("MoveForward", this, &ThisClass::MoveForward);
    //绑定操作
    PlayerInputComponent->BindAction("Jump", IE_Pressed, this, &ThisClass::StartJump);
}
通过这三步 就可以在UE4中绑定玩家输入
增强输入系统 Enhanced Input System
1.必要模块:
添加EnhancedInput模块
//Build.cs文件
PublicDependencyModuleNames.AddRange(new string[] {
          "EnhancedInput"
}
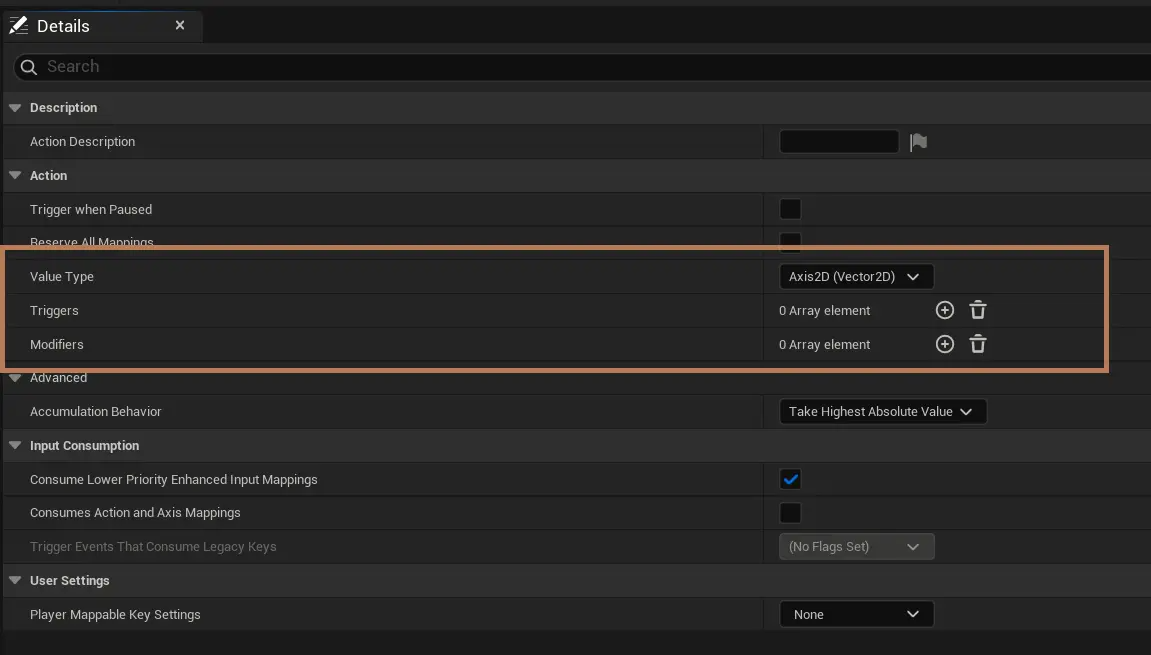
2.InputAction:输入动作
ValueType:操作的类型 类比上面 Axis就是轴类型 Bool就是动作类型
Triggers:指定动作触发的条件 满足条件才能被触发 如被按下、被抬起、组合键、长按…
Modifiers:对输入动作进行一定的修改 如忽略微小的操作、对输入的强度进行缩放、平滑…
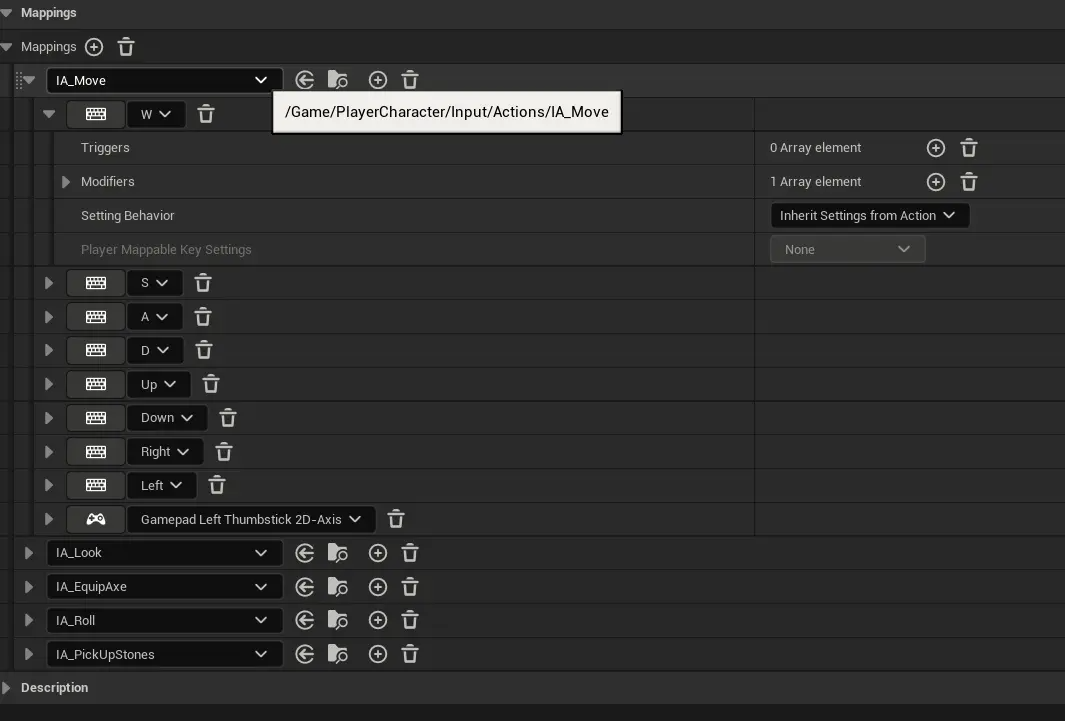
3.InputMappingContext:
可以为InputAction指定按键 其中Triggers和Modifiers与InputAction中是一样的
它很类似原输入系统在项目设置中做的工作
我们之后可以一个角色添加多个MappingContext 在不用的场合就可以一个按键触发不同的操作 更加灵活
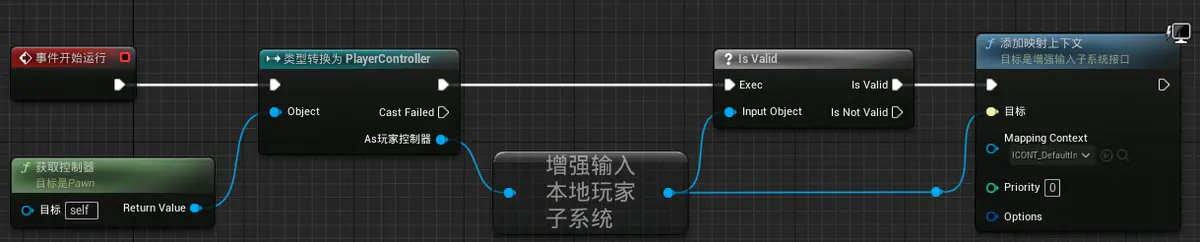
4.UEnhancedInputPlayerSubsystem 增强输入本地玩家子系统
它的主要作用是给角色添加或移除MappingContext
并且可以指定优先级 优先级高的会覆盖优先级低的
c++
//头文件
#include "EnhancedInputSubsystems.h"
//获得Player
ULocalPlayer *LocalPlayer = GetController<APlayerController>()->GetLocalPlayer();
//获得Subsystem
UEnhancedInputLocalPlayerSubsystem* Subsystem=ULocalPlayer::GetSubsystem<UEnhancedInputLocalPlayerSubsystem>(LocalPlayer);
check(Subsystem);
//添加MappingContext    其中0指最低优先级
Subsystem->AddMappingContext(MyMappingContext,0);
//移除MappingContext
Subsystem->RemoveMappingContext(MyMappingContext);
蓝图
5.绑定函数
void AWarriorHeroCharacter::SetupPlayerInputComponent(UInputComponent* PlayerInputComponent)
{
    PlayerInputComponent-> BindAction(MyInputAction, ETriggerEvent::Started, this, &ThisClass::StartJump);
}
现在只有BindAction一个函数 不需要BindAxis了
两种方式中BindAction函数,参数由动作的名称变成了InputAction
6.函数示例
移动
void AMyCharacter::Input_Move(const FInputActionValue& InputActionValue)
{
	const FVector2D MovementInput = InputActionValue.Get<FVector2D>();
	const FRotator MovementRotation(0.f,Controller->GetControlRotation().Yaw, 0.f);
	if (MovementInput.Y != 0.f)
	{
		const FVector ForwardDirection = MovementRotation.RotateVector(FVector::ForwardVector);
		AddMovementInput(ForwardDirection, MovementInput.Y);
	}
	if (MovementInput.X != 0.f)
	{
		const FVector RightDirection = MovementRotation.RotateVector(FVector::RightVector);
		AddMovementInput(RightDirection, MovementInput.X);
	}
}
旋转视角
void AMyCharacter::Input_Look(const FInputActionValue& InputActionValue)
{
	const FVector2D LookAxisVector = InputActionValue.Get<FVector2D>();
	if (LookAxisVector.X != 0.f)
	{
		AddControllerYawInput(LookAxisVector.X);
	}
	if (LookAxisVector.Y != 0.f)
	{
		AddControllerPitchInput(LookAxisVector.Y);
	}
}
总结
虚幻5将原来项目设置的内容 拆分成了InputAction和MappingContext
首先获取UEnhancedInputLocalPlayerSubsystem
添加MappingContext
最后在SetupPlayerInputComponent()中绑定BindAction


 854
854

 被折叠的 条评论
为什么被折叠?
被折叠的 条评论
为什么被折叠?
 到【灌水乐园】发言


