


Cobbler Server 使用 NAT模式 VMnet8
1.1 关闭防火墙
getenforce #查看状态命令   enabled或者Enforcing说明SELinux开启
临时关闭 setenforce 0 setenforce 0 设置SELinux 成为permissive模式 setenforce 1 设置SELinux 成为enforcing模式
#永久关闭 修改/etc/selinux/config 文件 将SELINUX=enforcing改为SELINUX=disabled 修改完 重启机器即可 reboot
永久关闭防火墙
[root@CobblerServer ~]# getenforce
Enforcing
[root@CobblerServer ~]# vim /etc/selinux/config

# This file controls the state of SELinux on the system.
# SELINUX= can take one of these three values:
#     enforcing - SELinux security policy is enforced.
#     permissive - SELinux prints warnings instead of enforcing.
#     disabled - No SELinux policy is loaded.
SELINUX=disabled
# SELINUXTYPE= can take one of three values:
#     targeted - Targeted processes are protected,
#     minimum - Modification of targeted policy. Only selected processes are protected.
#     mls - Multi Level Security protection.
SELINUXTYPE=targete

[root@CobblerServer ~]# reboot
[root@CobblerServer ~]# getenforce
Disabled
能访问到外部网络
[root@CobblerServer ~]# ping baidu.com
PING baidu.com (220.181.38.251) 56(84) bytes of data.
64 bytes from 220.181.38.251 (220.181.38.251): icmp_seq=1 ttl=128 time=7.36 ms
64 bytes from 220.181.38.251 (220.181.38.251): icmp_seq=2 ttl=128 time=6.74 ms
--- baidu.com ping statistics ---
2 packets transmitted, 2 received, 0% packet loss, time 1002ms
rtt min/avg/max/mdev = 6.749/7.056/7.364/0.318 ms
1.2安装和启动
#安装epel源 和 相关软件
[root@cobbler ~]#   yum install -y epel-release
[root@cobbler ~]#   yum install -y cobbler cobbler-web httpd dhcp tftp-server xinetd
[root@cobbler ~]#   yum install -y dhcp


#启动 设定开机自启
[root@cobbler ~]# systemctl start httpd cobblerd.service
[root@cobbler ~]# systemctl enable httpd
[root@cobbler ~]# systemctl enable  cobblerd.service

[root@cobbler ~]# systemctl start  dhcpd
[root@cobbler ~]# systemctl enable dhcpd
1.3 更改cobbler服务配置
cobbler check 命令查看cobbler给出的建议 并不是需要每条建议都执行 更改完最后需要重启动
[root@cobbler ~]# cobbler check The following are potential configuration items that you may want to fix: 1 : The 'server' field in /etc/cobbler/settings must be set to something other than localhost, or kickstarting features will not work. This should be a resolvable hostname or IP for the boot server as reachable by all machines that will use it. 2 : For PXE to be functional, the 'next_server' field in /etc/cobbler/settings must be set to something other than 127.0.0.1, and should match the IP of the boot server on the PXE network. 3 : change 'disable' to 'no' in /etc/xinetd.d/tftp 4 : Some network boot-loaders are missing from /var/lib/cobbler/loaders. If you only want to handle x86/x86_64 netbooting, you may ensure that you have installed a *recent* version of the syslinux package installed and can ignore this message entirely. Files in this directory, should you want to support all architectures, should include pxelinux.0, menu.c32, elilo.efi, and yaboot. 5 : enable and start rsyncd.service with systemctl 6 : debmirror package is not installed, it will be required to manage debian deployments and repositories 7 : ksvalidator was not found, install pykickstart 8 : The default password used by the sample templates for newly installed machines (default_password_crypted in /etc/cobbler/settings) is still set to 'cobbler' and should be changed, try: "openssl passwd -1 -salt 'random-phrase-here' 'your-password-here'" to generate new one 9 : fencing tools were not found, and are required to use the (optional) power management features. install cman or fence-agents to use them Restart cobblerd and then run 'cobbler sync' to apply changes.
1.3.1 cobbler服务器地址
cobbler第一条建议是修改/etc/cobbler/settings中的server项 server: 冒号后的空格不要删除掉 或者会报错语法错误 server: 127.0.0.1 改成 server: 192.168.192.128 #192.168.192.128 是我的cobbler服务器的地址
server: 192.168.192.1281.3.2 TFTP服务器地址
cobbler第二条建议修改/etc/cobbler/settings中的next_server项 next_server: 127.0.0.1 改成 next_server: 192.168.192.128 # 也指定自己的服务地址 将来要指向TFTP服务器地址 去加载网络引导文件以及去加载对应的内核
next_server: 192.168.192.1281.3.3
[root@CobblerServer ~]# vim  /etc/xinetd.d/tftp
service tftp
{
        socket_type             = dgram
        protocol                = udp
        wait                    = yes
        user                    = root
        server                  = /usr/sbin/in.tftpd
        server_args             = -s /var/lib/tftpboot
        disable                 = no
        per_source              = 11
        cps                     = 100 2
        flags                   = IPv4
}
1.3.4
[root@CobblerServer ~]# systemctl  start  rsyncd.service
[root@CobblerServer ~]# systemctl  enable  rsyncd.service
Created symlink from /etc/systemd/system/multi-user.target.wants/rsyncd.service to /usr/lib/systemd/system/rsyncd.service.
[root@CobblerServer ~]# systemctl  enable  rsyncd.service
1.3.5
[root@CobblerServer ~]# yum install pykickstart1.3.6
设置root密码 先通过算法 生产密码 然后替换 default_password_crypted选项的值 用新生成的密码去替换原有的默认密码
[root@CobblerServer ~]# openssl passwd -1 -salt 'random-phrase-123132' '123456'
$1$random-p$mzxQ/Sx848sXgvfwJCoZM0
[root@CobblerServer ~]# vim /etc/cobbler/settings
default_password_crypted: "$1$random-p$mzxQ/Sx848sXgvfwJCoZM0"
1.3.7
[root@CobblerServer ~]# yum install -y fence-agents1.3.8配置DHCP服务
#将manage_dhcp: 0 改成 manage_dhcp: 1 允许cibbler来进行dhcp的管理配置
subnet 192.168.232.0(往外分配的网段IP) netmask 255.255.255.0(子网掩码) { option routers 192.168.232.2(网段里的网关); option domain-name-servers 114.114.114.114,202.106.0.20(DNS服务器地址); range dynamic-bootp 192.168.232.100 192.168.232.200(范围IP,起始IP喝终止IP);
[root@CobblerServer ~]# vim /etc/cobbler/settings
manage_dhcp: 1

[root@CobblerServer ~]# vim /etc/cobbler/dhcp.template
subnet 192.168.192.0 netmask 255.255.255.0 {
     option routers             192.168.192.2;
     option domain-name-servers 114.114.114.114,202.106.0.20;
     option subnet-mask         255.255.255.0;
     range dynamic-bootp        192.168.192.100 192.168.192.254;
     default-lease-time         21600;
     max-lease-time             43200;
     next-server                $next_server;
1.3.9
[root@CobblerServer ~]# systemctl restart cobblerd
[root@CobblerServer ~]# cobbler sync
[root@CobblerServer ~]# systemctl restart xinetd
#查看dhcp服务是否启动
[root@CobblerServer ~]# netstat -anup | grep 69
udp        0      0 0.0.0.0:69              0.0.0.0:*                           20041/xinetd
1.4配置镜像
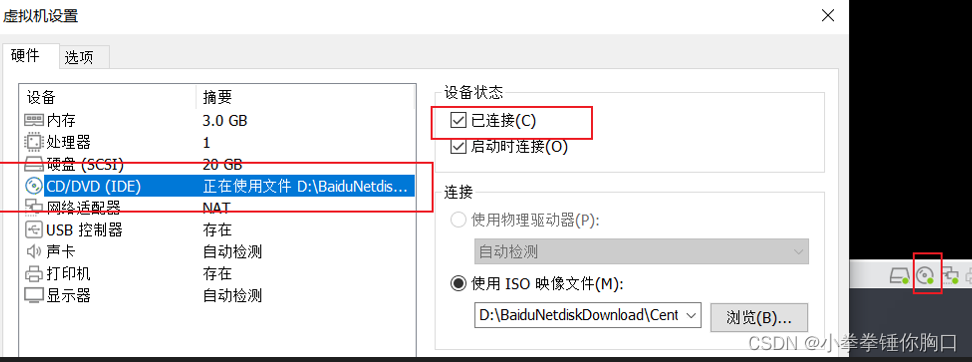
1.1导入系统镜像文件 通过http共享系统文件
在CD/DVD 中放好IOS映射文件光盘 进行连接
#挂载
[root@CobblerServer ~]# mount /dev/sr0 /mnt/

#导入镜像
[root@CobblerServer ~]# cobbler import --path /mnt --name=CentOS76 --arch=X86_64

#查看安装源
[root@CobblerServer ~]# cobbler distro list
   CentOS76-x86_64

#查看安装源配置文件
[root@CobblerServer ~]# cobbler profile list
   CentOS76-x86_64
1.5测试
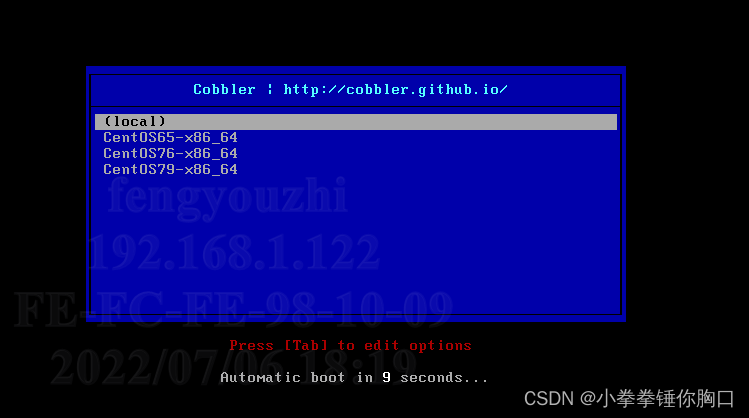
建一台新的机器 稍后安装操作系统 下一步 Linux(L) CentOS7 64位 下一步 下一步 完成 NAT模式开机 等会会出现小蓝屏 蓝屏有你刚才配置的 CentOS76-X86_64 名称 选中回车就知道安装了(在想选中多个镜像文件 就在从1.4走一边 从在CD/DVD 中放好IOS映射文件光盘开始
1.5.1卸载刚才挂载的光盘
卸载完更换 CD/DVD中的IOS映射文件 选中设备状态已连接 重新挂载下
[root@cobbler ~]# umount /dev/sr0
[root@cobbler ~]# cobbler import --path=/mnt --name=CentOS79 --arch=X86_641.6定制系统
-
为客户端绑定系统,省略菜单选择的过程[通过MAC地址绑定]
-
支持为客户端分配固定的IP地址
首先需要MAC地址 需要虚拟机设置中 -> 网络适配器 -> MAC 地址生成 -> 确认
cobbler systen add --name=vm01_centos66 --profile=CentOS66-x86 --mac-address=00:50:56:2F:9F:EA --ip-address=192.168.232.137 --gateway=192.168.232.2 --netmask=255.255.255.0 --name-servers=114.114.114.114 --hostname=node01.linux.com --static=1 --interface=etn0cobbler system list
1.7 cobbler API
-
使用xmlrpc进行调用
-
调用地址:http://cobbler服务器地址/cobbler_api/
-
确保服务 httpd 和cobbler.service 是正常运行的状态
1.7.1 获取服务器信息
import xmlrpc.client as xc
# 请求地址
cobbler_url = "http://192.168.232.128/cobbler_api"
#创建cobbler服务器连接 #用来和cobbler服务建立连接 将链接保存到cobbler_conn里
cobbler_conn = xc.Server(cobbler_url)
# 获取所有的distro 服务器上提供好的分发版本
#获取完后默认信息是放入list里的 每一个安装源对应一个dict
# print(cobbler_conn.get_distros())
for item in cobbler_conn.get_distros():
print("服务器上提供好的分发版本 : ",item.get("name"))
print("- " * 20)
# 获取所有的profile 系统分发对应的配置文件
# print(cobbler_conn.get_profiles())
for item in cobbler_conn.get_profiles():
print("系统分发对应的配置文件 : ",item.get("name"))
print("- " * 20)
#获取系统绑定信息
# print(cobbler_conn.get_systems())
for item in cobbler_conn.get_systems():
print("系统分发对应的配置文件 : ",item.get("name"))
print("- " * 20) 1.7.2配置服务器上的信息
创建一个新机器 生成MAC地址 配置完下面的配置 开机就ok了
from os import system
import xmlrpc.client as xc
cobbler_url= "http://192.168.232.128/cobbler_api"
cobbler_user = "cobbler"
cobbler_password="cobbler"

#创建cobbler的链接
cobbler_conn = xc.Server(cobbler_url)

#cobblerAPI认证 获取token令牌

def getUserToken():
	user_token = cobbler_conn.login(cobbler_user,cobbler_password)
	return user_token

# 创建一个系统的绑定
def createNewSystem():
    user_token = getUserToken()
    #创建新的系统绑定对象; cobbler system add
    system_obj = cobbler_conn.new_system(user_token)

    #配置系统绑定对象的信息
    cobbler_conn.modify_system(system_obj,"name","vm02_centos65",user_token)
    cobbler_conn.modify_system(system_obj,"hostname","node02.linxu.com",user_token)
    cobbler_conn.modify_system(system_obj,"modify_interface", {
        "macaddress-eth0": "00:50:56:34:D4:24",
        "ipaddress-eth0": "192.168.232.138",
        "gateway-eth0": "192.168.232.2",
        "nameservers-eth0": "114.114.114.114",
        "static-eth0": 1
    } ,user_token)
    cobbler_conn.modify_system(system_obj,"profile","CentOS65-x86_64",user_token)

    #保存systen配置 同步到cobbler服务器
    cobbler_conn.save_system(system_obj,user_token)

    #同步配置
    cobbler_conn.sync(user_token)

if  __name__ == "__main__":
    createNewSystem()


 898
898


 被折叠的 条评论
为什么被折叠?
被折叠的 条评论
为什么被折叠?
 到【灌水乐园】发言


