


一、创建功能包
cd catkin_ws  #进入工作空间
catkin_create_pkg jubot_demo urdf xacro #创建功能包、添加依赖
cd jubot_demo/
mkdir urdf
mkdir launch
mkdir meshes #存放渲染机器人模型的文件
mkdir config #存放rviz配置的文件
二、urdf文件
<?xml version="1.0" ?>
<robot name="jubot">

<!--base_car-->>
    <link name="base_link">
        <visual>
            <origin xyz="0.0 0.0 0.0" rpy="0.0 0.0 0.0"/>
            <geometry>
                <cylinder radius="0.20" length="0.16"/>
            </geometry>
            <material name="yellow">
                <color rgba="1 0.4 0 1"/>
            </material>
        </visual>
    </link>

<!--left_wheel-->>
    <joint name="left_wheel_joint" type="continuous">
        <origin xyz="0.0 0.19 -0.05" rpy="0.0 0.0 0.0"/>
        <parent link="base_link"/>
        <child link="left_wheel_link"/>
        <axis xyz="0.0 1.0 0.0"/>
    </joint>

    <link name="left_wheel_link">
        <visual>
            <origin xyz="0.0 0.0 0.0" rpy="1.5707 0.0 0.0"/>
            <geometry>
                <cylinder radius="0.06" length="0.025"/>
            </geometry>
            <material name="white">
                <color rgba="1 1 1 0.9"/>
            </material>
        </visual>
    </link>

<!--right_wheel-->>
    <joint name="right_wheel_joint" type="continuous">
        <origin xyz="0.0 -0.19 -0.05"/>
        <parent link="base_link"/>
        <child link="right_wheel_link"/>
        <axis xyz="0.0 1.0 0.0"/>
    </joint>

    <link name="right_wheel_link">
        <visual>
            <origin xyz="0.0 0.0 0.0" rpy="1.5707 0.0 0.0"/>
            <geometry>
                <cylinder radius="0.06" length="0.025"/>
            </geometry>
            <material name="white">
                <color rgba="1 1.0 1.0 0.9"/>
            </material>
        </visual>
    </link>

<!--front_caster-->
    <joint name="front_caster_joint" type="continuous">
        <origin xyz="0.18 0.0 -0.095" rpy="0.0 0.0 0.0"/>
        <parent link="base_link"/>
        <child link="front_caster_link"/>
        <axis xyz="0.0 1.0 0.0"/>
    </joint>

    <link name="front_caster_link">
        <visual>
            <origin xyz="0.0 0.0 0.0" rpy="0.0 0.0 0.0"/>
                <geometry>
                    <sphere radius="0.015"/>
                </geometry>
                <material name="black">
                    <color rgba="0.0 0.0 0.0 0.95"/>
                </material>
        </visual>
    </link>

<!--back_caster-->
    <joint name="back_caster_joint" type="continuous">
        <origin xyz="-0.18 0.0 -0.095" rpy="0.0 0.0 0.0"/>
        <parent link="base_link"/>
        <child link="back_caster_link"/>
        <axis xyz="0.0 1.0 0.0"/>
    </joint>

    <link name="back_caster_link">
        <visual>
            <origin xyz="0.0 0.0 0.0" rpy="0.0 0.0 0.0"/>
                <geometry>
                    <sphere radius="0.015"/>
                </geometry>
            <material name="black">
                <color rgba="0.0 0.0 0.0 0.95"/>
            </material>
        </visual>
    </link>
</robot>
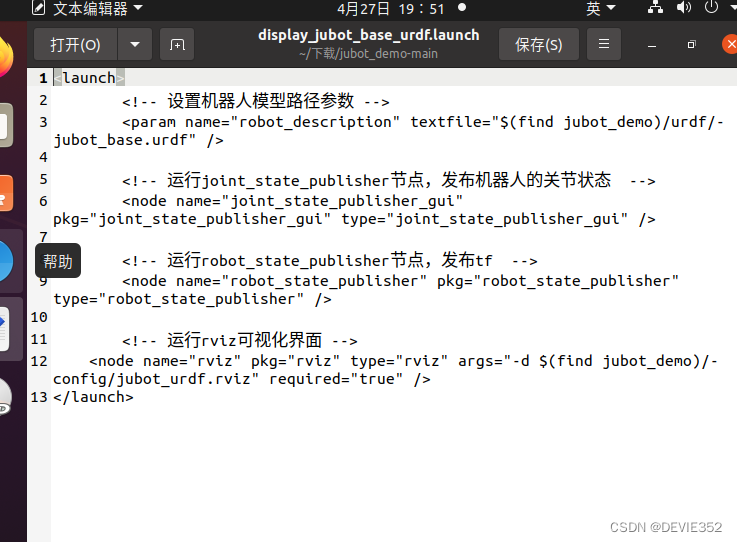
三、launch文件
<launch>
	<!-- 设置机器人模型路径参数 -->
	<param name="robot_description" textfile="$(find jubot_demo)/urdf/jubot_base.urdf" />

	<!-- 运行joint_state_publisher节点,发布机器人的关节状态  -->
	<node name="joint_state_publisher_gui" pkg="joint_state_publisher_gui" type="joint_state_publisher_gui" />

	<!-- 运行robot_state_publisher节点,发布tf  -->
	<node name="robot_state_publisher" pkg="robot_state_publisher" type="robot_state_publisher" />

	<!-- 运行rviz可视化界面 -->
    <node name="rviz" pkg="rviz" type="rviz" args="-d $(find jubot_demo)/config/jubot_urdf.rviz" required="true" />
</launch>
四、图形化显示 安装语法工具
sudo apt-get install liburdfdom-tools
在urdf文件夹下打开终端检查语法
check_urdf jubot_base.urdf
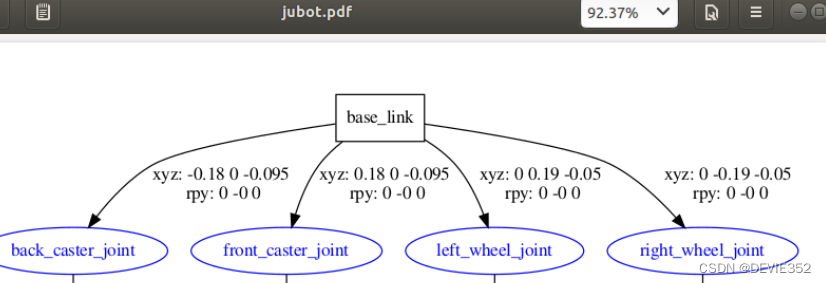
在urdf文件夹下打开终端,图形化显示URDF模型
urdf_to_graphiz jubot_base.urdf
五、RVIZ可视化
启动launch文件
roslaunch jubot_demo display_jubot_base_urdf.launch
启动rviz
rviz

六、再写一个urdf模型
依然是一个urdf文件和launch文件
跟上面的差不多,只是在参数上稍微做了修改,结构还是一个底座4个轮子
修改参数修改结构,就可以仿真出自己想要的小车模型
七、URDF文件转xacro文件,并加入控制插件
我们知道xacro文件是针对URDF模型产生的另一种精简版、可复用、模块化的描述形式。首先创建一个与urdf对应文件名的.xacro文件,我们在模型< robot>标签中加入xacro的声明:
<?xml version="1.0" encoding="utf-8"?>
<robot name="tianbot_mini_description" xmlns:xacro="http://www.ros.org/wiki/xacro">
添加传动装置
我们的机器人模型可看作一个两轮差速驱动的机器人,通过调节两个轮子的速度比例,完成前进、转向、倒退等动作。此时需要加入驱动机器人运动的动力源,为使用ROS控制驱动机器人,需要在模型中加入transmission元素,将传动装置与joint绑定。
 <!-- Transmission is important to link the joints and the controller -->
 <xacro:macro name="wheel" params="prefix reflect">
        <transmission name="${prefix}_wheel_joint_trans">
            <type>transmission_interface/SimpleTransmission</type>
            <joint name="${prefix}_wheel_joint" >
                <hardwareInterface>hardware_interface/VelocityJointInterface</hardwareInterface>
            </joint>
            <actuator name="${prefix}_wheel_joint_motor">
                <hardwareInterface>hardware_interface/VelocityJointInterface</hardwareInterface>
                <mechanicalReduction>1</mechanicalReduction>
            </actuator>
        </transmission>
    </xacro:macro>

 <wheel prefix="left"  reflect="1"/>
  <wheel prefix="right" reflect="-1"/>
添加gazebo控制器插件
我们直接加入gazebo提供的libgazebo_ros_diff_drive.so两轮差速插件,可以将其应用到现有的机器人模型上。
<!-- controller -->
        <gazebo>
            <plugin name="differential_drive_controller"
                    filename="libgazebo_ros_diff_drive.so">
                <rosDebugLevel>Debug</rosDebugLevel>
                <publishWheelTF>true</publishWheelTF>
                <robotNamespace>/</robotNamespace>
                <publishTf>1</publishTf>
                <publishWheelJointState>true</publishWheelJointState>
                <alwaysOn>true</alwaysOn>
                <updateRate>100.0</updateRate>
                <legacyMode>true</legacyMode>
                <leftJoint>left_wheel_joint</leftJoint>
                <rightJoint>right_wheel_joint</rightJoint>
                <wheelSeparation>0.1</wheelSeparation>
                <wheelDiameter>0.043</wheelDiameter>
                <broadcastTF>1</broadcastTF>
                <wheelTorque>30</wheelTorque>
                <wheelAcceleration>1.8</wheelAcceleration>
                <commandTopic>cmd_vel</commandTopic>
                <odometryFrame>odom</odometryFrame>
                <odometryTopic>odom</odometryTopic>
                <robotBaseFrame>base_footprint</robotBaseFrame>
            </plugin>
        </gazebo>
注意leftJoint和rightJoint标签中间要输入自己机器人的左右jointname,wheelSeparation和wheelDiameter标签中间要输入自己机器人的轮间距和轮直径。
到现在xacro文件已经配置好了,我们可以看一看总的
<?xml version="1.0" encoding="utf-8"?>
<robot name="tianbot_mini_description" xmlns:xacro="http://www.ros.org/wiki/xacro">
  <link
    name="base_link">
    <inertial>
      <origin
        xyz="0.025566 -0.0012293 0.024367"
        rpy="0 0 0" />
      <mass
        value="0.15009" />
   。
   。
   。
   中间太长,我给删了
   。
   。
   。
  <joint
    name="lidar_joint"
    type="fixed">
    <origin
      xyz="0.028391 -0.0024308 0.066849"
      rpy="0 0 0" />
    <parent
      link="base_link" />
    <child
      link="lidar_Link" />
    <axis
      xyz="0 0 0" />
  </joint>

<gazebo reference="base_link">
     <material>Gazebo/Red </material>
    </gazebo>
 <gazebo reference="right_wheel_link">
     <material>Gazebo/Black </material>
    </gazebo>
 <gazebo reference="left_wheel_link">
     <material>Gazebo/Black </material>
    </gazebo>
 <gazebo reference="caster_wheel_link">
     <material>Gazebo/Blue </material>
    </gazebo>


 <!-- Transmission is important to link the joints and the controller -->
 <xacro:macro name="wheel" params="prefix reflect">
        <transmission name="${prefix}_wheel_joint_trans">
            <type>transmission_interface/SimpleTransmission</type>
            <joint name="${prefix}_wheel_joint" >
                <hardwareInterface>hardware_interface/VelocityJointInterface</hardwareInterface>
            </joint>
            <actuator name="${prefix}_wheel_joint_motor">
                <hardwareInterface>hardware_interface/VelocityJointInterface</hardwareInterface>
                <mechanicalReduction>1</mechanicalReduction>
            </actuator>
        </transmission>
    </xacro:macro>

 <wheel prefix="left"  reflect="1"/>
  <wheel prefix="right" reflect="-1"/>
<!-- controller -->
        <gazebo>
            <plugin name="differential_drive_controller"
                    filename="libgazebo_ros_diff_drive.so">
                <rosDebugLevel>Debug</rosDebugLevel>
                <publishWheelTF>true</publishWheelTF>
                <robotNamespace>tianbot_mini</robotNamespace>
                <publishTf>1</publishTf>
                <publishWheelJointState>true</publishWheelJointState>
                <alwaysOn>true</alwaysOn>
                <updateRate>100.0</updateRate>
                <legacyMode>true</legacyMode>
                <leftJoint>left_wheel_joint</leftJoint>
                <rightJoint>right_wheel_joint</rightJoint>
                <wheelSeparation>0.1</wheelSeparation>
                <wheelDiameter>0.043</wheelDiameter>
                <broadcastTF>1</broadcastTF>
                <wheelTorque>30</wheelTorque>
                <wheelAcceleration>1.8</wheelAcceleration>
                <commandTopic>cmd_vel</commandTopic>
                <odometryFrame>odom</odometryFrame>
                <odometryTopic>odom</odometryTopic>
                <robotBaseFrame>base_footprint</robotBaseFrame>
            </plugin>
        </gazebo>


</robot>
现在的xacro文件可以通过launch文件打开,并且用键盘控制节点进行小车的控制


 3631
3631

 被折叠的 条评论
为什么被折叠?
被折叠的 条评论
为什么被折叠?
 到【灌水乐园】发言


