


1. 单目
1.1. 问题背景
我们现在有着的数据是
- 第 i i i帧相机位姿 R i R_i Ri, t i t_i ti, T i T_i Ti
- 第 i − 1 i-1 i−1帧相机位姿 R i − 1 R_{i-1} Ri−1, t i − 1 t_{i-1} ti−1, T i − 1 T_{i-1} Ti−1
- 这两帧中已经匹配好的某个特征点在两帧之中的归一化坐标 P i P_i Pi, P i − 1 P_{i-1} Pi−1
我们需要求解的是这个特征点在世界坐标系的坐标 P w P_w Pw以及深度 s i s_i si, s i − 1 s_{i-1} si−1
1.2. 推导过程
1.2.1. 世界坐标的推导
首先我们考虑
P
w
P_w
Pw的齐次坐标,方便维度对齐
P
w
=
(
X
w
,
Y
w
,
Z
w
,
1
)
(1)
P_w=(X_w,Y_w,Z_w,1)\tag1
Pw=(Xw,Yw,Zw,1)(1)
考虑相机模型,其中
P
c
1
P_{c1}
Pc1,
P
c
2
P_{c2}
Pc2为第
i
i
i帧和第
i
−
1
i-1
i−1帧特征点在相机坐标系的坐标
P
c
1
=
[
R
i
∣
t
i
]
P
w
(2)
P_{c1}=\left[\begin{matrix}R_i&|&t_i\end{matrix}\right]P_w\tag2
Pc1=[Ri∣ti]Pw(2)
将 P c 1 P_{c1} Pc1, P c 2 P_{c2} Pc2转换为归一化坐标
Z c 1 P i = [ R i ∣ t i ] P w = [ u i v i 1 ] 3 × 1 = T i 3 × 4 [ X w Y w Z w 1 ] 4 × 1 → P i = T P w (3) Z_{c1}P_i=\left[\begin{matrix}R_i&|&t_i\end{matrix}\right]P_w=\left[\begin{matrix}u_i\\v_i\\1\end{matrix}\right]_{3\times1}=T_{i_{3\times4}}\left[\begin{matrix}X_w\\Y_w\\Z_w\\1\end{matrix}\right]_{4\times1}\\\rightarrow P_i=TP_w\tag3 Zc1Pi=[Ri∣ti]Pw= uivi1 3×1=Ti3×4 XwYwZw1 4×1→Pi=TPw(3)
根据
(
3
)
(3)
(3)这个等式,
P
i
P_i
Pi和
T
P
w
TP_w
TPw共线,所以它们的叉积为0
P
i
×
T
P
w
=
0
(4)
P_i\times TP_w=0\tag4
Pi×TPw=0(4)
P i ∧ T P w = 0 (5) P_i^{\wedge}TP_w=0\tag5 Pi∧TPw=0(5)
P i ∧ = [ 0 − 1 v i 1 0 − u i − v i u i 0 ] (6) P_i^{\wedge}=\left[\begin{matrix}0&-1&v_i\\1&0&-u_i\\-v_i&u_i&0\end{matrix}\right]\tag6 Pi∧= 01−vi−10uivi−ui0 (6)
为了方便展开,我们将
T
T
T用一种简单的方式展开
T
=
[
r
1
r
2
r
3
]
(7)
T=\left[\begin{matrix}r_1\\r_2\\r_3\end{matrix}\right]\tag7
T=
r1r2r3
(7)
那么(5)可以表示为
[
0
−
1
v
i
1
0
−
u
i
−
v
i
u
i
0
]
[
r
1
r
2
r
3
]
P
w
=
[
−
r
2
+
v
i
r
3
r
1
−
u
i
r
3
]
P
w
=
0
(8)
\left[\begin{matrix}0&-1&v_i\\1&0&-u_i\\-v_i&u_i&0\end{matrix}\right]\left[\begin{matrix}r_1\\r_2\\r_3\end{matrix}\right]P_w=\left[\begin{matrix}{-r_2+v_ir_3}\\{r_1-u_ir_3}\end{matrix}\right]P_w=0\tag8
01−vi−10uivi−ui0
r1r2r3
Pw=[−r2+vir3r1−uir3]Pw=0(8)
同理,对于第
i
−
1
i-1
i−1帧
[
−
r
2
+
v
i
−
1
r
3
r
1
−
u
i
−
1
r
3
]
P
w
=
0
(9)
\left[\begin{matrix}{-r_2+v_{i-1}r_3}\\{r_1-u_{i-1}r_3}\end{matrix}\right]P_w=0\tag9
[−r2+vi−1r3r1−ui−1r3]Pw=0(9)
如今我们有四个约束式子,且形式都是
A
x
=
b
Ax=b
Ax=b的形式,那么我们用SVD方法求解这两个方程,通过SVD解得了四个数
x
0
x_0
x0,
x
1
x_1
x1,
x
2
x_2
x2,
x
3
x_3
x3,那么
特征点在世界坐标系的的三维坐标为:
P
w
=
[
X
w
Y
w
Z
w
1
]
=
[
x
0
x
3
x
1
x
3
x
2
x
3
1
]
0
(1)
P_w=\left[\begin{matrix}X_w\\Y_w\\Z_w\\1\end{matrix}\right]=\left[\begin{matrix}\frac{x_0}{x_3}\\\frac{x_1}{x_3}\\\frac{x_2}{x_3}\\1\end{matrix}\right]\tag10
Pw=
XwYwZw1
=
x3x0x3x1x3x21
0(1)
1.2.2. 深度计算
如今我们有了特征点的世界坐标和变换矩阵,那么我们求解特征点在相机坐标系中的坐标就可以解出了
Z
c
1
P
c
1
=
[
R
i
∣
t
i
]
P
w
1
(1)
Z_{c1}P_{c1}=\left[\begin{matrix}R_i&|&t_i\end{matrix}\right]P_w\tag11
Zc1Pc1=[Ri∣ti]Pw1(1)
Z
c
2
P
c
2
=
[
R
i
−
1
∣
t
i
−
1
]
P
w
2
(1)
Z_{c2}P_{c2}=\left[\begin{matrix}R_{i-1} &|& t_{i-1}\end{matrix}\right]P_w\tag12
Zc2Pc2=[Ri−1∣ti−1]Pw2(1)
其中
Z
c
1
Z_{c1}
Zc1和
Z
c
2
Z_{c2}
Zc2就是我们需要的深度了
2.双目
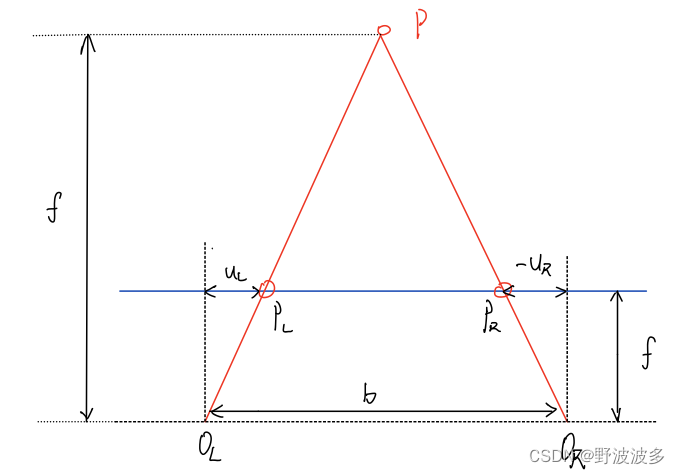
- O L O_L OL, O R O_R OR:左右光圈中心
- 蓝色框为成像平面, f f f为焦距
-
u
R
u_R
uR,
u
R
u_R
uR:成像平面的坐标
因为 Δ P P L P R ∼ Δ P O L O R \Delta PP_LP_R \sim \Delta PO_LO_R ΔPPLPR∼ΔPOLOR
z − f z = b − u L + u R b (13) \frac{z-f}{z} = \frac{b-u_L+u_R}{b}\tag{13} zz−f=bb−uL+uR(13)
所以
z = f b d z = \frac{fb}{d} z=dfb
其中
z z z:深度
d d d:左右图像横坐标之差, u L − u R u_L-u_R uL−uR
3. 代码实践
#include <iostream>
#include <vector>
#include <random>
#include <Eigen/Core>
#include <Eigen/SVD>
#include <Eigen/Dense>
#include <Eigen/Geometry>
#include <Eigen/Eigenvalues>

using namespace Eigen;
struct Pose
{
    Pose(Eigen::Matrix3d R, Eigen::Vector3d t) : Rwc(R), qwc(R), twc(t){};
    Eigen::Matrix3d Rwc;
    Eigen::Quaterniond qwc;
    Eigen::Vector3d twc;

    Eigen::Vector2d uv; // 这帧图像观测到的特征坐标
};
int main()
{

    int poseNums = 10;
    double radius = 8;
    double fx = 1.;
    double fy = 1.;
    std::vector<Pose> camera_pose;
    for (int n = 0; n < poseNums; ++n)
    {
        double theta = n * 2 * M_PI / (poseNums * 4); // 1/4 圆弧
        // 绕 z轴 旋转
        Eigen::Matrix3d R;
        R = Eigen::AngleAxisd(theta, Eigen::Vector3d::UnitZ());
        Eigen::Vector3d t = Eigen::Vector3d(radius * cos(theta) - radius, radius * sin(theta), 1 * sin(2 * theta));
        camera_pose.push_back(Pose(R, t));
    }

    // 随机数生成 1 个 三维特征点
    std::default_random_engine generator;
    std::uniform_real_distribution<double> xy_rand(-4, 4.0);
    std::uniform_real_distribution<double> z_rand(8., 10.);
    double tx = xy_rand(generator);
    double ty = xy_rand(generator);
    double tz = z_rand(generator);

    Eigen::Vector3d Pw(tx, ty, tz);
    // 这个特征从第三帧相机开始被观测,i=3
    int start_frame_id = 3;
    int end_frame_id = poseNums;
    for (int i = start_frame_id; i < end_frame_id; ++i)
    {
        Eigen::Matrix3d Rcw = camera_pose[i].Rwc.transpose(); // to camera from world 旋转
        Eigen::Vector3d Pc = Rcw * (Pw - camera_pose[i].twc); // 平移

        double x = Pc.x();
        double y = Pc.y();
        double z = Pc.z();

        camera_pose[i].uv = Eigen::Vector2d(x / z, y / z); // 每次观测,归一化平面坐标
    }

    /// TODO::homework; 请完成三角化估计深度的代码
    // 遍历所有的观测数据,并三角化
    Eigen::Vector3d P_est;
    // 结果保存到这个变量
    P_est.setZero();
    /* your code begin */
    auto loop_times = camera_pose.size() - start_frame_id;
    Eigen::MatrixXd D((loop_times) * 2, 4);
    for (int j = 0; j < loop_times; ++j)
    {
        Eigen::MatrixXd T_tmp(3, 4);
        T_tmp.block<3, 3>(0, 0) = camera_pose[j + 3].Rwc.transpose();
        T_tmp.block<3, 1>(0, 3) = -camera_pose[j + 3].Rwc.transpose() *
                                  camera_pose[j + 3].twc;
        auto P_k1 = T_tmp.block<1, 4>(0, 0);
        auto P_k2 = T_tmp.block<1, 4>(1, 0);
        auto P_k3 = T_tmp.block<1, 4>(2, 0);
        D.block<1, 4>(2 * j, 0) = camera_pose[j + 3].uv[0] * P_k3 - P_k1;
        D.block<1, 4>(2 * j + 1, 0) = camera_pose[j + 3].uv[1] * P_k3 -
                                      P_k2;
    }
    Eigen::Matrix4d D_res = D.transpose() * D;
    Eigen::JacobiSVD<Eigen::Matrix4d> svd(D_res, Eigen::ComputeFullU |
                                                     Eigen::ComputeFullV);
    auto res_U = svd.matrixU();
    auto res_V = svd.matrixV();
    // std::cout << "Trans=" << Trans.rows() << " " << Trans.cols() << std::endl;
    std::cout << "U=" << res_U << std::endl;
    auto tmp = res_U.rightCols(1);
    std::cout << "res=" << tmp / tmp(3) << std::endl;
    /* your code end */
    std::cout << "ground truth: \n"
              << Pw.transpose() << std::endl;
    std::cout << "your result: \n"
              << P_est.transpose() << std::endl;
    return 0;
}


 3801
3801


 被折叠的 条评论
为什么被折叠?
被折叠的 条评论
为什么被折叠?
 到【灌水乐园】发言


