


基于YOLOv11的目标检测系统
前言
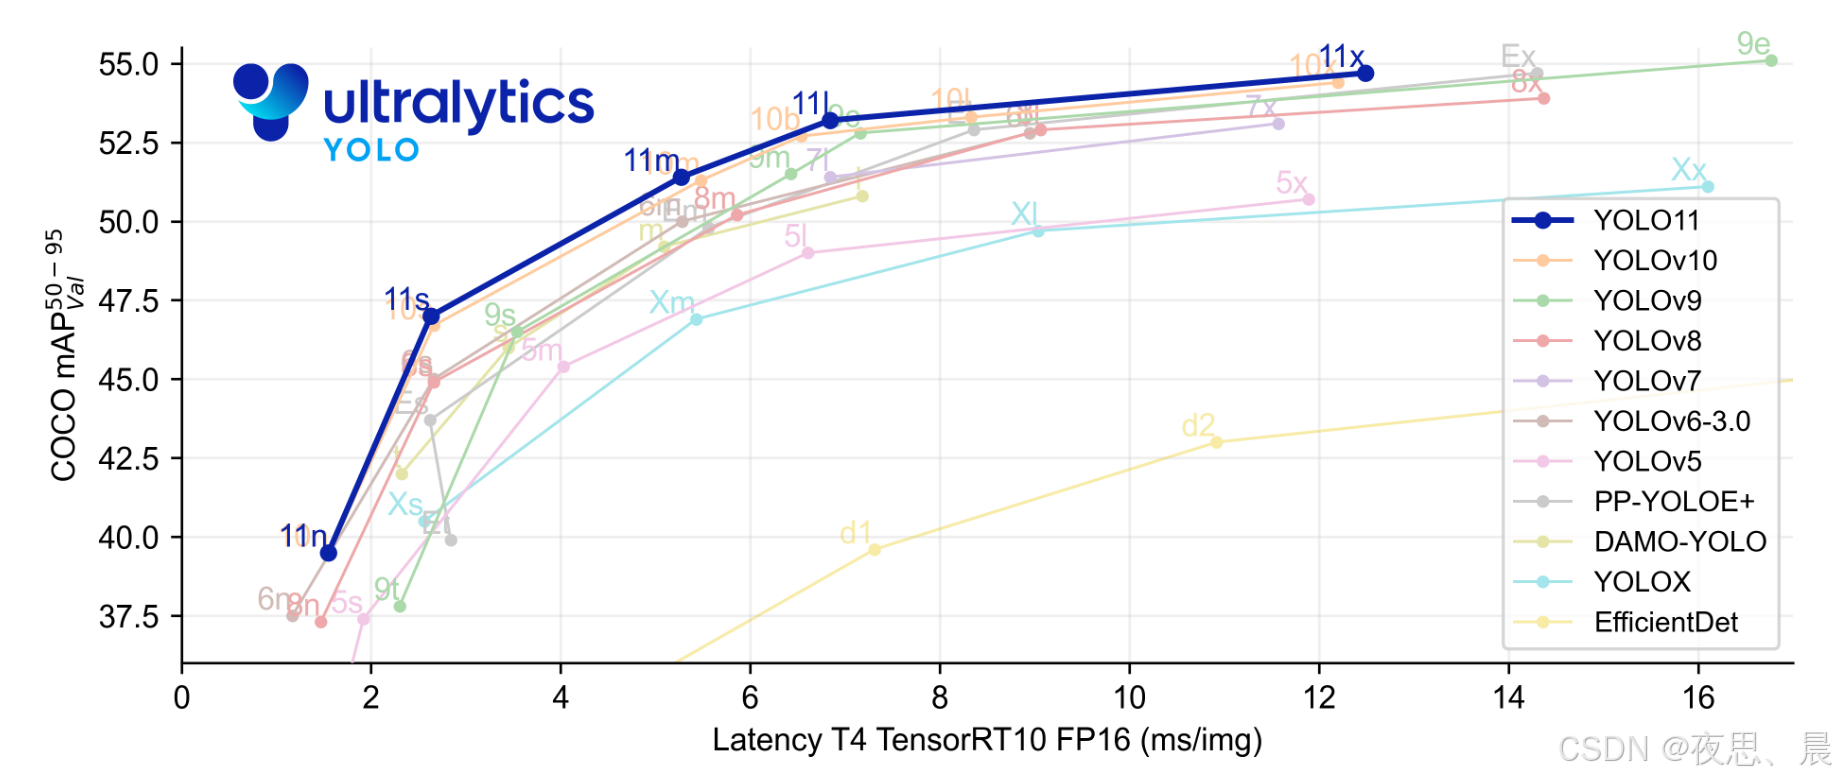
YOLO11 是 Ultralytics YOLO 是实时物体检测器系列中的最新产品,以最先进的精度、速度和效率重新定义了可能实现的目标。在之前YOLO 版本令人印象深刻的进步基础上,YOLO11 在架构和训练方法上进行了重大改进,使其成为广泛的计算机视觉任务的多功能选择。YOLOv11在COCO数据集的表现如下图:
一、软件简介
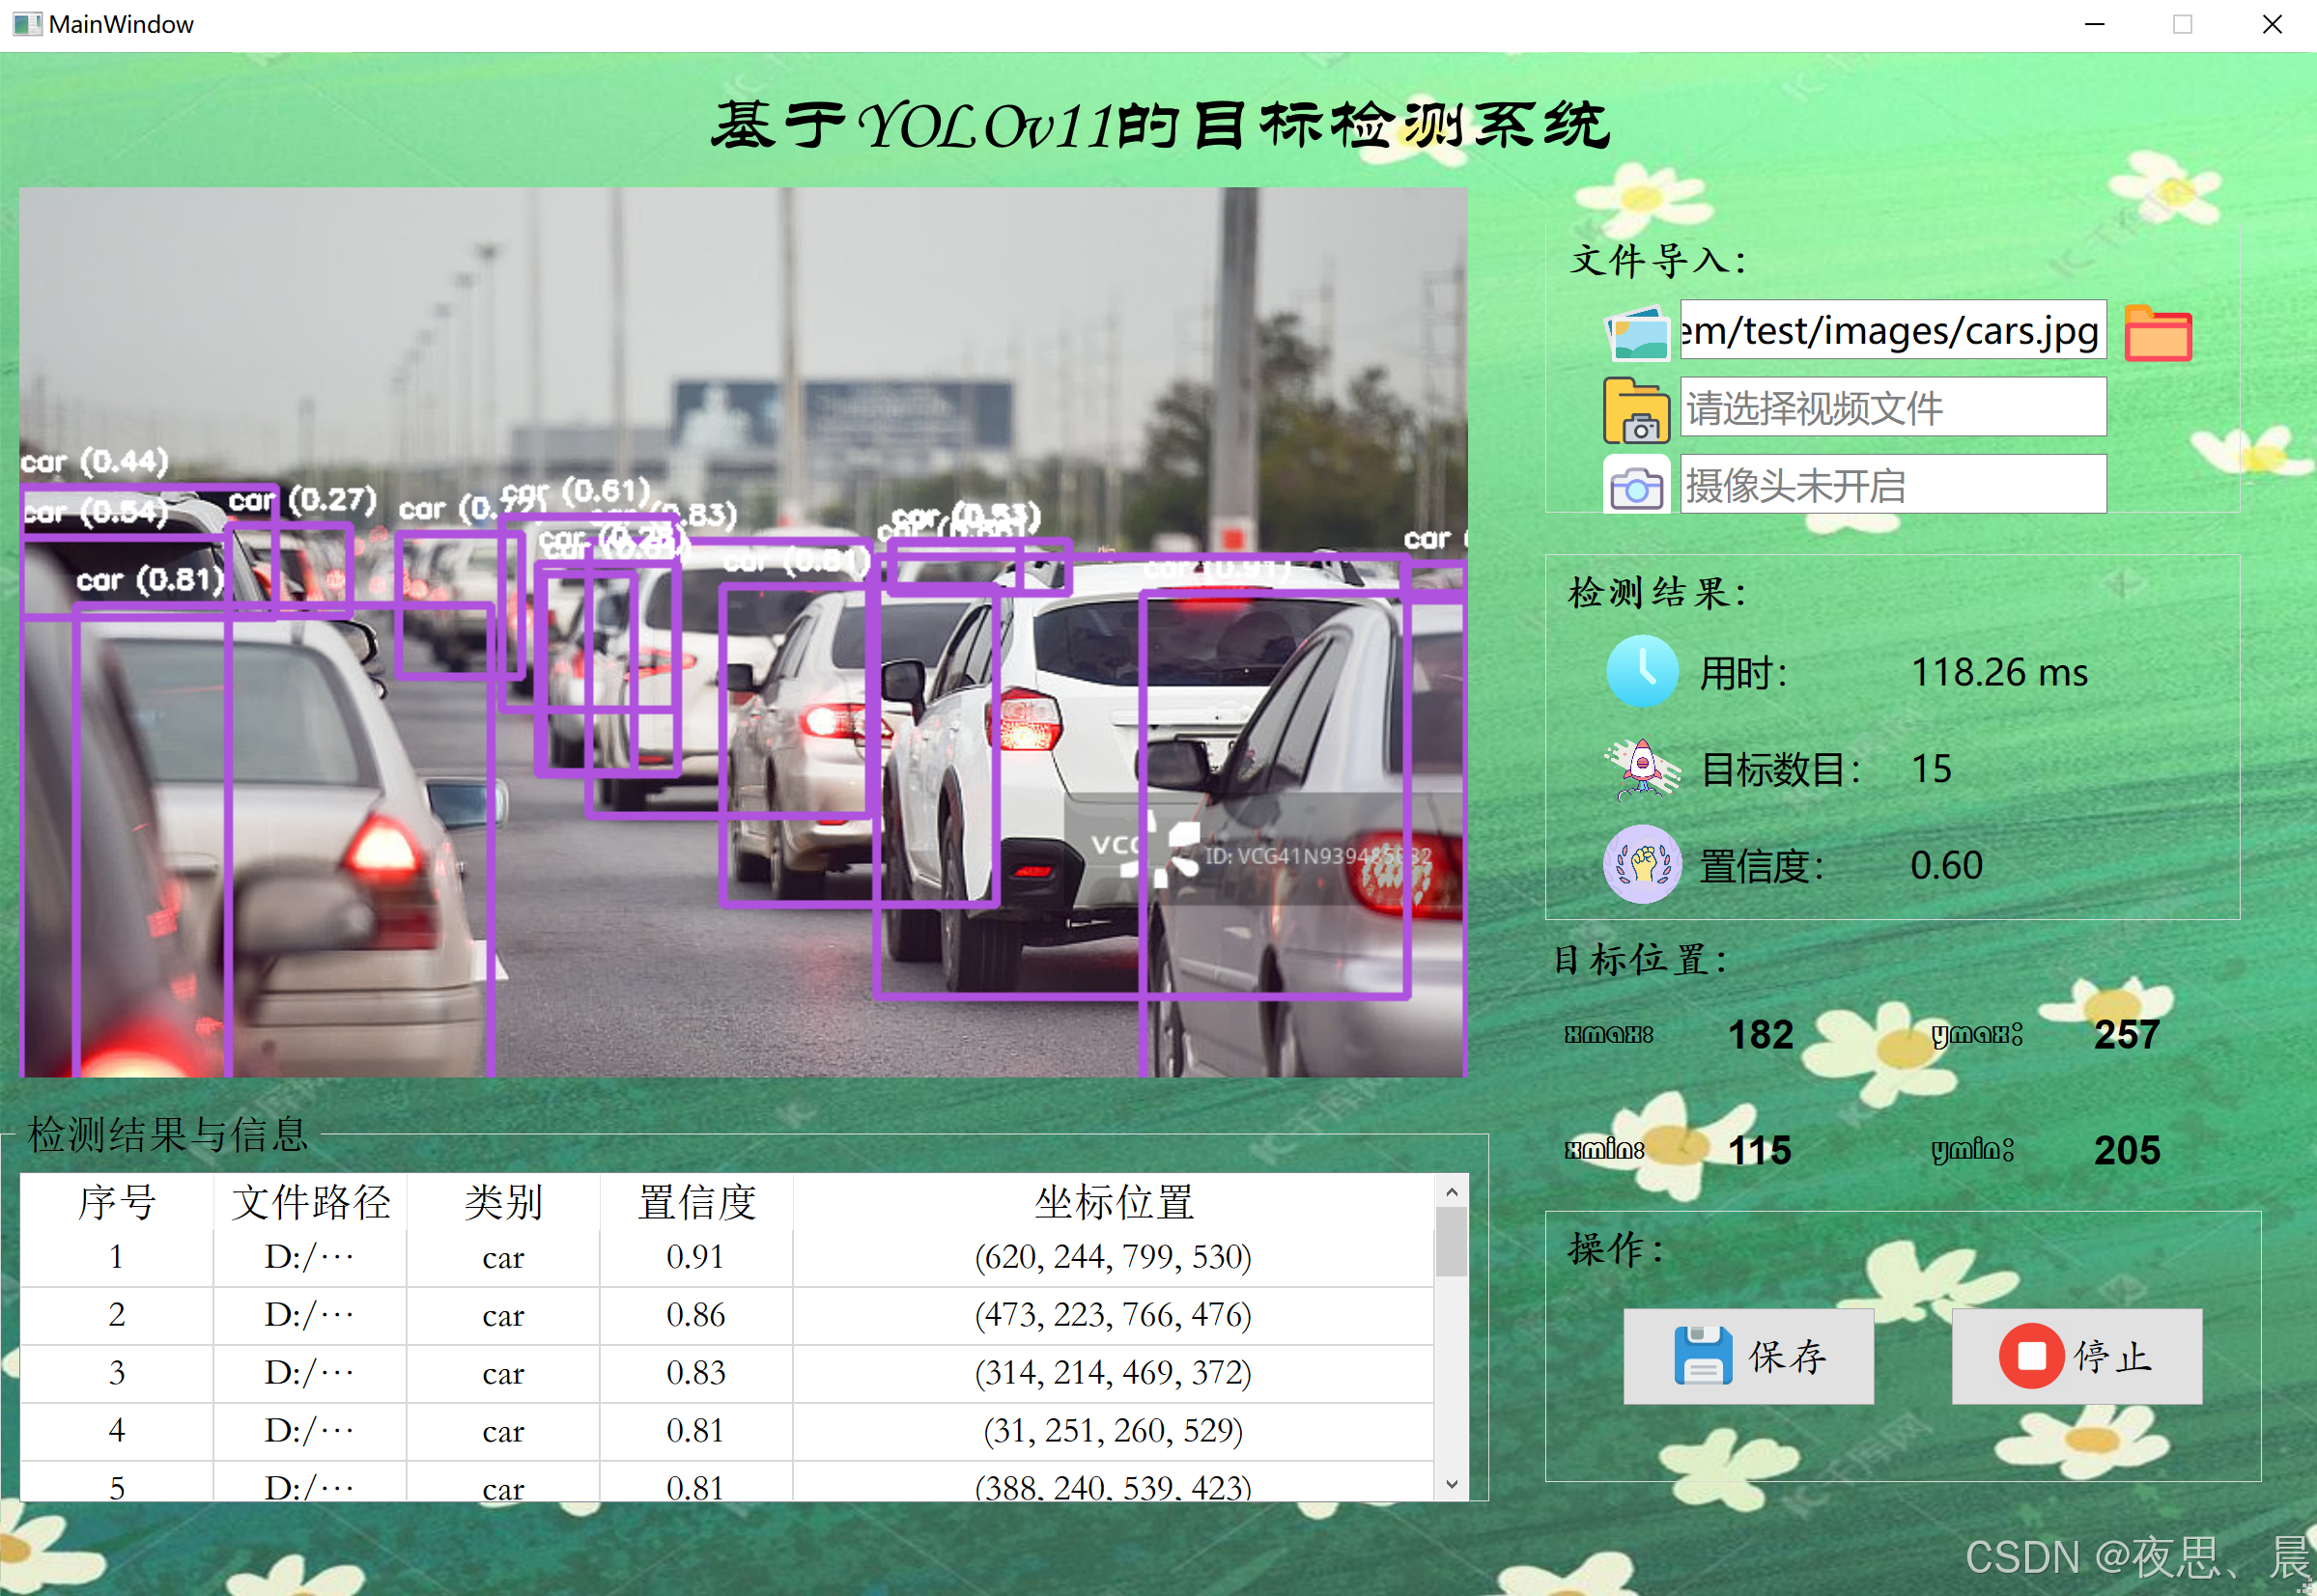
这款软件是一种基于最新YOLOv11算法的目标检测工具,旨在为用户提供高效、准确的目标识别和分析功能。它支持多种数据输入方式,包括单张图片、批量图片、视频文件以及实时摄像头输入,满足不同场景的需求。检测结果以直观的标注图和详细的数据列表形式呈现,并支持结果导出,方便用户进行后续分析和处理。
二、开发目的
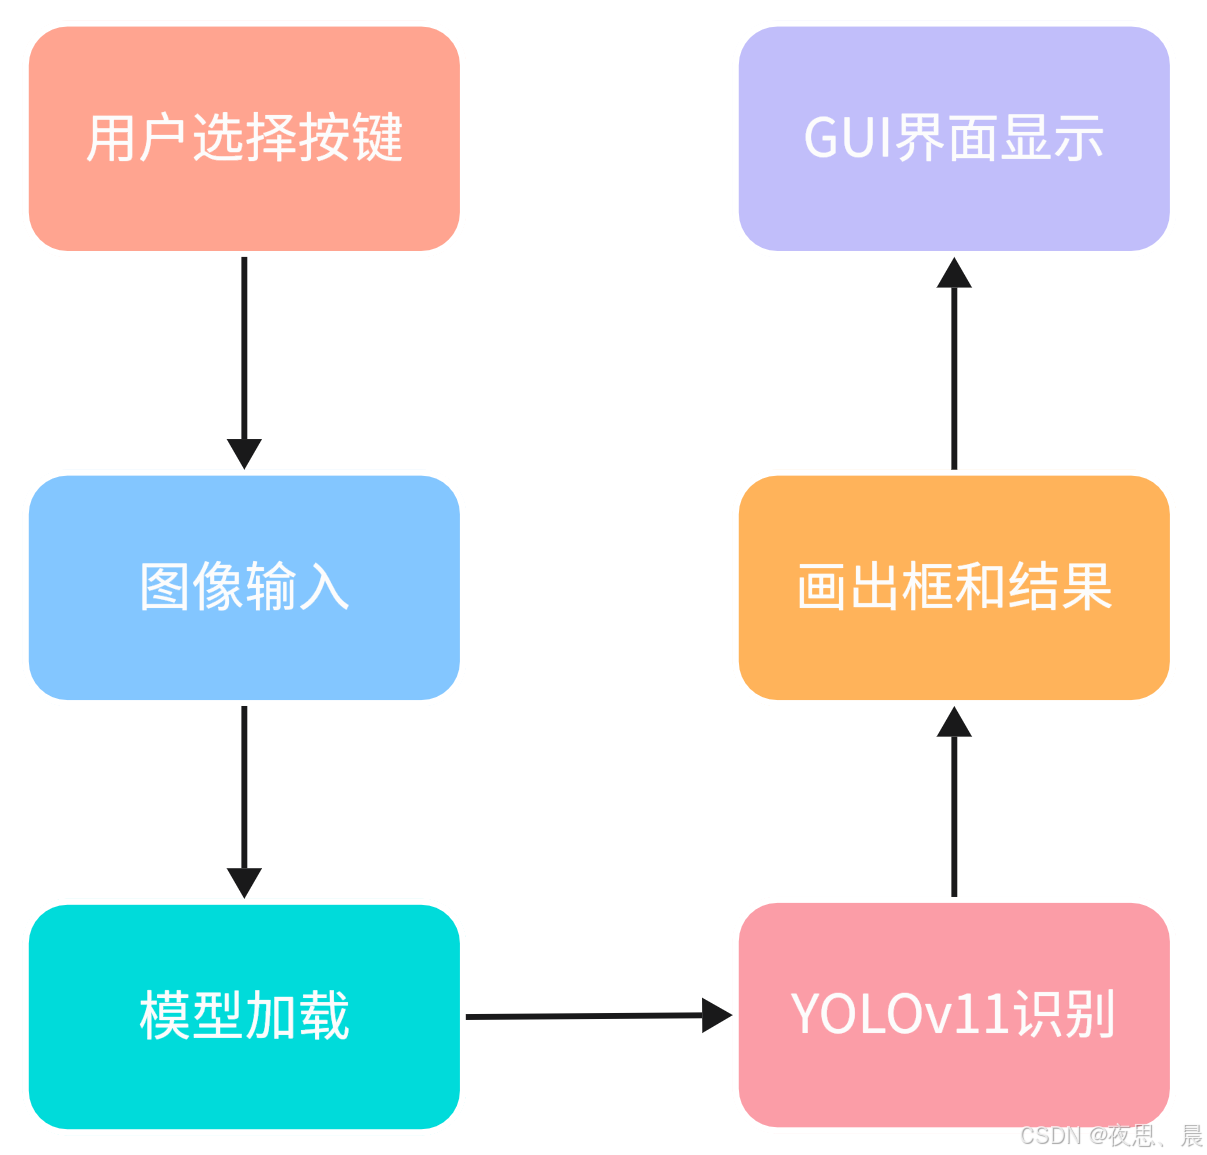
该软件的开发旨在提供一个高效、易用的目标检测工具,满足安防监控、智能交通和科研学习等领域的需求。通过集成先进的YOLOv11算法,用户可以快速进行目标检测,获取准确的识别结果,提升工作效率。总体框架如下:
三、软件主要功能
该软件具备以下主要功能:
- 图片目标检测:支持单张图片的目标检测,快速获取目标类别、置信度和位置信息。
- 文件夹图片批量检测:可对文件夹中的多张图片进行批量检测,提高处理效率。
- 本地视频文件识别:支持对本地视频文件进行逐帧分析,检测视频中的目标。
- 摄像头目标识别:实时调用摄像头,进行动态目标检测,适用于实时监控场景。
- 停止清除功能:提供任务中断和界面清除功能,方便用户重新开始检测或切换任务。
- 保存功能:支持将检测结果导出保存,便于后续分析和归档。

四、技术特点
该软件的技术特点包括:
- 高效算法:基于YOLOv11,具备高精度和实时检测能力。
- 多样化输入:支持图片、批量图片、视频和实时摄像头输入,满足不同用户需求。
- 结果直观:检测结果以标注图、统计信息和列表形式展示,清晰易懂。
- 操作便捷:界面友好,提供结果保存与任务管理功能,提升用户体验。
- 广泛适用性:适用于安防、交通等多个行业场景,提供灵活的检测解决方案。
五、初始化模型
# YOLOv11 示例代码
import torch
from ultralytics import YOLO

class YOLOPredict():
    def __init__(self, weight, data, input_size=(640, 640)):
        self.device = torch.device("cuda" if torch.cuda.is_available() else "cpu")
        print(f"Using device: {self.device}")
        self.model = YOLO(weight).to(self.device)
        self.input_size = input_size
        self.classes = self.load_classes(data)
六、导入coco.yaml文件
def load_classes(self, data):
        with open(data, 'r') as file:
            data = yaml.load(file, Loader=yaml.FullLoader)
            return data['names']
coco.yaml文件
# Classes
names:
  0: person
  1: bicycle
  2: car
  3: motorcycle
  4: airplane
  5: bus
  6: train
  7: truck
  8: boat
  9: traffic light
  10: fire hydrant
  11: stop sign
  12: parking meter
  13: bench
  14: bird
  15: cat
  16: dog
  17: horse
  18: sheep
  19: cow
  20: elephant
  21: bear
  22: zebra
  23: giraffe
  24: backpack
  25: umbrella
  26: handbag
  27: tie
  28: suitcase
  29: frisbee
  30: skis
  31: snowboard
  32: sports ball
  33: kite
  34: baseball bat
  35: baseball glove
  36: skateboard
  37: surfboard
  38: tennis racket
  39: bottle
  40: wine glass
  41: cup
  42: fork
  43: knife
  44: spoon
  45: bowl
  46: banana
  47: apple
  48: sandwich
  49: orange
  50: broccoli
  51: carrot
  52: hot dog
  53: pizza
  54: donut
  55: cake
  56: chair
  57: couch
  58: potted plant
  59: bed
  60: dining table
  61: toilet
  62: tv
  63: laptop
  64: mouse
  65: remote
  66: keyboard
  67: cell phone
  68: microwave
  69: oven
  70: toaster
  71: sink
  72: refrigerator
  73: book
  74: clock
  75: vase
  76: scissors
  77: teddy bear
  78: hair drier
  79: toothbrush
七、模型预测
# 检测识别示例代码
def detect_image(self, image):
        if isinstance(image, str):  # 传入文件路径
            image = cv2.imread(image)
            if image is None:  # 确保图像加载成功
                raise ValueError(f"Image at path {image} could not be loaded.")
        start_time = time.time()  # 开始计时
        try:
            detection_results = self.model(image)
        except Exception as e:
            print(f"Error during model inference: {e}")
            return [], image, 0, []
        end_time = time.time()
        inference_time = (end_time - start_time) * 1000  # 转换为毫秒
        results = []
        for r in detection_results[0]:
            xyxy = r.boxes.xyxy[0]
            conf = float(r.boxes.conf[0])
            cls = int(r.boxes.cls[0])
            x_min, y_min, x_max, y_max = map(int, xyxy)  # 转换为整数坐标
            result = {
                'class': self.classes[cls] if cls < len(self.classes) else 'Unknown',
                'confidence': round(conf, 2),
                'bbox': [x_min, y_min, x_max, y_max],
            }
            results.append(result)
            # 绘制检测框
            color = self.compute_color_for_labels(cls)
            cv2.rectangle(image, (x_min, y_min), (x_max, y_max), color, 4)
            label = f"{result['class']} ({result['confidence']})"
            cv2.putText(image, label, (x_min, y_min - 10), cv2.FONT_HERSHEY_SIMPLEX, 0.5, (255, 255, 255), 2)
        if not results:
            print("No detections found.")
            return [], image, inference_time
        return results, image, inference_time
八、背景图片改变大小脚本
from PIL import Image

def resize_image(input_path, output_path, size=(770, 440)):
    """
    将输入图片缩放至指定大小,并保存到输出路径。

    :param input_path: 原始图片路径
    :param output_path: 缩放后图片的保存路径
    :param size: 缩放后的大小(宽, 高)
    """
    with Image.open(input_path) as img:
        # 使用 LANCZOS 算法进行高质量缩放
        resized_img = img.resize(size, Image.LANCZOS)
        resized_img.save(output_path)
        print(f"图片已缩放并保存至: {output_path}")
# 示例用法
resize_image(r"D:\your\path\to\demo.jpg", "demo.jpg", size=(1200, 800))
九、目标识别系统项目
- 面包多:https://mbd.pub/o/bread/Z52Zlplx
- 闲鱼用户:欧阳孤云(头像为🐶)
- 功能:支持图片,文件内图片批量处理,本地视频文件,摄像头识别检测
- 哔哩哔哩展示
1、运行说明
- 创建虚拟环境
python -m venv venv
- 激活虚拟环境
activate ./venv/Scripts/activate
或者
./venv/Scripts/activate
如果遇到报错,执行以下指令,然后输入1回车,即可激活虚拟环境
Set-ExecutionPolicy RemoteSigned
Set-ExecutionPolicy -Scope CurrentUser
- 环境安装
pip install ultralytics == 8.3.57 PySide6 == 6.8.1 -i https://pypi.mirrors.ustc.edu.cn/simple/
- 运行程序
python mainprogram.py
十、总结
这款基于YOLOv11的目标检测系统,通过先进的算法和友好的用户界面,为各行业用户提供了高效、准确的目标检测工具。其多样化的功能和广泛的适用性,使其成为安防监控、智能交通和科研学习等领域的理想选择。
参考
https://github.com/ultralytics/ultralytics


 15万+
15万+

 被折叠的 条评论
为什么被折叠?
被折叠的 条评论
为什么被折叠?
 到【灌水乐园】发言


