


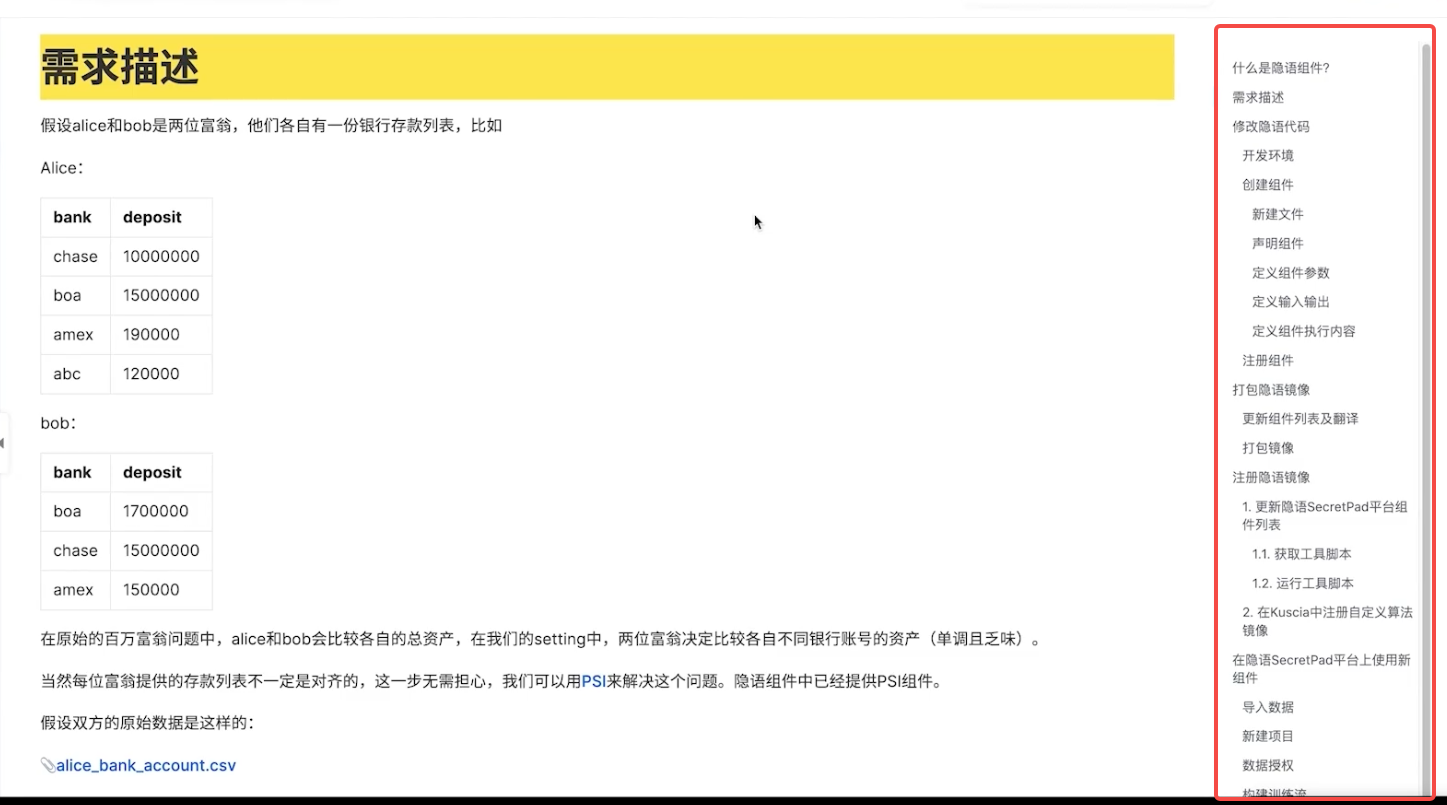
隐语第二期第11课《组件介绍与自定义开发》由蚂蚁隐私计算团队的冯骏老师主讲,主要介绍了隐语的组件标准、已有的组件能力以及进一步的自定义开发流程。本次笔记主要还是以分析记录为主。
隐语提出适用于隐私计算应用的一系列协议的集合,包括数据,组件,节点执行,运行报告等协议。
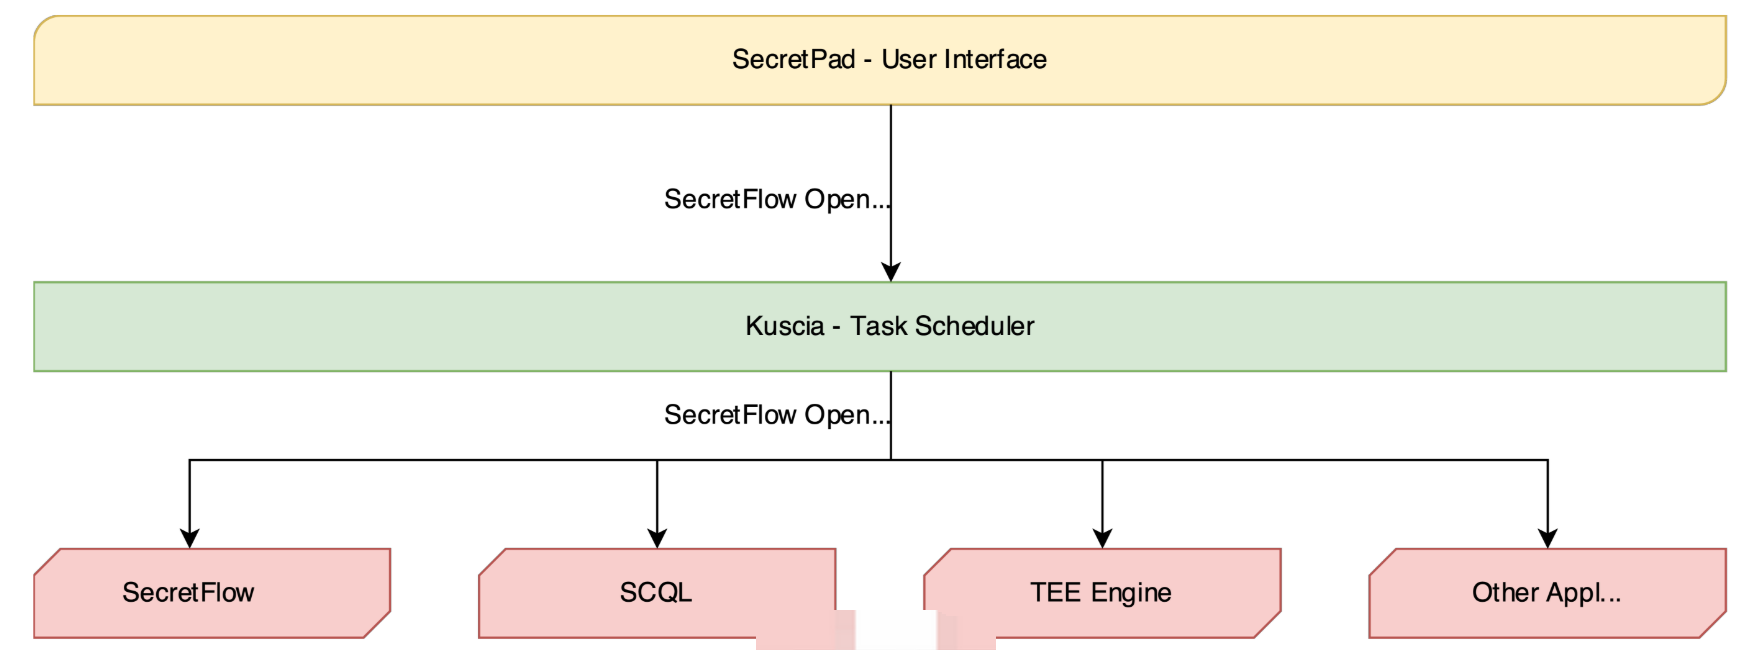
隐语开放标准被隐语生态系统使用,包括:
- SecretFlow:用于隐私保护数据分析和机器学习的统一框架。
- Kuscia:基于 K8s 的隐私保护计算任务编排框架。
- SecretPad:基于 Kuscia 框架的隐私保护计算 Web 平台,旨在为隐私保护数据智能和机器学习功能提供便捷访问。
- SCQL 和 TEE 引擎使用隐语开放标准。
1. 数据标准
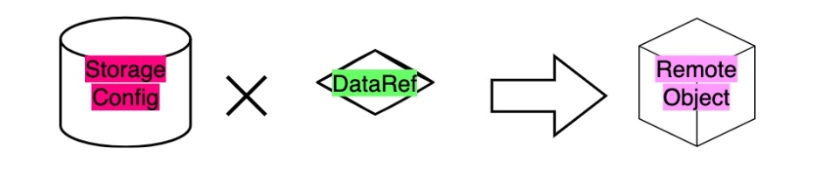
隐语对数据制定了面向隐私计算场景的标准定义,采用DistData,其中包含两种子类数据:(1)PublicData(可以公开的数据),包含name、type、meta、system_info等信息,不同的type对应不同的meta;(2)DataRef(远程数据的句柄引用,会指定对应的所有者(所有权)以及对应的URI),比如分散在各计算节点中的碎片数据就是一种远程的密态数据。
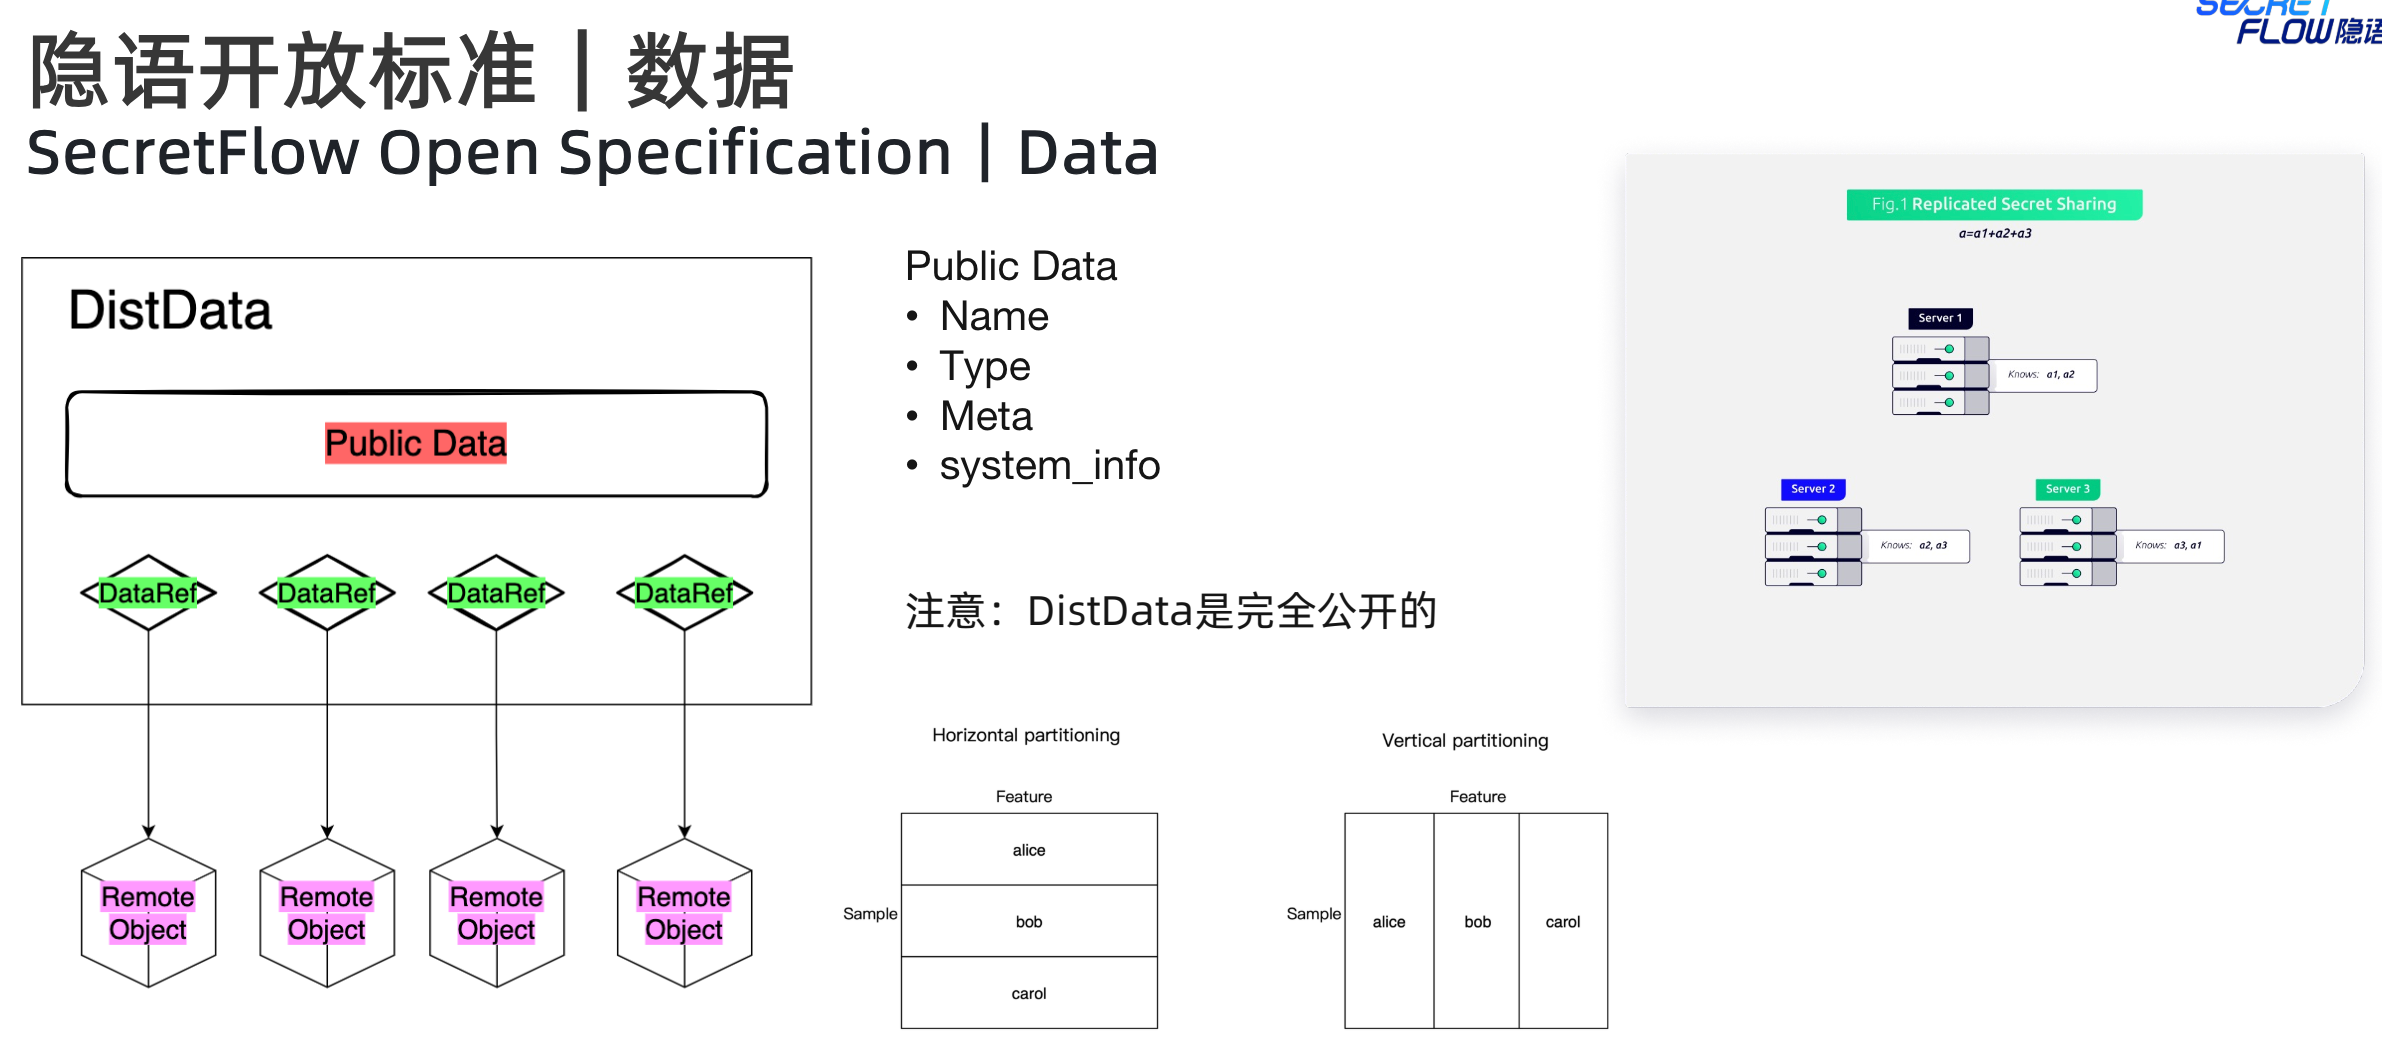
对于RemoteObject,指令需要根据所有者以及对应的URI找到对应的数据后,然后在所有者本地做处理操作。
隐语定义的proto文件,可以看下DistData结构
message DistData {
  // The name of this distributed data.
  string name = 1;

  // Type.
  string type = 2;

  // Describe the system information that used to generate this distributed
  // data.
  SystemInfo system_info = 3;

  // Public information, known to all parties.
  // i.e. VerticalTable.
  google.protobuf.Any meta = 4;

  // A reference to a data that is stored in the remote path.
  message DataRef {
    // The path information relative to StorageConfig of the party.
    string uri = 1;

    // The owner party.
    string party = 2;

    // The storage format, i.e. csv.
    string format = 3;
  }

  // Remote data references.
  repeated DataRef data_refs = 5;
}

// VerticalTable describes a virtual vertical partitioning table from multiple
// parties.
message VerticalTable {
  // The vertical partitioned slices' schema.
  // Must match data_refs in the parent DistData message.
  repeated TableSchema schemas = 1;

  // If -1, the number is unknown.
  int64 line_count = 2;
}

// IndividualTable describes a table owned by a single party.
message IndividualTable {
  // Schema.
  TableSchema schema = 1;

  // If -1, the number is unknown.
  int64 line_count = 2;
}

// The schema of a table.
// - A col must be one of `id | feature | label`. By default, it should be a
// feature.
// - All names must match the regexp `[A-Za-z0-9.][A-Za-z0-9_>./]*`.
// - All data type must be one of
// * int8
// * int16
// * int32
// * int64
// * uint8
// * uint16
// * uint32
// * uint64
// * float16
// * float32
// * float64
// * bool
// * int
// * float
// * str
message TableSchema {
  // Id column name(s).
  // Optional, can be empty.
  repeated string ids = 1;

  // Feature column name(s).
  repeated string features = 2;

  // Label column name(s).
  // Optional, can be empty.
  repeated string labels = 3;

  // Id column data type(s).
  // Len(id) should match len(id_types).
  repeated string id_types = 4;

  // Feature column data type(s).
  // Len(features) should match len(feature_types).
  repeated string feature_types = 5;

  // Label column data type(s).
  // Len(labels) should match len(label_types).
  repeated string label_types = 6;
}
2. 组件标准
首先是组件定义ComponentDef,包含以下重要信息,通过domain, name和 version定位具体的组件。这些基本信息,在业内应该属于事实性标准,看到很多其他厂商也是类似的定义。
- domain:组件的命名空间
- name:在命名空间中必须是唯一的
- version:组件的版本
- attributes:组件的属性
- inputs:组件的输入要求
- outputs:组件的输出要求
关于domain等信息,这里给出一个例子,帮助加深理解。domain可以理解为一个算法大类,比如这里是数据过滤模块,然后具体的组件名称为特征过滤模块,版本是0.0.1,且定义了输入和输出的数据类型。指定输入输出的类型,可以是多种类型。如果是表,可以进一步指定使用的列。还可以进一步指定每一选中列需要填入的参数。其他组件的定义可以看组件列表定义。
{
      "domain": "data_filter",
      "name": "feature_filter",
      "desc": "Drop features from the dataset.",
      "version": "0.0.1",
      "inputs": [
        {
          "name": "in_ds",
          "desc": "Input vertical table.",
          "types": [
            "sf.table.vertical_table"
          ],
          "attrs": [
            {
              "name": "drop_features",
              "desc": "Features to drop."
            }
          ]
        }
      ],
      "outputs": [
        {
          "name": "out_ds",
          "desc": "Output vertical table.",
          "types": [
            "sf.table.vertical_table"
          ]
        }
      ]
    },
此外,关于属性的定义规范,可以参考下述规则。
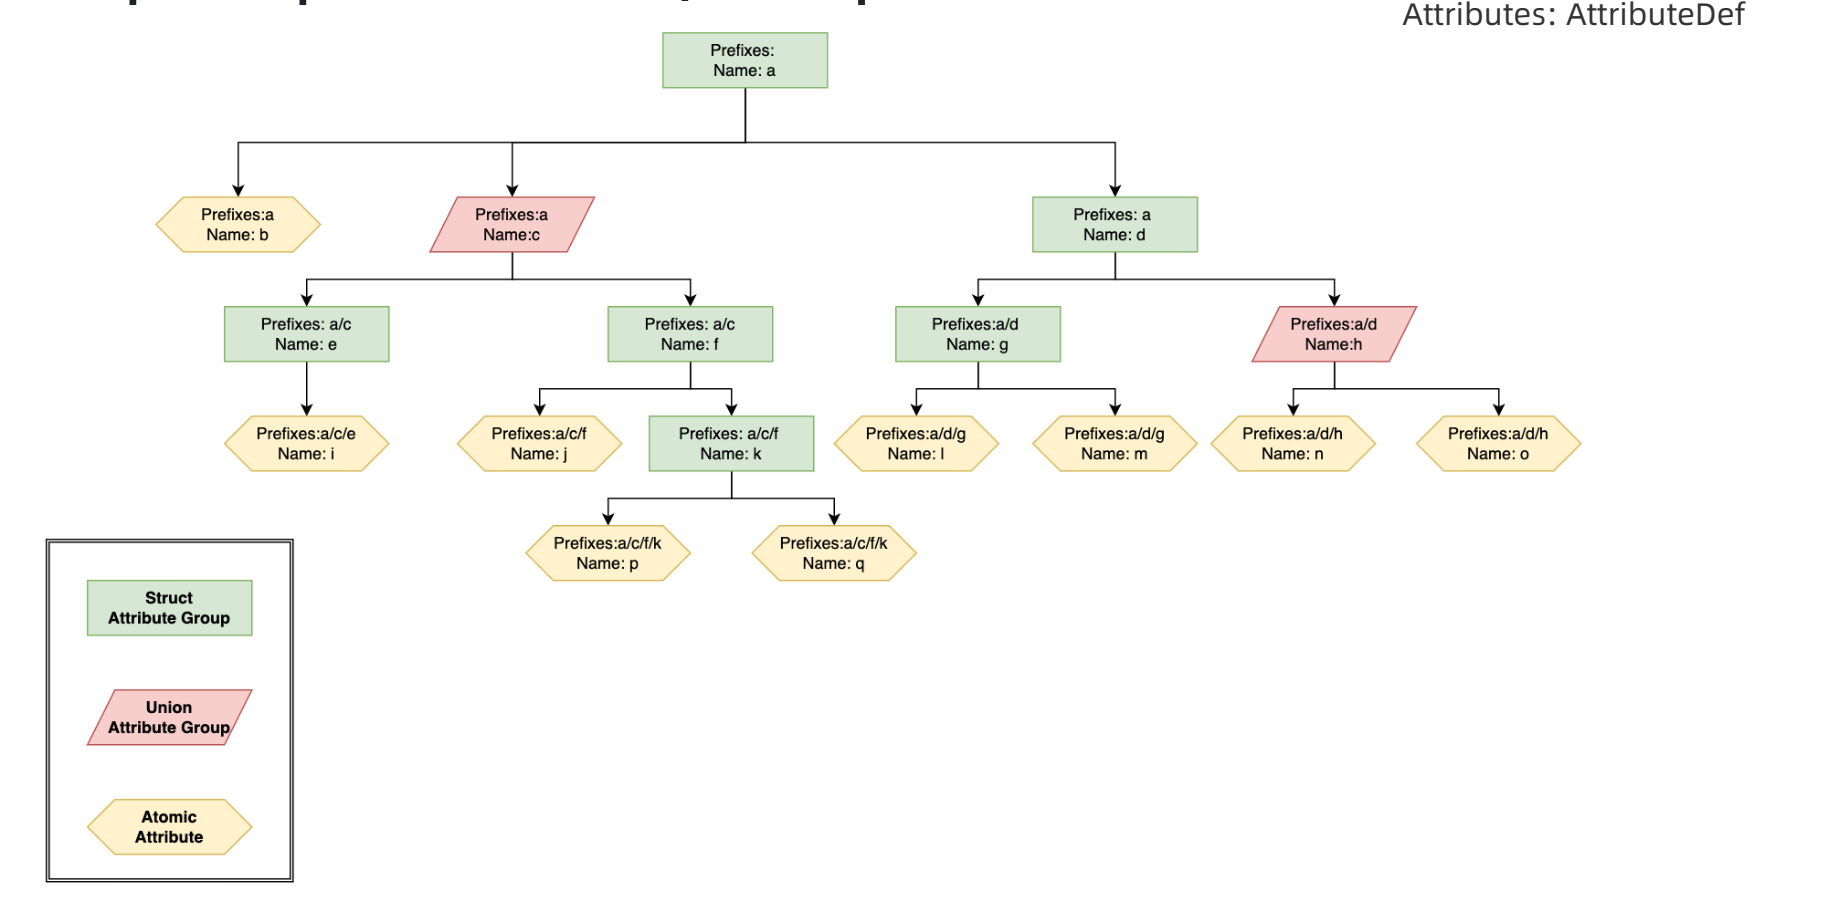
// Describe an attribute.
message AttributeDef {
  // Indicates the ancestors of a node,
  // e.g. `[name_a, name_b, name_c]` means the path prefixes of current
  // Attribute is `name_a/name_b/name_c/`.
  // Only `^[a-zA-Z0-9_.-]*$` is allowed.
  // `input` and `output` are reserved.
  repeated string prefixes = 1;

  // Must be unique in the same level just like Linux file systems.
  // Only `^[a-zA-Z0-9_.-]*$` is allowed.
  // `input` and `output` are reserved.
  string name = 2;

  string desc = 3;

  AttrType type = 4;

  // Extras for an atomic attribute.
  // Including: `AT_FLOAT | AT_INT | AT_STRING | AT_BOOL | AT_FLOATS | AT_INTS |
  // AT_STRINGS | AT_BOOLS`.
  message AtomicAttrDesc {
    // Only valid when type is `AT_FLOATS \| AT_INTS \| AT_STRINGS \| AT_BOOLS`.
    int64 list_min_length_inclusive = 1;
    // Only valid when type is `AT_FLOATS \| AT_INTS \| AT_STRINGS \| AT_BOOLS`.
    int64 list_max_length_inclusive = 2;

    // If True, when Atmoic Attr is not provided or is_na, default_value would
    // be used. Else, Atmoic Attr must be provided.
    bool is_optional = 3;

    // A reasonable default for this attribute if the user does not supply a
    // value.
    Attribute default_value = 4;

    // Only valid when type is `AT_FLOAT \| AT_INT \| AT_STRING \| AT_FLOATS \|
    // AT_INTS \| AT_STRINGS`.
    // Please use list fields of AtomicParameter, i.e. `ss`, `i64s`, `fs`.
    // If the attribute is a list, allowed_values is applied to each element.
    Attribute allowed_values = 5;

    // Only valid when type is `AT_FLOAT \| AT_INT \| AT_FLOATS \| AT_INTS `.
    // If the attribute is a list, lower_bound is applied to each element.
    bool lower_bound_enabled = 6;
    Attribute lower_bound = 7;
    bool lower_bound_inclusive = 8;

    // Only valid when type is `AT_FLOAT \| AT_INT \| AT_FLOATS \| AT_INTS `.
    // If the attribute is a list, upper_bound is applied to each element.
    bool upper_bound_enabled = 9;
    Attribute upper_bound = 10;
    bool upper_bound_inclusive = 11;
  }

  AtomicAttrDesc atomic = 5;

  // Extras for a union attribute group.
  message UnionAttrGroupDesc {
    // The default selected child.
    string default_selection = 1;
  }

  UnionAttrGroupDesc union = 6;

  // Extras for custom protobuf attribute
  string custom_protobuf_cls = 7;
}
3. 节点执行标准
完整的执行协议框架,包含了input、storage、application、output。

4. 运行报告
运行报告也是一种DistData,通常作为部分组件的输出,用户界面可以根据定义来渲染运行报告。从包含的信息可以看出,基本是参考了前端页面的组成。
包含的信息如下:
- Descriptions:以组的形式显示多个只读字段。
- Table:显示数据的行。
- Div:页面的一个部分或节,由Descriptions、Tables或Divs组成。
- Tab:报告的一个页面,由Divs组成。
- Report:报告的顶级,由Tabs组成。
5. 隐语组件列表
隐语提供了很多组件,可以参考组件列表。并且提供了可视化的编程界面,方便调用执行。


6. 调用隐语组件方式
可以使用多种方式调用隐语组件,包括SecretFlow CLI/Lib(无需任何其他依赖)、Kuscia(简化数据同步和调度操作)、SecretPad(使用用户界面)。可以参考组件指南。这里展示如何用 Python API 来执行节点,用一个极小的数据集来检测 PSI 组件。
- 将以下 bash 脚本保存为 generate_csv.sh 。
#!/bin/bash

set -e
show_help() {
    echo "Usage: bash generate_csv.sh -c {col_name} -p {file_name}"
    echo "  -c"
    echo "          the column name of id."
    echo "  -p"
    echo "          the path of output csv."
}
if [[ "$#" -lt 1 ]]; then
    show_help
    exit
fi

while getopts ":c:p:" OPTION; do
    case $OPTION in
    c)
        COL_NAME=$OPTARG
        ;;
    p)
        FILE_PATH=$OPTARG
        ;;
    *)
        echo "Incorrect options provided"
        exit 1
        ;;
    esac
done


# header
echo $COL_NAME > $FILE_PATH

# generate 800 random int
for ((i=0; i<800; i++))
do
# from 0 to 1000
id=$(shuf -i 0-1000 -n 1)

# check duplicates
while grep -q "^$id$" $FILE_PATH
do
    id=$(shuf -i 0-1000 -n 1)
done

# write
echo "$id" >> $FILE_PATH
done

echo "Generated csv file is $FILE_PATH."
2. 然后为两方产生输入。
mkdir -p /tmp/alice
sh generate_csv.sh -c id1 -p /tmp/alice/input.csv

mkdir -p /tmp/bob
sh generate_csv.sh -c id2 -p /tmp/bob/input.csv
3. 将以下 Python 代码保存为 psi_demo.py 。
import json

from secretflow.component.entry import comp_eval
from secretflow.spec.extend.cluster_pb2 import (
    SFClusterConfig,
    SFClusterDesc,
)
from secretflow.spec.v1.component_pb2 import Attribute
from secretflow.spec.v1.data_pb2 import (
    DistData,
    TableSchema,
    IndividualTable,
    StorageConfig,
)
from secretflow.spec.v1.evaluation_pb2 import NodeEvalParam
import click


@click.command()
@click.argument("party", type=str)
def run(party: str):
    desc = SFClusterDesc(
        parties=["alice", "bob"],
        devices=[
            SFClusterDesc.DeviceDesc(
                name="spu",
                type="spu",
                parties=["alice", "bob"],
                config=json.dumps(
                    {
                        "runtime_config": {"protocol": "REF2K", "field": "FM64"},
                        "link_desc": {
                            "connect_retry_times": 60,
                            "connect_retry_interval_ms": 1000,
                            "brpc_channel_protocol": "http",
                            "brpc_channel_connection_type": "pooled",
                            "recv_timeout_ms": 1200 * 1000,
                            "http_timeout_ms": 1200 * 1000,
                        },
                    }
                ),
            ),
            SFClusterDesc.DeviceDesc(
                name="heu",
                type="heu",
                parties=[],
                config=json.dumps(
                    {
                        "mode": "PHEU",
                        "schema": "paillier",
                        "key_size": 2048,
                    }
                ),
            ),
        ],
    )

    sf_cluster_config = SFClusterConfig(
        desc=desc,
        public_config=SFClusterConfig.PublicConfig(
            ray_fed_config=SFClusterConfig.RayFedConfig(
                parties=["alice", "bob"],
                addresses=[
                    "127.0.0.1:61041",
                    "127.0.0.1:61042",
                ],
            ),
            spu_configs=[
                SFClusterConfig.SPUConfig(
                    name="spu",
                    parties=["alice", "bob"],
                    addresses=[
                        "127.0.0.1:61045",
                        "127.0.0.1:61046",
                    ],
                )
            ],
        ),
        private_config=SFClusterConfig.PrivateConfig(
            self_party=party,
            ray_head_addr="local",  # local means setup a Ray cluster instead connecting to an existed one.
        ),
    )

    # check https://www.secretflow.org.cn/docs/spec/latest/zh-Hans/intro#nodeevalparam for details.
    sf_node_eval_param = NodeEvalParam(
        domain="preprocessing",
        name="psi",
        version="0.0.1",
        attr_paths=[
            "protocol",
            "sort",
            "bucket_size",
            "ecdh_curve_type",
            "input/receiver_input/key",
            "input/sender_input/key",
        ],
        attrs=[
            Attribute(s="ECDH_PSI_2PC"),
            Attribute(b=True),
            Attribute(i64=1048576),
            Attribute(s="CURVE_FOURQ"),
            Attribute(ss=["id1"]),
            Attribute(ss=["id2"]),
        ],
        inputs=[
            DistData(
                name="receiver_input",
                type="sf.table.individual",
                data_refs=[
                    DistData.DataRef(uri="input.csv", party="alice", format="csv"),
                ],
            ),
            DistData(
                name="sender_input",
                type="sf.table.individual",
                data_refs=[
                    DistData.DataRef(uri="input.csv", party="bob", format="csv"),
                ],
            ),
        ],
        output_uris=[
            "output.csv",
        ],
    )

    sf_node_eval_param.inputs[0].meta.Pack(
        IndividualTable(
            schema=TableSchema(
                id_types=["str"],
                ids=["id1"],
            ),
            line_count=-1,
        ),
    )

    sf_node_eval_param.inputs[1].meta.Pack(
        IndividualTable(
            schema=TableSchema(
                id_types=["str"],
                ids=["id2"],
            ),
            line_count=-1,
        ),
    )

    storage_config = StorageConfig(
        type="local_fs",
        local_fs=StorageConfig.LocalFSConfig(wd=f"/tmp/{party}"),
    )

    res = comp_eval(sf_node_eval_param, storage_config, sf_cluster_config)

    print(f'Node eval res is \n{res}')


if __name__ == "__main__":
    run()
4. 在两个终端中执行
应该在两个终端中看到以下输出:
Node eval res is
outputs {
  name: "output.csv"
  type: "sf.table.vertical_table"
  system_info {
  }
  meta {
    type_url: "type.googleapis.com/secretflow.spec.v1.VerticalTable"
    value: "\n\n\n\003id1\"\003str\n\n\n\003id2\"\003str\020\211\005"
  }
  data_refs {
    uri: "output.csv"
    party: "alice"
    format: "csv"
  }
  data_refs {
    uri: "output.csv"
    party: "bob"
    format: "csv"
  }
}
/tmp/alice/output.csv和/tmp/bob/output.csv检查结果。两个文件的内容除了表头应该是一致的。
7. 创建组件
这里看了下课程视频中的链接,和现在的官网链接对应不上,建议后续课程的视频可以与实际的网站链接对应起来。因此这里就记录了官网提供的在secretflow中新增组件case,处理的流程其实基本一致,所以是具有参考意义的。在 SecretFlow 中创建一个新的组件,可以参考 secretflow/component/preprocessing/train_test_split.py 。
构建一个 SecretFlow 组件的简要步骤如下:
1. 在 secretflow/component/ 目录下创建一个新的文件。
2. 使用 secretflow.component.component.Component 创建一个组件类:
from secretflow.component.component import Component

train_test_split_comp = Component(
    "train_test_split",
    domain="preprocessing",
    version="0.0.1",
    desc="""Split datasets into random train and test subsets.
    Please check: https://scikit-learn.org/stable/modules/generated/sklearn.model_selection.train_test_split.html
    """,
)
3. 定义属性和输入输出。
from secretflow.component.component import IoType
from secretflow.component.data_utils import DistDataType

train_test_split_comp.float_attr(
    name="train_size",
    desc="Proportion of the dataset to include in the train subset.",
    is_list=False,
    is_optional=True,
    default_value=0.75,
    allowed_values=None,
    lower_bound=0.0,
    upper_bound=1.0,
    lower_bound_inclusive=True,
    upper_bound_inclusive=True,
)
train_test_split_comp.float_attr(
    name="test_size",
    desc="Proportion of the dataset to include in the test subset.",
    is_list=False,
    is_optional=True,
    default_value=0.25,
    allowed_values=None,
    lower_bound=0.0,
    upper_bound=1.0,
    lower_bound_inclusive=True,
    upper_bound_inclusive=True,
)
train_test_split_comp.int_attr(
    name="random_state",
    desc="Specify the random seed of the shuffling.",
    is_list=False,
    is_optional=True,
    default_value=1234,
)
train_test_split_comp.bool_attr(
    name="shuffle",
    desc="Whether to shuffle the data before splitting.",
    is_list=False,
    is_optional=True,
    default_value=True,
)
train_test_split_comp.io(
    io_type=IoType.INPUT,
    name="input_data",
    desc="Input dataset.",
    types=[DistDataType.VERTICAL_TABLE],
    col_params=None,
)
train_test_split_comp.io(
    io_type=IoType.OUTPUT,
    name="train",
    desc="Output train dataset.",
    types=[DistDataType.VERTICAL_TABLE],
    col_params=None,
)
train_test_split_comp.io(
    io_type=IoType.OUTPUT,
    name="test",
    desc="Output test dataset.",
    types=[DistDataType.VERTICAL_TABLE],
    col_params=None,
)
4. 定义执行函数。
from secretflow.spec.v1.data_pb2 import DistData
# Signature of eval_fn must be
# func(*, ctx, attr_0, attr_1, ..., input_0, input_1, ..., output_0, output_1, ...) -> typing.Dict[str, DistData]
# All the arguments are keyword-only, so orders don't matter.
@train_test_split_comp.eval_fn
def train_test_split_eval_fn(
*, ctx, train_size, test_size, random_state, shuffle, input_data, train, test
):
# Please check more examples to learn component utils.
# ctx includes some parsed cluster def and other useful meta.
# The output of eval_fn is a map of DistDatas of which keys are output names.
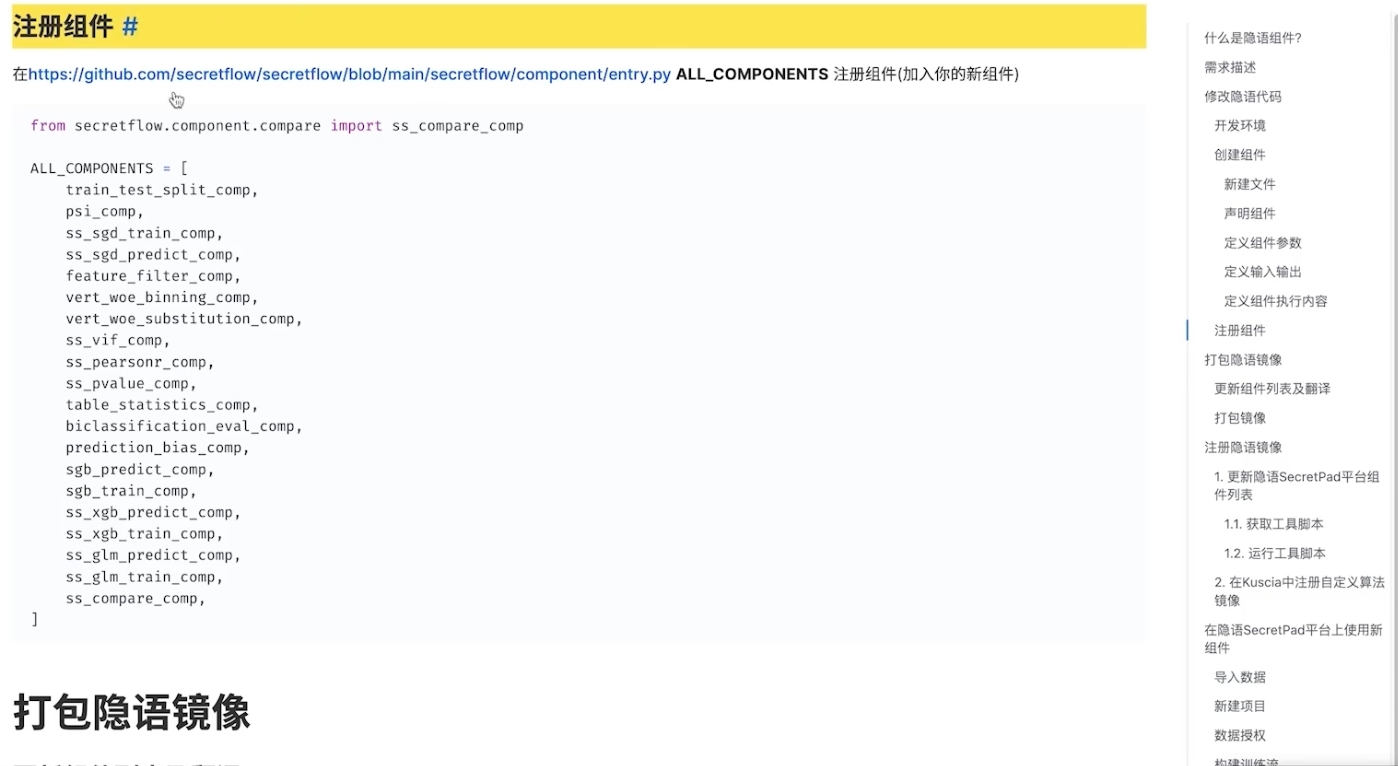
return {"train": DistData(), "test": DistData()}5. 将你的新组件加入到 secretflow.component.entry 的 ALL_COMPONENTS 中。
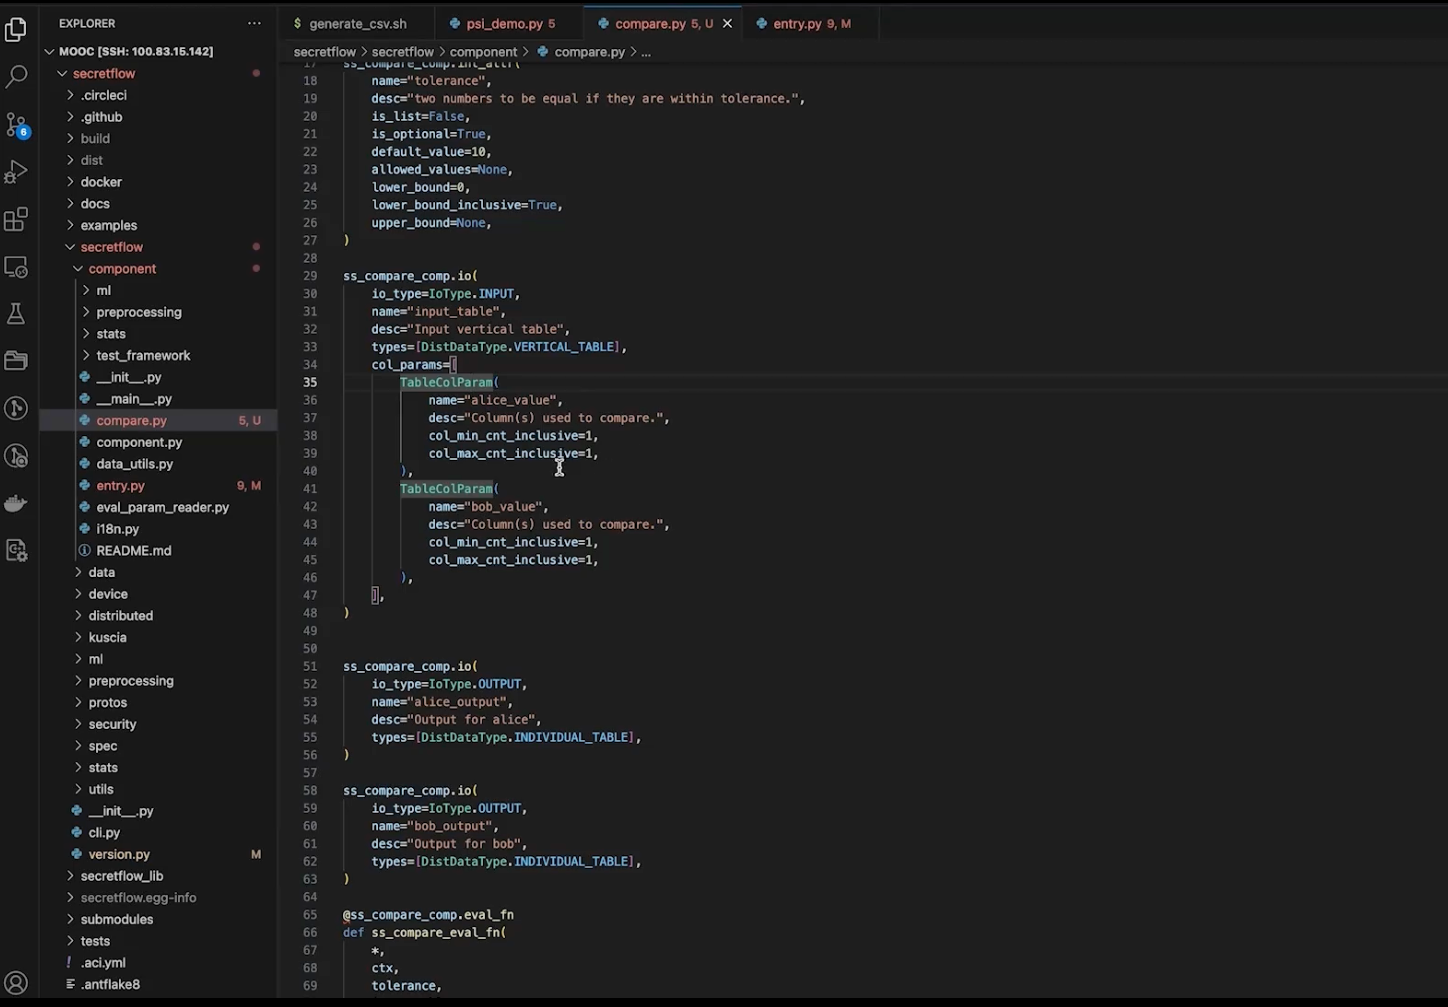
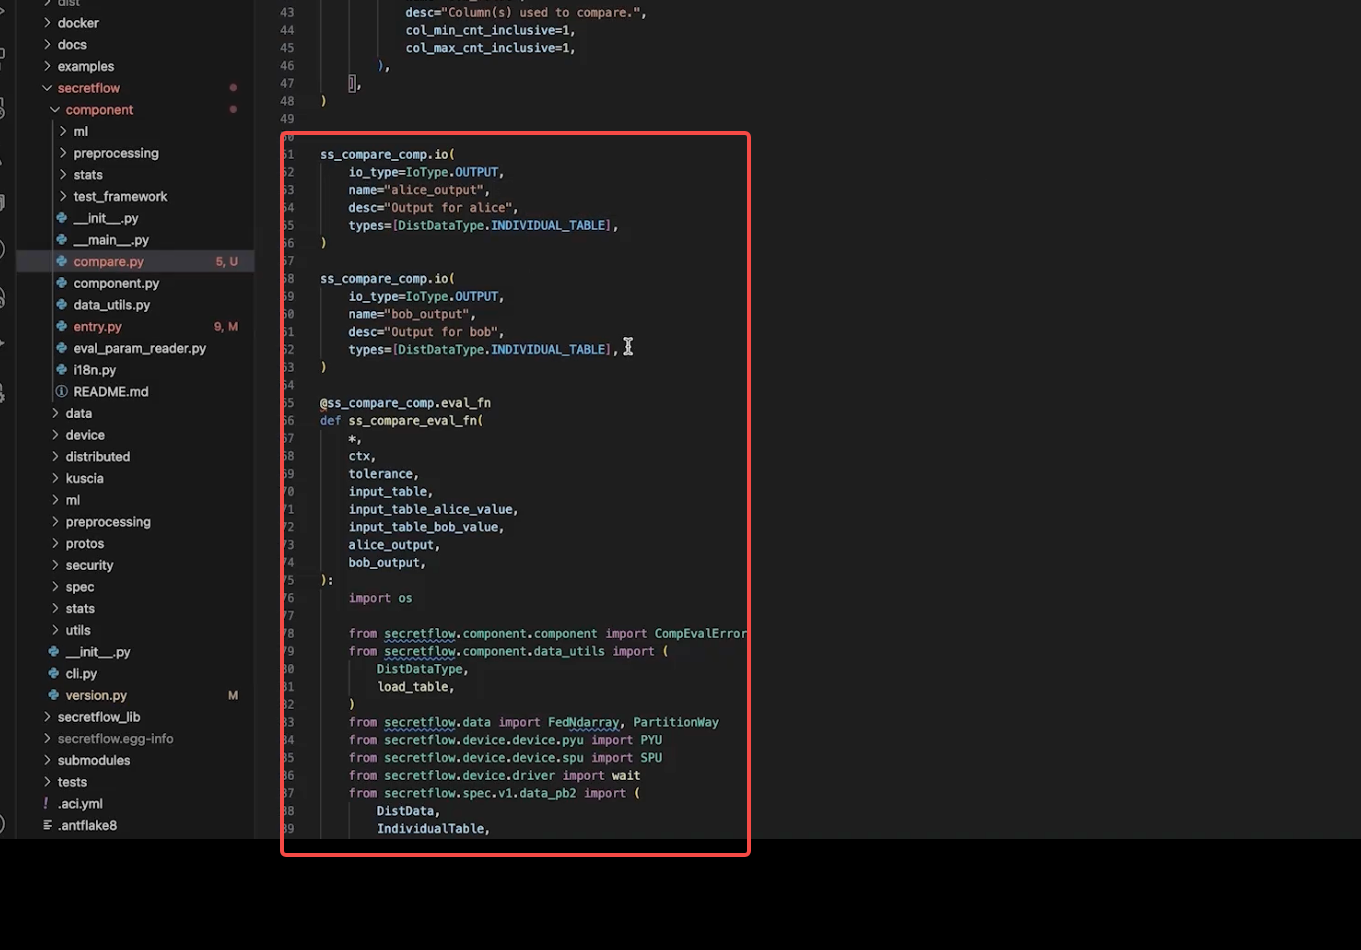
对于视频中提到的mpc比较算子组件
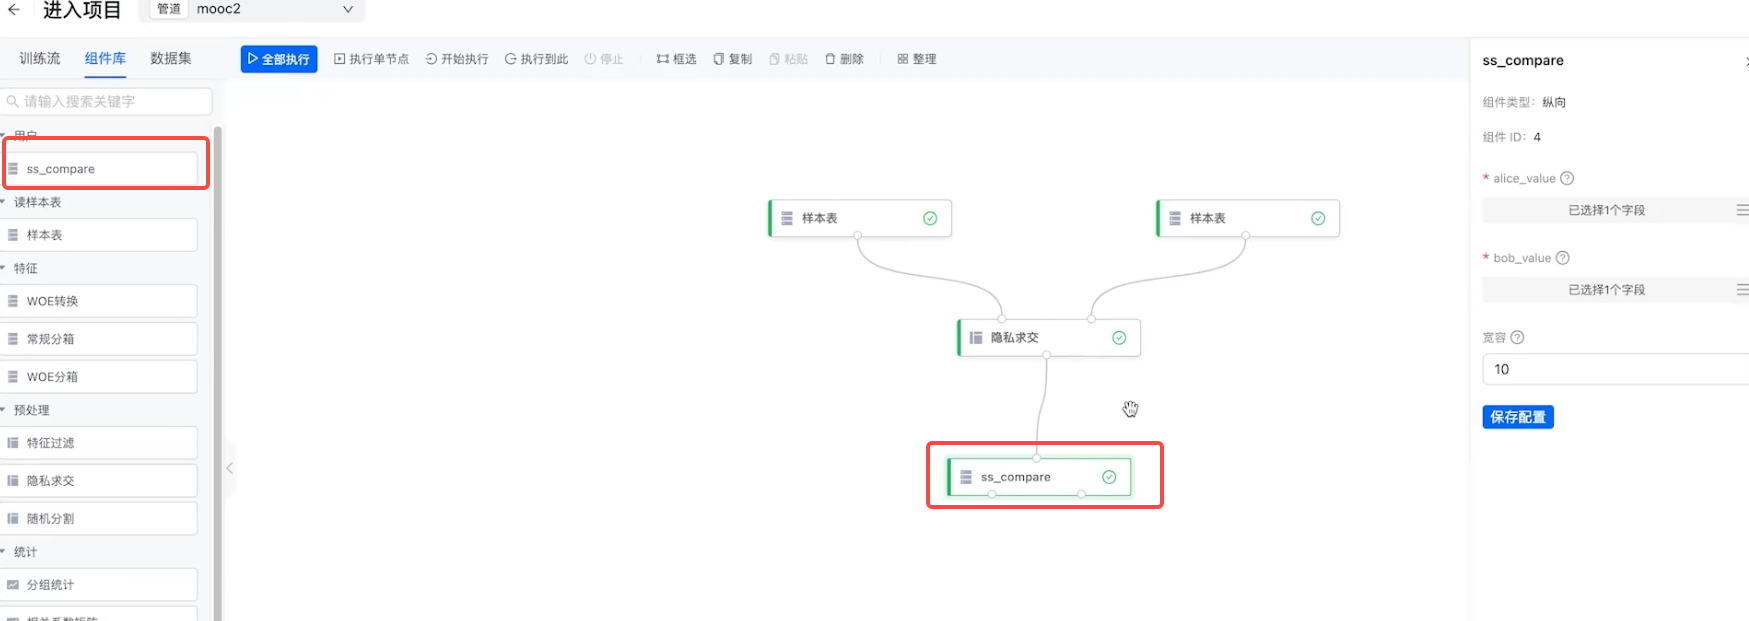
1. 整体流程大致一样,新建组件、声明组件 、定义组件参数、定义输入输出、定义组件执行内容、注册组件。
2. 注册组件和打包镜像
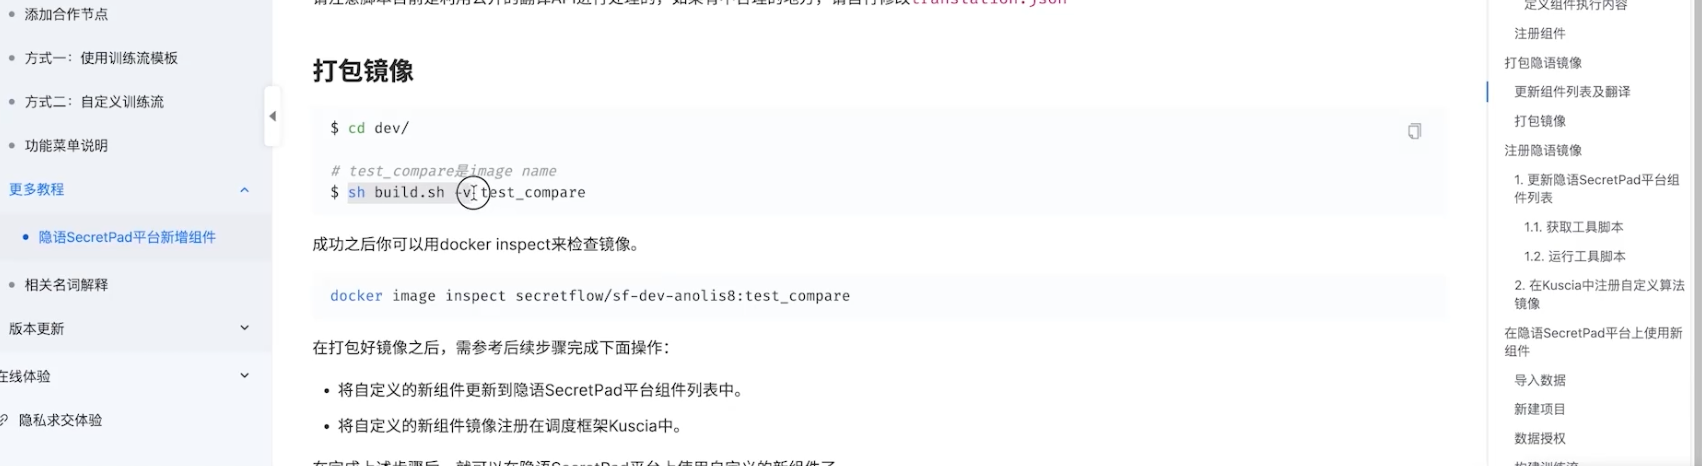
3. 最后可以在secretpad中调用该新增的比较算子组件


 668
668


 被折叠的 条评论
为什么被折叠?
被折叠的 条评论
为什么被折叠?
 到【灌水乐园】发言


