


前言
最近对yolo的源代码比较感兴趣,因此就通过debug的方式查看了yolov8在detect在推理一张图片的时候会经过的一系列操作,从中也能学到更加细致的代码写法和思路。
正文
一、构建模型和读取图片阶段
1、设置初始断点并进入第一阶段构造模型和相关信息获取
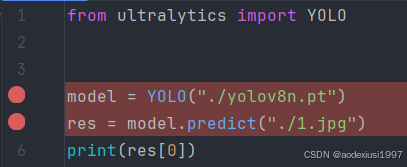
如上:非常简单构建了一个通过ultralytics库使用yolov8进行推理的代码了,并可以设置相应的断点。
现在版本的ultralytics以包的形式直接安装了,不再像很久之前通过setup.py进行构建,使用上要方便很多。 可以在debug阶段找到安装包的位置,再通过IDEA打开,这样方便在debug的时候查看相关的代码。在相应的环境下直接使用pip show ultralytics,找到位置,再在对应位置找到ultralytics文件夹后使用IDEA打开对应文件夹。
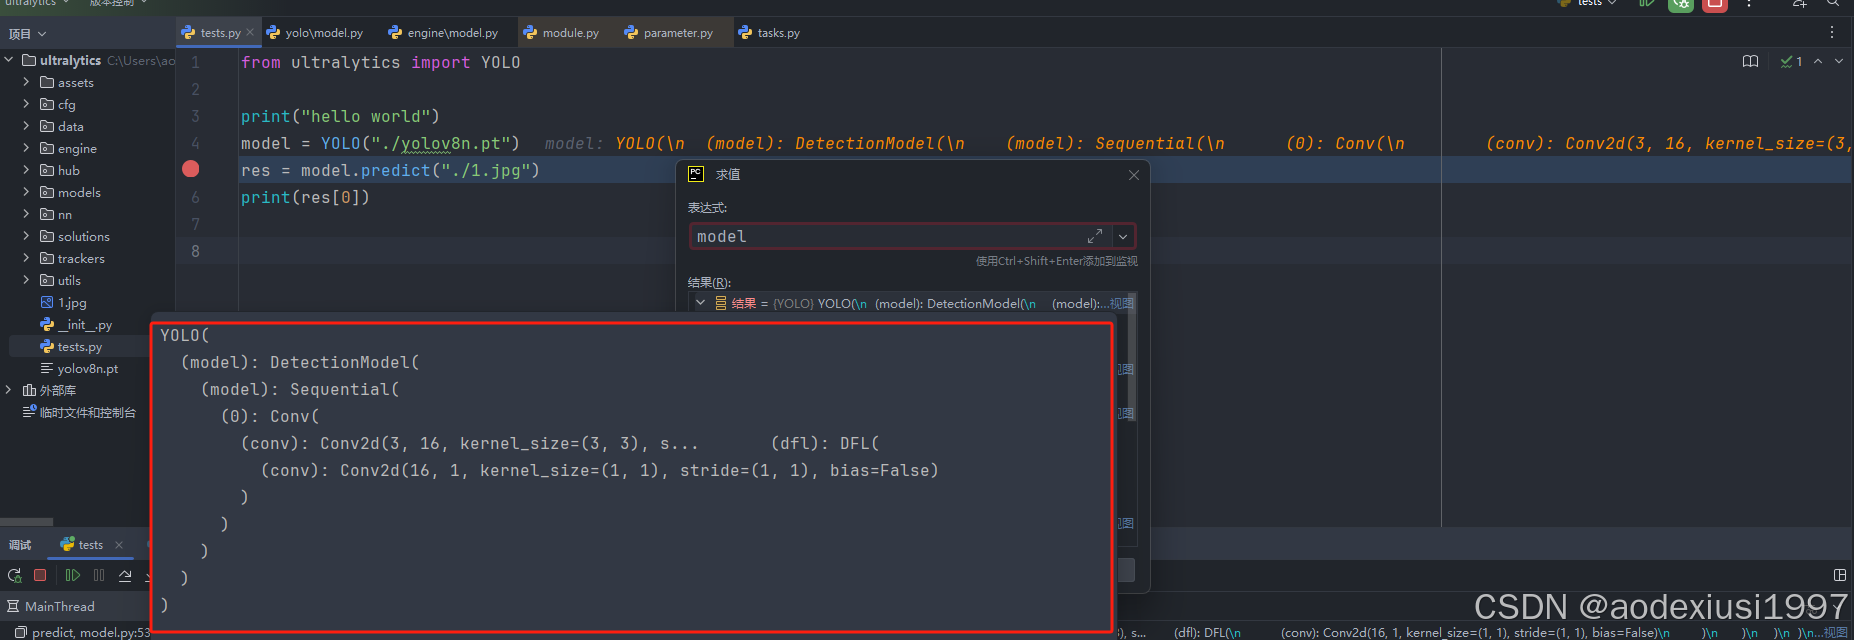
2、开始debug model = YOLO("./yolov8n.pt")
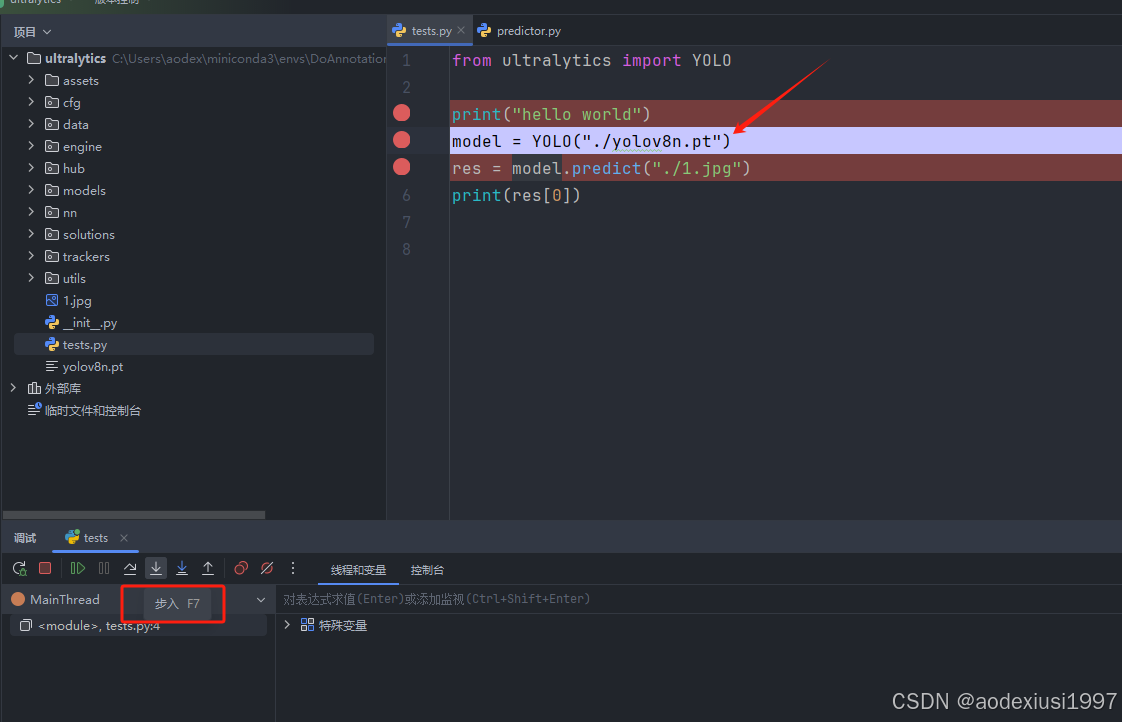
①、运行到该行代码的时候点击 步入 进入YOLO这个类的内部进行查看

这时候你会发现这是初始任务构建信息,并且继承于engine/model.py下的Model类,解读代码就是看你要使用的是yolo还是yolo-world。我们这里使用的是yolo,后面是任务字典,使用@property 将task_map方法封装成该类的属性方便后面调用,并且是重写的Model类里面的内容。
②、继续 单步执行 代码我们会发现我们进入了engine/model.py下的Model类,这是因为YOLO类是继承于engine/model.py下的Model类。那可能会有疑问,这个engine/model.py下的Model类是在做什么呢?
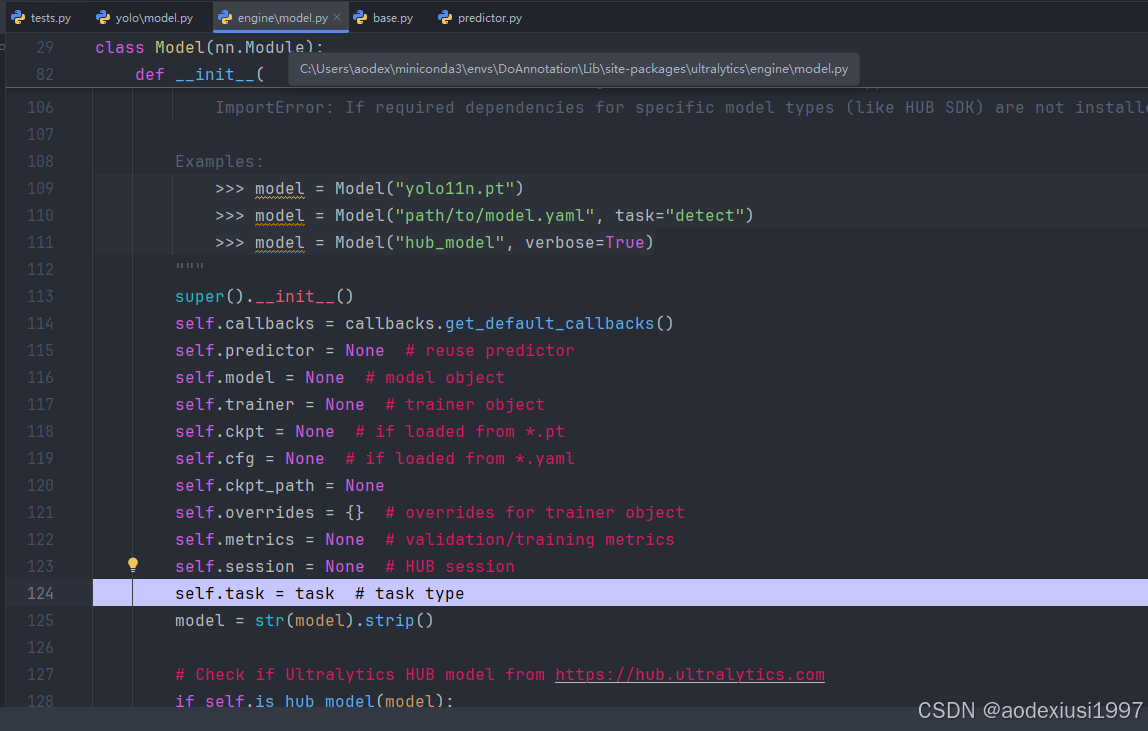
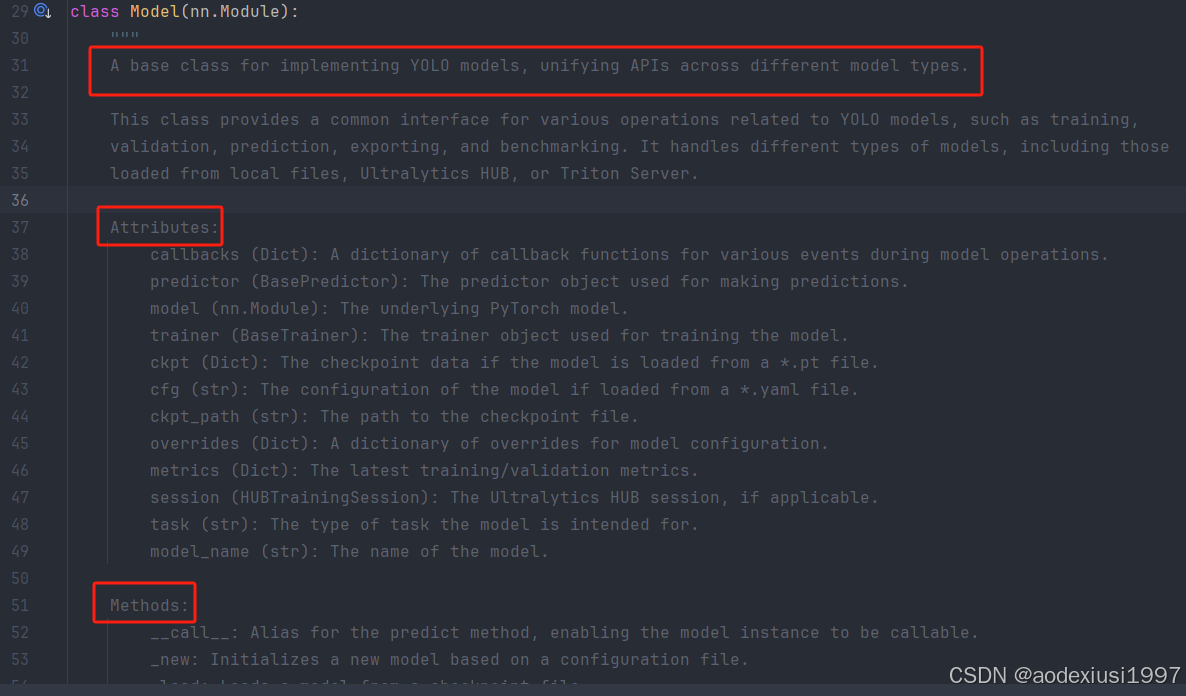
这时候不着急看代码,拉到最上面部分查看官方对该类的描述,可以明确得知(翻译一下:这是实现YOLO模型的基类,统一不同模型类型的API。该类为与YOLO模型相关的各种操作提供了一个通用接口,验证、预测、导出和基准测试。它处理不同类型的模型,包括从本地文件、Ultralytics HUB或Triton Server加载。)并且包含了对于该类的attributes和methods的详细解释,感兴趣可以详细查看了解。
接下来我们继续单步执行我们的代码,我们会看到进行pytorch版本的检测和检测模型文件等等相关代码,如果发现没有相应的权重文件,将会尝试直接download一个模型下来进行使用。
③、我们继续执行 单步执行 操作,如果中间遇到一些循环等操作可以选择直接 步出 。此时我们会进入 engine/model.py model类下面的_load方法中,这个方法处理你输入的参数比如是 pt 或者 yaml或者链接等进行对应的模型构建和任务的选择,这个方法的总体解释(翻译一下:从检查点文件加载模型或从权重文件初始化模型。此方法处理从.pt检查点文件或其他权重文件格式加载模型。它根据加载的权重,设置模型、任务和相关属性。)这里还会去读取一下那个default.yaml,配置一下参数,设置任务的支持类型。此时我们输入的是pt权重的路径,会进入下面这部分代码进行模型构建。
if Path(weights).suffix == ".pt":
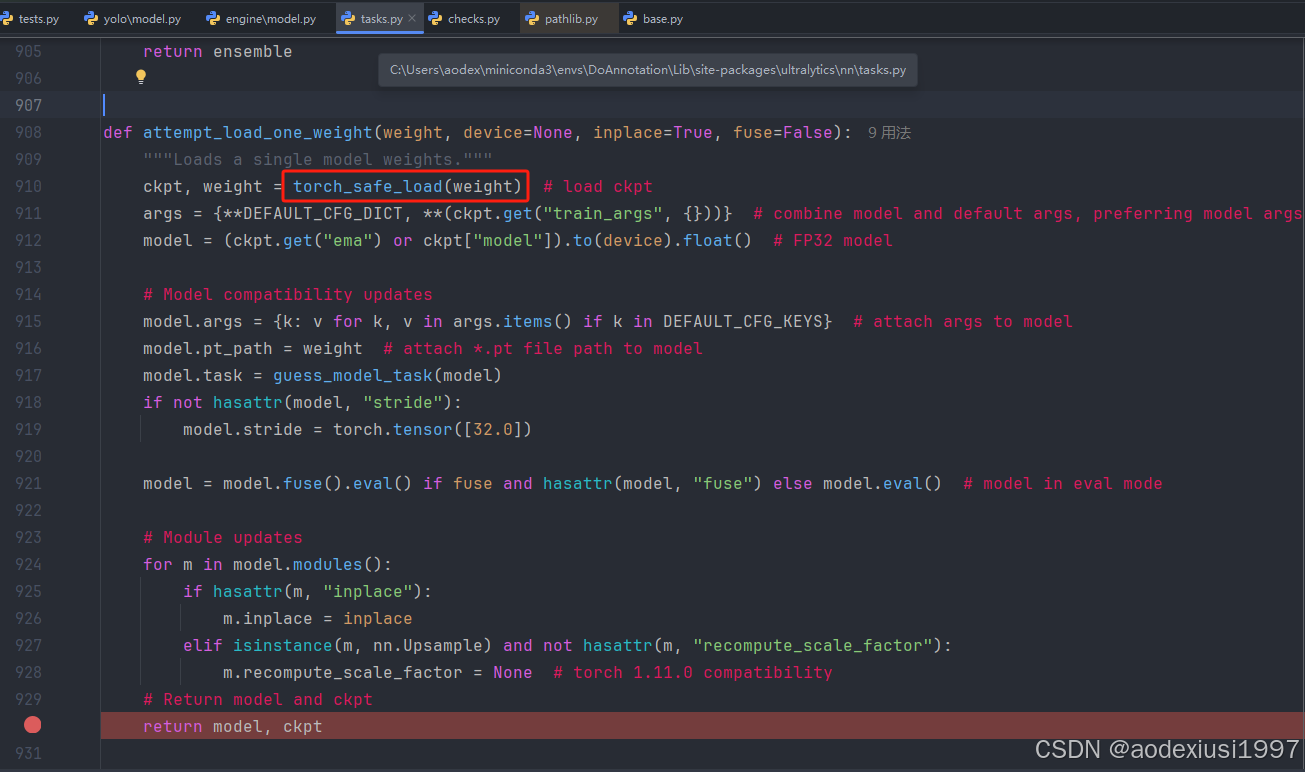
self.model, self.ckpt = attempt_load_one_weight(weights)
self.task = self.model.args["task"]
self.overrides = self.model.args = self._reset_ckpt_args(self.model.args)
self.ckpt_path = self.model.pt_path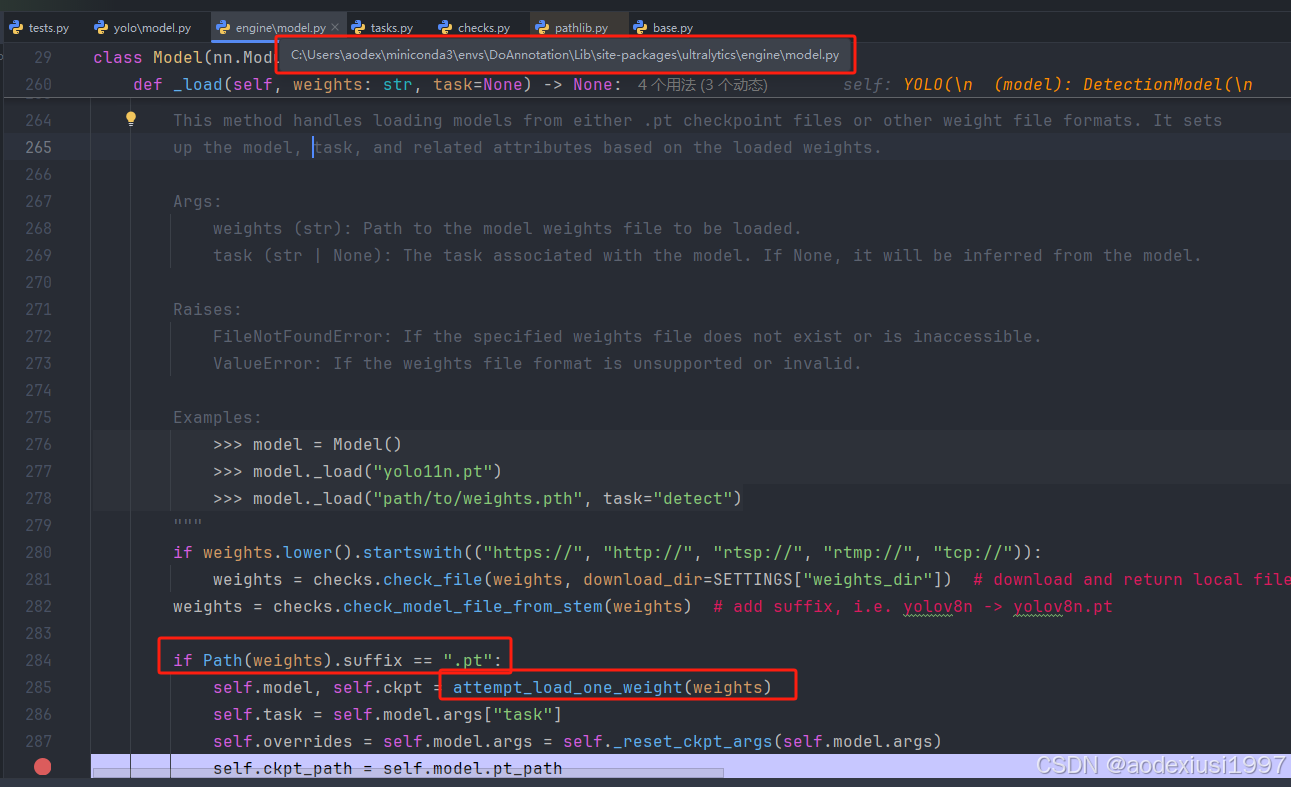
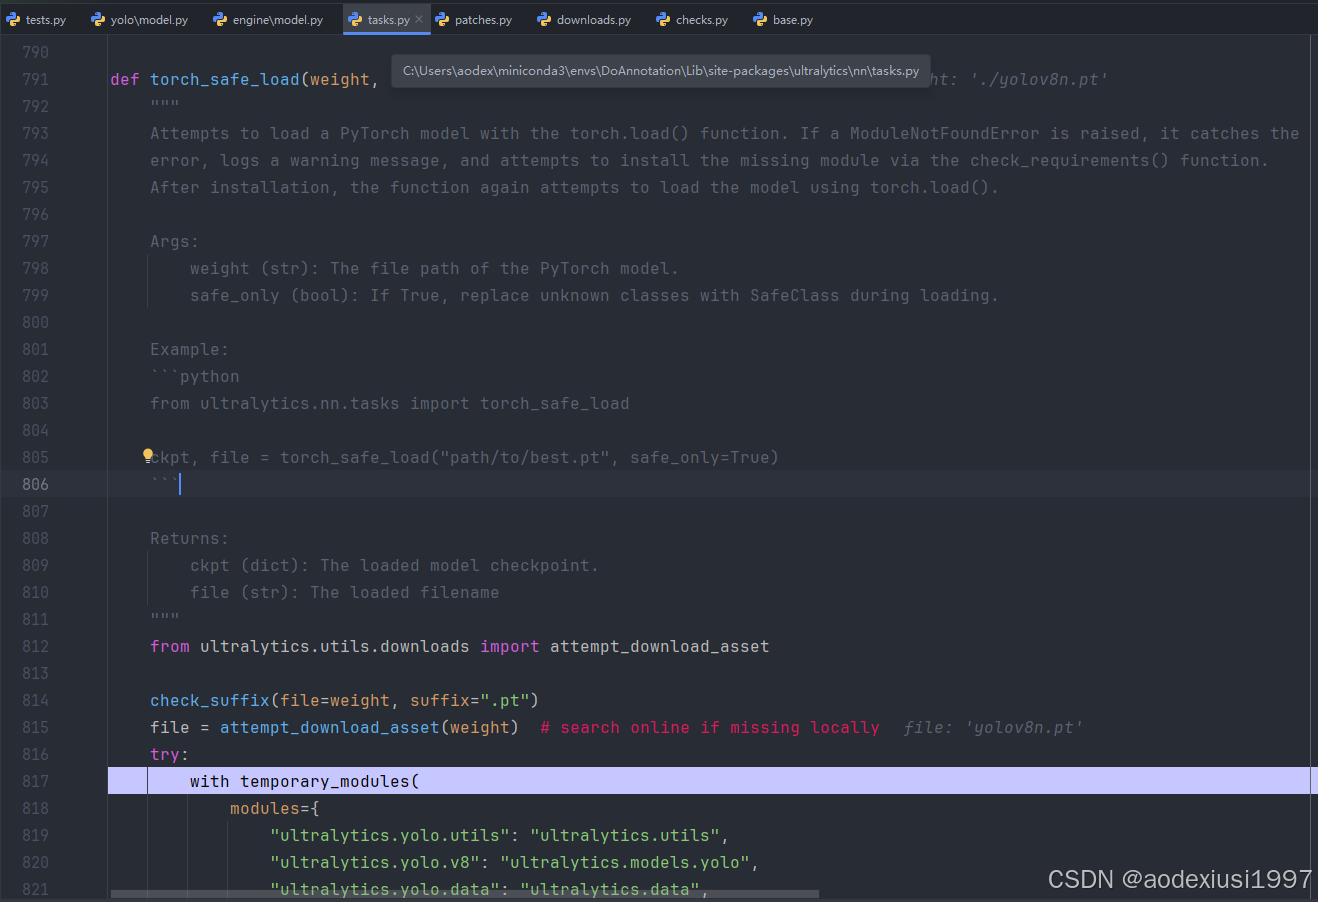
代码中会使用nn/tasks.py下的attempt_load_one_weight方法进行模型的加载工作。并进行相应模型的返回。
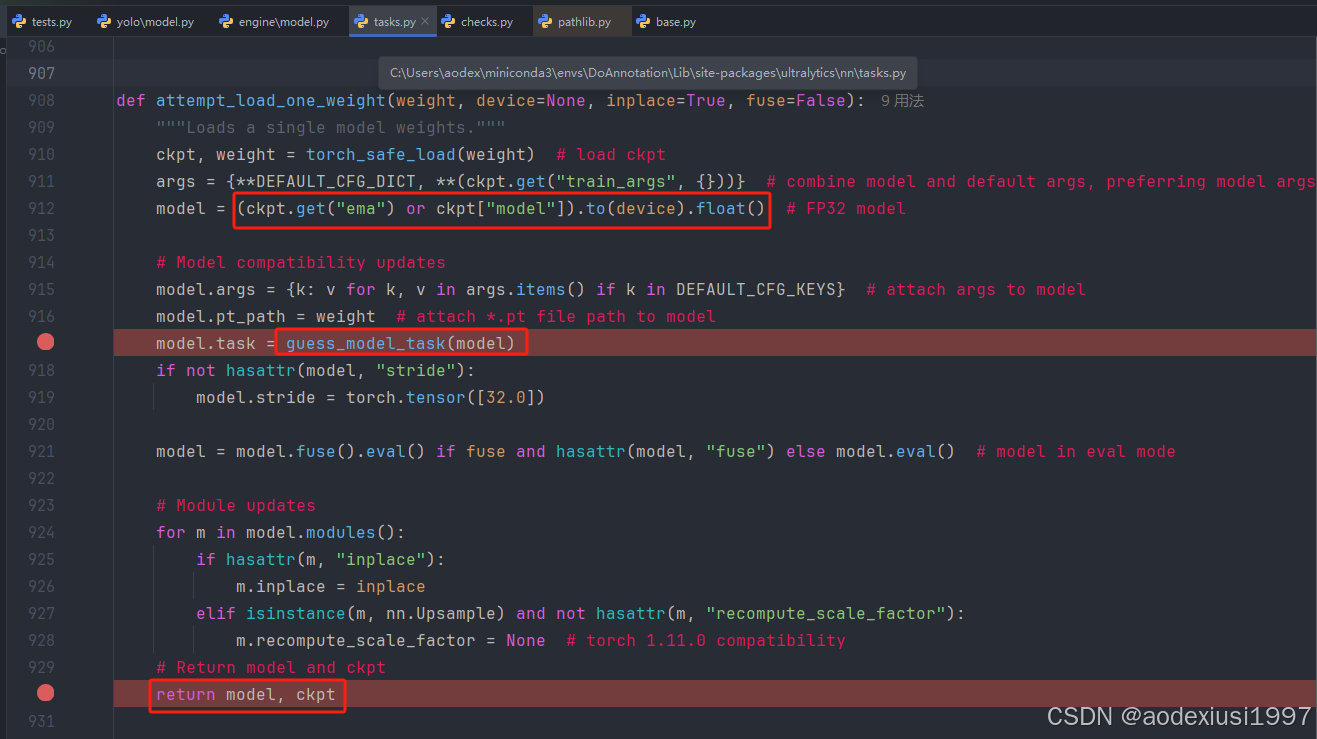
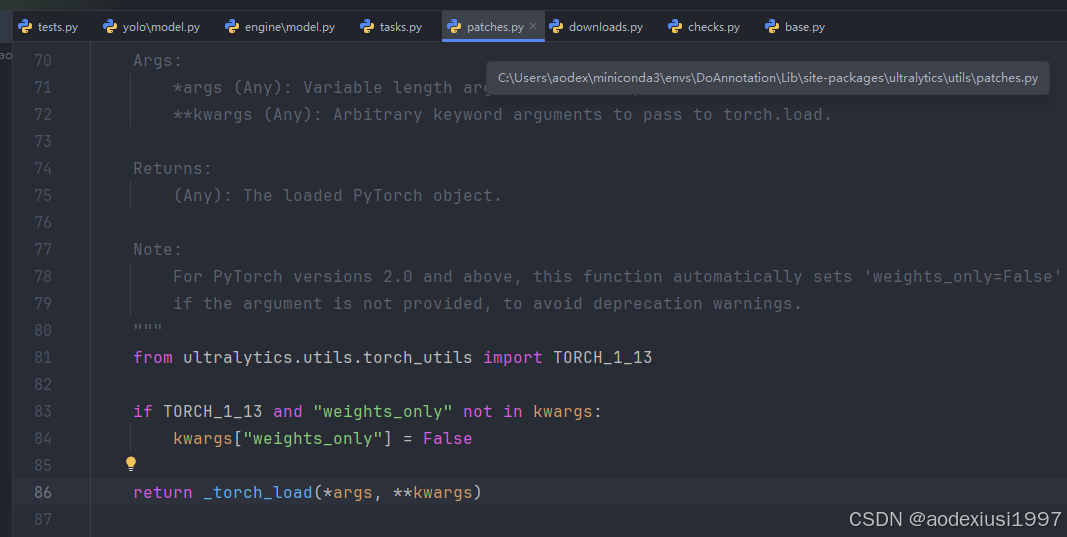
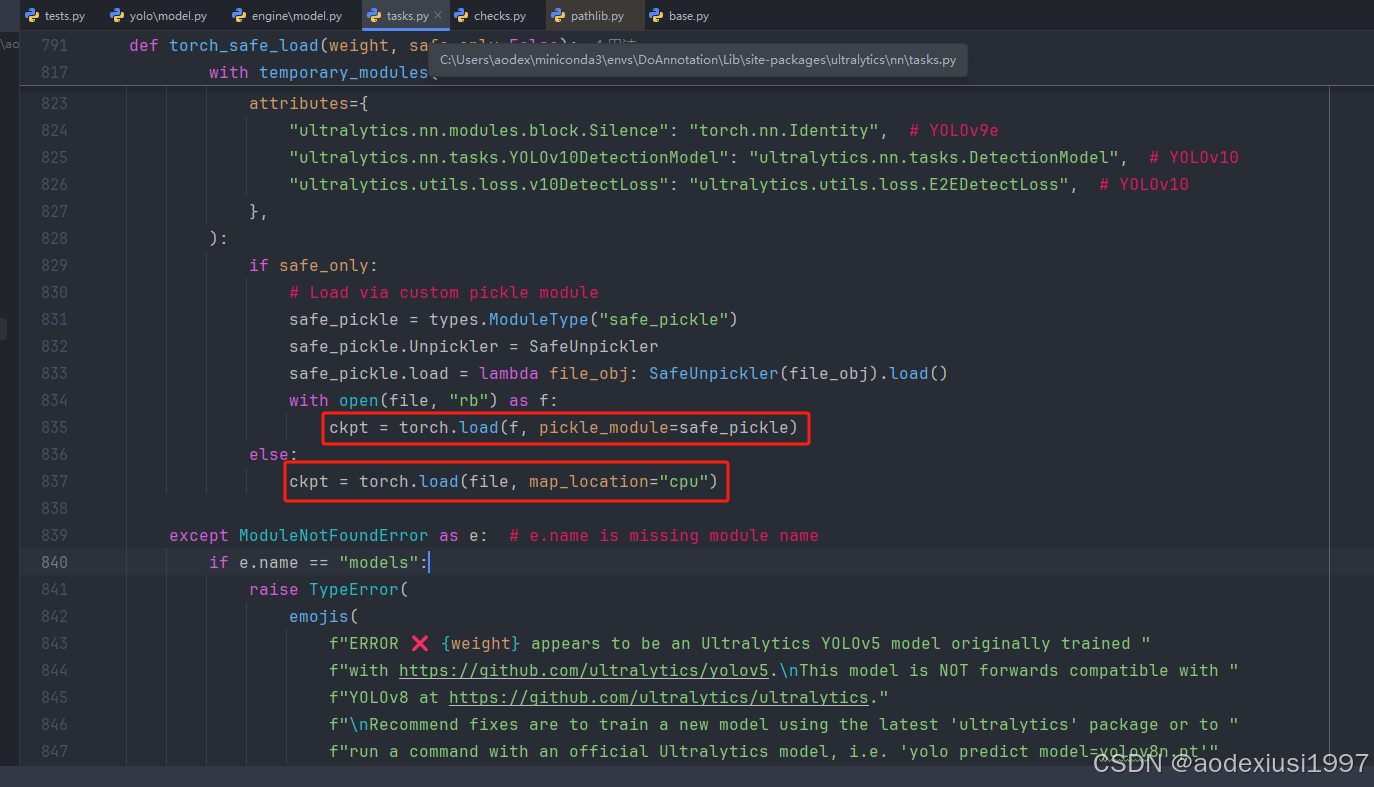
在使用attempt_load_one_weight方法中也会去调用nn/tasks.py下面的torch_safe_load方法进行模型加载工作。这个torch_safe_load起一个什么作用呢?官方文档中也明确给了说明(翻译一下:尝试使用torch.load()函数加载一个PyTorch模型。如果出现ModuleNotFoundError,它会捕获该错误,记录-条警告消息,并尝试通过check requirements ()函数安装缺失的模块。安装后,该函数再次尝试使用torch.load ()加载模型。)这个方法是先检测后缀,如果本地没有该模型,会尝试进行下载,如果当前yolo模型不支持将会抛出异常,还会检测是否是字典形式的pt文件。并对其中一些模块进行替换,但是替换的是不对模型结果影响的部分。
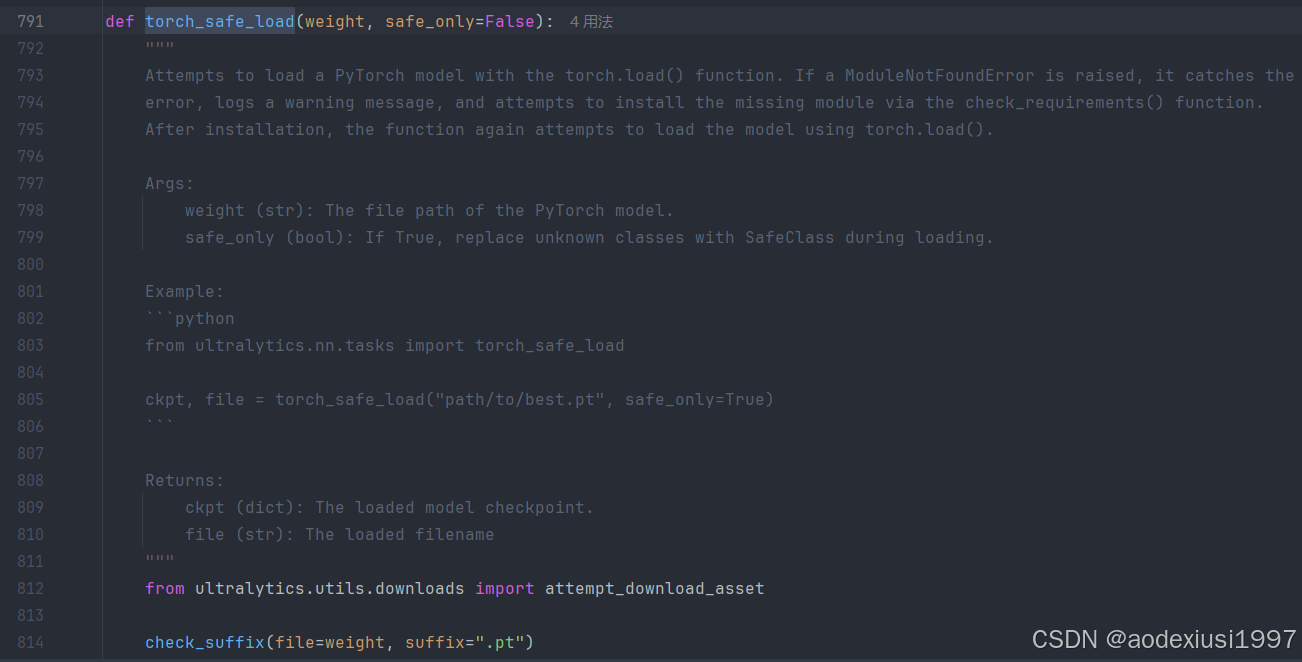
torch_safe_load的部分代码。这里为啥使用torch.load直接加载模型的原因
在这个tasks文件夹下面还有很多的方法,比如前面传入yaml文件进行构造模型的方法就写在这部分,感兴趣可以自己去查看。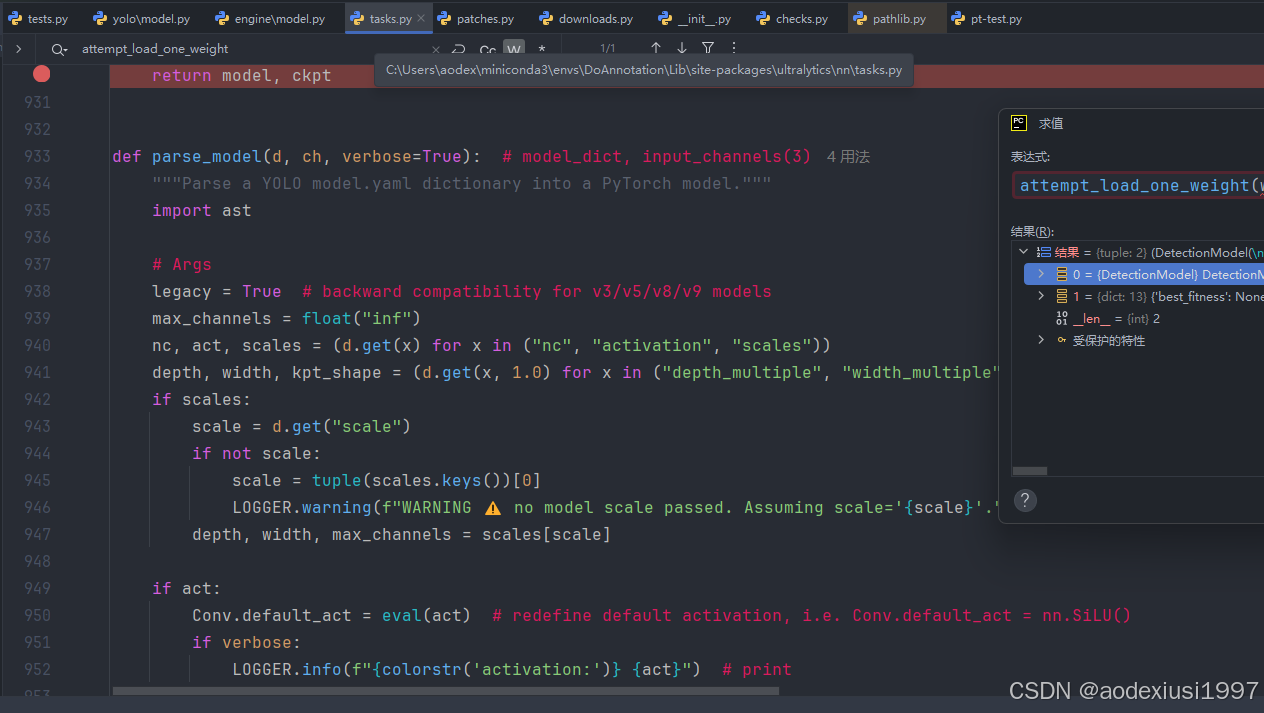
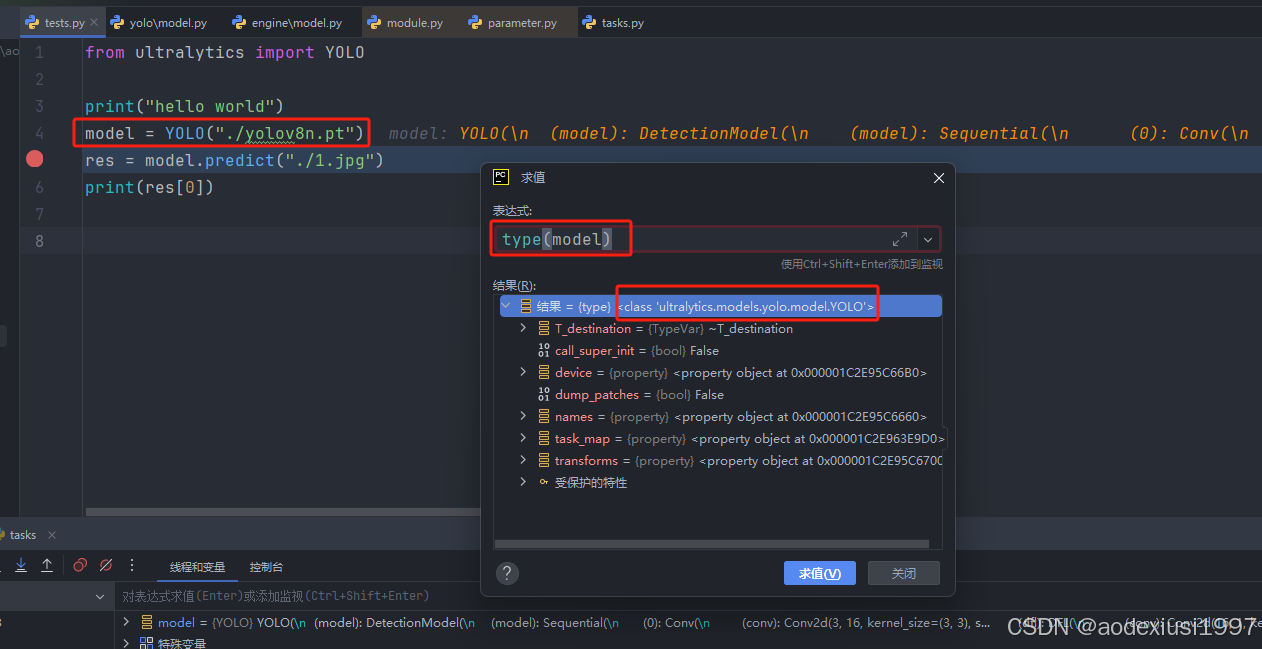
④、到这个阶段model = YOLO("./yolov8n.pt")的实例化基本就算执行完毕了,现在我们查看一下model,看看是个什么东西,并检查它的类型,很显然是一个实例化的YOLO类,不是我们平时直接实例化的model,里面包含了很多信息,包括模型、各种属性,后面我们使用model.predict就会使用到的属性等等。
二、模型的推理部分
1、开始debug res = model.predict("./1.jpg")
这部分主要涉及的是模型对于图片的前后处理
①、此时就会调用predict的方法。我们来看看对于predict方法解释(翻译一下:使用YOLO模型对给定的图像源进行预测。 这种方法简化了预测过程,允许通过关键字参数进行各种配置。 它支持使用自定义预测器或默认预测器方法进行预测。该方法处理不同 图像源的类型,并且可以在流模式下操作。 Args: source(str|Path|int|PIL.Image|np.ndarray|torch.Tensor|List|Tuple):源代码 对图像进行预测。接受各种类型,包括文件路径、URL、PIL 图像、numpy数组和torch张量。 stream(bool):如果为True,则将输入源视为用于预测的连续流。 预测(BasePredictor|None):用于进行预测的自定义预测器类的实例。 如果为None,则该方法使用默认预测器。 **kwargs(Any):用于配置预测过程的其他关键字参数。 返回:(列表[ultralytics.engine.results.results]):预测结果列表,每个结果都封装在一个 结果对象。 )这个告诉你还可以使用自己的predictor进行处理。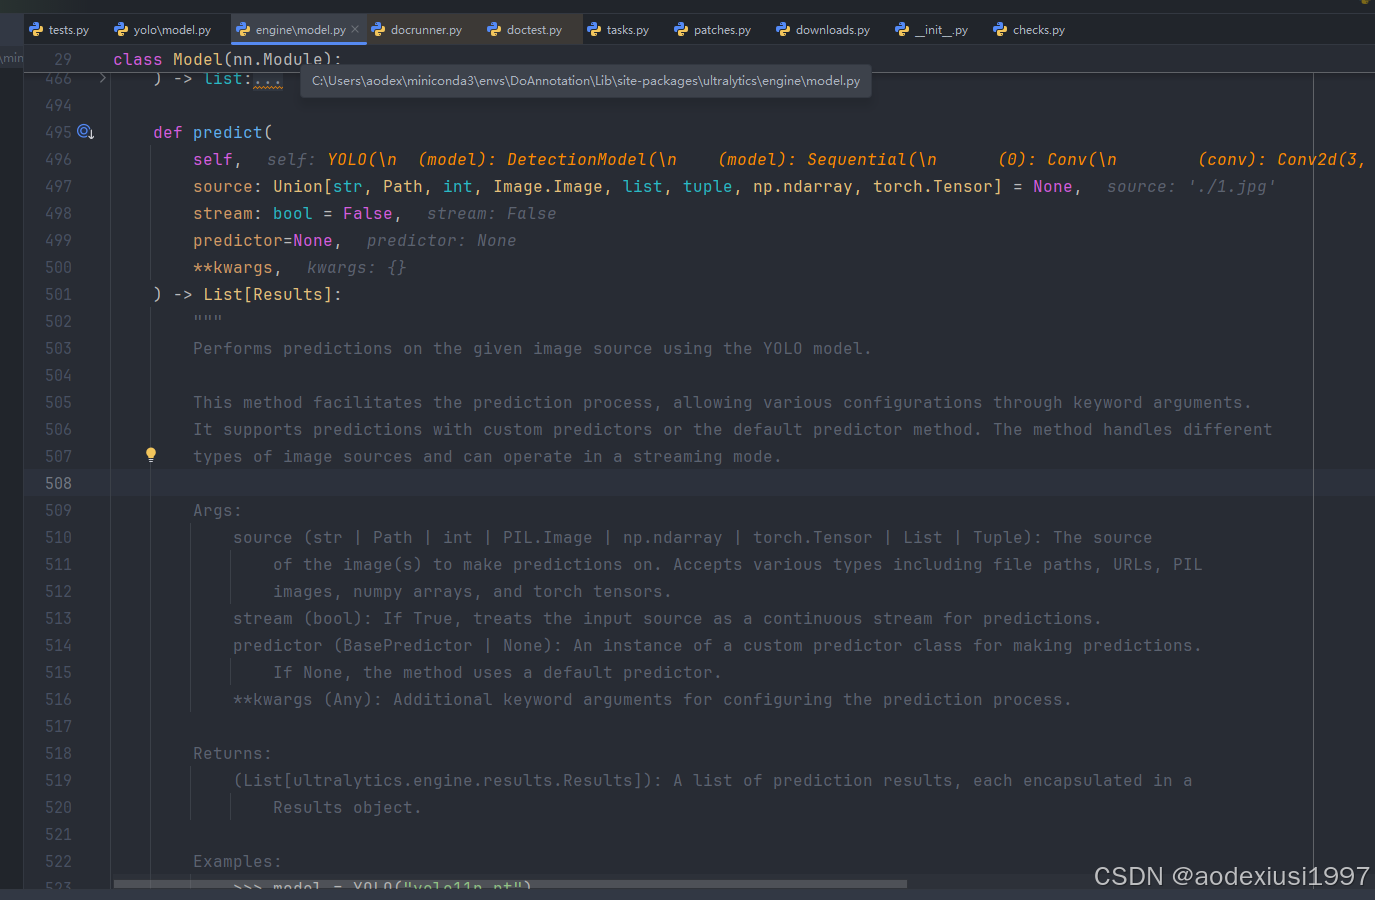
②、然后我们继续查看一下这部分的内容。这段代码有一些默认参数的配置。如batch和conf等推理的时候需要使用的部分。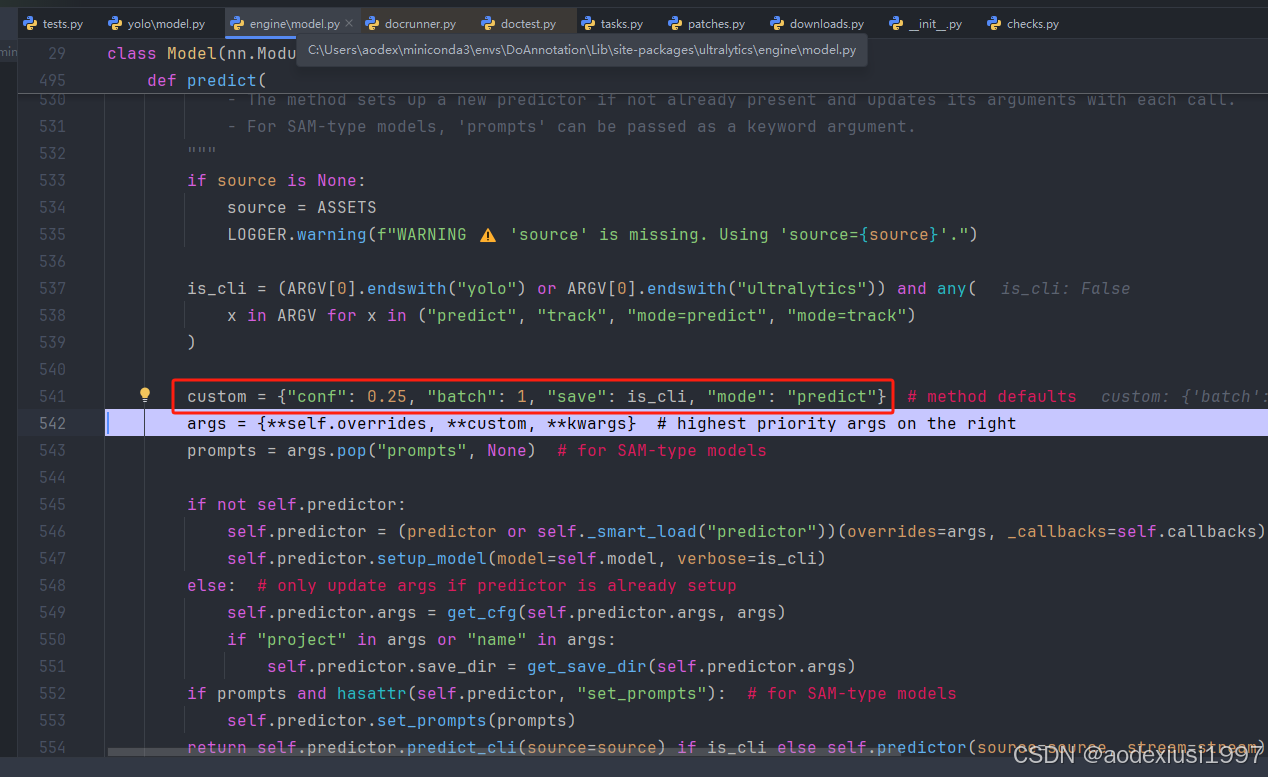
②、在这个方法的后面部分就是predictor的初始化了,我们进入查看会发现我们将会进入一个BasePredictor的类中,这个类是做什么的呢?同样有解释(翻译一下:
""" BasePredictor 创建预测器的基类
属性:args(SimpleNamespace):预测器的配置
save_dir(Path):保存结果的目录。
done_warmup(bool):预测器是否已完成设置。
model(nn.Module):用于预测的模型。
data(dict):数据配置。
device (torch.device):用于预测的device。
数据集(dataset):用于预测的数据集。
vid_writer(dict):用于保存视频输出的{save_path:video_writer,…}writer for saving video output)。"""也就是说这是一个基类,里面会初始化一些在检测 分割等会用到的一些方法属性等等,这是面向对象了。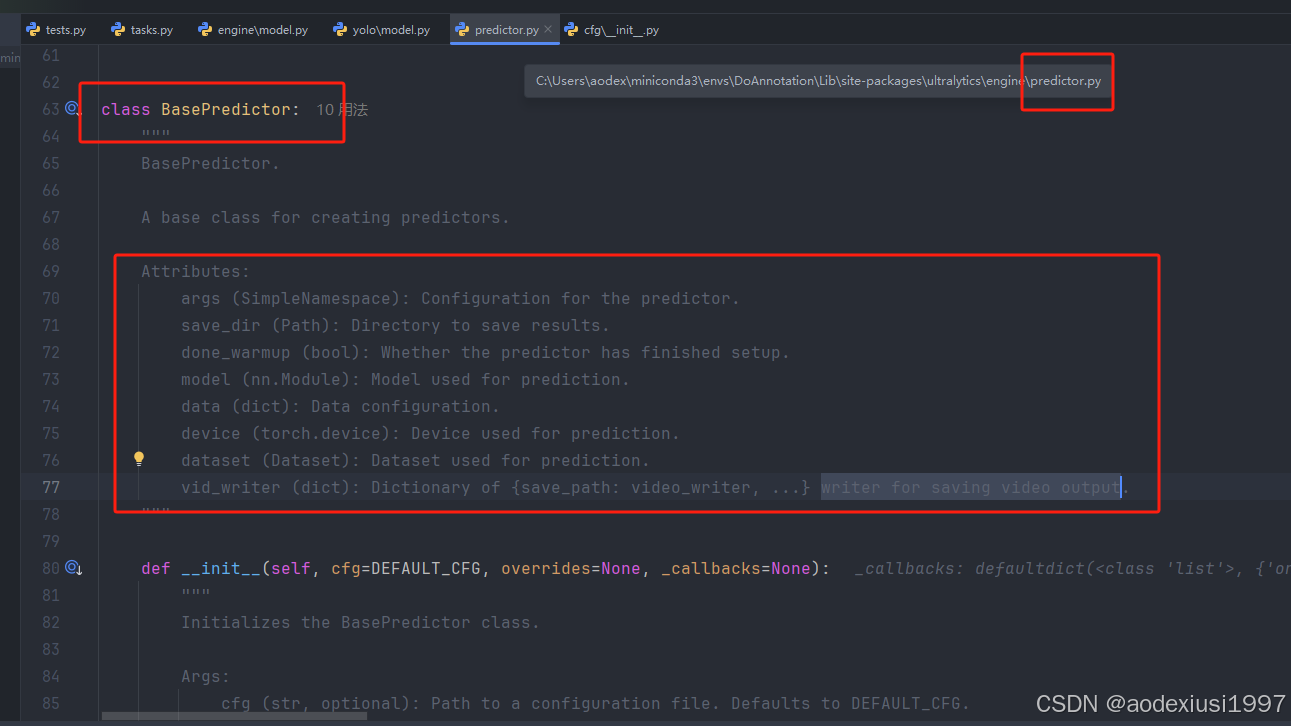
我们继续看这个类,发现后面有很多的方法,当然对于我们而言比较重要的前后处理就在这部分代码中了。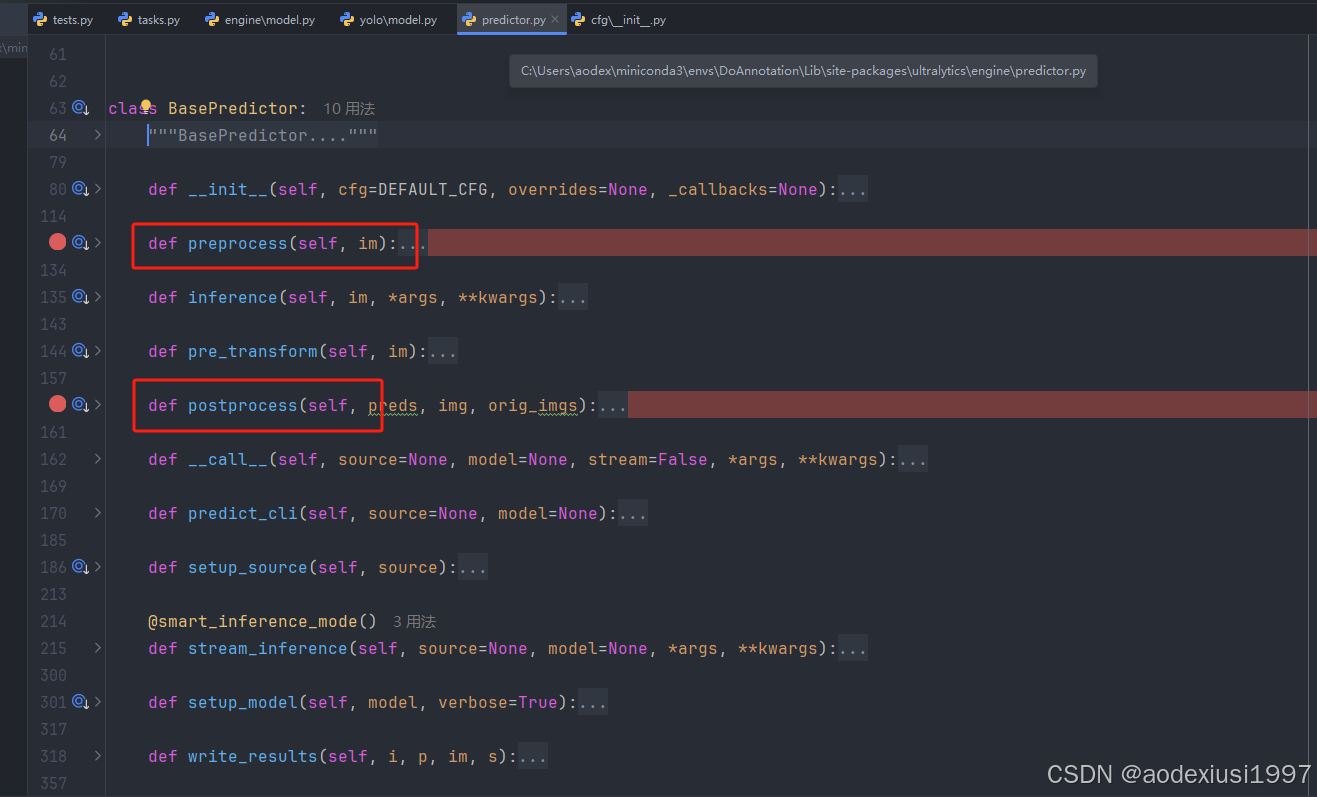
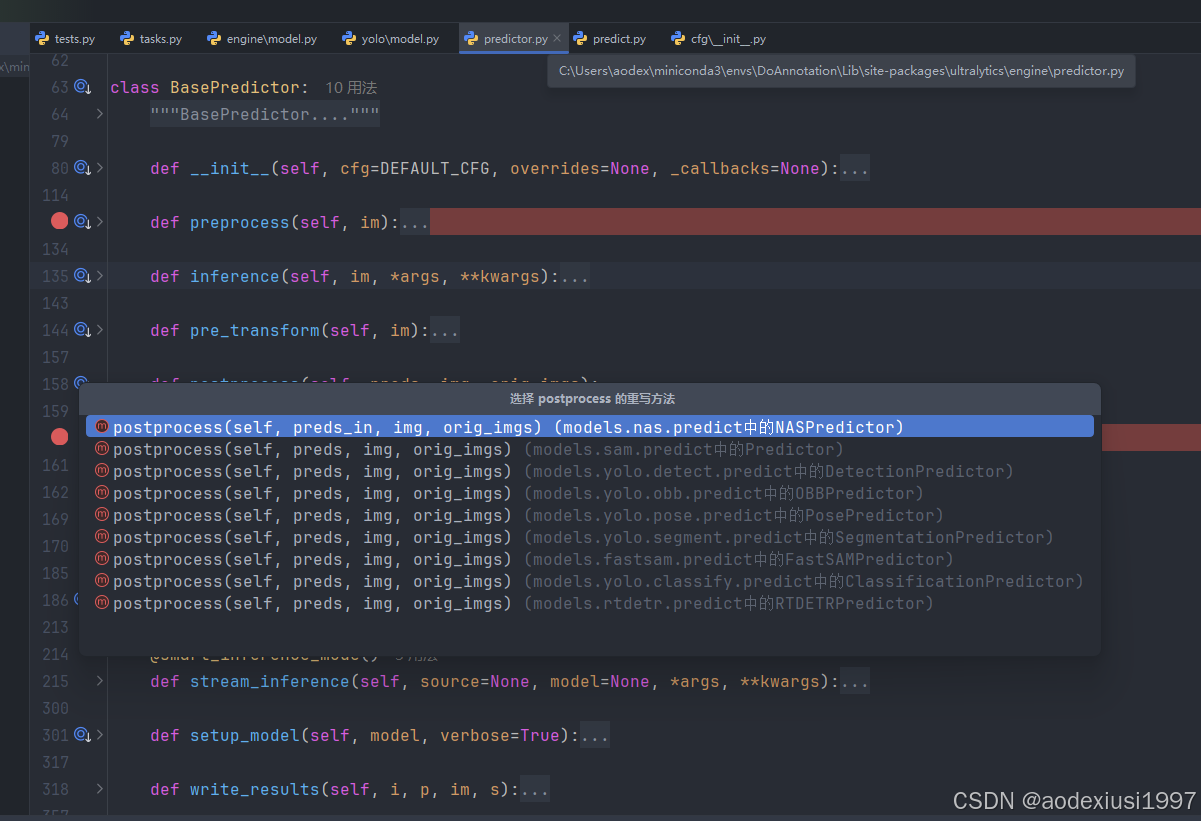
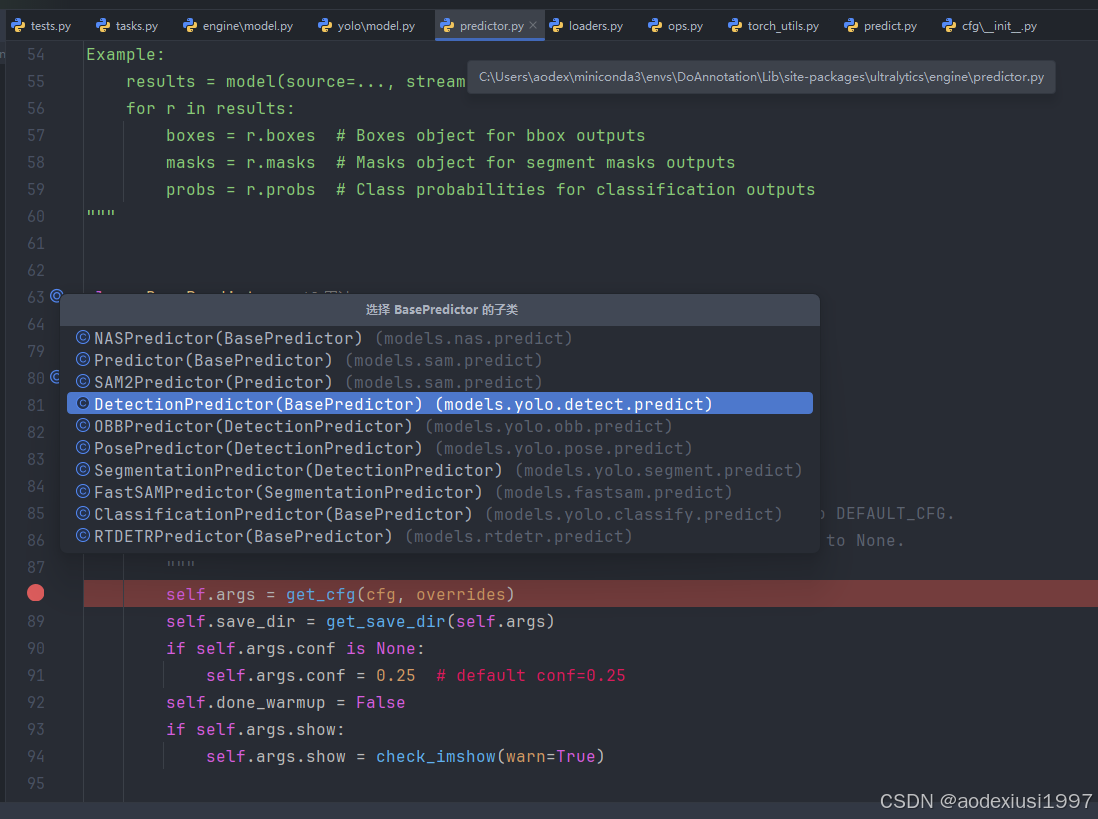
③、细看内容,我们在展开这两部分的代码就会发现,为什么前处理还有代码,后处理代码就直接返回数据了呢?别急在IDEA左侧可以看到这些方法基本都有重写,也就是说在针对不同的任务类别的时候,前处理可能大致相同,但是后处理都不大相同。在本文中我们重点查看对于detect部分(后面部分进行查看),如果想详细了解其它任务的具体实现可以自行设置对应任务进行debug。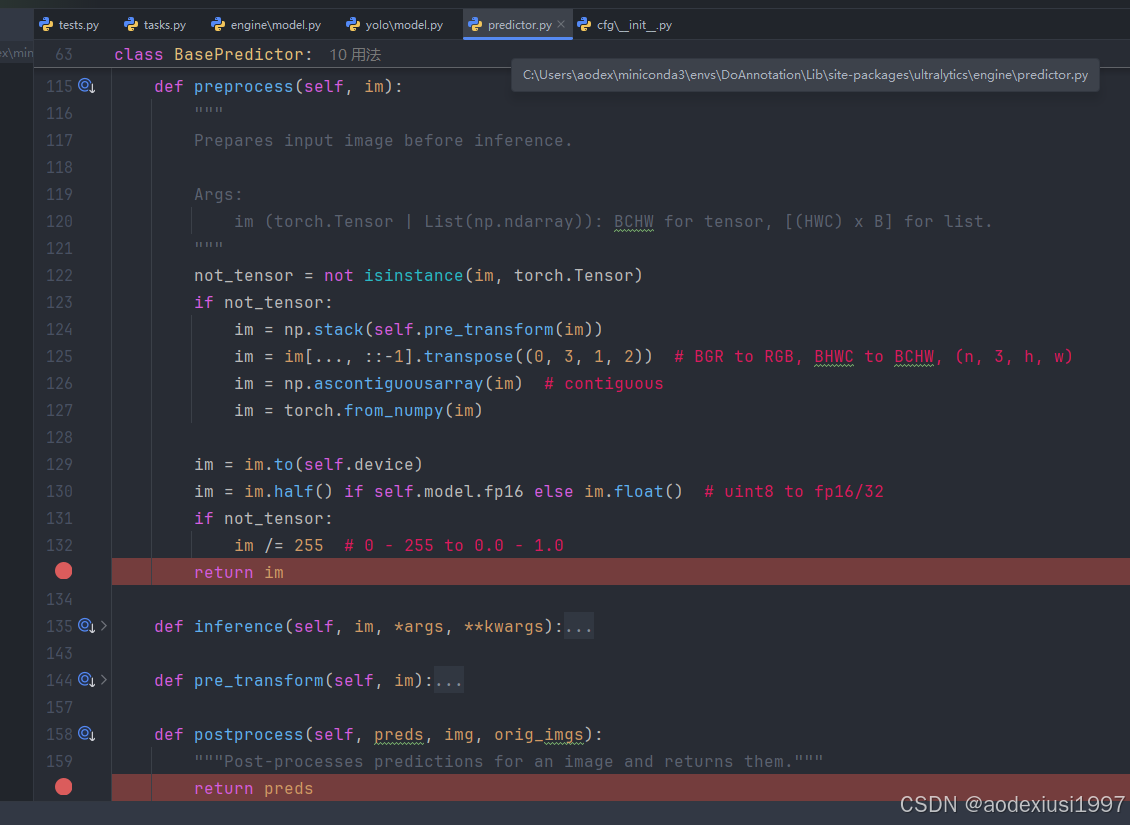
④、其它方法简单查看,我们还可以看下这里的__call__函数,看会怎么调用,发现这里就是参数stream=True/False的地方,能够看出来它们最后返回的对象不是一样的哦,也就是设置stream参数会对结果获取有不同的方法哦!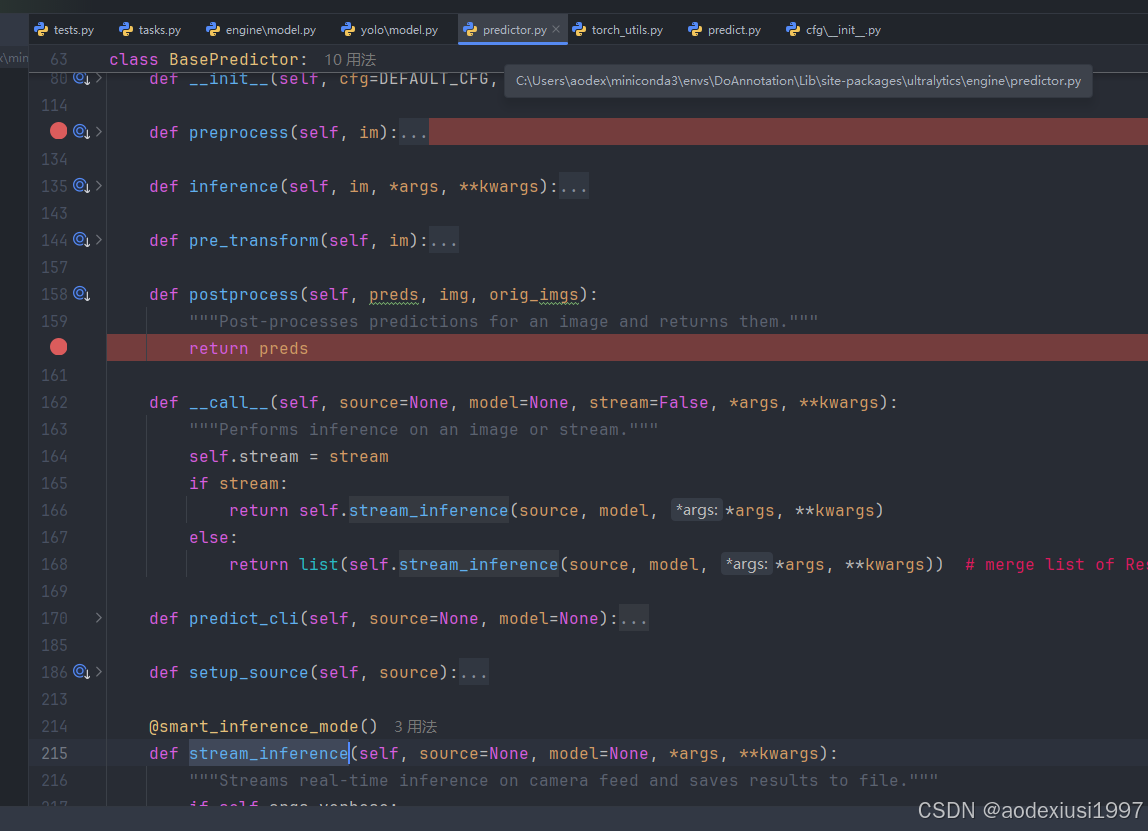
接下来,继续。它会调用BasePredicter的stream_inference()进行推理。这个方法有个装饰器@smart_inference(),也就是判断pytorch版本并进行推理优化。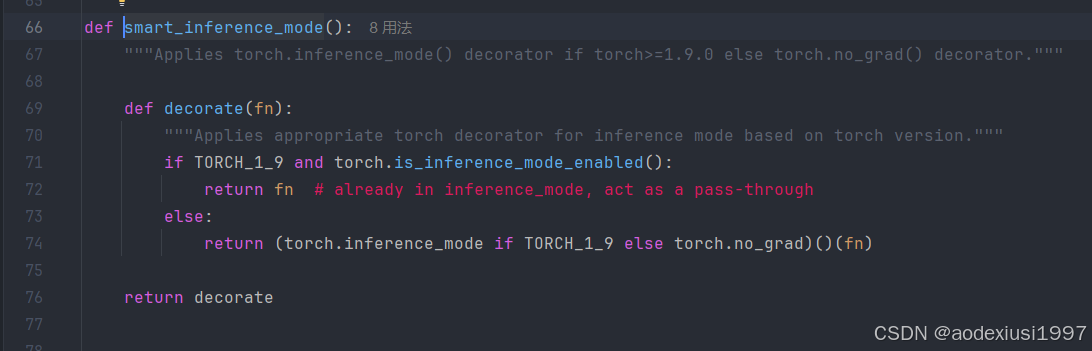
⑤、推理相关,接下里,重点看下stream_inference(self, source=None, model=None, *args, **kwargs)。前期也就是做的设置模型、输入数据、以及检查相关文件夹情况,以及预热模型(打箭头部分)。自己做推理用GPU前面1/2帧推理太慢就可以先做模型预热哦~
⑥、接上面未截图全部分,这个ops.Profile()基本也就是推理情况记录器、针对时间。后面基本就是图像前处理 推理 图像后处理部分 数据可视化的部分了。 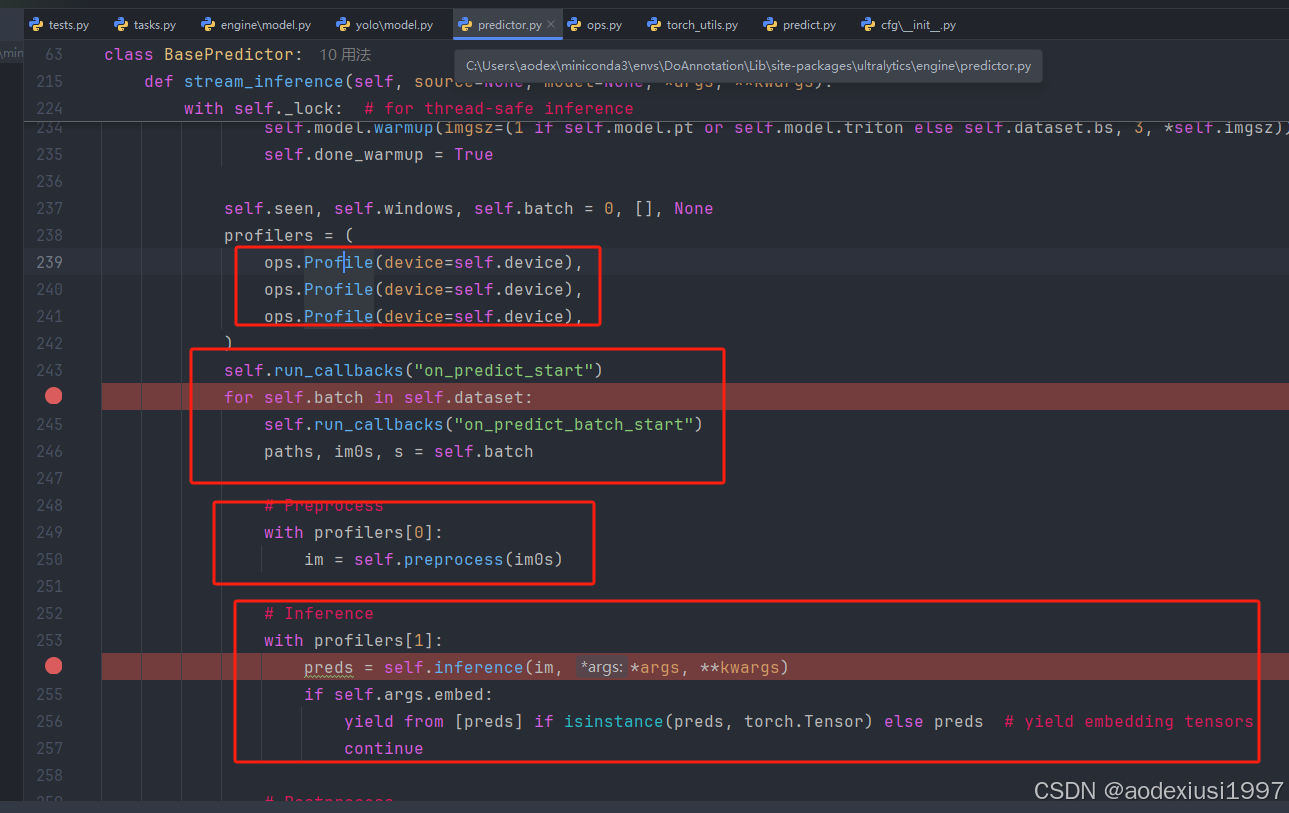
2、针对继承BasePredictor的DetectPredictor进行查看学习
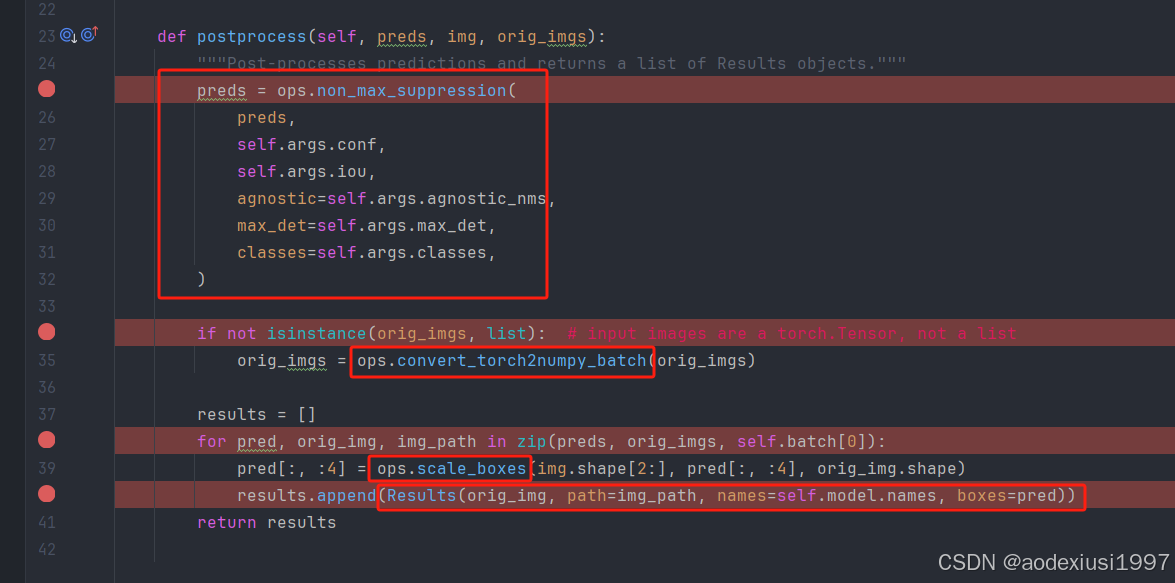
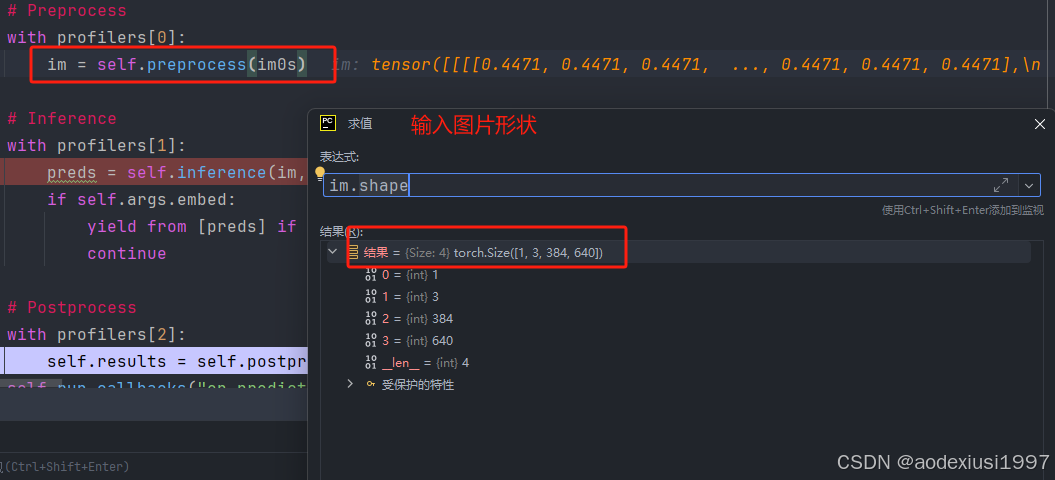
但是在查看之前我们还是先看前处理吧,因为前处理基本就是 增加通道、改数据类型等等。可以看到重写的方法就只有 分类和SAM 对于图像的前处理不同,也就其它任务对于图像的前处理基本是相同的。看下面的代码,就会明白,经常看到在一些嵌入式板端等等平台对 输入数据/255.0 的原因所在了。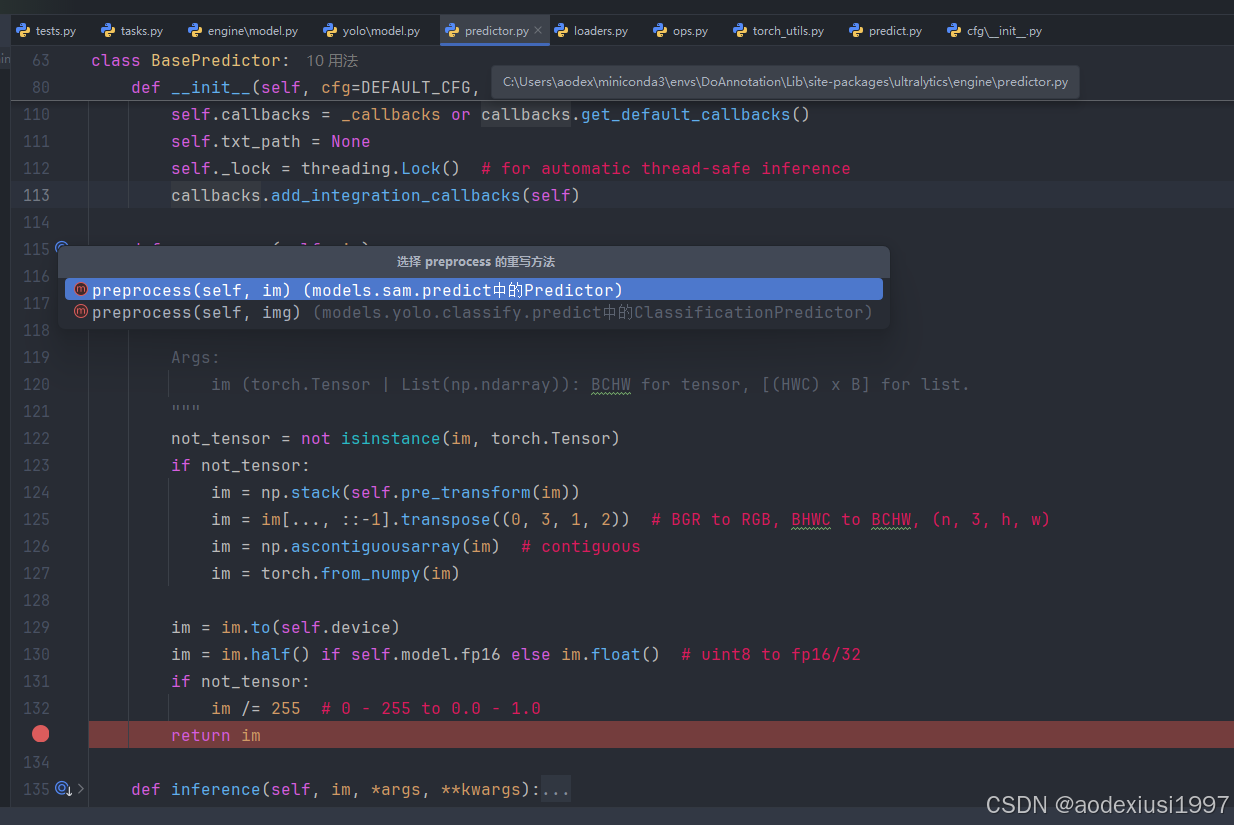 ①、正式跳转过去瞅瞅,你可以发现很短,就40来行的代码,主要是实现了postprocess,我们就可以根据这段逻辑实现后处理,不管是在c++平台或者还是其它需要实现后处理的地方。当然更加细致实现方式就在这些函数里面实现,可以点击进去详细查看,当然最主要的就是NMS的处理,有趣的是它在它的non_max_suppression()方法实现中,又去调用了torchvision.ops.下面的nms进行处理。当然实际上呢,进行nms的大概步骤基本就是那些。
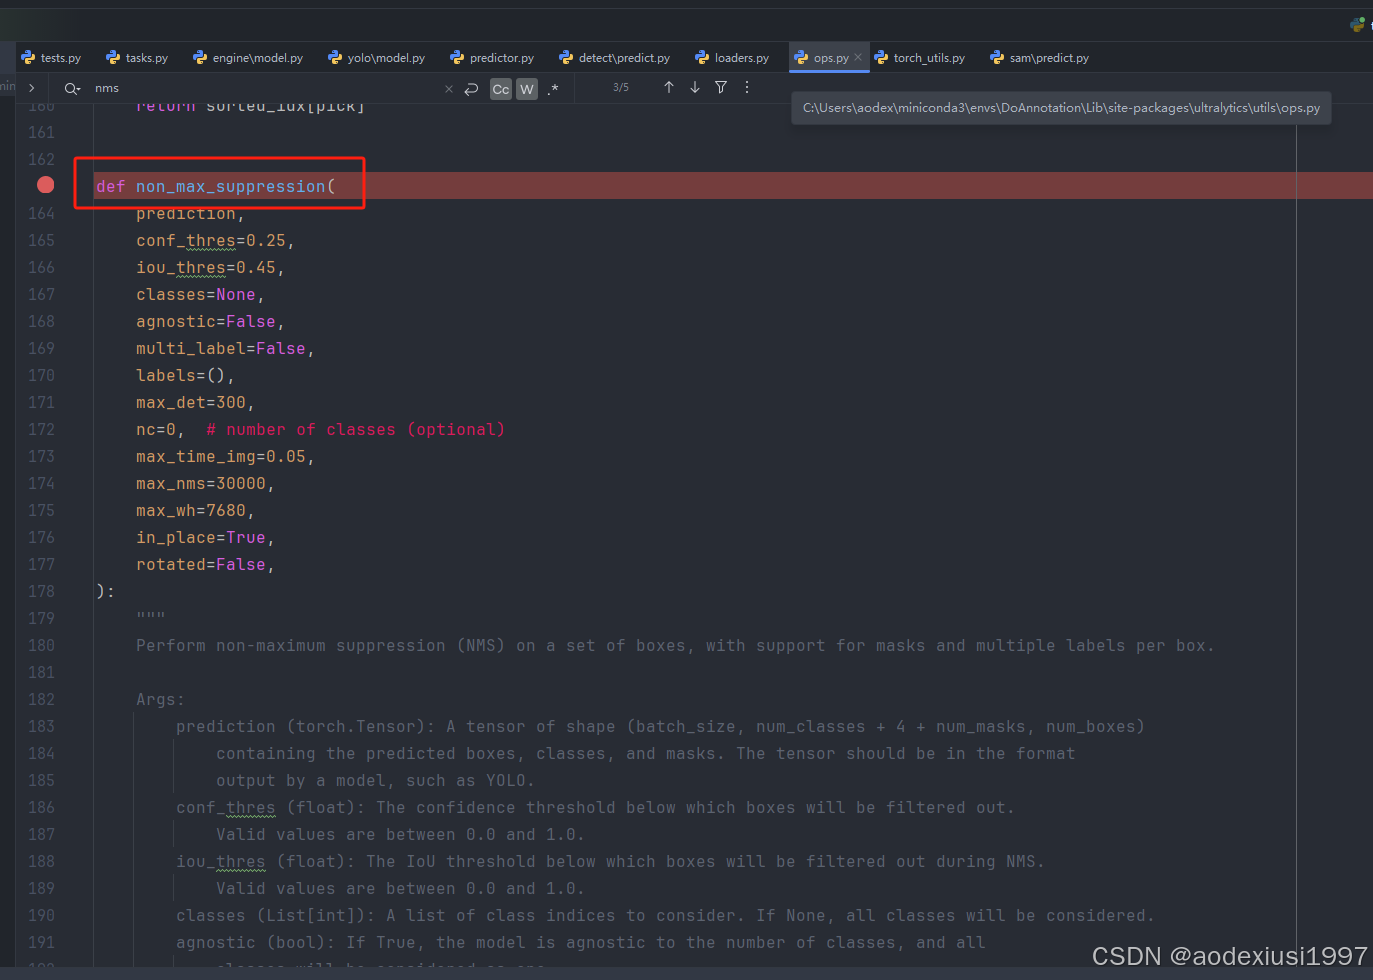
②、你可能对其中细节比较感兴趣,刚好,我也是,我也尝试进行一下解读操作。经过不断的步出和下一步终于到了关键部分。这是目前版本官方代码对于后处理的这部分代码。
最开始能看到一些默认参数和一些类别等等。
接着使用assert检测输入的阈值是否合法。
后面有意思的注意,这里面可以传递classes参数指定保留哪些检测类别结果,也就是你训练的多类别,可能只检测其中的一类或多类。可能有些同学不知道,官方文档也没看到,这还可以!
接下来就是一些NMS操作,其中还考虑了旋转矩形框(nms_rotated(boxes, scores, iou_thres))
还有进行类别的处理,(if labels and len(labels[xi]) and not rotated)你可以试试下面的代码,yolov8官方权重是保留了类别和类别名字的,自己训练的我没查看过,应该是差不多的。这个类别处理的作用,目前来看是再训练过程中,方便后续的损失处理。若错误,请指正,谢谢!
后面的话就是返回结果了!这部分结束后的一些可视化就不多研究了!!!
import torch


checkpoint = torch.load('model_weights.pt')
nc = checkpoint['model'].nc
names = checkpoint['model'].names
print(nc, names)
其中有对于标签的处理,也就是说一个框可能属于多个类别,这里需要进行不同的处理。
(
# 分离出边框、类别和掩码
box, cls, mask = x.split((4, nc, nm), 1)
if multi_label:
# 找到符合置信度的类别
i, j = torch.where(cls > conf_thres)
x = torch.cat((box[i], x[i, 4 + j, None], j[:, None].float(), mask[i]), 1)
else:
# 每个框选择最大置信度的类别
conf, j = cls.max(1, keepdim=True)
x = torch.cat((box, conf, j.float(), mask), 1)[conf.view(-1) > conf_thres])
)
def non_max_suppression(
    prediction,
    conf_thres=0.25,
    iou_thres=0.45,
    classes=None,
    agnostic=False,
    multi_label=False,
    labels=(),
    max_det=300,
    nc=0,  # number of classes (optional)
    max_time_img=0.05,
    max_nms=30000,
    max_wh=7680,
    in_place=True,
    rotated=False,
):
    """
    Perform non-maximum suppression (NMS) on a set of boxes, with support for masks and multiple labels per box.

    Args:
        prediction (torch.Tensor): A tensor of shape (batch_size, num_classes + 4 + num_masks, num_boxes)
            containing the predicted boxes, classes, and masks. The tensor should be in the format
            output by a model, such as YOLO.
        conf_thres (float): The confidence threshold below which boxes will be filtered out.
            Valid values are between 0.0 and 1.0.
        iou_thres (float): The IoU threshold below which boxes will be filtered out during NMS.
            Valid values are between 0.0 and 1.0.
        classes (List[int]): A list of class indices to consider. If None, all classes will be considered.
        agnostic (bool): If True, the model is agnostic to the number of classes, and all
            classes will be considered as one.
        multi_label (bool): If True, each box may have multiple labels.
        labels (List[List[Union[int, float, torch.Tensor]]]): A list of lists, where each inner
            list contains the apriori labels for a given image. The list should be in the format
            output by a dataloader, with each label being a tuple of (class_index, x1, y1, x2, y2).
        max_det (int): The maximum number of boxes to keep after NMS.
        nc (int, optional): The number of classes output by the model. Any indices after this will be considered masks.
        max_time_img (float): The maximum time (seconds) for processing one image.
        max_nms (int): The maximum number of boxes into torchvision.ops.nms().
        max_wh (int): The maximum box width and height in pixels.
        in_place (bool): If True, the input prediction tensor will be modified in place.
        rotated (bool): If Oriented Bounding Boxes (OBB) are being passed for NMS.

    Returns:
        (List[torch.Tensor]): A list of length batch_size, where each element is a tensor of
            shape (num_boxes, 6 + num_masks) containing the kept boxes, with columns
            (x1, y1, x2, y2, confidence, class, mask1, mask2, ...).
    """
    import torchvision  # scope for faster 'import ultralytics'

    # Checks
    assert 0 <= conf_thres <= 1, f"Invalid Confidence threshold {conf_thres}, valid values are between 0.0 and 1.0"
    assert 0 <= iou_thres <= 1, f"Invalid IoU {iou_thres}, valid values are between 0.0 and 1.0"
    if isinstance(prediction, (list, tuple)):  # YOLOv8 model in validation model, output = (inference_out, loss_out)
        prediction = prediction[0]  # select only inference output
    if classes is not None:
        classes = torch.tensor(classes, device=prediction.device)

    if prediction.shape[-1] == 6:  # end-to-end model (BNC, i.e. 1,300,6)
        output = [pred[pred[:, 4] > conf_thres][:max_det] for pred in prediction]
        if classes is not None:
            output = [pred[(pred[:, 5:6] == classes).any(1)] for pred in output]
        return output

    bs = prediction.shape[0]  # batch size (BCN, i.e. 1,84,6300)
    nc = nc or (prediction.shape[1] - 4)  # number of classes
    nm = prediction.shape[1] - nc - 4  # number of masks
    mi = 4 + nc  # mask start index
    xc = prediction[:, 4:mi].amax(1) > conf_thres  # candidates

    # Settings
    # min_wh = 2  # (pixels) minimum box width and height
    time_limit = 2.0 + max_time_img * bs  # seconds to quit after
    multi_label &= nc > 1  # multiple labels per box (adds 0.5ms/img)

    prediction = prediction.transpose(-1, -2)  # shape(1,84,6300) to shape(1,6300,84)
    if not rotated:
        if in_place:
            prediction[..., :4] = xywh2xyxy(prediction[..., :4])  # xywh to xyxy
        else:
            prediction = torch.cat((xywh2xyxy(prediction[..., :4]), prediction[..., 4:]), dim=-1)  # xywh to xyxy

    t = time.time()
    output = [torch.zeros((0, 6 + nm), device=prediction.device)] * bs
    for xi, x in enumerate(prediction):  # image index, image inference
        # Apply constraints
        # x[((x[:, 2:4] < min_wh) | (x[:, 2:4] > max_wh)).any(1), 4] = 0  # width-height
        x = x[xc[xi]]  # confidence

        # Cat apriori labels if autolabelling
        if labels and len(labels[xi]) and not rotated:
            lb = labels[xi]
            v = torch.zeros((len(lb), nc + nm + 4), device=x.device)
            v[:, :4] = xywh2xyxy(lb[:, 1:5])  # box
            v[range(len(lb)), lb[:, 0].long() + 4] = 1.0  # cls
            x = torch.cat((x, v), 0)

        # If none remain process next image
        if not x.shape[0]:
            continue

        # Detections matrix nx6 (xyxy, conf, cls)
        box, cls, mask = x.split((4, nc, nm), 1)

        if multi_label:
            i, j = torch.where(cls > conf_thres)
            x = torch.cat((box[i], x[i, 4 + j, None], j[:, None].float(), mask[i]), 1)
        else:  # best class only
            conf, j = cls.max(1, keepdim=True)
            x = torch.cat((box, conf, j.float(), mask), 1)[conf.view(-1) > conf_thres]

        # Filter by class
        if classes is not None:
            x = x[(x[:, 5:6] == classes).any(1)]

        # Check shape
        n = x.shape[0]  # number of boxes
        if not n:  # no boxes
            continue
        if n > max_nms:  # excess boxes
            x = x[x[:, 4].argsort(descending=True)[:max_nms]]  # sort by confidence and remove excess boxes

        # Batched NMS
        c = x[:, 5:6] * (0 if agnostic else max_wh)  # classes
        scores = x[:, 4]  # scores
        if rotated:
            boxes = torch.cat((x[:, :2] + c, x[:, 2:4], x[:, -1:]), dim=-1)  # xywhr
            i = nms_rotated(boxes, scores, iou_thres)
        else:
            boxes = x[:, :4] + c  # boxes (offset by class)
            i = torchvision.ops.nms(boxes, scores, iou_thres)  # NMS
        i = i[:max_det]  # limit detections

        # # Experimental
        # merge = False  # use merge-NMS
        # if merge and (1 < n < 3E3):  # Merge NMS (boxes merged using weighted mean)
        #     # Update boxes as boxes(i,4) = weights(i,n) * boxes(n,4)
        #     from .metrics import box_iou
        #     iou = box_iou(boxes[i], boxes) > iou_thres  # IoU matrix
        #     weights = iou * scores[None]  # box weights
        #     x[i, :4] = torch.mm(weights, x[:, :4]).float() / weights.sum(1, keepdim=True)  # merged boxes
        #     redundant = True  # require redundant detections
        #     if redundant:
        #         i = i[iou.sum(1) > 1]  # require redundancy

        output[xi] = x[i]
        if (time.time() - t) > time_limit:
            LOGGER.warning(f"WARNING ⚠️ NMS time limit {time_limit:.3f}s exceeded")
            break  # time limit exceeded

    return output
三、结尾
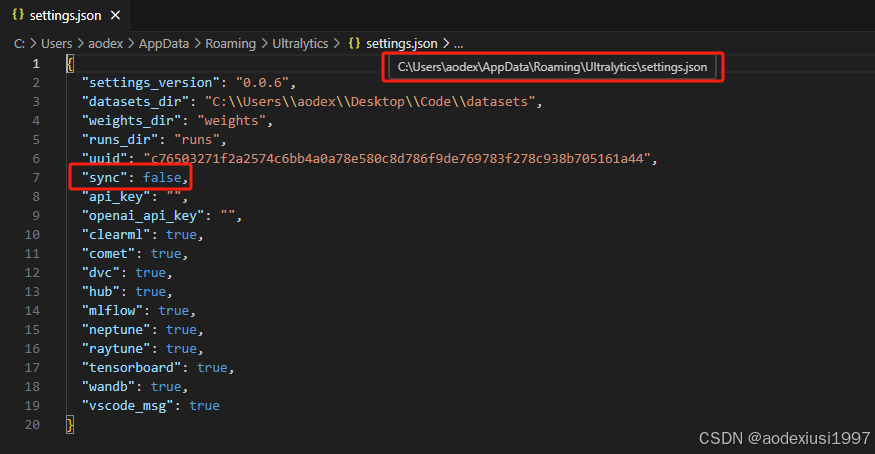
代码里面有很多方便使用部分,比如特别是在ultralytics\utils\ops.py里面,很多转换的代码,还可以。同时里面还涉及一些ultralytics官方传输不敏感信息进行收集的代码,此处贴出来,介意的可以将其设置未False,就可以不发送相关信息到ultralytcis官方!也就是一般会在安装使用第一次ultralytics的时候就会在对应用户路径下的相应文件夹创建一个setting.json配置文件,sync就是代表同不同意传输。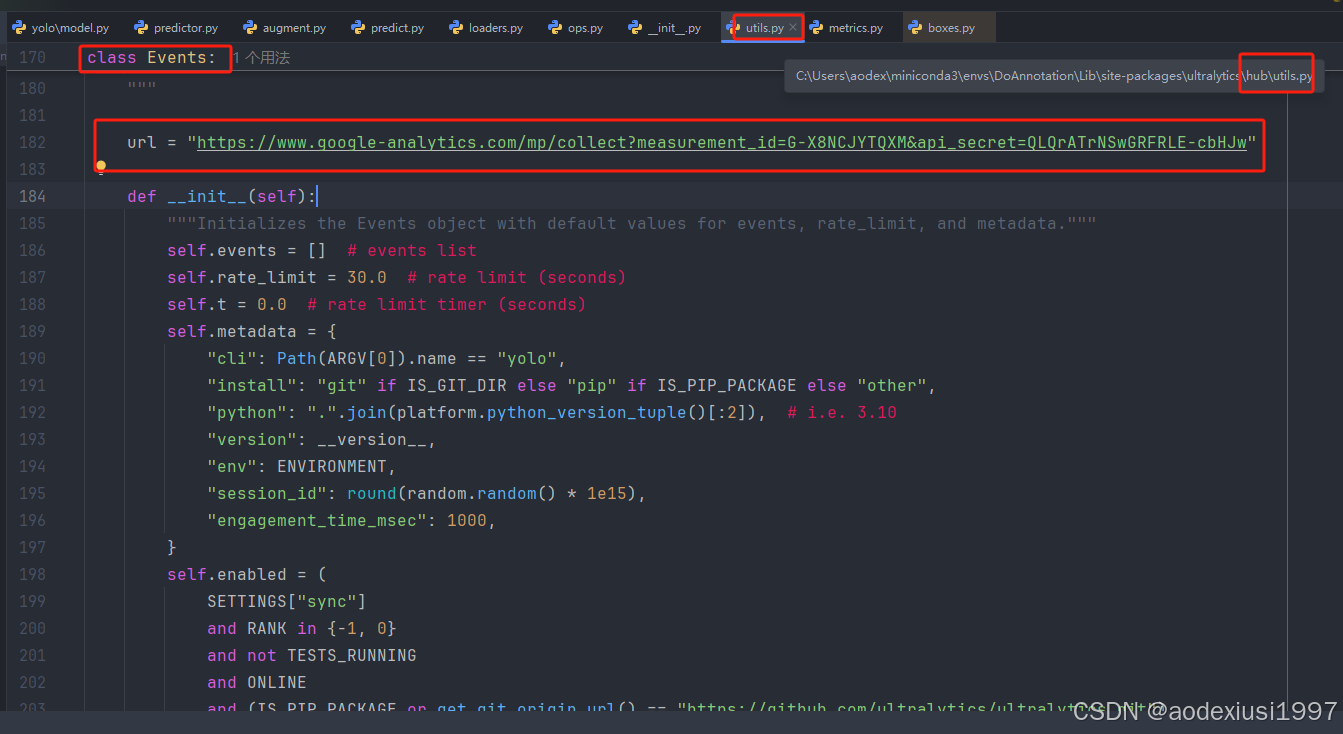
本文代码部分主要是来源于ultralytics/ultralytics: Ultralytics YOLO11 🚀,若涉及相关问题,请及时告知删除!
本文属于原创文章,未经允许禁止转载,后果自负~可能存在很多错误!如果看到了,请指正。这篇文章有时间还会不断修改,尽量将其中细节补充清楚!
版本v1.0
补充:
也许有同学在debug的时候会发现这里输出不是经典的8400,是1,84,5040呢?但是用相同的权重导出成onnx可以发现变成了1,84,8400。这是由于动态维度的问题,导出onnx的时候设定成640,640尺寸了,但是使用ultralytics推理却是使用动态维度,此时模型输出形状是1,84,5040。输出比例5040/8400=0.6,和图片输入384/640=0.6的比例相同!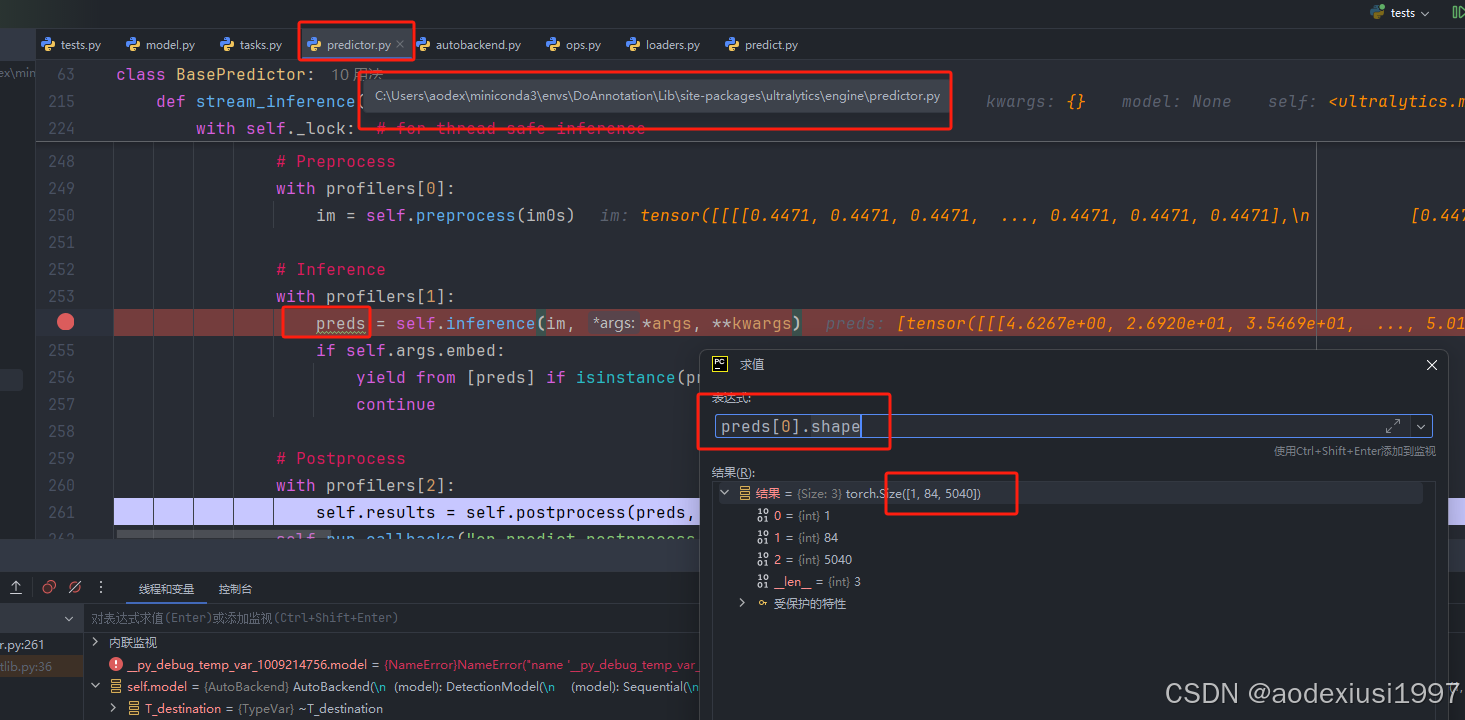
版本v1.1


 4万+
4万+

 被折叠的 条评论
为什么被折叠?
被折叠的 条评论
为什么被折叠?
 到【灌水乐园】发言


