


Chapter10 高级纹理
一、立方体纹理
1.基本概念
- 立方体映射是环境映射的一种实现方式,可以让物体反射出周围的环境
①组成
- 立方体纹理由6张图像组成,对应立方体6个面(左手坐标系)
- 正面 (Front):沿着 +Z 轴观察
- 背面 (Back):沿着 -Z 轴观察
- 左面 (Left):沿着 -X 轴观察
- 右面 (Right):沿着 +X 轴观察
- 上面 (Top):沿着 +Y 轴观察
- 下面 (Bottom):沿着 -Y 轴观察
②采样
- 立方体纹理需要提供 三维纹理坐标 ,表示世界空间下的3D方向
- 这个方向矢量从立方体中心出发,延伸并与立方体的一个面相交,采样结果由交点处的图像数据决定
2.天空盒子 Sky Box
- 一个盒子,用来 模拟环境,整个场景被包围在一个立方体内
- 这个立方体每个面使用的技术就是 立方体纹理映射技术
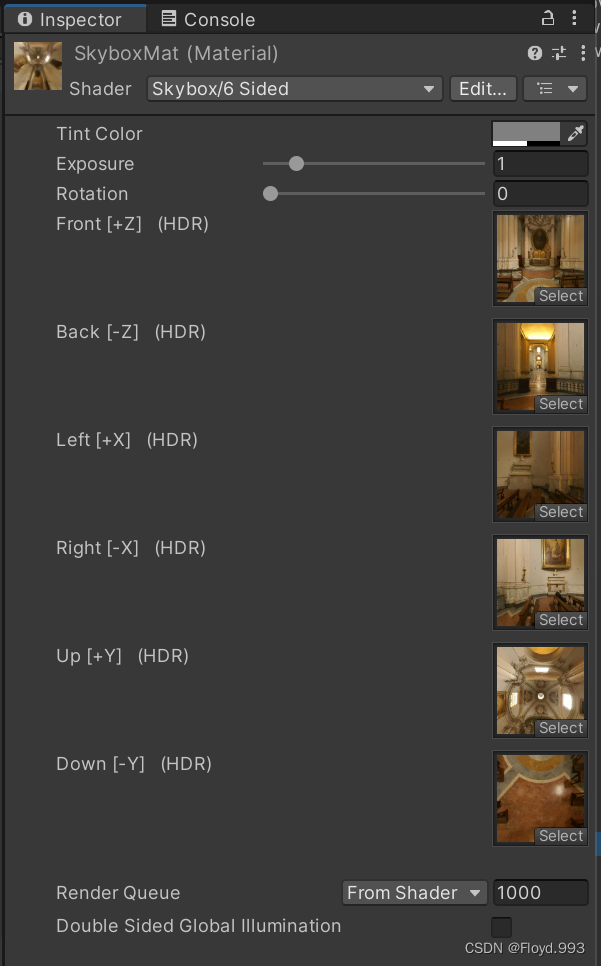
- 要把六张纹理的 Wrap Mode 设置为 Clamp
- Tint Color 控制材质的整体颜色
- Exposure 调整天空盒的亮度
- Rotation 调整天空盒沿 +y 方向的旋转角度
3.环境映射
- 可以模拟物体表面的 反射和折射效果 (金属、玻璃等质感的材质)
三种方法
①特殊布局的纹理创建
使用一张HDR图像(类似立方体展开图的交叉布局、全景布局等),把该纹理的 Texture Type 设置为 Cubemap 即可
②手动创建Cubemap——老方法
创建一个 Cubemap ,然后把6张纹理拖拽到面板中
③脚本生成
利用 Camera.RenderToCubemap 函数来实现(可以把任意位置观察到的场景图像存储到6张图像中,创建Cubemap)
4.反射
- 金属镀层效果
- 通过 入射光线的方向和表面法线方向 来计算 反射方向 ,再利用反射方向对立方体纹理采样即可
- _ReflectColor 用于控制反射颜色; _ReflectAmount 用于控制材质反射程度;_Cubemap 用于模拟反射的环境纹理
 Properties{
     _Color ("Color Tint", Color) = (1,1,1,1)
     _ReflectColor ("Reflect Color", Color) = (1,1,1,1)
     _ReflectAmount ("Reflect Amount", Range(0,1)) = 1
     _Cubemap ("Reflection Cubemap", Cube) = "_Skybox"{}
 }
- 在 v2f 结构体中定义了需要用于计算反射方向的 worldPos、worldNormal、worldViewDir 以及存储反射方向的 worldRefl
struct a2v{
    float4 vertex :POSITION;
    float3 normal : NORMAL;
};
struct v2f{
    float4 pos : SV_POSITION;
    float3 worldPos : TEXCOORD0;
    float3 worldNormal : TEXCOORD1;
    float3 worldViewDir : TEXCOORD2;
    fixed3 worldRefl : TEXCOORD3;
    SHADOW_COORD(4)
};
- 在顶点着色器中计算反射方向,用了CG的 reflect 函数
- 物体反射到摄像机的光线方向,可以由光路可逆原则来反向求得——可以计算 o.worldViewDir 视角方向 关于顶点法线的反射方向来求得入射光线方向
 v2f vert(a2v v)
 {
     v2f o;
     o.pos = mul(UNITY_MATRIX_MVP, v.vertex);
     o.worldNormal = UnityObjectToWorldNormal(v.normal);
     o.worldPos = mul(_Object2World, v.vertex).xyz;
     o.worldViewDir = UnityWorldSpaceViewDir(o.worldPos);

     //计算世界空间下的反射方向
     o.worldRefl = reflect(-o.worldViewDir, o.worldNormal);

     TRANSFER_SHADOW(o);
     return o;
 }
- 对立方体纹理采样需要用到 CG的 texCUBE 函数
- 使用 _ReflectAmount 来混合漫反射颜色和反射颜色
fixed4 frag(v2f i) : SV_Target{
    fixed3 worldNormal = normalize(i.worldNormal);
    fixed3 worldLightDir = normalize(UnityWorldSpaceLightDir(i.worldPos));
    fixed3 worldViewDir = normalize(i.worldViewDir);

    fixed3 ambient = UNITY_LIGHTMODEL_AMBIENT.xyz;
    fixed3 diffuse = _LightColor0.rgb * _Color.rgb * max(0, dot(worldNormal,worldLightDir));
    fixed3 reflection = texCUBE(_Cubemap, i.worldRefl).rgb * _ReflectColor.rgb;

    UNITY_LIGHT_ATTENTION(atten, i, i.worldPos);

    fixed3 color = ambient + lerp(diffuse, reflection, _ReflectAmount) * atten;

    return fixed4(color, 1.0);
}
- 把 Cubemap_0 拖进 Reflection map中
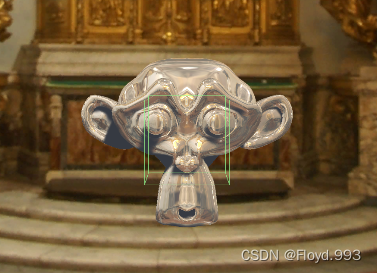

5.折射
- 给定入射角时,可以使用 斯涅尔定律 来计算反射角
- 当光从介质1沿着和表面法线夹角为 θ 1 θ_{1} θ1 的方向斜射入介质2时,可以用如下公式计算得到折射光线与法线的夹角 θ 2 θ_{2} θ2
- η 1 s i n θ 1 η_{1} sinθ_{1} η1sinθ1 = η 2 s i n θ 2 η_{2} sinθ_{2} η2sinθ2
-
η
1
η_{1}
η1 和
η
2
η_{2}
η2 为两介质的折射率(真空一般为1,玻璃一般为1.5)

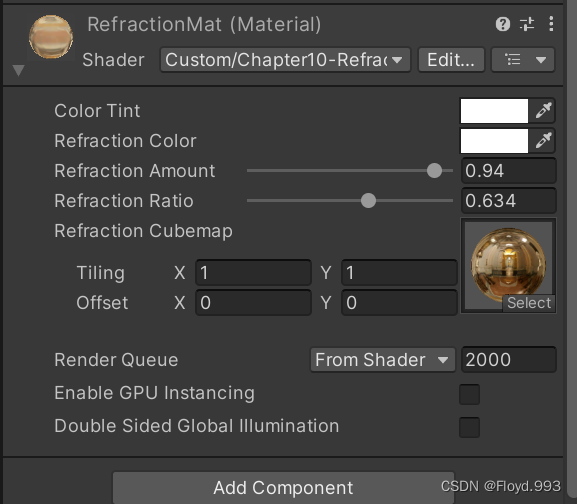
- _RefractColor、_RefractAmount 与反射属性相似, _RefractRatio 表示该属性不同介质的透射比(入射光线所在介质的折射率与折射光线所在介质折射率的比值),以此来计算折射方向
Properties{
    _Color ("Color Tint", Color) = (1,1,1,1)
    _RefractColor ("Refraction Color", Color) = (1,1,1,1)
    _RefractAmount ("Refraction Amount", Range(0, 1)) = 1
    _RefractRatio ("Refraction Ratio", Range(0.1, 1)) = 0.5
    _Cubemap ("Refraction Cubemap", Cube) = "_Skybox"{}
}
- 使用CG中的 refract函数来计算折射方向,第一个参数为 入射光线方向(必须归一化后的矢量),第二个为 表面法线(必须归一化后的矢量),第三个是两个介质的折射率比值
v2f vert(a2v v)
{
    v2f o;
    o.pos = mul(UNITY_MATRIX_MVP, v.vertex);

    o.worldPos = mul(_Object2World, v.vertex).xyz;
    o.worldNormal = UnityObjectToWorldNormal(v.normal);

    o.worldViewDir = UnityWorldSpaceViewDir(o.worldPos);

    //计算世界空间下的折射方向
    o.worldRefr = refract(-normalize(o.worldViewDir), normalize(o.worldNormal), _RefractRatio);

    TRANSFER_SHADOW(o);

    return o;
}
 fixed4 frag(v2f i) : SV_Target {
     fixed3 worldNormal = normalize(i.worldNormal);
     fixed3 worldPos = normalize(i.worldPos);
     fixed3 worldLightDir = normalize(UnityWorldSpaceLightDir(i.worldPos));
     fixed3 worldViewDir = normalize(i.worldViewDir);

     fixed3 ambient = UNITY_LIGHTMODEL_AMBIENT.xyz;
     fixed3 diffuse = _LightColor0.rgb * _Color.rgb * max(0,dot(worldNormal, worldLightDir));

     fixed3 refraction = texCUBE(_Cubemap, i.worldRefr).rgb * _RefractColor.rgb;

     UNITY_LIGHT_ATTENUATION(atten, i, i.worldPos);

     fixed3 color = ambient + lerp(diffuse, refraction, _RefractAmount)*atten;

     return fixed4(color,1.0);
 }

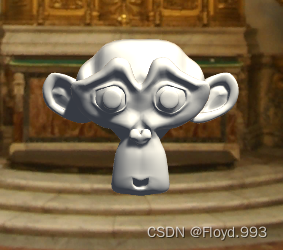
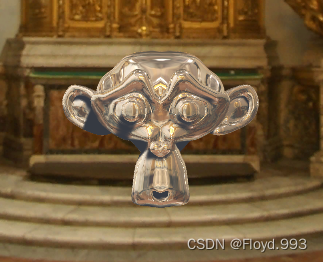
6.菲涅尔反射
- 描述了一种光学现象,光照到物体表面时,一部分发生反射,一部分进入物体内部发生折射或者散射
- 许多车漆、水面等材质的渲染中,会使用菲涅尔反射来模拟更加真实的效果
- Schlick 菲涅尔近似等式
- F s c h l i c k ( v ⋅ n ) = F 0 + ( 1 − F 0 ) ( 1 − v ⋅ n ) 5 F_{schlick}( v \cdot n) = F_{0} + (1 - F_{0})(1 - v \cdot n)^{5} Fschlick(v⋅n)=F0+(1−F0)(1−v⋅n)5
- F 0 F_{0} F0 为反射系数,用于控制菲涅尔反射的强度
- v 是视角方向,n 是表面法线
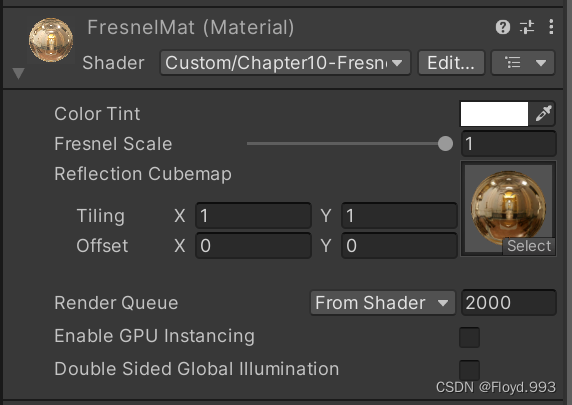
- 声明了用于调整菲涅尔反射的属性以及使用的Cubemap
Properties
{
		_Color ("Color Tint", Color) = (1,1,1,1)
		_FresnelScale ("Fresnel Scale", Range(0,1)) = 0.5
		_Cubemap ("Reflection Cubemap", Cube) = "_Skybox"{}
}
- 在顶点着色器中计算法线、视角方向以及反射方向
v2f vert(a2v v)
{
	v2f o;
	o.pos = mul(UNITY_MATRIX_MVP, v.vertex);
	o.worldPos = mul(_Object2World, v.vertex).xyz;
	o.worldNormal = UnityObjectToWorldNormal(v.normal);
	o.worldViewDir = UnityWorldSpaceViewDir(o.worldPos);
	o.worldRefl = reflect(-o.worldViewDir, o.worldNormal);

	TRANSFER_SHADOW(o);

	return o;
}
- 在片元着色器中计算菲涅尔反射,并使用结果指混合漫反射光照和反射光照
fixed4 frag(v2f i):SV_Target
{
	//fixed3 worldPos = normalize(i.worldPos);
	fixed3 worldNormal = normalize(i.worldNormal);
	fixed3 worldLightDir = normalize(UnityWorldSpaceLightDir(i.worldPos));
	fixed3 worldViewDir = normalize(i.worldViewDir);

	fixed3 ambient = UNITY_LIGHTMODEL_AMBIENT.xyz;

	UNITY_LIGHT_ATTENUATION(atten, i, i.worldPos);

	fixed3 reflection = texCUBE(_Cubemap, i.worldRefl).rgb;

	fixed fresnel = _FresnelScale + (1 - _FresnelScale) * pow(1-dot(worldNormal,worldViewDir),5);

	fixed3 diffuse = _LightColor0.rgb * _Color.rgb * max(0,dot(worldNormal,worldLightDir));
	fixed3 color = ambient + lerp(diffuse, reflection, saturate(fresnel)) * atten;

	return fixed4(color,1.0);
}
- _FresnelScale 调为1时,物体将完全反射图像,调为0时,则是一个具有边缘光照效果的漫反射物体
二、渲染
- 渲染纹理(Render Texture)是 Unity 中一种特殊的纹理类型,它允许我们将场景渲染到一张纹理上,而不是直接显示在屏幕上
1.镜子效果
- 创建一个Render Texture 作为渲染纹理
- 创建一个渲染摄像机,将摄像机的 Render Target 设为 Render Texture(要将摄像机绕y轴旋转180°)
- 声明一个纹理属性,对应了由镜子摄像机渲染得到的渲染纹理
Properties {
	_MainTex ("Main Tex", 2D) = "white" {}
}
- 在顶点着色器中计算纹理坐标
- 因为镜子是左右翻转的,所以需要翻转x坐标
v2f vert(a2v v) {
	v2f o;
	o.pos = UnityObjectToClipPos(v.vertex);

	o.uv = v.texcoord;
	// Mirror needs to filp x
	o.uv.x = 1 - o.uv.x;

	return o;
}
- 在片元着色器中对渲染纹理进行采样输出
fixed4 frag(v2f i) : SV_Target {
	return tex2D(_MainTex, i.uv);
}
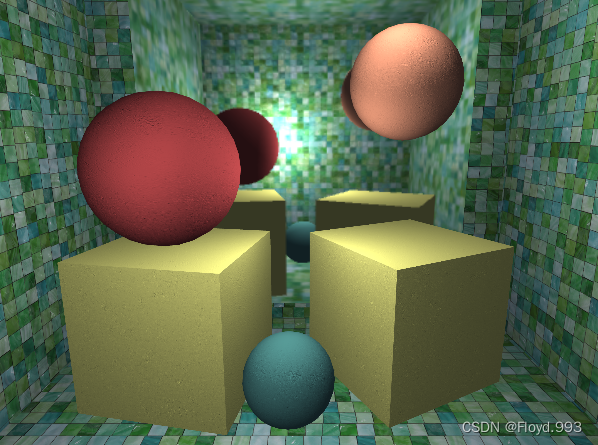
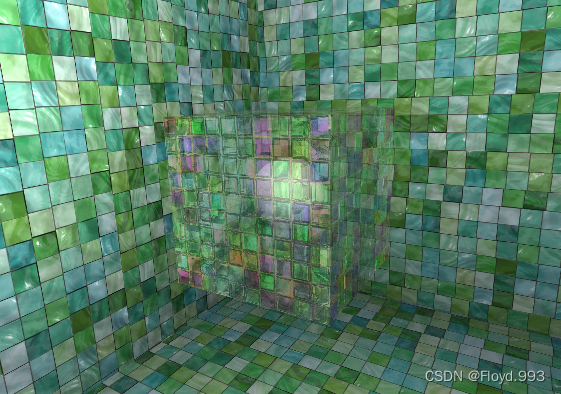
2.玻璃效果
- 还可以通过在Shader中使用一种特殊的Pass来完成获取屏幕图像的目的 —— GrabPass
- GrabPass可以实现类似于玻璃等透明材质的模拟(可以使用法线模拟折射效果)
- 使用时要注意渲染队列
- _MainTex是玻璃的材质纹理,_BumpMap是法线纹理,_Cubemap是模拟反射的环境纹理,_Distortion控制折射时图像的扭曲程度,_RefractAmount控制折射程度
Properties
{
	_MainTex ("Main Tex", 2D) = "white"{}
	_BumpMap ("Normal Map", 2D) = "white"{}
	_Cubemap ("Environment Cubemap", Cube) = "_Skybox"{}
	_Distortion ("Distortion", Range(0, 100)) = 100
	_RefractAmount ("Refract Amount", Range(0.0, 1.0)) = 1.0
}
- 定义相应的渲染队列,并使用GrabPass来获取屏幕图像
SubShader
{
	Tags { "Queue"="Transparent" "RenderType"="Opaque" }

	GrabPass {"_RefractionTex"}
- _RefractionTex 和_RefractionTex_TexelSize,后者可以让我们得到该纹理的纹素大小,我们需要在对屏幕图像的采样坐标进行偏移时使用该变量
sampler2D _MainTex;
float4 _MainTex_ST;
sampler2D _BumpMap;
float4 _BumpMap_ST;
samplerCUBE _Cubemap;
float _Distortion;
fixed _RefractAmount;
sampler2D _RefractionTex;
float4 _RefractionTex_TexelSize;
- 在顶点着色器中,使用内置的 ComputeGrabScreenPos 函数来得到对应被抓取屏幕图像的采样坐标
- o.uv 存储了 _MainTex 和 _BumpTex 的采样坐标
- 计算顶点对应的从切线空间到世界空间的变换矩阵 TBN → \rightarrow → 需要在片元着色器中把法线方向从切线方向(由法线采样纹理得)变换到世界空间下,以便对Cubemap进行采样。把TBN变换矩阵的每一行存储在 TtoW0、TtoW1、TtoW2 的xyz分量中,w存储世界空间下的顶点坐标
v2f vert (a2v v) {
	v2f o;
	o.pos = UnityObjectToClipPos(v.vertex);

	o.scrPos = ComputeGrabScreenPos(o.pos);

	o.uv.xy = TRANSFORM_TEX(v.texcoord, _MainTex);
	o.uv.zw = TRANSFORM_TEX(v.texcoord, _BumpMap);

	float3 worldPos = mul(unity_ObjectToWorld, v.vertex).xyz;
	fixed3 worldNormal = UnityObjectToWorldNormal(v.normal);
	fixed3 worldTangent = UnityObjectToWorldDir(v.tangent.xyz);
	fixed3 worldBinormal = cross(worldNormal, worldTangent) * v.tangent.w;

	o.TtoW0 = float4(worldTangent.x, worldBinormal.x, worldNormal.x, worldPos.x);
	o.TtoW1 = float4(worldTangent.y, worldBinormal.y, worldNormal.y, worldPos.y);
	o.TtoW2 = float4(worldTangent.z, worldBinormal.z, worldNormal.z, worldPos.z);

	return o;
}
- 在片元着色器中,首先通过TtoW0等获得顶点的世界坐标
- fixed3 bump = UnpackNormal(tex2D(_BumpMap, i.uv.zw));
- 对法线纹理进行采样,得到切线空间下的法线方向
- 使用bump 与 _Distortion、_RefractionTex_TexelSize 来对屏幕图像的采样坐标进行偏移
→
\rightarrow
→ 模拟折射效果
- _Distortio值越大,偏移越大,玻璃背后物体形变越大
- 选择使用切线空间下的法线方向来偏移 是因为该空间下的法线可以反映顶点局部空间下的法线方向
- 再对scrPos 透视除法 i.scrPos.xy/i.scrPos.w 得到真正屏幕坐标,再使用该坐标对抓取的屏幕图像进行采样,模拟折射的颜色
- 把法线从切线空间变换到世界空间 half3(dot(i.TtoW0.xyz, bump), dot(i.TtoW1.xyz, bump), dot(i.TtoW2.xyz, bump)),以此得到反射方向(光路可逆)
- 用反射方向对Cubemap进行采样 texCUBE(_Cubemap, reflDir).rgb ,并与主纹理颜色 texColor.rgb 相乘后得到反射颜色
- 最终用 _RefractAmount 对反射 reflCol * (1 - _RefractAmount) 和折射颜色 refrCol * _RefractAmount 进行混合,得到最终的输出颜色
fixed4 frag (v2f i) : SV_Target {
	float3 worldPos = float3(i.TtoW0.w, i.TtoW1.w, i.TtoW2.w);
	fixed3 worldViewDir = normalize(UnityWorldSpaceViewDir(worldPos));

	// Get the normal in tangent space
	fixed3 bump = UnpackNormal(tex2D(_BumpMap, i.uv.zw));

	// Compute the offset in tangent space
	float2 offset = bump.xy * _Distortion * _RefractionTex_TexelSize.xy;
	i.scrPos.xy = offset * i.scrPos.z + i.scrPos.xy;
	fixed3 refrCol = tex2D(_RefractionTex, i.scrPos.xy/i.scrPos.w).rgb;

	// Convert the normal to world space
	bump = normalize(half3(dot(i.TtoW0.xyz, bump), dot(i.TtoW1.xyz, bump), dot(i.TtoW2.xyz, bump)));
	fixed3 reflDir = reflect(-worldViewDir, bump);
	fixed4 texColor = tex2D(_MainTex, i.uv.xy);
	fixed3 reflCol = texCUBE(_Cubemap, reflDir).rgb * texColor.rgb;

	fixed3 finalColor = reflCol * (1 - _RefractAmount) + refrCol * _RefractAmount;

	return fixed4(finalColor, 1);
}
3.渲染纹理 vs GrabPass
- 渲染纹理:
- 需要创建一个 额外的摄像机 和一个 渲染纹理资源
- 可以自定义渲染纹理的分辨率和属性
- 效率更高,尤其是在移动设备上
- GrabPass:
- 实现简单,只需在着色器中 添加 GrabPass 命令
- 可以获取当前屏幕的图像,无需创建额外的摄像机
- 效率较低,尤其是在高分辨率屏幕上
- 所有使用 GrabPass 的物体都会 使用同一张屏幕图像
- 在移动设备上,GrabPass 虽然不会重新渲染场景,但往往需要CPU直接读取后备缓冲(back buffer),破坏了CPU和GPU的并行性
- 命令缓冲(Command Buffers)
- 可以实现类似抓屏的效果,并在不透明物体 渲染后对图像进行额外的操作,例如模糊、颜色调整等
- 效率更高,功能更强大,但使用起来也更复杂
三、程序纹理
- 指用计算机生成的图像,可以使用各种参数来控制纹理的外观
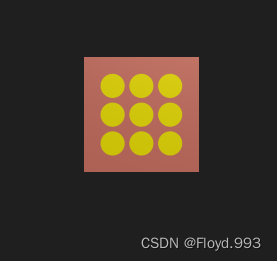
1.简单程序纹理
[ExecuteInEditMode] //为了让该脚本可以在编辑器模式下运行
public class ProceduralTextureGeneration : MonoBehaviour
{
    public Material material = null;
    #region Material properties
    //纹理的大小(数值通常是2的整数幂)
    [SerializeField, SetProperty("textureWidth")]
    private int m_textureWidth = 512;
    public int textureWidth
    {
        get
        {
            return m_textureWidth;
        }
        set
        {
            m_textureWidth = value;
            _UpdateMaterial();
        }
    }
    //纹理的背景颜色
    [SerializeField, SetProperty("backgroundColor")]
    private Color m_backgroundColor = Color.white;
    public Color backgroundColor
    {
        get
        {
            return m_backgroundColor;
        }
        set
        {
            m_backgroundColor = value;
            _UpdateMaterial();
        }
    }
    //圆点的颜色
    [SerializeField, SetProperty("circleColor")]
    private Color m_circleColor = Color.yellow;
    public Color circleColor
    {
        get
        {
            return m_circleColor;
        }
        set
        {
            m_circleColor = value;
            _UpdateMaterial();
        }
    }
    //模糊因子——模糊圆形边界
    [SerializeField, SetProperty("blurFactor")]
    private float m_blurFactor = 2.0f;
    public float blurFactor
    {
        get
        {
            return m_blurFactor;
        }
        set
        {
            m_blurFactor = value;
            _UpdateMaterial();
        }
    }
    #endregion

    private Texture2D m_generatedTexture = null; //保存生成的程序纹理

    private void Start()
    {
        if(material == null)
        {
            Renderer renderer = GetComponent<Renderer>();
            if(renderer == null)
            {
                Debug.LogWarning("Cannot find a renderer.");
                return;
            }
            material = renderer.sharedMaterial;
        }
        _UpdateMaterial();
    }
    private void _UpdateMaterial()
    {
        if (material != null)
        {
            m_generatedTexture = _GenerateProceduralTexture();
            material.SetTexture("_MainTex", m_generatedTexture); //把生成的纹理赋值给材质,material中需要有一个名为_MainTex 的纹理属性
        }
    }
    private Color _MixColor(Color color0, Color color1, float mixFactor)
    {
        Color mixColor = Color.white;
        mixColor.r = Mathf.Lerp(color0.r, color1.r, mixFactor);
        mixColor.g = Mathf.Lerp(color0.g, color1.g, mixFactor);
        mixColor.b = Mathf.Lerp(color0.b, color1.b, mixFactor);
        mixColor.a = Mathf.Lerp(color0.a, color1.a, mixFactor);
        return mixColor;
    }
    private Texture2D _GenerateProceduralTexture()
    {
        Texture2D proceduralTexture = new Texture2D(textureWidth, textureWidth);

        // 定义圆之间的间距
        float circleInterval = textureWidth / 4.0f;
        // 定义圆的半径
        float radius = textureWidth / 10.0f;
        //定义模糊系数
        float edgeBlur = 1.0f / blurFactor;

        for (int w = 0; w < textureWidth; w++)
        {
            for (int h = 0; h < textureWidth; h++)
            {
                //使用背景颜色初始化
                Color pixel = backgroundColor;

                // 依次画9个圆
                for (int i = 0; i < 3; i++)
                {
                    for (int j = 0; j < 3; j++)
                    {
                        // 计算当前所绘制的圆心位置
                        Vector2 circleCenter = new Vector2(circleInterval * (i + 1), circleInterval * (j + 1));

                        // 计算当前像素与圆心的距离
                        float dist = Vector2.Distance(new Vector2(w, h), circleCenter) - radius;

                        // 模糊圆的边界
                        Color color = _MixColor(circleColor, new Color(pixel.r, pixel.g, pixel.b, 0.0f), Mathf.SmoothStep(0f, 1.0f, dist * edgeBlur));

                        // 混合颜色
                        pixel = _MixColor(pixel, color, color.a);
                    }
                }

                proceduralTexture.SetPixel(w, h, pixel);
            }
        }

        proceduralTexture.Apply();

        return proceduralTexture;
    }
}
2.Unity中的程序材质
- 程序材质使用的纹理是程序纹理,在 Substance Designer 生成
- 自由度高
- 可与 Shader 配合:可以实现更加复杂的视觉效果


 3338
3338


 被折叠的 条评论
为什么被折叠?
被折叠的 条评论
为什么被折叠?
 到【灌水乐园】发言


