


一、动态画面
1.1 内置时间变量
1.2 纹理动画
序列帧动画
准备一张序列帧图像
Shader "Unity Shaders Book/Chapter 11/Image Sequence Animation" {
	Properties {
		_Color ("Color Tint", Color) = (1, 1, 1, 1)
		_MainTex ("Image Sequence", 2D) = "white" {}
    	_HorizontalAmount ("Horizontal Amount", Float) = 4
    	_VerticalAmount ("Vertical Amount", Float) = 4
    	_Speed ("Speed", Range(1, 100)) = 30
	}
	SubShader {
	//半透明渲染标准tag
		Tags {"Queue"="Transparent" "IgnoreProjector"="True" "RenderType"="Transparent"}

		Pass {
			Tags { "LightMode"="ForwardBase" }

			ZWrite Off
			Blend SrcAlpha OneMinusSrcAlpha

			CGPROGRAM

			#pragma vertex vert
			#pragma fragment frag

			#include "UnityCG.cginc"

			fixed4 _Color;
			sampler2D _MainTex;
			float4 _MainTex_ST;
			float _HorizontalAmount;
			float _VerticalAmount;
			float _Speed;

			struct a2v {
			    float4 vertex : POSITION;
			    float2 texcoord : TEXCOORD0;
			};

			struct v2f {
			    float4 pos : SV_POSITION;
			    float2 uv : TEXCOORD0;
			};

			v2f vert (a2v v) {
				v2f o;
				o.pos = mul(UNITY_MATRIX_MVP, v.vertex);
				o.uv = TRANSFORM_TEX(v.texcoord, _MainTex);
				return o;
			}

			fixed4 frag (v2f i) : SV_Target {
			//计算行列数
				float time = floor(_Time.y * _Speed);
				float row = floor(time / _HorizontalAmount);
				float column = time - row * _HorizontalAmount;

//				half2 uv = float2(i.uv.x /_HorizontalAmount, i.uv.y / _VerticalAmount);
//				uv.x += column / _HorizontalAmount;
//				uv.y -= row / _VerticalAmount;
			// 采样,计算截取哪一块
				half2 uv = i.uv + half2(column, -row);
				uv.x /=  _HorizontalAmount;
				uv.y /= _VerticalAmount;

				fixed4 c = tex2D(_MainTex, uv);
				c.rgb *= _Color;

				return c;
			}

			ENDCG
		}
	}
	FallBack "Transparent/VertexLit"
}
滚动的背景
Shader "Unity Shaders Book/Chapter 11/Scrolling Background" {
	Properties {
	//分别是远处得场景和近处的场景
		_MainTex ("Base Layer (RGB)", 2D) = "white" {}
		_DetailTex ("2nd Layer (RGB)", 2D) = "white" {}
		_ScrollX ("Base layer Scroll Speed", Float) = 1.0
		_Scroll2X ("2nd layer Scroll Speed", Float) = 1.0
		_Multiplier ("Layer Multiplier", Float) = 1
	}
	SubShader {
		Tags { "RenderType"="Opaque" "Queue"="Geometry"}

		Pass {
			Tags { "LightMode"="ForwardBase" }

			CGPROGRAM

			#pragma vertex vert
			#pragma fragment frag

			#include "UnityCG.cginc"

			sampler2D _MainTex;
			sampler2D _DetailTex;
			float4 _MainTex_ST;
			float4 _DetailTex_ST;
			float _ScrollX;
			float _Scroll2X;
			float _Multiplier;

			struct a2v {
				float4 vertex : POSITION;
				float4 texcoord : TEXCOORD0;
			};

			struct v2f {
				float4 pos : SV_POSITION;
				float4 uv : TEXCOORD0;
			};

			v2f vert (a2v v) {
				v2f o;
				o.pos = mul(UNITY_MATRIX_MVP, v.vertex);
				// 滚动的x坐标
				o.uv.xy = TRANSFORM_TEX(v.texcoord, _MainTex) + frac(float2(_ScrollX, 0.0) * _Time.y);
				o.uv.zw = TRANSFORM_TEX(v.texcoord, _DetailTex) + frac(float2(_Scroll2X, 0.0) * _Time.y);

				return o;
			}

			fixed4 frag (v2f i) : SV_Target {
				fixed4 firstLayer = tex2D(_MainTex, i.uv.xy);
				fixed4 secondLayer = tex2D(_DetailTex, i.uv.zw);
				//用第二层的透明通道混合两张
				fixed4 c = lerp(firstLayer, secondLayer, secondLayer.a);
				c.rgb *= _Multiplier;

				return c;
			}

			ENDCG
		}
	}
	FallBack "VertexLit"
}
1.2 顶点动画
波动水流
Shader "Unity Shaders Book/Chapter 11/Water" {
	Properties {
		_MainTex ("Main Tex", 2D) = "white" {}
		_Color ("Color Tint", Color) = (1, 1, 1, 1)
		_Magnitude ("Distortion Magnitude", Float) = 1
 		_Frequency ("Distortion Frequency", Float) = 1
 		_InvWaveLength ("Distortion Inverse Wave Length", Float) = 10
 		_Speed ("Speed", Float) = 0.5
	}
	SubShader {
		// Need to disable batching because of the vertex animation
		//一些subshader在使用批处理的时候会出现问题
		//这些需要特殊处理的shader通常指包含了模型空间的顶点动画的shader
		Tags {"Queue"="Transparent" "IgnoreProjector"="True" "RenderType"="Transparent" "DisableBatching"="True"}

		Pass {
			Tags { "LightMode"="ForwardBase" }

			ZWrite Off
			Blend SrcAlpha OneMinusSrcAlpha
			//水流的每个面都能实现,关闭了剔除功能
			Cull Off

			CGPROGRAM
			#pragma vertex vert
			#pragma fragment frag

			#include "UnityCG.cginc"

			sampler2D _MainTex;
			float4 _MainTex_ST;
			fixed4 _Color;
			float _Magnitude;
			float _Frequency;
			float _InvWaveLength;
			float _Speed;

			struct a2v {
				float4 vertex : POSITION;
				float4 texcoord : TEXCOORD0;
			};

			struct v2f {
				float4 pos : SV_POSITION;
				float2 uv : TEXCOORD0;
			};

			v2f vert(a2v v) {
				v2f o;
				//计算位移,只在x方向上发生位移
				float4 offset;
				offset.yzw = float3(0.0, 0.0, 0.0);
				//第一个分量控制正弦函数的频率,后面几个控制不同位置的幅度
				offset.x = sin(_Frequency * _Time.y + v.vertex.x * _InvWaveLength + v.vertex.y * _InvWaveLength + v.vertex.z * _InvWaveLength) * _Magnitude;
				o.pos = mul(UNITY_MATRIX_MVP, v.vertex + offset);

				o.uv = TRANSFORM_TEX(v.texcoord, _MainTex);
				o.uv +=  float2(0.0, _Time.y * _Speed);

				return o;
			}

			fixed4 frag(v2f i) : SV_Target {
				fixed4 c = tex2D(_MainTex, i.uv);
				c.rgb *= _Color.rgb;

				return c;
			}

			ENDCG
		}
	}
	FallBack "Transparent/VertexLit"
}
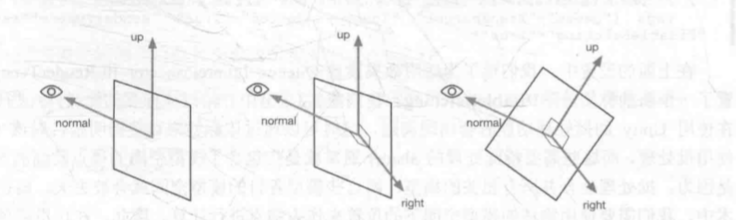
广告牌
指让一个被纹理着色渲染的多边形总是朝向摄像机
我们首先能获取
- 目标的表面法线
- 指向上的方向
通过这两个计算指向右的方向
这样就有两个基了,很容易算出第三个基
v2f vert (a2v v) {
				v2f o;
				//计算模型空间的视角方向
				float3 center = float3(0, 0, 0);
				float3 viewer = mul(_World2Object,float4(_WorldSpaceCameraPos, 1));
				//计算三个基向量
				float3 normalDir = viewer - center;
				normalDir.y =normalDir.y * _VerticalBillboarding;
				normalDir = normalize(normalDir);
				float3 upDir = abs(normalDir.y) > 0.999 ? float3(0, 0, 1) : float3(0, 1, 0);
				float3 rightDir = normalize(cross(upDir, normalDir));
				upDir = normalize(cross(normalDir, rightDir));

				// 只计算偏移,乘以基向量即可
				float3 centerOffs = v.vertex.xyz - center;
				float3 localPos = center + rightDir * centerOffs.x + upDir * centerOffs.y + normalDir * centerOffs.z;

				o.pos = mul(UNITY_MATRIX_MVP, float4(localPos, 1));
				o.uv = TRANSFORM_TEX(v.texcoord,_MainTex);

				return o;
			}
注意事项
- 使用顶点动画会降低性能(没有批处理)
- SHADOWCASTER的有关代码需要自己写
二、屏幕后处理
2.1 基本的后处理脚本系统
想要实现屏幕屏幕后处理的基础在于得到渲染后的屏幕图像,即抓取屏幕。
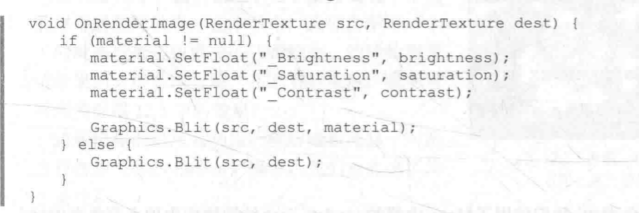
Unity提供了OnRenderImage函数

- 第一个参数是源纹理
- 第二个参数是输出纹理
在这个函数中,我们使用Graphics.Bilt函数完成对渲染纹理的处理

- src源纹理
- dest目标纹理,为null时直接显示到屏幕上
- mat是使用的材质,这个材质对应的shader将会进行屏幕后处理操作,而src回传传递给Shader中名为_MainTex的纹理属性
- pass为-1时代表所有的pass,否则指调用给指定索引
一般来讲,OnRenderImage会在所有不透明和透明的Pass执行完毕后悲调用,但是如果需要的话,可以通过给该函数前添加ImageEffectOpaque来达成在不透明物体Pass完之后立刻执行。
- 绑定脚本必需条件:这是个摄像机,并且我们希望在编辑器下也能看到这个效果
[ExecuteInEditMode]
[RequireComponent (typeof(Camera))]
- 需要提前检查各种资源是否满足
	protected void CheckResources() {
		bool isSupported = CheckSupport();

		if (isSupported == false) {
			NotSupported();
		}
	}
	protected bool CheckSupport() {
		if (SystemInfo.supportsImageEffects == false || SystemInfo.supportsRenderTextures == false) {
			Debug.LogWarning("This platform does not support image effects or render textures.");
			return false;
		}

		return true;
	}

	// Called when the platform doesn't support this effect
	protected void NotSupported() {
		enabled = false;
	}
	protected void Start() {
		CheckResources();
	}
- 用一个Shader来创建一个用于处理渲染纹理的材质,是一个方法
protected Material CheckShaderAndCreateMaterial(Shader shader, Material material) {
		if (shader == null) {
			return null;
		}

		if (shader.isSupported && material && material.shader == shader)
			return material;

		if (!shader.isSupported) {
			return null;
		}
		else {
			material = new Material(shader);
			material.hideFlags = HideFlags.DontSave;
			if (material)
				return material;
			else
				return null;
		}
	}
2.2 初级屏幕后处理
调整屏幕的亮度、饱和度、对比度。
对于屏幕特效来说,他们的材质都是临时创建的。
模型真的要说的就像个四边形面片
一开始先继承前面的基类
- 获取一个public shader,并且创建一个可访问的材质material

- 用OnRenderImage进行真正的特效处理,每当函数调用时,会检查材质是否可用,不可用就直接显示,可用就交给Graphics.Bilt
在shader这块,我们必须首先得有个_MainTex,作为Graphics.Bilt的输入,然后声明三个属性,上面的脚本会传入。
-
屏幕后处理实际上相当于一个遮盖图层,不能让他对其他的物体产生影响,要关闭深度写入
SubShader { Pass { ZTest Always Cull Off ZWrite Off -
顶点着色器就是把屏幕坐标变换并且传递uv
重点在于片元着色器
			fixed4 frag(v2f i) : SV_Target {
				fixed4 renderTex = tex2D(_MainTex, i.uv);

				// 调整整体亮度
				fixed3 finalColor = renderTex.rgb * _Brightness;

				// 像素点的亮度值
				fixed luminance = 0.2125 * renderTex.r + 0.7154 * renderTex.g + 0.0721 * renderTex.b;
				fixed3 luminanceColor = fixed3(luminance, luminance, luminance);
				finalColor = lerp(luminanceColor, finalColor, _Saturation);

				// Apply contrast
				fixed3 avgColor = fixed3(0.5, 0.5, 0.5);
				finalColor = lerp(avgColor, finalColor, _Contrast);

				return fixed4(finalColor, renderTex.a);
			}
边缘检测
卷积:
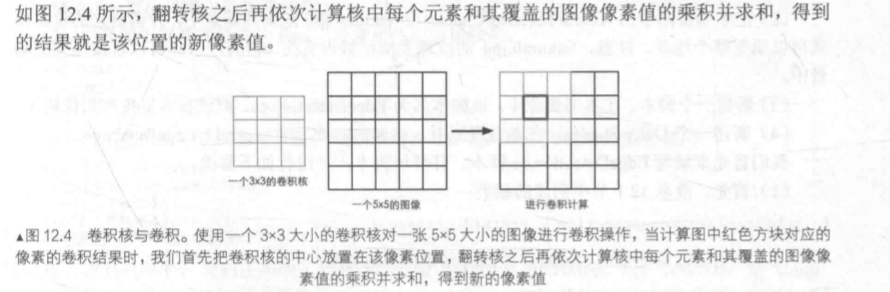
常用的边缘检测算子:
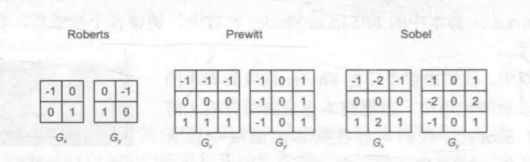
操作和上面一节基本相似
这里是需要注意的地方
- 提供的参数:

- 顶点着色器,需要计算边缘检测的纹理坐标,在结构体内定义九维的纹理数组
			struct v2f {
				float4 pos : SV_POSITION;
				half2 uv[9] : TEXCOORD0;
			};

			v2f vert(appdata_img v) {
				v2f o;
				o.pos = mul(UNITY_MATRIX_MVP, v.vertex);

				half2 uv = v.texcoord;
				//uv是1x1的,size可以精准定位像素
				o.uv[0] = uv + _MainTex_TexelSize.xy * half2(-1, -1);
				o.uv[1] = uv + _MainTex_TexelSize.xy * half2(0, -1);
				o.uv[2] = uv + _MainTex_TexelSize.xy * half2(1, -1);
				o.uv[3] = uv + _MainTex_TexelSize.xy * half2(-1, 0);
				o.uv[4] = uv + _MainTex_TexelSize.xy * half2(0, 0);
				o.uv[5] = uv + _MainTex_TexelSize.xy * half2(1, 0);
				o.uv[6] = uv + _MainTex_TexelSize.xy * half2(-1, 1);
				o.uv[7] = uv + _MainTex_TexelSize.xy * half2(0, 1);
				o.uv[8] = uv + _MainTex_TexelSize.xy * half2(1, 1);

				return o;
			}
- 片元着色器
			//计算明度
			fixed luminance(fixed4 color) {
				return  0.2125 * color.r + 0.7154 * color.g + 0.0721 * color.b;
			}
			//计算当前像素的梯度点edge
			half Sobel(v2f i) {
				const half Gx[9] = {-1,  0,  1,
										-2,  0,  2,
										-1,  0,  1};
				const half Gy[9] = {-1, -2, -1,
										0,  0,  0,
										1,  2,  1};

				half texColor;
				//水平和竖直方向上
				half edgeX = 0;
				half edgeY = 0;
				for (int it = 0; it < 9; it++) {
					texColor = luminance(tex2D(_MainTex, i.uv[it]));
					edgeX += texColor * Gx[it];
					edgeY += texColor * Gy[it];
				}
				//一个化简方法
				half edge = 1 - abs(edgeX) - abs(edgeY);

				return edge;
			}

			fixed4 fragSobel(v2f i) : SV_Target {
				half edge = Sobel(i);

				fixed4 withEdgeColor = lerp(_EdgeColor, tex2D(_MainTex, i.uv[4]), edge);
				fixed4 onlyEdgeColor = lerp(_EdgeColor, _BackgroundColor, edge);
				return lerp(withEdgeColor, onlyEdgeColor, _EdgeOnly);
 			}
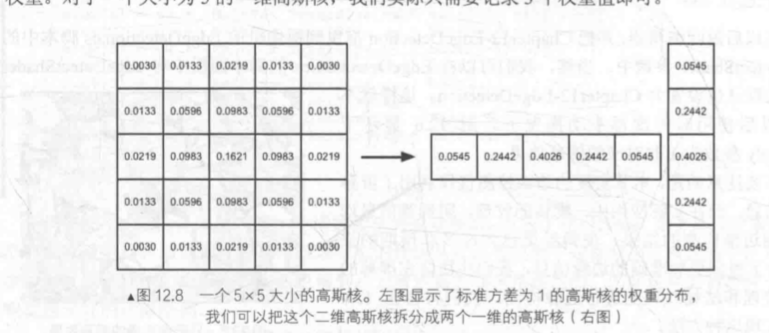
高斯模糊
高斯滤波

为了简化运算,我们可以把一个二维的高斯函数拆分成两个一维的,先后对图像滤波。
接下来我们会有两个pass(一个水平、一个垂直)对图像进行滤波。
- OnRenderImage的初阶实现,调用了两次pass,制定了一块缓冲区记录第一个pass的结果,再使用第二个pass。

- OnRenderImage的进阶实现,利用缩放对图像进行降采样,减少需要处理的像素个数

- OnRenderImage的高阶实现,考虑到了高斯模糊的迭代次数。
	void OnRenderImage (RenderTexture src, RenderTexture dest) {
		if (material != null) {
			int rtW = src.width/downSample;
			int rtH = src.height/downSample;

			RenderTexture buffer0 = RenderTexture.GetTemporary(rtW, rtH, 0);
			buffer0.filterMode = FilterMode.Bilinear;
			//把src的图像缩放后存储到buffer0中去
			Graphics.Blit(src, buffer0);
			//不断迭代,最终buffer0存储
			for (int i = 0; i < iterations; i++) {
				material.SetFloat("_BlurSize", 1.0f + i * blurSpread);

				RenderTexture buffer1 = RenderTexture.GetTemporary(rtW, rtH, 0);

				// Render the vertical pass
				Graphics.Blit(buffer0, buffer1, material, 0);

				RenderTexture.ReleaseTemporary(buffer0);
				buffer0 = buffer1;
				buffer1 = RenderTexture.GetTemporary(rtW, rtH, 0);

				// Render the horizontal pass
				Graphics.Blit(buffer0, buffer1, material, 1);

				RenderTexture.ReleaseTemporary(buffer0);
				buffer0 = buffer1;
			}

			Graphics.Blit(buffer0, dest);
			RenderTexture.ReleaseTemporary(buffer0);
		} else {
			Graphics.Blit(src, dest);
		}
	}
- 回到shader上,使用5x1的卷积核
这是水平方向的顶点着色器
		v2f vertBlurHorizontal(appdata_img v) {
			v2f o;
			o.pos = mul(UNITY_MATRIX_MVP, v.vertex);

			half2 uv = v.texcoord;

			o.uv[0] = uv;
			o.uv[1] = uv + float2(_MainTex_TexelSize.x * 1.0, 0.0) * _BlurSize;
			o.uv[2] = uv - float2(_MainTex_TexelSize.x * 1.0, 0.0) * _BlurSize;
			o.uv[3] = uv + float2(_MainTex_TexelSize.x * 2.0, 0.0) * _BlurSize;
			o.uv[4] = uv - float2(_MainTex_TexelSize.x * 2.0, 0.0) * _BlurSize;

			return o;
		}
竖直的同理
- 片元着色器两个用的是一样的
		fixed4 fragBlur(v2f i) : SV_Target {
			float weight[3] = {0.4026, 0.2442, 0.0545};

			fixed3 sum = tex2D(_MainTex, i.uv[0]).rgb * weight[0];

			for (int it = 1; it < 3; it++) {
				sum += tex2D(_MainTex, i.uv[it*2-1]).rgb * weight[it];
				sum += tex2D(_MainTex, i.uv[it*2]).rgb * weight[it];
			}

			return fixed4(sum, 1.0);
		}
Bloom
Bloom的原理是根据一个阈值提取出图像中较亮的区域,把他们存储在一张纹理中,再利用高斯模糊对这张纹理模糊,和原图像混合。
- OnRenderImage
和上面一节的基本相同,差异标在下面
void OnRenderImage (RenderTexture src, RenderTexture dest) {
		if (material != null) {
			material.SetFloat("_LuminanceThreshold", luminanceThreshold);

			int rtW = src.width/downSample;
			int rtH = src.height/downSample;

			RenderTexture buffer0 = RenderTexture.GetTemporary(rtW, rtH, 0);
			buffer0.filterMode = FilterMode.Bilinear;
			//第一个pass提取图像较亮区域
			Graphics.Blit(src, buffer0, material, 0);

			for (int i = 0; i < iterations; i++) {
				material.SetFloat("_BlurSize", 1.0f + i * blurSpread);

				RenderTexture buffer1 = RenderTexture.GetTemporary(rtW, rtH, 0);

				// Render the vertical pass
				Graphics.Blit(buffer0, buffer1, material, 1);

				RenderTexture.ReleaseTemporary(buffer0);
				buffer0 = buffer1;
				buffer1 = RenderTexture.GetTemporary(rtW, rtH, 0);

				// Render the horizontal pass
				Graphics.Blit(buffer0, buffer1, material, 2);

				RenderTexture.ReleaseTemporary(buffer0);
				buffer0 = buffer1;
			}
			//进行最后的混合
			material.SetTexture ("_Bloom", buffer0);
			Graphics.Blit (src, dest, material, 3);

			RenderTexture.ReleaseTemporary(buffer0);
		} else {
			Graphics.Blit(src, dest);
		}
	}
- 定义提取较亮区域的顶点和片元着色器
		struct v2f {
			float4 pos : SV_POSITION;
			half2 uv : TEXCOORD0;
		};

		v2f vertExtractBright(appdata_img v) {
			v2f o;

			o.pos = mul(UNITY_MATRIX_MVP, v.vertex);

			o.uv = v.texcoord;

			return o;
		}

		fixed luminance(fixed4 color) {
			return  0.2125 * color.r + 0.7154 * color.g + 0.0721 * color.b;
		}

		fixed4 fragExtractBright(v2f i) : SV_Target {
		//减去阈值
		//结果截取在0-1内
			fixed4 c = tex2D(_MainTex, i.uv);
			fixed val = clamp(luminance(c) - _LuminanceThreshold, 0.0, 1.0);

			return c * val;
		}
- 定义混合操作的顶点片元着色器
struct v2fBloom {
			float4 pos : SV_POSITION;
			half4 uv : TEXCOORD0;
		};

		v2fBloom vertBloom(appdata_img v) {
			v2fBloom o;

			o.pos = mul (UNITY_MATRIX_MVP, v.vertex);
			o.uv.xy = v.texcoord;
			o.uv.zw = v.texcoord;
			//平台差异化处理
			#if UNITY_UV_STARTS_AT_TOP
			if (_MainTex_TexelSize.y < 0.0)
				o.uv.w = 1.0 - o.uv.w;
			#endif

			return o;
		}

		fixed4 fragBloom(v2fBloom i) : SV_Target {
			return tex2D(_MainTex, i.uv.xy) + tex2D(_Bloom, i.uv.zw);
		}
运动模糊
在本例中,我们会保存之前的渲染结果,不断把当前的渲染图象叠加到之前的渲染图像中,产生一种运动轨迹的视觉效果。
- 定义一个RenderTexture类型的变量,保存之前图像叠加的结果,在脚本不运行的时候,销毁该texture,这样下次就可以重新叠加图像
- OnRenderImage函数
	void OnRenderImage (RenderTexture src, RenderTexture dest) {
		if (material != null) {
			// Create the accumulation texture
			//判断合不合屏幕分辨率
			//不合的情况下重新创建
			if (accumulationTexture == null || accumulationTexture.width != src.width || accumulationTexture.height != src.height) {
				DestroyImmediate(accumulationTexture);
				accumulationTexture = new RenderTexture(src.width, src.height, 0);
				//这个变量不会存在于Hierarchy里面
				accumulationTexture.hideFlags = HideFlags.HideAndDontSave;
				//我们使用当前的帧图像初始化
				Graphics.Blit(src, accumulationTexture);
			}

			//进行渲染纹理的恢复操作
			//恢复操作发生在渲染到纹理而该纹理没有被提前清空或者销毁的情况下
			//accumulationTexture不需要提前清空,他有我们的混合结果
			accumulationTexture.MarkRestoreExpected();

			material.SetFloat("_BlurAmount", 1.0f - blurAmount);

			Graphics.Blit (src, accumulationTexture, material);
			Graphics.Blit (accumulationTexture, dest);
		} else {
			Graphics.Blit(src, dest);
		}
	}
- shader这块比较简单
顶点着色器
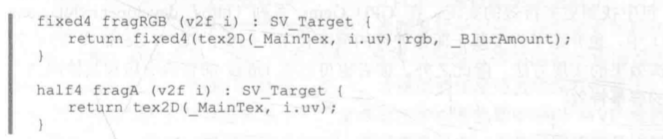
- 片元着色器,渲染RGB通道的A通道值为_BlurAmount,采样A通道的直接返回即可,这样是为了维护渲染纹理的透明通道值,否则会受到_BlurAmount的影响
- 我们会定义两个Pass,一个用于更新渲染纹理的RGB通道,另一个更新A通道


 875
875


 被折叠的 条评论
为什么被折叠?
被折叠的 条评论
为什么被折叠?
 到【灌水乐园】发言


