


目录
四:Using NTP and time settings via PLCnextBase library
五:NTP client configuration via WBM
六:Sync time with NTP server on AXC F 2152
七:Time sync through a proxy-server
一:默认时区
所有 PLCnext 控制设备默认设置为 UTC0,即协调世界时 (UTC) 的 UTC±00:00。
注意:由OPC UA or DataLogger创建的时间戳始终为 UTC0。
二:在控制器中修改系统时间
Setting via PLCnext Engineer
您可以通过PLCnext Engineer软件设置系统时间。使用PLCnext Engineer进行访问需要使用用户名和密码进行身份验证。.
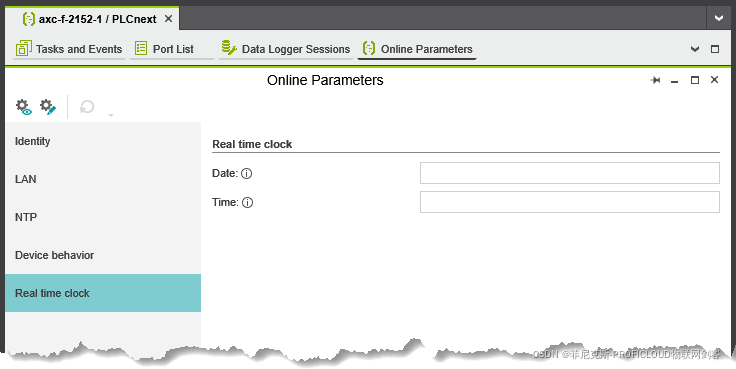
Defining RTC parameters
- In the PLANT area, click on PLCnext.
- 在 Online Parameters页签, 选择Real time clock.
- 在相应的输入框中输入想要的值(格式见圈内的ℹ)
在PLCnext Engineer导航栏中使用Clock button
通过时钟按钮,可以将主机当前系统时间写入控制器的实时时钟中,作为控制器的UTC0时间。
注意:控制器将忽略任何给定的偏移量或时区!

目前,在 PLCnext 设备上使用 UTC0 或特定时区(自动切换到/从夏令时)的唯一方法是使用PLCnextBase library中的 PLCnextBase 库。
Setting via shell
您还可以通过 shell 手动更改系统时间。 SSH 访问 shell 需要使用用户名和密码进行身份验证。 具有管理员权限的访问:
- User name: admin
- Password: 印在controller上
请求系统时间
- Open the shell.
- 通过date命令请求系统时间。
Setting the system time
- 输入shell命令 sudo date -s "YYYY-MM-DD hh:mm:ss", with
- YYYY: Year
- MM: Month
- TT: Day
- hh: Hours
- mm: Minutes
- ss: Seconds
三:Using the NTP client
可以连接到网络时间协议(NTP)服务器或启动自己的服务器。
NTP服务器可以通过PLCnext Engineer和RSC服务配置。
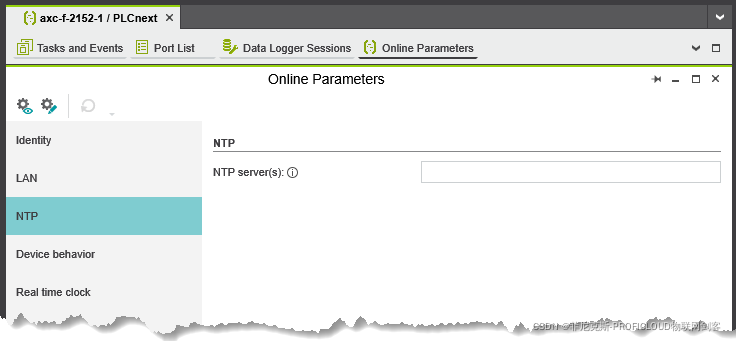
Setting via PLCnext Engineer
- In the PLANT area, click on PLCnext
- In the Online Parameters tab, select the NTP section
- 在输入栏中最多输入3个NTP服务器(以空格隔开)
- 重新启动PLCnext设备,使更改生效
Setting via shell
ntpd (Network Time Protocol daemon) 来自 Network Time Protocol project (see ntp.org) 被集成到操作系统中.
- 以Admin用户登录控制器,具有修改数据的权限。
- 进入 /etc/ 目录.
- 在“ntp.conf”配置文件中输入IP地址和名称
注意:WBM也使用相同的文件。 - 通过执行重启NTP守护进程 sudo /etc/init.d/ntpd
Additional information
- 在the developer's introduction中找到关于网络时间协议守护进程(ntpd)的一般概述 .
- 在the developer's documentation中找到配置选项的详细描述.
- PLCnext运行时已经包含了用于诊断和监控的NTP实用程序(例如ntpq和ntpdc)
四:Using NTP and time settings via PLCnextBase library
设置系统时间的另一种方法是 PLCnextBase library,它在 PLCnext Store 中免费提供,无需许可证。 将此库导入 PLCnextEngineer 后,它提供了一些有助于开发基于 PLCnext 的自动化解决方案的函数、功能块和程序。 它附带导入和设置说明,以及 IEC 61131-3 接口和所有组件的详细说明。
对于系统时间,PLCnextBase library依赖于本机 Linux 功能。 在 PLCnext Engineer 中导入此库后,您可以通过读取时区以及与 UTC 的本地偏移量来使用本地时间设置,并自动切换。
Note: Time stamps created by OPC UA or DataLogger are always UTC0.
五:NTP client configuration via WBM
Available from 2022.0LTS
NTP 客户端能够配置通过Date and TimeWBM页面.
六:Sync time with NTP server on AXC F 2152
This tutorial will shortly explain the steps to set the current ntp time for UTC. This is very useful when the PLC sends TSD data to PROFICLOUD and far superior to the hand-set version!
This assumes that you are not behind a proxy-server! When you are behind a proxy server your company has to provide their own ntp server (which address you must then use in this tutorial. If you are behind a proxy-server and your company does not provide ntp, then jump to the end of this document to see a non-ntp version for time synchronization!
Connect to the PLC via SSH.
Become root by entering the command “su” (this will ask for the password, which is written on the PLC)
Check the timezone using the following command. It should show “Universal”.
Now we need to configure ntp by editing the file “/etc/ntp.conf” and add the lines
server timeserver.europe.phoenixcontact.com
server pool.ntp.org
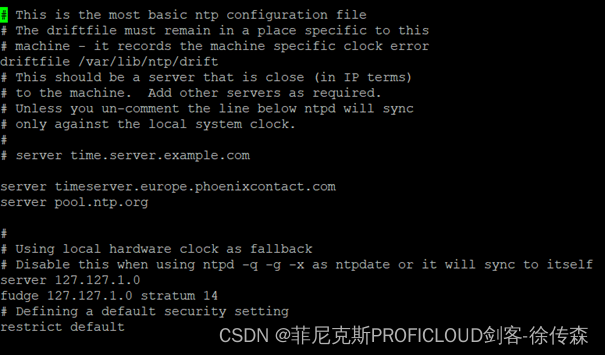
Save the file. The address pool.ntp.org will forward to the ntp server which is closest to you.
Now stop (!) the ntp daemon:
/etc/init.d/ntpd stop
We can now synchronize time using the following command:
ntpd -qg && hwclock -w
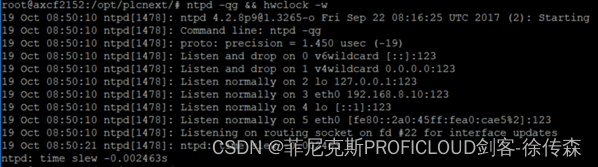
We can now check the date with the command “date” and compare it to the current UTC time (e.g. UTC - exact time now - Time.is)
![]()
Now we can schedule a crontab to regularly update the time. Edit the file “/etc/crontab”. Since we must stop the ntp daemon beforehande we need to add the following line to update the time at system start:
@reboot root /etc/init.d/ntpd stop && ntpd -qg && hwclock -w
Then, for an hourly update, also add the line:
1 * * * * root ntpd -qg && hwclock –w
to the file and save it.
Enjoy!
七:Time sync through a proxy-server:
To synchronize time behind a proxy-server and without company ntp server, just add the following 2 lines to the /etc/crontab file (instead of the above):
@reboot root date -u --set="$(curl -H 'Cache-Control: no-cache' -sD - http://google.com |grep '^Date:' |cut -d' ' -f3-6)"
1 * * * * root date -u --set="$(curl -H 'Cache-Control: no-cache' -sD - http://google.com |grep '^Date:' |cut -d' ' -f3-6)"
This assumes that you configured the proxy server (if any) in the environment variables. See the proxy-tutorial for more information on dealing with proxy-servers!


 2933
2933

 被折叠的 条评论
为什么被折叠?
被折叠的 条评论
为什么被折叠?
 到【灌水乐园】发言


