from:http://blog.csdn.net/lujiandong1/article/details/52777168
XGBoost模型和其他模型一样,如果迭代次数过多,也会进入过拟合。表现就是随着迭代次数的增加,测试集上的测试误差开始下降。当开始过拟合或者过训练时,测试集上的测试误差开始上升,或者说波动。下面通过实验来说明这种情况:
下面实验数据的来源:https://archive.ics.uci.edu/ml/datasets/Pima+Indians+Diabetes
-
- from numpy import loadtxt
- from xgboost import XGBClassifier
- from sklearn.cross_validation import train_test_split
- from sklearn.metrics import accuracy_score
-
- dataset = loadtxt('pima-indians-diabetes.csv', delimiter=",")
-
- X = dataset[:,0:8]
- Y = dataset[:,8]
-
- X_train, X_test, y_train, y_test = train_test_split(X, Y, test_size=0.33, random_state=7)
-
- model = XGBClassifier()
- eval_set = [(X_test, y_test)]
- model.fit(X_train, y_train, eval_metric="error", eval_set=eval_set, verbose=True)
-
- y_pred = model.predict(X_test)
- predictions = [round(value) for value in y_pred]
-
- accuracy = accuracy_score(y_test, predictions)
- print("Accuracy: %.2f%%" % (accuracy * 100.0))
下面,分析每次迭代时,test error的情况:
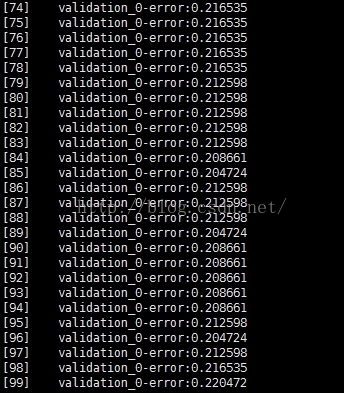
分析:当迭代次数过多时,测试集上的测试误差基本上已经不再下降。并且测试误差基本上已经在一个水平附近波动,甚至下降。说明,已经进入了过训练阶段
==============================================================================================================================
下面,我们通过可视化训练loss,测试loss来说明过拟合的现象
-
- from numpy import loadtxt
- from xgboost import XGBClassifier
- from sklearn.cross_validation import train_test_split
- from sklearn.metrics import accuracy_score
- from matplotlib import pyplot
-
- dataset = loadtxt('pima-indians-diabetes.csv', delimiter=",")
-
- X = dataset[:,0:8]
- Y = dataset[:,8]
-
- X_train, X_test, y_train, y_test = train_test_split(X, Y, test_size=0.33, random_state=7)
-
- model = XGBClassifier()
- eval_set = [(X_train, y_train), (X_test, y_test)]
- model.fit(X_train, y_train, eval_metric=["error", "logloss"], eval_set=eval_set, verbose=True)
-
- y_pred = model.predict(X_test)
- predictions = [round(value) for value in y_pred]
-
- accuracy = accuracy_score(y_test, predictions)
- print("Accuracy: %.2f%%" % (accuracy * 100.0))
-
- results = model.evals_result()
- epochs = len(results['validation_0']['error'])
- x_axis = range(0, epochs)
-
- fig, ax = pyplot.subplots()
- ax.plot(x_axis, results['validation_0']['logloss'], label='Train')
- ax.plot(x_axis, results['validation_1']['logloss'], label='Test')
- ax.legend()
- pyplot.ylabel('Log Loss')
- pyplot.title('XGBoost Log Loss')
- pyplot.show()
-
- fig, ax = pyplot.subplots()
- ax.plot(x_axis, results['validation_0']['error'], label='Train')
- ax.plot(x_axis, results['validation_1']['error'], label='Test')
- ax.legend()
- pyplot.ylabel('Classification Error')
- pyplot.title('XGBoost Classification Error')
- pyplot.show()
说明:对于该代码的一些解说
- eval_set = [(X_train, y_train), (X_test, y_test)]
- model.fit(X_train, y_train, eval_metric=["error", "logloss"], eval_set=eval_set, verbose=True)
说明:每轮迭代的过程中,需要对训练集和测试进行评测,并且,评测的指标是"error","logloss"
-
- results = model.evals_result()
- epochs = len(results['validation_0']['error'])
- x_axis = range(0, epochs)
-
- fig, ax = pyplot.subplots()
- ax.plot(x_axis, results['validation_0']['logloss'], label='Train')
- ax.plot(x_axis, results['validation_1']['logloss'], label='Test')
- ax.legend()
- pyplot.ylabel('Log Loss')
- pyplot.title('XGBoost Log Loss')
- pyplot.show()
说明:每轮评估的结果可以通过evals_result取得,results['validation_0']对应的是训练集的评估结果,results['validation_1']对应的是测试集上的评估结果
下面可视化训练集误差曲线和测试集误差曲线:
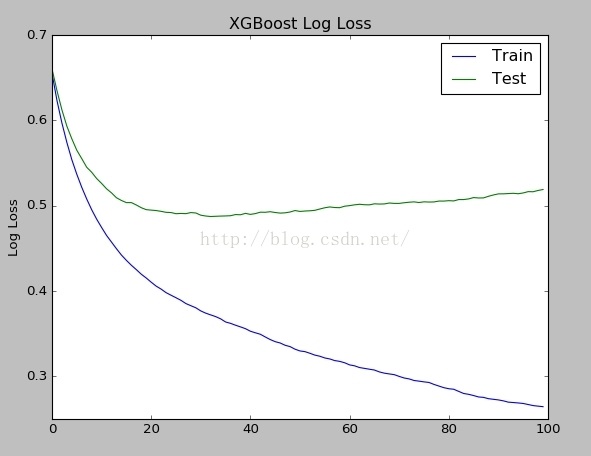
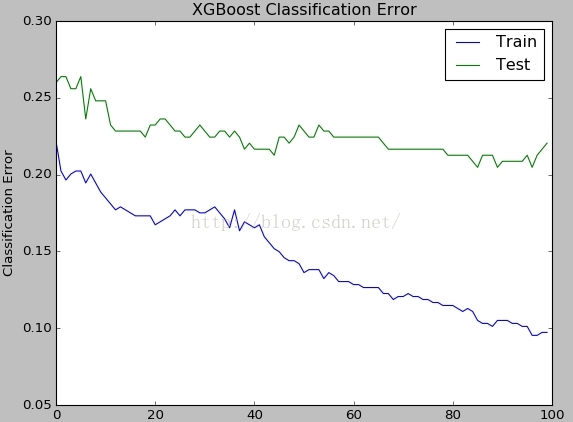
通过logloss图,很明显看出,当nround大于40的时候,测试集上的误差开始上升,已经进入了过拟合了。
XGBoost可以通过设置参数 early_stopping_rounds 来解决因为迭代次数过多而过拟合的状态。
- eval_set = [(X_test, y_test)]
- model.fit(X_train, y_train, early_stopping_rounds=10, eval_metric="logloss", eval_set=eval_set, verbose=True)
说明:设置early_stopping_rounds=10,当logloss在10轮迭代之内,都没有提升的话,就stop。如果说eval_metric有很多个指标,那就以最后一个指标为准。
-
- from numpy import loadtxt
- from xgboost import XGBClassifier
- from sklearn.cross_validation import train_test_split
- from sklearn.metrics import accuracy_score
-
- dataset = loadtxt('pima-indians-diabetes.csv', delimiter=",")
-
- X = dataset[:,0:8]
- Y = dataset[:,8]
-
- seed = 7
- test_size = 0.33
- X_train, X_test, y_train, y_test = train_test_split(X, Y, test_size=test_size, random_state=seed)
-
- model = XGBClassifier()
- eval_set = [(X_test, y_test)]
- model.fit(X_train, y_train, early_stopping_rounds=10, eval_metric="logloss", eval_set=eval_set, verbose=True)
-
- y_pred = model.predict(X_test)
- predictions = [round(value) for value in y_pred]
-
- accuracy = accuracy_score(y_test, predictions)
- print("Accuracy: %.2f%%" % (accuracy * 100.0))
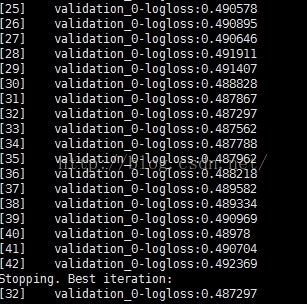
说明:当nround = 42时,就stop了,说明logloss最佳的状态在nround = 32的时候。经验上,选择early_stopping_rounds = 10%*(总迭代次数)
当使用了early_stopping_rounds,可以通过best_iteration属性来提取出最适合的迭代次数,然后预测的时候就使用stop之前训练的树来预测。
- print (model.best_iteration)
- limit = model.best_iteration
- y_pred = model.predict(X_test,ntree_limit=limit)
- predictions = [round(value) for value in y_pred]
-
- accuracy = accuracy_score(y_test, predictions)
- print("Accuracy: %.2f%%" % (accuracy * 100.0))


 本文探讨了XGBoost模型在迭代过程中如何出现过拟合现象,并通过可视化训练损失与测试损失的变化趋势来说明过拟合的表现形式。此外,还介绍了如何利用early_stopping_rounds参数来自动停止训练过程,避免过拟合。


 361
361

 被折叠的 条评论
为什么被折叠?
被折叠的 条评论
为什么被折叠?
 到【灌水乐园】发言


