


最近在使用相机时彩色模式下应用平场校正不能用,拍出的图像中间亮,两边暗(光源原因),对识别造成很大影响。so只好通过软件来校正图像。
一、主要方法步骤
- 相机上电,打开光源
- 光圈为2
- 行频为工况行频
- 增益ALL为1,绿色为1。
- 使用白色漫反射板
- 图像格式为RGB8,图像大小设为为4096*100
- 调整曝光时间,使图片绿色通道不过曝,且平均值在200左右,记录此时的曝光时间,用于工况。
- 分别调整红蓝增益,使红色和蓝色像素的均值与绿色通道基本一致,记录此时的红蓝增益,用于工况。
- 保存图像,文件名为001.BMP
- 调整增益ALL为工况下的增益。
- 在程序中使用001.BMP
- 001.BMP拆成RGB三通道
- 以绿色通道为例,对BMP的每一列(高度方向)求均值,取整。得到4096*1的数据
- 对这个数据再求MAX值,然后再转化为最大值为255的行,数据为4096*1。
- 实时采集得到一张图像,对G通道进行修正。
- 修正方法为每个像素的G值*255/对应列的修正值,不超过255。
- 红蓝通道参考绿色通道进行调整。
将所计算后的校正系数存起来,采集彩色图像处理计算前,可先进行校正再处理。
二、主要算法
环境:vs2013+opencv3.0
001.bmp如下图:

待修正图:

代码如下:
// demo.cpp : 定义控制台应用程序的入口点。
//

#include "stdafx.h"
#include <opencv2/opencv.hpp>
#include <highgui/highgui.hpp>
#include<string>
#include<math.h>
#include <iomanip>
#include<iostream>
#include <opencv2\imgproc\types_c.h>
#include <ctype.h>
#include<windows.h>
#include<fstream>
#include<vector>

using namespace std;
using namespace cv;

Mat src,img,srcresize,imgresize,dst;
String input_path = "E:\\...\\work\\001.bmp";//标定过的图
String input_path_src = "E:\\...\\work\\*.bmp";//待修正图

const char* src_dst = "原图修正后";
const char* src_input = "原图";

int _tmain(int argc, _TCHAR* argv[])
{

    img = imread(input_path);
    src = imread(input_path_src);
    if (!src.data)
    {
        printf("could not load image ... \n");
        return -1;
    }

    dst.create(src.size(), src.type());

    /**********************通道求均值***************************/
    vector<int> pImgVector;
    //对标定图像列求均值
    for (int col = 0; col < img.cols;col++)
    {

        Mat colRange = img.colRange(col, col + 1);
        Scalar meanImg = mean(colRange);
        //cout << "meanImg:" << meanImg << endl;
        double dImg = (meanImg[0] + meanImg[1] + meanImg[2]) / 3;
        //cout << "dImg:" << dImg << endl;
        pImgVector.push_back(dImg);
    }
    vector<int>::iterator biggestImg = max_element(begin(pImgVector), end(pImgVector));
    //cout << "pImgVector最大值:" << *biggestImg<<endl;

    vector<double> pImgCoefficient;

    for (int i = 0; i < pImgVector.size(); i++)
    {
        double pImgElement = (double)*biggestImg / (double)pImgVector[i];
        std::cout << setiosflags(ios::fixed) << setprecision(2);//打印两位小数
        //std::cout << "pBlueElement:" << pImgElement << endl;
        pImgCoefficient.push_back(pImgElement);

    }

    //系数写入txt,提取系数可打开注释
    /*ofstream fout;
    fout.open("D:\\...\\coefficient.txt",ios_base::out);
    if (fout.is_open())
    {
        for (vector<double>::iterator i = pImgCoefficient.begin(), end = pImgCoefficient.end(); i != end; ++i)
        {
            fout << (*i)<<",";
        }
    }
    fout.close();*/

    for (int row = 0; row < src.rows; row++)
    {
        for (int col = 0; col < src.cols; col++)
        {

            int b = src.at<Vec3b>(row, col)[0];
            int g = src.at<Vec3b>(row, col)[1];
            int r = src.at<Vec3b>(row, col)[2];
            int dBlue = b*pImgCoefficient[col];
            int dGreen = g*pImgCoefficient[col];
            int dRed = r*pImgCoefficient[col];
        /*    if (dBlue > 255)
            {
                std::cout << "dBlue" << dBlue << endl;
                dBlue = 255;
            }
            if (dGreen > 255)
            {
                std::cout << "dGreen" << dGreen << endl;
                dGreen = 255;
            }
            if (dRed > 255)
            {
                std::cout << "dRed" << dRed << endl;
                dRed = 255;
            }*/

            dst.at<Vec3b>(row, col)[0] = dBlue;
            dst.at<Vec3b>(row, col)[1] = dGreen;
            dst.at<Vec3b>(row, col)[2] = dRed;

        }
    }
    namedWindow(src_input, WINDOW_AUTOSIZE);
    namedWindow(src_dst, WINDOW_AUTOSIZE);
    imshow(src_input, src);
    imshow(src_dst, dst);
三、结果
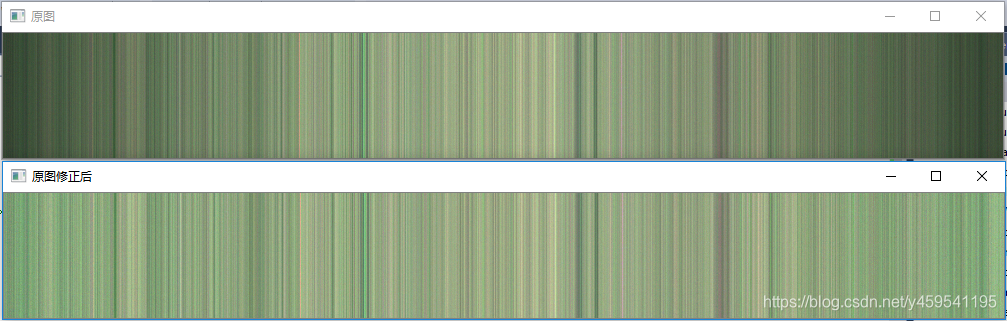
校正后图像两边明显好多了,后面就可以采集图像处理了。


 983
983

 被折叠的 条评论
为什么被折叠?
被折叠的 条评论
为什么被折叠?
 到【灌水乐园】发言


