


欢迎关注『youcans动手学模型』系列
本专栏内容和资源同步到 GitHub/youcans
【YOLO 项目实战】(10)YOLO8 环境配置与推理检测
【YOLO 项目实战】(11)YOLO8 数据集与模型训练
【YOLO 项目实战】(12)红外/可见光多模态目标检测
【YOLO 项目实战】(12)红外/可见光多模态目标检测
1. 红外/可见光目标检测数据集
红外/可见光目标检测数据集包含两个模态的数据:可见光(RGB)图像和红外(IR)图像。
空间与时间上的对齐是多光谱图像数据集构建中的重要问题,时间上对齐指需尽量在同一时刻获取红外及可见光图像,空间上的对齐指获取得到的图像需尽量在每个像素上对应同一物体。注意有的数据集已经对红外/可见光图像进行了配准,可以直接进行融合。有些数据集则没有进行对齐。
- LLVIP 数据集 (Low-Light Vision Infrared-Paired)
LLVIP 是一个用于低光视觉的可见红外配对数据集。使用双光谱摄像机以俯视的监控视角采集含大量行人及骑行者的街景得到的,其含有大量低光照场景下的图像。所有图像在时间和空间上都已严格对齐。
该数据集包括 24个黑暗场景、2个白天场景,共 30976张图像(15488对),其中12025对用于训练,3463对用于测试。
数据集对"行人"类别进行了标记,包含 41579 个’person’标签,其中train标签33648个,test标签7931个。同一对可见光和红外图像共享相同的标签,具有相同的名称。其中110423.xml为空白标签。
主要用于低光照条件下的计算机视觉任务,例如可见和红外图像融合、目标检测和图像到图像的转换。
参考论文:LLVIP: A Visible-infrared Paired Dataset for Low-light Vision
下载地址:LLVIP-Github,LLVIP-百度飞桨,paperscode

- KAIST 行人数据集
KAIST 多光谱行人数据集由取自车辆的95k个彩色热对(640x480,20Hz)组成,分别在白天和晚上捕获了包括校园、街道以及乡下的各种常规交通场景。KAIST数据集是由放置在行车顶部的红外及可见光相机采集的,通过激光分束器及相机标定程序,可尽量保证每对图像在空间上的对齐。
KAIST 数据集包括 95328 张图片,每张图片都包含RGB图像和红外图像两个版本。数据集总共分为12个文件夹set00-set11。前6个文件夹为训练集包含50187张图片,后6个文件夹为测试集包含45141张图片。
数据集的标签包含 person、people、cyclist 三个类别。共有 103,128 个密集注释和 1,182 个独特的行人。其中可明显看出是行人的被分为“Person”,不易被分辨的个体被分为“People”,骑着双轮车的人被看作“Cyclist”,即使普通人类也无法分辨为是否为行人的被分为“Person?”。注释包括边界框之间的时间对应关系。
主要应用于热红外和可见光的联合行人检测任务。
参考论文:Multispectral Pedestrian Detection/CVPR15
下载地址:KAIST-Github, KAIST-OpenDataLab

- FLIR Dataset(RGB-T object detection)
由FLIR公司提供的用于热红外和可见光联合目标检测的数据集。
该数据集包含10,000多张配对的可见光和红外图像,每张可见光图像都有一张对应的红外图像。
数据集标注了4个类别:行人(person)、自行车(bicycle)、汽车(car)和狗(dog)。训练集上有person: 22372个, bicycle :3986个, car :41260个, dog :226个;测试集上有person: 5779个, bicycle :471个, car :5432个, dog :14个
注意该数据集中的图像对没有经过精确对准,进行融合前需要进行配准。
FLIR Dataset适用于开发热红外与可见光联合的目标检测算法,尤其是在夜间或低光照条件下。
下载地址:FREE Teledyne FLIR Thermal Dataset for Algorithm Training

- VisDrone:Drone 交通数据集
VisDrone 是一个大规模的基于无人机的可见光/红外车辆检测数据集,覆盖了城市道路、住宅区、停车场和其他日夜场景。
该数据集包括由无人机收集的 56878张(28439对)成对的RGB图像和红外图像。
数据集为 5个类别制作了带有 OBB 边界框的注释。其中,汽车(car)有389779个RGB图像注释、428086个红外图像注释,卡车(truck)有22123个RGB图像注解、25960个红外图像注解,公共汽车(bus)有15333个RGB图像批注、16590个红外图像批注,小货车(van)有11935个RGB图像注释、12708个红外图像注释;厢式货车(freight car)有13400个RGB图像附注、17173个红外图像附注。
参考论文:Drone-based RGB-Infrared Cross-Modality Vehicle Detection via Uncertainty-Aware Learning
下载地址:VisDrone-Github

关于图像融合,可以参考开源算法 PIAFusion (Information Fusion, 2022)
参考论文:PIAFusion: A progressive infrared and visible image fusion network based on illumination aware
下载地址:PIAFusion
1.2 YOLO 数据集结构
本文从 LLVIP 可见红外配对数据集中选择了 800对图像,用于模型训练。
将 LLVIP 数据集保存在项目的指定路径 datasets 下,并严格按下面的格式组织样本图片和标签。
- yolov8
   - datasets
      - LLVIP800
         - image
            - test
            - train
            - val
         - images
            - test
            - train
            - val
         - labels
            - test
            - train
            - val
         - dataLLVIP800.yaml
   - ultralytics
   - yolov8n.pt
其中,images 保存的是可见光图片,image 保存的是红外图片,labels 是标注的标签(可见光/红外公用)。
注意 images/train 和 image/train 目录下的可见光图片和红外图片的文件名必须完全相同,否则在图像融合时会出错。同样地,test 和 val 目录下的可见光图片和红外图片的文件名也必须完全相同。
每个标签文件(.txt)包含一行或多行数据,每一行代表一个物体的标签,格式如下:
<class_index> <x_center> <y_center> <width> <height>
其中:
<class_index> 是物体类别的索引;
<x_center> 是物体中心点相对于图像宽度的比例位置;
<y_center> 是物体中心点相对于图像高度的比例位置;
是物体宽度相对于图像宽度的比例;
是物体高度相对于图像高度的比例。
2. 基于可见光的目标检测模型训练
首先,我们仅使用数据集中可见光图片,进行模型训练,这就是一个普通的目标检测任务。我们以此来测试 YOLOv8 的配置,并作为性能测试的基准。
关于 YOLOv8 建立数据集和模型训练的具体步骤,详见上节:【YOLO 项目实战】(11)YOLO8 数据集与模型训练
2.1 YOLO 数据集配置文件( data.yaml)
YOLO 模型训练时,要调用数据集配置文件( .yaml),指定数据集的路径和分类类别。
YOLOv8 项目提供了多个数据集配置文件可供参考。根据LLVIP800 Dataset 数据集配置文件 data.yaml ,编写本项目的数据集配置文件 dataLLVIP800.yaml,保存到数据集的根目录,内容如下:
# Ultralytics YOLO 🚀, AGPL-3.0 license
# LLVIP800 dataset
# parent
# ├── ultralytics
# └── datasets
#     └── LLVIP800

# Train/val/test sets as 1) dir: path/to/imgs, 2) file: path/to/imgs.txt, or 3) list: [path/to/imgs1, path/to/imgs2, ..]
path: LLVIP800  # dataset root dir

train: images/train  # train images (relative to 'path')
val: images/val  # val images (relative to 'path')
test:  # test images (optional)

# Classes
names:
  0: person
2.2 YOLO 模型配置文件( model.yaml)
YOLO 模型训练时,要调用模型配置文件( .yaml),指定 YOLO 模型的结构。
YOLOv8 项目提供了多个模型配置文件,例如:“ultralytics/cfg/models/v8/yolov8.yaml” 用于目标检测模型。仅使用数据集中可见光图像进行模型训练时,不需要修改 YOLO 模型配置文件,可以直接使用 yolov8.yaml。
本文对配置文件 yolov8.yaml 增加了一行 “ch: 3 # number of channels”,表示通道数 ch=3,便于后续与红外/可见光融合时进行比较。内容如下。
# Ultralytics YOLO 🚀, AGPL-3.0 license
# YOLOv8 object detection model with P3-P5 outputs. For Usage examples see https://docs.ultralytics.com/tasks/detect

# Parameters
ch: 3  # number of channels
nc: 80  # number of classes
scales: # model compound scaling constants, i.e. 'model=yolov8n.yaml' will call yolov8.yaml with scale 'n'
  # [depth, width, max_channels]
  n: [0.33, 0.25, 1024]  # YOLOv8n summary: 225 layers,  3157200 parameters,  3157184 gradients,   8.9 GFLOPs
  s: [0.33, 0.50, 1024]  # YOLOv8s summary: 225 layers, 11166560 parameters, 11166544 gradients,  28.8 GFLOPs
  m: [0.67, 0.75, 768]   # YOLOv8m summary: 295 layers, 25902640 parameters, 25902624 gradients,  79.3 GFLOPs
  l: [1.00, 1.00, 512]   # YOLOv8l summary: 365 layers, 43691520 parameters, 43691504 gradients, 165.7 GFLOPs
  x: [1.00, 1.25, 512]   # YOLOv8x summary: 365 layers, 68229648 parameters, 68229632 gradients, 258.5 GFLOPs

# YOLOv8.0n backbone
backbone:
  # [from, repeats, module, args]
  - [-1, 1, Conv, [64, 3, 2]]  # 0-P1/2
  - [-1, 1, Conv, [128, 3, 2]]  # 1-P2/4
  - [-1, 3, C2f, [128, True]]
  - [-1, 1, Conv, [256, 3, 2]]  # 3-P3/8
  - [-1, 6, C2f, [256, True]]
  - [-1, 1, Conv, [512, 3, 2]]  # 5-P4/16
  - [-1, 6, C2f, [512, True]]
  - [-1, 1, Conv, [1024, 3, 2]]  # 7-P5/32
  - [-1, 3, C2f, [1024, True]]
  - [-1, 1, SPPF, [1024, 5]]  # 9

# YOLOv8.0n head
head:
  - [-1, 1, nn.Upsample, [None, 2, 'nearest']]
  - [[-1, 6], 1, Concat, [1]]  # cat backbone P4
  - [-1, 3, C2f, [512]]  # 12

  - [-1, 1, nn.Upsample, [None, 2, 'nearest']]
  - [[-1, 4], 1, Concat, [1]]  # cat backbone P3
  - [-1, 3, C2f, [256]]  # 15 (P3/8-small)

  - [-1, 1, Conv, [256, 3, 2]]
  - [[-1, 12], 1, Concat, [1]]  # cat head P4
  - [-1, 3, C2f, [512]]  # 18 (P4/16-medium)

  - [-1, 1, Conv, [512, 3, 2]]
  - [[-1, 9], 1, Concat, [1]]  # cat head P5
  - [-1, 3, C2f, [1024]]  # 21 (P5/32-large)

  - [[15, 18, 21], 1, Detect, [nc]]  # Detect(P3, P4, P5)
2.3 基于可见光数据集的模型训练
YOLOv8 提供了 Python 接口的调用方式。它提供了加载和运行模型以及处理模型输出的函数。该界面设计易于使用,以便用户可以在他们的项目中快速实现目标检测。
使用 LLVIP800 数据集进行模型训练的 Python 参考例程如下。
注意:
(1)使用项目默认路径自带的模型配置文件 “./ultralytics/cfg/mo
dels/v8/yolov8.yaml” 。其中通道数 ch=3,即默认的 RGB 通道。
(2)训练数据集的配置文件路径为 “./ultralytics/cfg/datasets/dataLLVIP800.yaml”。
(3)训练好的模型及训练日志保存在 “./runs/detect/train” 目录下。
from ultralytics import YOLO

if __name__ == '__main__':
    # 创建 YOLO 模型对象,加载指定的模型配置
    model = YOLO(r"ultralytics/cfg/models/v8/yolov8.yaml")
    # # 加载预训练的权重文件,加速训练并提升模型性能
    # model.load('yolov8n.pt')
    # 用指定数据集训练模型
    model.train(data=r"ultralytics/cfg/datasets/dataLLVIP800.yaml",  # 指定训练数据集的配置文件路径
                cache=False,  # 是否缓存数据集以加快后续训练速度
                imgsz=640,  # 指定训练时使用的图像尺寸
                epochs=100,  # 设置训练的总轮数为100轮
                batch=16,  # 设置每个训练批次的大小为16
                close_mosaic=10,  # 设置在训练的最后 10 轮中关闭 Mosaic 数据增强
                workers=4,  # 设置用于数据加载的线程数为4
                device='0',  # 指定使用的 GPU 设备
                optimizer='SGD'  # 设置优化器为SGD(随机梯度下降)
                )
在 PyCharm 编译并运行程序,就实现对 LLVIP800 数据集进行模型训练,并将训练结果保存到 “./runs/detect/train/weights/best.py”。
C:\Users\Administrator\.conda\envs\yolo8\python.exe C:\Python\PythonProjects\YOLOv8\YOLOv8Multi01.py
WARNING ⚠️ no model scale passed. Assuming scale='n'.

                   from  n    params  module                                       arguments
  0                  -1  1       464  ultralytics.nn.modules.conv.Conv             [3, 16, 3, 2]
  1                  -1  1      4672  ultralytics.nn.modules.conv.Conv             [16, 32, 3, 2]
  2                  -1  1      7360  ultralytics.nn.modules.block.C2f             [32, 32, 1, True]
  3                  -1  1     18560  ultralytics.nn.modules.conv.Conv             [32, 64, 3, 2]
  4                  -1  2     49664  ultralytics.nn.modules.block.C2f             [64, 64, 2, True]
  5                  -1  1     73984  ultralytics.nn.modules.conv.Conv             [64, 128, 3, 2]
  6                  -1  2    197632  ultralytics.nn.modules.block.C2f             [128, 128, 2, True]
  7                  -1  1    295424  ultralytics.nn.modules.conv.Conv             [128, 256, 3, 2]
  8                  -1  1    460288  ultralytics.nn.modules.block.C2f             [256, 256, 1, True]
  9                  -1  1    164608  ultralytics.nn.modules.block.SPPF            [256, 256, 5]
 10                  -1  1         0  torch.nn.modules.upsampling.Upsample         [None, 2, 'nearest']
 11             [-1, 6]  1         0  ultralytics.nn.modules.conv.Concat           [1]
 12                  -1  1    148224  ultralytics.nn.modules.block.C2f             [384, 128, 1]
 13                  -1  1         0  torch.nn.modules.upsampling.Upsample         [None, 2, 'nearest']
 14             [-1, 4]  1         0  ultralytics.nn.modules.conv.Concat           [1]
 15                  -1  1     37248  ultralytics.nn.modules.block.C2f             [192, 64, 1]
 16                  -1  1     36992  ultralytics.nn.modules.conv.Conv             [64, 64, 3, 2]
 17            [-1, 12]  1         0  ultralytics.nn.modules.conv.Concat           [1]
 18                  -1  1    123648  ultralytics.nn.modules.block.C2f             [192, 128, 1]
 19                  -1  1    147712  ultralytics.nn.modules.conv.Conv             [128, 128, 3, 2]
 20             [-1, 9]  1         0  ultralytics.nn.modules.conv.Concat           [1]
 21                  -1  1    493056  ultralytics.nn.modules.block.C2f             [384, 256, 1]
 22        [15, 18, 21]  1    897664  ultralytics.nn.modules.head.Detect           [80, [64, 128, 256]]
YOLOv8 summary: 225 layers, 3157200 parameters, 3157184 gradients, 8.9 GFLOPs

train: Scanning C:\Python\PythonProjects\YOLOv8\datasets\LLVIP800\labels\train.cache... 751 images, 0 backgrounds, 0 corrupt: 100%|██████████| 751/751 [00:00<?, ?it/s]
val: Scanning C:\Python\PythonProjects\YOLOv8\datasets\LLVIP800\labels\val.cache... 432 images, 0 backgrounds, 0 corrupt: 100%|██████████| 432/432 [00:00<?, ?it/s]
Plotting labels to runs\detect\train2\labels.jpg...
optimizer: SGD(lr=0.01, momentum=0.937) with parameter groups 57 weight(decay=0.0), 64 weight(decay=0.0005), 63 bias(decay=0.0)
100 epochs...

      Epoch    GPU_mem   box_loss   cls_loss   dfl_loss  Instances       Size
      1/100      2.15G       4.56      4.062      3.873         97        640: 100%|██████████| 47/47 [00:07<00:00,  6.01it/s]
                 Class     Images  Instances      Box(P          R      mAP50  mAP50-95): 100%|██████████| 14/14 [00:02<00:00,  5.53it/s]
                   all        432        944   0.000748      0.103   0.000426   0.000164
...

      Epoch    GPU_mem   box_loss   cls_loss   dfl_loss  Instances       Size
    100/100      2.16G      1.482     0.9729      1.677         36        640: 100%|██████████| 47/47 [00:05<00:00,  8.52it/s]
                 Class     Images  Instances      Box(P          R      mAP50  mAP50-95): 100%|██████████| 14/14 [00:01<00:00,  7.59it/s]
                   all        432        944      0.711      0.664      0.704      0.336

100 epochs completed in 0.216 hours.
Optimizer stripped from runs\detect\train\weights\last.pt, 6.2MB
Optimizer stripped from runs\detect\train\weights\best.pt, 6.2MB

Validating runs\detect\train\weights\best.pt...
Ultralytics YOLOv8.1.0 🚀 Python-3.8.20 torch-2.4.1+cu121 CUDA:0 (NVIDIA GeForce RTX 3060, 12288MiB)
YOLOv8 summary (fused): 168 layers, 3005843 parameters, 0 gradients, 8.1 GFLOPs
                 Class     Images  Instances      Box(P          R      mAP50  mAP50-95): 100%|██████████| 14/14 [00:02<00:00,  6.47it/s]
                   all        432        944      0.783      0.683      0.746      0.366
Speed: 0.1ms preprocess, 1.4ms inference, 0.0ms loss, 0.9ms postprocess per image
Results saved to runs\detect\train
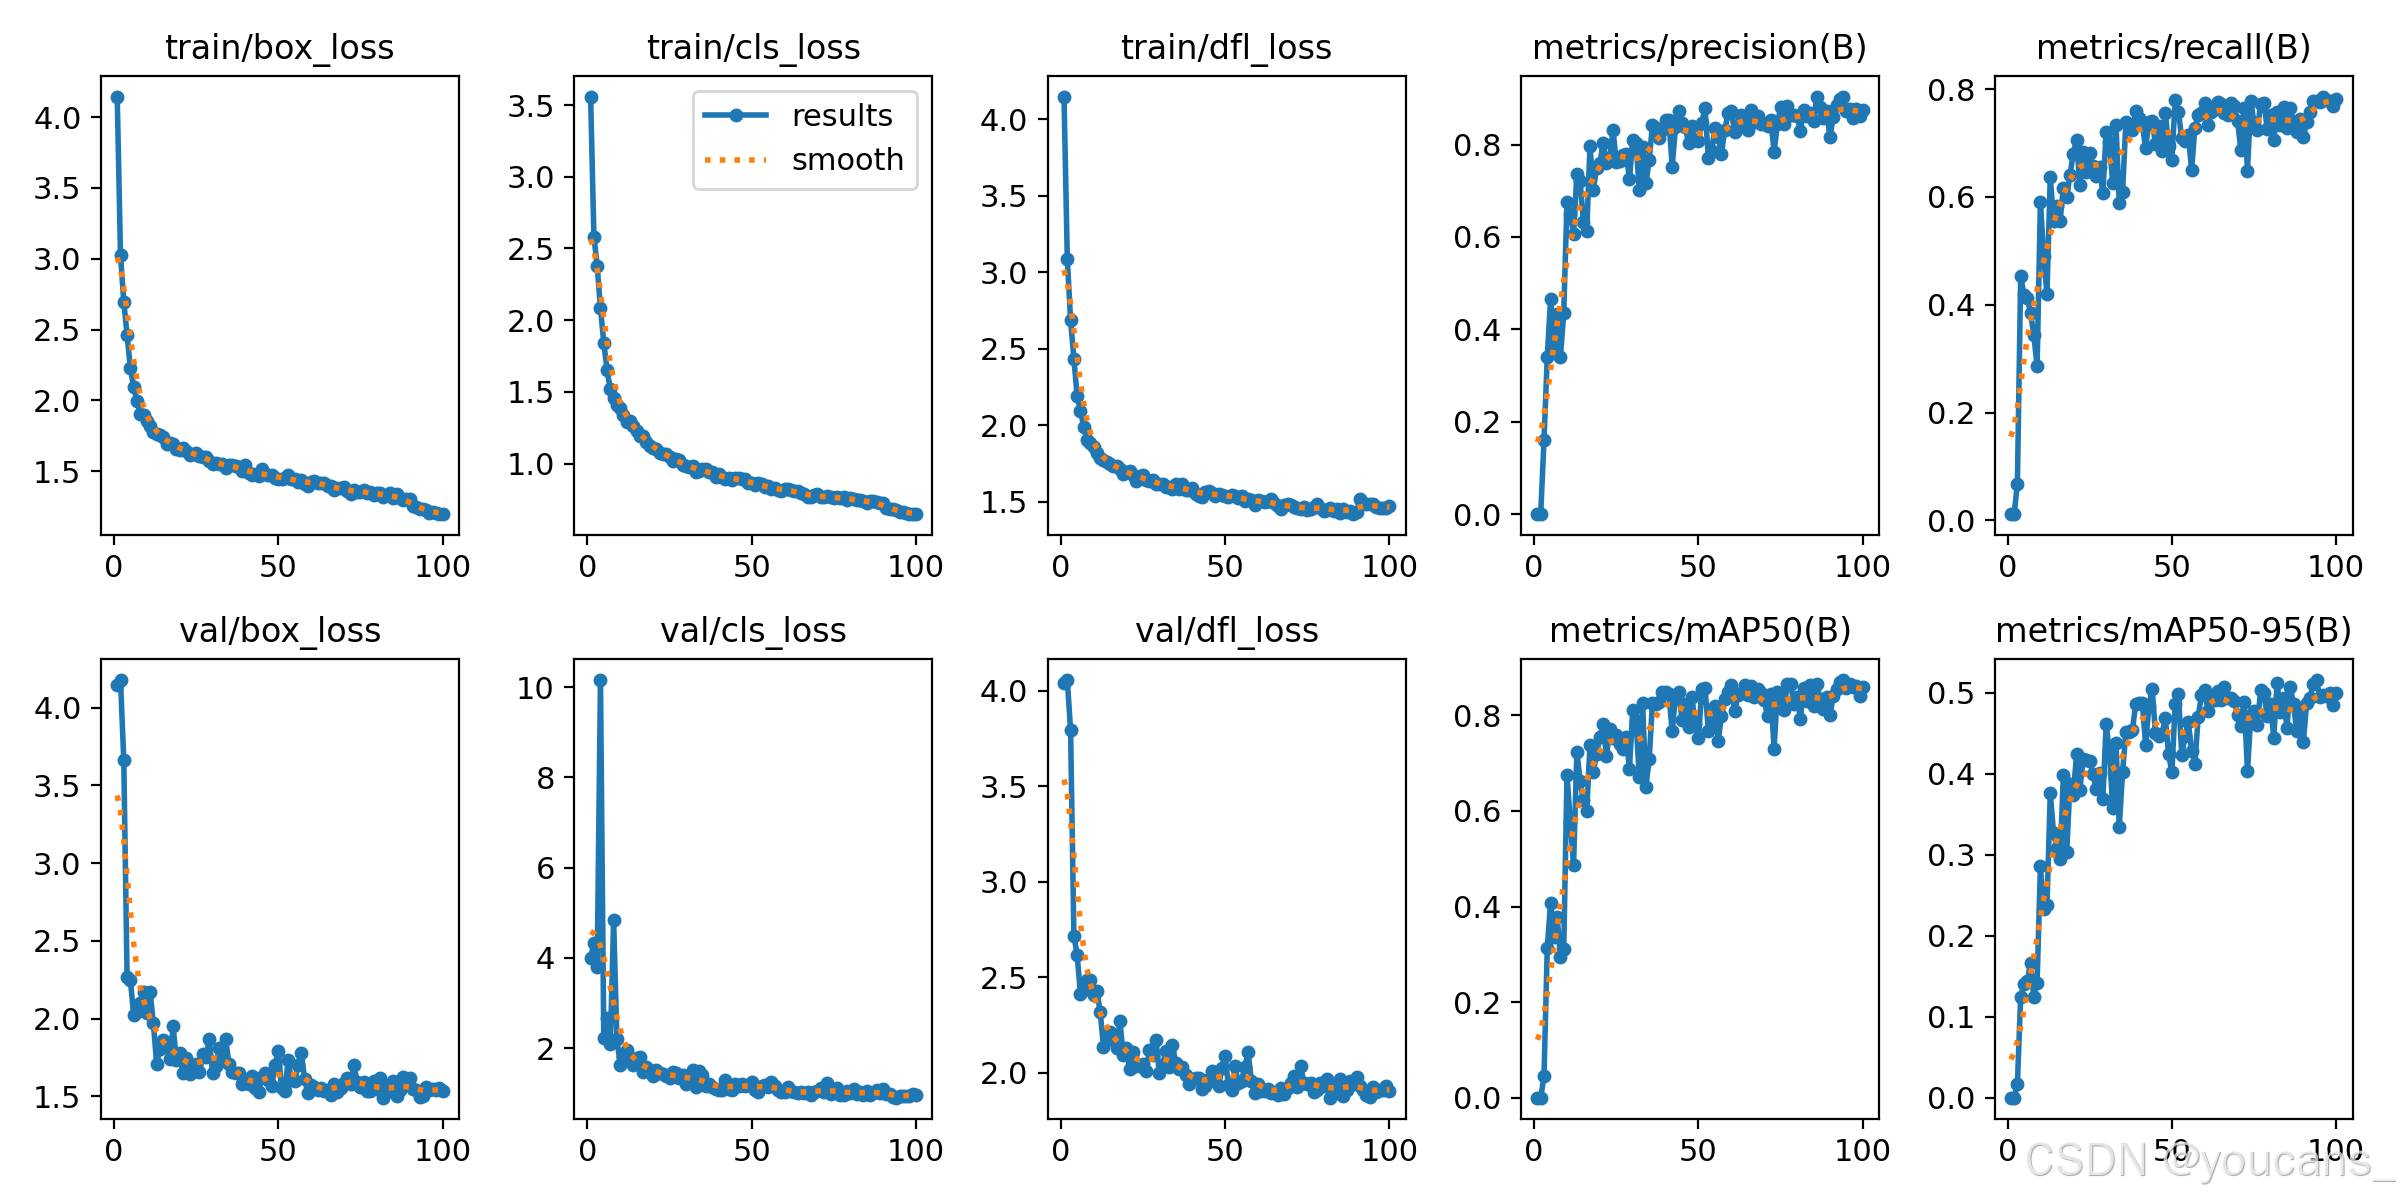
经过 100 轮遍历训练,训练过程及结果文件保存在目录 “runs\detect\train”,如下图所示:

3. 基于可见光/红外的多模态模型训练
3.1 多模态图像融合
接下来,我们使用 LLVIP 数据集中可见光图像和红外图像,进行多模态模型训练。LLVIP 数据集提供的可见光图像和红外图像,已经在空间和时间上对齐,不需要再做配准处理。
同时使用可见光图像和红外图像进行训练,需要修改 YOLO 模型的网络结构,进行图像融合。目前,多模态数据融合主要有三种方式:前端融合(early-fusion)或数据端融合(data-level fusion)、后端融合(late-fusion)或决策端融合(decision-level fusion)和中间融合(intermediate-fusion)。
-
前端融合,是指将多个独立的数据集融合成一个单一的特征向量,然后输入到机器学习模型进行分类。
前端融合在本质上没有改变模型结构,方法简单易行。但往往无法充分利用多个模态数据间的互补性,且原始数据通常包含大量的冗余信息。因此,多模态前端融合方法常常与特征提取方法相结合以剔除冗余信息,如主成分分析(PCA)、最大相关最小冗余算法(mRMR)、自动解码器(Autoencoders)等。 -
后端融合,则是用不同模态数据分别训练得到各自的分类器,再对各个分类器的输出进行融合。
由于融合模型的错误来自不同的分类器,而来自不同分类器的错误往往互不相关、互不影响,不会造成错误的进一步累加,因此可能获得更好的结果。常见的后端融合方式包括最大值融合(max-fusion)、平均值融合(averaged-fusion)、 贝叶斯规则融合(Bayes’rule based)和集成学习(ensemble learning)等。 -
中间融合,是指将不同的模态数据先转化为高维特征表达,再于模型的中间层进行融合。
中间融合首先利用神经网络将原始数据转化成高维 特征表达,然后获取不同模态数据在高维空间上的共性。其优势是可以灵活的选择融合位置。
简单地,本文先讨论前端融合,将可见光图像和红外图像进行通道的合并(Marge)。红外图像实际只有 1 个通道,与可见光图像 RGB 通道合并后可以得到 4个通道的 RGBI 图像。但由于红外数据集的图像文件也已被保存为 3通道图像,为了便于读者理解,进一步简化实现过程,我们直接将可见光图像与红外图像进行通道合并,得到 6通道的图像(特征向量),送入 YOLOv8 模型进行训练。

3.2 红外可见光融合模块
文件目录 ".\ultralytics\nn\modules"下的文件定义模型中的组成构建,
.\ultralytics\nn\modules
   __init__.py: 表明此目录是Python包。
   block.py: 包含定义神经网络中的基础块,如残差块或瓶颈块。
   conv.py: 包含卷积层相关的实现。
   head.py: 定义网络的头部,用于预测。
   transformer.py: 包含Transformer模型相关的实现。
   utils.py: 提供构建神经网络时可能用到的辅助函数。
其中,block.py 包含定义神经网络中的基础块,如残差块或瓶颈块。
# Ultralytics YOLO 🚀, AGPL-3.0 license
"""Block modules."""

import torch
import torch.nn as nn
import torch.nn.functional as F
from .conv import Conv, DWConv, GhostConv, LightConv, RepConv
from .transformer import TransformerBlock

__all__ = ('DFL', 'HGBlock', 'HGStem', 'SPP', 'SPPF', 'C1', 'C2', 'C3', 'C2f', 'C3x', 'C3TR', 'C3Ghost',
           'GhostBottleneck', 'Bottleneck', 'BottleneckCSP', 'Proto', 'RepC3', 'ResNetLayer')


class DFL(nn.Module):
...
为了实现 红外/可见光 图像的融合,我们需要在 block.py 中添加一个融合模块 MF,用 “torch.cat” 将二者合并起来,得到 6通道的输入层。
# Ultralytics YOLO 🚀, AGPL-3.0 license
"""Block modules."""

import torch
import torch.nn as nn
import torch.nn.functional as F
from .conv import Conv, DWConv, GhostConv, LightConv, RepConv
from .transformer import TransformerBlock

__all__ = ('DFL', 'HGBlock', 'HGStem', 'SPP', 'SPPF', 'C1', 'C2', 'C3', 'C2f', 'C3x', 'C3TR', 'C3Ghost',
           'GhostBottleneck', 'Bottleneck', 'BottleneckCSP', 'Proto', 'RepC3', 'ResNetLayer', 'IN', 'Multiin', 'MF')
...

class MF(nn.Module):
    def __init__(self, c1, c2, reduction=16):
        super(MF, self).__init__()
        self.mask_map_r = nn.Conv2d(c1//2, 1, 1, 1, 0, bias=True)
        self.mask_map_i = nn.Conv2d(c1//2, 1, 1, 1, 0, bias=True)
        self.softmax = nn.Softmax(-1)
        self.bottleneck1 = nn.Conv2d(c1//2, c2//2, 3, 1, 1, bias=False)
        self.bottleneck2 = nn.Conv2d(c1//2, c2//2, 3, 1, 1, bias=False)
        self.se = SE_Block(c2, reduction)

    def forward(self, x):
        x_left_ori,x_right_ori = x[:, :3, :, :], x[:, 3:, :, :]
        x_left = x_left_ori * 0.5
        x_right = x_right_ori * 0.5

        x_mask_left = torch.mul(self.mask_map_r(x_left), x_left)
        x_mask_right = torch.mul(self.mask_map_i(x_right), x_right)

        out_IR = self.bottleneck1(x_mask_right + x_right_ori)
        out_RGB = self.bottleneck2(x_mask_left + x_left_ori)  # RGB
        out = self.se(torch.cat([out_RGB, out_IR], 1))

        return out

class SE_Block(nn.Module):
    def __init__(self, ch_in, reduction=16):
        super(SE_Block, self).__init__()
        self.avg_pool = nn.AdaptiveAvgPool2d(1)
        self.fc = nn.Sequential(
            nn.Linear(ch_in, ch_in // reduction, bias=False),
            nn.ReLU(inplace=True),
            nn.Linear(ch_in // reduction, ch_in, bias=False),
            nn.Sigmoid()
        )

    def forward(self, x):
        b, c, _, _ = x.size()
        y = self.avg_pool(x).view(b, c)
        y = self.fc(y).view(b, c, 1, 1)
        return x * y.expand_as(x)
3.3 多模态 YOLO 模型的数据集配置文件(data.yaml)
YOLO 模型训练时,要调用数据集配置文件( .yaml),指定数据集的路径和分类类别。
根据 LLVIP800 Dataset 数据集配置文件 data.yaml ,编写本项目的数据集配置文件。多模态 YOLO 模型的数据集配置文件( data.yaml)的内容与 2.2 中可见光模型的数据集配置文件 dataLLVIP800.yaml 是完全相同的。
但是,程序在运行时,会分别读取 images/train 和 image/train 目录下的图像文件。因此,数据集必须严格按照 1.2 节的数据集结构进行组织,而且 images/train 和 image/train 目录下的可见光图片和红外图片的文件名必须完全相同,否则在图像融合时会出错。同样地,test 和 val 目录下的可见光图片和红外图片的文件名也必须完全相同。
# Ultralytics YOLO 🚀, AGPL-3.0 license
# LLVIP800 dataset
# parent
# ├── ultralytics
# └── datasets
#     └── LLVIP800

# Train/val/test sets as 1) dir: path/to/imgs, 2) file: path/to/imgs.txt, or 3) list: [path/to/imgs1, path/to/imgs2, ..]
path: LLVIP800  # dataset root dir

train: images/train  # train images (relative to 'path')
val: images/val  # val images (relative to 'path')
test:  # test images (optional)

# Classes
names:
  0: person
3.4 多模态 YOLO 模型的训练配置文件(default.yaml)
YOLO 模型训练时,要调用训练配置文件(default.yaml),指定默认训练设置和超参数。
使用可见光和红外图像进行模型训练时,需要修改 YOLO 模型训练配置文件,将输入图像的通道数设为 6,表示使用红外/可见光融合图像作为输入图像。配置文件的其它部分内容也不变。
多模态 YOLO 模型的训练配置文件 default.yaml 的具体内容如下。
# Ultralytics YOLO 🚀, AGPL-3.0 license
# Default training settings and hyperparameters for medium-augmentation COCO training

task: detect  # (str) YOLO task, i.e. detect, segment, classify, pose
mode: train  # (str) YOLO mode, i.e. train, val, predict, export, track, benchmark
ch: 6  # (int) 6 input channels

# Train settings -------------------------------------------------------------------------------------------------------
model:  # (str, optional) path to model file, i.e. yolov8n.pt, yolov8n.yaml
data:  # (str, optional) path to data file, i.e. coco128.yaml
epochs: 100  # (int) number of epochs to train for
time:  # (float, optional) number of hours to train for, overrides epochs if supplied
patience: 50  # (int) epochs to wait for no observable improvement for early stopping of training
batch: 16  # (int) number of images per batch (-1 for AutoBatch)
imgsz: 640  # (int | list) input images size as int for train and val modes, or list[w,h] for predict and export modes
save: True  # (bool) save train checkpoints and predict results
save_period: -1 # (int) Save checkpoint every x epochs (disabled if < 1)
cache: False  # (bool) True/ram, disk or False. Use cache for data loading
device:  # (int | str | list, optional) device to run on, i.e. cuda device=0 or device=0,1,2,3 or device=cpu
workers: 8  # (int) number of worker threads for data loading (per RANK if DDP)
project:  # (str, optional) project name
name:  # (str, optional) experiment name, results saved to 'project/name' directory
exist_ok: False  # (bool) whether to overwrite existing experiment
pretrained: True  # (bool | str) whether to use a pretrained model (bool) or a model to load weights from (str)
optimizer: auto  # (str) optimizer to use, choices=[SGD, Adam, Adamax, AdamW, NAdam, RAdam, RMSProp, auto]
verbose: True  # (bool) whether to print verbose output
seed: 0  # (int) random seed for reproducibility
deterministic: True  # (bool) whether to enable deterministic mode
single_cls: False  # (bool) train multi-class data as single-class
rect: False  # (bool) rectangular training if mode='train' or rectangular validation if mode='val'
cos_lr: False  # (bool) use cosine learning rate scheduler
close_mosaic: 10  # (int) disable mosaic augmentation for final epochs (0 to disable)
resume: False  # (bool) resume training from last checkpoint
amp: True  # (bool) Automatic Mixed Precision (AMP) training, choices=[True, False], True runs AMP check
fraction: 1.0  # (float) dataset fraction to train on (default is 1.0, all images in train set)
profile: False  # (bool) profile ONNX and TensorRT speeds during training for loggers
freeze: None  # (int | list, optional) freeze first n layers, or freeze list of layer indices during training
multi_scale: False   # (bool) Whether to use multi-scale during training
# Segmentation
overlap_mask: True  # (bool) masks should overlap during training (segment train only)
mask_ratio: 4  # (int) mask downsample ratio (segment train only)
# Classification
dropout: 0.0  # (float) use dropout regularization (classify train only)

# Val/Test settings ----------------------------------------------------------------------------------------------------
val: True  # (bool) validate/test during training
split: val  # (str) dataset split to use for validation, i.e. 'val', 'test' or 'train'
save_json: False  # (bool) save results to JSON file
save_hybrid: False  # (bool) save hybrid version of labels (labels + additional predictions)
conf:  # (float, optional) object confidence threshold for detection (default 0.25 predict, 0.001 val)
iou: 0.7  # (float) intersection over union (IoU) threshold for NMS
max_det: 300  # (int) maximum number of detections per image
half: False  # (bool) use half precision (FP16)
dnn: False  # (bool) use OpenCV DNN for ONNX inference
plots: True  # (bool) save plots and images during train/val

# Predict settings -----------------------------------------------------------------------------------------------------
source:  # (str, optional) source directory for images or videos
vid_stride: 1  # (int) video frame-rate stride
stream_buffer: False  # (bool) buffer all streaming frames (True) or return the most recent frame (False)
visualize: False  # (bool) visualize model features
augment: False  # (bool) apply image augmentation to prediction sources
agnostic_nms: False  # (bool) class-agnostic NMS
classes:  # (int | list[int], optional) filter results by class, i.e. classes=0, or classes=[0,2,3]
retina_masks: False  # (bool) use high-resolution segmentation masks
embed:  # (list[int], optional) return feature vectors/embeddings from given layers

# Visualize settings ---------------------------------------------------------------------------------------------------
show: False  # (bool) show predicted images and videos if environment allows
save_frames: False  # (bool) save predicted individual video frames
save_txt: False  # (bool) save results as .txt file
save_conf: False  # (bool) save results with confidence scores
save_crop: False  # (bool) save cropped images with results
show_labels: True  # (bool) show prediction labels, i.e. 'person'
show_conf: True  # (bool) show prediction confidence, i.e. '0.99'
show_boxes: True  # (bool) show prediction boxes
line_width:   # (int, optional) line width of the bounding boxes. Scaled to image size if None.

# Export settings ------------------------------------------------------------------------------------------------------
format: torchscript  # (str) format to export to, choices at https://docs.ultralytics.com/modes/export/#export-formats
keras: False  # (bool) use Kera=s
optimize: False  # (bool) TorchScript: optimize for mobile
int8: False  # (bool) CoreML/TF INT8 quantization
dynamic: False  # (bool) ONNX/TF/TensorRT: dynamic axes
simplify: False  # (bool) ONNX: simplify model
opset:  # (int, optional) ONNX: opset version
workspace: 4  # (int) TensorRT: workspace size (GB)
nms: False  # (bool) CoreML: add NMS

# Hyperparameters ------------------------------------------------------------------------------------------------------
lr0: 0.01  # (float) initial learning rate (i.e. SGD=1E-2, Adam=1E-3)
lrf: 0.01  # (float) final learning rate (lr0 * lrf)
momentum: 0.937  # (float) SGD momentum/Adam beta1
weight_decay: 0.0005  # (float) optimizer weight decay 5e-4
warmup_epochs: 3.0  # (float) warmup epochs (fractions ok)
warmup_momentum: 0.8  # (float) warmup initial momentum
warmup_bias_lr: 0.1  # (float) warmup initial bias lr
box: 7.5  # (float) box loss gain
cls: 0.5  # (float) cls loss gain (scale with pixels)
dfl: 1.5  # (float) dfl loss gain
pose: 12.0  # (float) pose loss gain
kobj: 1.0  # (float) keypoint obj loss gain
label_smoothing: 0.0  # (float) label smoothing (fraction)
nbs: 64  # (int) nominal batch size
hsv_h: 0.015  # (float) image HSV-Hue augmentation (fraction)
hsv_s: 0.7  # (float) image HSV-Saturation augmentation (fraction)
hsv_v: 0.4  # (float) image HSV-Value augmentation (fraction)
degrees: 0.0  # (float) image rotation (+/- deg)
translate: 0.1  # (float) image translation (+/- fraction)
scale: 0.5  # (float) image scale (+/- gain)
shear: 0.0  # (float) image shear (+/- deg)
perspective: 0.0  # (float) image perspective (+/- fraction), range 0-0.001
flipud: 0.0  # (float) image flip up-down (probability)
fliplr: 0.5  # (float) image flip left-right (probability)
mosaic: 1.0  # (float) image mosaic (probability)
mixup: 0.0  # (float) image mixup (probability)
copy_paste: 0.0  # (float) segment copy-paste (probability)
auto_augment: randaugment  # (str) auto augmentation policy for classification (randaugment, autoaugment, augmix)
erasing: 0.4  # (float) probability of random erasing during classification training (0-1)
crop_fraction: 1.0  # (float) image crop fraction for classification evaluation/inference (0-1)

# Custom config.yaml ---------------------------------------------------------------------------------------------------
cfg:  # (str, optional) for overriding defaults.yaml

# Tracker settings ------------------------------------------------------------------------------------------------------
tracker: botsort.yaml  # (str) tracker type, choices=[botsort.yaml, bytetrack.yaml]
3.5 多模态 YOLO 模型的配置文件(model.yaml)
YOLO 模型训练时,要调用模型配置文件( .yaml),指定 YOLO 模型的结构。
使用可见光和红外图像进行模型训练时,需要修改 YOLO 模型配置文件,将输入图像的通道数设为 6,表示使用红外/可见光融合图像作为输入图像。模型其它结构没有修改,配置文件的其它部分内容也不变。
多模态 YOLO 模型的配置文件 yolov8-fuse.yaml (具体路径为:ultralytics/cfg/models/v8/yolov8-FrontendFusion.yaml)的具体内容如下。
# Ultralytics YOLO 🚀, AGPL-3.0 license
# YOLOv8 object detection model with P3-P5 outputs. For Usage examples see https://docs.ultralytics.com/tasks/detect

# Parameters
ch: 6  # (int) input channels
nc: 80  # number of classes
scales: # model compound scaling constants, i.e. 'model=yolov8n.yaml' will call yolov8.yaml with scale 'n'
  # [depth, width, max_channels]
  n: [0.33, 0.25, 1024]  # YOLOv8n summary: 225 layers,  3157200 parameters,  3157184 gradients,   8.9 GFLOPs
  s: [0.33, 0.50, 1024]  # YOLOv8s summary: 225 layers, 11166560 parameters, 11166544 gradients,  28.8 GFLOPs
  m: [0.67, 0.75, 768]   # YOLOv8m summary: 295 layers, 25902640 parameters, 25902624 gradients,  79.3 GFLOPs
  l: [1.00, 1.00, 512]   # YOLOv8l summary: 365 layers, 43691520 parameters, 43691504 gradients, 165.7 GFLOPs
  x: [1.00, 1.25, 512]   # YOLOv8x summary: 365 layers, 68229648 parameters, 68229632 gradients, 258.5 GFLOPs

# YOLOv8.0n backbone
backbone:
  # [from, repeats, module, args]
  - [ -1, 1, MF, [ 64 ] ]  # 0-Fusion
  - [-1, 1, Conv, [64, 3, 2]]  # 0-P1/2
  - [-1, 1, Conv, [128, 3, 2]]  # 1-P2/4
  - [-1, 3, C2f, [128, True]]
  - [-1, 1, Conv, [256, 3, 2]]  # 3-P3/8
  - [-1, 6, C2f, [256, True]]
  - [-1, 1, Conv, [512, 3, 2]]  # 5-P4/16
  - [-1, 6, C2f, [512, True]]
  - [-1, 1, Conv, [1024, 3, 2]]  # 7-P5/32
  - [-1, 3, C2f, [1024, True]]
  - [-1, 1, SPPF, [1024, 5]]  # 9

# YOLOv8.0n head
head:
  - [-1, 1, nn.Upsample, [None, 2, 'nearest']]
  - [[-1, 6], 1, Concat, [1]]  # cat backbone P4
  - [-1, 3, C2f, [512]]  # 12

  - [-1, 1, nn.Upsample, [None, 2, 'nearest']]
  - [[-1, 4], 1, Concat, [1]]  # cat backbone P3
  - [-1, 3, C2f, [256]]  # 15 (P3/8-small)

  - [-1, 1, Conv, [256, 3, 2]]
  - [[-1, 12], 1, Concat, [1]]  # cat head P4
  - [-1, 3, C2f, [512]]  # 18 (P4/16-medium)

  - [-1, 1, Conv, [512, 3, 2]]
  - [[-1, 9], 1, Concat, [1]]  # cat head P5
  - [-1, 3, C2f, [1024]]  # 21 (P5/32-large)

  - [[15, 18, 21], 1, Detect, [nc]]  # Detect(P3, P4, P5)
3.5 基于可见光数据集的模型训练
YOLOv8 提供了 Python 接口的调用方式。它提供了加载和运行模型以及处理模型输出的函数。该界面设计易于使用,以便用户可以在他们的项目中快速实现目标检测。
使用 LLVIP800 数据集进行模型训练的 Python 参考例程如下。
注意:
(1)使用项目默认路径的红外/可见光融合模型配置文件 “./ultralytics/cfg/mo
dels/v8/yolov8-FrontendFusion.yaml” 。其中通道数 ch=6,即 RGB 通道+红外通道。
(2)训练数据集的配置文件路径为 “./ultralytics/cfg/datasets/dataLLVIP800.yaml”。
(3)训练好的模型及训练日志保存在 “./runs/detect/train” 目录下。
from ultralytics import YOLO

if __name__ == '__main__':
    # 训练
    model = YOLO(r"ultralytics/cfg/models/v8/yolov8-FrontendFusion.yaml")

    # 用指定数据集训练模型
    model.train(data=r"ultralytics/cfg/datasets/dataLLVIP800.yaml",  # 指定训练数据集的配置文件路径
                cache=False,  # 是否缓存数据集以加快后续训练速度
                imgsz=640,  # 指定训练时使用的图像尺寸
                epochs=100,  # 设置训练的总轮数为 100轮
                batch=16,  # 设置每个训练批次的大小为16
                close_mosaic=10,  # 设置在训练的最后 10 轮中关闭 Mosaic 数据增强
                workers=4,  # 设置用于数据加载的线程数为4
                device='0',  # 指定使用的 GPU 设备
                optimizer='SGD'  # 设置优化器为SGD(随机梯度下降)
                )

    # 验证
    # model = YOLO(r"YOLOv8MMF.pt")
    # model.val(data=r"ultralytics/cfg/datasets/mydata.yaml",batch=1)

    # 检测
    # model = YOLO(r"YOLOv8MMF.pt")
    # model.predict(source=r"datasets/LLVIP800/images/val", save=True)  # RGB 图片路径
在 PyCharm 编译并运行程序,就实现对 LLVIP800 数据集进行模型训练,并将训练结果保存到 “./runs/detect/train/”。
C:\Users\Administrator\.conda\envs\yolo8\python.exe C:\Python\PythonProjects\YOLOv8_MMF\YOLOv8FrontFusion02.py
WARNING ⚠️ no model scale passed. Assuming scale='n'.

                   from  n    params  module                                       arguments

                   from  n    params  module                                       arguments
  0                  -1  1       472  ultralytics.nn.modules.block.MF              [6, 16]
  1                  -1  1      2336  ultralytics.nn.modules.conv.Conv             [16, 16, 3, 2]
  2                  -1  1      4672  ultralytics.nn.modules.conv.Conv             [16, 32, 3, 2]
  3                  -1  1      7360  ultralytics.nn.modules.block.C2f             [32, 32, 1, True]
  4                  -1  1     18560  ultralytics.nn.modules.conv.Conv             [32, 64, 3, 2]
  5                  -1  2     49664  ultralytics.nn.modules.block.C2f             [64, 64, 2, True]
  6                  -1  1     73984  ultralytics.nn.modules.conv.Conv             [64, 128, 3, 2]
  7                  -1  2    197632  ultralytics.nn.modules.block.C2f             [128, 128, 2, True]
  8                  -1  1    295424  ultralytics.nn.modules.conv.Conv             [128, 256, 3, 2]
  9                  -1  1    460288  ultralytics.nn.modules.block.C2f             [256, 256, 1, True]
 10                  -1  1    164608  ultralytics.nn.modules.block.SPPF            [256, 256, 5]
 11                  -1  1         0  torch.nn.modules.upsampling.Upsample         [None, 2, 'nearest']
 12             [-1, 6]  1         0  ultralytics.nn.modules.conv.Concat           [1]
 13                  -1  1    148224  ultralytics.nn.modules.block.C2f             [384, 128, 1]
 14                  -1  1         0  torch.nn.modules.upsampling.Upsample         [None, 2, 'nearest']
 15             [-1, 4]  1         0  ultralytics.nn.modules.conv.Concat           [1]
 16                  -1  1     37248  ultralytics.nn.modules.block.C2f             [192, 64, 1]
 17                  -1  1     36992  ultralytics.nn.modules.conv.Conv             [64, 64, 3, 2]
 18            [-1, 12]  1         0  ultralytics.nn.modules.conv.Concat           [1]
 19                  -1  1    156416  ultralytics.nn.modules.block.C2f             [448, 128, 1]
 20                  -1  1    147712  ultralytics.nn.modules.conv.Conv             [128, 128, 3, 2]
 21             [-1, 9]  1         0  ultralytics.nn.modules.conv.Concat           [1]
 22                  -1  1    493056  ultralytics.nn.modules.block.C2f             [384, 256, 1]
 23        [15, 18, 21]  1   3527104  ultralytics.nn.modules.head.Detect           [80, [192, 448, 384]]
YOLOv8-FrontendFusion summary: 238 layers, 5821752 parameters, 5821736 gradients

train: Scanning C:\Python\PythonProjects\YOLOv8\datasets\LLVIP800\labels\train.cache... 751 images, 0 backgrounds, 0 corrupt: 100%|██████████| 751/751 [00:00<?, ?it/s]
val: Scanning C:\Python\PythonProjects\YOLOv8\datasets\LLVIP800\labels\val.cache... 432 images, 0 backgrounds, 0 corrupt: 100%|██████████| 432/432 [00:00<?, ?it/s]
Plotting labels to runs\detect\train3\labels.jpg...
optimizer: SGD(lr=0.01, momentum=0.937) with parameter groups 57 weight(decay=0.0), 70 weight(decay=0.0005), 65 bias(decay=0.0)
100 epochs...

      Epoch    GPU_mem   box_loss   cls_loss   dfl_loss  Instances       Size
       1/10      3.58G       3.74      3.812      4.272         44        640: 100%|██████████| 47/47 [00:13<00:00,  3.44it/s]
                 Class     Images  Instances      Box(P          R      mAP50  mAP50-95): 100%|██████████| 14/14 [00:03<00:00,  4.39it/s]
                   all        432        944   7.72e-05     0.0106   3.97e-05   7.56e-06
...

      Epoch    GPU_mem   box_loss   cls_loss   dfl_loss  Instances       Size
    100/100      3.64G      1.199     0.6479      1.471         36        640: 100%|██████████| 47/47 [00:12<00:00,  3.89it/s]
                 Class     Images  Instances      Box(P          R      mAP50  mAP50-95): 100%|██████████| 14/14 [00:02<00:00,  4.73it/s]
                   all        432        944      0.874      0.782       0.86        0.5

100 epochs completed in 0.274 hours.
Optimizer stripped from runs\detect\train3\weights\last.pt, 11.8MB
Optimizer stripped from runs\detect\train3\weights\best.pt, 11.8MB
经过 100 轮遍历训练,训练过程及结果文件保存在目录 “runs\detect\train2”,如下图所示:

4. 模型推理
detect.py 程序使用PyTorch加载预训练的YOLOv8 模型。程序解析从命令行传入的参数,这些参数包括输入文件的路径(可以是图像、视频或目录)、预训练模型的路径、输出文件的路径、置信度阈值等。
将训练的模型 “runs\detect\train2\best.pt” 保存到项目的根目录,另存为 “yolov8n-mmf-best.pt”。读取指定路径的图片,结果默认保存到 runs/detect 文件夹中。
使用预训练模型 “yolov8n-mmf-best.pt” 进行推理的 Python 程序如下。
from ultralytics import YOLO

if __name__ == '__main__':
    # # 训练
    # model = YOLO(r"ultralytics/cfg/models/v8/yolov8-FrontendFusion.yaml")

    # 验证
    # model = YOLO(r"YOLOv8MMF.pt")
    # model.val(data=r"ultralytics/cfg/datasets/mydata.yaml",batch=1)

    # 检测
    model = YOLO(r"YOLOv8MMF.pt")
    model.predict(source=r"datasets/LLVIP800/images/val", save=True)  # RGB 图片路径
运行程序,就实现对指定图像文件的检测,并将检测结果保存到文件夹 “./runs/detect/predict”。
C:\Users\Administrator\.conda\envs\yolo8\python.exe C:\Python\PythonProjects\YOLOv8_MMF\YOLOv8Multi_predict.py

image 1/432 C:\Python\PythonProjects\YOLOv8_MMF\datasets\LLVIP800\images\val\190008.jpg: 512x640 5 persons, 5.5ms
...
image 432/432 C:\Python\PythonProjects\YOLOv8_MMF\datasets\LLVIP800\images\val\260529.jpg: 512x640 2 persons, 13.0ms

Speed: 8.9ms preprocess, 16.2ms inference, 1.4ms postprocess per image at shape (1, 6, 512, 640)
Results saved to runs\detect\predict

【本节完】
版权声明:
欢迎关注『youcans动手学模型』系列
转发请注明原文链接:
【YOLO 项目实战】(12)红外/可见光多模态目标检测
Copyright 2024 youcans
Crated:2024-12-31


 831
831

 被折叠的 条评论
为什么被折叠?
被折叠的 条评论
为什么被折叠?
 到【灌水乐园】发言


