 基于YOLO11实现双模态目标检测


系列文章目录
《双模态检测系列 一》: 一文看懂YOLO11(系列进化史+网络结构+源码目录)
《双模态检测系列 二》: 手把手教你将YOLO11改成双模态目标检测(红外+可见光图像,代码实战)
《双模态检测系列 四》: 双模态检测数据集大全 敬请期待…
如果下面的内容对您有帮助,请多多点赞、收藏、转发,谢谢大家的支持。同时博主创建了一个计算机视觉相关的科研互助群Q:950440005。本系列所有教程可以进群获取,欢迎大家加群讨论👏👏👏
文章目录
前言
随着感知技术的快速发展,多模态融合感知在自动驾驶、安防检测、病理诊断、情感分析等多方面表现出了非常重要的地位。利用不同数据类型的互补优势,双模态数据融合为各个领域实现了高效感知。
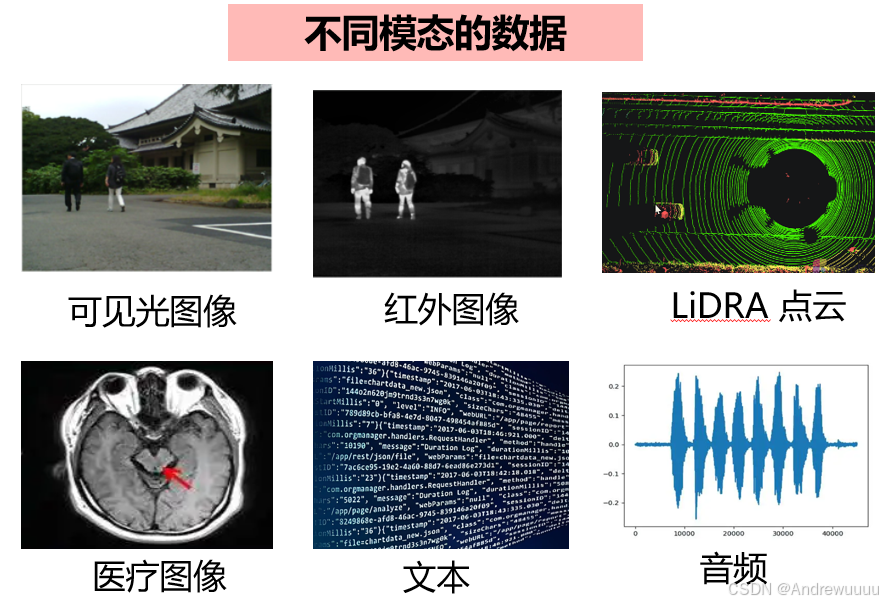
(1)可见光图像:具有丰富的色彩和纹理细节,但容易受到光照的影响;
(2)红外图像:不受光照、大雾、大雪等恶劣条件影响,能够高亮显示人和动物,但不具备色彩信息;
(3)LiDRA 点云:提供了精确的深度信息,但成本高,点云数据稀疏;
(4)解剖形态结构影像(CT、MRI)以较高的空间分辨率提供了清晰的解剖结构信息,但其不能提供功能、代谢信息;
(5)功能图像(SPECT、PET)分辨率较差,难以得到精确的解剖结构和定位信息,但它能反映脏器的功能、代谢信息;
每个模态的数据有着各自独特的优缺点,利用两个或多个模态的数据进行信息互补,对于AI任务来说是非常必要的!
多模态感知具有无限可能!大家抓紧学习起来!
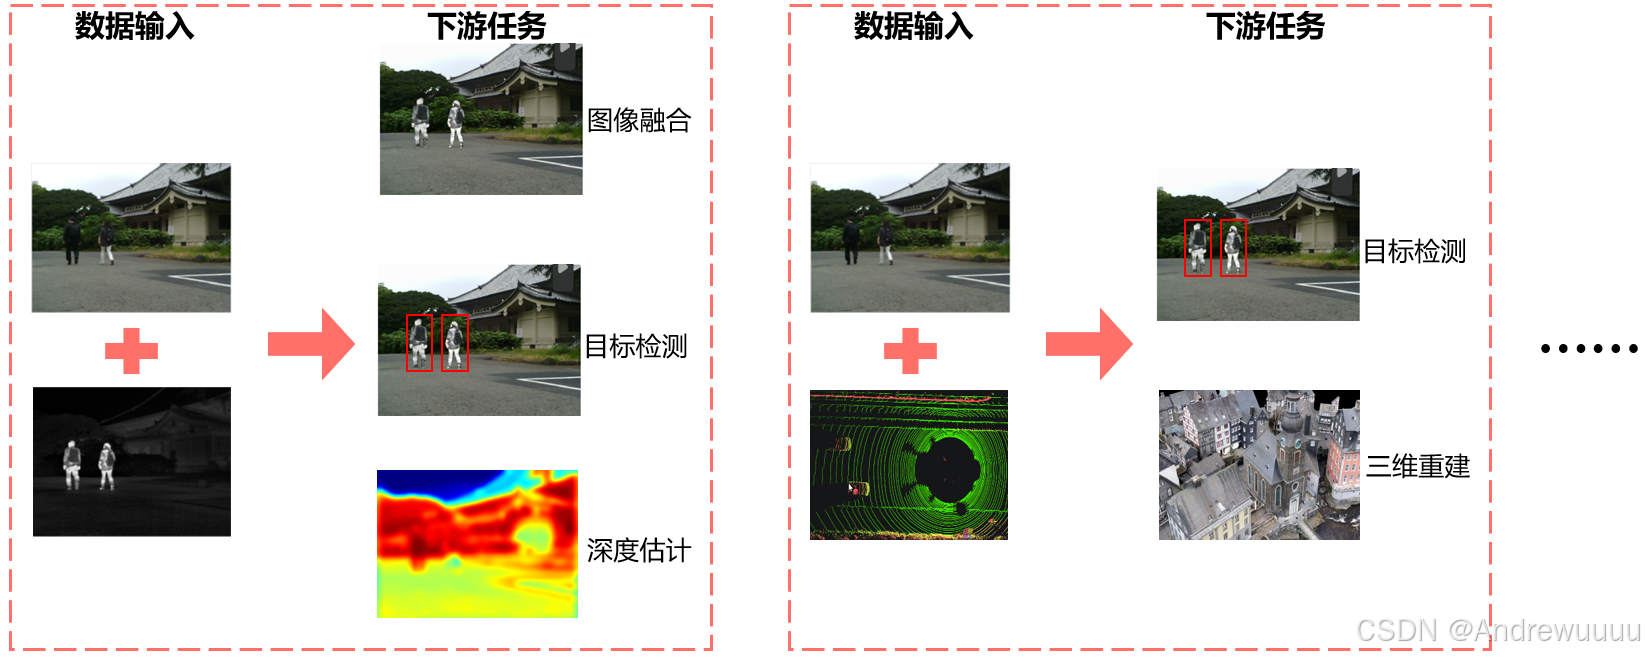
本文将基于YOLO11最新官方代码,手把手带你实现可见光与红外图像的双模态检测任务。理论上,可以拓展到多个模态、多种模态…
一、双模态YOLO11改进
要将单模态YOLO11改进成双模态,我们可以从 train、valid、prediction 这三大块下手。
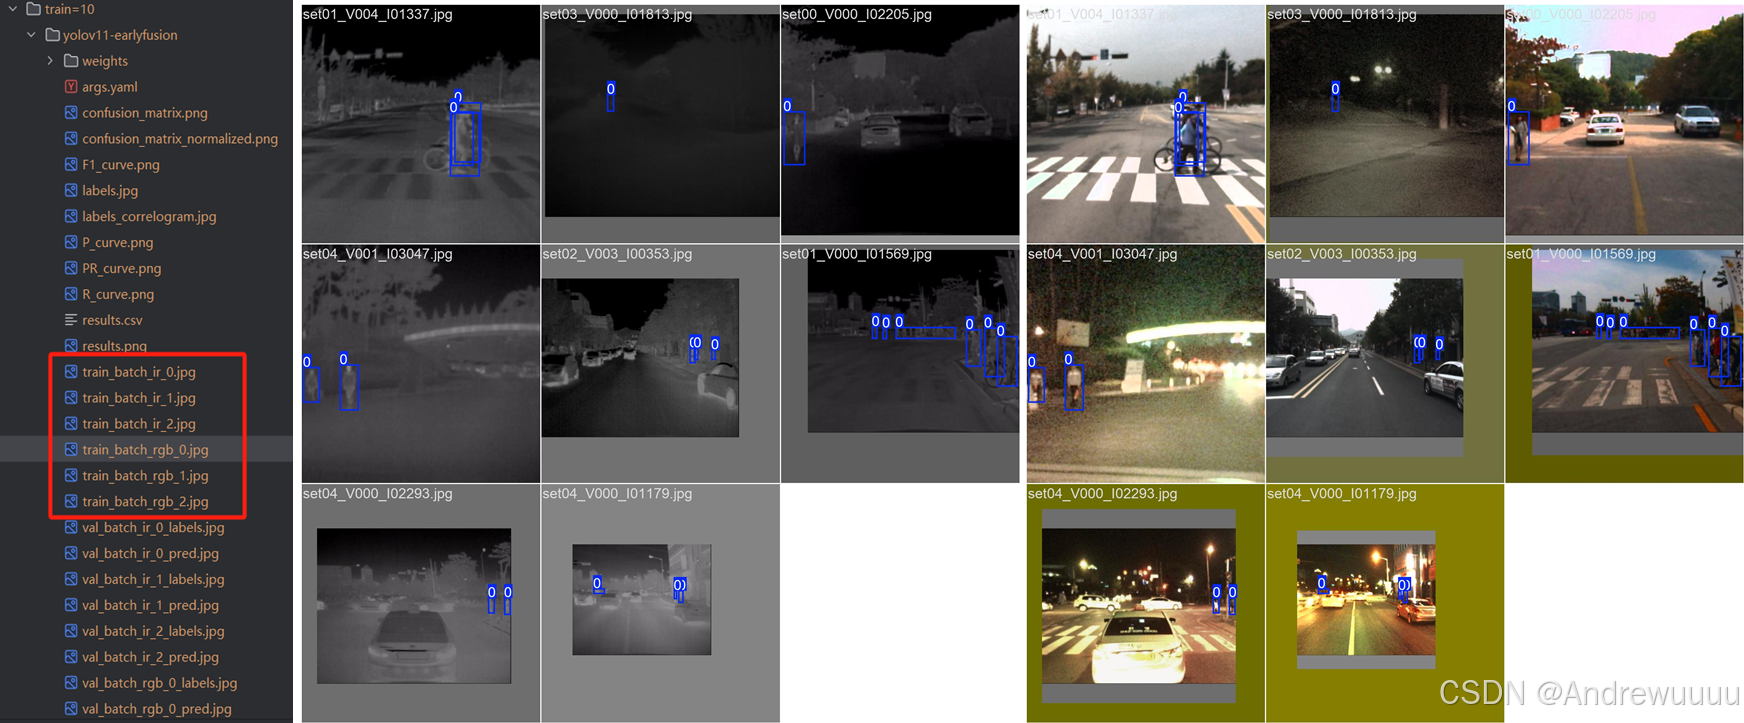
在train过程中,我们首先需要确保网络能够导入两种模态的数据(一般来说,可见光图像为3通道,红外图像也是3个灰度通道),并且同时绘制训练过程开始时两种模态的批次图片(如训练结果文件中的train_batch_0.jpg)。
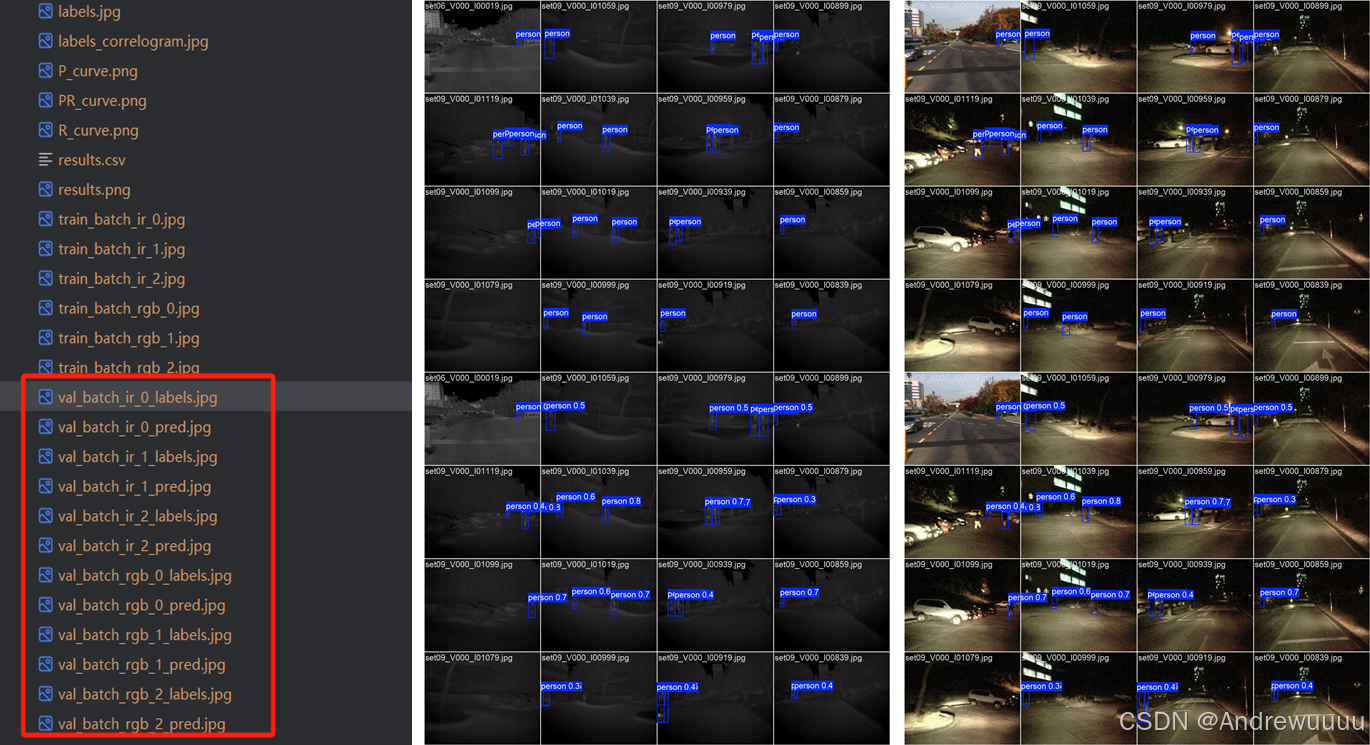
其次,在valid过程中,我们也要绘制验证过程的两种模态前几个batch标签和验证的结果图片(如训练结果文件中的val_batch_0_labels和val_batch_0_pred)。
最后,在prediction过程中,要将检测结果框绘制分别绘制在两种模态中,并保存。
到这大家肯定还是不能理解,我们保持Passion,继续往下一步一步看。
1.1 Train部分改进
- 在ultralytics/models/yolo/detect/train.py中的plot_training_samples()函数中,添加了对红外图的显示;
- 在ultralytics/data/base.py的load_image()函数中,添加了对红外图像的读取;
- 修改default.yaml中的ch参数,以及mydata.yaml中的路径,以适应双模态输入;
- 在ultralytics/data/augment.py的类RandomHSV中,对融合后的6通道图像进行拆开,分别对RGB和红外图像进行HSV变换,再合并。
(1)在ultralytics/models/yolo/detect/train.py中的plot_training_samples()函数中,添加了对红外图的显示:
    def plot_training_samples(self, batch, ni):
        """Plots training samples with their annotations."""
        plot_images(
            images=batch["img"][:, :3],  # 先画RGB图像
            batch_idx=batch["batch_idx"],
            cls=batch["cls"].squeeze(-1),
            bboxes=batch["bboxes"],
            paths=batch["im_file"],
            fname=self.save_dir / f"train_batch_rgb_{ni}.jpg",
            on_plot=self.on_plot,
        )

        if batch['img'].size(1) > 3:
            plot_images(images=batch['img'][:, 3:],  # 再画IR图像
                        batch_idx=batch['batch_idx'],
                        cls=batch['cls'].squeeze(-1),
                        bboxes=batch['bboxes'],
                        paths=batch['im_file'],
                        fname=self.save_dir / f'train_batch_ir_{ni}.jpg',
                        on_plot=self.on_plot)
(2)修改default.yaml中的ch参数,以及mydata.yaml中的路径,以适应双模态输入:
# Ultralytics YOLO 🚀, AGPL-3.0 license
# Default training settings and hyperparameters for medium-augmentation COCO training
ch: 6  # 这是我们自己定义的输入通道数,如果为6则意味着输入为(RGB+IR),为3则意味着输入为单模态(RGB或IR)
task: detect # (str) YOLO task, i.e. detect, segment, classify, pose, obb
mode: train # (str) YOLO mode, i.e. train, val, predict, export, track, benchmark
path: kaist  # 数据集路径,最好是改成绝路路径
# 下面这些路径是固定的,都不要改,只改上面的'path'
train: images/train  # train images
train_infrared: image/train  # 红外图路径
val: images/test  # val images
test:  # test images (optional)

# Classes
names:
  0: person
(3)在ultralytics/data/base.py的load_image()函数中,添加了网络对红外图像的读取:
    def load_image(self, i, rect_mode=True):
        """Loads 1 image from dataset index 'i', returns (im, resized hw)."""
        im, f, fn = self.ims[i], self.im_files[i], self.npy_files[i]
        ir = f.replace("images", 'image')  # 将可见光图像的images替换为image,即对应的红外图像
        if im is None:  # not cached in RAM
            if fn.exists():  # load npy
                try:
                    im = np.load(fn)
                except Exception as e:
                    LOGGER.warning(f"{self.prefix}WARNING ⚠️ Removing corrupt *.npy image file {fn} due to: {e}")
                    Path(fn).unlink(missing_ok=True)
                    im = cv2.imread(f)  # BGR
            else:  # read image
                im = cv2.imread(f)  # BGR
                if self.hyp.ch > 3:  # 如果输入通道数大于3
                    im = cv2.merge((cv2.imread(ir), im))  # 将可见光图像和红外图像合并
            if im is None:
                raise FileNotFoundError(f"Image Not Found {f}")
(4) 在ultralytics/data/augment.py的类RandomHSV中,对融合后的6通道图像进行拆开,分别对RGB和红外图像进行HSV变换,再合并:
class RandomHSV:
    """
    Randomly adjusts the Hue, Saturation, and Value (HSV) channels of an image.

    This class applies random HSV augmentation to images within predefined limits set by hgain, sgain, and vgain.

    Attributes:
        hgain (float): Maximum variation for hue. Range is typically [0, 1].
        sgain (float): Maximum variation for saturation. Range is typically [0, 1].
        vgain (float): Maximum variation for value. Range is typically [0, 1].

    Methods:
        __call__: Applies random HSV augmentation to an image.

    Examples:
        >>> import numpy as np
        >>> from ultralytics.data.augment import RandomHSV
        >>> augmenter = RandomHSV(hgain=0.5, sgain=0.5, vgain=0.5)
        >>> image = np.random.randint(0, 255, (100, 100, 3), dtype=np.uint8)
        >>> labels = {"img": image}
        >>> augmented_labels = augmenter(labels)
        >>> augmented_image = augmented_labels["img"]
    """

    def __init__(self, hgain=0.5, sgain=0.5, vgain=0.5) -> None:
        """
        Initializes the RandomHSV object for random HSV (Hue, Saturation, Value) augmentation.

        This class applies random adjustments to the HSV channels of an image within specified limits.

        Args:
            hgain (float): Maximum variation for hue. Should be in the range [0, 1].
            sgain (float): Maximum variation for saturation. Should be in the range [0, 1].
            vgain (float): Maximum variation for value. Should be in the range [0, 1].

        Examples:
            >>> hsv_aug = RandomHSV(hgain=0.5, sgain=0.5, vgain=0.5)
            >>> augmented_image = hsv_aug(image)
        """
        self.hgain = hgain
        self.sgain = sgain
        self.vgain = vgain

    def __call__(self, labels):
        """
        Applies random HSV augmentation to an image within predefined limits.

        This method modifies the input image by randomly adjusting its Hue, Saturation, and Value (HSV) channels.
        The adjustments are made within the limits set by hgain, sgain, and vgain during initialization.

        Args:
            labels (Dict): A dictionary containing image data and metadata. Must include an 'img' key with
                the image as a numpy array.

        Returns:
            (None): The function modifies the input 'labels' dictionary in-place, updating the 'img' key
                with the HSV-augmented image.

        Examples:
            >>> hsv_augmenter = RandomHSV(hgain=0.5, sgain=0.5, vgain=0.5)
            >>> labels = {"img": np.random.randint(0, 255, (100, 100, 3), dtype=np.uint8)}
            >>> hsv_augmenter(labels)
            >>> augmented_img = labels["img"]
        """
        img = labels["img"]
        if self.hgain or self.sgain or self.vgain:
            r = np.random.uniform(-1, 1, 3) * [self.hgain, self.sgain, self.vgain] + 1  # random gains
            # hue, sat, val = cv2.split(cv2.cvtColor(img, cv2.COLOR_BGR2HSV))
            dtype = img.dtype  # uint8

            x = np.arange(0, 256, dtype=r.dtype)
            lut_hue = ((x * r[0]) % 180).astype(dtype)
            lut_sat = np.clip(x * r[1], 0, 255).astype(dtype)
            lut_val = np.clip(x * r[2], 0, 255).astype(dtype)

            # 当输入图像包含红外和可见光时,需要分别调整,再合并
            if img.shape[-1] > 5:
                hue, sat, val = cv2.split(cv2.cvtColor(img[..., -3:], cv2.COLOR_BGR2HSV))
                hue_, sat_, val_ = cv2.split(cv2.cvtColor(img[..., :-3], cv2.COLOR_BGR2HSV))
                im_hsv = cv2.merge((cv2.LUT(hue, lut_hue), cv2.LUT(sat, lut_sat), cv2.LUT(val, lut_val)))
                im_hsv_ = cv2.merge((cv2.LUT(hue_, lut_hue), cv2.LUT(sat_, lut_sat), cv2.LUT(val_, lut_val)))
                img[..., -3:] = cv2.cvtColor(im_hsv, cv2.COLOR_HSV2BGR)  # no return needed
                img[..., :-3] = cv2.cvtColor(im_hsv_, cv2.COLOR_HSV2BGR)  # no return needed
                labels['img'] = img
            else:
                hue, sat, val = cv2.split(cv2.cvtColor(img, cv2.COLOR_BGR2HSV))
                im_hsv = cv2.merge((cv2.LUT(hue, lut_hue), cv2.LUT(sat, lut_sat), cv2.LUT(val, lut_val)))
                cv2.cvtColor(im_hsv, cv2.COLOR_HSV2BGR, dst=img)  # no return needed
            # im_hsv = cv2.merge((cv2.LUT(hue, lut_hue), cv2.LUT(sat, lut_sat), cv2.LUT(val, lut_val)))
            # cv2.cvtColor(im_hsv, cv2.COLOR_HSV2BGR, dst=img)  # no return needed
        return labels
到此,我们网络能够正确读取双模态的图片信息,并绘制出前3个batch的训练结果图片,如下图所示:
1.2 Valid部分改进
- 在ultralytics/engine/validator.py的类BaseValidator中的157行,将model.warmup(imgsz=(1 if pt else self.args.batch, 3, imgsz, imgsz))的3改为self.args.ch,以适应双模态输入;
- 在ultralytics/models/yolo/detect/val.py的类DetectionValidator中的plot_val_samples()和plot_predictions()函数中添加对红外图像的结果绘制。
(1)在ultralytics/engine/validator.py的类BaseValidator中的157行,将model.warmup(imgsz=(1 if pt else self.args.batch, 3, imgsz, imgsz))的3改为self.args.ch,以适应双模态输入:
model.warmup(imgsz=(1 if pt else self.args.batch, self.args.ch, imgsz, imgsz)) # warmup
(2)在ultralytics/models/yolo/detect/val.py的类DetectionValidator中的plot_val_samples()和plot_predictions()函数中添加对红外图像的结果绘制:
    def plot_val_samples(self, batch, ni):
        """Plot validation image samples."""
        plot_images(batch['img'][:, :3],
                    batch['batch_idx'],
                    batch['cls'].squeeze(-1),
                    batch['bboxes'],
                    paths=batch['im_file'],
                    fname=self.save_dir / f'val_batch_rgb_{ni}_labels.jpg',
                    names=self.names,
                    on_plot=self.on_plot)
        if batch['img'].size(1) > 3:
            plot_images(batch['img'][:, 3:],
                        batch['batch_idx'],
                        batch['cls'].squeeze(-1),
                        batch['bboxes'],
                        paths=batch['im_file'],
                        fname=self.save_dir / f'val_batch_ir_{ni}_labels.jpg',
                        names=self.names,
                        on_plot=self.on_plot)

    def plot_predictions(self, batch, preds, ni):
        """Plots predicted bounding boxes on input images and saves the result."""
        plot_images(batch['img'][:, :3],
                    *output_to_target(preds, max_det=self.args.max_det),
                    paths=batch['im_file'],
                    fname=self.save_dir / f'val_batch_rgb_{ni}_pred.jpg',
                    names=self.names,
                    on_plot=self.on_plot)  # pred
        if batch['img'].size(1) > 3:
            plot_images(batch['img'][:, 3:],
                        *output_to_target(preds, max_det=self.args.max_det),
                        paths=batch['im_file'],
                        fname=self.save_dir / f'val_batch_ir_{ni}_pred.jpg',
                        names=self.names,
                        on_plot=self.on_plot)  # pred
至此,Valid过程可以顺利进行,结果如下:
1.3 Prediction
- ultralytics/engine/predictor.py的类BasePredictor;
- 修改ultralytics/data/loaders.py的类LoadImagesAndVideos;
- 在ultralytics/models/yolo/detect/predict.py的类DetectionPredictor中,修改postprocess函数。
具体修改源码可以加上面深度学习交流Q群: 950440005 获取交流。
二、双模态网络的不同形式
双模态网络(包括融合、检测)的构建形式主要包括三种方式:
| 融合方式 | 方法 | 优点 | 缺点 |
|---|---|---|---|
| 前融合 | 简单加权、级联 | 容易实现 | 信息丢失,不适应复杂系统 |
| 中间融合 | 特征级融合 | 更细粒度的特征共享,适应复杂系统 | 计算复杂度高,需要大量数据,训练时间长 |
| 后融合 | 投票法 | 简单容易实现,独立训练各模态数据,互不干扰 | 无法获取模态之间深层次的信息关系,适应性差,依赖个体模型 |
目前研究最多、应用最广泛的方法是中间融合方法。
2.1 前融合
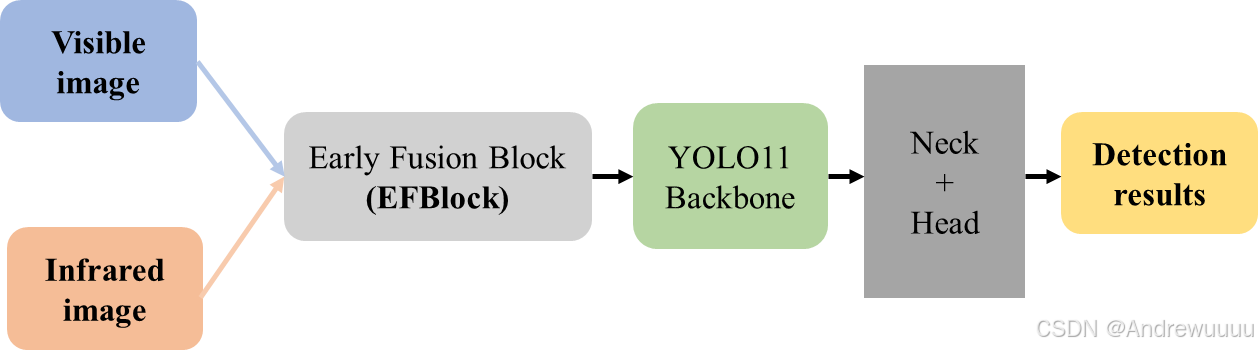
实现步骤:
(1)在ultralytics/nn/models/block.py等中添加新模块,例如名称为`EFBlock`;
(2)在相应block.py的 __all__ 中添加` EFBlock `;
(3)在ultralytics/nn/models/__init__.py中添加` EFBlock `;
(4)在ultralytics/nn/tasks.py的 parse_model() 函数中中添加` EFBlock `相关c1、c2、args参数规则;
(5)在ultralytics/cfg/models/11中编写相应的模型yaml文件,如yolo11-earlyfusion.yaml。
2.2 中间融合
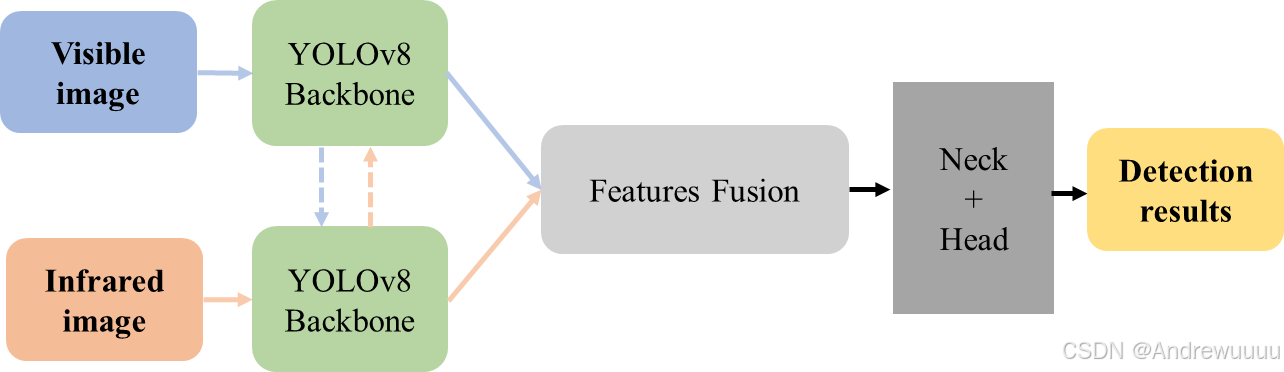
(1)Backbone模块使用原来YOLOv8的CSPDarknet架构,只简单改变通道数;
(2)暂不添加主干网络之间的跨模态信息交互;
(3)Feature Fusion模块采用简单的通道级联操作;
(4)融合特征输入后续的Neck和Head中,生成检测结果。
(5)在 ultralytics/cfg/models/11 中编写相应的模型yaml文件,如yolov11-twoCSP.yaml
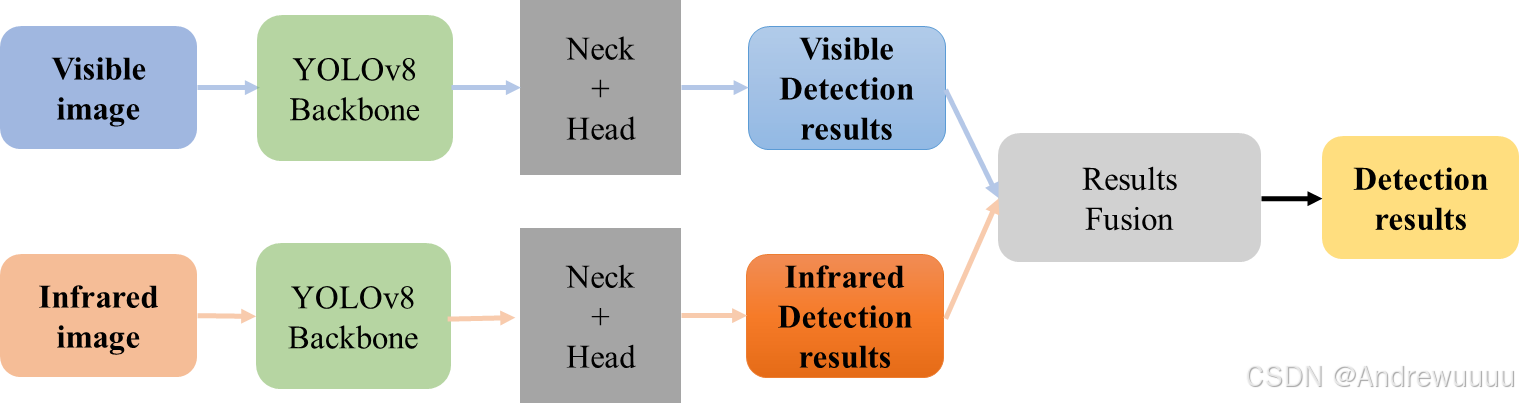
2.3 后融合
总结
本文以YOLO11官方代码为基础,实现了红外+可见光图像双模态目标检测。同时,大致阐述了三种不同双模态融合方法优缺点。大家如果想要更详细的代码,欢迎加交流Q群: 950440005


 417
417

 被折叠的 条评论
为什么被折叠?
被折叠的 条评论
为什么被折叠?
 到【灌水乐园】发言


