


环境搭建
首先拷贝之前搭建好的fasterrcnn环境,具体见https://blog.csdn.net/yuanjiaqi_k/article/details/125599570
下载mmcv
pip install mmcv-full -f https://download.openmmlab.com/mmcv/dist/{cu_version}/{torch_version}/index.html
其中{cu_version}/{torch_version}填写自己的版本,我的是
pip install mmcv-full -f https://download.openmmlab.com/mmcv/dist/cu113/torch1.10.0/index.html
然后在官网https://github.com/open-mmlab/mmdetection.git下载代码zip文件
python setup.py develop
验证是否安装成功
安装pip install -U openmim
下载mim download mmdet --config yolov3_mobilenetv2_320_300e_coco --dest .
运行成功且result.jpg有对应框
python demo/image_demo.py demo/demo.jpg yolov3_mobilenetv2_320_300e_coco.py yolov3_mobilenetv2_320_300e_coco_20210719_215349-d18dff72.pth --device cpu --out-file result.jpg
OK!安装成功!
运行faster-rcnn
首先准备voc数据集
修改代码:
- mmdet/dataset/voc.py
类别修改为自己的
#CLASSES = ('aeroplane', 'bicycle', 'bird', 'boat', 'bottle', 'bus', 'car',
    #           'cat', 'chair', 'cow', 'diningtable', 'dog', 'horse',
    #           'motorbike', 'person', 'pottedplant', 'sheep', 'sofa', 'train',
    #           'tvmonitor')

    CLASSES = ('break', 'gap', 'ok_gap', 'short', 'ok_spot',
                'long_unaligned', 'offcut', 'spot', 'strip', 'unaligned',
                'wrinkle', 'ok_unaligned')
- mmdet/core/evaluation/class_name.py
voc_classes()改成你自己数据集的类别
def voc_classes():
    return [
        'break', 'gap', 'ok_gap', 'short', 'ok_spot',
        'long_unaligned', 'offcut', 'spot', 'strip', 'unaligned',
        'wrinkle', 'ok_unaligned'
    ]
- 准备voc数据,在目录中建立data文件夹,放入数据

这个博客有非常完整的步骤https://blog.csdn.net/qq_30121457/article/details/112591430?utm_medium=distribute.pc_relevant.none-task-blog-baidujs_utm_term-0&spm=1001.2101.3001.4242
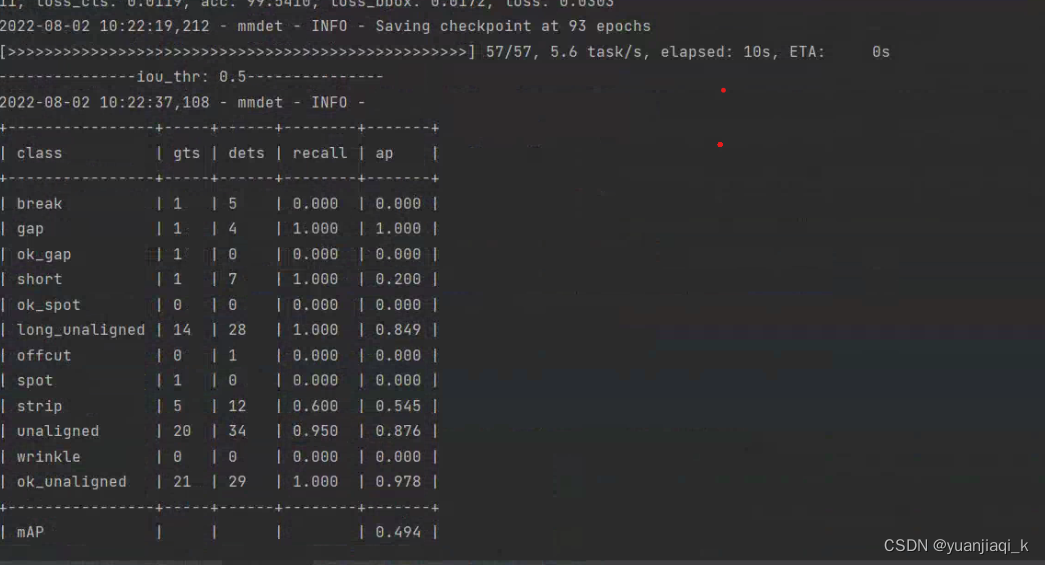
训练获得结果
!!训练时保存评估最好模型的方法:
在数据configs/datasets/coco_detection.py中加入参数save_best='bbox_mAP':
evaluation = dict(interval=1, metric='bbox',save_best='bbox_mAP')#save_best
这样训练的时候会保存额外保存最好模型
测试
python tools/test.py configs/faster_rcnn/faster_rcnn_r50_fpn_1x_coco.py work_dirs/faster_rcnn_r50_fpn_1x_coco/epoch_93.pth --eval mAP
模型转化
cd mmdetection
pip install -e .
mkdir checkpoints
cd checkpoints
wget https://download.openmmlab.com/mmdetection/v2.0/faster_rcnn/faster_rcnn_r50_fpn_1x_coco/faster_rcnn_r50_fpn_1x_coco_20200130-047c8118.pth
# 改名
mv faster_rcnn_r50_fpn_1x_coco_20200130-047c8118.pth faster_rcnn_r50_fpn_1x_coco.pth
cd ../../mmdeploy

pip install -i https://pypi.tuna.tsinghua.edu.cn/simple pycuda
我把自己训练好的last.pth 文件拷贝到checkpoints中
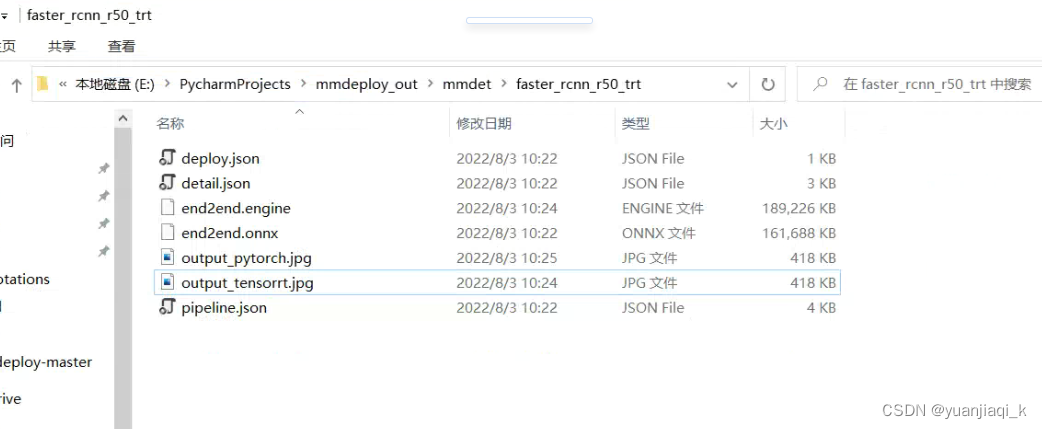
python tools/deploy.py configs/mmdet/detection/detection_tensorrt_dynamic-320x320-1344x1344.py ../mmdetection-master/configs/faster_rcnn/faster_rcnn_r50_fpn_1x_coco.py ../mmdetection-master/checkpoints/latest.pth ../mmdetection-master/demo/1.jpg --work-dir ../mmdeploy_out/mmdet/faster_rcnn_r50_trt/ --device cuda:0 --dump-info
成功将模型转化为onnx和engine文件
模型推理
只进行c++接口的模型推理
用 Inference SDK
部署
部署的相关环境搭建根据如下链接
https://github.com/open-mmlab/mmdeploy/blob/master/docs/zh_cn/01-how-to-build/windows.md
其中前面环境已经安装完成,从pplcv开始安装
git clone https://github.com/openppl-public/ppl.cv.git
cd ppl.cv
git checkout tags/v0.7.0 -b v0.7.0
$env:PPLCV_DIR = "$pwd"
mkdir pplcv-build
cd pplcv-build
cmake .. -G "Visual Studio 15 2017" -T v141 -A x64 -DCMAKE_BUILD_TYPE=Release -DCMAKE_INSTALL_PREFIX=install -DPPLCV_USE_CUDA=ON -DPPLCV_USE_MSVC_STATIC_RUNTIME=OFF
cmake --build . --config Release -- /m
cmake --install . --config Release
cd ../..
因为我之前有下载过vs2017,注意!vs2017不能用!还是要vs2019所以报错时rror MSB8020: 无法找到 v142 的生成工具(平台工具集 =“v142”)
将v142改为vs2017对应的v141,然后删除build文件夹所有内容,重新执行
好像没有报错8?
MMdeploy pytorch模型转换onnx,tensorrt
下载MMdeploy代码
编译mmdeploy,新建build文件夹,cd进去
#vs2017 失败!
cmake .. -G "Visual Studio 15 2017" -A x64 -T v141 -DMMDEPLOY_BUILD_SDK=ON -DMMDEPLOY_TARGET_DEVICES="cuda" -DMMDEPLOY_TARGET_BACKENDS="tr
t" -DMMDEPLOY_CODEBASES="all" -Dpplcv_DIR="E:\PycharmProjects\mmdetection-master\ppl.cv\pplcv-build\install\lib\cmake\ppl" -DTENSORRT_DIR="E:\PycharmProjects\mmdetection-master\ppl.cv\pplcv-build\install\lib\cmake\ppl" -
DCUDNN_DIR="C:\Program Files\NVIDIA GPU Computing Toolkit\CUDA\v11.3"
-------------------------------------------------------------------------
#vs2019
cmake .. -G "Visual Studio 16 2019" -A x64 -T v142 -DMMDEPLOY_BUILD_SDK=ON -DMMDEPLOY_TARGET_DEVICES="cuda" -DMMDEPLOY_TARGET_BACKENDS="trt" -DMMDEPLOY_CODEBASES="all" -Dpplcv_DIR="E:\PycharmProjects\mmdetection-master\ppl.cv\pplcv-build\install\lib\cmake\ppl" -DTENSORRT_DIR="E:\PycharmProjects\mmdetection-master\ppl.cv\pplcv-build\install\lib\cmake\ppl" -DCUDNN_DIR="C:\Program Files\NVIDIA GPU Computing Toolkit\CUDA\v11.3"
- 报错No CUDA toolset found.
No CUDA toolset found.
问题:cMake编译yolov5报错:No CUDA toolset found.
解决:在stackoverflow找到解决方案。
将该路径下的四个文件 C:\Program Files\NVIDIA GPU Computing Toolkit\CUDA\v11.1\extras\visual_studio_integration\MSBuildExtensions
复制到
C:\Program Files (x86)\Microsoft Visual Studio\2019\Enterprise\MSBuild\Microsoft\VC\v160\BuildCustomizations
- 报错显示找不到spdlog文件,重新去github中copy一份
cd ..\third_party\spdlog
git clone https://github.com/gabime/spdlog.git
cd ..\..\build
清空build文件夹,重新编译
cmake --build . --config Release -- /m
报错!好多!!晕了!
E0135 namespace “std” 没有成员 “min” mmdeploy_tensorrt_ops_obj E:\Pychar
前面因为懒得装vs2019,用vs2017进行编译的,怀疑是版本问题,下载了vs2019,重新执行,成功
cmake --install . --config Release
然后编译example
cd $env:MMDEPLOY_DIR\build\install\example
mkdir build -ErrorAction SilentlyContinue
cd build
cmake .. -G "Visual Studio 16 2019" -A x64 -T v142 ` -DMMDeploy_DIR="E:\\PycharmProjects\\mmdeploy-master\\build\\install\\lib\\cmake\\MMDeploy"
报错
CMake Error: The source directory “E:/PycharmProjects/mmdeploy-master/build/install/example” does not appear to contain CMakeLists.txt.
Specify --help for usage, or press the help button on the CMake GUI.
查找后发现txt文件在example的cpp文件夹中,复制到example目录中
报错
CMake Error at E:/PycharmProjects/mmdeploy-master/build/install/lib/cmake/MMDeploy/modules/FindTENSORRT.cmake:7 (message):
Please set TENSORRT_DIR with cmake -D option.
根据提示加上TensorRT文件夹目录
cmake .. -G "Visual Studio 16 2019" -A x64 -T v142 ` -DMMDeploy_DIR="E:\\PycharmProjects\\mmdeploy-master\\build\\install\\lib\\cmake\\MMDeploy" -DTENSORRT_DIR="E:\PycharmProjects\mmdetection-master\ppl.cv\pplcv-build\install\lib\cmake\ppl"
成功
cmake --build . --config Release -- /m
Realease文件夹中存在exe文件

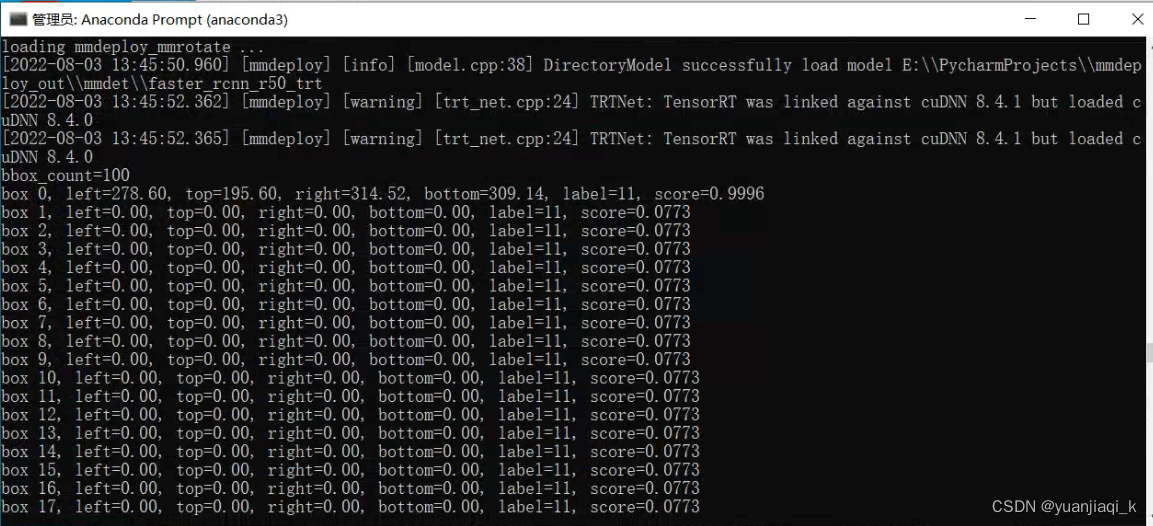
尝试运行demo中的文件
tensorrt模型文件夹:F:\mmdeploy_c_sdk_demo\models\yolox_s
要推理的图片:F:\gy77\mmdetection\demo\demo.jpg
cd Release
object_detection.exe cuda E:\\PycharmProjects\\mmdeploy_out\\mmdet\\faster_rcnn_r50_trt E:\\PycharmProjects\\mmdetection-master\\demo\\1.jpg
报错!气死!

找到这些dll文件E:\PycharmProjects\mmdeploy-master\build\install\bin,放在exe文件同一层E:\PycharmProjects\mmdeploy-master\build\install\example\build\Release
再次运行 成功!yeah!
感谢https://blog.csdn.net/qq_39435411/category_11937756.html的分享!
修改
添加时间计数以及标签显示内容
#include <fstream>
#include <opencv2/imgcodecs/imgcodecs.hpp>
#include <opencv2/imgproc/imgproc.hpp>
#include <string>
#include<iostream>
#include "mmdeploy/detector.h"
//标签类别命名
std::string coco_classes[12] = {"break", "gap"," ok_gap", "short", "ok_spot",
        "long_unaligned", "offcut", "spot", "strip", "unaligned",
        "wrinkle", "ok_unaligned"};

int main(int argc, char* argv[]) {
  if (argc != 4) {
    fprintf(stderr, "usage:\n  object_detection device_name model_path image_path\n");
    return 1;
  }
  auto device_name = argv[1];
  auto model_path = argv[2];
  auto image_path = argv[3];
  cv::Mat img = cv::imread(image_path);
  if (!img.data) {
    fprintf(stderr, "failed to load image: %s\n", image_path);
    return 1;
  }

  mmdeploy_detector_t detector{};
  int status{};
  status = mmdeploy_detector_create_by_path(model_path, device_name, 0, &detector);
  if (status != MMDEPLOY_SUCCESS) {
    fprintf(stderr, "failed to create detector, code: %d\n", (int)status);
    return 1;
  }

  mmdeploy_mat_t mat{
      img.data, img.rows, img.cols, 3, MMDEPLOY_PIXEL_FORMAT_BGR, MMDEPLOY_DATA_TYPE_UINT8};

  mmdeploy_detection_t* bboxes{};
  int* res_count{};

//计时
 clock_t startTime,endTime; // new adding
 startTime = clock(); // 推理计时开始 // new adding
 status = mmdeploy_detector_apply(detector, &mat, 1, &bboxes, &res_count); // 推理过程
 endTime = clock(); // 推理计时结束 // new adding
 std::cout << "The inference time time is: " <<(double)(endTime - startTime) / CLOCKS_PER_SEC << "s" << "!!!"<< std::endl; // 打印时间 // new adding


  //status = mmdeploy_detector_apply(detector, &mat, 1, &bboxes, &res_count);
  if (status != MMDEPLOY_SUCCESS) {
    fprintf(stderr, "failed to apply detector, code: %d\n", (int)status);
    return 1;
  }

  fprintf(stdout, "bbox_count=%d\n", *res_count);

  for (int i = 0; i < *res_count; ++i) {
    const auto& box = bboxes[i].bbox;
    const auto& mask = bboxes[i].mask;

   // fprintf(stdout, "box %d, left=%.2f, top=%.2f, right=%.2f, bottom=%.2f, label=%d, score=%.4f\n",
    //        i, box.left, box.top, box.right, box.bottom, bboxes[i].label_id, bboxes[i].score);

    // skip detections with invalid bbox size (bbox height or width < 1)
    if ((box.right - box.left) < 1 || (box.bottom - box.top) < 1) {
      continue;
    }

    // skip detections less than specified score threshold
    if (bboxes[i].score < 0.3) {
      continue;
    }

    // generate mask overlay if model exports masks
    if (mask != nullptr) {
      fprintf(stdout, "mask %d, height=%d, width=%d\n", i, mask->height, mask->width);

      cv::Mat imgMask(mask->height, mask->width, CV_8UC1, &mask->data[0]);
      auto x0 = std::max(std::floor(box.left) - 1, 0.f);
      auto y0 = std::max(std::floor(box.top) - 1, 0.f);
      cv::Rect roi((int)x0, (int)y0, mask->width, mask->height);

      // split the RGB channels, overlay mask to a specific color channel
      cv::Mat ch[3];
      split(img, ch);
      int col = 0;  // int col = i % 3;
      cv::bitwise_or(imgMask, ch[col](roi), ch[col](roi));
      merge(ch, 3, img);
    }

    cv::rectangle(img, cv::Point{(int)box.left, (int)box.top},
                  cv::Point{(int)box.right, (int)box.bottom}, cv::Scalar{0, 255, 0});
    //框内显示类名
	cv::putText(img, coco_classes[bboxes[i].label_id] + ":" + std::to_string(bboxes[i].score),
                    cv::Point{(int) box.left, (int) box.top}, cv::FONT_HERSHEY_SIMPLEX, 0.5,
                    cv::Scalar{0, 0, 255}, 2);
  }

  cv::imwrite("output_detection.jpg", img);

  mmdeploy_detector_release_result(bboxes, res_count, 1);

  mmdeploy_detector_destroy(detector);

  return 0;
}


 4216
4216


 被折叠的 条评论
为什么被折叠?
被折叠的 条评论
为什么被折叠?
 到【灌水乐园】发言


