| 软件版本:VIVADO2017.4 操作系统:WIN10 64bit 硬件平台:适用米联客 ZYNQ系列开发板 米联客(MSXBO)论坛:www.osrc.cn答疑解惑专栏开通,欢迎大家给我提问!! 21.1概述 本课讲解了一个最基本的DMA环路搭建,通过PS端控制DMA对DDR数据的读写和校验,完成环路测试。本课程是DMA设计的基础,读者务必认真阅读和学习。 本课程设计一个最基本的DMA环路,实现DMA的环路测试。
- PS端ARM将数据发送给DDR。
- PS控制DMA,使DMA通过数据通道读取DDR中的数据;DMA将读取到的数据传给FIFO。
- FIFO将数据传输给DMA;PS控制DMA,使DMA通过数据通道将数据写入DDR中。
- 传输校验,对比接收数据与发送数据是否一致。
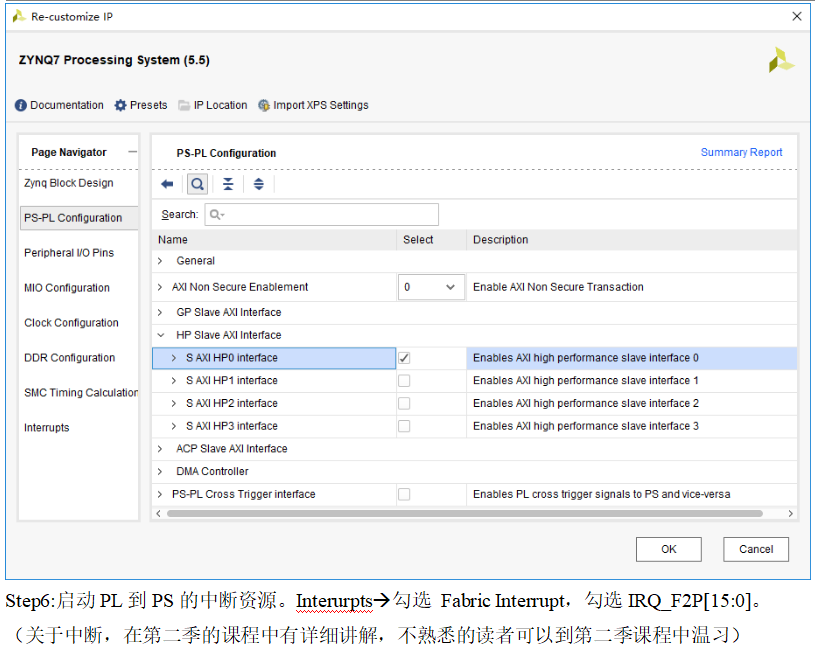
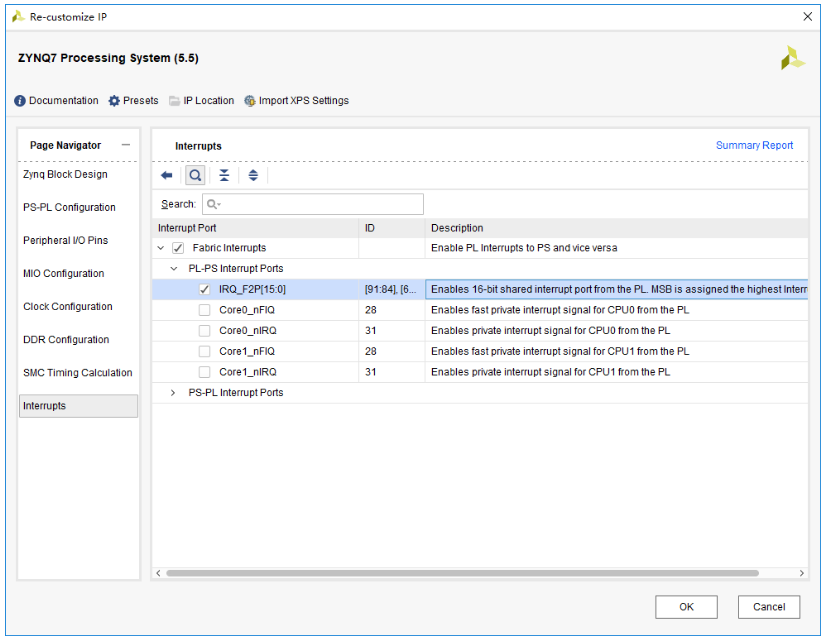
本课程会详细介绍创建工程的每个步骤,后面的课程将不再详细介绍创建工程的步骤。 21.2 FPGA BD工程搭建 Step1:新建一个名为为Miz_sys的工程。 Step2:创建一个BD文件,并命名为system,添加并且配置好ZYNQ IP。读者需要根据自己的硬件类型配置好输入时钟频率、内存型号、串口,连接时钟等。新手不清楚这些内容个,请参考“CH01 HelloWold/DDR/网口测试及固化”这一节课。 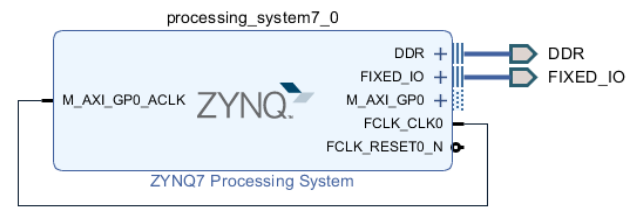
Step4:PL Fabric Clock:勾选FCLK_CLK0,设置为100,即PS的PLL提供本系统的时钟100MHZ。 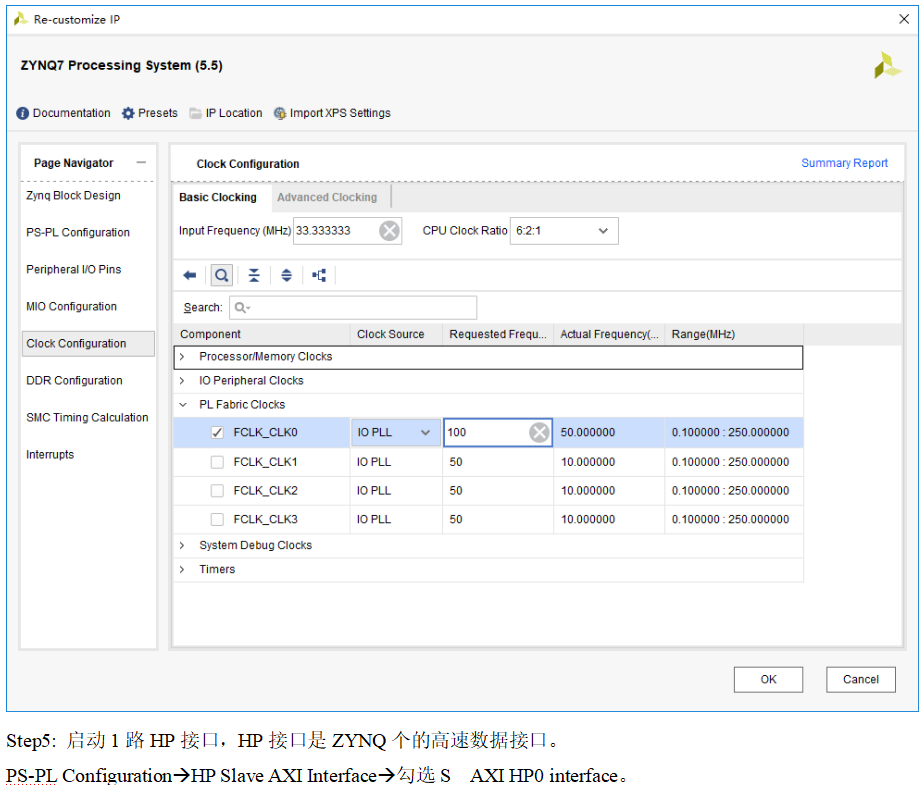
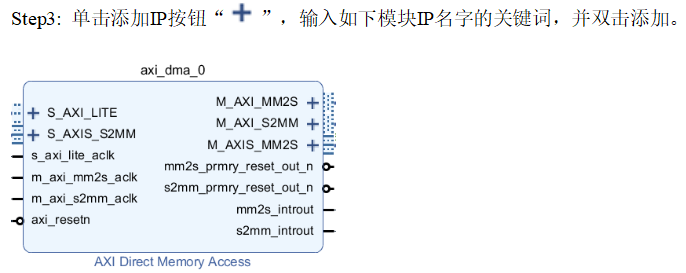
Step7:单击OK。 Step8:双击DMA IP ,设置如下。 勾选读通道;勾选写通道; 设置Wideh of buffer length register :14。(寄存器设置最大为23,即2的23次方8,388,607bytes,8M大小,这里设置14bit 就够用了,长度越大,需要的资源也就越多) 
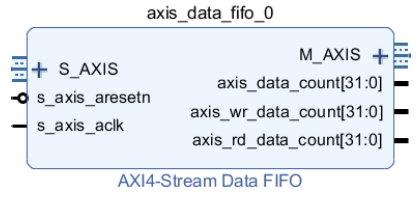
Step9:Data FIFO 设置 设置TDATA Width为4。 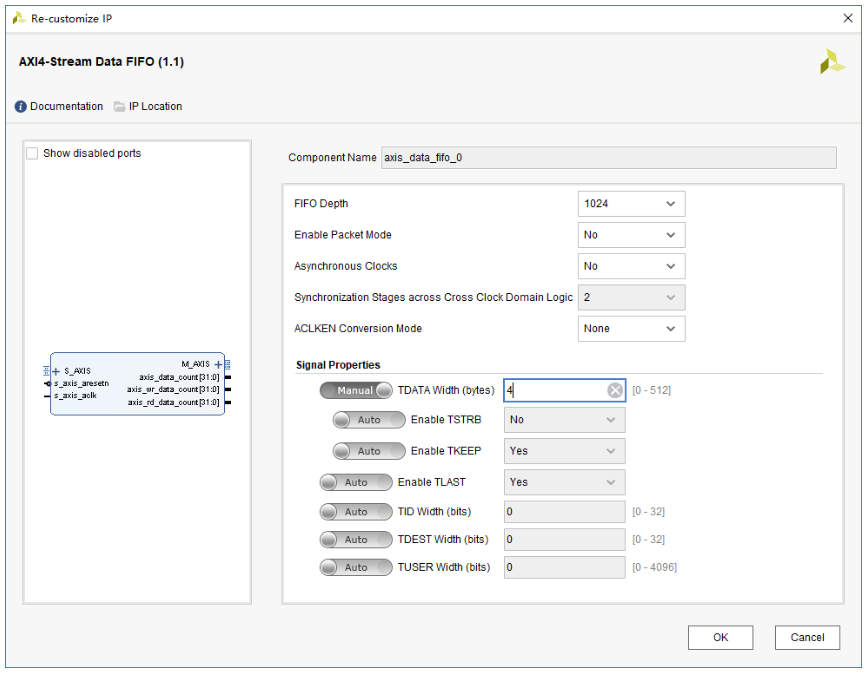
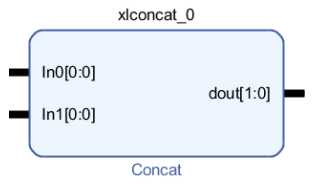
Step12:Concat IP设置 Concate IP实现了单个分散的信号,整合成总线信号。这里,将2个独立的中断信号,合并在一起连接到ZYNQ IP的中断信号接口上。 设置:Number of Ports:2 In0 Width :1 In1 Width :1 Dout Width:2 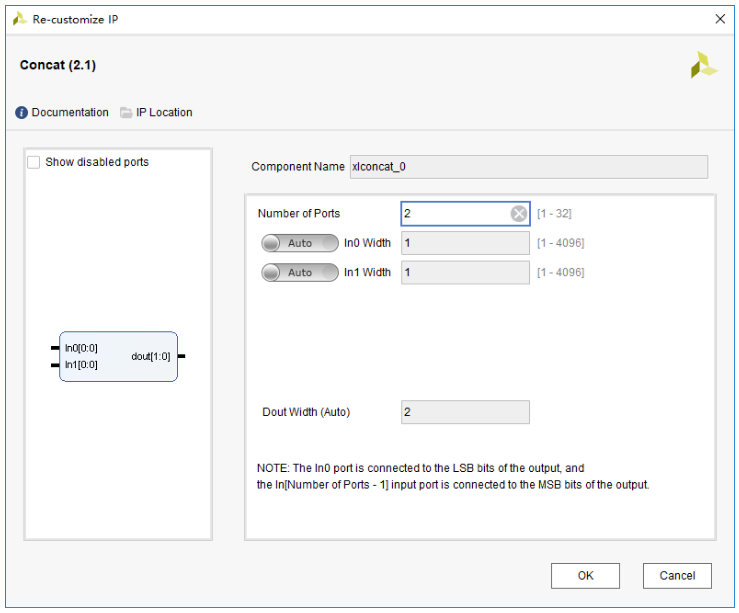
Step10:点击Run Block Automation ,自动配置ZYNQ IP 。 
Step11:点击Run Connection Automation 自动连线。只要软件提示你需要自动连线,一般都需要进行自动连线,除非自己知道如何连线,有特殊需求。 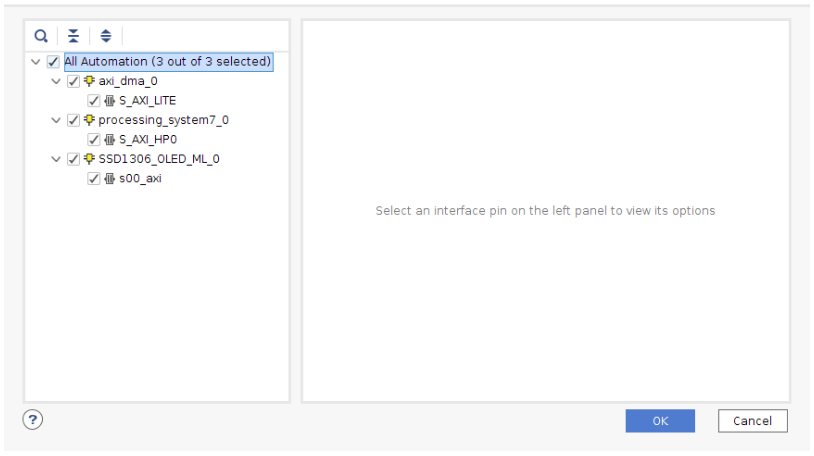
Step12:如果还有提示需要自动连线的继续让软件自动连线,直到出下如下。可以看到,还有未连线的模块。 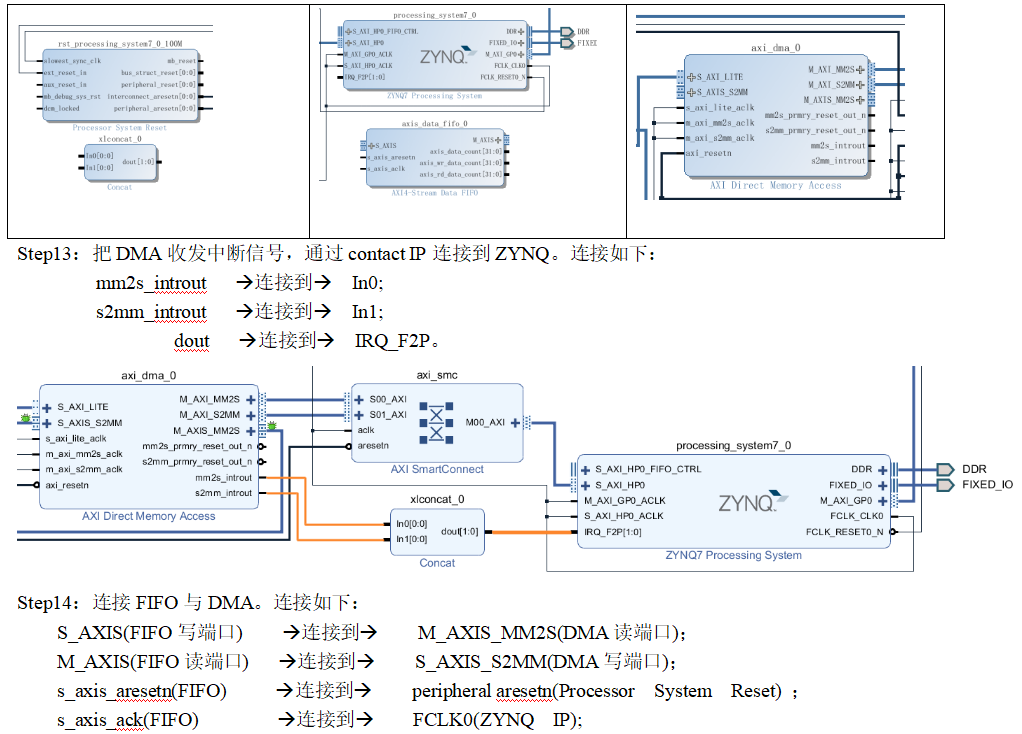
连接完成后如下图 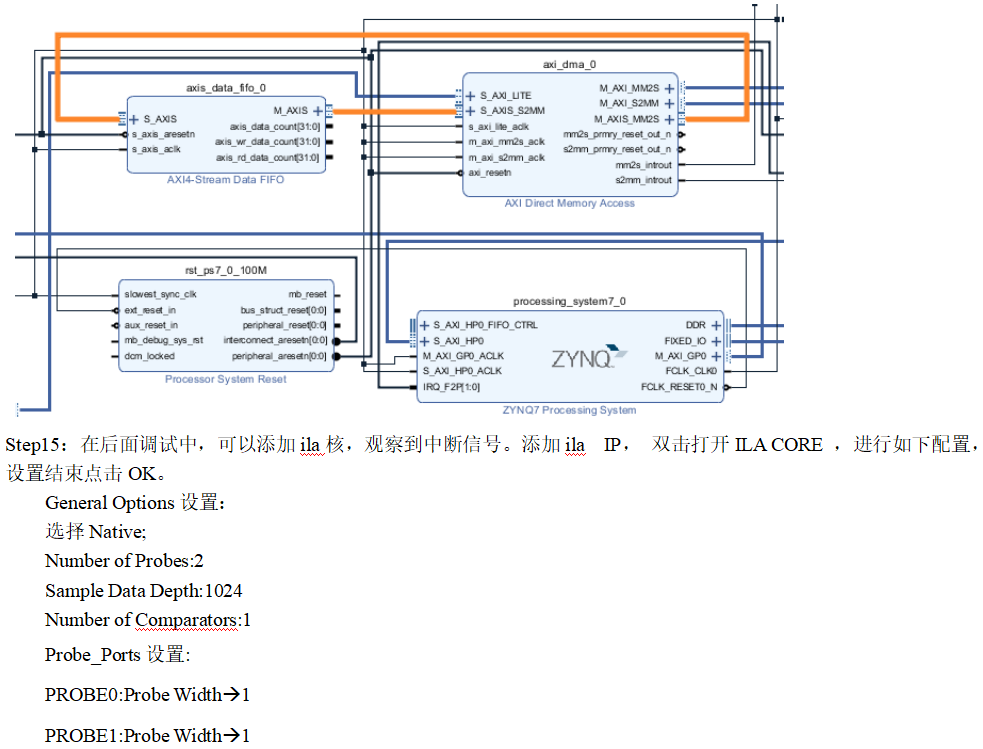 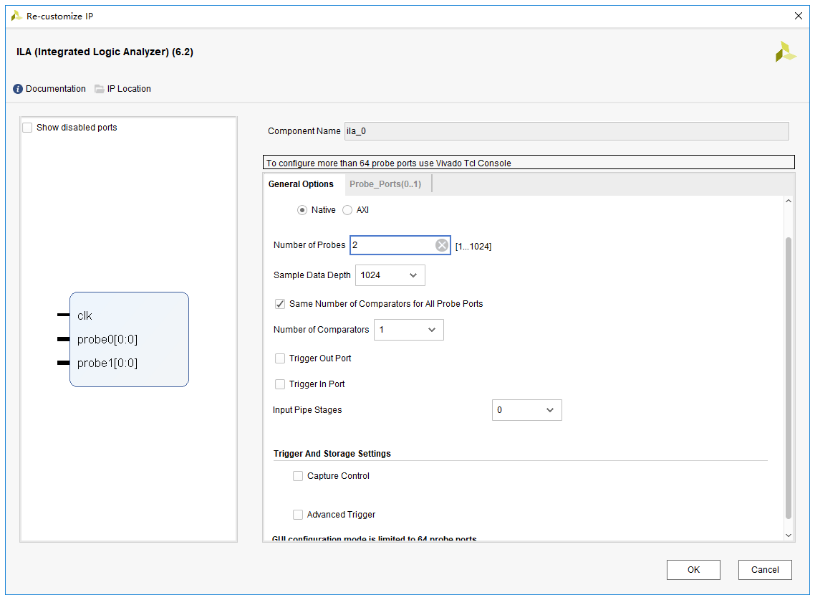

21.3 搭建好的FPGA BD工程 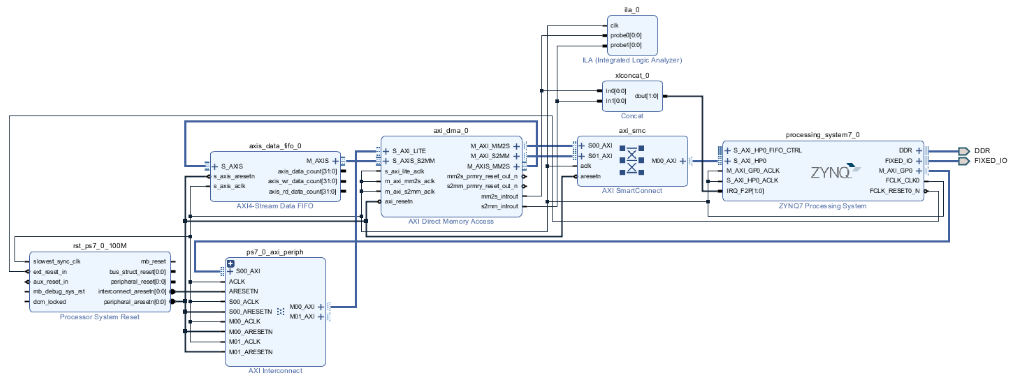
至此,就完成了工程架构的搭建。后面的操作过程是Validate Design->Gerate Out products->Create wrappers-> Generate Bitstream ,产生完成后导出硬件,加载SDK。 21.4 PS部分软件分析 21.4.1新建SDK工程 Step1:新建一个名为AXI_DMA_Test的空的软件工程 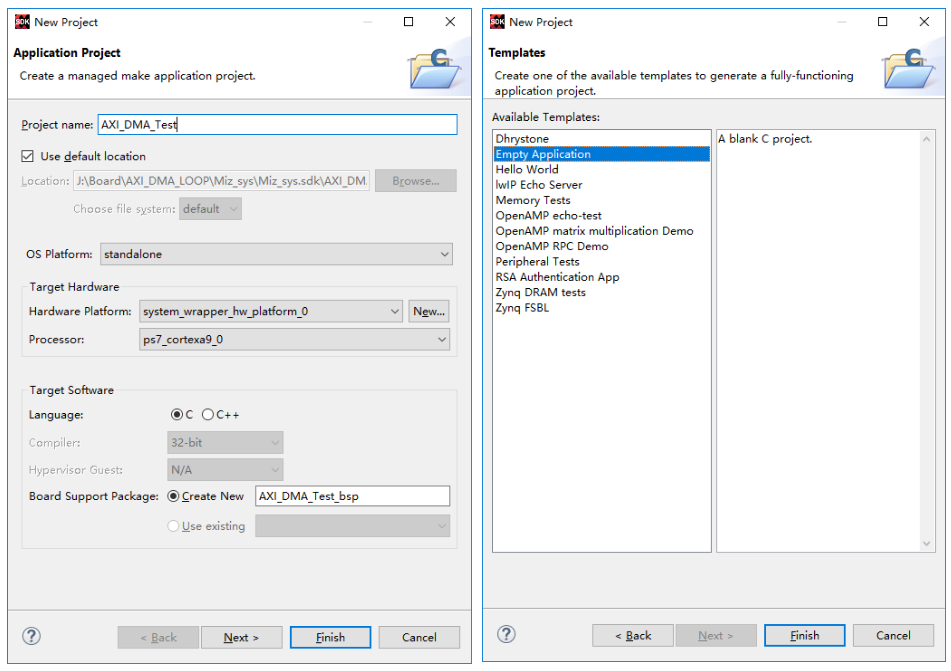 Step2:将提供例程中SDK工程的源文件复制,并粘贴到新建SDK工程,软件会自动编译。 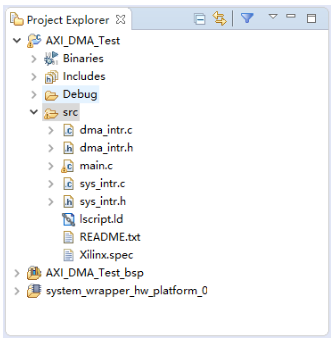
21.3.2 main.c源码的分析 函数分析1 函数名:int init_intr_sys(void); 功能:对中断资源的初始化,使能中断资源。 说明:这个函数里面调用的函数是笔者封装好的初始化函数,使用起来比较方便。一般只要给出中断对象,中断号,就可以对中断进行初始化。 init_intr_sys函数
| int init_intr_sys(void) { DMA_Intr_Init(&AxiDma,0);//initial interrupt system Init_Intr_System(&Intc); // initial DMA interrupt system Setup_Intr_Exception(&Intc); DMA_Setup_Intr_System(&Intc,&AxiDma,TX_INTR_ID,RX_INTR_ID);//setup dma interrpt system DMA_Intr_Enable(&Intc,&AxiDma); } |
init_intr_sys()调用函数 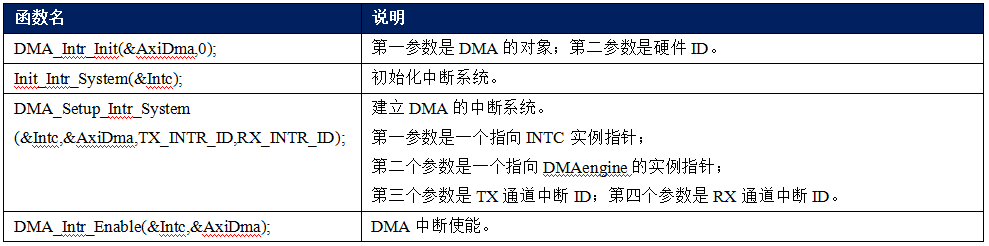
函数分析2 函数名称:int axi_dma_test() 功能:AXI DMA 传输测试 说明:为了发送的数据是已知是确定数据,先对TxBufferPtr 发送缓冲进行初始化,初始化后用Xil_DCacheFlushRange 函数把数据全部刷到DDR中。 axi_dma_test()调用函数 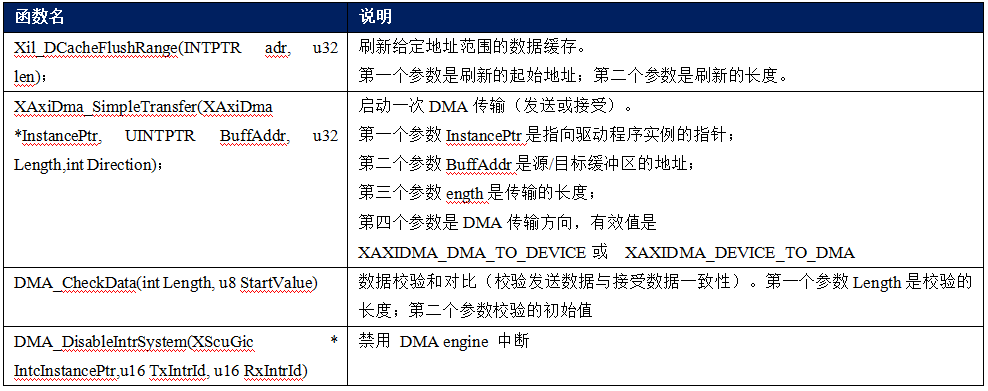
Main.c文件
| int axi_dma_test() { int Status; TxDone = 0; RxDone = 0; Error = 0; xil_printf("\r\n----DMA Test----\r\n"); xil_printf("PKT_LEN=%d\r\n",MAX_PKT_LEN); //while(1) for(i = 0; i < Tries; i ++) { Value = TEST_START_VALUE + (i & 0xFF); for(Index = 0; Index < MAX_PKT_LEN; Index ++) { TxBufferPtr[Index] = Value; Value = (Value + 1) & 0xFF; } /* Flush the SrcBuffer before the DMA transfer, in case the Data Cache * is enabled */ Xil_DCacheFlushRange((u32)TxBufferPtr, MAX_PKT_LEN); Status = XAxiDma_SimpleTransfer(&AxiDma,(u32) RxBufferPtr, MAX_PKT_LEN, XAXIDMA_DEVICE_TO_DMA); if (Status != XST_SUCCESS) { return XST_FAILURE; } Status = XAxiDma_SimpleTransfer(&AxiDma,(u32) TxBufferPtr, MAX_PKT_LEN, XAXIDMA_DMA_TO_DEVICE); if (Status != XST_SUCCESS) { return XST_FAILURE; } /* * Wait TX done and RX done */ while (!TxDone || !RxDone) { /* NOP */ } success++; TxDone = 0; RxDone = 0; if (Error) { xil_printf("Failed test transmit%s done, " "receive%s done\r\n", TxDone? "":" not", RxDone? "":" not"); goto Done; } /* * Test finished, check data */ Status = DMA_CheckData(MAX_PKT_LEN, (TEST_START_VALUE + (i & 0xFF))); if (Status != XST_SUCCESS) { xil_printf("Data check failed\r\n"); goto Done; } } xil_printf("AXI DMA interrupt example test passed\r\n"); xil_printf("success=%d\r\n",success); /* Disable TX and RX Ring interrupts and return success */ DMA_DisableIntrSystem(&Intc, TX_INTR_ID, RX_INTR_ID); Done: xil_printf("--- Exiting Test --- \r\n"); return XST_SUCCESS; } int init_intr_sys(void) { DMA_Intr_Init(&AxiDma,0);//initial interrupt system Init_Intr_System(&Intc); // initial DMA interrupt system Setup_Intr_Exception(&Intc); DMA_Setup_Intr_System(&Intc,&AxiDma,TX_INTR_ID,RX_INTR_ID);//setup dma interrpt system DMA_Intr_Enable(&Intc,&AxiDma); } int main(void) { init_intr_sys(); axi_dma_test(); } |
21.3.3 dma_intr.c 源码分析 XAxiDma *AxiDmaInst = (XAxiDma *)Callback;这句代码是为了获取当前中断的对象。void *Callback是一个无符号的指针,传递进来的阐述可以强制转换成其他任何的对象,这里就是强制转换成 XAxiDma 对象了。 IrqStatus =XAxiDma_IntrGetIrq(AxiDmaInst, XAXIDMA_DMA_TO_DEVICE)这个函数获取当前中断号。 XAxiDma_IntrAckIrq(AxiDmaInst, IrqStatus, XAXIDMA_DMA_TO_DEVICE);这个函数是响应当前中断,通知CPU 当前中断已经被接收,并且清除中断标志位。如果中断全部正确,TxDone将被置为1表示发送中断完成。如果有错误,则复位DMA,并且设置超时参数 DMA_TxIntrHandler函数
| /*****************************************************************************/ /* * * This is the DMA TX Interrupt handler function. * * It gets the interrupt status from the hardware, acknowledges it, and if any * error happens, it resets the hardware. Otherwise, if a completion interrupt * is present, then sets the TxDone.flag * * @param Callback is a pointer to TX channel of the DMA engine. * * @return None. * * @note None. * ******************************************************************************/ static void DMA_TxIntrHandler(void *Callback) { u32 IrqStatus; int TimeOut; XAxiDma *AxiDmaInst = (XAxiDma *)Callback; /* Read pending interrupts */ IrqStatus = XAxiDma_IntrGetIrq(AxiDmaInst, XAXIDMA_DMA_TO_DEVICE); /* Acknowledge pending interrupts */ XAxiDma_IntrAckIrq(AxiDmaInst, IrqStatus, XAXIDMA_DMA_TO_DEVICE); /* * If no interrupt is asserted, we do not do anything */ if (!(IrqStatus & XAXIDMA_IRQ_ALL_MASK)) { return; } /* * If error interrupt is asserted, raise error flag, reset the * hardware to recover from the error, and return with no further * processing. */ if ((IrqStatus & XAXIDMA_IRQ_ERROR_MASK)) { Error = 1; /* * Reset should never fail for transmit channel */ XAxiDma_Reset(AxiDmaInst); TimeOut = RESET_TIMEOUT_COUNTER; while (TimeOut) { if (XAxiDma_ResetIsDone(AxiDmaInst)) { break; } TimeOut -= 1; } return; } /* * If Completion interrupt is asserted, then set the TxDone flag */ if ((IrqStatus & XAXIDMA_IRQ_IOC_MASK)) { TxDone = 1; } } |
接收中断函数的原理和发送一样 XAxiDma *AxiDmaInst = (XAxiDma *)Callback;这句代码是为了获取当前中断的对象。void *Callback是一个无符号的指针,传递进来的阐述可以强制转换成其他任何的对象,这里就是强制转换成 XAxiDma 对象了。 IrqStatus = XAxiDma_IntrGetIrq(AxiDmaInst, XAXIDMA_DEVICE_TO_DMA);这个函数是获取当前中断号。 XAxiDma_IntrAckIrq(AxiDmaInst, IrqStatus, XAXIDMA_DEVICE_TO_DMA);这个函数是响应当前中断,通知CPU 当前中断已经被接收,并且清除中断标志位。 如果中断全部正确,RxDone将被置为1表示接收中断完成。如果有错误,则复位DMA,并且设置超时参数 DMA_RxIntrHandler函数
| /*****************************************************************************/ /* * * This is the DMA RX interrupt handler function * * It gets the interrupt status from the hardware, acknowledges it, and if any * error happens, it resets the hardware. Otherwise, if a completion interrupt * is present, then it sets the RxDone flag. * * @param Callback is a pointer to RX channel of the DMA engine. * * @return None. * * @note None. * ******************************************************************************/ static void DMA_RxIntrHandler(void *Callback) { u32 IrqStatus; int TimeOut; XAxiDma *AxiDmaInst = (XAxiDma *)Callback; /* Read pending interrupts */ IrqStatus = XAxiDma_IntrGetIrq(AxiDmaInst, XAXIDMA_DEVICE_TO_DMA); /* Acknowledge pending interrupts */ XAxiDma_IntrAckIrq(AxiDmaInst, IrqStatus, XAXIDMA_DEVICE_TO_DMA); /* * If no interrupt is asserted, we do not do anything */ if (!(IrqStatus & XAXIDMA_IRQ_ALL_MASK)) { return; } /* * If error interrupt is asserted, raise error flag, reset the * hardware to recover from the error, and return with no further * processing. */ if ((IrqStatus & XAXIDMA_IRQ_ERROR_MASK)) { Error = 1; /* Reset could fail and hang * NEED a way to handle this or do not call it?? */ XAxiDma_Reset(AxiDmaInst); TimeOut = RESET_TIMEOUT_COUNTER; while (TimeOut) { if(XAxiDma_ResetIsDone(AxiDmaInst)) { break; } TimeOut -= 1; } return; } /* * If completion interrupt is asserted, then set RxDone flag */ if ((IrqStatus & XAXIDMA_IRQ_IOC_MASK)) { RxDone = 1; } } |
DMA_CheckData函数
| /*****************************************************************************/ /* * * This function checks data buffer after the DMA transfer is finished. * * We use the static tx/rx buffers. * * @param Length is the length to check * @param StartValue is the starting value of the first byte * * @return * - XST_SUCCESS if validation is successful * - XST_FAILURE if validation is failure. * * @note None. * ******************************************************************************/ int DMA_CheckData(int Length, u8 StartValue) { u8 *RxPacket; int Index = 0; u8 Value; RxPacket = (u8 *) RX_BUFFER_BASE; Value = StartValue; /* Invalidate the DestBuffer before receiving the data, in case the * Data Cache is enabled */ #ifndef __aarch64__ Xil_DCacheInvalidateRange((u32)RxPacket, Length); #endif for(Index = 0; Index < Length; Index++) { if (RxPacket[Index] != Value) { xil_printf("Data error %d: %x/%x\r\n", Index, RxPacket[Index], Value); return XST_FAILURE; } Value = (Value + 1) & 0xFF; } return XST_SUCCESS; } |
21.3.4 dam_intr.h 文件分析 一般把DMA相关变量、常量、函数的声明或者定义放到头文件中,dam_intr.h比较关键的参数如下: dam_intr.h中变量
| 名称 | 说明 | | TX_BUFFER_BASE | DMA发送缓存的基地址 | | RX_BUFFER_BASE | DMA接收缓存的基地址 | | MAX_PKT_LEN | 表示每一包数据传输的长度 | | NUMBER_OF_TRANSFERS | 用在连续测试的时候的测试次数 | | TEST_START_VALUE | 用于测试的起始参数 |
dam_intr.h中函数
| 名称 | 说明 | | DMA_CheckData | 对数据进行对比 | | DMA_Setup_Intr_System | DMA 中断注册 | | DMA_Intr_Enable | DMA中断使能 | | DMA_Intr_Init | DMA中断初始化 |
dam_intr.h
| #ifndef DMA_INTR_H #define DMA_INTR_H #include "xaxidma.h" #include "xparameters.h" #include "xil_exception.h" #include "xdebug.h" #include "xscugic.h" /************************** Constant Definitions *****************************/ /* * Device hardware build related constants. */ #define DMA_DEV_ID XPAR_AXIDMA_0_DEVICE_ID #define MEM_BASE_ADDR 0x01000000 #define RX_INTR_ID XPAR_FABRIC_AXI_DMA_0_S2MM_INTROUT_INTR #define TX_INTR_ID XPAR_FABRIC_AXI_DMA_0_MM2S_INTROUT_INTR #define TX_BUFFER_BASE (MEM_BASE_ADDR + 0x00100000) #define RX_BUFFER_BASE (MEM_BASE_ADDR + 0x00300000) #define RX_BUFFER_HIGH (MEM_BASE_ADDR + 0x004FFFFF) /* Timeout loop counter for reset */ #define RESET_TIMEOUT_COUNTER 10000 /* test start value */ #define TEST_START_VALUE 0xC /* * Buffer and Buffer Descriptor related constant definition */ #define MAX_PKT_LEN 256//4MB /* * transfer times */ #define NUMBER_OF_TRANSFERS 100000 extern volatile int TxDone; extern volatile int RxDone; extern volatile int Error; int DMA_CheckData(int Length, u8 StartValue); int DMA_Setup_Intr_System(XScuGic * IntcInstancePtr,XAxiDma * AxiDmaPtr, u16 TxIntrId, u16 RxIntrId); int DMA_Intr_Enable(XScuGic * IntcInstancePtr,XAxiDma *DMAPtr); int DMA_Intr_Init(XAxiDma *DMAPtr,u32 DeviceId); #endif |
21.4验证测试 测试是使用软件: VIVADIO 和 SDK 测试步骤如下: Step1:启动SDK 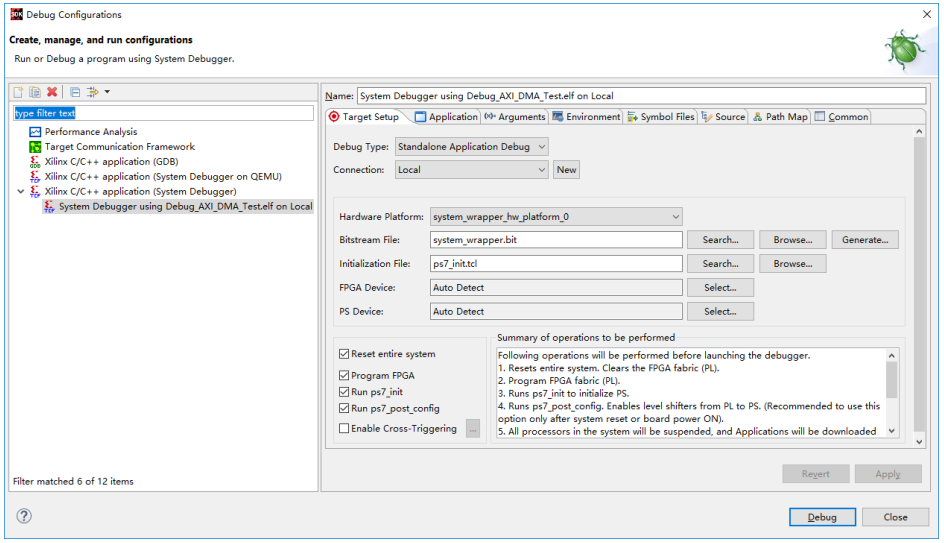
Step2:在VIVADO工程中点击Open Target 然后点击Auto Connect 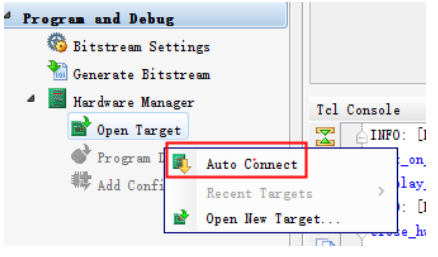
Step3:连接成功后入下图 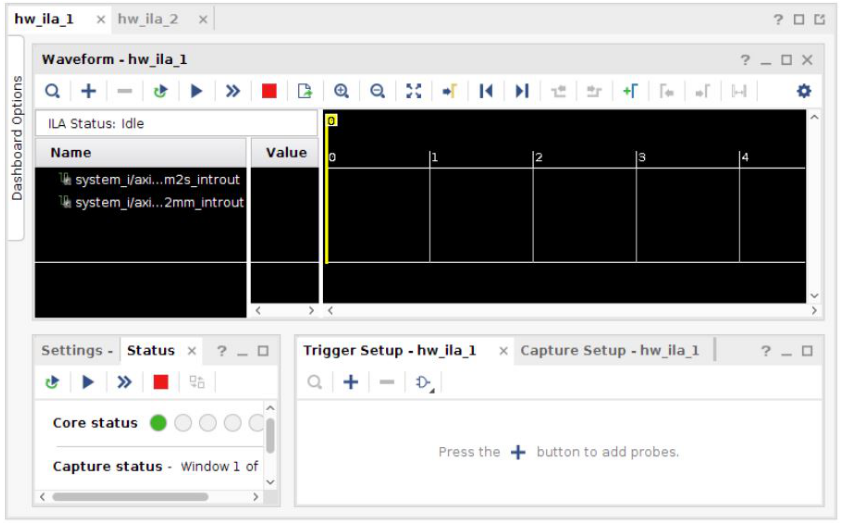
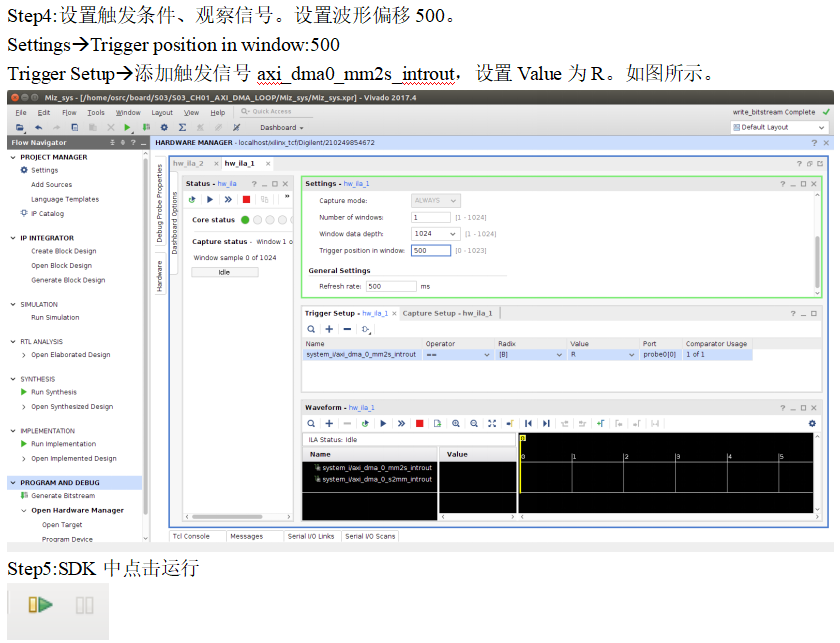
当中断触发的时,VIVAIDO中Hardware Manager出现捕捉波形,如下图所示 
Step6:观察数据 打开Memory:Window->Show View->Memory 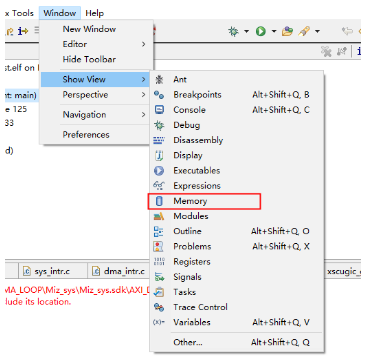
点击添加接收内存部分地址用于观察内存中的数据 地址为 0x01300000 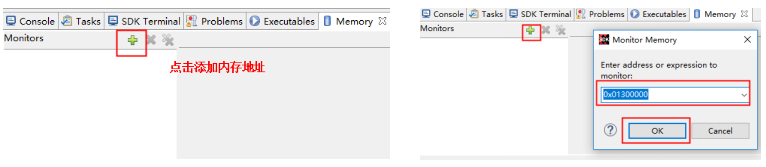
为了观察一次收发数据:设置断点,重新让收发程序跑一次。 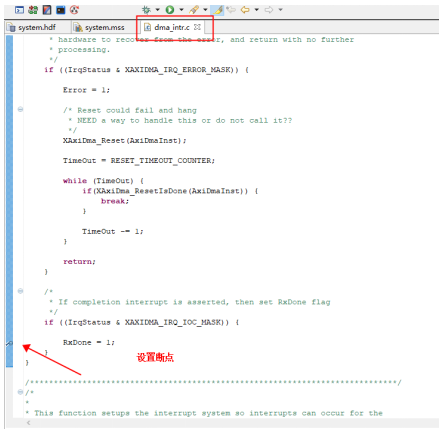

收发一次,从内存中读取的数据如图: 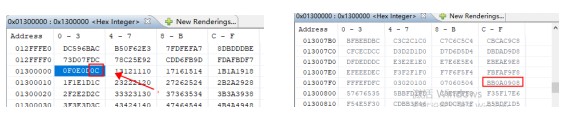
可以看到第一个数据是0X0C ,后面是依次加1,一次接收的数据量是2047。发送数据也是OX0C后面依次加1,发送量是2047。接收数据一致,测试结束。 |


 被折叠的 条评论
为什么被折叠?
被折叠的 条评论
为什么被折叠?
 到【灌水乐园】发言


