


背包栏打开点击的时候也会触发主角移动,解决办法
if (Input.GetMouseButtonDown(0)&&UICamera.hoveredObject==null)
给npc添加box collider,在脚本中调用 private void OnMouseOver()当有鼠标指针落到npc上面就自动触发该函数
要想弹出任务框,还得将任务框的图片拖动到脚本中
这里的TweenPosition设成public,就把任务栏拖动到那里即可,因为任务栏里面有tweenPosition
public TweenPosition questTween;

    private void OnMouseOver()
    {
        if (Input.GetMouseButtonDown(0))
        {
            ShowQuest();
        }
    }
    //显示任务框
    void ShowQuest()
    {
        questTween.gameObject.SetActive(true);
        questTween.PlayForward();
    }
如果一个物体不能添加c#脚本,检查下该脚本的类名写错没
下面是背包系统的制作:
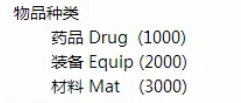
首先物品种类的分析:
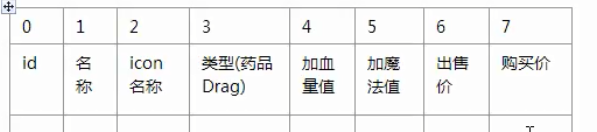
创建txt文件,放入所有物品信息:
1001,小瓶血药,icon-potion1,Drug,50,0,50,60
1002,大瓶血药,icon-potion2,Drug,100,0,70,100
1003,蓝药,icon-potion3,Drug,0,100,60,80
我们发现,当物品种类是药品的时候才会有4,5,也即加血量和加魔法值,我们可以通过物品id得到一条信息,该信息可以得到该物品的名称,类型,价格等等,所以用字典的方式,key为id,value为ObjectInfo集合来标识
public class ObjectsInfo : MonoBehaviour {

    public static ObjectsInfo _instance;

    private Dictionary<int, ObjectInfo> objectInfoDict = new Dictionary<int, ObjectInfo>();
    //把存有所有物品的txt文件拖动到这里
    public TextAsset objectsInfoListText;

    void Awake() {
        _instance = this;
        ReadInfo();
    }


    public ObjectInfo GetObjectInfoById(int id) {   //根据id得到该id的物品所有属性
        ObjectInfo info=null;
        objectInfoDict.TryGetValue(id, out info);
        return info;
    }
  //读取文本文件
    void ReadInfo() {
        string text = objectsInfoListText.text;
        string[] strArray = text.Split('\n');//用一个string数组来保存每一行的数据

        foreach (string str in strArray) {
            string[] proArray = str.Split(',');//得到一行数据中的所有属性,每个属性用,来隔开
            ObjectInfo info = new ObjectInfo();

            int id = int.Parse(proArray[0]);
            string name = proArray[1];
            string icon_name = proArray[2];
            string str_type = proArray[3];
            ObjectType type = ObjectType.Drug;
            switch (str_type) {
                case "Drug":
                    type = ObjectType.Drug;
                    break;
                case "Equip":
                    type = ObjectType.Equip;
                    break;
                case "Mat":
                    type = ObjectType.Mat;
                    break;
            }
            info.id = id; info.name = name; info.icon_name = icon_name;
            info.type = type;
            if (type == ObjectType.Drug) {
                int hp = int.Parse(proArray[4]);
                int mp = int.Parse(proArray[5]);
                int price_sell = int.Parse(proArray[6]);
                int price_buy = int.Parse(proArray[7]);
                info.hp = hp; info.mp = mp;
                info.price_buy = price_buy; info.price_sell = price_sell;
            }
            objectInfoDict.Add(id, info);//添加到字典中,id为key,可以很方便的根据id查找到这个物品信息
        }
    }

}

//id
//名称
//icon名称
//类型(药品drug)
//加血量值
//加魔法值
//出售价
//购买
public enum ObjectType {
    Drug,
    Equip,
    Mat
}
//该集合保存了物品的所有信息
public class ObjectInfo {
    public int id;
    public string name;
    public string icon_name;//这个名称是存储在图集中的名称
    public ObjectType type;
    public int hp;
    public int mp;
    public int price_sell;
    public int price_buy;
}
给背包物品添加可拖拽功能:给物品添加脚本,让它继承UIDragDropItem,这个应该是NGUI的一个类,这里注意的是继承了这个类就要把默认的start和update函数删去否则默认重写该函数,或者在start函数中加上base.start();也行
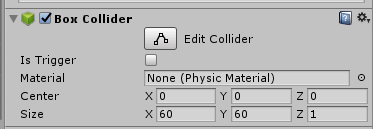
而且由于物品要和鼠标拖拽交互,需要给他添加box collider,这是游戏里发现可以对物品进行拖拽了,给物品和背包的格子添加tag来区分,给每个格子都添加box collider,这里注意的是物品,格子,背包全部添加了box collider,给物品添加这样的脚本,当拖拽结束的时候如果下面是格子,就会打印出格子的tag
public class Inventory_item : UIDragDropItem{

    protected override void OnDragDropRelease(GameObject surface)
    {
        base.OnDragDropRelease(surface);
        if (surface != null) {
            Debug.Log(surface.tag);
        }

    }
}
private void Awake()
    {
        sprite = GetComponent<UISprite>();
}添加2个方法:
public void SetId(int id)
    {
        //根据ObjectInfo的id拿到该id的物品所有信息
        ObjectInfo info = ObjectsInfo._instance.GetObjectInfoById(id);
        sprite.spriteName = info.icon_name;
    }
public void SetIconName(string icon_name)
{
sprite.spriteName = icon_name;
}给格子的右下角添加物品的个数,放一个UI label,并把它隐藏
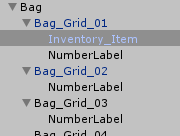
在Bag_Grid中添加脚本Inventory_item_Grid脚本
public class Inventory_item_Grid : MonoBehaviour {

   public int id = 0;
    private int num = 0;
    private UILabel numLabel;
    private Inventory_item item;
    private ObjectInfo info;

    private void Start()
    {
        numLabel = GetComponentInChildren<UILabel>();
    }

    //物品拖过去的时候让物品初始化个数为1
    public void SetId(int id,int num=1)
    {
        this.id = id;//这行容易忽略,当拖动了已有的物品要把拖动的id和grid的id判断是否相等
        info = ObjectsInfo._instance.GetObjectInfoById(id);
        //这里容易犯错不是getComponent<>看清父子关系
        item = this.GetComponentInChildren<Inventory_item>();
        item.SetIconName(info.icon_name);
        //不是numLabel.Setactive看清楚
        numLabel.gameObject.SetActive(true);
         this.num = num;
        numLabel.text = num.ToString();
    }

    //让物品的数量加一
    public void PlusNumber(int num = 1)
    {
        this.num += num;
        //注意是this.num.ToString()可不是num.ToString
        numLabel.text = this.num.ToString();
    }

    //清空格子
    public void ClearInfo()
    {
        id = 0;
        info = null;
        num = 0;
        numLabel.gameObject.SetActive(false);
    }
}
对于ShowInventory脚本添加给背包bag,当人物拾取一个物品,遍历所有格子
public class ShowInventory : MonoBehaviour {

    public static ShowInventory _instance;
    private TweenPosition tween;
    private int coinCount = 1000;
    public UILabel coinNumber;
    //在这里创建list保存所以格子,把所有格子拖动到这里
    public List<Inventory_item_Grid> list = new List<Inventory_item_Grid>();
    //这里把物品的prefab拖动到这里,Inventory_item时物品的脚本,看清楚
    public Inventory_item item;

    private void Awake()
    {
        _instance = this;
    }

    private void Start()
    {
        tween = GetComponent<TweenPosition>();
    }
    public void Show()
    {
        tween.PlayForward();
    }
    public void Off()
    {
        tween.PlayReverse();
    }

    private void Update()
    {
        //暂时用键盘的X来代表拿到了随机的一个药品
        if(Input.GetKeyDown(KeyCode.X)){
            GetId(Random.Range(1001,1004));
        }
    }
    //拾取到id物品,添加到物品栏
    public void GetId(int id)
    {
        //如果拿到了物品的id就要实例化一个inventory_item添加到物品栏里面,但是物品栏不知道哪个空着,所以要遍历一下
        //物品栏看看哪个空着,当然有两种情况,首先看看所有物品栏里面有没有已经有该物品的格子,如果有,就让它数量+1
        //如果没有,就实例化该物体
        Inventory_item_Grid grid=null;
        foreach (Inventory_item_Grid temp in list)
        {
            if (temp.id==id)
            {
                grid = temp;
                break;
            }
        }
        if (grid!=null)
        {
            //数量加一即可
            grid.PlusNumber();
        }
        else
        {
            //实例化物品item
            foreach (Inventory_item_Grid temp in list)
            {
                if (temp.id == 0)
                {
                    grid = temp;
                    //记得要break跳出循环,否则会得到最后一个格子
                    break;
                }
            }
            //如果格子全部都有物品,那么grid就为null,这个判断也得加上
            if (grid!=null)
            {
                //注意在这里是实例化NGUI的控件,所以要用NGUI的接口, NGUITools.AddChild方法中第一个参数是添加的
                //物品的父类,这里的父类是第几个格子,所以是grid.gameObject第二个参数是添加的实例物品,在最上面public
                //该物品,拖动过来就行
                //这里犯的错误是第二个错误不是item,而是item.gameObject,item是那个物品的脚本
                GameObject go = NGUITools.AddChild(grid.gameObject,item.gameObject);
                go.transform.localPosition = Vector3.zero;
                grid.SetId(id);
            }
        }

    }
}
这样的话当在游戏中一直按x来添加物品,那么物品的效果如下;
实际中在取得UI Label显示物品数量的时候GetComponentInChildren<UI Label>一直取不到,这是因为我们已经把他隐藏了,通过getComponent方式拿不到隐藏的Gameobject,那么我们不隐藏,在该显示的时候让label.enabled=true,在该清空物品的时候false即可
另外说明的是在测试bug的时候,要看哪个Gameobject有没有取到,如果是private,可以改成public在play模式下可以查看有没有获取到
如果物品的数量被物品的图片挡住了,修改Depth即可
this.transform.parent的使用:
作用在克隆的时候,因为克隆出来的物体为了位置的统一和管理的统一,你要把他们放到同一个父体里面,也就是直接设置clone.transform.parent=某个对象。这样克隆出来的对象直接就放到“某个对象”里面了
下面来讲解这样的效果:

 protected override void OnDragDropRelease(GameObject surface)
    {
        base.OnDragDropRelease(surface);
        if (surface != null) {
          //  print(surface.tag);
            //下面进行拖拽功能,分为三种,当把物品拖拽到没有物品的格子,把图片和数量移动到其他格子,当把物品拖拽到已有物品
            //的格子,那么进行交换,当把物品拖拽到原来的格子,不变
            if (surface.tag==Tags.bag)
            {
                transform.localPosition = Vector3.zero;
            }else if (surface.tag == Tags.grid)
            {
                //分为拖到其他格子和拖到自己格子
                if (surface==transform.parent.gameObject)//移动到了当前格子
                {
                    transform.localPosition = Vector3.zero;
                }
                else//移动到其他格子
                {
                    //获取父物体的Gameobject采用this.transform.parent.gameObject的方式
                    Inventory_item_Grid newGrid = surface.GetComponent<Inventory_item_Grid>();
                    Inventory_item_Grid oldGrid = this.transform.parent.GetComponent<Inventory_item_Grid>();
                    //我对这行代码的理解错了,我以为是把当前的格子grid的位置放到拖动的格子上面,真正的意思是
              //把让item的坐标移动到surface为父物体的下面,也即让item坐标移动到拖动到的格子下面,原来的格子位置不变
                    this.transform.parent = surface.transform;
                    newGrid.SetId(oldGrid.id,oldGrid.num);
                    transform.localPosition = Vector3.zero;
                    oldGrid.ClearInfo();
                }

            }else if (surface.tag==Tags.item)//移动到了也有物体的格子上面
            {
                //由于surface碰到的是item,所以newGrid不能等于surface.GetComponent<Inventory_item_Grid>();
                Inventory_item_Grid newGrid = surface.transform.parent.GetComponent<Inventory_item_Grid>();
                Inventory_item_Grid oldGrid = this.transform.parent.GetComponent<Inventory_item_Grid>();
                int id = newGrid.id;int num = newGrid.num;
                newGrid.SetId(oldGrid.id,oldGrid.num);
                oldGrid.SetId(id, num);
                transform.localPosition = Vector3.zero;
            }

        }
        else
        {
            //如果拖到没有tag的地方
        }
    }


 182
182

 被折叠的 条评论
为什么被折叠?
被折叠的 条评论
为什么被折叠?
 到【灌水乐园】发言


