一、目的
上一节我们实现了远程查看开发板灯的状态,这一节在我们远程控制LED灯的开关。NICE!
二、环境
ESP32 + 240x240的oled彩色屏幕+ Thonny IDE + 几根杜邦线
接线方式请看上前面的章节,此处不再重复赘述。
三、用到的知识
前面我们学习的远程控制开关LED灯和240x240屏幕的知识。大家不会的话,请看前面的章节。不懂得也可以留言哈。
四、用到的图片
开关的图标:


* 绿色图标为开,红色图标为关
五、HTML代码
我们只需要将图标添加到我们上一节的代码即可
led_on.html:
<!DOCTYPE html>
<html>
<head>
<meta charset="utf-8">
<title>blog.csdn.net</title>
</head>
<body>
    <span style="font-size: 40px;">手机远程控制LED系统</span><span style="font-size: 30px;"> blog.csdn.net/zhusongziye</span>
    <img src="https://img-blog.csdnimg.cn/f37948052b334aa5b6e7d7b79ef768f2.png" style="width: 100%;">
    <div>
        <span style="font-size: 100px;vertical-align:middle;">开关 </span>
        <a href="/switch_btn">
            <img src="https://img-blog.csdnimg.cn/bc4239a675104179bbbf4fc57bff6188.png" style="height:160px;vertical-align:middle;">
        </a>
    </div>
</body>
</html>
led_off.html
<!DOCTYPE html>
<html>
<head>
<meta charset="utf-8">
<title>blog.csdn.net</title>
</head>
<body>
    <span style="font-size: 40px;">手机远程控制LED系统</span><span style="font-size: 30px;"> https://blog.csdn.net/zhusongziye</span>
    <img src="https://img-blog.csdnimg.cn/93d26a24c29044509ca5ca62df50107c.png" style="width: 100%;">
    <div>
        <span style="font-size: 100px;vertical-align:middle;">开关 </span>
        <a href="/switch_btn">
            <img src="https://img-blog.csdnimg.cn/aecc049ebe46438eae917321246bdf99.png" style="height:160px;vertical-align:middle;">
        </a>
    </div>
</body>
</html>
六、python代码
更新如下,稍作改动:
from uQR import QRCode
from machine import Pin, SPI
import st7789_new
import socket
import time
import network
import machine
import re


# 全局变量,标记led灯
led = Pin(2, Pin.OUT)


# 无线连接函数
def do_connect():
    wlan = network.WLAN(network.STA_IF)
    wlan.active(True)
    if not wlan.isconnected():
        print('connecting to network...')
        wlan.connect('WIFI名字', 'WIFI密码')  # WIFI名字和密码
        i = 1
        while not wlan.isconnected():
            print("正在链接中...{}".format(i))
            i += 1
            time.sleep(1)
    print('network config:', wlan.ifconfig())
    return wlan.ifconfig()[0]

# 显示二维码函数
def show_qrcode(ip):
    tft = st7789_new.ST7889_Image(SPI(2, 80000000), dc=Pin(4), cs=Pin(5), rst=Pin(15))  #因为板载LED灯占用的是D2,所以用dc=Pin(4)
    tft.fill(st7789_new.color565(255, 255, 255))  # 背景设置为白色


    qr = QRCode(border=2)
    qr.add_data('http://{}'.format(ip))  # ip  192.168.0.106-->http://192.168.0.106
    matrix = qr.get_matrix()

    row_len = len(matrix)
    col_len = len(matrix[0])

    print("row=%d, col=%d" % (row_len, col_len))

    # 放大倍数
    scale_rate = 8

    # 准备黑色,白色数据
    buffer_black = bytearray(scale_rate * scale_rate * 2)  # 每个点pixel有2个字节表示颜色
    buffer_white = bytearray(scale_rate * scale_rate * 2)  # 每个点pixel有2个字节表示颜色
    color_black = st7789_new.color565(0, 0, 0)
    color_black_byte1 = color_black & 0xff00 >> 8
    color_black_byte2 = color_black & 0xff
    color_white = st7789_new.color565(255, 255, 255)
    color_white_byte1 = color_white & 0xff00 >> 8
    color_white_byte2 = color_white & 0xff

    for i in range(0, scale_rate * scale_rate * 2, 2):
        buffer_black[i] = color_black_byte1
        buffer_black[i + 1] = color_black_byte2
        buffer_white[i] = color_white_byte1
        buffer_white[i + 1] = color_white_byte2

    # 循环次数不增加,只增加每次发送的数据量,每次发送scale_rate X scale_rate个点的信息
    for row in range(row_len):
        for col in range(col_len):
            if matrix[row][col]:
                # tft.pixel(row, col, st7789_new.color565(0, 0, 0))
                tft.show_img(row * scale_rate, col * scale_rate, row * scale_rate + scale_rate - 1, col * scale_rate + scale_rate - 1, buffer_black)
            else:
                # tft.pixel(row, col, st7789_new.color565(255, 255, 255))
                tft.show_img(row * scale_rate, col * scale_rate, row * scale_rate + scale_rate - 1 , col * scale_rate + scale_rate - 1, buffer_white)
            col += 1

        row += 1

# 开启客户端
def handle_request(client_socket):
    """
    处理浏览器发送过来的数据
    然后回送相对应的数据(html、css、js、img。。。)
    :return:
    """

    print("test---0---")

    # 1. 接收
    recv_content = client_socket.recv(1024).decode("utf-8")

    print("-----接收到的数据如下----:")
    # print(recv_content)
    lines = recv_content.splitlines()  # 将接收到的http的request请求数据按照行进行切割到一个列表中
    # for line in lines:
    #     print("---")
    #     print(line)

    # 2. 处理请求
    # 提取出浏览器发送过来的request中的路径
    # GET / HTTP/1.1
    # GET /index.html HTTP/1.1
    # .......
    # lines[0]

    # 提取出/index.html 或者 /
    request_file_path = re.match(r"[^/]+(/[^ ]*)", lines[0]).group(1)

    print("----提出来的请求路径是:----")
    print(request_file_path)

    print("test---1---")

    # 完善对方访问主页的情况,如果只有/那么就认为浏览器要访问的是主页
    if request_file_path == "/":
        if led.value():
            request_file_path = "led_on.html"
        else:
            request_file_path = "led_off.html"
    print("test---2---")

    if request_file_path == "/switch_btn":
        if led.value():
            led.value(0)
            request_file_path = "led_off.html"
        else:
            led.value(1)
            request_file_path = "led_on.html"

    print("test---3---")

    try:
        # 取出对应的文件的数据内容
        with open(request_file_path, "rb") as f:
            content = f.read()
            print("test---4---")
    except Exception as ret:
        # 如果要是有异常,那么就认为:找不到那个对应的文件,此时就应该对浏览器404
        print(ret)
        response_headers = "HTTP/1.1 404 Not Found\r\n"
        response_headers += "Connection: close\r\n"
        response_headers += "Content-Type:text/html;charset=utf-8\r\n"
        response_headers += "\r\n"
        response_boy = "----sorry,the file you need not found-------"
        response = response_headers + response_boy
        # 3.2 给浏览器回送对应的数据
        client_socket.send(response.encode("utf-8"))
        print("test---5---")
    else:
        # 如果要是没有异常,那么就认为:找到了指定的文件,将其数据回送给浏览器即可
        response_headers = "HTTP/1.1 200 OK\r\n"
        response_headers += "Connection: close\r\n"
        response_headers += "Content-Type:text/html;charset=utf-8\r\n"
        response_headers += "\r\n"
        response_boy = content
        response = response_headers.encode("utf-8") + response_boy
        # 3.2 给浏览器回送对应的数据
        client_socket.send(response)
        print("test---6---")

    # 4. 关闭套接字
    client_socket.close()
    print("test---7---")

# 开启服务端
def tcp_server_control_led():
    print("---1---")
    # 1. 创建套接字
    tcp_server_socket = socket.socket(socket.AF_INET, socket.SOCK_STREAM)
    # 为了保证在tcp先断开的情况下,下一次依然能够使用指定的端口,需要设置
    tcp_server_socket.setsockopt(socket.SOL_SOCKET, socket.SO_REUSEADDR, 1)
    print("---2---")
    # 2. 绑定本地信息
    tcp_server_socket.bind(("", 80))
    print("---3---")
    # 3. 变成监听套接字
    tcp_server_socket.listen(128)

    print("---4---")
    while True:
        # 4. 等待客户端的链接
        client_socket, client_info = tcp_server_socket.accept()
        print("---5---")
        print(client_info)  # 打印 当前是哪个客户端进行了请求
        print("---6---")
        # 5. 为客户端服务
        try:
            handle_request(client_socket)
        except Exception as ret:
            print("error:", ret)
    print("---7---")
    # 6. 关闭套接字
    tcp_server_socket.close()


def main():
    # 1. 链接wifi
    ip = do_connect()
    print("ip地址是:", ip)

    # 2. 显示二维码
    show_qrcode(ip)

    # 3. 创建tcp服务器,等待客户端链接,然后根据客户端的命令控制LED灯
    tcp_server_control_led()


if __name__ == "__main__":
    main()
七、演示效果
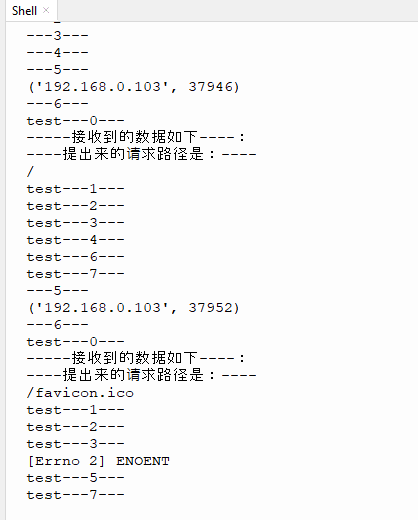
我们在Thonny上运行程序,首先shell打印如下:

同时我们看到屏幕显示二维码,我们使用手机浏览器扫描二维码:


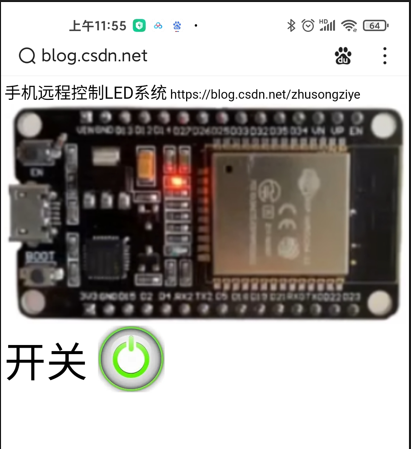
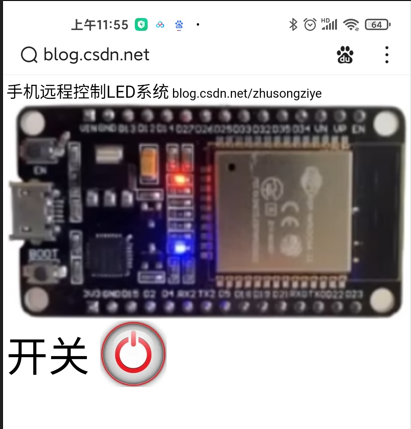
然后手机上显示当前的状态,我们可以点击手机上的开关实现对远程开关灯的操作。


八、结束语
好了,通过这三节的学习,相信你已经学会了,如何远程控制开关灯,如果你需要更加深入的学习,建议学习Python网络编程的知识,包括但不限于TCP,HTTP等。


 8672
8672


 被折叠的 条评论
为什么被折叠?


