


Caffe Code Analysis - 全连接层和卷积层
本周我们一起学习了Caffe 的源代码,重点讨论了全连接层和部分卷积层。
现就本周内容进行一个复盘总结。
1. C++类模板和函数模板回顾
caffe工程的所有layer都是从几个基本layer继承而来,而为了工程代码的简介和可重用性,caffe的layer层都是基于泛型程序设计而开发的。
现就类模板和函数模板进行简单回顾
1.1 类模板
类模板是对一批仅仅成员数据类型不同的类的抽象,程序员只要为这一批类所组成的整个类家族创建一个类模板,给出一套程序代码,就可以用来生成多种具体的类—-类模板的实例
类模板

template <类型名 参数名1,类型名参数名2,…>
class 类名
{
  类声明体
};
1.2 函数模板
函数模板提供了一种机制通过它我们可以保留函数定义和函数调用的语义在一个程序位置上封装了一段代码确保在函数调用之前实参只被计算一次.
函数模板提供一个种用来自动生成各种类型函数实例的算法程序员对于函数接口参数和返回类型中的全部或者部分类型进行参数化(parameterize)而函数体保持不变
函数模板
Template<class 类型参数1,class 类型参数2,……>
返回值类型 模板名(形参表)
{
    函数体
};
//模板使用举例
#include<iostream>
using namespace std;
Template<class T>
void Swap(T &x, T & y)
{
    T tmp = x;
    x = y;
    y = tmp;
}
int main()
{
    int n = 1, m = 2;
    Swap(n, m);
    double p = 1.0, q = 2.0;
    Swap(p, q);
    return 0;
}
2. 全连接层和卷积层
2.1 全连接层
全连接层为inner_product_layer.cpp
主要有三个函数组成
- LayerSetUp
- Forward
- Backward
下面对三个函数进行简单的介绍
2.1.1 LayerSetUp
// Initialize the weights
    vector<int> weight_shape(2);
    if (transpose_) {
      weight_shape[0] = K_;
      weight_shape[1] = N_;
    } else {
      weight_shape[0] = N_;
      weight_shape[1] = K_;
    }
    this->blobs_[0].reset(new Blob<Dtype>(weight_shape));
    // fill the weights
    shared_ptr<Filler<Dtype> > weight_filler(GetFiller<Dtype>(
        this->layer_param_.inner_product_param().weight_filler()));
    weight_filler->Fill(this->blobs_[0].get());
    // If necessary, intiialize and fill the bias term
    if (bias_term_) {
      vector<int> bias_shape(1, N_);
      this->blobs_[1].reset(new Blob<Dtype>(bias_shape));
      shared_ptr<Filler<Dtype> > bias_filler(GetFiller<Dtype>(
          this->layer_param_.inner_product_param().bias_filler()));
      bias_filler->Fill(this->blobs_[1].get());
    }
  }  // parameter initialization
  this->param_propagate_down_.resize(this->blobs_.size(), true);
}
2.1.2 Forward层
实现的功能
- x为输入,维度 MxK
- y为输出,维度 Nx1
- w为权重,维度 NxK
- b为偏置,维度 Nx1
caffe_cpu_gemm<Dtype>(CblasNoTrans, transpose_ ? CblasNoTrans : CblasTrans,
      M_, N_, K_, (Dtype)1.,
      bottom_data, weight, (Dtype)0., top_data);
// 实现y =wx
  if (bias_term_) {
    caffe_cpu_gemm<Dtype>(CblasNoTrans, CblasNoTrans, M_, N_, 1, (Dtype)1.,
        bias_multiplier_.cpu_data(),
        this->blobs_[1]->cpu_data(), (Dtype)1., top_data);
  }
// 实现了 y = y + b


// 分析一下caffe_cpu_gemm
void caffe_cpu_gemm<float>(const CBLAS_TRANSPOSE TransA,
    const CBLAS_TRANSPOSE TransB, const int M, const int N, const int K,
    const float alpha, const float* A, const float* B, const float beta,
    float* C)

const CBLAS_TRANSPOSE TransA  # A是否转置
const CBLAS_TRANSPOSE TransB  # B是否转置

# 直观

const int M
const int N
const int K
const float alpha
const float* A
const float* B
const float beta,
float* C

# 其中A维度是MxK,B维度是KxN,C维度为MxN
2.1.2 Backward层
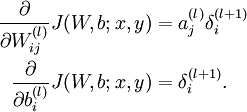
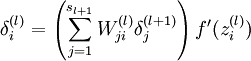
实现的功能如下
- 步骤
- 更新w
- 更新b
- 计算 δ
实现的功能如下公式
代码分析
if (transpose_) {
      caffe_cpu_gemm<Dtype>(CblasTrans, CblasNoTrans,
          K_, N_, M_,
          (Dtype)1., bottom_data, top_diff,
          (Dtype)1., this->blobs_[0]->mutable_cpu_diff());
    } else {
      caffe_cpu_gemm<Dtype>(CblasTrans, CblasNoTrans,
          N_, K_, M_,
          (Dtype)1., top_diff, bottom_data,
          (Dtype)1., this->blobs_[0]->mutable_cpu_diff());
    }
// 更新w
需要更新的w的梯度的维度是NxK
公式中的
δ(l)j
对应的是bottom_data,维度是KxM
公式中的
δ(l+1)i
对应的是top_diff,维度是NxM
caffe_cpu_gemv<Dtype>(CblasTrans, M_, N_, (Dtype)1., top_diff,
        bias_multiplier_.cpu_data(), (Dtype)1.,
        this->blobs_[1]->mutable_cpu_diff());

// 更新b
对caffe_cpu_gemv 进行分析
void caffe_cpu_gemv<float>(const CBLAS_TRANSPOSE TransA,
const int M,const int N, const float alpha, const float* A, const float* x,const float beta, float* y)
#实现的功能类似 Y←αAX + βY#
其中A的维度为 MxN
# X是一个向量,
维度为 Nx1# Y是结果 ,也是一个向量,
维度为Mx1

const CBLAS_TRANSPOSE TransA
# 是否对A进行转置

const int M
const float alpha
const float* x
const float beta
float* y
2.2 卷积层
卷积层为conv_layer.cpp
实现如下的功能
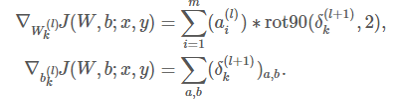
在全连接中的实现如下:
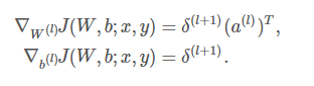
卷积层的操作可以套回全连接层的参数求导公式
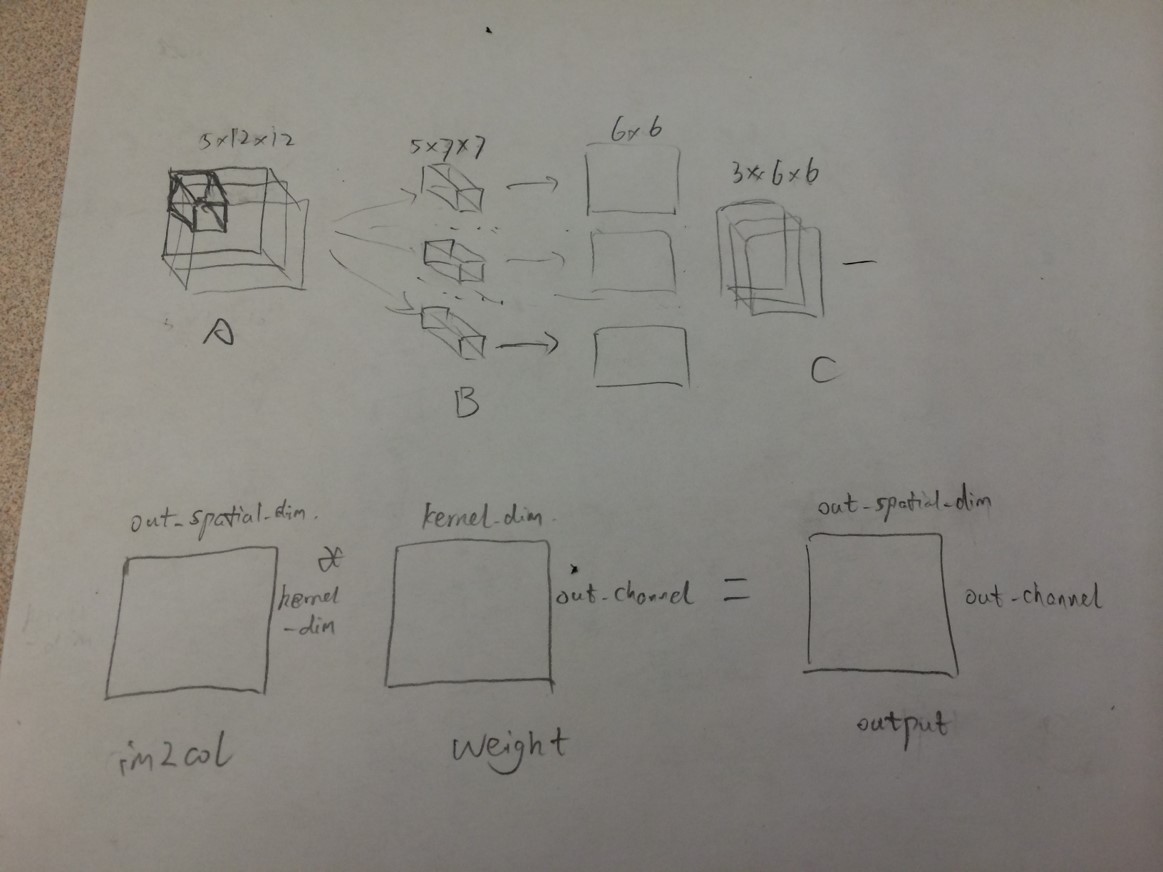
只需要增加一步im2col这一步的意思是将首先将整张图片按照卷积的窗口大小切好(按照stride来切,可以有重叠)然后各自拉成一列.对于这个小窗口内拉成一列的神经元来说来说,它们跟下一层神经元就是全连接了,所以这个小窗口里面的梯度计算就可以按照全连接来计算就可以了.
具体实现上:
1.第一部分先将 input 变成一维具有(channel, height, weight)形式的array。在conv_im2col_cpu里实现。
2.第二部分做卷积,实际上是将3D的卷积变成2D的矩阵相乘。
2.2.1 forward函数
template <typename Dtype>
Void BaseConvolutionLayer<Dtype>::forward_cpu_gemm(const Dtype* input,
    const Dtype* weights, Dtype* output, bool skip_im2col) {
  const Dtype* col_buff = input;
  if (!is_1x1_) {
    if (!skip_im2col) {
      conv_im2col_cpu(input, col_buffer_.mutable_cpu_data());
    }
    col_buff = col_buffer_.cpu_data();
  }
  for (int g = 0; g < group_; ++g) {
    caffe_cpu_gemm<Dtype>(CblasNoTrans, CblasNoTrans, conv_out_channels_ /
        group_, conv_out_spatial_dim_, kernel_dim_ / group_,
        (Dtype)1., weights + weight_offset_ * g, col_buff + col_offset_ * g,
        (Dtype)0., output + output_offset_ * g);
  }
}
这样做的出发点就是把3D运算变成2D运算, 对于weight, 把每一个小的卷积块平展成一个array, 所有的小卷积块变成矩阵。对应的,input image也要变成一个2维矩阵。实际上,就是对每一个output上的一点, 拿到在原图中得到这点的对应kernel的那些点,并flat它们。
如下图
forward_cpu_bias 函数,把计算卷积中的bias加上。
template <typename Dtype>
void BaseConvolutionLayer<Dtype>::forward_cpu_bias(Dtype* output,
    const Dtype* bias) {
  caffe_cpu_gemm<Dtype>(CblasNoTrans, CblasNoTrans, num_output_,
      height_out_ * width_out_, 1, (Dtype)1., bias, bias_multiplier_.cpu_data(),
      (Dtype)1., output);
}
Forward_cpu函数,对每一张图进行卷积计算,然后存储。
先计算weight, 再计算bias。
template <typename Dtype>
void ConvolutionLayer<Dtype>::Forward_cpu(const vector<Blob<Dtype>*>& bottom,
      const vector<Blob<Dtype>*>& top) {
  const Dtype* weight = this->blobs_[0]->cpu_data();
  for (int i = 0; i < bottom.size(); ++i) {
    const Dtype* bottom_data = bottom[i]->cpu_data();
    Dtype* top_data = top[i]->mutable_cpu_data();
    for (int n = 0; n < this->num_; ++n) {
      this->forward_cpu_gemm(bottom_data + bottom[i]->offset(n), weight,
          top_data + top[i]->offset(n));
      if (this->bias_term_) {
        const Dtype* bias = this->blobs_[1]->cpu_data();
        this->forward_cpu_bias(top_data + top[i]->offset(n), bias);
      }
    }
  }
}
参考资料:
http://zhangliliang.com/2015/02/11/about-caffe-code-convolutional-layer/
http://blog.csdn.net/ayst123/article/details/43924151
http://cogprints.org/5869/1/cnn_tutorial.pdf


 299
299


 被折叠的 条评论
为什么被折叠?
被折叠的 条评论
为什么被折叠?
 到【灌水乐园】发言


