 Unity5.2.0中使用自定义图片标签实现文本内的图片插入


 本文详细介绍了如何在Unity5.2.0中利用自定义文本标签实现文本内图片的插入,包括创建材质、调整文本布局以及解决图片显示问题的方法。
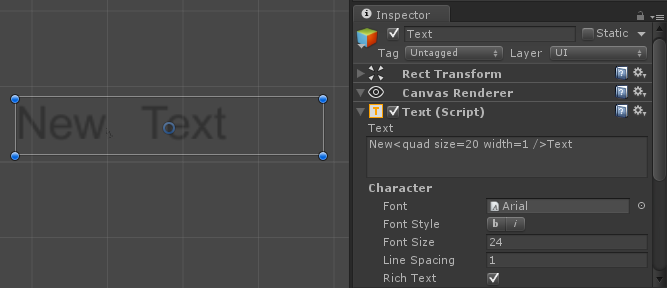
当前测试版本:Unity 5.2.0
Unity 新 UI 系统中的
Text 组件支持富文本标签,标签包括 b(黑体)、i(斜体)、size(大小)、color(颜色),并不支持图片的直接插入。但官方文档提到可以对
Text Mesh 插入贴图,文档说明如下:
quadThis is only useful for text meshes and renders an image inline with the text. It takes parameters that specify the material to use for the image, the image height in pixels, and a further four that denote a rectangular area of the image to display. Unlike the other tags, quad does not surround a piece of text and so there is no ending tag - the slash character is placed at the end of the initial tag to indicate that it is “self-closing”.<quad material=1 size=20 x=0.1 y=0.1 width=0.5 height=0.5 />This selects the material at position in the renderer’s material array and sets the height of the image to 20 pixels. The rectangular area of image starts at given by the x, y, width and height values, which are all given as a fraction of the unscaled width and height of the texture.
即
Text Mesh
上可以在文本内插入一张图片,参数
material
表示所要插入图片的材质下标。
创建一个
3D Text 对象,如下所示:
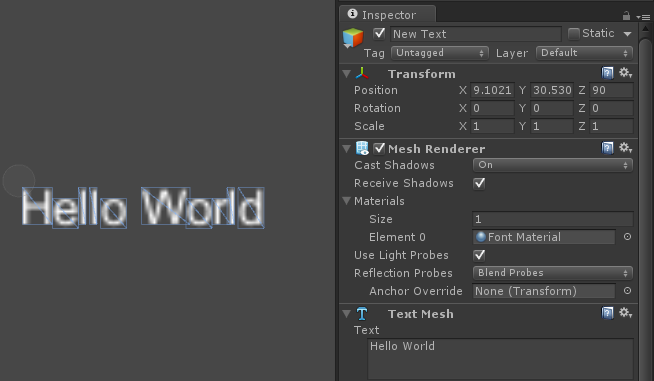
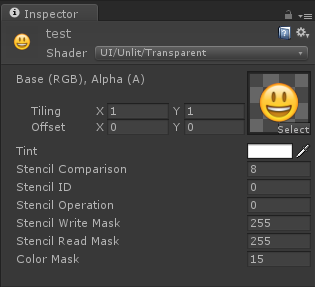
在 Assets 目录下,创建一个空材质,材质设置如下:
对
Mesh Renderer 添加这个材质,然后设置
Text Mesh 的
Text 属性为
|
1
|
Hello
<quad material=
1
size=
20
x=
0
.
1
y=
0
.
1
width=
0
.
5
height=
0
.
5
/>World
|
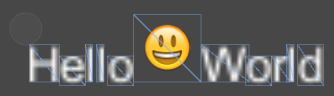
效果为如下所示:
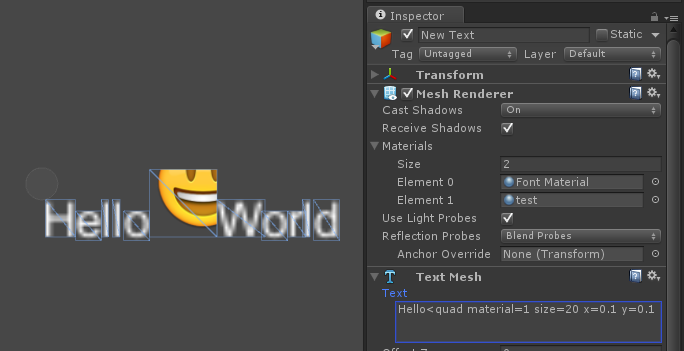
重新设置
Text Mesh 的 Text 属性为
|
1
|
Hello
<quad material=
1
size=
20
x=
0
y=
0
width=
1
height=
1
/>World
|
效果为如下所示:
插入图片标签里面的属性 x 和 y 表示材质里图片的偏移位置,将会根据这两个值,对最后的图片进行反向偏移。width 和 height 表示图片未缩放前的比例,将会根据这两个值,对最后的图片进行缩放到原始比例。
uGUI 里面的
Text 组件无法使用这种方式插入图片,但是可以使用这种方式来变成占位符,最后再在占位符的位置放上所需要插入的图片。
占位符效果如下所示:
用下面的文本内容进行测试:
|
1
|
N
<quad name=
xb_b size=
25
width=
1
/>
|
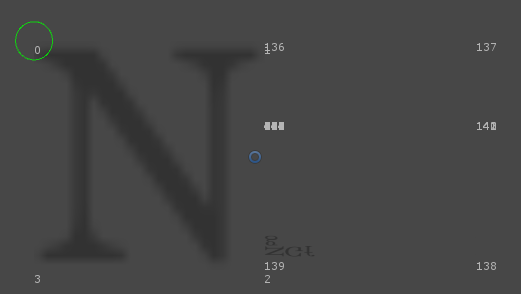
每个字母占4个顶点,即使是
quad
标签所占用的字符串,也要占用顶点数,如下图所示:
我们可以取标签最后所在的顶点,将图片放置于此坐标。新建一个类,派生自原生的
Text 类,代码如下:
|
1
2 3 4 5 6 7 8 9 10 11 12 13 14 15 16 17 18 19 20 21 22 23 24 25 26 27 28 29 30 31 32 33 34 35 36 37 38 39 40 41 42 43 44 45 46 47 48 49 50 51 52 53 54 55 56 57 58 59 60 61 62 63 64 65 66 67 68 69 70 71 72 73 74 75 76 77 78 79 80 81 82 83 84 85 86 87 88 89 90 91 92 93 94 95 96 97 |
using UnityEngine;
using System.Collections; using System.Collections.Generic; using System.Text.RegularExpressions; using UnityEngine.UI; public class TextPic : Text { /// <summary> /// 图片池 /// </summary> private readonly List<Image> m_ImagesPool = new List<Image>(); /// <summary> /// 图片的最后一个顶点的索引 /// </summary> private readonly List< int> m_ImagesVertexIndex = new List< int>(); /// <summary> /// 正则取出所需要的属性 /// </summary> private static readonly Regex s_Regex = new Regex(@ "<quad name=(.+?) size=(\d*\.?\d+%?) width=(\d*\.?\d+%?) />", RegexOptions.Singleline); public override void SetVerticesDirty() { base.SetVerticesDirty(); UpdateQuadImage(); } protected void UpdateQuadImage() { m_ImagesVertexIndex.Clear(); foreach (Match match in s_Regex.Matches(text)) { var picIndex = match.Index + match.Length - 1; var endIndex = picIndex * 4 + 3; m_ImagesVertexIndex.Add(endIndex); m_ImagesPool.RemoveAll(image => image == null); if (m_ImagesPool.Count == 0) { GetComponentsInChildren<Image>(m_ImagesPool); } if (m_ImagesVertexIndex.Count > m_ImagesPool.Count) { var resources = new DefaultControls.Resources(); var go = DefaultControls.CreateImage(resources); go.layer = gameObject.layer; var rt = go.transform as RectTransform; if (rt) { rt.SetParent(rectTransform); rt.localPosition = Vector3.zero; rt.localRotation = Quaternion.identity; rt.localScale = Vector3.one; } m_ImagesPool.Add(go.GetComponent<Image>()); } var spriteName = match.Groups[ 1].Value; var size = float.Parse(match.Groups[ 2].Value); var img = m_ImagesPool[m_ImagesVertexIndex.Count - 1]; if (img.sprite == null || img.sprite.name != spriteName) { img.sprite = Resources.Load<Sprite>(spriteName); } img.rectTransform.sizeDelta = new Vector2(size, size); img.enabled = true; } for (var i = m_ImagesVertexIndex.Count; i < m_ImagesPool.Count; i++) { if (m_ImagesPool[i]) { m_ImagesPool[i].enabled = false; } } } protected override void OnPopulateMesh(Mesh toFill) { base.OnPopulateMesh(toFill); var verts = toFill.vertices; for (var i = 0; i < m_ImagesVertexIndex.Count; i++) { var endIndex = m_ImagesVertexIndex[i]; var rt = m_ImagesPool[i].rectTransform; var size = rt.sizeDelta; if (endIndex < verts.Length) { rt.anchoredPosition = new Vector2(verts[endIndex].x + size.x / 2, verts[endIndex].y + size.y / 2); } } } } |
|
1
|
Trying to add Image (UnityEngine.UI.Image) for graphic rebuild while we are already inside a graphic rebuild loop. This is not supported.
|
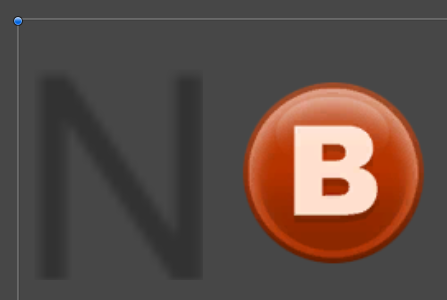
最后效果如下所示:

图片根据标签里面的
name 属性来加载,从 Resources 目录读取。图片的大小通过
size 属性来控制。
但是,可以发现左下角有小黑点绘制,这是因为使用到了
quad 标签,但是没有用它底层的插入图片方式,所以“乱码”显示了小黑点。这里用更改顶点坐标方式来抹除,更改代码如下:
|
1
2 3 4 5 6 7 8 9 10 11 12 13 14 15 16 17 18 19 20 21 22 23 24 25 26 27 28 |
protected
override
void OnPopulateMesh(Mesh toFill)
{ base.OnPopulateMesh(toFill); var verts = toFill.vertices; for (var i = 0; i < m_ImagesVertexIndex.Count; i++) { var endIndex = m_ImagesVertexIndex[i]; var rt = m_ImagesPool[i].rectTransform; var size = rt.sizeDelta; if (endIndex < verts.Length) { rt.anchoredPosition = new Vector2(verts[endIndex].x + size.x / 2, verts[endIndex].y + size.y / 2); // 抹掉左下角的小黑点 for ( int j = endIndex, m = endIndex - 3; j > m; j--) { verts[j] = verts[m]; } } } if (m_ImagesVertexIndex.Count != 0) { toFill.vertices = verts; m_ImagesVertexIndex.Clear(); } } |
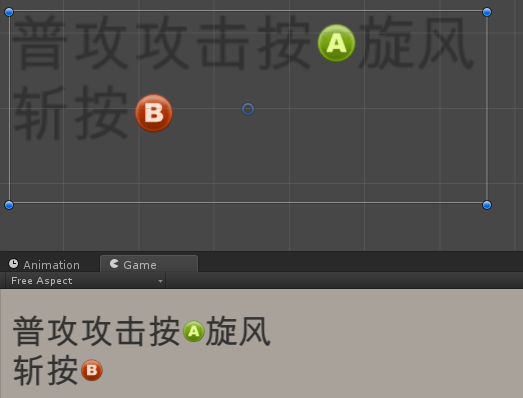
最后的效果如下:
测试例子如下:
当然离最后的使用,还需要进行进一步的修改。


 4669
4669

 被折叠的 条评论
为什么被折叠?
被折叠的 条评论
为什么被折叠?
 到【灌水乐园】发言


