[UnityShader3]2D描边效果

参考链接:

http://inpla.net/thread-6502-1-1.html

http://www.jianshu.com/p/1d9d439c28fa


1.


Shader "Custom/Edge"
{
	Properties
	{
		_MainTex ("Texture", 2D) = "white" {}
		_OffsetUV ("OffsetUV", Range(0, 1)) = 0.1
		_EdgeColor ("EdgeColor", Color) = (1, 0, 0, 1)
		_AlphaTreshold ("Treshold", Range(0, 1)) = 0.5  
	}
	SubShader
	{
		Tags { "Queue" = "Transparent" }
		Blend SrcAlpha OneMinusSrcAlpha

		Pass
		{
			CGPROGRAM
			#pragma vertex vert
			#pragma fragment frag
			#include "UnityCG.cginc"

			struct appdata
			{
				float4 vertex : POSITION;
				fixed2 uv : TEXCOORD0;
			};

			struct v2f
			{			
				float4 vertex : SV_POSITION;
				fixed2 uv[5] : TEXCOORD0;
			};

			sampler2D _MainTex;
			float4 _MainTex_ST;
			fixed _OffsetUV;
			fixed4 _EdgeColor;
			fixed _AlphaTreshold;

			v2f vert (appdata v)
			{
				v2f o;
				o.vertex = mul(UNITY_MATRIX_MVP, v.vertex);
				
				o.uv[0] = v.uv;  
                o.uv[1] = v.uv + fixed2(0, _OffsetUV); //up  
                o.uv[2] = v.uv + fixed2(-_OffsetUV, 0); //left  
                o.uv[3] = v.uv + fixed2(0, -_OffsetUV); //bottom  
                o.uv[4] = v.uv + fixed2(_OffsetUV, 0); //right 

				return o;
			}
			
			fixed4 frag (v2f i) : SV_Target
			{
				fixed4 original = tex2D(_MainTex, i.uv[0]);  
                fixed alpha = original.a;
  
                fixed p1 = tex2D(_MainTex, i.uv[1]).a;  
                fixed p2 = tex2D(_MainTex, i.uv[2]).a;  
                fixed p3 = tex2D(_MainTex, i.uv[3]).a;  
                fixed p4 = tex2D(_MainTex, i.uv[4]).a;  
      
                alpha = p1 + p2 + p3 + p4 + alpha;  
                alpha /= 5;  
  
                if (alpha < _AlphaTreshold) original.rgb = _EdgeColor.rgb;  
        
                return original; 
			}
			ENDCG
		}
	}
}


2.


Shader "Custom/Edge"
{
	Properties
	{
		_Edge ("Edge", Range(0, 0.2)) = 0.043
		_EdgeColor ("EdgeColor", Color) = (1, 1, 1, 1)
		_MainTex ("MainTex", 2D) = "white" {}
	}
	SubShader
	{
		Pass
		{
			CGPROGRAM
			#pragma vertex vert
			#pragma fragment frag
			#include "UnityCG.cginc"

			fixed _Edge;
			fixed4 _EdgeColor;
			sampler2D _MainTex;

			struct appdata
			{
				float4 vertex : POSITION;
				fixed2 uv : TEXCOORD0;
			};

			struct v2f
			{
				float4 vertex : SV_POSITION;
				float4 objVertex : TEXCOORD0;
				fixed2 uv : TEXCOORD1;
			};

			v2f vert (appdata v)
			{
				v2f o;
				o.vertex = mul(UNITY_MATRIX_MVP, v.vertex);
				o.objVertex = v.vertex;
				o.uv = v.uv;

				return o;
			}
			
			fixed4 frag (v2f i) : SV_Target
			{	
				fixed x = i.uv.x;
				fixed y = i.uv.y;
					
				if((x < _Edge) || (abs(1 - x) < _Edge) || (y < _Edge) || (abs(1 - y) < _Edge)) 
				{
					return _EdgeColor * abs(cos(_Time.y));
				}
				else 
				{
					fixed4 color = tex2D(_MainTex, i.uv);
					return color;
				}

				//return i.objVertex;
				//return fixed4(i.uv, 0, 1);
			}
			ENDCG
		}
	}
}


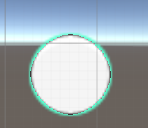
3.如下图,左边是一个Image,右边是一个Plane。


// Upgrade NOTE: replaced 'mul(UNITY_MATRIX_MVP,*)' with 'UnityObjectToClipPos(*)'

Shader "Custom/Edge"  
{  
    Properties  
    {  
        _Edge ("Edge", Range(0, 0.2)) = 0.043  
        _EdgeColor ("EdgeColor", Color) = (1, 1, 1, 1)  
		_FlowColor ("FlowColor", Color) = (1, 1, 1, 1) 
		_FlowSpeed ("FlowSpeed", Range(0, 10)) = 3
		_MainTex ("MainTex", 2D) = "white" {}  
    }  
    SubShader  
    {  
		Tags { "Queue"="Transparent" "RenderType"="Transparent" "IgnoreProjector"="True" } 

        Pass  
        {  
			ZWrite Off  
			Blend SrcAlpha OneMinusSrcAlpha 

            CGPROGRAM  
            #pragma vertex vert  
            #pragma fragment frag  
            #include "UnityCG.cginc"  
  
            fixed _Edge;  
            fixed4 _EdgeColor;  
			fixed4 _FlowColor;
			float _FlowSpeed;
			sampler2D _MainTex;

            struct appdata  
            {  
                float4 vertex : POSITION;  
                fixed2 uv : TEXCOORD0;  
            };  
  
            struct v2f  
            {  
                float4 vertex : SV_POSITION;  
                fixed2 uv : TEXCOORD1;  
            };  
  
            v2f vert (appdata v)  
            {  
                v2f o;  
                o.vertex = UnityObjectToClipPos(v.vertex);   
                o.uv = v.uv;  
                return o;  
            }  
              
            fixed4 frag (v2f i) : SV_Target  
            {     
                fixed x = i.uv.x;  
                fixed y = i.uv.y;  
			
                if((x < _Edge) || (abs(1 - x) < _Edge) || (y < _Edge) || (abs(1 - y) < _Edge))   
                {  
					//点旋转公式:
					//假设对图片上任意点(x,y),绕一个坐标点(rx0,ry0)逆时针旋转a角度后的新的坐标设为(x0,y0),有公式:
					//x0 = (x - rx0) * cos(a) - (y - ry0) * sin(a) + rx0 ;
					//y0 = (x - rx0) * sin(a) + (y - ry0) * cos(a) + ry0 ;

					float a = _Time.y * _FlowSpeed; 
					float2 rotUV;

					x -= 0.5;
					y -= 0.5;
					rotUV.x = x * cos(a) - y * sin(a) + 0.5;
					rotUV.y = x * sin(a) + y * cos(a) + 0.5;
					
					fixed temp = saturate(rotUV.x - 0.5);//-0.5作用是调整流动颜色的比例
                    return _EdgeColor * (1 - temp) + _FlowColor * temp;
                }  
                else   
                {  
                    //fixed4 color = tex2D(_MainTex, i.uv);  
                    return fixed4(1, 1, 1, 0);  
                }   
            }  
            ENDCG  
        }  
    }  
}  


4.通过观察上面的效果图,会发现右边的Plane出现了锯齿。而解决锯齿一般的方法就是做模糊处理,模糊处理一般又有贴图处理和代码处理之分,这里使用的是贴图处理。贴图处理需要提供一张边界模糊的贴图。


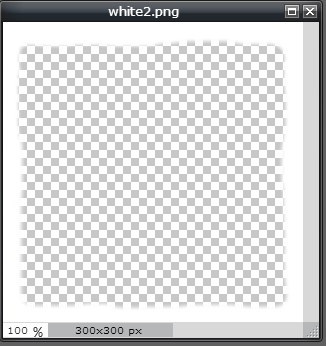
如上图,左下是内边反锯齿的图,右上是未经处理的图。

// Upgrade NOTE: replaced 'mul(UNITY_MATRIX_MVP,*)' with 'UnityObjectToClipPos(*)'  
  
Shader "Custom/Edge2"    
{    
    Properties    
    {    
        _Edge ("Edge", Range(0, 0.2)) = 0.043    
        _EdgeColor ("EdgeColor", Color) = (1, 1, 1, 1)    
        _FlowColor ("FlowColor", Color) = (1, 1, 1, 1)   
        _FlowSpeed ("FlowSpeed", Range(0, 10)) = 3  
        _MainTex ("MainTex", 2D) = "white" {}    
    }    
    SubShader    
    {    
        Tags { "Queue"="Transparent" "RenderType"="Transparent" "IgnoreProjector"="True" }   
  
        Pass    
        {    
            ZWrite Off    
            Blend SrcAlpha OneMinusSrcAlpha   
  
            CGPROGRAM    
            #pragma vertex vert    
            #pragma fragment frag    
            #include "UnityCG.cginc"    
    
            fixed _Edge;    
            fixed4 _EdgeColor;    
            fixed4 _FlowColor;  
            float _FlowSpeed;  
            sampler2D _MainTex;  
  
            struct appdata    
            {    
                float4 vertex : POSITION;    
                fixed2 uv : TEXCOORD0;    
            };    
    
            struct v2f    
            {    
                float4 vertex : SV_POSITION;    
                fixed2 uv : TEXCOORD1;    
            };    
    
            v2f vert (appdata v)    
            {    
                v2f o;    
                o.vertex = UnityObjectToClipPos(v.vertex);     
                o.uv = v.uv;    
                return o;    
            }    
                
            fixed4 frag (v2f i) : SV_Target    
            {             
				fixed4 color = tex2D(_MainTex, i.uv);
				float alpha = color.a;

				fixed x = i.uv.x;    
                fixed y = i.uv.y;  
				float a = _Time.y * _FlowSpeed;   
                float2 rotUV;  
  
                x -= 0.5;  
                y -= 0.5;  
                rotUV.x = x * cos(a) - y * sin(a) + 0.5;  
                rotUV.y = x * sin(a) + y * cos(a) + 0.5;  
                      
                fixed temp = saturate(rotUV.x - 0.5);//-0.5作用是调整流动颜色的比例  
				fixed4 finalColor = _EdgeColor * (1 - temp) + _FlowColor * temp; 				

				finalColor.a = alpha;
				return finalColor;   
            }    
            ENDCG    
        }    
    }    
} 


Shadero Sprite is a real time node-based shader tool for Unity 5, 2017 and 2018 NEW! Forum : https://forum.vetasoft.store/ Discuss with us about Shadero Sprite and more ! Description Shadero Sprite is a real time node-based shader editor. Shadero was made to be a real production time saver. Beautiful and fast, it creates many astonishing effects with the several premade and fully optimized node effects. Shadero will increase the number of the premade effects in every update. No code required. Features - Ultimate tools for 2D Shader Editor - Node based editor - Real time preview - Source code included - Load/Save project - Optimised shader - Fog Support - HDR Support - Visual selection node preview - Light Support - Blend Mode support - Normalmap with light Support - Preview directly the scene - Works with Unity UI - Many premade effects (+100) - Help Tutorial in editor - Project examples - Unity 5 and 2017 and 2018 compatible - Support Anima 2D - Support Render Texture - Support Mesh Renderer - Generate a Sprite - Create Morphing - And much much more ! http://www.shadero.com New version 1.7.0 see version history Version 1.1 - Add Node: UV > FX (UV) > Sprite Sheet Animation - Add Node: UV > FX (UV) > Pixel - Add Node: UV > FX (UV) > Fish Eye - Add Node: UV > FX (UV) > Pinch - Add Node: UV > FX (UV) > Kaleiodoscope - Add Node: Generate > Shape > XRay - Add Node: Generate > Shape > Donuts - Add Node: Generate > Shape > Lines - Add Node: Generate > Shape > Noise - Add Node: RGBA > Color > Turn Metal - Add Node: RGBA > Color > Turn Gold - Add Node: RGBA > Color > Turn Transparent - Add Node: RGBA > Color > HDR Control Value - Add Node: RGBA > Color > HDR Create - Add Force Change Parameters to the Build Shader Node (Experimental) - Add Lightning Support - Fix Node: UV > FX (UV) > Pixel XY precision - Fix new Shader Project that keep the preview material issue - Fix Auto variable order issue when you add the same node Any Feedback, error reports, questions or suggestions, please contact us at support@vetasoft.com If you like Shadero Sprite you can rate it on the asset store, it would be very helpful. Any idea or suggestions to improve Shadero Sprite? Feel free to contact us at : support@vetasoft.com
### 回答1: 这是一个描边效果的简单示例,你可以在这里找到更多关于描边效果的信息:https://docs.unity3d.com/Manual/OutlineEffect.html ``` Shader "Outlined/Silhouette Only" { Properties { _Color ("Color", Color) = (1,1,1,1) _OutlineColor ("Outline Color", Color) = (0,0,0,1) _Outline ("Outline width", Range (0.0, 0.1)) = 0.003 } SubShader { Tags { "RenderType"="Opaque" } LOD 200 CGPROGRAM // Physically based Standard lighting model, and enable shadows on all light types #pragma surface surf Standard fullforwardshadows // Use shader model 3.0 target, to get nicer looking lighting #pragma target 3.0 sampler2D _MainTex; struct Input { float2 uv_MainTex; }; half _Outline; fixed4 _Color; fixed4 _OutlineColor; void surf (Input IN, inout SurfaceOutputStandard o) { // Albedo comes from a texture tinted by color fixed4 c = tex2D (_MainTex, IN.uv_MainTex) * _Color; o.Albedo = c.rgb; // Metallic and smoothness come from slider variables o.Metallic = 0; o.Smoothness = 0; o.Alpha = c.a; } ENDCG } SubShader { // Render the outline on top of everything Tags { "RenderType"="Transparent" "Queue"="Geometry+10" } LOD 200 CGPROGRAM #pragma surface surf Standard fullforwardshadows #pragma target 3.0 sampler2D _MainTex; struct Input { float2 uv_MainTex; }; half _Outline; fixed4 _Color; fixed4 _OutlineColor; void surf (Input IN, inout SurfaceOutputStandard o) { fixed4 c = tex2D (_MainTex, IN.uv_MainTex) * _Color; o.Albedo = _OutlineColor.rgb; o.Alpha = c.a; } ENDCG } } ``` ### 回答2: Unity中可以通过编写Shader代码来实现描边效果。下面是一个简单的Unity描边效果shader代码示例: ```csharp Shader "Custom/Outline" { Properties { _MainTex ("Texture", 2D) = "white" {} _OutlineColor ("Outline Color", Color) = (1,1,1,1) _OutlineWidth ("Outline Width", Range(0, 0.1)) = 0.01 } SubShader { Tags { "Queue" = "Transparent" } LOD 100 Pass { CGPROGRAM #pragma vertex vert #pragma fragment frag #include "UnityCG.cginc" struct appdata { float4 vertex : POSITION; float2 uv : TEXCOORD0; }; struct v2f { float2 uv : TEXCOORD0; float4 vertex : SV_POSITION; }; sampler2D _MainTex; float4 _OutlineColor; float _OutlineWidth; v2f vert (appdata v) { v2f o; o.vertex = UnityObjectToClipPos(v.vertex); o.uv = v.uv; return o; } half4 frag (v2f i) : SV_Target { float2 uv = i.uv; // 在这里计算描边效果 float4 mainTexColor = tex2D(_MainTex, uv); float4 outlineColor = _OutlineColor; float4 finalColor = mainTexColor; float2 pixelUv = i.vertex.xy / i.vertex.w; float2 oPixelUv = float2(_ScreenParams.z, _ScreenParams.w) * 0.008 * _OutlineWidth; float4 outline = tex2D(_MainTex, pixelUv + float2(-oPixelUv.x, oPixelUv.y)) + tex2D(_MainTex, pixelUv + float2(oPixelUv.x, oPixelUv.y)) + tex2D(_MainTex, pixelUv + float2(-oPixelUv.x, -oPixelUv.y)) + tex2D(_MainTex, pixelUv + float2(oPixelUv.x, -oPixelUv.y)); if (length(mainTexColor - outlineColor) < 0.1) { finalColor = outline; } return finalColor; } ENDCG } } } ``` 这段Shader代码中,我们首先定义了两个属性:_MainTex是主纹理,_OutlineColor是描边颜色,_OutlineWidth是描边的宽度。然后在顶点和片段着色器中定义了相应的结构体,并通过顶点着色器将顶点坐标和纹理坐标传递给片段着色器。在片段着色器中,我们首先根据纹理坐标获取主纹理颜色,并计算出描边的颜色。然后,我们根据屏幕参数和描边宽度计算出描边效果,并判断是否需要将描边效果应用到最终的颜色中。最后返回最终的颜色。 ### 回答3: Unity中的描边效果可以通过编写一个自定义的shader来实现。以下是一个简单的示例代码: ```csharp Shader "Custom/Outline" { Properties{ _MainTex ("Texture", 2D) = "white" {} _Color ("Color", Color) = (1, 1, 1, 1) _OutlineColor ("Outline Color", Color) = (0, 0, 0, 1) _OutlineWidth ("Outline Width", Range(0, 0.1)) = 0.01 } SubShader { Tags { "RenderType" = "Opaque" } Cull Back Pass { CGPROGRAM #pragma vertex vert #pragma fragment frag #include "UnityCG.cginc" struct appdata { float4 vertex : POSITION; float2 uv : TEXCOORD0; }; struct v2f { float2 uv : TEXCOORD0; float4 vertex : SV_POSITION; }; float _OutlineWidth; v2f vert (appdata v) { v2f o; o.vertex = UnityObjectToClipPos(v.vertex); o.uv = v.uv; return o; } fixed4 _Color; sampler2D _MainTex; float4 frag (v2f i) : SV_Target { float4 col = _Color * tex2D(_MainTex, i.uv); float4 outlineCol = _OutlineColor; // 计算描边区域 fixed2 ddx = ddx(i.uv); fixed2 ddy = ddy(i.uv); fixed3 grad = normalize(fixed3(ddx.x, ddy.x, 0)); float2 o = i.uv + grad.xy * _OutlineWidth; float4 outline = tex2D(_MainTex, o); // 混合描边颜色和原始颜色 col = lerp(col, outlineCol, outline.a); return col; } ENDCG } } } ``` 以上是一个简单的Unity描边效果shader示例代码。该shader使用_MainTex作为主要纹理输入,并通过参数_Color指定基本颜色,并通过参数_OutlineColor指定描边颜色,并通过参数_OutlineWidth指定描边宽度。描边的计算是通过计算当前像素和偏移像素的颜色进行混合来实现的。混合使用了tex2D函数来获取主纹理颜色和偏移像素颜色,并使用lerp函数混合描边颜色和原始颜色。
评论 3
添加红包

请填写红包祝福语或标题

红包个数最小为10个

红包金额最低5元

当前余额3.43前往充值 >
需支付:10.00
成就一亿技术人!
领取后你会自动成为博主和红包主的粉丝 规则
hope_wisdom
发出的红包
实付
使用余额支付
点击重新获取
扫码支付
钱包余额 0

抵扣说明:

1.余额是钱包充值的虚拟货币,按照1:1的比例进行支付金额的抵扣。
2.余额无法直接购买下载,可以购买VIP、付费专栏及课程。

余额充值