


说道NpcAi,这个是个很大的话题,人工智能(Artificial Intelligence) ,英文缩写为AI。
人工智能是研究使计算机来模拟人的某些思维过程和智能行为(如学习、推理、思考、规划等)
也就是人类开发出来的一种电脑程序,你所说的游戏里面的 AI 就是一种模拟玩家操作的电脑程序,如果程序写的不好,模拟出来的人就非常不真实,也就是说的AI低,它是研究、开发用于模拟、延伸和扩展人的智能的理论、方法、技术及应用系统的一门新的技术科学。
开发游戏Ai是很费时费力的一项工程,不过好在U3D这方面为开发者提供了很多很好的选择,市面上常见的Ai插件,包括EasyAI,AIformecanim,AIbehavior,
Breadcrumb Ai,Busy World AI,AI4Enemies和我们这里使用的EnemyAI,其中EasyAI可能使用上最简单,具体使用方法我会今晚贴上来,


以上这些插件基本的游戏npc功能都可以实现,不过有些特别复杂的Ai就有些力不从心了,比如我们拿古剑二的战斗系统来说,我们玩家控制一个化身攻击,而我们的同伴这时由电脑控制攻击同一个目标怪物,这样复杂的AI就需要更为复杂的AI系统来实现了,我这里推荐一个Advanced AI,这个u3d的AI插件系统就可以解决我们固件战斗系统的难题,
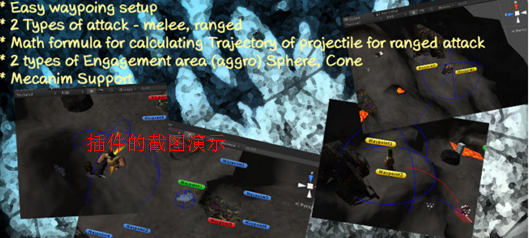
The Enemy package consists of the Patrol, Aggro, Attack and Health scripts. They weredesigned in a very abstract way in order to be able to work separately in case one of them isnot needed by the user. They can be easily triggered as they were designed using a STATElogic. Also Mecanim animation is supported with an example script, model, animation and statemachine.
敌人包括巡逻,仇恨,攻击和生命的脚本。他们使用非常抽象的方式设计,以便能够单独工作的情况下,满足用户其中一个单独脚本的需要。他们可以很容易地触发他们用statelogic设计。mecanim动画也用一个例子脚本,支持模型,动画和状态机。
Patrol
The enemy moves around predefined locations, the waypoints. Those can be placed accordingto the user’s preference and then can be referenced in the inspector under Waypoints. Also thePatrol speed can be tweaked through the inspector.
巡逻
敌人移动时的预定位置,航点。这些可根据用户的偏好,然后可以参考下检查点。而且速度可以调整,通过巡逻员(inspector)。

Toenable the script functionality the user just needs to change the state to
PATROLor to NOPATROL to stop patrolling and go back to a sort of idle state.
为了使脚本的功能,用户只需要改变巡逻或 nopatrol 到停止巡逻和 到后面去的闲置状态。
Aggro
This script is the engagement area around the enemy. It consists of 2 levels.
●SPHERE : a sphere around the enemy. When a target enters its radius, the SPHERE
state is enabled and the Target variable is set with the target’s GameObject.
●CONE : a cone in front of the enemy, within its field of view. When a target enters this
area, the CONE state is enabled and a Target (GameObject) is set.
●CLEAR : this state is active when the Target is null, which means nothing triggered the
other 2 states.
仇恨
这脚本是用于检测周围的敌人 。
●球体 : 球体环绕的 敌人。当一个目标 进入其半径, 状态启用的目标变量。
●锥 : 在敌人面前的领域 。当一个目标 进入这锥区,状态启用 。
●清屏 : 活跃状态这是目标清空的手段 。
The user can enable or disable SPHERE and CONE detection for the Enemy by toggling theappropriate bool values. Also the range of the 2 states can be adjusted by tweakingSphereDetectionRange and ConeDetectionRange values.
用户可以启用或禁用球体和圆锥来检测敌人2个范围可以被调整通过spheredetectionrange 和 conedetectionrange 的值调整。
Also there are 2 more variables that can be tweaked through the inspector.
●Max Chase Distance : Is the maximum distance between the Enemy and the target. If
it’s greater, the State changes back to CLEAR.
● Max Away Distance : This is the maximum distance that the enemy can walk away from
its initial position. If it’s greater, the State changes back to CLEAR.
有了更多的变量 可以被调整通过检查员的。
●最大追逐 距离 : 敌人和目标之间的最大的距离。如果最大,clear,追逐
● 最大的离开距离: 敌人和目标之间的最大的距离。如果最大,clear,寻找其他目标
Finally, the field Tag of Target represents the tag of the targets that the enemy
Aggro/Engagement responds (e.g. “Player”).
最后,标签代表的目标的标的 , 敌人的标签快攻/参与反应(例如 “玩家”)。

Attack
The attack script is responsible for the attack of the enemy and consists of 2 types of attack,
MELEE and RANGED. This can be selected in the inspector in the Type field and defines the
attack AI of the enemy. The attack functionality can be enabled by changing the State from
NOATTACK to ATTACK and depending on the Type, the appropriate functionality will be
triggered (melee or ranged).
攻击
脚本攻击的是负责敌人攻击,包括攻击近战和可攻击范围。这可以是检测在选定的 Ai对敌人的攻击 。功能可以被启用的改变的状态从noattack和攻击,选择触发(近战或远程 )。
MELEE
● Chase Speed : Enemy speed while chasing can be tweaked through the inspector.
●Max Melee Distance : is the max distance from the Target when the enemy starts
melee attacking.
○First it chases the target moving towards it
○ When it approaches, it checks if the target is in front of the enemy
○and starts attacking if the melee attack is not on cooldown (or 0)
●Melee Attack Cooldown : limits the melee attacks to perform every few seconds. User
can tweak this value in the inspector.
混战
● 追逐速度: 追逐敌人时速度可以被调整通过inspector。
●最大近战距离是:最大距离,从目标开始时的敌人 近战攻击。
○第一 追逐的目标是向它移动
○ 途径它时,它检查是否目标是在敌人面前的
○如果开始攻击的近战攻击 不在冷却时间(或 0)
●近战攻击冷却时间: 近战攻击的限制来执行冷却可以调整此值 设定。
RANGED
The ranged attack is similar to a cannon attack done by computing the trajectory of projectile.
●Fire Projectile Anchor : The user can define through the inspector the anchor of the
projectile, which is the position of the enemy model where the bullet is fired from.
●Reach Time : Defines after how much time the bullet will land on the target which also
affects the angle of the trajectory.
●Shoot Delay : The enemy first “marks” the target and shoots the bullet on that spot after
“Shoot Delay” seconds. Should be set to 0, if the ranged attack should have no delay
after marking the target.
●Ranged Attack Cooldown : User can tweak this value to adjust how fast every ranged
attack performs.
●Projectile : is the bullet prefab e.g. cannon ball
● Marker : an indication regarding to where the projectile will land.
不等
不等的攻击是类似于一个 大炮攻击的计算的弹丸轨迹。
● 火弹锚: 定义的用户可以通过该检查员的锚的的弹。
到达时间:●
● 拍摄延迟:
●范围攻击冷却时间: 用户可以调整这个值为
●弹丸:是的子弹预制例如 球炮
●标记: 到有关指示一个地方的土地。上面的是一个子弹类控制,用处不是很大

Health
The State can be called to check if the enemy is DEAD or ALIVE.
The user can tweak values through the inspector:
●Max Health : the maximum health that the enemy can have.
●Cur Health : is the current health of the enemy during the game
●Can Regenerate : toggles the ability for the enemy to regenerate health and recover
back at Max Health when its not receiving any hits.
●Regeneration Cooldown : is the time after the last attack to the Enemy that can trigger
the Health Regeneration.
健康
状态的可被称为 如果检查的敌人是死亡或 活着。
用户可以调整的 检查员的值通过:
●最大 生命 : 健康的最大的敌人, 都可以。
●当前生命: 是 目前的健康的的敌人 游戏中的
● 切换:可以再生的能力为 的敌人来再生 恢复健康,
回来在马克斯 健康时其不接收任何 命中。
● 再生冷却的时间是: 后的最后攻击到的敌人 ,可以触发再生的健康(生命值)。

Enemy Animation
Controls the enemy animations and rotations. Actual movement is handled by the
NavMeshAgent.
动画敌人
动画控制的敌人和旋转 。实际运动是由mecanim处理的
NavMeshAgent。
The animations are for demonstration only taken from the free unity tutorials. That’s why they
don’t look quite right. This was added, so you can have a reference how to implement mecanim
animations in your enemy.
这是对动画 示范 只采取从 教程免费的统一。这就是为什么他们
别看 相当正确。这是 添加,所以你可以 有一参考mecanim如何来实现
在你动画 敌人。
EnemyController
It’s an example that shows how the User could trigger the different scripts that were explained
above and create a sort of AI using the different states.
enemycontroller
以上这些是官方例子的说明文档,因为时间仓促我就把需要说明的地方翻译了一下,后面不重要的地方直接机翻的,所以不重要的地方可能有些不通顺,其实可以直接跳过,后面我会讲一个例子说明怎么做,这一篇文章图片量,信息量比较大,所以具体制作我开一个续帖来说,这里贴一下
/*
 *	Author: Anastasios Chouliaropoulos
 *
 */

using UnityEngine;
using System.Collections;
using System.Collections.Generic;

public class Patrol : MonoBehaviour
{

	public float patrolSpeed = 2f;									// The nav mesh agent's speed when patrolling.

	private List<Transform> wpnts = new List<Transform>();
	private int curIndex = 0;
	private int countIndex;
	private NavMeshAgent _agent;

	public Transform[] waypoints;
	/// <summary>
	/// Patrol state. Enables or Disables the enemy patrol between the waypoints
	/// </summary>
	public patrolState _state;										// change to public, to be able to change through the editor
	public enum patrolState{NOPATROL, PATROL};
	public patrolState state {
		get { return _state; }
		set { _state = value; }
	}

	void Awake ()
	{
		// inits
		_agent = GetComponent<NavMeshAgent>();

		// Keep wpnts on a list
		foreach (Transform tr in waypoints)
		{
				wpnts.Add(tr);
		}

		// cache the number of wpnts
		countIndex = wpnts.Count;
	}

	// Update is called once per frame
	void Update ()
	{
		// call patrol if there is no path assigned to the navmeshagent
		if (state == patrolState.PATROL)
		{
			if (!_agent.hasPath)
			{
				patrol ();
			}
			// offset between the enemy and the waypoint
			else if (_agent.remainingDistance < 1)
			{
				_agent.ResetPath();
			}
		}
		else if (state == patrolState.NOPATROL)
		{
			_agent.ResetPath();
		}
	}

	public void patrol()
	{
		// Set an appropriate speed for the NavMeshAgent.
		_agent.speed = patrolSpeed;

		// go to the next waypoint, use of modulo to get the correct numbers on every iteration
		_agent.SetDestination(wpnts[curIndex%countIndex].position);
		curIndex++;
	}
}
/*
 *	Authors: Argiro Georgopoulou
 *			Anastasios Chouliaropoulos
 *
 */

using UnityEngine;
using System.Collections;

public class Aggro : MonoBehaviour {

	public bool enableSphereDetection = true;				// Enable detection in a SPHERE around the enemy
	public bool enableConeDetection = true;					// Enable CONE detection in front of the enemy
	public float sphereDetectionRange = 2;					// Ranged of SPHERE detection
	public float coneDetectionRange = 5;					// Ranged of CONE detection
	public float maxChaseDistance = 10;						// max distance between the enemy and the target
	public float maxAwayDistance = 15;						// max distance that the enemy can go away from its initial position
	public string tagOfTarget = "Player";					// Targets with this tag will trigger the engagement area of the enemy

	/// <summary>
	/// Defines the State of the engagement area.
	/// Different AI can be coded using this state.
	/// e.g. when it's SPHERE and Player is Running trigger Enemy ATTACK, if Player is Walking do nothing.
	/// </summary>
	public engagementArea _state;							// change to public, to be able to change through the editor
	public enum engagementArea{CLEAR, SPHERE, CONE};
	public engagementArea state {
		get { return _state; }
		set { _state = value;
			if (value == engagementArea.CLEAR)
				target = null;
		}
	}

	/// <summary>
	/// Target of the enemy.
	/// </summary>
	private GameObject _target;
	public GameObject target {
		get { return _target; }
		set { _target = value; }
	}

	private Transform _transform;
	private Vector3 _initialPosition;

	void Awake () {
		_transform = GetComponent<Transform>();
		_initialPosition = _transform.position;									// cache the initial position
	}

	void Update () {
		if (enableSphereDetection || enableConeDetection) {
			if (enableSphereDetection)
				radiusDetection (_transform.position, sphereDetectionRange);	// cast sphere detection
			if (enableConeDetection)
				coneDetection (_transform.position, coneDetectionRange);		// cast cone detection
			// check chase and away distance
			checkChaseDistance();
			checkAwayDistance();
		}
	}

	/// <summary>
	/// Detection in a SPHERE around the enemy.
	/// </summary>
	/// <param name='center'>
	/// Origin of the detection.
	/// </param>
	/// <param name='radius'>
	/// Max radious of the detection
	/// </param>
	void radiusDetection (Vector3 center, float radius) {
        Collider[] hitColliders = Physics.OverlapSphere(center, radius);	// creates a sphere where the player can be detected
		foreach(Collider col in hitColliders){
			if(col.gameObject.tag == tagOfTarget){							// if the player is within the radius we have a target
				target = col.gameObject;									// cache target
				state = engagementArea.SPHERE;								// change the state
			}
		}
	}

	/// <summary>
	/// CONE detection in front of the enemy.
	/// </summary>
	/// <param name='center'>
	/// Origin of the detection.
	/// </param>
	/// <param name='radius'>
	/// Max distance of the detection
	/// </param>
	void coneDetection ( Vector3 center, float radius) {
		Collider[] hitColliders = Physics.OverlapSphere(center, radius);	// creates a sphere where the player can be detected
		foreach(Collider col in hitColliders){
			if(col.gameObject.tag == tagOfTarget){							// if the player is within the radius we have a target
				target = col.gameObject;									// cache target
			}
		}

		float cone;
		cone = Mathf.Cos(30 * Mathf.Deg2Rad);
		//if player is within the cone viw of the enemy
		if((target != null) && Vector3.Dot(_transform.forward, (target.transform.position-_transform.position).normalized) > cone){
			//if the player is close to the enemy
			if(Vector3.Distance(_transform.position, target.transform.position) < radius){
				state = engagementArea.CONE;
			}
		}
	}

	/// <summary>
	/// Checks the chase distance. If the target is far from the enemy state is set back to CLEAR
	/// </summary>
	void checkChaseDistance () {
		if (target) {
			float distBetween = Vector3.Distance(_transform.position, target.transform.position);
			if (distBetween > maxChaseDistance) {
				state = engagementArea.CLEAR;
			}
		}
	}

	/// <summary>
	/// Checks the distance away from the initial position of the enemy.
	/// </summary>
	void checkAwayDistance () {
		float distBetween = Vector3.Distance(_transform.position, _initialPosition);
		if (distBetween > maxAwayDistance) {
			state = engagementArea.CLEAR;
		}
	}

	//======================================================================//
	//================== CODE BELOW IS USED FOR DEBUGGING ==================//
	//======================================================================//
	void OnDrawGizmos(){
		Gizmos.color = Color.blue;
    	if (enableSphereDetection) Gizmos.DrawWireSphere (transform.position, sphereDetectionRange);				//Draws a blue sphere to see the sphereDetectionRange
		Gizmos.color = Color.green;
		if (enableConeDetection) Gizmos.DrawRay (transform.position, transform.forward * coneDetectionRange);		//Draws a green line to see the coneDetectionRange

		if (state == engagementArea.CONE || state == engagementArea.SPHERE) {
			Gizmos.color = Color.red;
			Gizmos.DrawRay (transform.position, transform.forward * maxChaseDistance);								//Draws a red line to see the max chase distance
		}
		Gizmos.color = Color.yellow;
		Gizmos.DrawWireSphere(_initialPosition, maxAwayDistance);
	}
}


 728
728

 被折叠的 条评论
为什么被折叠?
被折叠的 条评论
为什么被折叠?
 到【灌水乐园】发言


