


首先给图:
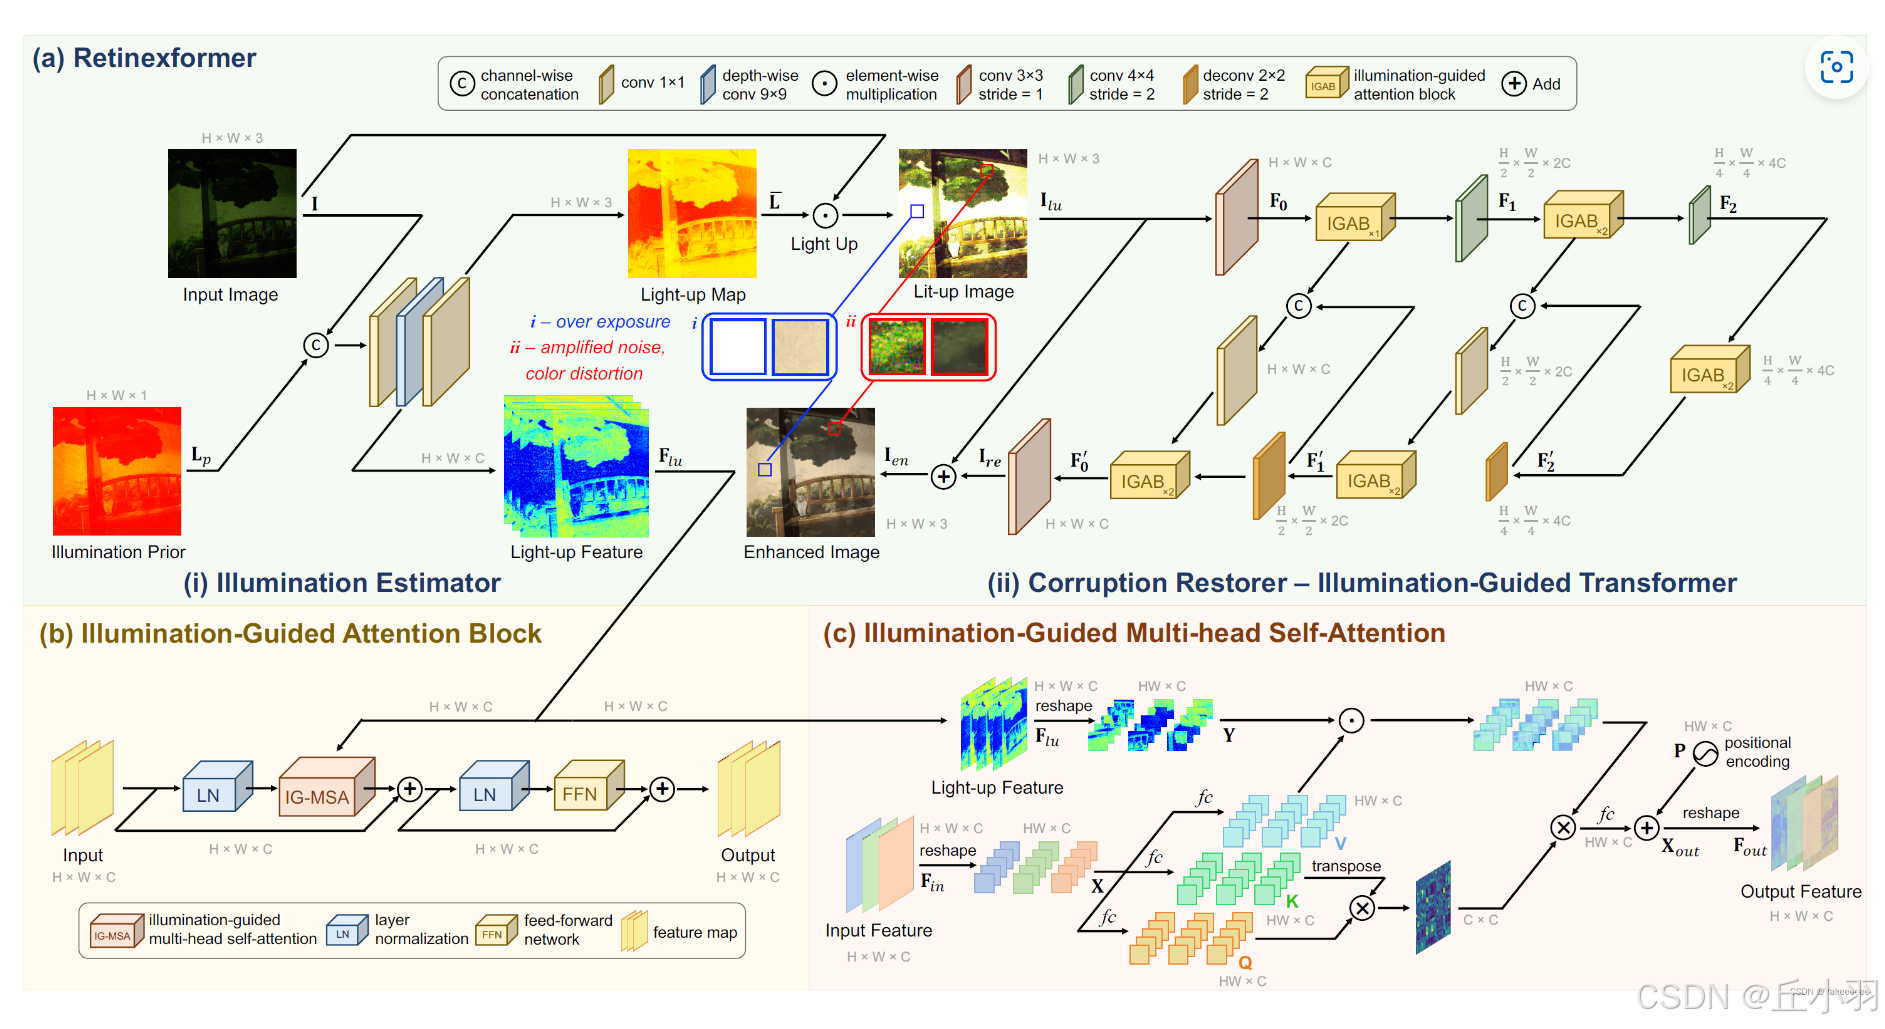
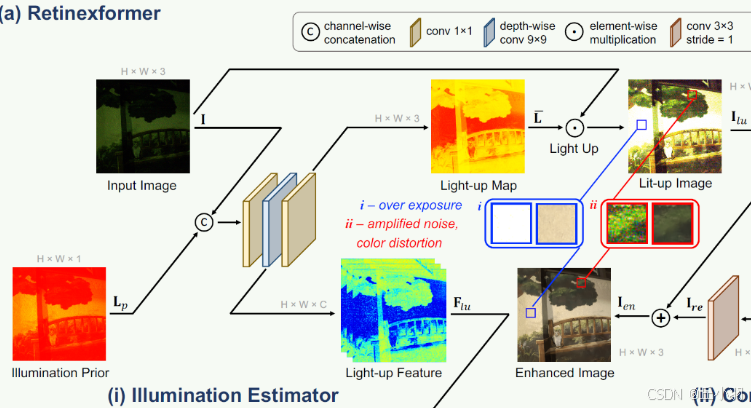
先来看第一部分:lllumination Estimator:
class Illumination_Estimator(nn.Module):
    def __init__(
            self, n_fea_middle, n_fea_in=4, n_fea_out=3):  #__init__部分是内部属性,而forward的输入才是外部输入
        super(Illumination_Estimator, self).__init__()

        self.conv1 = nn.Conv2d(n_fea_in, n_fea_middle, kernel_size=1, bias=True)

        self.depth_conv = nn.Conv2d(
            n_fea_middle, n_fea_middle, kernel_size=5, padding=2, bias=True, groups=n_fea_in)

        self.conv2 = nn.Conv2d(n_fea_middle, n_fea_out, kernel_size=1, bias=True)

    def forward(self, img):
        # img:        b,c=3,h,w
        # mean_c:     b,c=1,h,w

        # illu_fea:   b,c,h,w
        # illu_map:   b,c=3,h,w

        mean_c = img.mean(dim=1).unsqueeze(1)
        # stx()
        input = torch.cat([img,mean_c], dim=1)

        x_1 = self.conv1(input)
        illu_fea = self.depth_conv(x_1)
        illu_map = self.conv2(illu_fea)
        return illu_fea, illu_map
输入图像为b,3,h,w形状,计算每个通道上的均值得到mean_c为b,1,h,w,表示每个像素的平均亮度。将原始图像和均值图在通道维度上拼接得到新的输入形状是b,4,h,w。
显然上面的图有点不够直观,而后经过一个卷积层,将输入特征图的通道数从4转化为n_fea_middle,再经过一个5*5的深度卷积层,使用groups=n_fea_in表示每个通道的输入都有自己的卷积核,存在padding,输出通道数和输入通道数相同。仍是n_fea_middle,作为一个结果进行返回,显然,图像中就是Light-up Feature,这里面的n_fea_middle数量显著多于3了。再通过第二个卷积层,将中间特征图的通道数转化为n_fea_out,在代码中是3,得到的形状是b,3,h,w在图中表示的就是Light-up Map。
这个地方有改进的空间,返回的是中间特征图和光照图,可以在卷积层后面添加Batch Normalization,加快训练并提高模型的稳定性,添加激活函数,这个里面没有激活函数,也许添加之后效果会更好,也可以使用深度可分离卷积,减少参数数量:
class DepthwiseSeparableConv(nn.Module):
    def __init__(self, in_channels, out_channels):
        super(DepthwiseSeparableConv, self).__init__()
        self.depthwise = nn.Conv2d(in_channels, in_channels, kernel_size=3, padding=1, groups=in_channels)
        self.pointwise = nn.Conv2d(in_channels, out_channels, kernel_size=1)

    def forward(self, x):
        return self.pointwise(self.depthwise(x))
在适当位置添加Dropout,防止过拟合。可参考相关论文进行缝合。
使用多尺度特征提取,引用多尺度卷积层捕捉不同尺度信息(在目标检测中非常有用,但是在图像增强中效果未知,可以试试:
self.conv3x3 = nn.Conv2d(n_fea_in, n_fea_middle, kernel_size=3, padding=1)
self.conv5x5 = nn.Conv2d(n_fea_in, n_fea_middle, kernel_size=5, padding=2)
self.conv7x7 = nn.Conv2d(n_fea_in, n_fea_middle, kernel_size=7, padding=3)
x_3x3 = self.conv3x3(input)
x_5x5 = self.conv5x5(input)
x_7x7 = self.conv7x7(input)
x_concat = torch.cat([x_3x3, x_5x5, x_7x7], dim=1)
使用残差连接也行:可以避免梯度消失:(但是这样是不是显得网络的修改有点low) :
在init中添加:self.conv_res = nn.Conv2d(n_fea_in, n_fea_middle, kernel_size=1)

在forward方法中添加:
x_res = self.conv_res(input)
x_1 = self.conv1(input)
x_1 += x_res  # 残差连接
在此先引入注意力机制,那就基本上都是注意力机制了:
class SqueezeExcitation(nn.Module):
    def __init__(self, channels, reduction=16):
        super(SqueezeExcitation, self).__init__()
        self.fc1 = nn.Linear(channels, channels // reduction, bias=False)
        self.fc2 = nn.Linear(channels // reduction, channels, bias=False)

    def forward(self, x):
        b, c, _, _ = x.size()
        y = x.mean(dim=(2, 3)).view(b, c)
        y = self.fc1(y).relu()
        y = self.fc2(y).sigmoid()
        return x * y.view(b, c, 1, 1)

在forward方法中:

x_1 = self.conv1(input)
x_1 = SqueezeExcitation(n_fea_middle)(x_1)
考虑使用U-Net结构,也是diffusion常用的结构:
self.encoder = nn.Sequential(
    nn.Conv2d(n_fea_in, n_fea_middle, kernel_size=3, padding=1),
    nn.ReLU(),
    nn.MaxPool2d(2)
)
self.decoder = nn.Sequential(
    nn.ConvTranspose2d(n_fea_middle, n_fea_out, kernel_size=2, stride=2),
    nn.ReLU()
)
在forward方法中:
encoded = self.encoder(input)
decoded = self.decoder(encoded)
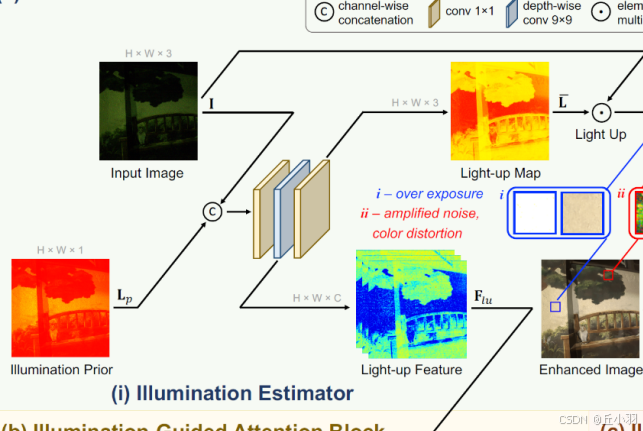
第一部分完结,下面是第二部分:
 第二部分是光引导的transformer,注重光照在此发挥的作用:
采用three-scale三层的U型结构(代码中会见到:encoder-bottleneck-decoder).
在下采样过程中,光照图像经过一个3*3的卷积(stride=1)得到分层特征F0(也称之为self.embeding),再经过一个IGAB,和一个4*4的卷积(stride=2)得到F1,再经过两个IGAB和一个4*4的卷积(stride=2)得到分层特征F2,然后F2又经过了两个IGAB。
代码实现部分好像和论文中有点出入:
在看denoiser之前首先要看看IGAB,在看IGAB之前首先要看看IG_MSA:
class IG_MSA(nn.Module):
    #used
    def __init__(
            self,
            dim,
            dim_head=64,
            heads=8,
    ):
        super().__init__()
        self.num_heads = heads
        self.dim_head = dim_head
        self.to_q = nn.Linear(dim, dim_head * heads, bias=False)
        self.to_k = nn.Linear(dim, dim_head * heads, bias=False)
        self.to_v = nn.Linear(dim, dim_head * heads, bias=False)
        self.rescale = nn.Parameter(torch.ones(heads, 1, 1))
        self.proj = nn.Linear(dim_head * heads, dim, bias=True)
        self.pos_emb = nn.Sequential(
            nn.Conv2d(dim, dim, 3, 1, 1, bias=False, groups=dim),
            GELU(),
            nn.Conv2d(dim, dim, 3, 1, 1, bias=False, groups=dim),
        )
        self.dim = dim
    def forward(self, x_in, illu_fea_trans):
        """
        x_in: [b,h,w,c]         # input_feature
        illu_fea: [b,h,w,c]         # mask shift? 涓轰粈涔堟槸 b, h, w, c?
        return out: [b,h,w,c]
        """
        b, h, w, c = x_in.shape
#将输入特征的形状转化
        x = x_in.reshape(b, h * w, c)
#使用线性层将输入特征转化为查询,键,值
#进行线性转化
        q_inp = self.to_q(x)
        k_inp = self.to_k(x)
        v_inp = self.to_v(x)
#光照特征
        illu_attn = illu_fea_trans # illu_fea: b,c,h,w -> b,h,w,c
#重拍光照特征
#重排后的形状:

q: [b, c, h * w, dim_head]
k: [b, c, h * w, dim_head]
v: [b, c, h * w, dim_head]
illu_attn: [b, c, h * w, 1](假设光照特征的通道数与头数相同)

        q, k, v, illu_attn = map(lambda t: rearrange(t, 'b n (h d) -> b h n d', h=self.num_heads),
                                 (q_inp, k_inp, v_inp, illu_attn.flatten(1, 2)))
        v = v * illu_attn
#上面的是value与光照特征进行相乘运算
        # q: b,heads,hw,c
# 形状: [b, C, dim_head, h * w]
        q = q.transpose(-2, -1)
        k = k.transpose(-2, -1)
        v = v.transpose(-2, -1)
#对Q和K进行L2归一化(当然,除了选择L2归一化之外,还可以选择其他的归一化,L2归一化的角度关系更加鲜明,但是不一定要采用L2归一化)
        q = F.normalize(q, dim=-1, p=2)
        k = F.normalize(k, dim=-1, p=2)
        attn = (k @ q.transpose(-2, -1))   # A = K^T*Q得到的形状是[b, c, h * w, h * w]
        attn = attn * self.rescale
#self.rescale 是一个可学习的参数,能够调整注意力权重的强度。通过缩放,可以控制模型对不同特征的关注程度。(一个可以借鉴的点,通过设置可学习权重来更改对不同特征的关注程度)
        attn = attn.softmax(dim=-1)
        x = attn @ v   # b,heads,d,hw
        x = x.permute(0, 3, 1, 2)    # Transpose
        x = x.reshape(b, h * w, self.num_heads * self.dim_head)
#回归原始
        out_c = self.proj(x).view(b, h, w, c)
#位置嵌入,也就是两个卷积层加上激活函数
#实在不明白为什么val加上两个卷积运算和激活就叫做位置编码了。。。也有道理,照你这样说,基本上所有形状不变的卷积操作都可以叫做位置编码了
        out_p = self.pos_emb(v_inp.reshape(b, h, w, c).permute(
            0, 3, 1, 2)).permute(0, 2, 3, 1)
        out = out_c + out_p

        return out
class IGAB(nn.Module):
#used
def __init__(
self,
dim,
dim_head=64,
heads=8,
num_blocks=2,
):
super().__init__()
self.blocks = nn.ModuleList([])
for _ in range(num_blocks):
#明明是相对比较复杂的注意力机制,但是封装之后就显得很简单
self.blocks.append(nn.ModuleList([
IG_MSA(dim=dim, dim_head=dim_head, heads=heads),
PreNorm(dim, FeedForward(dim=dim))
]))
def forward(self, x, illu_fea):
"""
x: [b,c,h,w]
illu_fea: [b,c,h,w]
return out: [b,c,h,w]
"""
x = x.permute(0, 2, 3, 1)
#输入和光照特征图作为总输入,经过注意力机制之后,再加上原始的输入作为IG-MSA的输出
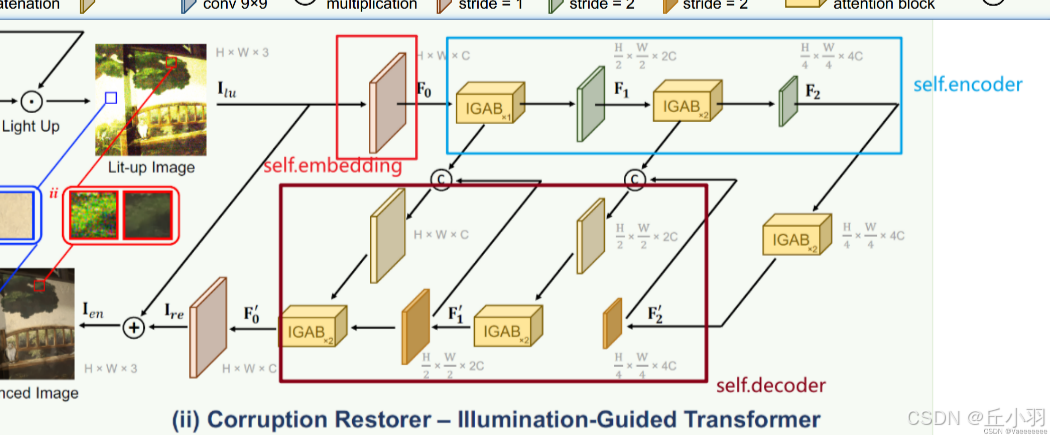
然后再经过归一化处理,显然,与图中不符,图中是先归一化再经过IG-MSA处理
for (attn, ff) in self.blocks:
x = attn(x, illu_fea_trans=illu_fea.permute(0, 2, 3, 1)) + x
x = ff(x) + x
out = x.permute(0, 3, 1, 2)
return outclass Denoiser(nn.Module):
#输入特征的通道维度是3,输出特征的通道数也是3,特征维度的初始值为31,?为什么一定是31,难道31就那么好吗,编码器和解码器的层数是2,每个层中的IGAB(小的transformer结构)数量是2,2,4
def __init__(self, in_dim=3, out_dim=3, dim=31, level=2, num_blocks=[2, 4, 4]):
super(Denoiser, self).__init__()
self.dim = dim
self.level = level
# Input projection
#输入投影,将通道数改变为C
self.embedding = nn.Conv2d(in_dim, self.dim, 3, 1, 1, bias=False)
# Encoder
#创建多层编码器
self.encoder_layers = nn.ModuleList([])
dim_level = dim
for i in range(level):
self.encoder_layers.append(nn.ModuleList([
IGAB(
dim=dim_level, num_blocks=num_blocks[i], dim_head=dim, heads=dim_level // dim),
#跨度为2,经过下采样之后,宽和高缩小一半,同时通道数增加
nn.Conv2d(dim_level, dim_level * 2, 4, 2, 1, bias=False),
nn.Conv2d(dim_level, dim_level * 2, 4, 2, 1, bias=False)
]))
dim_level *= 2#dim_level转化为原来的两倍
# Bottleneck
self.bottleneck = IGAB(
dim=dim_level, dim_head=dim, heads=dim_level // dim, num_blocks=num_blocks[-1])
# Decoder
self.decoder_layers = nn.ModuleList([])
for i in range(level):
self.decoder_layers.append(nn.ModuleList([
#先是一个上采样的过程,使用的是Transpose2d
nn.ConvTranspose2d(dim_level, dim_level // 2, stride=2,
kernel_size=2, padding=0, output_padding=0),
nn.Conv2d(dim_level, dim_level // 2, 1, 1, bias=False),
IGAB(
dim=dim_level // 2, num_blocks=num_blocks[level - 1 - i], dim_head=dim,
heads=(dim_level // 2) // dim),
]))
dim_level //= 2
# Output projection
self.mapping = nn.Conv2d(self.dim, out_dim, 3, 1, 1, bias=False)
# activation function
self.lrelu = nn.LeakyReLU(negative_slope=0.1, inplace=True)
self.apply(self._init_weights)
def _init_weights(self, m):
if isinstance(m, nn.Linear):
trunc_normal_(m.weight, std=.02)
if isinstance(m, nn.Linear) and m.bias is not None:
nn.init.constant_(m.bias, 0)
elif isinstance(m, nn.LayerNorm):
nn.init.constant_(m.bias, 0)
nn.init.constant_(m.weight, 1.0)
def forward(self, x, illu_fea):
#输入的不但有图像特征还有光照特征
"""
x: [b,c,h,w] x是feature, 不是image
illu_fea: [b,c,h,w]
return out: [b,c,h,w]
"""
# Embedding
#投影变化,将通道数变为C
fea = self.embedding(x)
# Encoder
fea_encoder = []
illu_fea_list = []
for (IGAB, FeaDownSample, IlluFeaDownsample) in self.encoder_layers:#进行多次处理
#输入和光照特征进行综合作为输入特征
fea = IGAB(fea,illu_fea) # bchw
#加入光照特征,光照特征长和宽依次减小一半
illu_fea_list.append(illu_fea)
#编码器加入输入特征,输入特征也是依次减小一半
fea_encoder.append(fea)
#输入特征进行下采样
fea = FeaDownSample(fea)
#光照特征进行下采样
illu_fea = IlluFeaDownsample(illu_fea)
# Bottleneck
#再经过四层IGAB,其实形状是不变的,上述过程中形状已经变成了原本宽高的四分之一,得到的是F2'
fea = self.bottleneck(fea,illu_fea)
# Decoder
for i, (FeaUpSample, Fution, LeWinBlcok) in enumerate(self.decoder_layers):
#先进行上采样,恢复到H/2,W/2
fea = FeaUpSample(fea)
#将上采样得到的特征与编码器得到的特征进行拼接,然后转化通道数为为拼接后的一半
fea = Fution(
torch.cat([fea, fea_encoder[self.level - 1 - i]], dim=1))
#得到光照特征,与得到的特征进行注意力机制层处理
illu_fea = illu_fea_list[self.level-1-i]
fea = LeWinBlcok(fea,illu_fea)
#转化通道数为out_dim,同时加上初始输入的特征,作为返回值
# Mapping
out = self.mapping(fea) + x
return out
其实在计算过程中一直存在光照信息的输入,但是图中缺没有表现出来。
微调IGAB网络:
增加聚合模块:
在light-up-MAP里面添加一个特征增强模块:
得到新的light-up-MAP。效果略好,最高可高近0.5个点。


 664
664

 被折叠的 条评论
为什么被折叠?
被折叠的 条评论
为什么被折叠?
 到【灌水乐园】发言


