


 本文介绍了C语言中常用的编程技巧,如宏定义、typedef和结构体等,并展示了如何在STM32F10x平台上实现GPIO控制LED、按键检测、传感器响应以及蜂鸣器的开关功能。
按键简介
•按键:常见的输入设备,按下导通,松手断开
•按键抖动:由于按键内部使用的是机械式弹簧片来进行通断的,所以在按下和松手的瞬间会伴随有一连串的抖动
传感器模块介绍

原理:负载分压,旁边为滤波电容(为了给中间的电压输出进行滤波,保证输出电压波形平整)
硬件电路
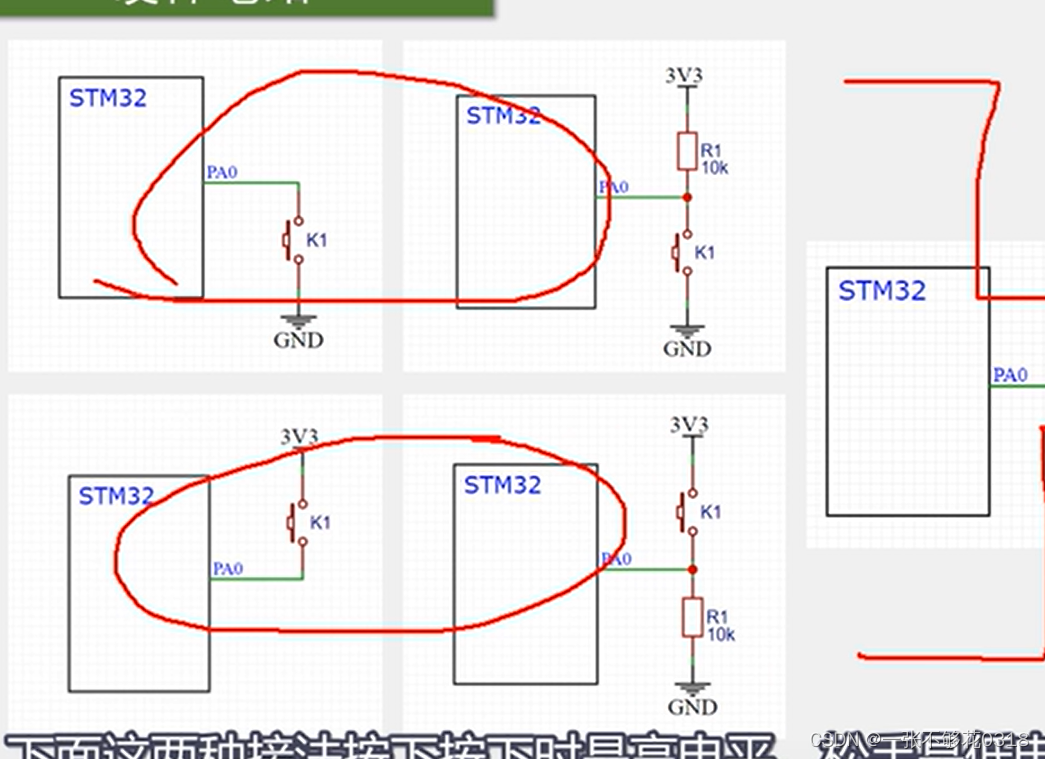
上面两种接法按键按下时为低电平(采用上拉)
上面两种接法按键按下时为高电平(采用下拉,了解)
左边两种接法必须为上拉或下拉模式,右边两种接法可为悬空状态
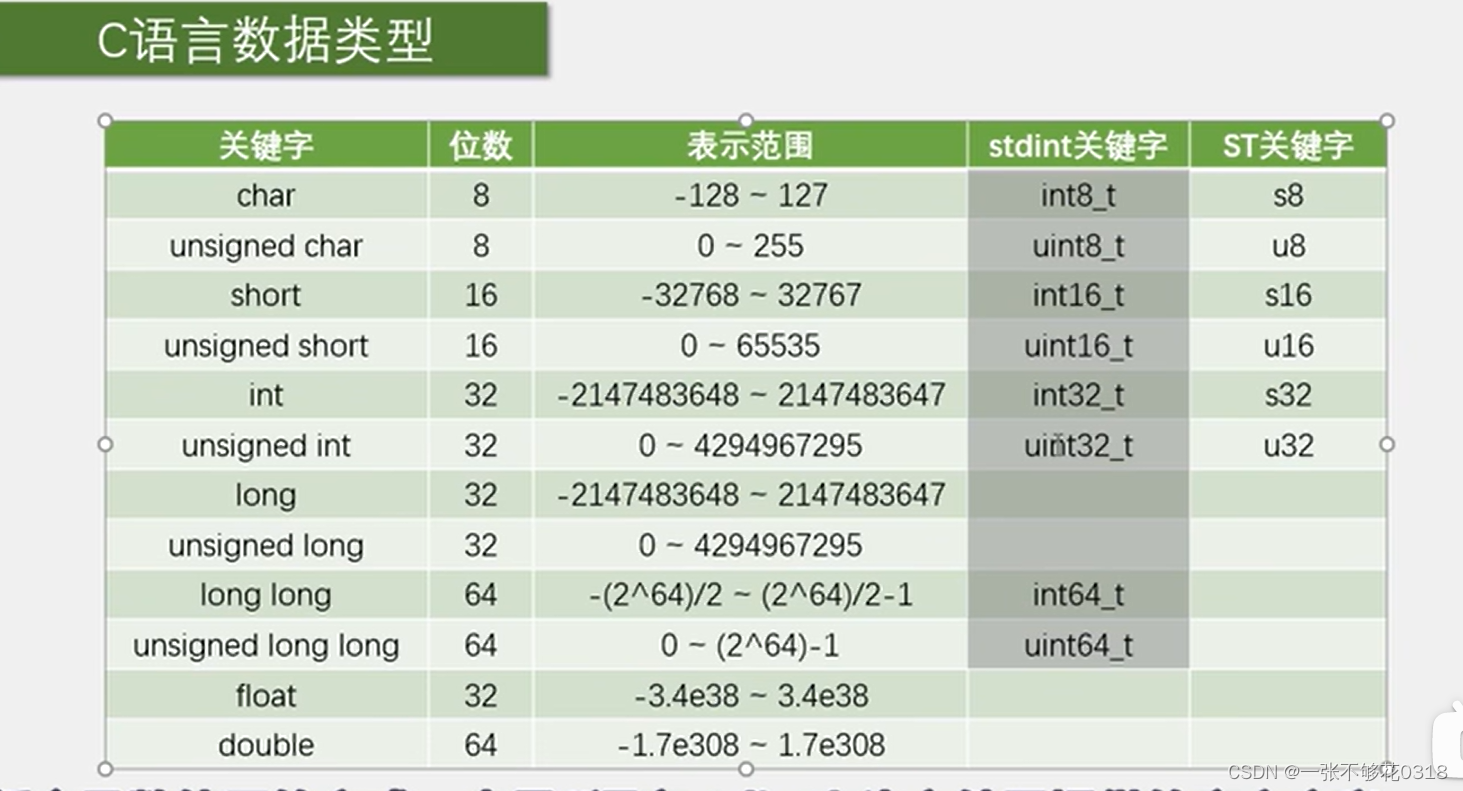
C语言数据类
C语言宏定义
•关键字:#define
•用途:用一个字符串代替一个数字,便于理解,防止出错;提取程序中经常出现的参数,便于快速修改
•定义宏定义:
#define ABC 12345
•引用宏定义:
int a = ABC; //等效于int a = 12345;
C语言typedef
•关键字:typedef
•用途:将一个比较长的变量类型名换个名字,便于使用
•定义typedef:
typedef unsigned char uint8_t;
•引用typedef:
uint8_t a; //等效于unsigned char a;
•只适用于变量类型重命名
C语言结构体
•关键字:struct
•用途:数据打包,不同类型变量的集合
•定义结构体变量:
struct{char x; int y; float z;} StructName;
因为结构体变量类型较长,所以通常用typedef更改变量类型名
•引用结构体成员:
StructName.x = 'A';
StructName.y = 66;
StructName.z = 1.23;
或 pStructName->x = 'A'; //pStructName为结构体的地址 pStructName->y = 66;
pStructName->z = 1.23;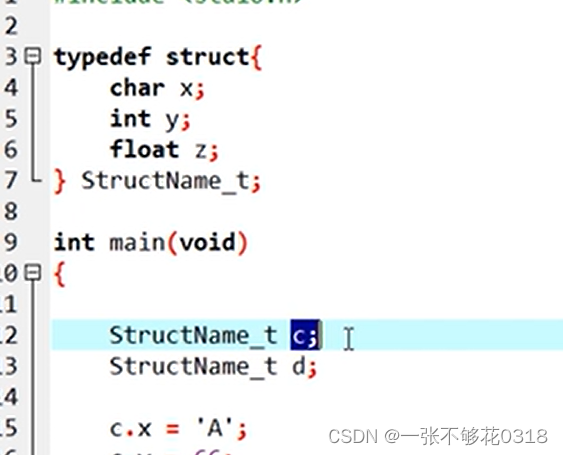
C语言枚举
•关键字:enum
•用途:定义一个取值受限制的整型变量,用于限制变量取值范围;宏定义的集合
•定义枚举变量:
enum{FALSE = 0, TRUE = 1} EnumName;
因为枚举变量类型较长,所以通常用typedef更改变量类型名
•引用枚举成员:
EnumName = FALSE;
EnumName = TRUE;
#include "stm32f10x.h" // Device header #include "Delay.h"
int main(void) { RCC_APB2PeriphClockCmd(RCC_APB2Periph_GPIOA, ENABLE);
3-1led闪烁
GPIO_InitTypeDef GPIO_InitStructure;
GPIO_InitStructure.GPIO_Mode = GPIO_Mode_Out_PP;
GPIO_InitStructure.GPIO_Pin = GPIO_Pin_0;
GPIO_InitStructure.GPIO_Speed = GPIO_Speed_50MHz;
GPIO_Init(GPIOA, &GPIO_InitStructure);
while (1)
{
GPIO_ResetBits(GPIOA, GPIO_Pin_0);
Delay_ms(500);
GPIO_SetBits(GPIOA, GPIO_Pin_0);
Delay_ms(500);
GPIO_WriteBit(GPIOA, GPIO_Pin_0, Bit_RESET);
Delay_ms(500);
GPIO_WriteBit(GPIOA, GPIO_Pin_0, Bit_SET);
Delay_ms(500);
GPIO_WriteBit(GPIOA, GPIO_Pin_0, (BitAction)0);
Delay_ms(500);
GPIO_WriteBit(GPIOA, GPIO_Pin_0, (BitAction)1);
Delay_ms(500);
}
}
3-2led流水灯
#include "stm32f10x.h" // Device header #include "Delay.h"
int main(void) { RCC_APB2PeriphClockCmd(RCC_APB2Periph_GPIOA, ENABLE);
GPIO_InitTypeDef GPIO_InitStructure;
GPIO_InitStructure.GPIO_Mode = GPIO_Mode_Out_PP;
GPIO_InitStructure.GPIO_Pin = GPIO_Pin_All;
GPIO_InitStructure.GPIO_Speed = GPIO_Speed_50MHz;
GPIO_Init(GPIOA, &GPIO_InitStructure);
while (1)
{
GPIO_Write(GPIOA, ~0x0001); //0000 0000 0000 0001
Delay_ms(100);
GPIO_Write(GPIOA, ~0x0002); //0000 0000 0000 0010
Delay_ms(100);
GPIO_Write(GPIOA, ~0x0004); //0000 0000 0000 0100
Delay_ms(100);
GPIO_Write(GPIOA, ~0x0008); //0000 0000 0000 1000
Delay_ms(100);
GPIO_Write(GPIOA, ~0x0010); //0000 0000 0001 0000
Delay_ms(100);
GPIO_Write(GPIOA, ~0x0020); //0000 0000 0010 0000
Delay_ms(100);
GPIO_Write(GPIOA, ~0x0040); //0000 0000 0100 0000
Delay_ms(100);
GPIO_Write(GPIOA, ~0x0080); //0000 0000 1000 0000
Delay_ms(100);
}
}
3-3蜂鸣器
#include "stm32f10x.h" // Device header #include "Delay.h"
int main(void) { RCC_APB2PeriphClockCmd(RCC_APB2Periph_GPIOB, ENABLE);
GPIO_InitTypeDef GPIO_InitStructure;
GPIO_InitStructure.GPIO_Mode = GPIO_Mode_Out_PP;
GPIO_InitStructure.GPIO_Pin = GPIO_Pin_12;
GPIO_InitStructure.GPIO_Speed = GPIO_Speed_50MHz;
GPIO_Init(GPIOB, &GPIO_InitStructure);
while (1)
{
GPIO_ResetBits(GPIOB, GPIO_Pin_12);
Delay_ms(100);
GPIO_SetBits(GPIOB, GPIO_Pin_12);
Delay_ms(100);
GPIO_ResetBits(GPIOB, GPIO_Pin_12);
Delay_ms(100);
GPIO_SetBits(GPIOB, GPIO_Pin_12);
Delay_ms(700);
}
}
3-4按键控制led
#include "stm32f10x.h" // Device header #include "Delay.h" #include "LED.h" #include "Key.h"
uint8_t KeyNum;
int main(void) { LED_Init(); Key_Init();
while (1)
{
    KeyNum = Key_GetNum();
    if (KeyNum == 1)
    {
        LED1_Turn();
    }
    if (KeyNum == 2)
    {
        LED2_Turn();
    }
}
}
3-5光敏传感器控制蜂鸣器
#include "stm32f10x.h" // Device header #include "Delay.h" #include "Buzzer.h" #include "LightSensor.h"
int main(void) { Buzzer_Init(); LightSensor_Init();
while (1)
{
    if (LightSensor_Get() == 1)
    {
        Buzzer_ON();
    }
    else
    {
        Buzzer_OFF();
    }
}
}


 343
343


 被折叠的 条评论
为什么被折叠?
被折叠的 条评论
为什么被折叠?
 到【灌水乐园】发言


