


微调
在深度学习和自然语言处理(NLP)领域,大规模语言模型如BERT、GPT-3等通过在大量数据上进行预训练获得了强大的语言理解和生成能力。这些预训练模型通常需要进行微调(Fine-tuning),以便在特定的下游任务上表现更好。微调可以采取不同的形式,包括full、LoRA和Q-LoRA。
- Full微调(Full Fine-tuning)
Full微调是最传统的微调方法,指的是在特定任务上对整个预训练模型的所有参数进行更新。这种方法简单直接,可以使模型完全适应新任务,但它有两个缺点:一是参数量大,更新所有参数需要大量的计算资源;二是容易过拟合,特别是当下游任务数据量不足时。 - LoRA(Low-Rank Adaptation)
LoRA是一种新颖的微调方法,它通过将模型中的权重矩阵分解为低秩矩阵来减少需要更新的参数数量。基本思想是在预训练模型的基础上引入额外的小型矩阵,并且只更新这些小型矩阵。这些小型矩阵与原始权重矩阵进行某种形式的交互(例如加法或者变换),从而微调模型的行为。LoRA的好处在于,它可以大幅减少微调时需要更新的参数数量,从而降低计算成本并减小过拟合的风险。 - Q-LoRA
Q-LoRA是在LoRA的基础上进一步发展的技术。它旨在通过量化技术进一步减少模型参数。量化通常涉及将模型的权重和激活函数的精度降低,例如从32位浮点数减少到8位整数。这样不仅可以减少模型的存储空间,也可以加快计算速度。Q-LoRA通过在LoRA的基础上应用量化,结合了低秩逼近和量化的优势,进一步提高了模型微调的效率。
这三种方法各有优势和用途,选择哪一种方法取决于具体任务的需求、可用的计算资源以及对模型大小和速度的约束。在实际应用中,研究者和工程师需要根据具体情况做出选择。
经过 LoRA 微调后的模型无法与量化模型合并参数,因为会损失过多的精度
指令跟随是一种让语言模型根据给定的提示来执行特定任务的能力。例如,指令可以是继续聊天,对这段文本进行总结,或者是提供一份销售某个小部件公司的名单。指令跟随模型可以执行任何你给定的指令,只要它们是合理和安全的。
指令跟随是语言模型的一种重要应用,可以让用户更方便地利用语言模型的强大功能。指令跟随模型的训练方法有很多,例如使用人工编写的指令跟随数据集,使用人类反馈的强化学习,或者使用自我指令创建等技术。
DeepSpeed是一个由微软开发的开源深度学习优化库,旨在提高大规模模型训练的效率和可扩展性。它通过多种技术手段来加速训练,包括模型并行化、梯度累积、动态精度缩放、本地模式混合精度等。DeepSpeed还提供了一些辅助工具,如分布式训练管理、内存优化和模型压缩等,以帮助开发者更好地管理和优化大规模深度学习训练任务。此外,deepspeed基于pytorch构建,只需要简单修改即可迁移。DeepSpeed已经在许多大规模深度学习项目中得到了应用,包括语言模型、图像分类、目标检测等等。
Swift 框架
- 支持的SFT方法: lora, qlora, longlora, qalora, 全参数微调, 部分参数微调.
- 支持的特性: 模型量化, DDP, 模型并行, gradient checkpointing, 支持推送ModelScope Hub, 自定义数据集, 多模态和Agent SFT, 多轮对话, DPO, 自我认知微调, …
* - 支持的数据集:
- NLP:
- 通用: 🔥ms-bench, 🔥alpaca-en(gpt4), 🔥alpaca-zh(gpt4), multi-alpaca-all, instinwild-en, instinwild-zh, cot-en, cot-zh, firefly-all-zh, instruct-en, gpt4all-en, sharegpt-en, sharegpt-zh, tulu-v2-sft-mixture, wikipedia-zh, open-orca, open-orca-gpt4, sharegpt-gpt4, 🔥sharegpt-gpt4-mini.
- Agent: 🔥ms-agent, damo-mini-agent-zh, damo-agent-zh, agent-instruct-all-en.
- RLHF: 🔥hh-rlhf, stack-exchange-paired.
- 代码: code-alpaca-en, 🔥leetcode-python-en, 🔥codefuse-python-en, 🔥codefuse-evol-instruction-zh.
- 医疗: medical-en, medical-zh, medical-mini-zh, disc-med-sft-zh.
- 法律: 🔥lawyer-llama-zh, tigerbot-law-zh, disc-law-sft-zh.
- 数学: 🔥blossom-math-zh, school-math-zh, open-platypus-en.
- SQL: text2sql-en, 🔥sql-create-context-en.
- 文本生成: 🔥advertise-gen-zh, 🔥dureader-robust-zh.
- 分类: cmnli-zh, 🔥cmnli-mini-zh, 🔥jd-sentiment-zh, 🔥hc3-zh, 🔥hc3-en.
- RLHF: 🔥hh-rlhf, stack-exchange-paired.
- 其他: finance-en, poetry-zh, webnovel-zh, generated-chat-zh, cls-fudan-news-zh, ner-jave-zh.
- 多模态:
- 视觉: coco-en, 🔥coco-mini-en, coco-mini-en-2, capcha-images.
- 音频: aishell1-zh, 🔥aishell1-mini-zh.
- 自定义数据集
- NLP:
- 支持的对话模板:
- 文本生成: default-generation, default-generation-bos, chatglm-generation, qwen-audio-generation.
- 对话: default, qwen, qwen-audio, baichuan, chatglm2, chatglm3, llama, openbuddy, internlm, internlm2, internlm-xcomposer2, yi, yi-vl, yuan, xverse, ziya, skywork, bluelm, zephyr, sus, deepseek, deepseek-coder, codefuse-codellama, codefuse, cogagent-chat, cogagent-instruct, orion, openbmb, chatml.
安装
# 全量能力
pip install ms-swift[all] -U
# 仅使用LLM
pip install ms-swift[llm] -U
# 仅使用AIGC
pip install ms-swift[aigc] -U
# 仅使用adapters
pip install ms-swift -U

# 从源码安装
git clone https://github.com/modelscope/swift.git
cd swift
pip install -e .[all] -i https://mirrors.aliyun.com/pypi/simple
- 安装flash-attention(可选)
手动下载flash-attn库网址未为https://github.com/Dao-AILab/flash-attention/releases
注意确保cuda版本和torch版本对应 上,并根据abi支持情况选择合适的安装包
pip install package_name.whl -i https://mirrors.aliyun.com/pypi/simple
运行 web ui
WEBUI_SERVER=0.0.0.0 WEBUI_PORT=6006 swift web-ui
支持的环境变量:
WEBUI_SHARE=1 控制gradio是否是share状态 SWIFT_UI_LANG=en/zh 控制web-ui界面语言 WEBUI_SERVER server_name参数, web-ui host ip,0.0.0.0代表所有ip均可访问,127.0.0.1代表只允许本机访问 WEBUI_PORT web-ui的端口号

数据集准备
[{"conversations": [{"from": "user", "value": "Picture 1:<img>img_path</img>\n11111"}, {"from": "assistant", "value": "22222"}]},
{"conversations": [{"from": "user", "value": "Picture 1:<img>img_path</img>\nPicture 2:<img>img_path</img>\naaaaa"}, {"from": "assistant", "value": "bbbbb"}, {"from": "user", "value": "Picture 1:<img>img_path</img>\nccccc"}, {"from": "assistant", "value": "ddddd"}]},
{"conversations": [{"from": "user", "value": "AAAAA"}, {"from": "assistant", "value": "BBBBB"}, {"from": "user", "value": "CCCCC"}, {"from": "assistant", "value": "DDDDD"}]}]
{conversion :
"role":"user"
value”:“<img>http://xxxx001.jpg</img>\n引脚间距是多少?
"role":"assitant"
value"
"引脚间距为e"
"role":"user"
value":“图中的封装类型是什么?“
"role":"assitant"
"value":“封装类型为sop'
conversion":[
"role":"user",
"value”:“<img>http://xxxx8e2.jpg</img>\n引脚间距是多少?
"role":
"assitant"
"value":"引脚间距为e"
"role":"user"
"value":“图中的封装类型是什么?“
"role": "assitant"
"value":
“封装类型为 SoP”}
参数设置
- –resume_from_checkpoint: 用于断点续训, 默认为None. 你可以将其设置为checkpoint的路径, 例如: ‘output/qwen-7b-chat/vx_xxx/checkpoint-xxx’, 来进行断点续训.
CUDA_VISIBLE_DEVICES=0 nohup swift sft \
--model_type "qwen1half-1_8b-chat" --model_cache_dir "/root/autodl-tmp/model/qwen/Qwen1___5-1___8B-Chat" \
--template_type "qwen" --system "You are a helpful assistant." \
--custom_train_dataset_path /root/autodl-tmp/dataset.jsonl \
--train_dataset_sample "50" \
--num_train_epochs "55" \
--save_steps "50" --lora_target_modules ALL \
--learning_rate "1e-5" --gradient_accumulation_steps "1" \
--eval_batch_size "1" --add_output_dir_suffix False \
--output_dir /root/autodl-tmp/output/qwen1half-1_8b-chat/v0-20240221-172110 \
--logging_dir /root/autodl-tmp/output/qwen1half-1_8b-chat/v0-20240221-172110/runs > /root/autodl-tmp/output/qwen1half-1_8b-chat/v0-20240221-172110/runs/run.log 2>&1
tensorboard
tensorboard --logdir v0-20240301-084449
模型合并
swift merge-lora --ckpt_dir 'xxx/vx_xxx/checkpoint-xxx'
模型推理
直接推理
CUDA_VISIBLE_DEVICES=0 swift infer --model_type="yi-vl-6b-chat" --model_cache_dir="/home/ubuntu/project/Models/01ai/Yi-VL-6B/"
使用微调参数推理
CUDA_VISIBLE_DEVICES=0 swift infer --ckpt_dir 'xxx/vx_xxx/checkpoint-xxx-merged'
使用脚本推理
CUDA_VISIBLE_DEVICES=0 swift infer \
    --ckpt_dir '/workspace/output/qwen-vl-chat/v0-20240301-200337/qwen-vl-chat/v0-20240301-201320/checkpoint-72050' \
    --max_length 2048 \
    --use_flash_attn false \
    --max_new_tokens 2048 \
    --temperature 0.5 \
    --top_p 0.7 \
    --repetition_penalty 1. \
    --do_sample true \
    --merge_lora false \
    --custom_val_dataset_path '/workspace/val_dataset.json' \
    #--model_type 'yi-vl-6b-chat' --model_id_or_path '01ai/Yi-VL-6B'\
输入数据样式
[{"conversations": [{"from": "user", "value": "Picture 1:<img>img_path</img>\n11111"}, {"from": "assistant", "value": "22222"}]},
{"conversations": [{"from": "user", "value": "Picture 1:<img>img_path</img>\nPicture 2:<img>img_path</img>\naaaaa"}, {"from": "assistant", "value": "bbbbb"}, {"from": "user", "value": "Picture 1:<img>img_path</img>\nccccc"}, {"from": "assistant", "value": "ddddd"}]},
{"conversations": [{"from": "user", "value": "AAAAA"}, {"from": "assistant", "value": "BBBBB"}, {"from": "user", "value": "CCCCC"}, {"from": "assistant", "value": "DDDDD"}]}]
python 推理
import os
os.environ['CUDA_VISIBLE_DEVICES'] = '0'

from swift.llm import (
    get_model_tokenizer, get_template, inference, ModelType, get_default_template_type,
)
from swift.utils import seed_everything

model_type = ModelType.qwen_vl_chat
template_type = get_default_template_type(model_type)
print(f'template_type: {template_type}')  # template_type: qwen

model, tokenizer = get_model_tokenizer(model_type, model_kwargs={'device_map': 'auto'})

template = get_template(template_type, tokenizer)
seed_everything(42)
query = tokenizer.from_list_format([
    {'image': 'https://qianwen-res.oss-cn-beijing.aliyuncs.com/Qwen-VL/assets/demo.jpeg'},
    {'text': '这是什么'},
])
response, history = inference(model, template, query)
print(f'query: {query}')
print(f'response: {response}')
query = '输出击掌的检测框'
response, history = inference(model, template, query, history)
print(f'query: {query}')
print(f'response: {response}')
print(f'history: {history}')
image = tokenizer.draw_bbox_on_latest_picture(response, history)
image.save('output_chat.jpg')
"""
query: Picture 1:<img>https://qianwen-res.oss-cn-beijing.aliyuncs.com/Qwen-VL/assets/demo.jpeg</img>
这是什么
response: 图中是一名女子在沙滩上和狗玩耍,旁边的狗是一只拉布拉多犬,它们处于沙滩上。
query: 输出击掌的检测框
response: <ref>击掌</ref><box>(523,513),(584,605)</box>
history: [('Picture 1:<img>https://qianwen-res.oss-cn-beijing.aliyuncs.com/Qwen-VL/assets/demo.jpeg</img>\n这是什么', '图中是一名女子在沙滩上和狗玩耍,旁边的狗是一只拉布拉多犬,它们处于沙滩上。'), ('输出击掌的检测框', '<ref>击掌</ref><box>(523,513),(584,605)</box>')]
"""
使用LoRA增量权重进行推理:
import os
os.environ['CUDA_VISIBLE_DEVICES'] = '0'

from swift.llm import (
get_model_tokenizer, get_template, inference, ModelType, get_default_template_type
)
from swift.tuners import Swift

model_dir = 'vx_xxx/checkpoint-100'
model_type = ModelType.qwen_7b_chat
template_type = get_default_template_type(model_type)

model, tokenizer = get_model_tokenizer(model_type, model_kwargs={'device_map': 'auto'})

model = Swift.from_pretrained(model, model_dir, inference_mode=True)
template = get_template(template_type, tokenizer)
query = 'xxxxxx'
response, history = inference(model, template, query)
print(f'response: {response}')
print(f'history: {history}')
使用LoRA merged的权重进行推理:
import os
os.environ['CUDA_VISIBLE_DEVICES'] = '0'

from swift.llm import (
get_model_tokenizer, get_template, inference, ModelType, get_default_template_type
)

model_dir = 'vx_xxx/checkpoint-100-merged'
model_type = ModelType.qwen_7b_chat
template_type = get_default_template_type(model_type)

model, tokenizer = get_model_tokenizer(model_type, model_kwargs={'device_map': 'auto'},
                                       model_dir=model_dir)

template = get_template(template_type, tokenizer)
query = 'xxxxxx'
response, history = inference(model, template, query)
print(f'response: {response}')
print(f'history: {history}')
批量评估脚本
Yi-VL
import os
import torch
from swift.llm import (
   get_template, inference, ModelType, get_default_template_type,
)
from swift.utils import seed_everything
from swift.llm.utils.model import get_model_tokenizer_yi_vl
from swift.tuners import Swift

os.environ['CUDA_VISIBLE_DEVICES'] = '0'
model_type=ModelType.yi_vl_34b_chat
model_cache_dir='/hy-tmp/modelscope/hub/01ai/Yi-VL-34B'
temperature=0.8
top_p=1
max_length=1024


template_type = get_default_template_type(model_type)
print(f'template_type: {template_type}')  # template_type: qwen

# 使用qwen-vl需要修改此处的函数为
# get_model_tokenizer(
#         model_type: str,
#         torch_dtype: Optional[Dtype] = None,
#         model_kwargs: Optional[Dict[str, Any]] = None,
#         load_model: bool = True,
#         *,
#         model_id_or_path: Optional[str] = None,
#         **kwargs)

model, tokenizer = get_model_tokenizer_yi_vl(model_cache_dir,
                                             torch_dtype=torch.float16,
                                             model_kwargs={'device_map': 'auto'})


ckpt_dir='/hy-tmp/project/swift/output/yi-vl-34b-chat/v2-20240312-032921/checkpoint-4500'

# =========================================================================================

# 载入lora参数
model = Swift.from_pretrained(model, ckpt_dir, inference_mode=True)

template = get_template(template_type, tokenizer)
seed_everything(42)

model.generation_config.temperature=temperature
model.generation_config.max_length=max_length

# =========================================================================================
# 数据集处理
import json
import pandas as pd
val_dataset_path="/hy-tmp/project/Yi-VL-Finetune/data/v5/val_dataset.json"

# 加载JSON文件
with open(val_dataset_path, 'r') as f:
    data = json.load(f)

# 将JSON数据转换为DataFrame
df = pd.DataFrame(data)
df.head(5)

# =========================================================================================

 # 单个推理
def single_infer(system,query,images,label,history=None):
    response, history = inference(model=model,
                                  template=template,
                                  query=query,
                                  history=history,
                                  system=system,
                                  images=images)
    return response

# =========================================================================================

system='''This is a chat between an inquisitive human and an AI assistant.
    Assume the role of the AI assistant. Read all the images carefully,
    and respond to the human's questions with informative, helpful, detailed and polite answers.
    这是一个好奇的人类和一个人工智能助手之间的对话。
    假设你扮演这个AI助手的角色。
    仔细阅读所有的图像,并对人类的问题做出信息丰富、有帮助、详细的和礼貌的回答。
    '''
model.generation_config.temperature=0.1
model.generation_config.top_p=0.75
model.generation_config.max_length=1024


from rouge import Rouge
import time
from tqdm.notebook import tqdm


sum_count=0
right_count=0
pbar=tqdm(desc='evalating....',total=df.shape[0],leave=None)
rouger = Rouge()
sum_scores = {
    'rouge-1': {'r': 0.0, 'p': 0.0, 'f': 0.0},
    'rouge-2': {'r': 0.0, 'p': 0.0, 'f': 0.0},
    'rouge-l': {'r': 0.0, 'p': 0.0, 'f': 0.0}
}
list_res=[]
list_label=[]
for index,row in df.iterrows():
    pbar.update(1)
    sum_count+=1

    query=row['query']
    images=row['images']
    label=row['response']


    response=single_infer(system,query,images,label)
    label=label.strip()
    response=response.strip()


    if label==response:
        right_count+=1
    pbar.write(f'[query]:    {query}')
    pbar.write(f'[images]:   {images}')
    pbar.write(f'[response]: {response}')
    pbar.write(f'[label]:    {label}')
    pbar.set_postfix_str(f'正确的回答有{right_count}个,回答完全正确的正确率为{(right_count/sum_count):.4f}')
    pbar.write("================================================================================")

    hypothesis = label
    reference = response
    list_res.append(' '.join(hypothesis))
    list_label.append(' '.join(reference))


    # print(row)

scores=rouger.get_scores(list_label, list_res)
# 初始化累加字典
avg_scores = {
    'rouge-1': {'r': 0.0, 'p': 0.0, 'f': 0.0},
    'rouge-2': {'r': 0.0, 'p': 0.0, 'f': 0.0},
    'rouge-l': {'r': 0.0, 'p': 0.0, 'f': 0.0}
}

# 累加每个指标的值
for score in scores:
    for rouge_key, rouge_value in score.items():
        for metric_key, metric_value in rouge_value.items():
            avg_scores[rouge_key][metric_key] += metric_value

# 计算平均数
for rouge_key, rouge_value in avg_scores.items():
    for metric_key in rouge_value:
        avg_scores[rouge_key][metric_key] = f"{avg_scores[rouge_key][metric_key] / len(scores):.4f}"


# 输出结果
print('rouge评估结果:',avg_scores)
print('回答总体正确率',right_count/sum_count)
零基础如何学习大模型 AI
领取方式在文末
为什么要学习大模型?
学习大模型课程的重要性在于它能够极大地促进个人在人工智能领域的专业发展。大模型技术,如自然语言处理和图像识别,正在推动着人工智能的新发展阶段。通过学习大模型课程,可以掌握设计和实现基于大模型的应用系统所需的基本原理和技术,从而提升自己在数据处理、分析和决策制定方面的能力。此外,大模型技术在多个行业中的应用日益增加,掌握这一技术将有助于提高就业竞争力,并为未来的创新创业提供坚实的基础。
大模型实际应用案例分享
①智能客服:某科技公司员工在学习了大模型课程后,成功开发了一套基于自然语言处理的大模型智能客服系统。该系统不仅提高了客户服务效率,还显著降低了人工成本。
②医疗影像分析:一位医学研究人员通过学习大模型课程,掌握了深度学习技术在医疗影像分析中的应用。他开发的算法能够准确识别肿瘤等病变,为医生提供了有力的诊断辅助。
③金融风险管理:一位金融分析师利用大模型课程中学到的知识,开发了一套信用评分模型。该模型帮助银行更准确地评估贷款申请者的信用风险,降低了不良贷款率。
④智能推荐系统:一位电商平台的工程师在学习大模型课程后,优化了平台的商品推荐算法。新算法提高了用户满意度和购买转化率,为公司带来了显著的增长。
…
这些案例表明,学习大模型课程不仅能够提升个人技能,还能为企业带来实际效益,推动行业创新发展。
学习资料领取
如果你对大模型感兴趣,可以看看我整合并且整理成了一份AI大模型资料包,需要的小伙伴文末免费领取哦,无偿分享!!!
vx扫描下方二维码即可
加上后会一个个给大家发

部分资料展示
一、 AI大模型学习路线图
整个学习分为7个阶段
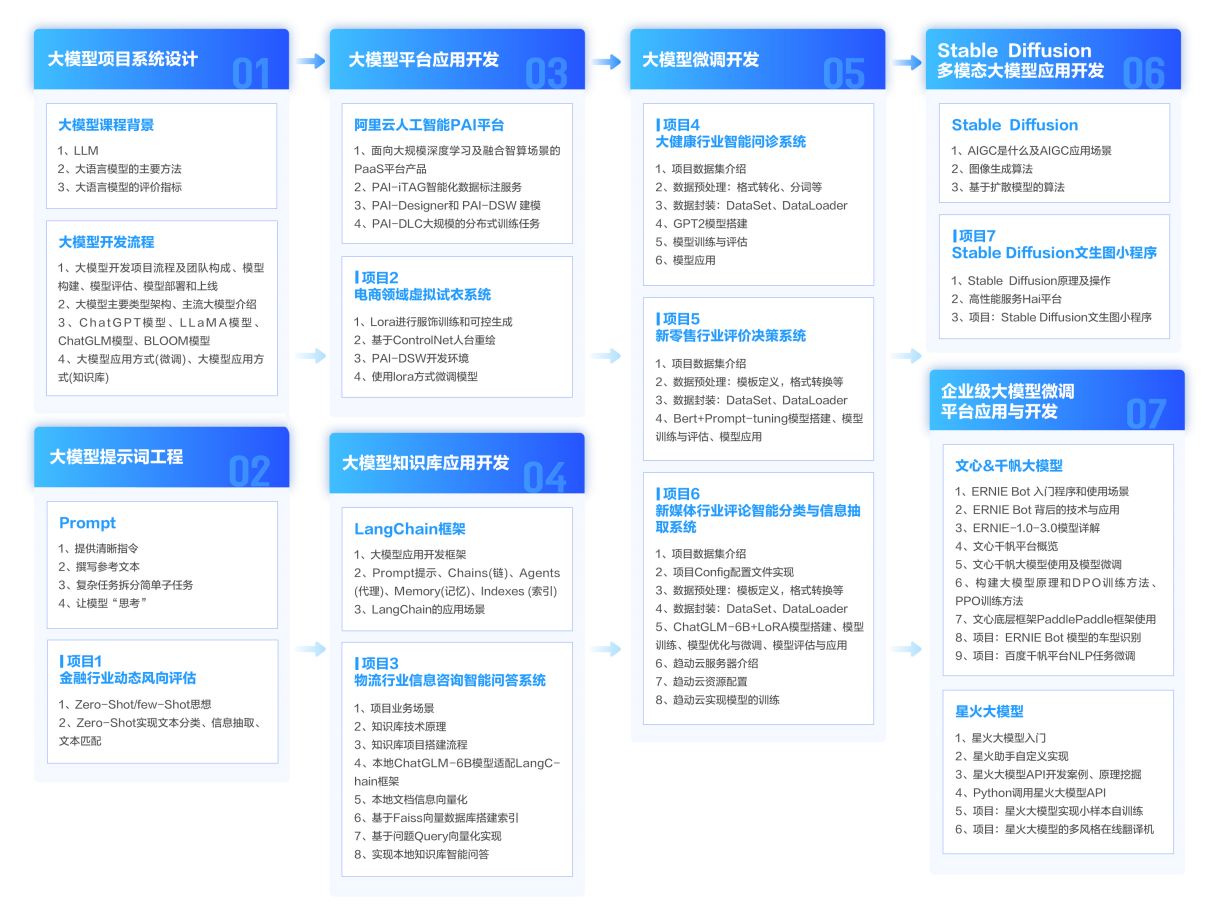
二、AI大模型实战案例
涵盖AI大模型的理论研究、技术实现、行业应用等多个方面。无论您是科研人员、工程师,还是对AI大模型感兴趣的爱好者,皆可用。

三、视频和书籍PDF合集
从入门到进阶这里都有,跟着老师学习事半功倍。


如果二维码失效,可以点击下方链接,一样的哦
【CSDN大礼包】最新AI大模型资源包,这里全都有!无偿分享!!!
😝朋友们如果有需要的话,可以V扫描下方二维码联系领取~


 2236
2236

 被折叠的 条评论
为什么被折叠?
被折叠的 条评论
为什么被折叠?
 到【灌水乐园】发言


