


2.图像去畸变
(1)针孔相机模型
#include <opencv2/opencv.hpp>
#include <string>

using namespace std;

string image_file = "../test.png";

int main(int argc, char *argv[])
{
    //畸变参数
    double k1 = -0.28340811, k2 = 0.07395907, p1 = 0.00019359, p2 = 1.76187114e-05;
    //内参
    double fx = 458.654, fy = 457.296, cx = 367.215, cy = 248.375;

    cv::Mat image = cv::imread(image_file, 0);   //0:图像灰度图, CV_8UC1
    int rows = image.rows, cols = image.cols;
    cv::Mat image_undistort = cv::Mat(rows, cols, CV_8UC1); //去畸变后的图

    //计算去畸变后图像的内容
    for(int v = 0; v < rows; v++)
    {
        for(int u = 0; u < cols; u++)
        {
            double x;
            x = (u - cx) / fx;
            double y;
            y = (v - cy) / fy;
            double r;
            r = sqrt(x * x + y * y);

            double x_dis = x * (1 + k1 * r * r + k2 * r*r*r*r) + 2 * p1 * x *y + p2 * (r * r + 2 * x * x);
            double y_dis = y * (1 + k1 * r * r + k2 * r*r*r*r) + 2 * p2 * x *y + p1 * (r * r + 2 * y * y);

            double u_dis = fx * x_dis + cx;
            double v_dis = fy * y_dis + cy;

            //赋值
            if(u_dis >= 0 && v_dis >= 0 && u_dis < cols && v_dis < rows)
            {
                image_undistort.at<uchar>(v,u) = image.at<uchar>((int) v_dis, (int) u_dis);
            }
            else{
                image_undistort.at<uchar>(v,u) = 0;	//.at(int y, int x)可以用来存取图像中对应坐标为(x,y)的元素坐标
            }
        }
    }

    //画出去畸变后的图像
    cv::imshow("distorted", image);
    cv::imshow("undistorted", image_undistort);
    cv::waitKey();

    return 0;
}
cmake_minimum_required(VERSION 3.1)
project(undistort_image)

set(CMAKE_BUILD_TYPE "Release")
set(CMAKE_CXX_FLAGS "-std=c++14 -O3")

find_package(OpenCV REQUIRED)
include_directories(${OpenCV_INCLUDE_DIRS})

add_executable(undistort_image undistortImage.cpp)
target_link_libraries(undistort_image ${OpenCV_LIBS})
(2)鱼眼模型
#include <opencv2/opencv.hpp>
#include <opencv2/calib3d.hpp>
#include <string>

using namespace std;

string image_file = "../fisheye.jpg";

int main(int argc, char *argv[])
{
    //畸变参数
    double k1 = 0, k2 = 0, k3 = 0, k4 = 0;
    //内参
    //double fx = 458.654, fy = 457.296, cx = 367.215, cy = 248.375;
    double fx = 689.21, fy = 690.48, cx = 1295.56, cy = 942.17;

    cv::Mat image = cv::imread(image_file, 3);
    int rows = image.rows, cols = image.cols;
    cv::Mat image_undistort = cv::Mat(rows, cols, CV_8UC3); //去畸变后的图

    //计算去畸变后图像的内容
    for(int v = 0; v < rows; v++)
    {
        for(int u = 0; u < cols; u++)
        {
            double a;
            a = (u - cx) / fx;
            double b;
            b = (v - cy) / fy;
            double r;
            r = sqrt(a * a + b * b);
            double theta = atan(r);
            double theta2 = theta * theta;
            double theta4 = theta2 * theta2;
            double theta6 = theta2 * theta4;
            double theta8 = theta4 * theta4;
            double theta_d = theta * (1 + k1 * theta2 + k2 * theta * theta2 + k3 * theta6 * k4 * theta8);

            double x_dis = (theta_d / r) * a;
            double y_dis = (theta_d / r) * b;

            double u_dis = fx * x_dis + cx;
            double v_dis = fy * y_dis + cy;

			//对像素点重新赋值
            if (u_dis >= 0 && v_dis >= 0 && u_dis < cols && v_dis < rows) {
                image_undistort.at<cv::Vec3b>(v, u) = image.at<cv::Vec3b>((int)v_dis, (int)u_dis);
            } else {
                image_undistort.at<cv::Vec3b>(v, u) = 0;
            }
        }
    }

    //画出去畸变后的图像
    cv::namedWindow("distorted",0);
    cv::imshow("distorted", image);
    cv::namedWindow("undistorted",0);
    cv::imshow("undistorted", image_undistort);


    cv::waitKey();

    return 0;
}
4.双目视差的使用
(0)模型示意图
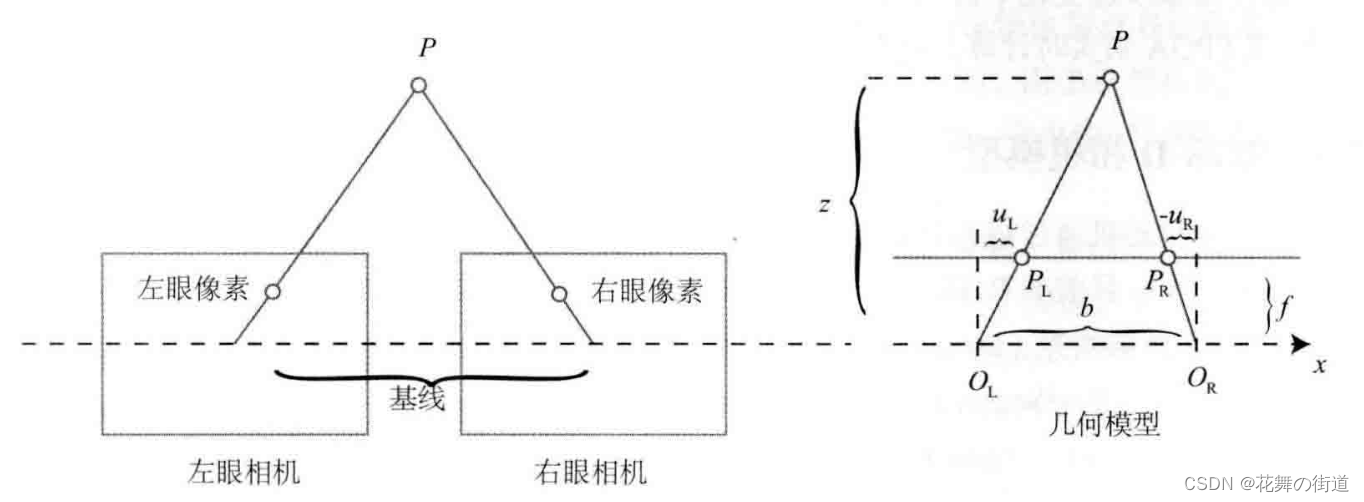
(1)理论部分
由双目相机几何模型可得,
Z
−
f
Z
=
b
−
d
b
\frac{Z-f}{Z} = \frac{b-d}{b}
ZZ−f=bb−d
由上式,得
Z
=
f
b
d
Z = \frac{fb}{d}
Z=dfb
双目相机可以看成两个针孔相机:
左相机:
Z
−
f
f
=
X
−
X
l
X
l
\frac{Z-f}{f}=\frac{X-Xl}{Xl}
fZ−f=XlX−Xl
得出与针孔相机相同的结论。
(2)编程部分
#include <opencv2/opencv.hpp>
#include <string>
#include <Eigen/Core>
#include <pangolin/pangolin.h>
#include <unistd.h>

using namespace std;
using namespace Eigen;

string left_file = "../left.png";
string right_file = "../right.png";
string disparity_file = "../disparity.png";
void showpointcloud(vector<Vector4d, Eigen::aligned_allocator<Vector4d>> &pointcloud);

int main(int argc, char *argv[])
{
    //内参
    double fx = 718.856;
    double fy = 718.856;
    double cx = 607.1928;
    double cy = 185.2157;

    //间距
    double b = 0.573;

    //读取图像
    cv::Mat left = cv::imread(left_file, 0);
    cv::Mat right = cv::imread(right_file, 0);
    cv::Mat disparity = cv::imread(disparity_file, 0);

    //生成点云
    vector<Vector4d, Eigen::aligned_allocator<Vector4d>> pointcloud;

    for(int v = 0; v < left.rows; v++)
    {
        for(int u = 0; u < left.cols; u++)
        {
            Vector4d point(0, 0, 0, left.at<uchar>(v, u) / 255.0);    //前三维xyz, 第四维为颜色

            //根据双目模型计算point的位置
            double d = disparity.at<uchar>(v, u);
            double z = (fx * b)/ d;     //此处fx可能为近似 fx = alpha * f
            point[0] = (u - cx) / fx * z;
            point[1] = (v - cy) / fy * z;
            point[2] = z;

            pointcloud.push_back(point);
        }
    }
    showpointcloud(pointcloud);
    return 0;
}


void showpointcloud(vector<Vector4d, Eigen::aligned_allocator<Vector4d>> &pointcloud) {
    if (pointcloud.empty()) {
        cerr << "PointCloud is empty!\n";
        return;
    }

    // create pangolin window and plot the trajectory
    pangolin::CreateWindowAndBind("PointCloud Viewer", 1024, 768);
    glEnable(GL_DEPTH_TEST);
    glEnable(GL_BLEND);     //使用OpenGL混合功能

    //GL_SRC_ALPHA:使用源颜色的alpha值作为因子
    //GL_ONE_MINUS_SRC_ALPHA:表示用1.0减去源颜色的alpha值作为因子
    /*
        glBlendFunc(GL_SRC_ALPHA, GL_ONE_MINUS_SRC_ALPHA);
        则表示源颜色乘以自身的alpha 值,目标颜色乘以1.0减去源颜色的alpha值,
        这样一来,源颜色的alpha值越大,则产生的新颜色中源颜色所占比例就越大,而目标颜色所占比例则减小。
        这种情况下,我们可以简单的将源颜色的alpha值理解为“不透明度”。
    */
    glBlendFunc(GL_SRC_ALPHA, GL_ONE_MINUS_SRC_ALPHA);

    pangolin::OpenGlRenderState s_cam(
            pangolin::ProjectionMatrix(1024, 768, 500, 500, 512, 389, 0.1, 1000),
            pangolin::ModelViewLookAt(0, -0.1, -1.8, 0, 0, 0, 0.0, -1.0, 0.0)
    );

    pangolin::View &d_cam = pangolin::CreateDisplay()
            .SetBounds(0.0, 1.0, pangolin::Attach::Pix(175), 1.0, -1024.0f / 768.0f)
            .SetHandler(new pangolin::Handler3D(s_cam));


    while (pangolin::ShouldQuit() == false) {
        glClear(GL_COLOR_BUFFER_BIT | GL_DEPTH_BUFFER_BIT);

        d_cam.Activate(s_cam);
        glClearColor(1.0f, 1.0f, 1.0f, 1.0f);

        glPointSize(2);
        glBegin(GL_POINTS);
        for (auto &p : pointcloud) {
            glVertex3d(p[0], p[1], p[2]);
            glColor3f(p[3], p[3], p[3]);
        }
        glEnd();
        pangolin::FinishFrame();
        usleep(5000);   // sleep 5 ms
    }
}
总结:
1)生成点云显示到pangolin与轨迹的描绘类似,不同点是轨迹传入vector容器的是李群(变换矩阵),而点云传入的是4*1的向量,这决定了对它们操作的不同,而不同的操作正是需要分析学习的。
2)Vector4d point(0, 0, 0, left.at<uchar>(v, u) / 255.0);此句代码中255.0数据的精度若有不同,如改为255则图像会变黑,255.000多几个0则深度显示有问题,图像发白,确实最好的显示结果为255.0,此处需要思考不同精度的影响。


 294
294


 被折叠的 条评论
为什么被折叠?
被折叠的 条评论
为什么被折叠?
 到【灌水乐园】发言


