


2.前端Frontend
(1)构造函数
Frontend::Frontend() {
    gftt_ = cv::GFTTDetector::create(Config::Get<int>("num_features"), 0.01, 20);
    num_features_init_ = Config::Get<int>("num_features_init");
    num_features_ = Config::Get<int>("num_features");
}
(2)初始化
根据左右目之间的光流匹配,寻找可以三角化的地图点,成功时建立初始地图
1 初始化函数
bool Frontend::StereoInit() {
    int num_features_left = DetectFeatures();
    int num_coor_features = FindFeaturesInRight();
    if (num_coor_features < num_features_init_) {
        return false;
    }

    bool build_map_success = BuildInitMap();
    if (build_map_success) {
        status_ = FrontendStatus::TRACKING_GOOD;
        if (viewer_) {
            viewer_->AddCurrentFrame(current_frame_);
            viewer_->UpdateMap();
        }
        return true;
    }
    return false;
}
2 提取特征点
有点忘记,复习一下十四讲中OpenCV提取特征的代码
#include <iostream>
#include <opencv2/core/core.hpp>
#include <opencv2/features2d/features2d.hpp>
#include <opencv2/highgui/highgui.hpp>
#include <chrono>

using namespace std;
using namespace cv;

int main(int argc, char **argv) {
  if (argc != 3) {
    cout << "usage: feature_extraction img1 img2" << endl;
    return 1;
  }
  //-- 读取图像
  Mat img_1 = imread(argv[1], CV_LOAD_IMAGE_COLOR);
  Mat img_2 = imread(argv[2], CV_LOAD_IMAGE_COLOR);
  assert(img_1.data != nullptr && img_2.data != nullptr);

  //-- 初始化
  std::vector<KeyPoint> keypoints_1, keypoints_2;
  Mat descriptors_1, descriptors_2;
  Ptr<FeatureDetector> detector = ORB::create();
  Ptr<DescriptorExtractor> descriptor = ORB::create();
  Ptr<DescriptorMatcher> matcher = DescriptorMatcher::create("BruteForce-Hamming");

  //-- 第一步:检测 Oriented FAST 角点位置
  chrono::steady_clock::time_point t1 = chrono::steady_clock::now();
  detector->detect(img_1, keypoints_1);
  detector->detect(img_2, keypoints_2);

  //-- 第二步:根据角点位置计算 BRIEF 描述子
  descriptor->compute(img_1, keypoints_1, descriptors_1);
  descriptor->compute(img_2, keypoints_2, descriptors_2);
  chrono::steady_clock::time_point t2 = chrono::steady_clock::now();
  chrono::duration<double> time_used = chrono::duration_cast<chrono::duration<double>>(t2 - t1);
  cout << "extract ORB cost = " << time_used.count() << " seconds. " << endl;

  Mat outimg1;
  drawKeypoints(img_1, keypoints_1, outimg1, Scalar::all(-1), DrawMatchesFlags::DEFAULT);
  imshow("ORB features", outimg1);

  //-- 第三步:对两幅图像中的BRIEF描述子进行匹配,使用 Hamming 距离
  vector<DMatch> matches;
  t1 = chrono::steady_clock::now();
  matcher->match(descriptors_1, descriptors_2, matches);
  t2 = chrono::steady_clock::now();
  time_used = chrono::duration_cast<chrono::duration<double>>(t2 - t1);
  cout << "match ORB cost = " << time_used.count() << " seconds. " << endl;

  //-- 第四步:匹配点对筛选
  // 计算最小距离和最大距离
  auto min_max = minmax_element(matches.begin(), matches.end(),
                                [](const DMatch &m1, const DMatch &m2) { return m1.distance < m2.distance; });
  double min_dist = min_max.first->distance;
  double max_dist = min_max.second->distance;

  printf("-- Max dist : %f \n", max_dist);
  printf("-- Min dist : %f \n", min_dist);

  //当描述子之间的距离大于两倍的最小距离时,即认为匹配有误.但有时候最小距离会非常小,设置一个经验值30作为下限.
  std::vector<DMatch> good_matches;
  for (int i = 0; i < descriptors_1.rows; i++) {
    if (matches[i].distance <= max(2 * min_dist, 30.0)) {
      good_matches.push_back(matches[i]);
    }
  }

  //-- 第五步:绘制匹配结果
  Mat img_match;
  Mat img_goodmatch;
  drawMatches(img_1, keypoints_1, img_2, keypoints_2, matches, img_match);
  drawMatches(img_1, keypoints_1, img_2, keypoints_2, good_matches, img_goodmatch);
  imshow("all matches", img_match);
  imshow("good matches", img_goodmatch);
  waitKey(0);

  return 0;
}
/*
	1 在一帧图像里截出 20*20的正方形
	2 检测角点位置
	3 将得到的角点位置存入
*/
int Frontend::DetectFeatures() {
    cv::Mat mask(current_frame_->left_img_.size(), CV_8UC1, 255);
    for (auto &feat : current_frame_->features_left_) {
        cv::rectangle(mask, feat->position_.pt - cv::Point2f(10, 10),
                      feat->position_.pt + cv::Point2f(10, 10), 0, CV_FILLED);
    }

    std::vector<cv::KeyPoint> keypoints;
    gftt_->detect(current_frame_->left_img_, keypoints, mask);
    int cnt_detected = 0;
    for (auto &kp : keypoints) {
        current_frame_->features_left_.push_back(
            Feature::Ptr(new Feature(current_frame_, kp)));
        cnt_detected++;
    }

    LOG(INFO) << "Detect " << cnt_detected << " new features";
    return cnt_detected;
}
3 左右目匹配
/*
	1 遍历左图所有特征点
	2 将每个特征的(u, v)存入	--帧
	3 通过特征对应的路标点转换到右图提取(u, v)	--特征->路标点->特征

	判断好坏??
	4 通过cv内置函数求解状态
		如果在当前图像中能够光流得到标定的特征点位置改变,则设置status的对应位置为1,否则设置为0
*/
int Frontend::FindFeaturesInRight() {
    // use LK flow to estimate points in the right image
    std::vector<cv::Point2f> kps_left, kps_right;
    for (auto &kp : current_frame_->features_left_) {
        kps_left.push_back(kp->position_.pt);
        auto mp = kp->map_point_.lock();
        if (mp) {
            // use projected points as initial guess
            auto px = camera_right_->world2pixel(mp->pos_, current_frame_->Pose());
            kps_right.push_back(cv::Point2f(px[0], px[1]));
        } else {
            // use same pixel in left iamge
            kps_right.push_back(kp->position_.pt);
        }
    }

    std::vector<uchar> status;
    Mat error;
    cv::calcOpticalFlowPyrLK(
        current_frame_->left_img_, current_frame_->right_img_, kps_left,
        kps_right, status, error, cv::Size(11, 11), 3,
        cv::TermCriteria(cv::TermCriteria::COUNT + cv::TermCriteria::EPS, 30,
                         0.01),
        cv::OPTFLOW_USE_INITIAL_FLOW);

    int num_good_pts = 0;
    for (size_t i = 0; i < status.size(); ++i) {
        if (status[i]) {
            cv::KeyPoint kp(kps_right[i], 7);
            Feature::Ptr feat(new Feature(current_frame_, kp));
            feat->is_on_left_image_ = false;
            current_frame_->features_right_.push_back(feat);
            num_good_pts++;
        } else {
            current_frame_->features_right_.push_back(nullptr);
        }
    }
    LOG(INFO) << "Find " << num_good_pts << " in the right image.";
    return num_good_pts;
}
3 构建初始化地图
/*
	目的:建立初始地图	--> 初始帧上的点转化为地图上的点
	1 遍历当前帧上所有特征点
	2 根据帧上的特征点反求光心点
	3 三角化求出实际3D点
	4 传入地图
*/
bool Frontend::BuildInitMap() {
    std::vector<SE3> poses{camera_left_->pose(), camera_right_->pose()};
    size_t cnt_init_landmarks = 0;
    for (size_t i = 0; i < current_frame_->features_left_.size(); ++i) {
        if (current_frame_->features_right_[i] == nullptr) continue;
        // create map point from triangulation
        std::vector<Vec3> points{
            camera_left_->pixel2camera(
                Vec2(current_frame_->features_left_[i]->position_.pt.x,
                     current_frame_->features_left_[i]->position_.pt.y)),
            camera_right_->pixel2camera(
                Vec2(current_frame_->features_right_[i]->position_.pt.x,
                     current_frame_->features_right_[i]->position_.pt.y))};
        Vec3 pworld = Vec3::Zero();

        if (triangulation(poses, points, pworld) && pworld[2] > 0) {
            auto new_map_point = MapPoint::CreateNewMappoint();
            new_map_point->SetPos(pworld);
            new_map_point->AddObservation(current_frame_->features_left_[i]);
            new_map_point->AddObservation(current_frame_->features_right_[i]);
            current_frame_->features_left_[i]->map_point_ = new_map_point;
            current_frame_->features_right_[i]->map_point_ = new_map_point;
            cnt_init_landmarks++;
            map_->InsertMapPoint(new_map_point);
        }
    }
    current_frame_->SetKeyFrame();
    map_->InsertKeyFrame(current_frame_);
    backend_->UpdateMap();

    LOG(INFO) << "Initial map created with " << cnt_init_landmarks
              << " map points";

    return true;
}
(3)追踪
1 追踪函数
bool Frontend::Track() {
    if (last_frame_) {
        //当前帧的pose为 上一帧的pose左乘当前与上一帧的变换
        current_frame_->SetPose(relative_motion_ * last_frame_->Pose());
    }

    int num_track_last = TrackLastFrame();
    tracking_inliers_ = EstimateCurrentPose();

    if (tracking_inliers_ > num_features_tracking_) {
        // tracking good
        status_ = FrontendStatus::TRACKING_GOOD;
    } else if (tracking_inliers_ > num_features_tracking_bad_) {
        // tracking bad
        status_ = FrontendStatus::TRACKING_BAD;
    } else {
        // lost
        status_ = FrontendStatus::LOST;
    }

    InsertKeyframe();
    relative_motion_ = current_frame_->Pose() * last_frame_->Pose().inverse();

    if (viewer_) viewer_->AddCurrentFrame(current_frame_);
    return true;
}
2 追踪上一帧(上一帧与当前帧的光流匹配)
与初始化时的左右匹配类似
int Frontend::TrackLastFrame() {
    // use LK flow to estimate points in the right image
    std::vector<cv::Point2f> kps_last, kps_current;
    for (auto &kp : last_frame_->features_left_) {
        if (kp->map_point_.lock()) {
            // use project point
            auto mp = kp->map_point_.lock();
            auto px = camera_left_->world2pixel(mp->pos_, current_frame_->Pose());
            kps_last.push_back(kp->position_.pt);
            kps_current.push_back(cv::Point2f(px[0], px[1]));
        } else {
            kps_last.push_back(kp->position_.pt);
            kps_current.push_back(kp->position_.pt);
        }
    }

    std::vector<uchar> status;
    Mat error;
    cv::calcOpticalFlowPyrLK(
        last_frame_->left_img_, current_frame_->left_img_, kps_last,
        kps_current, status, error, cv::Size(11, 11), 3,
        cv::TermCriteria(cv::TermCriteria::COUNT + cv::TermCriteria::EPS, 30,
                         0.01),
        cv::OPTFLOW_USE_INITIAL_FLOW);

    int num_good_pts = 0;

    for (size_t i = 0; i < status.size(); ++i) {
        if (status[i]) {
            cv::KeyPoint kp(kps_current[i], 7);
            Feature::Ptr feature(new Feature(current_frame_, kp));
            feature->map_point_ = last_frame_->features_left_[i]->map_point_;
            current_frame_->features_left_.push_back(feature);
            num_good_pts++;
        }
    }

    LOG(INFO) << "Find " << num_good_pts << " in the last image.";
    return num_good_pts;
}
3 估计当前帧位姿
4 添加关键帧
bool Frontend::InsertKeyframe() {
    if (tracking_inliers_ >= num_features_needed_for_keyframe_)     //特征足够,不需要添加了
    {
        // still have enough features, don't insert keyframe
        return false;
    }
    // current frame is a new keyframe
    current_frame_->SetKeyFrame();
    map_->InsertKeyFrame(current_frame_);

    LOG(INFO) << "Set frame " << current_frame_->id_ << " as keyframe "
              << current_frame_->keyframe_id_;

    SetObservationsForKeyFrame();
    DetectFeatures();  // detect new features

    // track in right image
    FindFeaturesInRight();
    // triangulate map points
    TriangulateNewPoints();
    // update backend because we have a new keyframe
    backend_->UpdateMap();

    if (viewer_) viewer_->UpdateMap();

    return true;
}
3.整体流程
明确一点,这些类都是由视觉里程计这个类初始化。
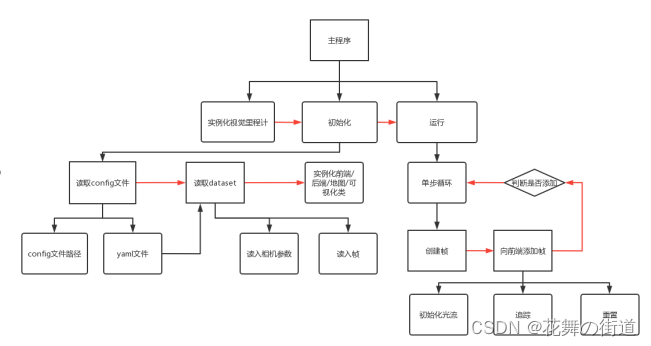
(1)读取config文件
1 cv::FileStorage
XML/YAML/JSON 文件存储类,封装了向文件写入数据或从文件读取数据所需的所有信息。
2 读取文件(实例化config对象)
setParameterFile()
3 视觉里程计类的构造函数将yaml文件的路径传入
(2)读取dataset数据集
1 相机数据
2 帧
(3)实例化frontend/backend/map/viewer
(4)实例化帧–>向前端循环添加帧
1 初始化光流
目的:建立初始化地图
如何三角化得到3D点:左右目之间的光流匹配
第一步:提取左图特征;第二步:找到与左图对应的右图特征;第三步:根据三角化算法求得初始化地图
更新前端的状态
2 正常追踪
给定初始当前帧的位姿;追踪上一帧;估计当前帧位姿;判断追踪效果,更新状态;添加关键帧。
3 追踪失败
主要的代码就是前端
4.光流法及前端过程
复习,感觉有点忘了。
#include <opencv2/opencv.hpp>
#include <string>
#include <Eigen/Core>
#include <Eigen/Dense>
using namespace std;
using namespace cv;

// this program shows how to use optical flow

string file_1 = "../1.png";  // first image
string file_2 = "../2.png";  // second image

int main(int argc, char **argv) {

    // images, note they are CV_8UC1, not CV_8UC3 灰度图单通道
    Mat img1 = imread(file_1, 0);
    Mat img2 = imread(file_2, 0);

    // key points, using GFTT here.
    vector<KeyPoint> kp1;
    Ptr<GFTTDetector> detector = GFTTDetector::create(500, 0.01, 20); // maximum 500 keypoints
    detector->detect(img1, kp1);


    // use opencv's flow for validation
    vector<Point2f> pt1, pt2;
    for (auto &kp: kp1) pt1.push_back(kp.pt);
    vector<uchar> status;
    vector<float> error;
    cv::calcOpticalFlowPyrLK(img1, img2, pt1, pt2, status, error, cv::Size(8, 8));

    Mat img2_CV;
    cv::cvtColor(img2, img2_CV, COLOR_GRAY2BGR);
    for (int i = 0; i < pt2.size(); i++) {
        if (status[i]) {
            cv::circle(img2_CV, pt2[i], 2, cv::Scalar(0, 250, 0), 2);
            cv::line(img2_CV, pt1[i], pt2[i], cv::Scalar(0, 0, 230));
        }
    }

    cv::imshow("tracked by opencv", img2_CV);
    cv::waitKey(0);

    return 0;
}
1 int Frontend::TrackLastFrame() 函数
比较上述示例代码与TrackLastFrame():相同点 :1)定义一个存储特征点的vector,pt1对应kps_last,pt2对应kps_current 2)循环上一帧得到上一帧特征点的像素值 3)定义状态与error 4)使用cv::calcOpticalFlowPyrLK()函数
不同点:最后循环实现的效果不同
步骤:
1)定义一个存储特征点的vector,遍历上一帧图像所有特征点(循环内实现具体功能)
2)实现的具体功能:将得到的像素值push进vector,和示例不同,`TrackLastFrame()``函数需要计算当前帧的像素值
3)计算光流
    std::vector<uchar> status;
    Mat error;
    cv::calcOpticalFlowPyrLK()
4)创建特征并将创建的特征对应的地图点关联到帧上的特征对应的地图点(当前帧)
5)计数
2 估计当前位姿(优化部分先不看)
3 插入新的帧
步骤:
1)将当前帧设置为关键帧,并将其传入地图
2)得到将追踪上一帧最后得到的当前帧的特征对应的地图点
3)提取特征
4)找到在右图的对应点
5)左右图三角化得到路标点
主要是追踪:1 光流法追踪的作用:由上一帧及当前帧估计当前帧的位姿;2 对当前帧(成为了关键帧的)处理有3步,提取特征,右图对应点,三角化,为下一次读入图像准备 3 传入后端优化


 775
775


 被折叠的 条评论
为什么被折叠?
被折叠的 条评论
为什么被折叠?
 到【灌水乐园】发言


