


1 源码
OpenCV中内置了很多滤波器,这里我们讨论cv::ximgproc其中包含的滤波器。
https://docs.opencv.org/3.4/da/d17/group__ximgproc__filters.html
需要注意的是,默认安装的OpenCV中不包含cv::ximgproc,请从源码重修编译。
在这里贴上我的测试源码。
/*
cv::ximgproc::AdaptiveManifoldFilter
[86] Eduardo SL Gastal and Manuel M Oliveira. Adaptive manifolds for real-time high-dimensional filtering. ACM Transactions on Graphics (TOG), 31(4):33, 2012.

cv::ximgproc::EdgeAwareInterpolator
[182] Jerome Revaud, Philippe Weinzaepfel, Zaid Harchaoui, and Cordelia Schmid. Epicflow: Edge-preserving interpolation of correspondences for optical flow. In Computer Vision and Pattern Recognition (CVPR), IEEE Conference on, pages 1164–1172, 2015.

cv::ximgproc::DTFilter
[85] Eduardo SL Gastal and Manuel M Oliveira. Domain transform for edge-aware image and video processing. In ACM Transactions on Graphics (TOG), volume 30, page 69. ACM, 2011.

cv::ximgproc::DisparityWLSFilter

cv::ximgproc::FastBilateralSolverFilter
[14] Jonathan T Barron and Ben Poole. The fast bilateral solver. In European Conference on Computer Vision (ECCV), pages 617–632. Springer International Publishing, 2016.

cv::ximgproc::FastGlobalSmootherFilter
[158] Dongbo Min, Sunghwan Choi, Jiangbo Lu, Bumsub Ham, Kwanghoon Sohn, and Minh N Do. Fast global image smoothing based on weighted least squares. Image Processing, IEEE Transactions on, 23(12):5638–5653, 2014.
[66] Zeev Farbman, Raanan Fattal, Dani Lischinski, and Richard Szeliski. Edge-preserving decompositions for multi-scale tone and detail manipulation. In ACM Transactions on Graphics (TOG), volume 27, page 67. ACM, 2008.

cv::ximgproc::GuidedFilter
[99] Kaiming He, Jian Sun, and Xiaoou Tang. Guided image filtering. In Computer Vision–ECCV 2010, pages 1–14. Springer, 2010.

cv::ximgproc::RidgeDetectionFilter
[64] Niki Estner. Best way of segmenting veins in leaves.
[151] Wolfram Mathematica. Ridge filter mathematica.

*/


#include <ros/ros.h>
#include <sensor_msgs/Image.h>
#include <cv_bridge/cv_bridge.h>
#include <image_transport/image_transport.h>
#include <opencv2/imgproc/imgproc.hpp>
#include <opencv2/highgui/highgui.hpp>
#include <opencv2/ximgproc.hpp>
#include <message_filters/subscriber.h>
#include <message_filters/time_synchronizer.h>
#include <message_filters/sync_policies/approximate_time.h>

#include <pcl/point_types.h>
#include <pcl_ros/point_cloud.h>
#include <pcl/common/common.h>
#include <pcl/common/pca.h>
#include <Eigen/Dense>

class ImageProcessor
{
public:
    ImageProcessor()
    : it_(nh_), image_sub_(nh_, "/camera/color/image_raw", 1), depth_sub_(nh_, "/camera/aligned_depth_to_color/image_raw", 1)
    {
        typedef message_filters::sync_policies::ApproximateTime<sensor_msgs::Image, sensor_msgs::Image> MySyncPolicy;
        // ApproximateTime或者ExactTime
        sync_.reset(new message_filters::Synchronizer<MySyncPolicy>(MySyncPolicy(10), image_sub_, depth_sub_));
        sync_->registerCallback(boost::bind(&ImageProcessor::callback, this, _1, _2));

        pub_ = it_.advertise("/fbs/depth_processed", 1);
        cloud_pub_ = nh_.advertise<pcl::PointCloud<pcl::PointXYZRGB>>("/fbs/output_cloud", 1);
        cloud2_pub_ = nh_.advertise<pcl::PointCloud<pcl::PointXYZRGB>>("/fbs/output_cloud2", 1);

    }

    void callback(const sensor_msgs::ImageConstPtr& color_msg, const sensor_msgs::ImageConstPtr& depth_msg)
    {
        cv::Mat color_image, depth_image;

        try {
            color_image = cv_bridge::toCvShare(color_msg, "rgb8")->image;
            depth_image = cv_bridge::toCvShare(depth_msg, sensor_msgs::image_encodings::TYPE_16UC1)->image;

            cv::Mat confidence;
            generateConfidence(depth_image, confidence);

            // 将confidence图像标准化到0-255的范围
            cv::Mat normalized_confidence;
            confidence.convertTo(normalized_confidence, CV_8UC1, 255.0); // 将浮点值乘以255以进行转换

            // // 显示信心图
            // cv::namedWindow("Confidence", cv::WINDOW_AUTOSIZE); // 创建一个窗口
            // cv::imshow("Confidence", normalized_confidence);    // 显示信心图
            // cv::waitKey(1); // 等待1毫秒,让显示函数有机会更新窗口

            cv::Mat filtered_image;
            applyFastBilateralSolverFilter(depth_image, color_image, confidence, filtered_image);
            // applyFastGlobalSmootherFilter(depth_image, color_image, filtered_image);
            // applyGuidedFilter(depth_image, color_image, filtered_image);
            // applyRidgeDetectionFilter(depth_image, filtered_image);

            // 转换回ROS图像并发布
            sensor_msgs::ImagePtr msg_out = cv_bridge::CvImage(std_msgs::Header(), sensor_msgs::image_encodings::TYPE_16UC1, filtered_image).toImageMsg();
            pub_.publish(msg_out);

            // 发布点云
            pcl::PointCloud<pcl::PointXYZRGB>::Ptr cloud(new pcl::PointCloud<pcl::PointXYZRGB>());
            depthToPointCloud(depth_image, color_image, *cloud);
            cloud->header.stamp = pcl_conversions::toPCL(color_msg->header.stamp); // Use the correct message for the timestamp
            cloud_pub_.publish(cloud);

            // 发布点云
            // pcl::PointCloud<pcl::PointXYZRGB>::Ptr cloud(new pcl::PointCloud<pcl::PointXYZRGB>());
            depthToPointCloud(filtered_image, color_image, *cloud);
            // cloud->header.stamp = pcl_conversions::toPCL(color_msg->header.stamp); // Use the correct message for the timestamp
            cloud2_pub_.publish(cloud);

        } catch (const cv_bridge::Exception& e) {
            ROS_ERROR("cv_bridge exception: %s", e.what());
            return;
        }
    }

    void generateConfidence(const cv::Mat &depth, cv::Mat &confidence)
    {
        confidence = cv::Mat::zeros(depth.size(), CV_32F);
        confidence.setTo(1, depth != 0);
    }

    void applyFastBilateralSolverFilter(const cv::Mat &depth, const cv::Mat &color, const cv::Mat &confidence, cv::Mat &output)
    {
        auto filter = cv::ximgproc::createFastBilateralSolverFilter(color, 10, 1, 10);
        filter->filter(depth, confidence, output);
    }

    void applyFastGlobalSmootherFilter(const cv::Mat &depth, const cv::Mat &color, cv::Mat &output)
    {
        // 将depth转换为16S格式
        cv::Mat depth16S;
        depth.convertTo(depth16S, CV_16S);

        // 创建Fast Global Smoother滤波器
        auto filter = cv::ximgproc::createFastGlobalSmootherFilter(color, 128, 10);

        // 使用16S格式的depth进行滤波
        filter->filter(depth16S, output);
    }

    void applyGuidedFilter(const cv::Mat &depth, const cv::Mat &color, cv::Mat &output)
    {
        // 将depth图像转换为CV_32F类型
        cv::Mat depth32F;
        cv::Mat output32F;
        depth.convertTo(depth32F, CV_32F, 1.0 / 255.0);

        auto filter = cv::ximgproc::createGuidedFilter(color, 5, 0.01);
        filter->filter(depth32F, output32F);

        output32F.convertTo(output, CV_16U, 255.0);
    }

    void applyRidgeDetectionFilter(const cv::Mat &depth, cv::Mat &output)
    {
        // 将图像转换为浮点类型,这是脊线检测滤波器的要求
        cv::Mat depth32F;
        depth.convertTo(depth32F, CV_32FC1, 1.0 / 255.0);

        // 创建脊线检测滤波器
        int ddepth = -1; // 使用相同的图像深度作为输入和输出
        double scale = 1; // Sobel算子的比例因子
        double delta = 0; // 添加到结果中的可选增量值
        int borderType = cv::BORDER_DEFAULT; // 边缘填充方式

        cv::Ptr<cv::ximgproc::RidgeDetectionFilter> ridgeFilter = cv::ximgproc::RidgeDetectionFilter::create();

        // 应用脊线检测滤波器
        cv::Mat output32F;
        ridgeFilter->getRidgeFilteredImage(depth32F, output32F);

        // 将结果转换回8位图像以便显示
        output32F.convertTo(output, CV_16UC1, 255.0);
    }

    void depthToPointCloud(const cv::Mat& depth_img, const cv::Mat& rgb_img, pcl::PointCloud<pcl::PointXYZRGB>& cloud) {
        // 假设 fx, fy, cx, cy 是相机内参
        float fx = 644.7825927734375; // 焦距x
        float fy = 644.0340576171875; // 焦距y
        float cx = 636.1322631835938; // 主点x
        float cy = 367.4698486328125; // 主点y

        cloud.width = depth_img.cols;
        cloud.height = depth_img.rows;
        cloud.is_dense = false;
        cloud.points.resize(cloud.width * cloud.height);
        cloud.header.frame_id = "map";


        for (int v = 0; v < depth_img.rows; v++) {
            for (int u = 0; u < depth_img.cols; u++) {
                pcl::PointXYZRGB& point = cloud.points[v * depth_img.cols + u];

                float depth = depth_img.at<ushort>(v, u) / 1000.0f; // 深度单位转换为米
                if (depth == 0) continue; // 无效点跳过

                // 从像素坐标转换到相机坐标系
                point.x = (u - cx) * depth / fx;
                point.y = (v - cy) * depth / fy;
                point.z = depth;

                // 设置颜色
                cv::Vec3b rgb = rgb_img.at<cv::Vec3b>(v, u);
                uint32_t rgb_val = ((uint32_t)rgb[0] << 16 | (uint32_t)rgb[1] << 8 | (uint32_t)rgb[2]);
                point.rgb = *reinterpret_cast<float*>(&rgb_val);
            }
        }
    }

private:
    ros::NodeHandle nh_;
    image_transport::ImageTransport it_;
    image_transport::Publisher pub_;
    message_filters::Subscriber<sensor_msgs::Image> image_sub_, depth_sub_;
    boost::shared_ptr<message_filters::Synchronizer<message_filters::sync_policies::ApproximateTime<sensor_msgs::Image, sensor_msgs::Image>>> sync_;
    ros::Publisher cloud_pub_;
    ros::Publisher cloud2_pub_;
};

int main(int argc, char** argv)
{
    ros::init(argc, argv, "image_processor");
    ImageProcessor ip;
    ros::spin();
    return 0;
}
这里FBS和其他的滤波器的本质区别是,FBS引入了信心图(confidence),这使得其在进行滤波时不会被无效像素所影响,因此我建议,当使用无信心图的滤波器时,尽量使用其他后处理方法填充空洞,减少无效像素;当使用FBS时,建议深度图宁缺毋滥,尽量保持真值。
2 效果展示
这是realsense D455的原始深度图与经过FBS的深度图是对比。
| null | raw | FBS |
|---|---|---|
| 深度图 | 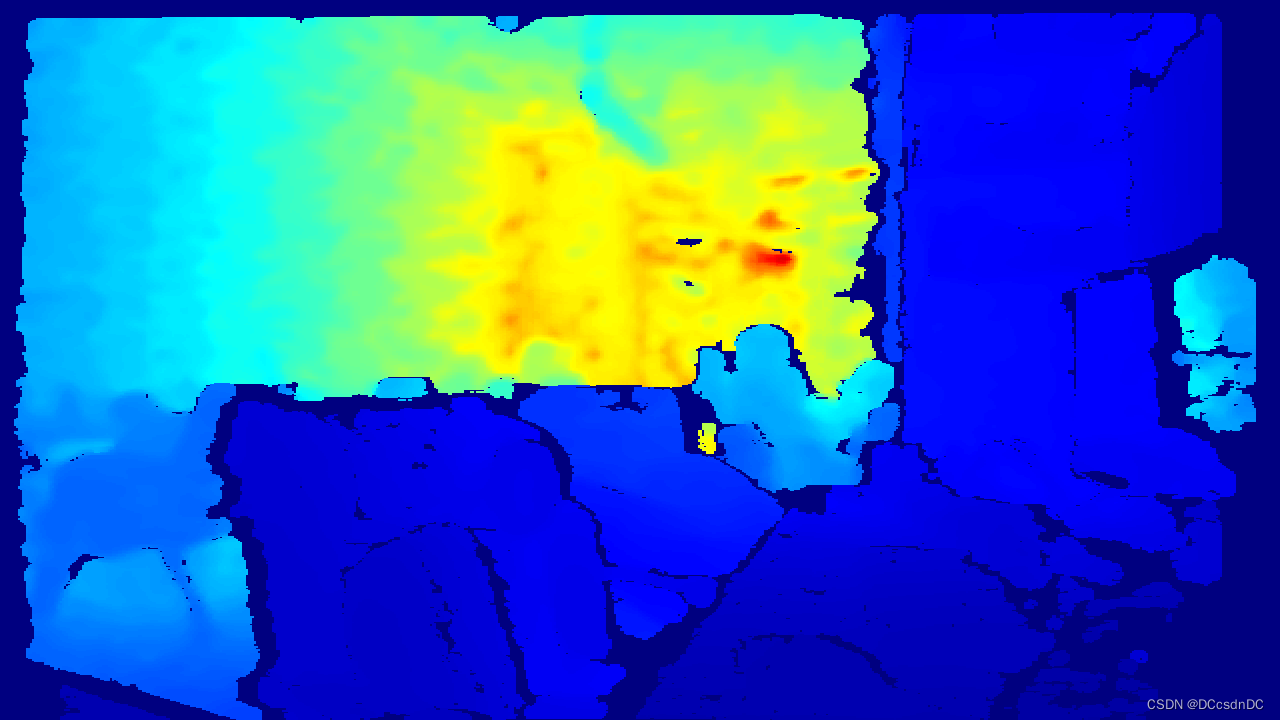 | 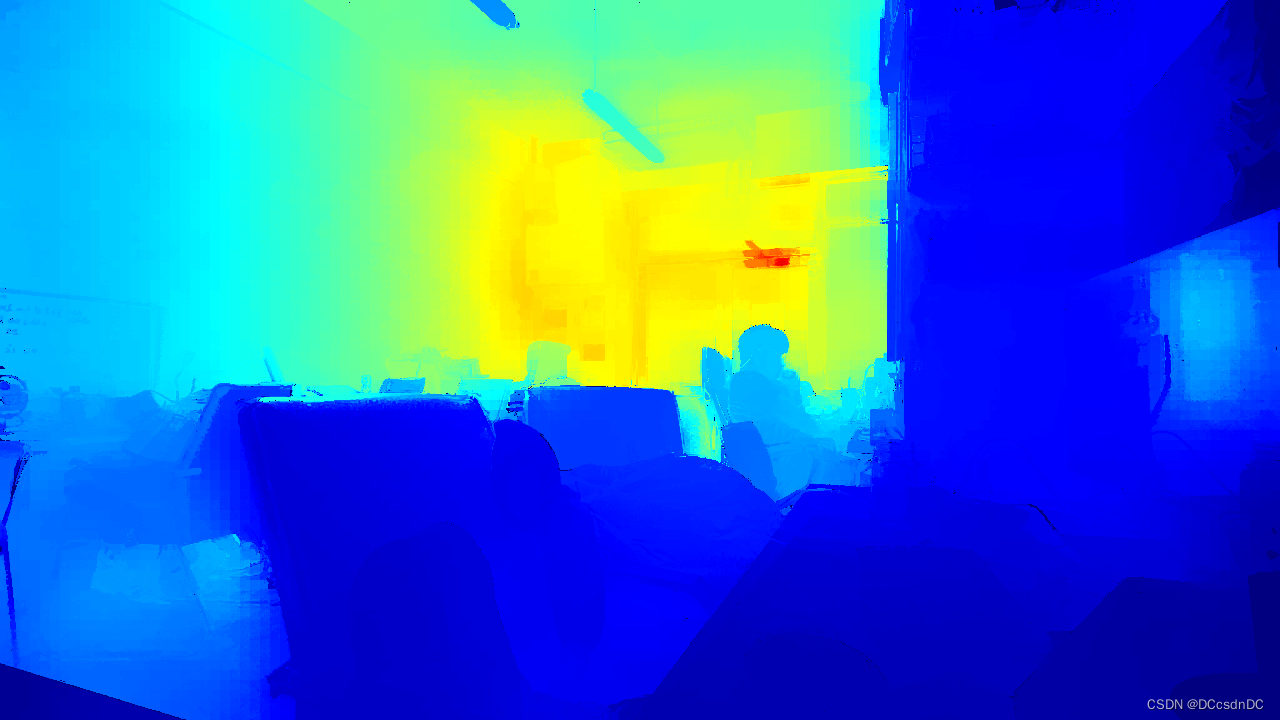 |
| 深度图 | 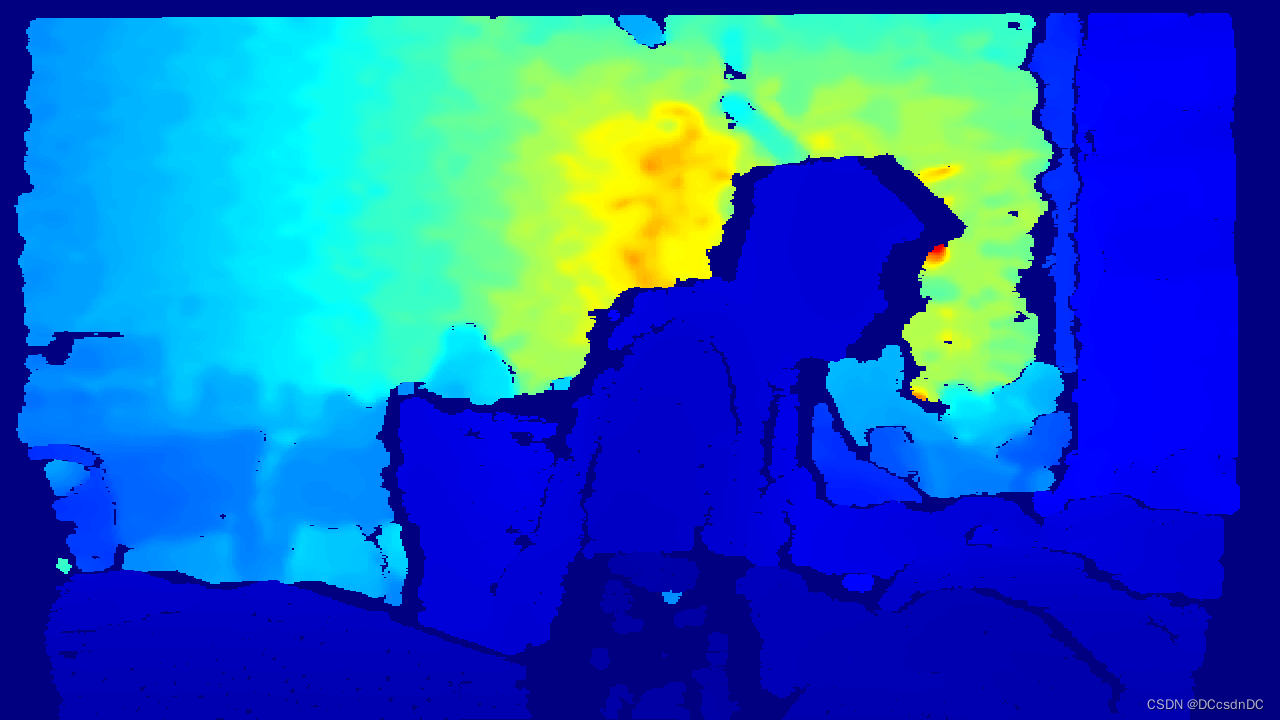 | 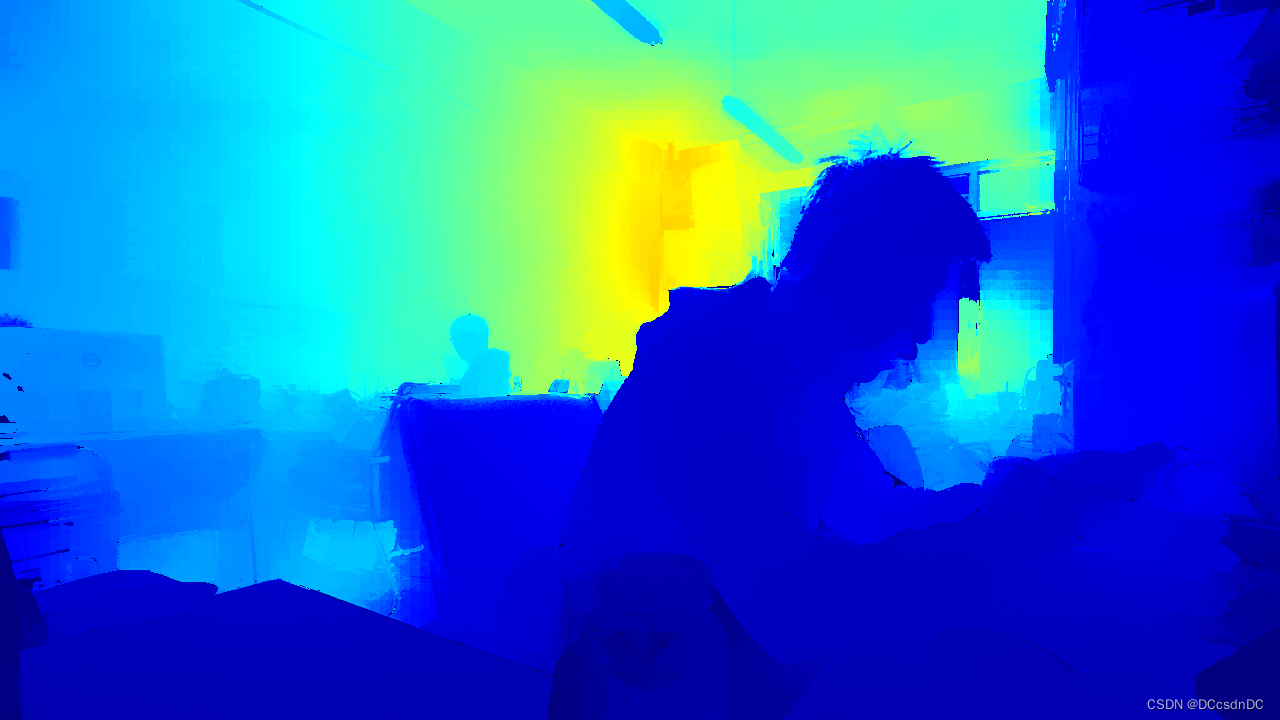 |
| 点云 | 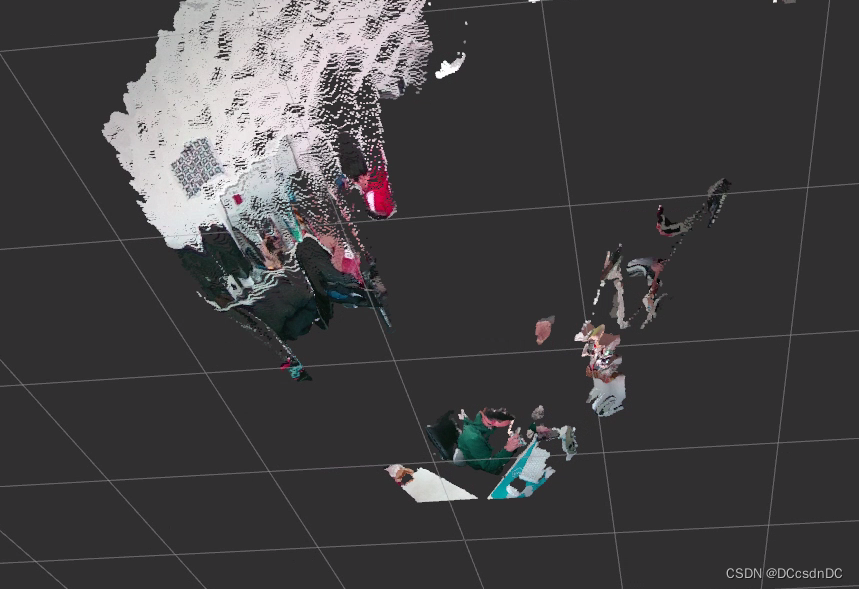 | 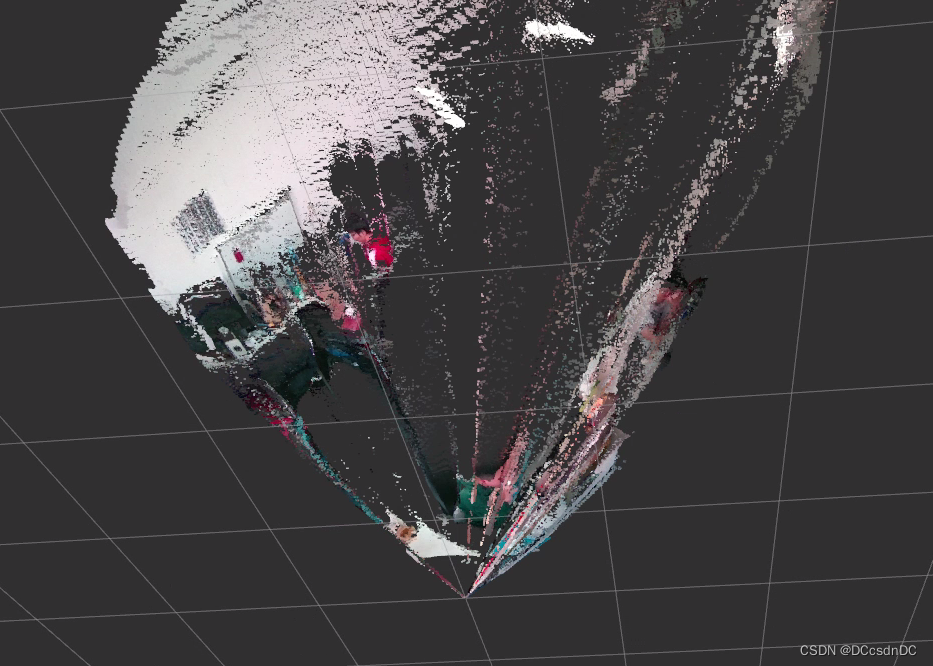 |
看起来似乎不错,但我们将其转换为点云就会发现,原始深度图干干净净,不同深度处的物体分离性很好;但是经过优化的深度图产生了大量的离群点,这些是FBS“猜”错的点。
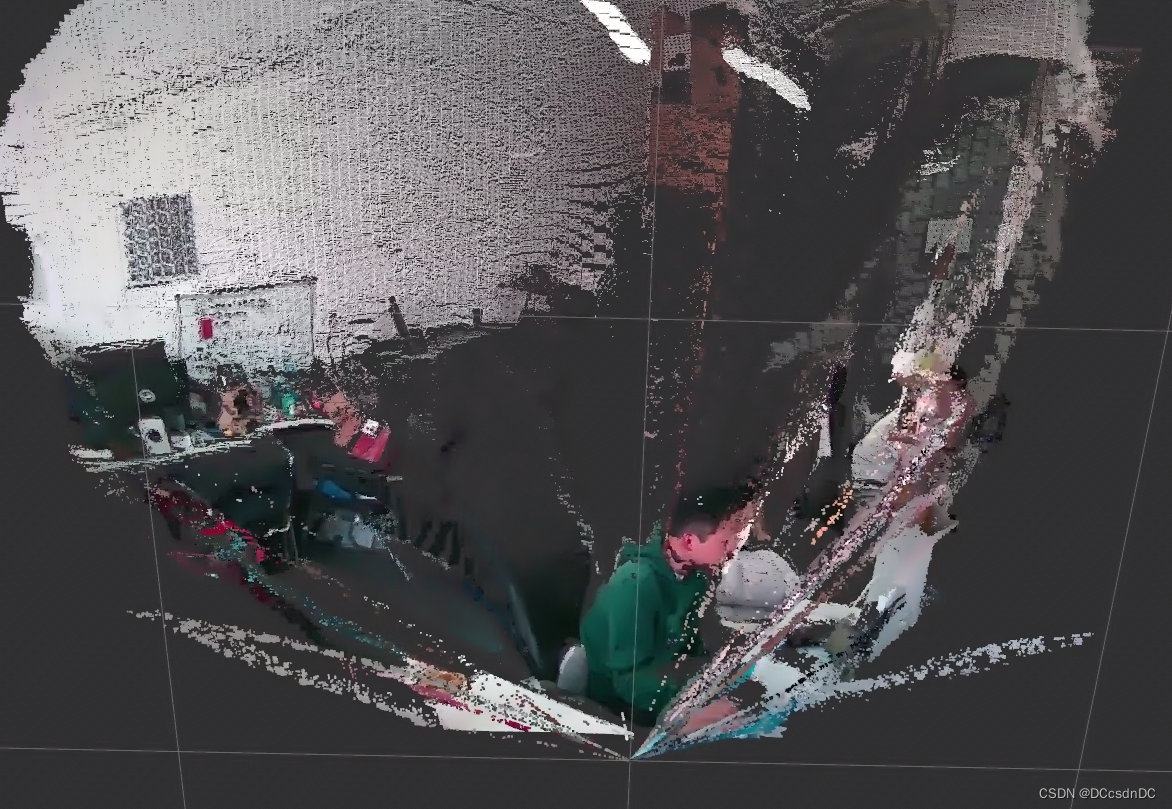
这个视角下我们看到,FBS确实补全了部分缺失的深度值,但也带来了很大问题,最主要的问题就是这些错误的点。


 2780
2780


 被折叠的 条评论
为什么被折叠?
被折叠的 条评论
为什么被折叠?
 到【灌水乐园】发言


