


example02: NumPy and OpenCV
Example of rendering depth and color images using the help of OpenCV and Numpy:
使用OpenCV和Numpy渲染深度和彩色图像的示例:
## License: Apache 2.0. See LICENSE file in root directory.
## Copyright(c) 2015-2017 Intel Corporation. All Rights Reserved.

###############################################
##      Open CV and Numpy integration        ##
###############################################

import pyrealsense2 as rs
import numpy as np
import cv2

# Configure depth and color streams
pipeline = rs.pipeline()
# 创建 config 对象:
config = rs.config()
config.enable_stream(rs.stream.depth, 640, 480, rs.format.z16, 30)
config.enable_stream(rs.stream.color, 640, 480, rs.format.bgr8, 30)
"""
enable_stream(*args, **kwargs)
Overloaded function.

1. enable_stream(self: pyrealsense2.pyrealsense2.config, stream_type: pyrealsense2.pyrealsense2.stream, stream_index:
int, width: int, height: int, format: pyrealsense2.pyrealsense2.format=format.any, framerate: int=0) -> None

Enable a device stream explicitly(明确地), with selected stream parameters. The method allows the application to request a
stream with specific configuration. If no stream is explicitly enabled, the pipeline configures the device and its
streams according to the attached computer vision modules and processing blocks requirements, or default
configuration for the first available device. The application can configure any of the input stream parameters
according to its requirement, or set to 0 for don't care value. The config accumulates the application calls for
enable configuration methods, until the configuration is applied. Multiple enable stream calls for the same stream
override each other, and the last call is maintained. Upon calling resolve(), the config checks for conflicts between
the application configuration requests and the attached computer vision modules and processing blocks requirements,
and fails if conflicts are found. Before resolve() is called, no conflict check is done.

2. enable_stream(self: pyrealsense2.pyrealsense2.config, stream_type: pyrealsense2.pyrealsense2.stream, stream_index:
int=-1) -> None

Stream type and possibly(可能,修饰stream) also stream index. Other parameters are resolved internally(内部解决).

3. enable_stream(self: pyrealsense2.pyrealsense2.config, stream_type: pyrealsense2.pyrealsense2.stream,
format: pyrealsense2.pyrealsense2.format, framerate: int=0) -> None

Stream type and format, and possibly frame rate. Other parameters are resolved internally.

4. enable_stream(self: pyrealsense2.pyrealsense2.config, stream_type: pyrealsense2.pyrealsense2.stream, width: int,
height: int, format: pyrealsense2.pyrealsense2.format=format.any, framerate: int=0) -> None

Stream type and resolution, and possibly format and frame rate. Other parameters are resolved internally.

5. enable_stream(self: pyrealsense2.pyrealsense2.config, stream_type: pyrealsense2.pyrealsense2.stream, stream_index:
int, format: pyrealsense2.pyrealsense2.format, framerate: int=0) -> None

Stream type, index, and format, and possibly framerate. Other parameters are resolved internally.
"""

# Start streaming
pipeline.start(config)

try:
    while True:

        # Wait for a coherent pair of frames(一对连贯的帧): depth and color
        frames = pipeline.wait_for_frames()
        depth_frame = frames.get_depth_frame()
        color_frame = frames.get_color_frame()
        """
        get_color_frame(self: pyrealsense2.pyrealsense2.composite_frame) -> pyrealsense2.pyrealsense2.video_frame

        Retrieve the first color frame, if no frame is found, search for the color frame from IR stream. If one still
        can't be found, return an empty frame instance. """

        if not depth_frame or not color_frame:
            continue

        # Convert images to numpy arrays
        depth_image = np.asanyarray(depth_frame.get_data())
        color_image = np.asanyarray(color_frame.get_data())

        # Apply colormap on depth image (image must be converted to 8-bit per pixel first)
        depth_colormap = cv2.applyColorMap(cv2.convertScaleAbs(depth_image, alpha=0.03), cv2.COLORMAP_JET)
        """
        applyColorMap(src, colormap[, dst]) -> dst
        .   @brief Applies a GNU Octave/MATLAB equivalent colormap on a given image.
        .
        .   @param src The source image, grayscale(灰度图) or colored of type CV_8UC1 or CV_8UC3.
        .   @param dst The result is the colormapped source image. Note: Mat::create is called on dst.
        .   @param colormap The colormap to apply, see #ColormapTypes


        applyColorMap(src, userColor[, dst]) -> dst
        .   @brief Applies a user colormap on a given image.
        .
        .   @param src The source image, grayscale or colored of type CV_8UC1 or CV_8UC3.
        .   @param dst The result is the colormapped source image. Note: Mat::create is called on dst.
        .   @param userColor The colormap to apply of type CV_8UC1 or CV_8UC3 and size 256
        """

        """
        convertScaleAbs(src[, dst[, alpha[, beta]]]) -> dst
        .   @brief Scales, calculates absolute values, and converts the result to 8-bit.
        .
        .   On each element of the input array, the function convertScaleAbs
        .   performs three operations sequentially(依次地): scaling, taking an absolute
        .   value, conversion to an unsigned 8-bit type:
        .   \f[\texttt{dst} (I)= \texttt{saturate\_cast<uchar>} (| \texttt{src} (I)* \texttt{alpha} +  \texttt{beta} |)\f]
        .   In case of multi-channel arrays, the function processes each channel
        .   independently. When the output is not 8-bit, the operation can be
        .   emulated(仿真) by calling the Mat::convertTo method (or by using matrix
        .   expressions 矩阵表达式) and then by calculating an absolute value of the result.
        .   For example:
        .   @code{.cpp}
        .   Mat_<float> A(30,30);
        .   randu(A, Scalar(-100), Scalar(100));
        .   Mat_<float> B = A*5 + 3;
        .   B = abs(B);
        .   // Mat_<float> B = abs(A*5+3) will also do the job,
        .   // but it will allocate(分配) a temporary matrix
        .   @endcode
        .   @param src input array.
        .   @param dst output array.
        .   @param alpha optional scale factor.
        .   @param beta optional delta added to the scaled values.
        .   @sa  Mat::convertTo, cv::abs(const Mat&)
        """
        # print(type(depth_colormap))
        # <class 'numpy.ndarray'>

        # Stack both images horizontally(水平堆叠两个图像)
        images = np.hstack((color_image, depth_colormap))
        """
        hstack(tup) -> ndarray
            Stack arrays in sequence horizontally(水平排列) (column wise 列优先).

            This is equivalent to concatenation(级联:在数据通信传输中把多个数据集结合起来的过程) along the second axis, except for 1-D
            arrays where it concatenates along the first axis. Rebuilds arrays divided
            by `hsplit`.

            This function makes most sense(有意义) for arrays with up to 3 dimensions. For
            instance(例如), for pixel-data with a height (first axis), width (second axis),
            and r/g/b channels (third axis). The functions `concatenate`, `stack` and
            `block` provide more general stacking and concatenation operations.

            Parameters
            ----------
            tup : sequence of ndarrays
                The arrays must have the same shape along all but(all but: 除了... 都) the second axis,
                except 1-D arrays which can be any length.

            Returns
            -------
            stacked : ndarray
                The array formed by stacking the given arrays.

            See Also
            --------
            stack : Join a sequence of arrays along a new axis.
            vstack : Stack arrays in sequence vertically (row wise).
            dstack : Stack arrays in sequence depth wise (along third axis).
            concatenate : Join a sequence of arrays along an existing axis.
            hsplit : Split array along second axis.
            block : Assemble arrays from blocks.

            Examples
            --------
            >>> a = np.array((1,2,3))
            >>> b = np.array((2,3,4))
            >>> np.hstack((a,b))
            array([1, 2, 3, 2, 3, 4])
            >>> a = np.array([[1],[2],[3]])
            >>> b = np.array([[2],[3],[4]])
            >>> np.hstack((a,b))
            array([[1, 2],
                   [2, 3],
                   [3, 4]])

        """

        # Show images
        cv2.namedWindow('RealSense', cv2.WINDOW_AUTOSIZE)
        """
        namedWindow(winname[, flags]) -> None
        .   @brief Creates a window.
        .
        .   The function namedWindow creates a window that can be used as a placeholder(占位符) for images and
        .   trackbars(滑动条). Created windows are referred to by their names.
        .
        .   If a window with the same name already exists, the function does nothing.
        .
        .   You can call cv::destroyWindow or cv::destroyAllWindows to close the window and de-allocate(取消分配) any
        .   associated memory usage. For a simple program, you do not really have to call these functions because all
        .   the resources and windows of the application are closed automatically by the operating system upon exit.
        .
        .   @note
        .
        .   Qt backend(后端) supports additional flags:
        .   -   **WINDOW_NORMAL or WINDOW_AUTOSIZE:** WINDOW_NORMAL enables you to resize the
        .   window, whereas(尽管) WINDOW_AUTOSIZE adjusts automatically the window size to fit the
        .   displayed image (see imshow ), and you cannot change the window size manually.
        .   -   **WINDOW_FREERATIO or WINDOW_KEEPRATIO:** WINDOW_FREERATIO adjusts the image
        .   with no respect to(不论) its ratio(比例), whereas WINDOW_KEEPRATIO keeps the image ratio.
        .   -   **WINDOW_GUI_NORMAL or WINDOW_GUI_EXPANDED:** WINDOW_GUI_NORMAL is the old way to draw the window
        .   without statusbar and toolbar, whereas WINDOW_GUI_EXPANDED is a new enhanced GUI.
        .   By default, flags == WINDOW_AUTOSIZE | WINDOW_KEEPRATIO | WINDOW_GUI_EXPANDED
        .
        .   @param winname Name of the window in the window caption that may be used as a window identifier(标识符).
        .   @param flags Flags of the window. The supported flags are: (cv::WindowFlags)
        """
        cv2.imshow('RealSense', images)
        """
        imshow(winname, mat) -> None
        .   @brief Displays an image in the specified window.
        .
        .   The function imshow displays an image in the specified window. If the window was created with the
        .   cv::WINDOW_AUTOSIZE flag, the image is shown with its original size, however it is still limited by the
        .   screen resolution. Otherwise, the image is scaled to fit the window. The function may scale the image,
        .   depending on its depth:
        .
        .   -   If the image is 8-bit unsigned(8位无符号数), it is displayed as is.
        .   -   If the image is 16-bit unsigned or 32-bit integer, the pixels are divided by 256. That is, the
        .   value range [0,255\*256] is mapped to [0,255].
        .   -   If the image is 32-bit or 64-bit floating-point, the pixel values are multiplied by 255. That is, the
        .   value range [0,1] is mapped to [0,255].
        .
        .   If window was created with OpenGL support, cv::imshow also support ogl::Buffer , ogl::Texture2D and
        .   cuda::GpuMat as input.
        .
        .   If the window was not created before this function, it is assumed creating a window with cv::WINDOW_AUTOSIZE.
        .
        .   If you need to show an image that is bigger than the screen resolution, you will need to call
        .   namedWindow("", WINDOW_NORMAL) before the imshow.
        .
        .   @note This function should be followed by cv::waitKey function which displays the image for specified
        .   milliseconds. Otherwise, it won't display the image. For example, **waitKey(0)** will display the window
        .   infinitely(永久地) until any keypress (it is suitable for image display). **waitKey(25)** will display a frame
        .   for 25 ms, after which display will be automatically closed. (If you put it in a loop to read
        .   videos, it will display the video frame-by-frame)
        .
        .   @note
        .
        .   [__Windows Backend Only__] Pressing Ctrl+C will copy the image to the clipboard.
        .
        .   [__Windows Backend Only__] Pressing Ctrl+S will show a dialog to save the image.(保存图像)
        .
        .   @param winname Name of the window.
        .   @param mat Image to be shown.
        """
        cv2.waitKey(1)
        print(cv2.waitKey(1))
        """
        waitKey([, delay]) -> retval(返回值)
        .   @brief Waits for a pressed key.
        .
        .   The function waitKey waits for a key event infinitely (when \f$\texttt{delay}\leq 0\f$ ) or for delay
        .   milliseconds, when it is positive. Since the OS has a minimum time between switching threads(切换线程), the
        .   function will not wait exactly delay ms, it will wait at least delay ms, depending on what else is
        .   running on your computer at that time. It returns the code of the pressed key or -1 if no key was
        .   pressed before the specified time had elapsed(流逝).
        .
        .   @note
        .
        .   This function is the only method in HighGUI that can fetch and handle events, so it needs to be
        .   called periodically for normal event processing unless HighGUI is used within an environment that
        .   takes care of event processing.
        .
        .   @note
        .
        .   The function only works if there is at least one HighGUI window created and the window is active.
        .   If there are several HighGUI windows, any of them can be active.
        .
        .   @param delay Delay in milliseconds. 0 is the special value that means "forever".
        """

finally:

    # Stop streaming
    pipeline.stop()
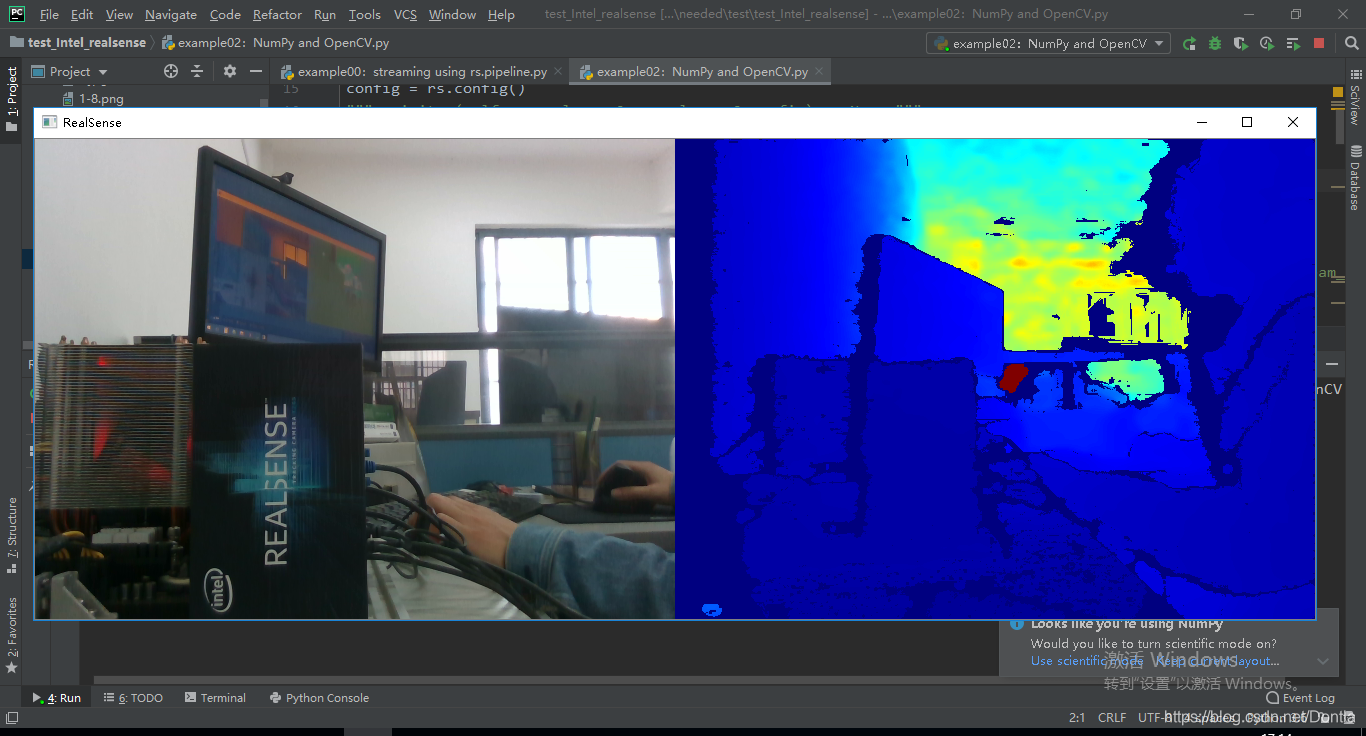
运行结果:


 237
237

 被折叠的 条评论
为什么被折叠?
被折叠的 条评论
为什么被折叠?
 到【灌水乐园】发言


