


///
在Python中,我们可以使用内置的json库来解析和操作JSON格式的数据。以下是几种获取JSON字段的实现方法:
1 使用字典索引法获取字段:
import json
data = '{"name": "Alice", "age": 25, "city": "New York"}'
json_data = json.loads(data)
name = json_data["name"]
age = json_data["age"]
city = json_data["city"]
print(name, age, city) # 输出:Alice 25 New York
2 使用get()方法获取字段,可以在字段不存在的情况下提供默认值:
import json
data = '{"name": "Alice", "age": 25}'
json_data = json.loads(data)
name = json_data.get("name", "") # 若字段不存在则返回默认值""
age = json_data.get("age", 0) # 若字段不存在则返回默认值0
city = json_data.get("city", "Unknown")
print(name, age, city) # 输出:Alice 25 Unknown
3 使用try/except捕获字段不存在的异常:
import json
data = '{"name": "Alice", "age": 25, "city": "New York"}'
json_data = json.loads(data)
try:
name = json_data["name"]
except KeyError:
name = ""
try:
age = json_data["age"]
except KeyError:
age = 0
try:
city = json_data["city"]
except KeyError:
city = "Unknown"
print(name, age, city) # 输出:Alice 25 New York
///
从文件中读取数据,同时去除掉空格和换行,代码如下
import numpy as np
def sort(path):
w = open(path,'r')
l = w.readlines()
col=[]
for k in l:
k = k.strip('\n') #去掉读取中的换行字符
col.append(k)
while '' in col:
col.remove('') #去掉读取的空格
t = map(int,col) #把字符数组转换为整型数组
dd=np.sort(t) #把整型数组进行排序
for m in dd:
print(m) #一行行的输出结果
if __name__ == '__main__':
path=raw_input('input:')
sort(path)
//
要解决Python文件路径中存在空格的问题,可以考虑以下方法:
1、使用双引号括起文件路径:可以在文件路径中使用双引号将整个路径括起来,这样Python解释器就能正确解析含有空格的文件路径。
file_path = "C:/path/to/file with spaces.txt"
2、使用原始字符串表示法(Raw string):在字符串前添加 r 前缀,可以使字符串成为原始字符串表示法,这样字符串中的所有字符都会被视为字面量,包括空格。
file_path = r"C:/path/to/file with spaces.txt"
3、使用转义字符:如果不使用原始字符串表示法,可以在空格前添加反斜杠 \ 转义字符。
file_path = "C:/path/to/file\ with\ spaces.txt"
4、使用os.path模块:如果要在代码中构建文件路径,最好使用os.path模块,它能够根据当前操作系统正确地构建文件路径,并自动处理空格等特殊字符。
import os
file_path = os.path.join("C:/path/to", "file with spaces.txt")
//
在Python中获取手机WiFi IP地址通常需要使用特定的库或工具,这些库可能依赖于操作系统提供的接口或者调用外部命令。
在安卓设备上,可以使用adb shell命令结合ip命令来获取WiFi IP。首先确保你的设备已经连接到电脑并且启用了USB调试模式。
import subprocess
def get_wifi_ip_address():
try:
# 对于安卓设备,可以使用以下命令
# 需要确保设备已通过USB连接到电脑且启用了调试模式
# 此命令会在设备上执行 'ip addr show wlan0' 来获取IP地址
result = subprocess.check_output(
'adb shell ip addr show wlan0 | grep "inet " | cut -d" " -f6 | cut -d"/ " -f1'.split())
wifi_ip = result.decode('utf-8').strip()
return wifi_ip
except Exception as e:
print(f"Error getting WiFi IP address: {e}")
return None
# 使用函数获取IP地址
wifi_ip = get_wifi_ip_address()
if wifi_ip:
print(f"WiFi IP address: {wifi_ip}")
else:
print("Unable to get WiFi IP address.")
Python ADB 获得手机的IP
import os
import re
def exec_cmd(cmd):
cmd = os.popen(cmd)
cmd_result = cmd.read()
cmd.close()
return cmd_result
def get_device_ip(content):
math_obj = re.search(r'inet\s(\d+\.\d+\.\d+\.\d+).*?wlan0', content)
if math_obj and math_obj.group(1):
return math_obj.group(1)
return None
if __name__ == '__main__':
os.chdir(r'E:\ADB\0714\0607u')#有ADB命令的目录
result1 = exec_cmd('adb shell ip addr show wlan0')
ip = get_device_ip(result1)
print(ip)

//
python3.7显示行号_Python IDLE怎么显示行号
具体操作
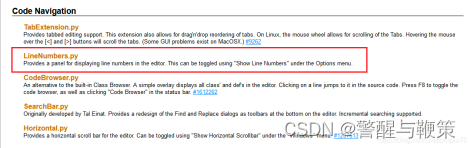
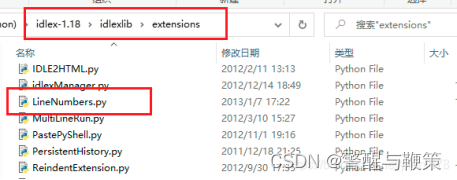
1、下载 LineNumbers.py,可以到http://idlex.sourceforge.net/extensions.html下载,也可以自己去网上下载。
(下图为 LineNumbers.py 文件的说明)
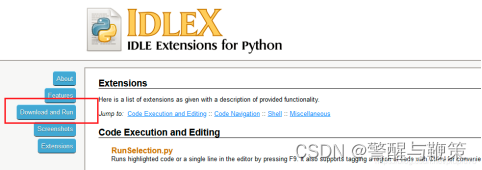
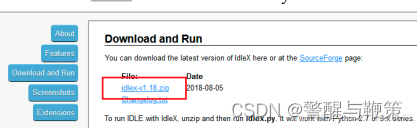
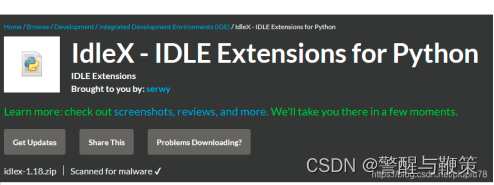
点击 Download and Run,然后选择 idlex-v1.18.zip 进行下载。
2.解压会得到一个名为 idlex-1.18 的文件夹,将其中的 LineNumbers.py 复制到 Python 安装路径中的 C:\Python\Python39\Lib\idlelib 里面(这是我的安装路径)。
3.在该路径中找到 config-extensions.def 文件(idle扩展的配置文件)
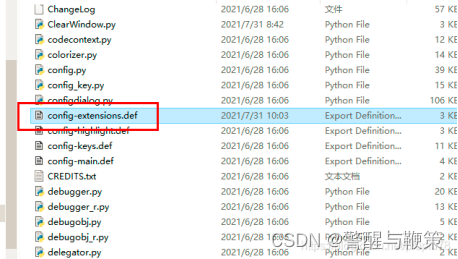
以记事本的方式打开它并粘入以下内容:
[LineNumbers]
enable=True
enable_editor=True
enable_shell=True
visible=True
[LineNumbers_cfgBindings]
linenumbers-show=True
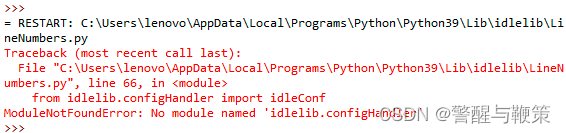
4.修入linenumber.py内容。
用 IDLE 打开 LineNumber.py,作以下修改:

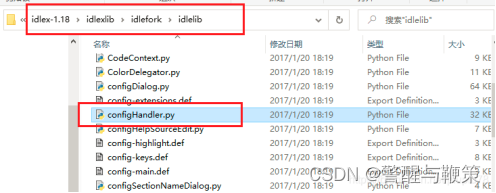
修改完运行一下,如果提示找不到 configHandler,可以到刚才解压的文件中去复制。如果还有其它错误,要先解决。要保证它能运行。
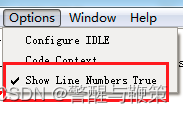
运行成功图如下:

【注】菜单中可以选择关闭行号显示。
//
问题:SyntaxError: (unicode error) 'unicodeescape' codec can't decode bytes in position
解决:
The problem is with the string
"C:\Users\Eric\Desktop\beeline.txt"
Here, \U in "C:\Users... starts an eight-character Unicode escape, such as \U00014321. In your code, the escape is followed by the character 's', which is invalid.
You either need to duplicate all backslashes:
"C:\\Users\\Eric\\Desktop\\beeline.txt"
Or prefix the string with r (to produce a raw string):
r"C:\Users\Eric\Desktop\beeline.txt"
//
问题:UnicodeEncodeError: ‘ascii’ codec can’t encode character u’\xa0′ in position 20: ordinal not in range(128) in Python
a = 'geeksforgeeks1234567\xa0'.encode("ASCII")
print(a)
解决:
a = 'geeksforgeeks1234567\xa0'.encode("UTF-8")
print(a)
//
问题:python TypeError: bufsize must be an integer
解决:
//
在python程序中运行带参数的exe文件
#encoding=utf-8
import os
main = r'D:\cloc\cloc-1.64.exe' # 你要运行的exe文件
params1 = r'C:\Users\yuan\Desktop\test\dp.bat' # 你要传入的参数
# 如果要传入多个参数,就继续定义,然后在os.system里加起来就行
r_v = os.system(main+' '+params1)
print (r_v )
//
获取当前执行的python脚本所在的父目录,并遍历里边文件夹里指定的文件,并替换字符串
def process_manifest_files(root_dir):
try:
# 获取当前脚本所在的父目录
parent_dir = os.path.dirname(os.path.abspath(__file__))
target_dir = os.path.join(parent_dir, root_dir)
# 遍历特定目录及其子目录中的所有文件
for root, dirs, files in os.walk(target_dir):
for file in files:
if file.lower() == "aa.xml":
manifest_path = os.path.join(root, file)
process_manifest_file(manifest_path)
except Exception as e:
print(f"处理aa.xml时出错:{e}")
def process_manifest_file(manifest_path):
try:
# 读取 aa.xml 文件内容
with open(manifest_path, "r", encoding="utf-8") as f:
manifest_content = f.read()
manifest_content = re.sub(r'android:process=":myprocess"', '', manifest_content)
# 将修改后的内容写回文件
with open(manifest_path, "w", encoding="utf-8") as f:
f.write(manifest_content)
print(f"处理 aa.xml 文件: {manifest_path}")
except Exception as e:
print(f"处理 aa.xml 文件时出错:{e}")
//
自己手动创建最上层文件夹后,
希望 subprocess.Popen(['svn', 'checkout', svn_url], cwd=current_dir).wait() 不要自动创建最上层的文件夹了。
要在执行 svn checkout 命令时避免拉取最上层的文件夹,可以在 subprocess.Popen 或 subprocess.run 的命令参数中指定 --depth 参数,并将其设置为 empty。这样会使得只拉取指定路径下的内容,而不包括最上层的文件夹。
command = ["svn", "checkout", svn_url, destination, "--depth", "empty"] subprocess.Popen(command).wait()
command = ["svn", "checkout", svn_url, destination, "--depth", "empty"] subprocess.run(command, check=True)
//
Python 处理Excel 的14个常用操作详解
1. 读取 Excel 文件
使用 pandas 库读取 Excel 文件是一种常见的数据处理操作,它能够快速加载 Excel 中的表格数据,并将其转换为数据框架(DataFrame)。以下是一个简单的示例代码,演示如何使用 pandas 读取 Excel 文件。
import pandas as pd
# 读取 Excel 文件
file_path = 'example_data.xlsx'
df = pd.read_excel(file_path)
# 打印读取的数据框架
print("读取的数据框架:")
print(df)
在这个例子中,使用 pd.read_excel 函数读取了一个名为 'example_data.xlsx' 的 Excel 文件。读取后,数据被存储在一个 pandas 数据框架中。
2. 写入 Excel 文件
在处理数据后,将结果写入新的 Excel 文件是一项常见的任务。使用 pandas 库,可以将处理过的数据写入新的 Excel 文件。以下是一个简单的示例代码,演示如何使用 pandas 将数据写入 Excel 文件。
import pandas as pd
# 创建示例数据框架
data = {
'Product': ['A', 'B', 'C'],
'Price': [25.5, 30.2, 15.8],
'Quantity': [10, 8, 4]
}
df = pd.DataFrame(data)
# 将数据框架写入 Excel 文件
df.to_excel('output_data.xlsx', index=False)
在这个例子中,使用 to_excel 函数将数据框架写入 Excel 文件。参数 index=False 表示不包含行索引信息。生成的 Excel 文件名为 'output_data.xlsx'。
3. 数据筛选与过滤
在数据分析中,经常需要根据特定条件筛选和过滤数据,以便只保留感兴趣的部分。使用 pandas 库,可以进行数据筛选和过滤。以下是一个简单的示例代码,演示如何使用 pandas 进行数据筛选与过滤。
import pandas as pd
# 创建示例数据框架
data = {
'Product': ['A', 'B', 'C', 'A', 'B'],
'Price': [25.5, 30.2, 15.8, 22.0, 18.5],
'Quantity': [10, 8, 4, 6, 2]
}
df = pd.DataFrame(data)
# 筛选 Price 大于 20 的数据
filtered_data = df[df['Price'] > 20]
# 打印筛选后的数据框架
print("Price 大于 20 的数据:")
print(filtered_data)
在这个例子中,使用了条件筛选,保留了 'Price' 列大于 20 的行数据。你可以根据实际需求定义不同的筛选条件,以过滤符合条件的数据。
4. 数据排序
在 Excel 中,数据排序是一种常见的操作,可以更好地理解数据的结构和趋势。使用 pandas 库,可以对数据进行排序。以下是一个简单的示例代码,演示如何使用 pandas 对数据进行排序。
import pandas as pd
# 创建示例数据框架
data = {
'Product': ['B', 'A', 'C', 'D', 'A'],
'Price': [30.2, 25.5, 15.8, 40.0, 20.5],
'Quantity': [8, 10, 4, 2, 6]
}
df = pd.DataFrame(data)
# 按 'Product' 列升序排序
df_sorted = df.sort_values(by='Product')
# 打印排序后的数据框架
print("按 'Product' 列升序排序:")
print(df_sorted)
在这个例子中,使用 sort_values 函数按 'Product' 列的值进行升序排序。也可以通过指定 ascending=False 参数来实现降序排序。这种排序方式使可以更容易地观察数据的特征和趋势。
5. 数据统计与汇总
通过pandas的统计函数,可以快速了解数据的统计信息,如均值、中位数等。
假设有一个包含销售数据的数据框架sales_data,其中包括产品销售额(sales_amount)、销售数量(quantity)和单价(unit_price)等列。我们将使用这个数据框架来演示如何进行全面的数据统计与汇总。
import pandas as pd
# 假设我们有一个包含销售数据的数据框架
data = {
'Product': ['A', 'B', 'C', 'A', 'B', 'A'],
'Sales_Amount': [100, 150, 200, 120, 180, 130],
'Quantity': [5, 3, 4, 6, 2, 5],
'Unit_Price': [20, 50, 50, 20, 90, 26]
}
sales_data = pd.DataFrame(data)
# 打印原始数据
print("原始数据:")
print(sales_data)
# 统计与汇总
mean_sales_amount = sales_data['Sales_Amount'].mean()
median_quantity = sales_data['Quantity'].median()
mode_product = sales_data['Product'].mode().values[0]
std_unit_price = sales_data['Unit_Price'].std()
min_sales_amount = sales_data['Sales_Amount'].min()
max_quantity = sales_data['Quantity'].max()
# 打印统计结果
print("\n统计与汇总结果:")
print(f"平均销售额:{mean_sales_amount}")
print(f"销售数量中位数:{median_quantity}")
print(f"产品销售频率最高的是:{mode_product}")
print(f"单价标准差:{std_unit_price}")
print(f"最小销售额:{min_sales_amount}")
print(f"最大销售数量:{max_quantity}")
这个例子中,使用了均值、中位数、众数、标准差、最小值和最大值等统计方法来全面了解销售数据的特征。通过运用这些统计函数,可以更好地理解数据的分布、趋势和离散程度,为进一步的数据分析和决策提供了基础。
6. 单元格格式设置
在处理 Excel 数据时,自定义单元格格式是提高数据可读性和呈现效果的关键步骤。使用 openpyxl 库,可以轻松地对 Excel 单元格进行格式设置。下面是一些常见的单元格格式设置的例子。
from openpyxl import Workbook
from openpyxl.styles import Font, Alignment, PatternFill
# 创建一个工作簿和工作表
workbook = Workbook()
sheet = workbook.active
# 示例数据
data = [
["Product", "Price", "Quantity"],
["A", 25.5, 10],
["B", 30.2, 8],
["C", 15.8, 15],
]
# 将数据写入工作表
for row in data:
sheet.append(row)
# 单元格格式设置
# 设置标题行的字体为粗体、字号14、颜色为蓝色
sheet['A1'].font = Font(bold=True, size=14, color="0000FF")
# 设置数据区域的对齐方式为居中
for row in sheet.iter_rows(min_row=2, max_row=sheet.max_row, min_col=1, max_col=sheet.max_column):
for cell in row:
cell.alignment = Alignment(horizontal='center', vertical='center')
# 设置价格列的数值格式为货币格式
for row in sheet.iter_rows(min_row=2, max_row=sheet.max_row, min_col=2, max_col=2):
for cell in row:
cell.number_format = '"$"#,##0.00'
# 设置数量列的背景颜色为浅黄色
for row in sheet.iter_rows(min_row=2, max_row=sheet.max_row, min_col=3, max_col=3):
for cell in row:
cell.fill = PatternFill(start_color="FFFF99", end_color="FFFF99", fill_type="solid")
# 保存工作簿
workbook.save("formatted_excel.xlsx")
在这个例子中,通过 Font、Alignment 和 PatternFill 类来设置单元格的字体、对齐方式和背景颜色。这种格式设置使得 Excel 表格更加美观、易读,有助于突出数据的重要性和结构。可以根据实际需求调整这些设置,以满足特定的数据展示要求。
7. 插入行与列
在处理 Excel 数据时,插入新的行和列是保持数据整洁和有序的关键步骤。使用 openpyxl 库,可以轻松地在 Excel 表格中插入新的行和列。以下是一些插入行和列的示例代码。
插入新的行
from openpyxl import Workbook
# 创建一个工作簿和工作表
workbook = Workbook()
sheet = workbook.active
# 原始数据
data = [
["Name", "Age", "Country"],
["Alice", 25, "USA"],
["Bob", 30, "Canada"],
]
# 将数据写入工作表
for row in data:
sheet.append(row)
# 打印原始数据
print("原始数据:")
for row in sheet.iter_rows(values_only=True):
print(row)
# 插入新的行(在第二行之后插入)
new_row_data = ["Charlie", 28, "UK"]
sheet.insert_rows(new_row_data, row_idx=2)
# 打印插入新行后的数据
print("\n插入新行后的数据:")
for row in sheet.iter_rows(values_only=True):
print(row)
# 保存工作簿
workbook.save("inserted_row.xlsx")
插入新的列
from openpyxl import Workbook
# 创建一个工作簿和工作表
workbook = Workbook()
sheet = workbook.active
# 原始数据
data = [
["Name", "Age", "Country"],
["Alice", 25, "USA"],
["Bob", 30, "Canada"],
]
# 将数据写入工作表
for row in data:
sheet.append(row)
# 打印原始数据
print("原始数据:")
for row in sheet.iter_rows(values_only=True):
print(row)
# 插入新的列(在第二列之后插入)
new_column_data = ["Female", "Male", "Female"]
sheet.insert_cols(values=new_column_data, col_idx=2)
# 打印插入新列后的数据
print("\n插入新列后的数据:")
for row in sheet.iter_rows(values_only=True):
print(row)
# 保存工作簿
workbook.save("inserted_column.xlsx")
这些示例代码演示了如何使用 insert_rows 和 insert_cols 方法在 Excel 表格中插入新的行和列。
8. 合并单元格
在 Excel 中,合并单元格是一种常用的操作,用于创建更复杂的表格结构或突出某些信息。使用 openpyxl 库,可以实现合并和取消合并单元格的操作。以下是一些合并单元格的示例代码。
合并单元格
from openpyxl import Workbook
# 创建一个工作簿和工作表
workbook = Workbook()
sheet = workbook.active
# 原始数据
data = [
["Name", "Age", "Country"],
["Alice", 25, "USA"],
["Bob", 30, "Canada"],
]
# 将数据写入工作表
for row in data:
sheet.append(row)
# 合并 A1 到 C1 的单元格
sheet.merge_cells('A1:C1')
# 在合并的单元格中写入标题
sheet['A1'] = 'Personal Information'
# 保存工作簿
workbook.save("merged_cells.xlsx")
取消合并单元格
from openpyxl import load_workbook
# 加载已存在的工作簿
workbook = load_workbook("merged_cells.xlsx")
sheet = workbook.active
# 取消合并 A1 到 C1 的单元格
sheet.unmerge_cells('A1:C1')
# 保存工作簿
workbook.save("unmerged_cells.xlsx")
在这个示例中,首先合并了 A1 到 C1 的单元格,创建了一个包含标题的大标题单元格。然后,演示了如何取消合并这些单元格。这种操作使得表格的布局更加灵活,可以根据实际需要进行定制。
9. 公式计算
在 Excel 中添加公式是一种常见的操作,可以实现自动计算,并随着数据的更新而动态调整。使用 openpyxl 库,可以轻松地在 Excel 中插入公式。以下是一个添加公式的示例代码。
from openpyxl import Workbook
# 创建一个工作簿和工作表
workbook = Workbook()
sheet = workbook.active
# 原始数据
data = [
["Product", "Price", "Quantity", "Total"],
["A", 25.5, 10, None],
["B", 30.2, 8, None],
]
# 将数据写入工作表
for row in data:
sheet.append(row)
# 添加公式计算 Total 列,Total = Price * Quantity
for row in range(2, sheet.max_row + 1):
sheet[f'D{row}'] = f'B{row} * C{row}'
# 保存工作簿
workbook.save("formulas.xlsx")
在这个例子中,通过循环遍历数据行,使用 Excel 公式 B(row) * C(row) 来计算 Total 列的值。这样,无论数据如何变化,Total 列都会自动更新。这种功能使得在 Excel 中进行复杂的数据计算变得更加方便和灵活。
10. 图表绘制
在 Excel 中插入图表是一种直观且生动的方式,可以更清晰地展示数据的趋势和关系。使用 openpyxl 和 matplotlib 库,可以将数据可视化为图表,并插入到 Excel 工作表中。以下是一个插入柱状图的示例代码。
from openpyxl import Workbook
from openpyxl.chart import BarChart, Reference
import matplotlib.pyplot as plt
from io import BytesIO
# 创建一个工作簿和工作表
workbook = Workbook()
sheet = workbook.active
# 原始数据
data = [
["Category", "Value"],
["A", 25],
["B", 30],
["C", 20],
]
# 将数据写入工作表
for row in data:
sheet.append(row)
# 创建柱状图
chart = BarChart()
chart.title = "Category vs Value"
chart.x_axis.title = "Category"
chart.y_axis.title = "Value"
# 数据范围
data_range = Reference(sheet, min_col=2, min_row=1, max_col=2, max_row=sheet.max_row)
# 设置图表数据
chart.add_data(data_range, titles_from_data=True)
# 将图表插入到工作表中
sheet.add_chart(chart, "D2")
# 保存工作簿
workbook.save("chart_example.xlsx")
在这个示例中,创建了一个包含柱状图的 Excel 工作表。首先,使用 BarChart 创建一个柱状图对象,然后设置图表的标题、X轴标题和Y轴标题。接着,通过 Reference 定义数据范围,并使用 add_data 将数据添加到图表中。最后,使用 add_chart 将图表插入到工作表中。这样,就能够在 Excel 中通过图表直观地展示数据的分布和关系。
11. 数据透视表
数据透视表是一种强大的数据分析工具,可以帮助我们快速透视和汇总数据。使用 pandas 的 pivot_table 函数,可以在 Python 中轻松创建数据透视表。以下是一个简单的示例代码。
import pandas as pd
# 创建示例数据框架
data = {
'Category': ['A', 'B', 'A', 'B', 'A', 'B'],
'Value': [10, 15, 20, 25, 30, 35],
'Quantity': [2, 3, 4, 5, 6, 7]
}
df = pd.DataFrame(data)
# 创建数据透视表
pivot_table = pd.pivot_table(df, values='Value', index='Category', columns='Quantity', aggfunc='sum', fill_value=0)
# 打印数据透视表
print("数据透视表:")
print(pivot_table)
在这个例子中,我们使用 pivot_table 函数根据 'Category' 和 'Quantity' 列创建了一个数据透视表。我们指定了值列为 'Value',使用 'sum' 函数进行汇总,如果某些组合不存在则用 0 填充。最后,打印了生成的数据透视表。
12. 数据验证
在 Excel 中设置数据验证规则是一种有效的方式,可以确保用户输入的数据符合预期的范围或格式。使用 openpyxl 库,可以添加数据验证规则。以下是一个简单的示例代码,演示如何在 Excel 中设置数据验证规则。
from openpyxl import Workbook
from openpyxl.worksheet.datavalidation import DataValidation
# 创建一个工作簿和工作表
workbook = Workbook()
sheet = workbook.active
# 原始数据
data = [
["Name", "Age", "Country"],
["Alice", 25, "USA"],
["Bob", 30, "Canada"],
]
# 将数据写入工作表
for row in data:
sheet.append(row)
# 创建数据验证规则(Age 列只允许输入 18 到 60 之间的整数)
dv = DataValidation(type="whole", operator="between", formula1=18, formula2=60)
dv.errorTitle = "Invalid Input"
dv.error = "Age must be between 18 and 60."
dv.add("B2:B1048576") # 应用规则到整个 B 列
# 添加数据验证规则到工作表
sheet.add_data_validation(dv)
# 保存工作簿
workbook.save("data_validation_example.xlsx")
在这个例子中,使用 DataValidation 类创建了一个数据验证规则,要求在 'B' 列(Age 列)中输入整数,并且范围必须在 18 到 60 之间。然后,将这个规则应用到整个 'B' 列。这样,用户在输入数据时,将受到相应范围和格式的限制,提高了数据的准确性。
13. 批量操作
批量操作是在 Excel 中处理大量数据时提高效率的关键。使用循环和函数,可以对数据进行批量处理。以下是一个简单的示例代码,演示如何使用循环和函数批量操作 Excel 数据。
from openpyxl import Workbook
# 创建一个工作簿和工作表
workbook = Workbook()
sheet = workbook.active
# 原始数据
data = [
["Product", "Price", "Quantity", "Total"],
["A", 25.5, 10, None],
["B", 30.2, 8, None],
]
# 将数据写入工作表
for row in data:
sheet.append(row)
# 批量计算 Total 列的值(Total = Price * Quantity)
for row in range(2, sheet.max_row + 1):
price = sheet[f'B{row}'].value
quantity = sheet[f'C{row}'].value
total = price * quantity
sheet[f'D{row}'] = total
# 打印批量计算后的数据
print("批量计算后的数据:")
for row in sheet.iter_rows(values_only=True):
print(row)
# 保存工作簿
workbook.save("batch_operations.xlsx")
在这个例子中,使用循环遍历数据行,并批量计算了 'Total' 列的值。通过使用循环,可以对整个数据集进行高效的操作,而不需要逐个手动处理每一行数据。
14. 错误处理
在处理 Excel 数据时,错误是不可避免的。为了提高代码的健壮性,可以使用异常处理机制来处理可能出现的错误。以下是一个简单的示例代码,演示如何使用异常处理来处理 Excel 操作中的错误。
from openpyxl import Workbook
try:
# 创建一个工作簿和工作表
workbook = Workbook()
sheet = workbook.active
# 原始数据
data = [
["Product", "Price", "Quantity", "Total"],
["A", 25.5, 10, None],
["B", 30.2, 8, None],
]
# 将数据写入工作表
for row in data:
sheet.append(row)
# 尝试计算 Total 列的值,但存在空值导致的错误
for row in range(2, sheet.max_row + 1):
try:
price = sheet[f'B{row}'].value
quantity = sheet[f'C{row}'].value
total = price * quantity
sheet[f'D{row}'] = total
except TypeError as e:
print(f"Error in row {row}: {e}")
# 打印处理后的数据
print("处理后的数据:")
for row in sheet.iter_rows(values_only=True):
print(row)
# 保存工作簿
workbook.save("error_handling_example.xlsx")
except Exception as e:
print(f"An error occurred: {e}")
在这个例子中,使用了两层异常处理。外层的异常处理捕获了可能发生的任何异常,而内层的异常处理仅捕获特定的 TypeError,这是由于在计算 'Total' 列时可能遇到的错误类型。
自动化执行一个 Python 脚本,您可以使用操作系统的定时任务或者计划任务功能。以下是在 Windows 和 Linux 上设置定时任务的简要步骤:
Windows 上的定时任务:
- 打开任务计划程序:按
Win + R键,输入taskschd.msc并按 Enter 键。 - 在左侧导航栏,选择“任务计划程序库”。
- 在右侧窗口中,选择“创建基本任务...”。
- 输入任务名称,点击“下一步”。
- 选择“启动程序”,点击“下一步”。
- 输入程序或脚本的路径(例如
"C:\\My.py"),点击“下一步”。 - 选择触发器,选择“每周”,设置执行时间为周六晚上 20:00,点击“下一步”。
- 确认设置,点击“完成”。
Linux 上的定时任务:
- 打开终端。
- 输入命令
crontab -e并按 Enter 键。 - 在编辑器中,添加一行来指定定时任务。例如,要在周六晚上 20:00 执行脚本,可以添加以下行:
- 0 20 * * 6 python3 /path/to/your/script.py 其中,
/path/to/your/script.py替换为您的脚本路径。 - 保存并退出编辑器。
// bat 和 py 的定时实现
在 Windows 上,可以将脚本作为后台任务运行,以下是一个简单的方法:
@echo off python F:\path\to\scheduler.py
这样,你的 Python 脚本将自动启动,并在后台运行,确保按计划执行任务。
-
是如何使用
schedule库来实现每周周六晚上 20:00 执行指定 Python 脚本的示例: - 首先,安装
schedule库。如果你还没有安装它,可以运行以下命令: -
pip install schedule - 创建一个新的 Python 脚本文件,例如
scheduler.py,并在其中编写以下代码: -
import schedule
import time
import subprocessdef job():
script_path = "C:\\My.py"
try:
subprocess.run(["python", script_path], check=True)
print(f"Successfully ran the script: {script_path}")
except subprocess.CalledProcessError as e:
print(f"Error running the script: {e}")# 每周周六晚上20:00执行任务
schedule.every().saturday.at("20:00").do(job)print("Scheduler is running. Waiting for the scheduled time...")
while True:
schedule.run_pending()
time.sleep(1)
- 保存该文件并运行
scheduler.py脚本: python scheduler.py-
此脚本将保持运行状态,并在每周六晚上 20:00 执行 C:\\My
.py脚本。请注意,为了使此方法有效,你需要确保
scheduler.py脚本在预定时间之前始终保持运行。你可以通过以下方式之一来实现这一点: - 将
scheduler.py脚本设置为系统服务或守护进程,以便在后台运行。 - 在服务器或个人计算机上保持一个终端窗口打开,并持续运行该脚本。
- 创建一个批处理文件(例如
run_scheduler.bat): - 在任务计划程序中设置一个任务来运行此批处理文件。按照前述步骤在任务计划程序中创建一个基本任务,但这次设置触发器为系统启动时运行。
//
//
\pyautogui\__init__.py", line 1031, in _failSafeCheck pyautogui.FailSafeException: PyAutoGUI fail-safe triggered from mouse moving to upper-left corner. To disable this fail-safe, set pyautogui.FAILSAFE to False.
///
安装python,先去官网下载第三方库PyAutoGUI-0.9.39这个压缩包,
找到文件夹里;cmd里 python setup.py install,如果你的python安装目录Python3.7.1\Lib\site-packages,没有需要的包,就会自动下载下边的东西:
'''
C:\Users\Admin\Desktop\PyAutoGUI-0.9.39\dist\PyAutoGUI-0.9.39>python
setup.py install
D:\MyWorkSoftwareFolder\Python3.7.1\lib\distutils\dist.py:274: UserWarning: Unkn
own distribution option: 'long_description_content_type'
warnings.warn(msg)
running install
Checking .pth file support in D:\MyWorkSoftwareFolder\Python3.7.1\Lib\site-packa
ges\
D:\MyWorkSoftwareFolder\Python3.7.1\pythonw.exe -E -c pass
TEST PASSED: D:\MyWorkSoftwareFolder\Python3.7.1\Lib\site-packages\ appears to s
upport .pth files
running bdist_egg
running egg_info
writing PyAutoGUI.egg-info\PKG-INFO
writing dependency_links to PyAutoGUI.egg-info\dependency_links.txt
writing requirements to PyAutoGUI.egg-info\requires.txt
writing top-level names to PyAutoGUI.egg-info\top_level.txt
reading manifest file 'PyAutoGUI.egg-info\SOURCES.txt'
reading manifest template 'MANIFEST.in'
writing manifest file 'PyAutoGUI.egg-info\SOURCES.txt'
installing library code to build\bdist.win32\egg
running install_lib
running build_py
creating build
creating build\lib
creating build\lib\pyautogui
copying pyautogui\screenshotUtil.py -> build\lib\pyautogui
copying pyautogui\test1.py -> build\lib\pyautogui
copying pyautogui\tweens.py -> build\lib\pyautogui
copying pyautogui\_pyautogui_java.py -> build\lib\pyautogui
copying pyautogui\_pyautogui_osx.py -> build\lib\pyautogui
copying pyautogui\_pyautogui_win.py -> build\lib\pyautogui
copying pyautogui\_pyautogui_x11.py -> build\lib\pyautogui
copying pyautogui\_window_win.py -> build\lib\pyautogui
copying pyautogui\__init__.py -> build\lib\pyautogui
copying pyautogui\__main__.py -> build\lib\pyautogui
creating build\bdist.win32
creating build\bdist.win32\egg
creating build\bdist.win32\egg\pyautogui
copying build\lib\pyautogui\screenshotUtil.py -> build\bdist.win32\egg\pyautogui
copying build\lib\pyautogui\test1.py -> build\bdist.win32\egg\pyautogui
copying build\lib\pyautogui\tweens.py -> build\bdist.win32\egg\pyautogui
copying build\lib\pyautogui\_pyautogui_java.py -> build\bdist.win32\egg\pyautogu
i
copying build\lib\pyautogui\_pyautogui_osx.py -> build\bdist.win32\egg\pyautogui
copying build\lib\pyautogui\_pyautogui_win.py -> build\bdist.win32\egg\pyautogui
copying build\lib\pyautogui\_pyautogui_x11.py -> build\bdist.win32\egg\pyautogui
copying build\lib\pyautogui\_window_win.py -> build\bdist.win32\egg\pyautogui
copying build\lib\pyautogui\__init__.py -> build\bdist.win32\egg\pyautogui
copying build\lib\pyautogui\__main__.py -> build\bdist.win32\egg\pyautogui
byte-compiling build\bdist.win32\egg\pyautogui\screenshotUtil.py to screenshotUt
il.cpython-37.pyc
byte-compiling build\bdist.win32\egg\pyautogui\test1.py to test1.cpython-37.pyc
byte-compiling build\bdist.win32\egg\pyautogui\tweens.py to tweens.cpython-37.py
c
byte-compiling build\bdist.win32\egg\pyautogui\_pyautogui_java.py to _pyautogui_
java.cpython-37.pyc
byte-compiling build\bdist.win32\egg\pyautogui\_pyautogui_osx.py to _pyautogui_o
sx.cpython-37.pyc
byte-compiling build\bdist.win32\egg\pyautogui\_pyautogui_win.py to _pyautogui_w
in.cpython-37.pyc
byte-compiling build\bdist.win32\egg\pyautogui\_pyautogui_x11.py to _pyautogui_x
11.cpython-37.pyc
byte-compiling build\bdist.win32\egg\pyautogui\_window_win.py to _window_win.cpy
thon-37.pyc
byte-compiling build\bdist.win32\egg\pyautogui\__init__.py to __init__.cpython-3
7.pyc
byte-compiling build\bdist.win32\egg\pyautogui\__main__.py to __main__.cpython-3
7.pyc
creating build\bdist.win32\egg\EGG-INFO
copying PyAutoGUI.egg-info\PKG-INFO -> build\bdist.win32\egg\EGG-INFO
copying PyAutoGUI.egg-info\SOURCES.txt -> build\bdist.win32\egg\EGG-INFO
copying PyAutoGUI.egg-info\dependency_links.txt -> build\bdist.win32\egg\EGG-INF
O
copying PyAutoGUI.egg-info\requires.txt -> build\bdist.win32\egg\EGG-INFO
copying PyAutoGUI.egg-info\top_level.txt -> build\bdist.win32\egg\EGG-INFO
zip_safe flag not set; analyzing archive contents...
creating dist
creating 'dist\PyAutoGUI-0.9.39-py3.7.egg' and adding 'build\bdist.win32\egg' to
it
removing 'build\bdist.win32\egg' (and everything under it)
Processing PyAutoGUI-0.9.39-py3.7.egg
Copying PyAutoGUI-0.9.39-py3.7.egg to d:\myworksoftwarefolder\python3.7.1\lib\si
te-packages
Adding PyAutoGUI 0.9.39 to easy-install.pth file
Installed d:\myworksoftwarefolder\python3.7.1\lib\site-packages\pyautogui-0.9.39
-py3.7.egg
Processing dependencies for PyAutoGUI==0.9.39
Searching for pyscreeze
Reading https://pypi.python.org/simple/pyscreeze/
Downloading https://files.pythonhosted.org/packages/1c/80/ba95b654c92264675a8e67
646d0f80066e0285c2a3ccd466126035c3fbbf/PyScreeze-0.1.18.tar.gz#sha256=11737e196a
5dc35b723e0b34784559c052c10af8518f37e9cf70c86b5936fb00
Best match: PyScreeze 0.1.18
Processing PyScreeze-0.1.18.tar.gz
Writing C:\Users\JIAQID~1.STE\AppData\Local\Temp\easy_install-fpxd8d9c\PyScreeze
-0.1.18\setup.cfg
Running PyScreeze-0.1.18\setup.py -q bdist_egg --dist-dir C:\Users\JIAQID~1.STE\
AppData\Local\Temp\easy_install-fpxd8d9c\PyScreeze-0.1.18\egg-dist-tmp-t5ot5fac
warning: no files found matching '*.py' under directory 'pyautogui'
zip_safe flag not set; analyzing archive contents...
Copying pyscreeze-0.1.18-py3.7.egg to d:\myworksoftwarefolder\python3.7.1\lib\si
te-packages
Adding pyscreeze 0.1.18 to easy-install.pth file
Installed d:\myworksoftwarefolder\python3.7.1\lib\site-packages\pyscreeze-0.1.18
-py3.7.egg
Searching for Pillow
Reading https://pypi.python.org/simple/Pillow/
D:\MyWorkSoftwareFolder\Python3.7.1\lib\site-packages\setuptools\pep425tags.py:8
9: RuntimeWarning: Config variable 'Py_DEBUG' is unset, Python ABI tag may be in
correct
warn=(impl == 'cp')):
D:\MyWorkSoftwareFolder\Python3.7.1\lib\site-packages\setuptools\pep425tags.py:9
3: RuntimeWarning: Config variable 'WITH_PYMALLOC' is unset, Python ABI tag may
be incorrect
warn=(impl == 'cp')):
Downloading https://files.pythonhosted.org/packages/aa/49/e9de895c7baab95f9b3ab6
c8df272edcabba3c92046b008cfa4650fe6eea/Pillow-5.3.0-cp37-cp37m-win32.whl#sha256=
b92f521cdc4e4a3041cc343625b699f20b0b5f976793fb45681aac1efda565f8
Best match: Pillow 5.3.0
Processing Pillow-5.3.0-cp37-cp37m-win32.whl
Installing Pillow-5.3.0-cp37-cp37m-win32.whl to d:\myworksoftwarefolder\python3.
7.1\lib\site-packages
Adding Pillow 5.3.0 to easy-install.pth file
Installed d:\myworksoftwarefolder\python3.7.1\lib\site-packages\pillow-5.3.0-py3
.7-win32.egg
Searching for PyTweening>=1.0.1
Reading https://pypi.python.org/simple/PyTweening/
Downloading https://files.pythonhosted.org/packages/b9/f8/c32a58d6e4dff8aa5c27e9
07194d69f3b57e525c2e4af96f39c6e9c854d2/PyTweening-1.0.3.zip#sha256=4b608a570f4dc
cf2201e898f643c2a12372eb1d71a3dbc7e778771b603ca248b
Best match: PyTweening 1.0.3
Processing PyTweening-1.0.3.zip
Writing C:\Users\JIAQID~1.STE\AppData\Local\Temp\easy_install-2lpfdies\PyTweenin
g-1.0.3\setup.cfg
Running PyTweening-1.0.3\setup.py -q bdist_egg --dist-dir C:\Users\JIAQID~1.STE\
AppData\Local\Temp\easy_install-2lpfdies\PyTweening-1.0.3\egg-dist-tmp-ogegr1xz
zip_safe flag not set; analyzing archive contents...
Copying pytweening-1.0.3-py3.7.egg to d:\myworksoftwarefolder\python3.7.1\lib\si
te-packages
Adding pytweening 1.0.3 to easy-install.pth file
Installed d:\myworksoftwarefolder\python3.7.1\lib\site-packages\pytweening-1.0.3
-py3.7.egg
Searching for pymsgbox
Reading https://pypi.python.org/simple/pymsgbox/
Downloading https://files.pythonhosted.org/packages/b6/65/86379ede1db26c40e7972d
7a41c69cdf12cc6a0f143749aabf67ab8a41a1/PyMsgBox-1.0.6.zip#sha256=3888116a60812d0
1d44529c402014bf0896d2a9262617cb18faa9a7b3800ad4e
Best match: PyMsgBox 1.0.6
Processing PyMsgBox-1.0.6.zip
Writing C:\Users\JIAQID~1.STE\AppData\Local\Temp\easy_install-jgds7ghy\PyMsgBox-
1.0.6\setup.cfg
Running PyMsgBox-1.0.6\setup.py -q bdist_egg --dist-dir C:\Users\JIAQID~1.STE\Ap
pData\Local\Temp\easy_install-jgds7ghy\PyMsgBox-1.0.6\egg-dist-tmp-4bky9tdk
zip_safe flag not set; analyzing archive contents...
Copying pymsgbox-1.0.6-py3.7.egg to d:\myworksoftwarefolder\python3.7.1\lib\site
-packages
Adding pymsgbox 1.0.6 to easy-install.pth file
Installed d:\myworksoftwarefolder\python3.7.1\lib\site-packages\pymsgbox-1.0.6-p
y3.7.egg
Finished processing dependencies for PyAutoGUI==0.9.39
C:\Users\\Desktop\PyAutoGUI-0.9.39\dist\PyAutoGUI-0.9.39>
...


 937
937


 被折叠的 条评论
为什么被折叠?
被折叠的 条评论
为什么被折叠?
 到【灌水乐园】发言


