


一、寄存器模型
1、简介
UVM 寄存器模型的本质就是重新定义了验证平台与DUT的寄存器接口,为了更好去验证和配置DUT的寄存器功能。没有寄存器模型只能通过sequence的方式去访问读取寄存器,寄存器太多或要反复读写寄存器就很麻烦,而且验证寄存器是否达到想要配置也不方便,也无法在其他组件中控制寄存器,寄存器模型引入可以在其他组件中通过后门访问去读写寄存器,寄存器模型中的寄存器的信息与DUT里面包含的寄存器信息是完全一致的。
前门访问:在寄存器模型上做的读写操作,最终会通过模拟cpu在总线上发出读指令,进行读写操作来实现总线上的物理时序访问。在这个过程中,仿真时间($time函数得到的时间)是一直往前走的。
后门访问:指不通过总线进行读写操作,指的是利用UVM DPl ,将寄存器的操作直接作用到DUT内的寄存器变量,而不通过物理总线访问,它不消耗仿真时间,消耗的运行时间要远小于前门访问操作的运行时间。
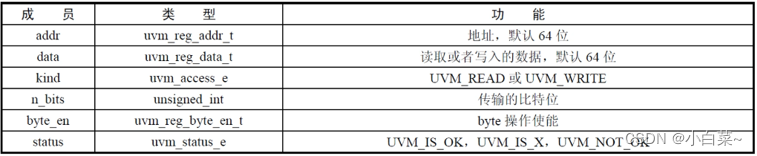
2、与寄存器模型相关的类和功能

2、前门访问流程
1、建立寄存器和寄存器表并包含所有的寄存器
class reg_invert extends uvm_reg;

    rand uvm_reg_field reg_data;

    virtual function void build();
        reg_data = uvm_reg_field::type_id::create("reg_data");
        reg_data.configure(this, 1, 0, "RW", 1, 0, 1, 1, 0);
    endfunction

    `uvm_object_utils(reg_invert)

    function new(input string name="reg_invert");
        super.new(name, 16, UVM_NO_COVERAGE);
    endfunction
endclass

class reg_model extends uvm_reg_block;

   rand reg_invert invert;

   virtual function void build();
      default_map = create_map("default_map", 0, 2, UVM_BIG_ENDIAN, 0);//0初始地址,每次偏移地址, UVM_BIG_ENDIAN地址排列大小端方式
      invert = reg_invert::type_id::create("invert", , get_full_name());
      invert.configure(this, null, "");
      invert.build();
      default_map.add_reg(invert, 'h8, "RW");
   endfunction

   `uvm_object_utils(reg_model)

    function new(input string name="reg_model");
        super.new(name, UVM_NO_COVERAGE);
    endfunction

endclass
说明:
- 先创建由uvm_reg_field产生寄存器reg_invert,该寄存器只有一个bit;
- reg_data.configure(this, 1, 0, "RW", 1, 0, 1, 1, 0);参数含义:1. 此域的parent 2. 宽度 3. 此域最低位在整个寄存器中的位置4. 此域的访问方式5. 是否易失,一般不用6. 上电复位后的默认值7. 是否有复位8. 是否可以随机化9. 是否可以单独访问
- UVM_NO_COVERAGE:是否要加入覆盖率的支持
- 建立reg_model:创建寻址表,参数含义:1. 名字2. 基地址3. 系统总线宽度(byte)4. 大小端:这个指地址的寻址的方向
- invert.configure(this, null, "");参数含义:1. block_parent 2. regfile_parent 3. hdl_path,后两个参数主要用于后门访问。
- default_map.add_reg(invert, 'h8, "RW");将寄存器加入表中,参数含义:1. 加入的寄存器2. 寄存器地址3. map中支持寄存器怎样的读取方式,create_map库里默认声明好了,只需例化。map的作用一方面用来表示寄存器和存储对应的偏移地址,同时由于一个reg_block可以包含多个map,各个map可以分别对应不同总线或者不同地址段。在reg_block中创建了各个
uvm_reg之后,需要调用uvm_reg::configure()去配置各个uvm_reg实例的属性。
2、adapter
前门访问也要通过sequence来访问,但寄存器中的数据无法直接兼容sequence的item挂载到sequencer上,两者数据类型肯定不一样,所以需要一个适配器(转换器)adapter。
class my_adapter extends uvm_reg_adapter;
    string tID = get_type_name();

    `uvm_object_utils(my_adapter)

   function new(string name="my_adapter");
      super.new(name);
   endfunction : new

   function uvm_sequence_item reg2bus(const ref uvm_reg_bus_op rw);
      bus_transaction tr;
      tr = new("tr");
      tr.addr = rw.addr;
      tr.bus_op = (rw.kind == UVM_READ) ? BUS_RD: BUS_WR;
      if (tr.bus_op == BUS_WR)
         tr.wr_data = rw.data;
      return tr;
   endfunction : reg2bus

   function void bus2reg(uvm_sequence_item bus_item, ref uvm_reg_bus_op rw);
      bus_transaction tr;
      if(!$cast(tr, bus_item)) begin
         `uvm_fatal(tID,
          "Provided bus_item is not of the correct type. Expecting bus_transaction")
          return;
      end
      rw.kind = (tr.bus_op == BUS_RD) ? UVM_READ : UVM_WRITE;
      rw.addr = tr.addr;
      rw.byte_en = 'h3;
      rw.data = (tr.bus_op == BUS_RD) ? tr.rd_data : tr.wr_data;
      rw.status = UVM_IS_OK;
   endfunction : bus2reg

endclass : my_adapter
说明:
-
实现reg2bus()和bus2reg()两个函数,这两个函数即实现了两种transaction的数据映射。uvm_reg_bus_op与总线transaction中各自的数据映射。
- 2.如果总线支持byte访问,可以使能supports_byte_enable;如果UVC要返回response数据,则应当使能provides_responses(provides_responses=1)。bus2reg()函数调用时得到的数据是总线返回时的transaction,但如果总线UVC不支持返回RSP(没有调用put_response(RSP)或者item_done(RSP)),那么不应该置此位,否则adapter将会使得验证环境挂起。默认情况下,上述的两个成员的复位值都是0。
- 结构图:

3、集成到验证平台和调用:
class my_vsqr extends uvm_sequencer;

   my_sequencer  p_my_sqr;
   bus_sequencer p_bus_sqr;
   reg_model     p_rm;//声明一个reg模型句柄,用于后续连接,调用

   function new(string name, uvm_component parent);
      super.new(name, parent);
   endfunction

   `uvm_component_utils(my_vsqr)
endclass
class base_test extends uvm_test;

   my_env         env;
   my_vsqr        v_sqr;
   reg_model      rm;
   my_adapter     reg_sqr_adapter;

   function new(string name = "base_test", uvm_component parent = null);
      super.new(name,parent);
   endfunction

   extern virtual function void build_phase(uvm_phase phase);
   extern virtual function void connect_phase(uvm_phase phase);
   extern virtual function void report_phase(uvm_phase phase);
   `uvm_component_utils(base_test)
endclass


function void base_test::build_phase(uvm_phase phase);
   super.build_phase(phase);
   env  =  my_env::type_id::create("env", this);
   v_sqr =  my_vsqr::type_id::create("v_sqr", this);
   rm = reg_model::type_id::create("rm", this);//例化
   rm.configure(null, "");//配置null表示没有再上一层的寄存器级,""表示路径
   rm.build();//调用所有的build函数
   rm.lock_model();//锁住,防止误操作
   rm.reset();//复位
   reg_sqr_adapter = new("reg_sqr_adapter");//例化adapter
   env.p_rm = this.rm;//env中p_rm连接this.rm,在env建立了与验证平台参考模型my_model的连接
endfunction

function void base_test::connect_phase(uvm_phase phase);
   super.connect_phase(phase);
   v_sqr.p_my_sqr = env.i_agt.sqr;
   v_sqr.p_bus_sqr = env.bus_agt.sqr;
   v_sqr.p_rm = this.rm;//v_sqr中的p_rm与this.rm连接
   rm.default_map.set_sequencer(env.bus_agt.sqr, reg_sqr_adapter);//
   rm.default_map.set_auto_predict(1);//自动更新镜像值
endfunction

function void base_test::report_phase(uvm_phase phase);
   uvm_report_server server;
   int err_num;
   super.report_phase(phase);

   server = get_report_server();
   err_num = server.get_severity_count(UVM_ERROR);

   if (err_num != 0) begin
      $display("TEST CASE FAILED");
   end
   else begin
      $display("TEST CASE PASSED");
   end
endfunction
class my_model extends uvm_component;
uvm_blocking_get_port #(my_transaction) port;
uvm_analysis_port #(my_transaction) ap;
reg_model p_rm;//定义一个reg模型
extern function new(string name, uvm_component parent);
extern function void build_phase(uvm_phase phase);
extern virtual task main_phase(uvm_phase phase);
extern virtual function void invert_tr(my_transaction tr);
`uvm_component_utils(my_model)
endclass
function my_model::new(string name, uvm_component parent);
super.new(name, parent);
endfunction
function void my_model::build_phase(uvm_phase phase);
super.build_phase(phase);
port = new("port", this);
ap = new("ap", this);
endfunction
function void my_model::invert_tr(my_transaction tr);
tr.dmac = tr.dmac ^ 48'hFFFF_FFFF_FFFF;
tr.smac = tr.smac ^ 48'hFFFF_FFFF_FFFF;
tr.ether_type = tr.ether_type ^ 16'hFFFF;
tr.crc = tr.crc ^ 32'hFFFF_FFFF;
for(int i = 0; i < tr.pload.size; i++)
tr.pload[i] = tr.pload[i] ^ 8'hFF;
endfunction
task my_model::main_phase(uvm_phase phase);
my_transaction tr;
my_transaction new_tr;
uvm_status_e status;
uvm_reg_data_t value;
super.main_phase(phase);
p_rm.invert.read(status, value, UVM_FRONTDOOR);//模型内部库通过sequencer前门访问读操作
while(1) begin
port.get(tr);
new_tr = new("new_tr");
new_tr.copy(tr);
//`uvm_info("my_model", "get one transaction, copy and print it:", UVM_LOW)
//new_tr.print();
if(value)
invert_tr(new_tr);
ap.write(new_tr);
end
endtaskclass my_env extends uvm_env;
my_agent i_agt;
my_agent o_agt;
bus_agent bus_agt;
my_model mdl;//声明验证平台参考模型
my_scoreboard scb;
reg_model p_rm;//声明reg模型
uvm_tlm_analysis_fifo #(my_transaction) agt_scb_fifo;
uvm_tlm_analysis_fifo #(my_transaction) agt_mdl_fifo;
uvm_tlm_analysis_fifo #(my_transaction) mdl_scb_fifo;
function new(string name = "my_env", uvm_component parent);
super.new(name, parent);
endfunction
virtual function void build_phase(uvm_phase phase);
super.build_phase(phase);
i_agt = my_agent::type_id::create("i_agt", this);
o_agt = my_agent::type_id::create("o_agt", this);
i_agt.is_active = UVM_ACTIVE;
o_agt.is_active = UVM_PASSIVE;
bus_agt = bus_agent::type_id::create("bus_agt", this);
bus_agt.is_active = UVM_ACTIVE;
mdl = my_model::type_id::create("mdl", this);//实例化
scb = my_scoreboard::type_id::create("scb", this);
agt_scb_fifo = new("agt_scb_fifo", this);
agt_mdl_fifo = new("agt_mdl_fifo", this);
mdl_scb_fifo = new("mdl_scb_fifo", this);
endfunction
extern virtual function void connect_phase(uvm_phase phase);
`uvm_component_utils(my_env)
endclass
function void my_env::connect_phase(uvm_phase phase);
super.connect_phase(phase);
i_agt.ap.connect(agt_mdl_fifo.analysis_export);
mdl.port.connect(agt_mdl_fifo.blocking_get_export);
mdl.ap.connect(mdl_scb_fifo.analysis_export);
scb.exp_port.connect(mdl_scb_fifo.blocking_get_export);
o_agt.ap.connect(agt_scb_fifo.analysis_export);
scb.act_port.connect(agt_scb_fifo.blocking_get_export);
mdl.p_rm = this.p_rm;//env中reg模型与my_model中reg模型连接
endfunction说明:
- 模型例化可以在base_test中,也可以在env中。
-
在还未集成predictor之前,我们采用了auto prediction的方式,因此调用了函数set_auto_predict()。自动预测不依赖于predictor模块,只要做了配置,就会自动更改寄存器模型里的镜像值。
-
在base_test环境的connect阶段中,rm.default_map.set_sequencer(env.bus_agt.sqr, reg_sqr_adapter);在于将map(寄存器信息)、sequencer(总线侧激励驱动)和adapter (寄存器级别和硬件总线级别的桥接)关联在一起。
3、后门访问流程
//reg_model.sv
class reg_model extends uvm_reg_block;
   rand reg_invert invert;
   rand reg_counter_high counter_high;
   rand reg_counter_low counter_low;

   virtual function void build();
      default_map = create_map("default_map", 0, 2, UVM_BIG_ENDIAN, 0);

      invert = reg_invert::type_id::create("invert", , get_full_name());
      invert.configure(this, null, "invert");//第三个参数要换成实际寄存器名字,便于直接通过路径的方式来寻找对应寄存器
      invert.build();
      default_map.add_reg(invert, 'h9, "RW");
      counter_high = reg_counter_high::type_id::create("counter_high", , get_full_name());
      counter_high.configure(this, null, "counter[31:16]");//第三个参数要换成实际寄存器名字
      counter_high.build();
      default_map.add_reg(counter_high, 'h5, "RW");
      counter_low = reg_counter_low::type_id::create("counter_low", , get_full_name());
      counter_low.configure(this, null, "counter[15:0]");//第三个参数要换成实际寄存器名字
      counter_low.build();
      default_map.add_reg(counter_low, 'h6, "RW");
   endfunction

   `uvm_object_utils(reg_model)

    function new(input string name="reg_model");
        super.new(name, UVM_NO_COVERAGE);
    endfunction

endclass
//base_test.sv
function void base_test::build_phase(uvm_phase phase);
   super.build_phase(phase);
   env  =  my_env::type_id::create("env", this);
   v_sqr =  my_vsqr::type_id::create("v_sqr", this);
   rm = reg_model::type_id::create("rm", this);
   rm.configure(null, "");
   rm.build();
   rm.lock_model();
   rm.reset();
   rm.set_hdl_path_root("top_tb.my_dut");//设置寄存器在dut中的路径,而不是模型中的地址
   reg_sqr_adapter = new("reg_sqr_adapter");
   env.p_rm = this.rm;
endfunction

function void base_test::connect_phase(uvm_phase phase);
   super.connect_phase(phase);
   v_sqr.p_my_sqr = env.i_agt.sqr;
   v_sqr.p_bus_sqr = env.bus_agt.sqr;
   v_sqr.p_rm = this.rm;
   rm.default_map.set_sequencer(env.bus_agt.sqr, reg_sqr_adapter);//连接
   rm.default_map.set_auto_predict(1);
endfunction
//my_case0.sv
virtual task body();
      uvm_status_e   status;
      uvm_reg_data_t value;
      bit[31:0] counter;
      if(starting_phase != null)
         starting_phase.raise_objection(this);
      p_sequencer.p_rm.counter_low.poke(status, 16'hFFFD);//后门访问
      p_sequencer.p_rm.counter_low.read(status, value, UVM_FRONTDOOR);
      counter[15:0] = value[15:0];
      p_sequencer.p_rm.counter_high.read(status, value, UVM_FRONTDOOR);
      counter[31:16] = value[15:0];
      `uvm_info("case0_cfg_vseq", $sformatf("after poke, counter's value(FRONTDOOR) is %0h", counter), UVM_LOW)
      p_sequencer.p_rm.counter_low.peek(status, value);//后门访问
      counter[15:0] = value[15:0];
      p_sequencer.p_rm.counter_high.peek(status, value);//后门访问
      counter[31:16] = value[15:0];
      `uvm_info("case0_cfg_vseq", $sformatf("after poke, counter's value(BACKDOOR) is %0h", counter), UVM_LOW)
      if(starting_phase != null)
         starting_phase.drop_objection(this);
   endtask
说明:
- 后门访问可以通过直接修改实际寄存器的值来修改DUT的寄存器值。在设置寄存器模型时,可以使用
set_hdl_path_root()方法指定寄存器在DUT中的路径,然后在后门访问中使用该路径访问寄存器,从而修改寄存器的值。需要注意的是,后门访问可能会绕过DUT中的一些逻辑,因此需要谨慎使用,以免产生意外的副作用。 - peek通过后门访问方式读取寄存器的值,不关心DUT的行为,即使寄存器的读写类型是不能读,也可以将值读出来。
- poke通过后门访问方式写入寄存器的值,不关心DUT的行为,即使寄存器的读写类型是不能写,也可以将值写进去
- read模仿DUT的行为,通过前门或者后门方式读取DUT中寄存器的值,并更新镜像值,会产生总线transaction
- write模仿DUT的行为,通过前门或者后门方式向DUT中写入寄存器值,会产生总线transaction。并且调用predict更新镜像值。


 3691
3691


 被折叠的 条评论
为什么被折叠?
被折叠的 条评论
为什么被折叠?
 到【灌水乐园】发言


