


基于fastmcp开发weather mcp server
天气预报接口定义
https://www.weather.gov/documentation/services-web-api
-
How do I get the forecast?
https://api.weather.gov/gridpoints/{office}/{gridX},{gridY}/forecast
例如:https://api.weather.gov/gridpoints/TOP/31,80/forecast
https://api.weather.gov/points/{latitude},{longitude}
-
How do I get alerts?
https://api.weather.gov/alerts/active?area={state}
安装 uv - Python依赖管理工具
详见《深度解锁MCP模型上下文协议,赋能大模型玩转智能体》扩展内容阅读 : [uv - Python依赖管理工具]
uv 是一个用 Rust 编写的极快的 Python 包和项目管理器。
https://github.com/astral-sh/uv
uvx 是 uv 工具链的扩展命令。uvx( uv tool run的别名)用于在临时环境中运行工具,无需安装即可调用工具。
https://docs.astral.sh/uv/guides/tools
开发环境准备
https://modelcontextprotocol.io/quickstart/server
# Create a new directory for our project
uv init weather
cd weather

# Create virtual environment and activate it
uv venv
source .venv/bin/activate

# Install dependencies
uv add "mcp[cli]" httpx

# Create our server file
touch weather.py
示例代码 weather.py
from typing import Any
import httpx
from mcp.server.fastmcp import FastMCP

# 初始化 FastMCP 服务器
mcp = FastMCP("weather")

# 常量
NWS_API_BASE = "https://api.weather.gov"
USER_AGENT = "weather-app/1.0"

async def make_nws_request(url: str) -> dict[str, Any] | None:
    """向 NWS API 发起请求,并进行错误处理。"""
    headers = {
        "User-Agent": USER_AGENT,
        "Accept": "application/geo+json"
    }
    async with httpx.AsyncClient() as client:
        try:
            response = await client.get(url, headers=headers, timeout=30.0)
            response.raise_for_status()
            return response.json()
        except Exception:
            return None

def format_alert(feature: dict) -> str:
    """将警报信息格式化为可读字符串。"""
    props = feature["properties"]
    return f"""
Event: {props.get('event', 'Unknown')}
Area: {props.get('areaDesc', 'Unknown')}
Severity: {props.get('severity', 'Unknown')}
Description: {props.get('description', 'No description available')}
Instructions: {props.get('instruction', 'No specific instructions provided')}
"""

@mcp.tool()
async def get_alerts(state: str) -> str:
    """获取美国州的天气警报。
    参数:
        state: 美国州的代码 (例如 CA, NY)
    """
    url = f"{NWS_API_BASE}/alerts/active/area/{state}"
    data = await make_nws_request(url)

    if not data or "features" not in data:
        return "Unable to fetch alerts or no alerts found."

    if not data["features"]:
        return "No active alerts for this state."

    alerts = [format_alert(feature) for feature in data["features"]]
    return "\n---\n".join(alerts)

@mcp.tool()
async def get_forecast(latitude: float, longitude: float) -> str:
    """获取地点的天气预报。
    参数:
        latitude: 地点的纬度
        longitude: 地点的经度
    """
    points_url = f"{NWS_API_BASE}/points/{latitude},{longitude}"
    points_data = await make_nws_request(points_url)

    if not points_data:
        return "Unable to fetch forecast data for this location."

    forecast_url = points_data["properties"]["forecast"]
    forecast_data = await make_nws_request(forecast_url)

    if not forecast_data:
        return "Unable to fetch detailed forecast."

    periods = forecast_data["properties"]["periods"]
    forecasts = []
    for period in periods[:5]:
        forecast = f"""
{period['name']}:
Temperature: {period['temperature']}°{period['temperatureUnit']}
Wind: {period['windSpeed']} {period['windDirection']}
Forecast: {period['detailedForecast']}
"""
        forecasts.append(forecast)

    return "\n---\n".join(forecasts)

if __name__ == "__main__":
    # 初始化并运行服务器
    mcp.run(transport='stdio')
运行weather mcp服务器
uv run weather.py
MCP Inspector调试
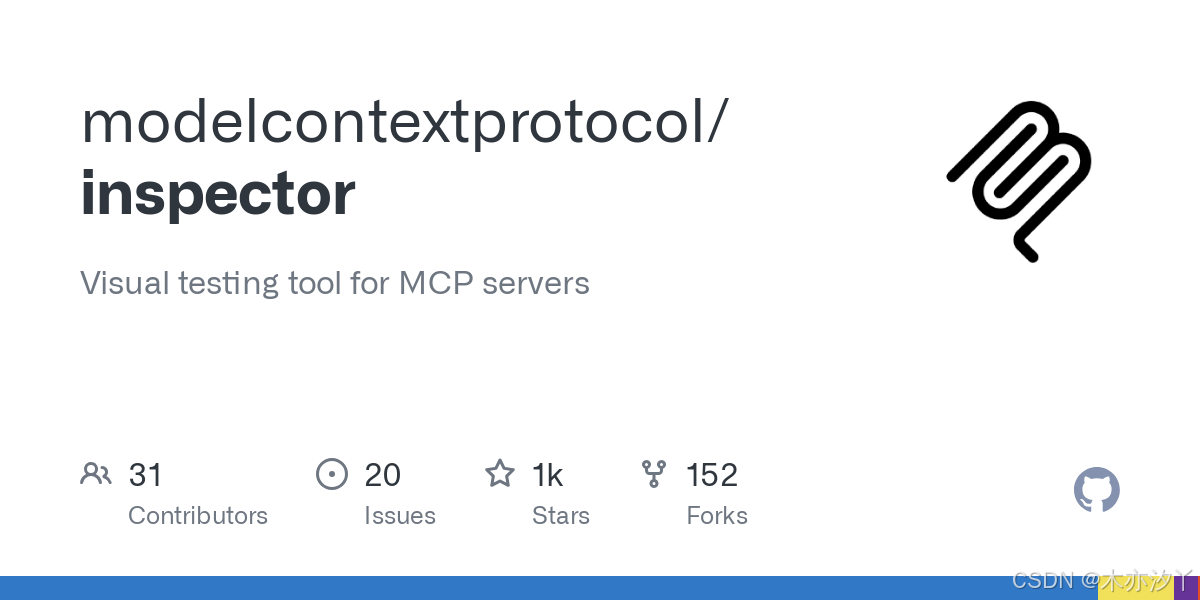
MCP Inspector 是专为 Model Context Protocol(MCP)服务器设计的交互式调试工具,支持开发者通过多种方式快速测试与优化服务端功能。
https://github.com/modelcontextprotocol/inspector
调试 MCP 服务器
我们可以通过两种方法来运行Inspector:
方式一、npx
Inspector 直接通过 npx 运行,无需安装:
npx @modelcontextprotocol/inspector <command>
npx @modelcontextprotocol/inspector <command> <arg1> <arg2>npx是Node.js的一个命令行工具,用于直接运行 npm 包中的命令,无需全局安装或显式指定路径。
安装nodejs就默认自带这个工具了。
npx 的核心价值在于 简化开发流程,通过临时安装、版本指定和依赖隔离,解决了全局包污染和版本冲突问题。
- 临时使用场景:无需全局安装即可运行包,执行后自动清理临时文件。
- 解决依赖冲突: 优先使用项目本地安装的包版本,避免全局版本冲突。
@modelcontextprotocol/inspector
@ 符号表示这是一个 作用域包,用于明确包的归属组织或用途。
@modelcontextprotocol 是组织名,inspector 是包名。
作用域包常见于企业级工具、框架官方包(如 @angular、@vue)或避免命名冲突的场景。
这个包在 @modelcontextprotocol/inspector - npm
通过
npx @modelcontextprotocol/inspector自动临时下载运行这个包。
<command> 和参数
这里的 <command> 是指让MCP服务器端执行起来的命令。
比如你是通过
node build/index.js执行MCP服务器端的命令,则可以用下面方式启动调试:npx @modelcontextprotocol/inspector node build/index.jsMCP服务器启动需要参数和环境变量,也可以通过下面方式传递:
# 传递参数 arg1 arg2
npx @modelcontextprotocol/inspector build/index.js arg1 arg2

# 传递环境变量 KEY=value  KEY2=$VALUE2
npx @modelcontextprotocol/inspector -e KEY=value -e KEY2=$VALUE2 node build/index.js

# 同时传递环境变量和参数
npx @modelcontextprotocol/inspector -e KEY=value -e KEY2=$VALUE2 node build/index.js arg1 arg2

# Use -- to separate inspector flags from server arguments
npx @modelcontextprotocol/inspector -e KEY=$VALUE -- node build/index.js -e server-flag
运行示例
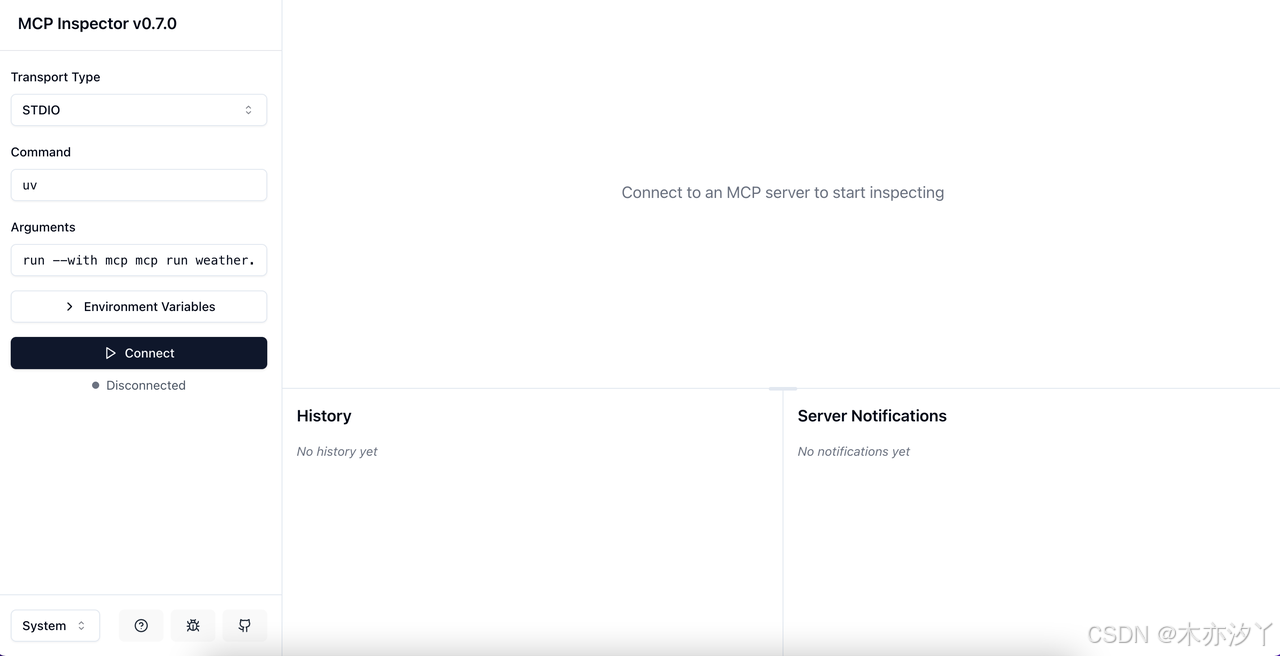
npx -y @modelcontextprotocol/inspector uv run weather.py方式二、mcp dev
mcp dev PYTHONFILE运行示例
mcp dev weather.pyInspector 运行起来后,会启动两个服务:
- 带UI的客户端,默认端口 5173
- MCP proxy server , 默认端口 3000
在浏览器中打开 http://localhost:5173 即可使用。
当然也可以根据需要自定义端口:
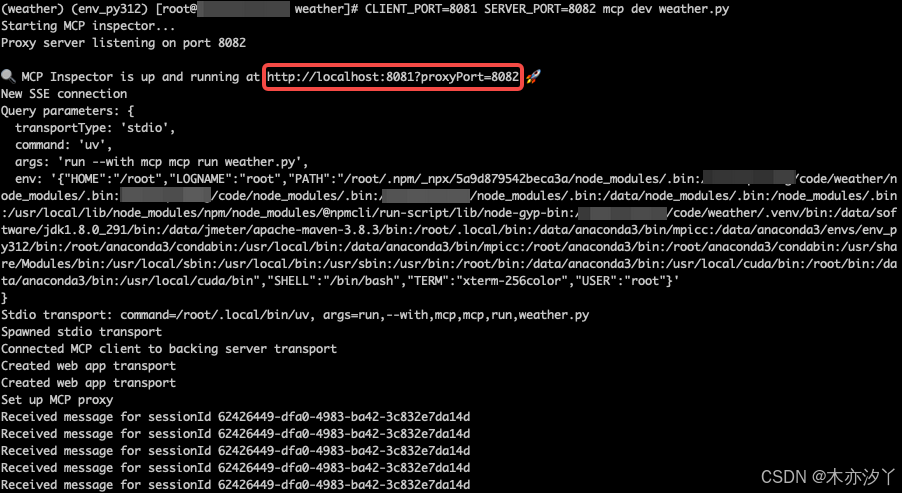
CLIENT_PORT=8081 SERVER_PORT=8082 npx @modelcontextprotocol/inspector uv run weather.py
或
CLIENT_PORT=8081 SERVER_PORT=8082 mcp dev weather.py
连接服务器的传输方式
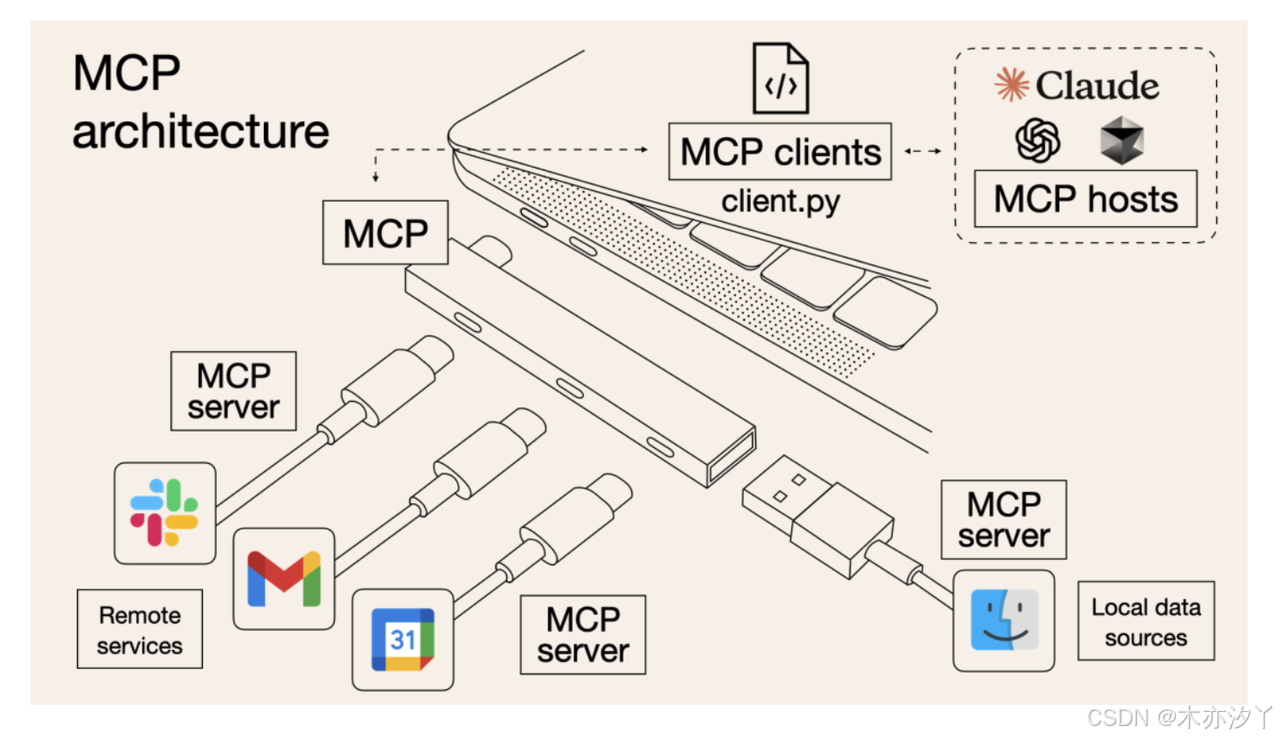
MCP Inspector 关于MCP的通信机制,有两种默认标准传输机制:标准输入输出(STDIO) 和 服务器发送事件(SSE)。这个我们在《深度解锁MCP模型上下文协议,赋能大模型玩转智能体》也有大概介绍过,同时Anthropic发布了MCP的更新,引入了一种新的“Streamable HTTP”传输方式,替代现有的HTTP+SSE方案。
这里的端口3000的MCP proxy server,就是对stdio传输机制的封装,让它暴露成 HTTP with SSE 方式。

图中每个框是一个进程,通过MCP Proxy Server启动服务端子进程(stdio传输机制的MCP Server),这样就把stdio服务变成HTTP服务。
调试weather mcp服务器
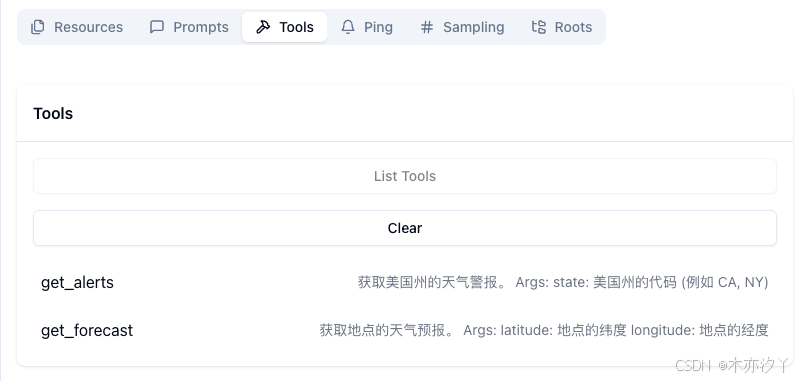
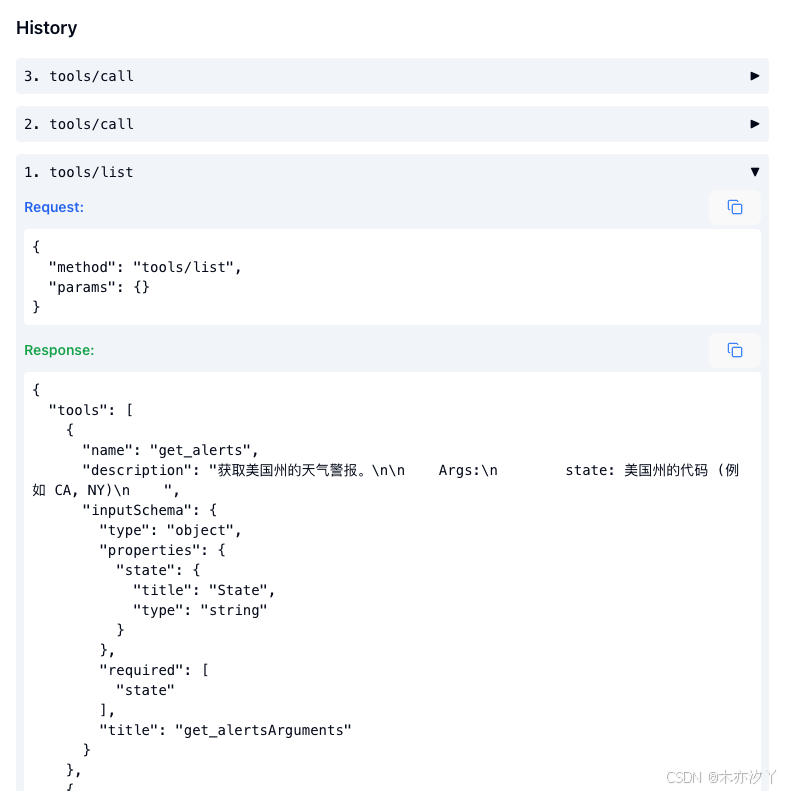
点击Connect,连接成功后,点击Tools->List Tools,我们发现有两个天气接口工具可以调用。
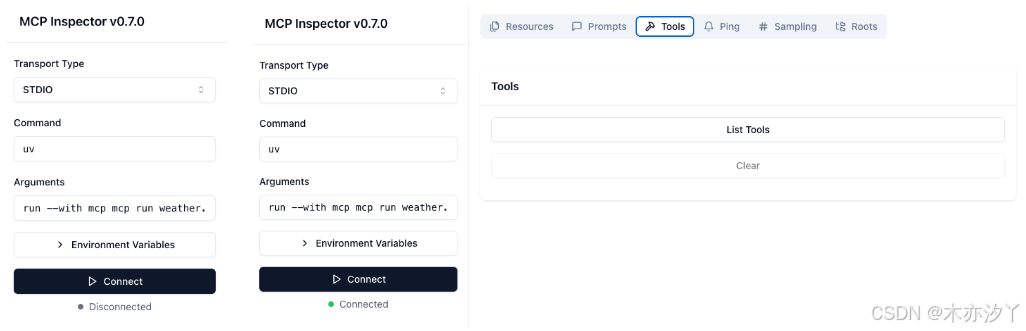
展示接口列表
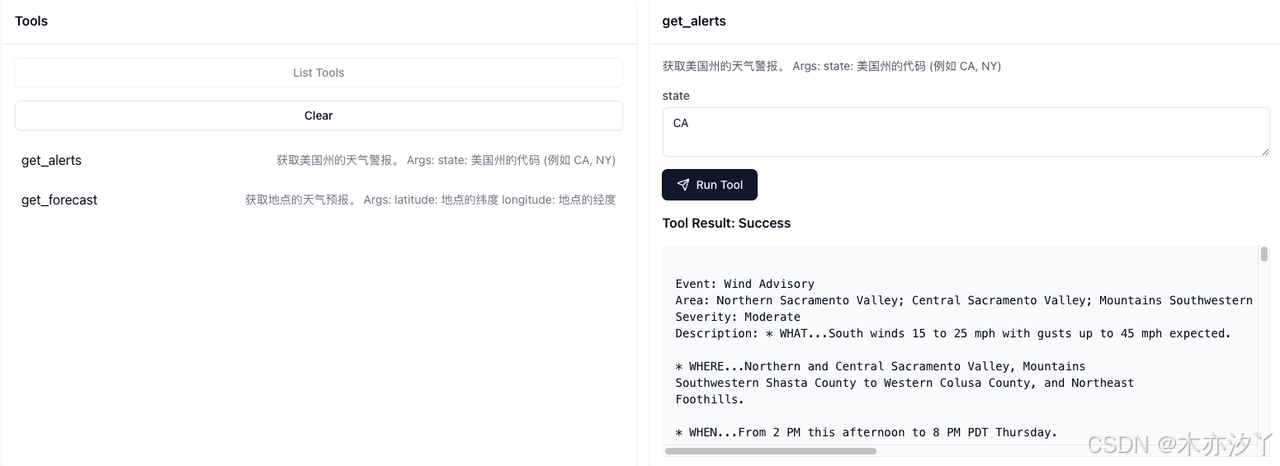
get_alerts测试
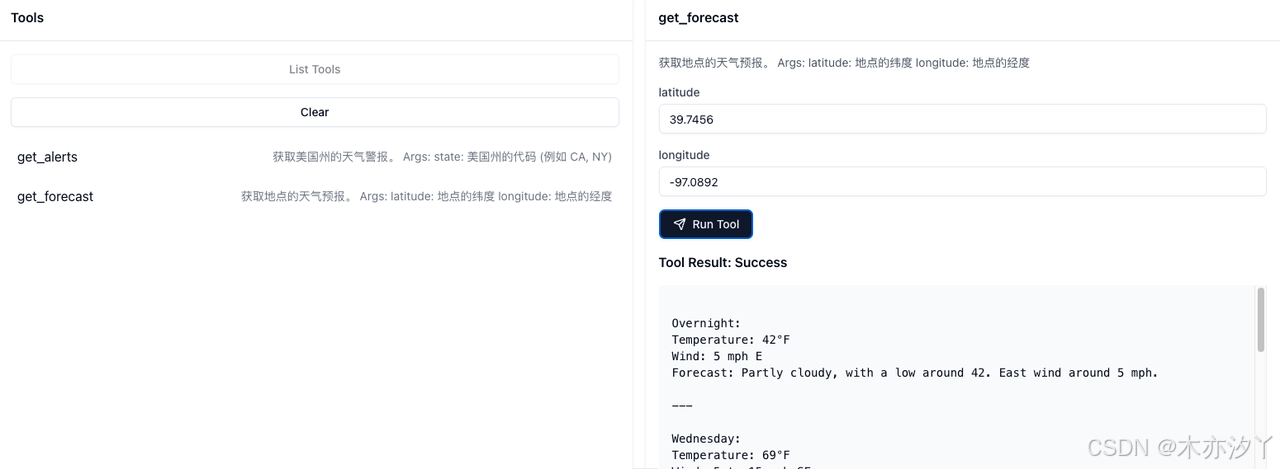
get_forecast测试
后台日志
请求记录
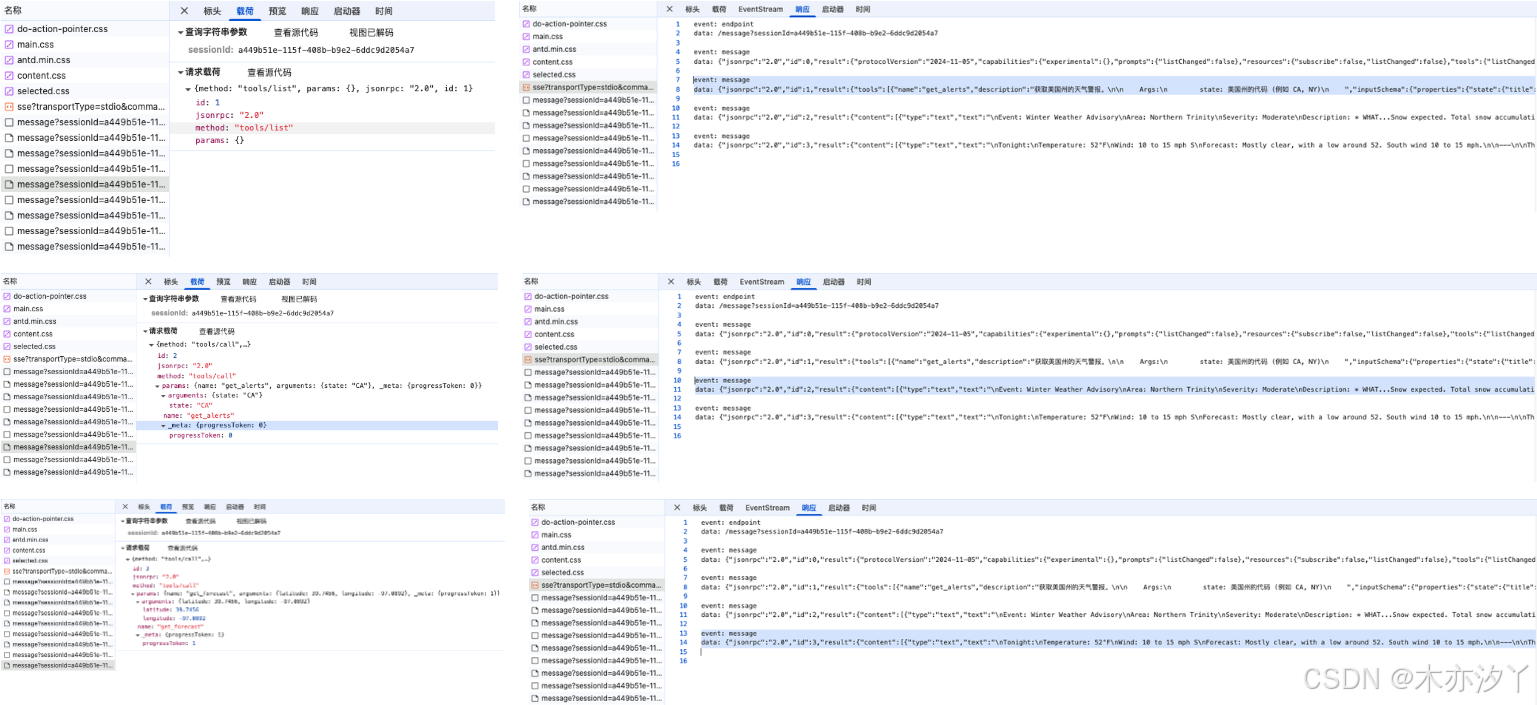
浏览器开发者工具
因为采用的是 SSE 协议, 则发送的信息和接受的信息不在一起。
- 发送的请求是通过 message 传递的;
- 接受的请求是通过 sse 接收的。


 2372
2372

 被折叠的 条评论
为什么被折叠?
被折叠的 条评论
为什么被折叠?
 到【灌水乐园】发言


