


1. 准备工作:安装并运行STAR+fastp
1.1 install STAR
gihub download: https://github.com/alexdobin/STAR
# Get latest STAR source from releases
wget https://github.com/alexdobin/STAR/archive/2.7.10b.tar.gz
tar -xzf 2.7.10b.tar.gz
cd STAR-2.7.10b
# Alternatively, get STAR source using git
git clone https://github.com/alexdobin/STAR.git
# Compile
cd STAR/source
make STAR
# 修改环境 vim ~/.bashrc增加下面一行后source ~/.bashrc
export PATH="/share2/pub/yangjy/yangjy/softs/STAR-2.7.10a/bin/Linux_x86_64_static:"$PATH
1.2 下载文件:gencode HG38
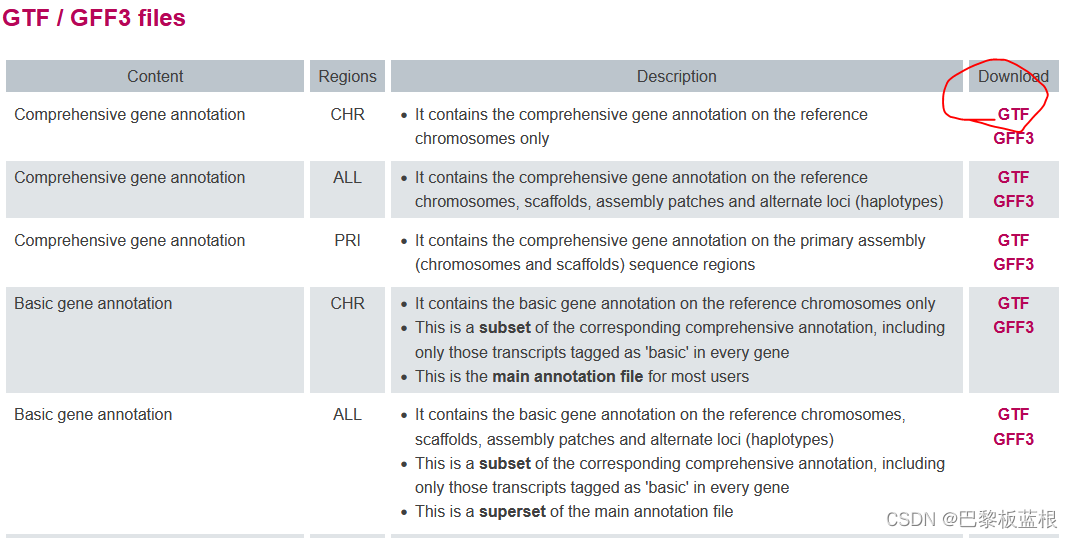
 官方推荐基因组的fasta采用primary_assembly版本, 不应该包含alt_scaffold和patches,但现在就选这个全都包含的。
1.3 构建index
# fasta 和 gtf文件 都解压缩
# 提前创建好index目录,在该目录下,会生成许多文件,所以必须有写权限
# 这个过程大概需要2.5-3h
STAR --runThreadN 10 \
--runMode genomeGenerate \
--genomeDir index/ \
--genomeFastaFiles fasta/GRCh38.p13.genome.fa \
--sjdbGTFfile HG38/gencode.v43.annotation.gtf \
--sjdbOverhang 149 #值默认为100, 在实际设置时,最佳取值为max(read_length) - 1
报错:
STAR --runThreadN 10 --runMode genomeGenerate --genomeDir index/ --genomeFastaFiles fasta/GRCh38.p13.genome.fa " "
STAR version: 2.7.10b   compiled: 2022-11-01T09:53:26-04:00 :/home/dobin/data/STAR/STARcode/STAR.master/source
Mar 10 16:32:04 ..... started STAR run
Mar 10 16:32:04 ... starting to generate Genome files
EXITING because of INPUT ERROR: could not open genomeFastaFile:
Mar 10 16:32:19 ...... FATAL ERROR, exiting
genomeGenerate.sh: 5: genomeGenerate.sh: --sjdbGTFfile: not found
解决:
this looks like a problem with the formatting of the command line. I would remove the backslashes \ so that it’s one line. You should be able to use backslashes for multiline commands, but you need to make sure there are no spaces after them.
1.4 安装fastp+HTSeq
conda install -c bioconda fastp # 这是很旧的版本
conda create -n fastp -c bioconda fastp=0.23.2
# A workaround would be creating a new conda environment and installing the latest fastp
# 参考https://github.com/OpenGene/fastp/issues/383
conda install -c bioconda htseq
激活后,后续就在工作目录下开始比对就好
2.运行
fastp参数详解:https://www.jianshu.com/p/6f492058da5b
fastp报告解读:https://www.pianshen.com/article/850281327/
STAR流程:https://blog.51cto.com/u_10721944/5398446
1. fastp与STAR
#!/bin/sh
name=$1
. /public/wgs/songjy/RNA_seq
mkdir -p LOG
mkdir -p test
date | sed 's/$/   XXX  fastp start.../' | sed "s/XXX/$name/" >LOG/${name}.log
fastp \
        -i test/$name\_R1.fastq.gz \
        -o test/$name\_R1_clean.fastq.gz \
        -I test/$name\_R2.fastq.gz \
        -O test/$name\_R2_clean.fastq.gz \
        -h test/$name\_fastp.html \
        -W 4 \
	-M 20 \
	--length_required 36 \
	>LOG/${name}.fastp.stdout 2>LOG/${name}.fastp.stderr
date | sed 's/$/  XXX  fastp end.../' | sed "s/XXX/$name/" >>LOG/${name}.log

mkdir -p BAM
date | sed 's/$/  XXX  STAR start.../' | sed "s/XXX/$name/" >>LOG/${name}.log
cd BAM
STAR --runMode alignReads \
	--runThreadN 16 \
	--genomeDir /public/wgs/songjy/RNA_seq/index/ \
	--alignIntronMax 1000000 \
	--alignIntronMin 20 \
	--alignMatesGapMax 1000000 \
	--alignSJDBoverhangMin 1 \
	--alignSJoverhangMin 8 \
	--chimJunctionOverhangMin 20 \
	--chimSegmentMin 0 \
	--genomeLoad NoSharedMemory\
	--readFilesIn  ../test/$name\_R1_clean.fastq.gz ../test/$name\_R2_clean.fastq.gz \
	--outFileNamePrefix ${name}_ \
	--outFilterIntronMotifs RemoveNoncanonical \
	--outFilterMatchNmin 0 \
	--limitBAMsortRAM 0 \
	--outFilterMatchNminOverLread 0.33 \
	--outFilterScoreMinOverLread 0.33 \
	--outFilterMismatchNmax 10 \
	--outFilterMismatchNoverLmax 0.05 \
	--sjdbScore 2 \
	--sjdbOverhang 149 \
	--outFilterMultimapNmax 20 \
	--outFilterMultimapScoreRange 1 \
	--outSAMstrandField intronMotif \
	--outFilterScoreMin 0 \
	--outSAMunmapped Within \
	--outSAMattributes NH HI NM MD AS XS \
	--outStd  Log \
	--outSAMtype BAM SortedByCoordinate \
	--outSAMheaderHD @HD VN:1.4 SO:coordinate \
	--outFilterType BySJout \
	--quantMode TranscriptomeSAM \
	--readFilesCommand zcat \
	--outReadsUnmapped Fastx >../LOG/${name}.STAR.stdout 2>../LOG/${name}.STAR.stderr
cd ../
date | sed 's/$/  XXX  STAR end.../' | sed "s/XXX/$name/" >>LOG/${name}.log
将上述保存为xxx.sh后运行
代码解释:找到fastq文件,批量写出"getCount_star_HTseq.sh",并且去重,因为前缀重复(在后缀-1,-2等情况下)
ssh nodexxx
conda activate rnaseq_fastp_htseq_new
ls FASTQ/ | awk -F '_' '{print "sh getCount_star_HTseq.sh", $1}' | sort -k2n  | uniq > run_rna.sh
nohup sh run_rna.sh &
确认样本个数:
# 由于分两批跑,FASTQ含18个“-P”文件,有14个被FASTQ3覆盖为“-N”并重新跑,此代码为输出的未被重新跑的文件,4个
comm -23 <(ls FASTQ/ |grep "P" |uniq |awk -F "-" '{print $1}' |uniq|sort)  <(ls FASTQ3/ |uniq |awk -F "-" '{print $1}' |uniq|sort)
# 查看每个bam文件是否有两个(-N和-T)
ls BAM/*_Aligned.toTranscriptome.out.bam | awk -F "-" '{print $1}' |awk -F "/" '{print $2}'|uniq -c |sort
如果样本未跑全,使用如下重新跑
comm -23 <(ls FASTQ4_0810/*.gz |awk -F "/" '{print $NF}' |awk -F "_"  '{print $1}' |sort|uniq) \
<(cat LOG/STAR_0815.log |awk '{print $7}' |awk -F "_"  '{print $1}' |sort |uniq -c | grep -vE '^ *1 '|awk '{print $2}') | \
awk 'BEGIN{OFS=""} {print "sbatch  -p research -N 1 -n 16 -e /public/wgs/JG_PA/RNAseq/LOG/",$0,"_STAR.err --output=/public/wgs/JG_PA/RNAseq/LOG/",$0,"_STAR.out   --wrap ","\"","sh getFastpStar.sh ",$0,"\""}' > run_STAR.sh
2.检查bam文件
2.1 samtools检查bam文件是否完整
cd BAM
for i in *.bam ;do (samtools quickcheck $i && echo "ok" || echo $i error);done
2.2 RSeQC https://rseqc.sourceforge.net/#genebody-coverage-py https://rseqc.sourceforge.net/#genebody-coverage-py
基本参考说明书即可,TIN.py运行失败很久,无报错就是没结果,后来发现是bed文件的问题,从这里重新下载bed文件可成功运行: RSeQC Files https://sourceforge.net/projects/rseqc/files/BED/Human_Homo_sapiens/
2.3 BAMixChecker https://bamixchecker.readthedocs.io/en/latest/Input.html#rna-seq-bam-file
不好启动呢,使用严格参考这里:https://bamixchecker.readthedocs.io/en/latest/Input.html ,需要python包和R包+配置BAMixChecker.config文件+安装picard+fasta文件也要提前构建好(这里使用之前wes构建好的)****
实际上,是因为bam文件不合格,需要two pass,即GATK流程处理一下才行,参考另一篇RNA-seq数据的GATK找变异流程 https://blog.csdn.net/JjinYyi/article/details/132564871
*这里的后续不需要看了:
#安装picard:
wget https://github.com/broadinstitute/picard/releases/download/2.25.5/picard.jar
picard.jar -h
1.注意输入文件的格式和bam文件需要readgroup 什么是readgroup:https://www.jianshu.com/p/9a29bfc87a50
2.一般需要bwa的mem参数添加readgroup
bwa mem -R "read_group_string" ...
samtools view -H sample.bam | grep '^@RG' # 果然无输出,发现没有相关信息
3.但rna用STAR未产生这样的数据,可以从这里获取read group各项信息,具体是参考bam reads,run:
samtools view filename.bam | cut -f1
#举例:A01415:337:HJFFGDSX3:4:1102:22571:31438
#解释:其中,A01415为机器编号,337为run id,HJFFGDSX3为flowcell编号,4为lane编号,1102为tile编号,22571为桥式扩增后的簇(cluster)在tile上的横坐标,31438为cluster在tile的纵坐标(一直误以为一个tile就是一个cluster。但是从这里可以看出,一个tile上有众多cluster)。
#所以直接用ID:HJFFGDSX3.4作为ID即可。
#上文说到一个fastq文件(双端测序可能是两个)中通常只有一个文库的一个lane的reads,已经满足了ID唯一的要求了。
#查看:(我是双端,不唯一,所以这项作废)
# samtools view filename.bam | cut -f1 | cut -d ":" -f 3,4 | sort | uniq
# run:
name=$1
machine=$(samtools view -@ 14 /public/wgs/JG_PA/RNAseq/BAM_test2/${name}_Aligned.sortedByCoord.out.bam | cut -f1 | cut -d ":" -f 1 | sort | uniq )
java -jar /public/wgs/JG_PA/RNAseq/BAMixChecker/picard.jar AddOrReplaceReadGroups \
I=/public/wgs/JG_PA/RNAseq/BAM_test2/${name}_Aligned.sortedByCoord.out.bam \
O=/public/wgs/JG_PA/RNAseq/BAMixChecker/containReadgroupBAM/${name}_ReadGroup.out.bam \
SO=coordinate RGID=$name RGLB=$name RGPL=ILLUMINA  RGSM=$name RGPU=$machine$name
# 貌似不太成熟,但能运行起来,RGPU似乎并非create所必需(下图),但一定要有输入
# https://www.zhihu.com/question/26011991 这里比较系统详细的解释了readgroup,也说RGPU非必需


3.首选featurecounts计数
mkdir -p Featurecounts
date | sed 's/$/  XXX  featurecounts start.../' | sed "s/XXX/union_count/" >> LOG/${name}.log
featureCounts \
	-T 5 -p -t exon -g gene_id  \
	-a /public/wgs/songjy/RNA_seq/HG38/gencode.v43.annotation.gtf \
	-o Featurecounts/union.counts.txt /BAM/*_Aligned.sortedByCoord.out.bam
date | sed 's/$/  XXX  featurecounts end.../' | sed "s/XXX/union_count/" >> LOG/${name}.log
或HTseq计数
mkdir -p HTSEQcount
date | sed 's/$/  XXX  HTseq-count start.../' | sed "s/XXX/$name/" >>LOG/${name}.log
htseq-count \
	-i gene_id \
	-f bam \
	--mode=intersection-nonempty \
	-r pos \
	-n 16 \
	-s no BAM/${name}_Aligned.sortedByCoord.out.bam \
	/public/wgs/songjy/RNA_seq/HG38/gencode.v43.annotation.gtf \
	> HTSEQcount/htseq.$name.txt 2>LOG/${name}.htseq.stderr
date | sed 's/$/  XXX  HTseq-count END.../' | sed "s/XXX/$name/" >>LOG/${name}.log
或,RSEM也可以跑,但注意用“Transcri.bam”
cd BAM
ls *Transcri*.bam |awk -F "_" '{print $1}'| uniq| while read name;
do
mkdir -p ../RSEM_count
date | sed 's/$/                XXX     RSEM start.../' | sed "s/XXX/$name/" >> ../LOG/RSEM_0815.log
rsem-calculate-expression --paired-end -no-bam-output --alignments -p 10 ${name} ../index_forRSEM/index_forRSEM ../RSEM_count/${name}_RSEM_count
date | sed 's/$/                XXX     RSEM end.../' | sed "s/XXX/$name/" >> ../LOG/RSEM_0815.log
done
cd ../
ps:一个双端样本的时长
Wed Mar 15 22:07:20 CST 2023                08678484-N     fastp start...
Wed Mar 15 22:26:44 CST 2023                08678484-N     fastp end...
Wed Mar 15 22:26:44 CST 2023                08678484-N     STAR start...
Wed Mar 15 23:32:16 CST 2023                08678484-N     STAR end...
Wed Mar 15 23:32:16 CST 2023                08678484-N     HTseq-count start...
Thu Mar 16 07:11:51 CST 2023                08678484-N     HTseq-count END...
而featurecounts定量只需2min
3. 对比htseq和featurecounts两个工具
htseq和featurecounts有所不同,对于paired-end推荐featurecounts: https://bioinformatics.cvr.ac.uk/featurecounts-or-htseq-count/
reads计数与标准化: https://www.jianshu.com/p/1505fa220ce4,perl合并featureconts文件,可以参考;同时对比了htseq和featurecounts
feature计数原理:
首先在计数水平上:
分为feature和meta-feature,feature是值基因组上被定义为一个片段区域,meta-feature是指多个feature组成的区域,如exon和gene的关系,分享相同的feature identifier (GTF文件中有)的feature属于同一个meta-feature
featurecount的 "-t" 参数:设置feature-type,“-t” 指定的必须是gtf中有的feature,同时read只有落到这些feature上才会被统计到,默认是“exon”,即以exon为最小单位(feature)去回帖计数。
featurecount的 "-f" 参数:设置之后将会统计feature层面的数据,如exon-level;否则会统计meta-feature层面的数据,如gene-levels;
默认 "-f" 不设置,并与 “ -t exon" 结合使用,表明:在exon-level上计数,共享相同gene identifier(隶属同一meta-feature)的exon相加,最终在meta-feature层面上得到计数统计数据。
fastp+STAR处理结果得到排序后的bam文件,用同一批bam文件测试:
不应该去对比同一样本的htseq/featurecounts结果是否有差异:
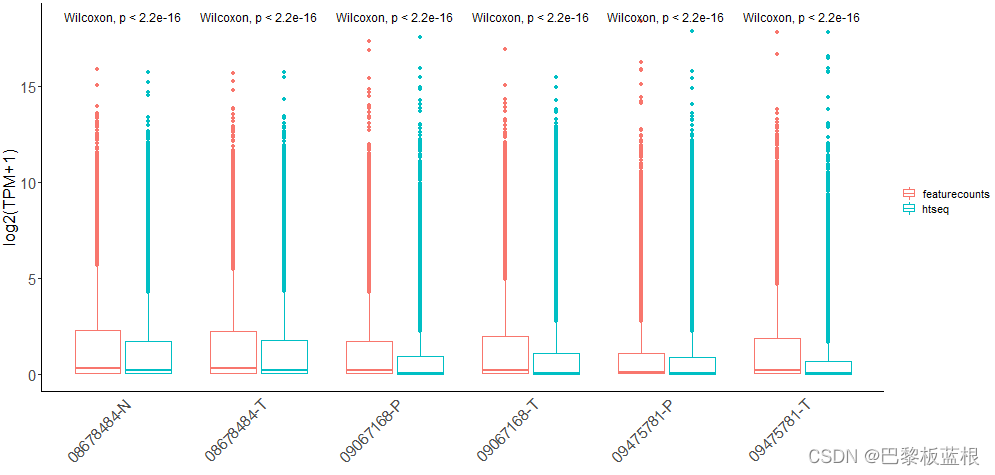
应该对比基因在两种方法的t.test差异,注意筛选PCG:
 这样子的结果应该是没问题的,因为sum(x$padj<0.05)得到0个。


 6492
6492

 被折叠的 条评论
为什么被折叠?
被折叠的 条评论
为什么被折叠?
 到【灌水乐园】发言


