


本文仅供学习使用
Python基础——Ch18~Ch22
18. 正则表达式
正则表达式是一个特殊的字符序列,它能帮助你方便的检查一个字符串是否与某种模式匹配。
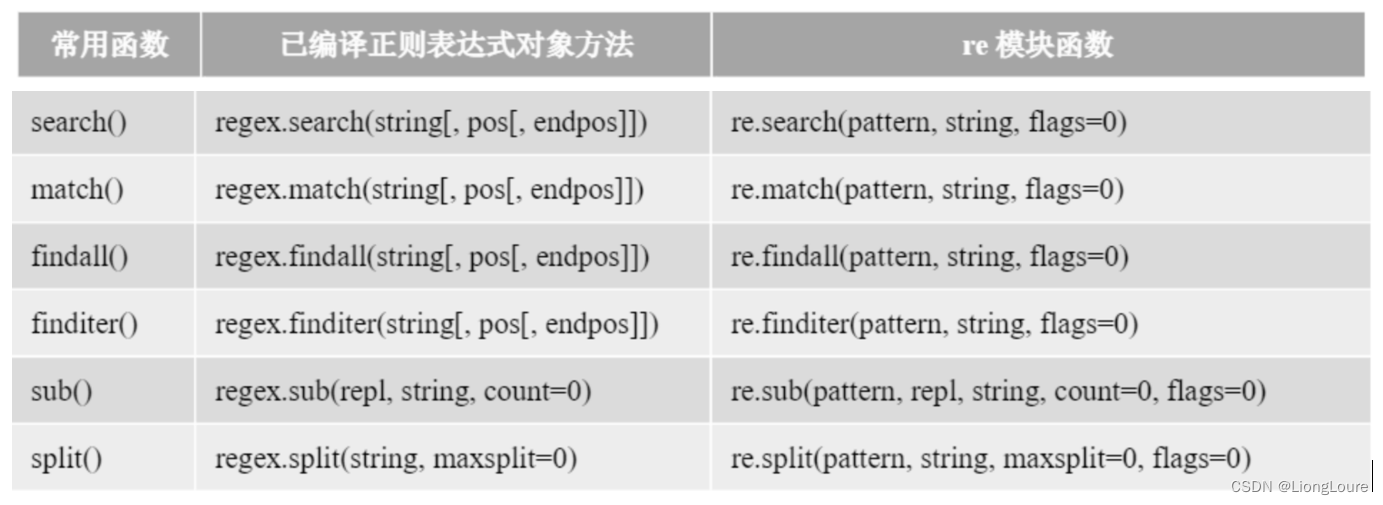
re 模块使 Python 语言拥有全部的正则表达式功能。

compile 函数根据一个模式字符串和可选的标志参数生成一个正则表达式对象。该对象拥有一系列方法用于正则表达式匹配和替换。
re 模块也提供了与这些方法功能完全一致的函数,这些函数使用一个模式字符串做为它们的第一个参数。
18.1 re 模块
正则表达式修饰符 - 可选标志:
正则表达式可以包含一些可选标志修饰符来控制匹配的模式。修饰符被指定为一个可选的标
志。多个标志可以通过按位 OR(|) 它们来指定。如 re.I | re.M 被设置成 I 和 M 标志:
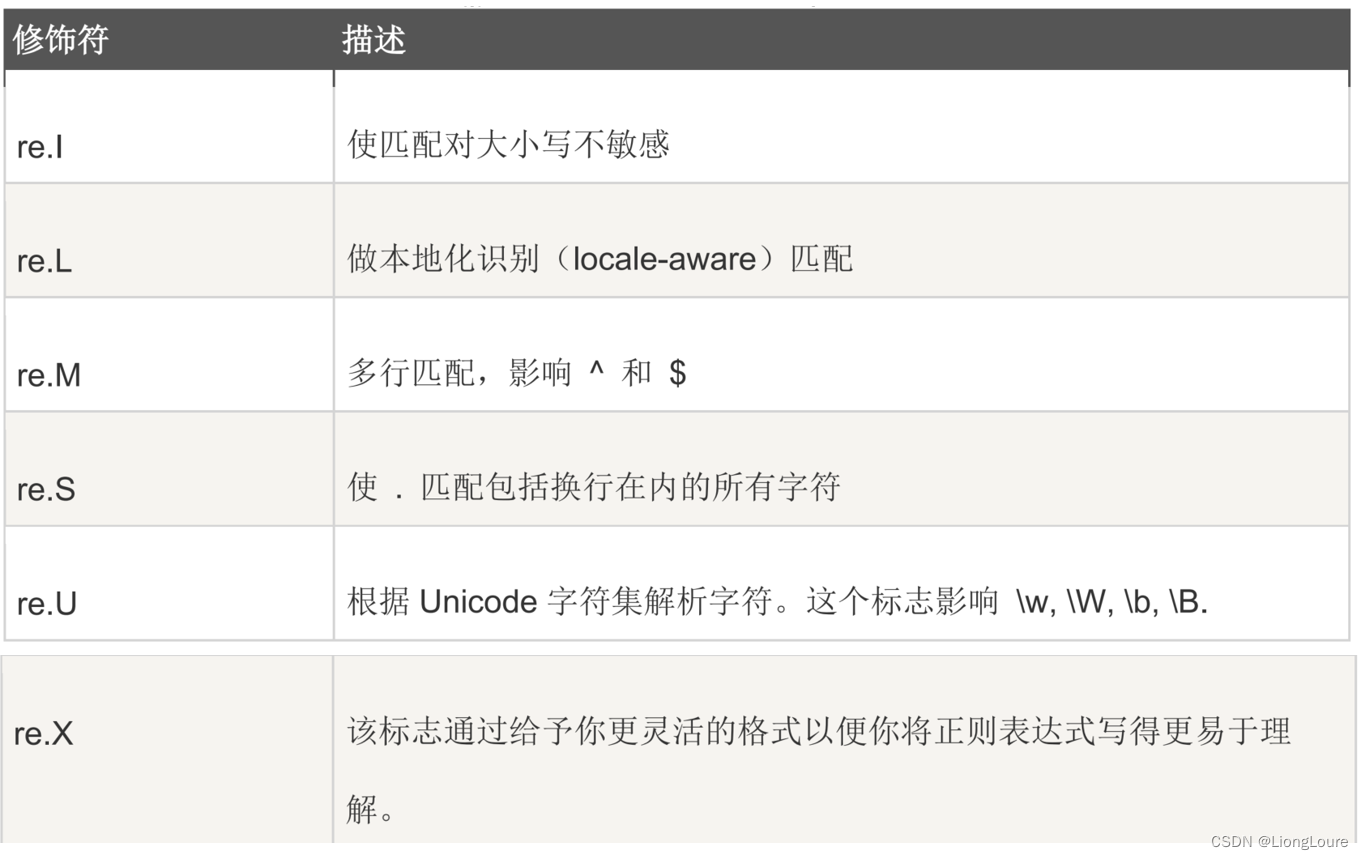
Python的正则表达式模块re,有一个re.DOTALL的参数。默认情况下,正则表达式中的dot(.),表示所有除了换行的字符,加上re.DOTALL参数后,就是真正的所有字符了,包括换行符(\n)
当使用re.MULTILINE时,^和$这两个符号的含义发生了一点变化,原来这两个符号表示整个字符串(可以有\n换行符的字符串)的开始和结束,加上re.MULTILINE参数后,含义变为每行的开始和结束。re.M是这个参数的简写。
re.VERBOSE 或简写为 re.X:详细模式,可以在正则表达式中加注解!——允许为传入re.compile()的字符串添加空格和注释
18.1.1 re.match 函数
re.match(pattern, string, flags=0)
re.match 尝试从字符串的起始位置匹配一个模式,如果不是起始位置匹配成功的话,match()就返回 none。
· pattern 匹配的正则表达式
· string 要匹配的字符串。
· flags 标志位,用于控制正则表达式的匹配方式,如:是否区分大小写,多行匹配等等。
· 匹配成功 re.match 方法返回一个匹配的对象,否则返回 None。
18.1.2 re.search 方法
re.search(pattern, string, flags=0)
re.search 扫描整个字符串并返回第一个成功的匹配。
· pattern 匹配的正则表达式
· string 要匹配的字符串。
· flags 标志位,用于控制正则表达式的匹配方式,如:是否区分大小写,多行匹配等等。
· 匹配成功 re.match 方法返回一个匹配的对象,否则返回 None。
re.match 与 re.search 的区别:
re.match 只匹配字符串的开始,如果字符串开始不符合正则表达式,则匹配失败,函数返回
None;而 re.search 匹配整个字符串,直到找到一个匹配。
print(res) # 匹配
import re
s = 'http://www.runoob.com.com'
sub_s = '.'  # . 代表任意字符,除了换行符
res = re.findall(sub_s, s)
print(res)  # ['h', 't', 't', 'p', ':', '/', '/', 'w', 'w', 'w', '.', 'r', 'u', 'n', 'o', 'o', 'b', '.', 'c', 'o', 'm', '.', 'c', 'o', 'm']

s = '\nhttp://www.runoob.com.com'
res = re.match(sub_s, s)
print(res)  # None
res = re.match(sub_s, s, re.S)  # 可以使 . 匹配换行符
print(res)  # <re.Match object; span=(0, 1), match='\n'>

sub_s = '\.'
res = re.findall(sub_s, s)
print(res)  # ['.', '.', '.']

res = re.findall(sub_s, s)
18.1.3 findall 函数
findall(pattern, string[, pos[, endpos]])
在字符串中找到正则表达式所匹配的所有子串,并返回一个列表,如果没有找到匹配的,则返回空列表。
· pattern 匹配的正则表达式
· string : 待匹配的字符串。
· pos : 可选参数,指定字符串的起始位置,默认为 0。
· endpos : 可选参数,指定字符串的结束位置,默认为字符串的长度。
注意: match 和 search 是匹配一次, findall 匹配所有。
import re
s = 'http://www.runoob.com.com'
sub_s = 'com'
res = re.findall(sub_s, s)
print(res)  # ['com', 'com']
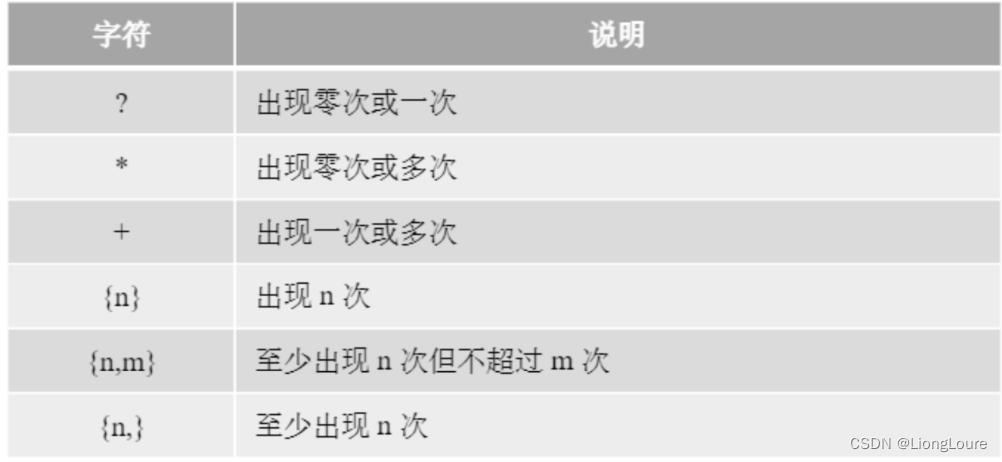
18.2 正则表达式模式
18.2.1 正则表达式中的字符
正则表达式是一种字符串,正则表达式字符串是由 普通字符串 和 元字符(Metacharacters) 组成。
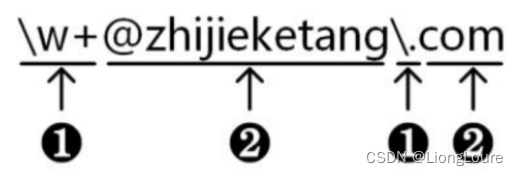
普通字符:按照字符字面意义表示的字符、如 ② 所示,都表示字符本身的字面意义
元字符:预先定义好的一些特定字符,如 ① 所示
引号前加 r 的说明:
向 re.compile()传递原始字符串
回忆一下,Python中转义字符使用倒斜杠(\)。字符串’\n’表示一个换行字符,而不是倒斜杠加上一个小写的n。你需要输入转义字符 \\,才能打印出一个倒斜杠。所以’\\n’表示一个倒斜杠加上一个小写的n。但是,通过在字符串的第一个引号之前加上r,可以将该字符串标记为原始字符串,它不包括转义字符。
因为正则表达式常常使用倒斜杠,向 re.compile((函数传入原始字符串就很方便,而不是输入额 外得到斜杠。输入r’\d\d\d-\d\d\d-\d\d\d\d’,比 输入"\\d\\d\\d-\\d\\d\\d-\\d\\d\\d\\d’要容易得多。
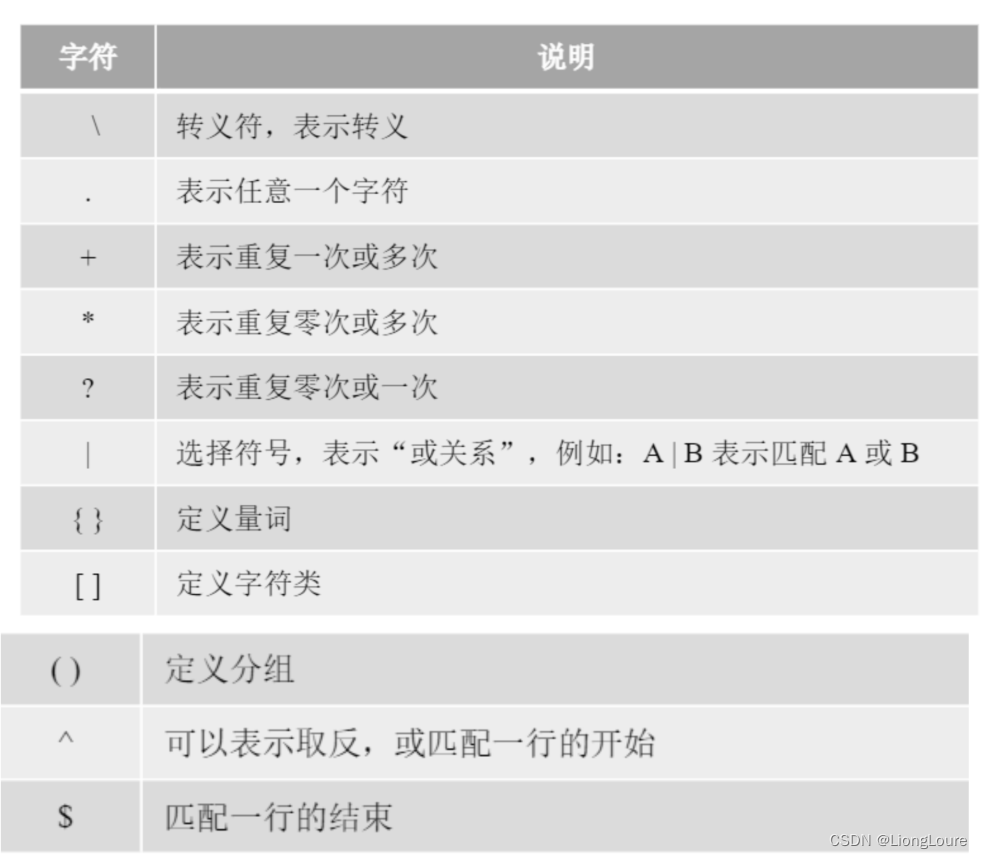
18.2.1.1 元字符
元字符(Metacharacters) : 是用来描述其他字符的特殊字符,由 基本元字符 + 普通字符 构成
# 量词
import re
s = 'http://www.runoob.com.com'
sub_s = 't+'  # 贪婪模式
res = re.search(sub_s, s)
print(res)  # <re.Match object; span=(1, 3), match='tt'>

sub_s = 'a+'  # 重复1次或多次
res = re.search(sub_s, s)
print(res) # None

sub_s = 'a*'  # 重复0次或多次
res = re.search(sub_s, s)
print(res) # <re.Match object; span=(0, 0), match=''>

sub_s = 'h?'  # 重复0次或1次
res = re.search(sub_s, s)
print(res)  # <re.Match object; span=(0, 1), match='h'>

sub_s = 't+?'  # 非贪婪模式
res = re.search(sub_s, s)
print(res)  # <re.Match object; span=(1, 2), match='t'>

# sub_s = 't?+'  # 不合法
# res = re.search(sub_s, s)
# print(res)  # baocuo

s = 'ttpptttp'

sub_s = 't??'  # 第一个?为量词,第二个表示使用非贪婪模式
res = re.findall(sub_s, s)
print(res)  # ['', 't', '', 't', '', '', '', 't', '', 't', '', 't', '', '']

sub_s = 't*?'
res = re.findall(sub_s, s)
print(res)  # ['', 't', '', 't', '', '', '', 't', '', 't', '', 't', '', '']

sub_s = '.*?'
res = re.findall(sub_s, s)
print(res)  # ['', 't', '', 't', '', 'p', '', 'p', '', 't', '', 't', '', 't', '', 'p', '']


sub_s = '.??'
res = re.findall(sub_s, s)
print(res)  # ['', 't', '', 't', '', 'p', '', 'p', '', 't', '', 't', '', 't', '', 'p', '']

'''
?? 与 *?
'''
18.2.1.2 字符转义
不仅可以对普通字符进行转义,还可以对基本元字符进行转义。如域名中的点(.)字符希望按照点(.)字面意义使用,作为 .com 域名的一部分,而不是作为基本元字符使用,所以要加反斜杠“\”进行转义。即‘ \ . ’。
import re
s = 'http://www.runoob.com.com'
sub_s = '.'  # 代表任意字符,除了换行符
res = re.findall(sub_s, s)
print(res)  # ['h', 't', 't', 'p', ':', '/', '/', 'w', 'w', 'w', '.', 'r', 'u', 'n', 'o', 'o', 'b', '.', 'c', 'o', 'm', '.', 'c', 'o', 'm']

sub_s = '\.'
res = re.findall(sub_s, s)
print(res)  # ['.', '.', '.']
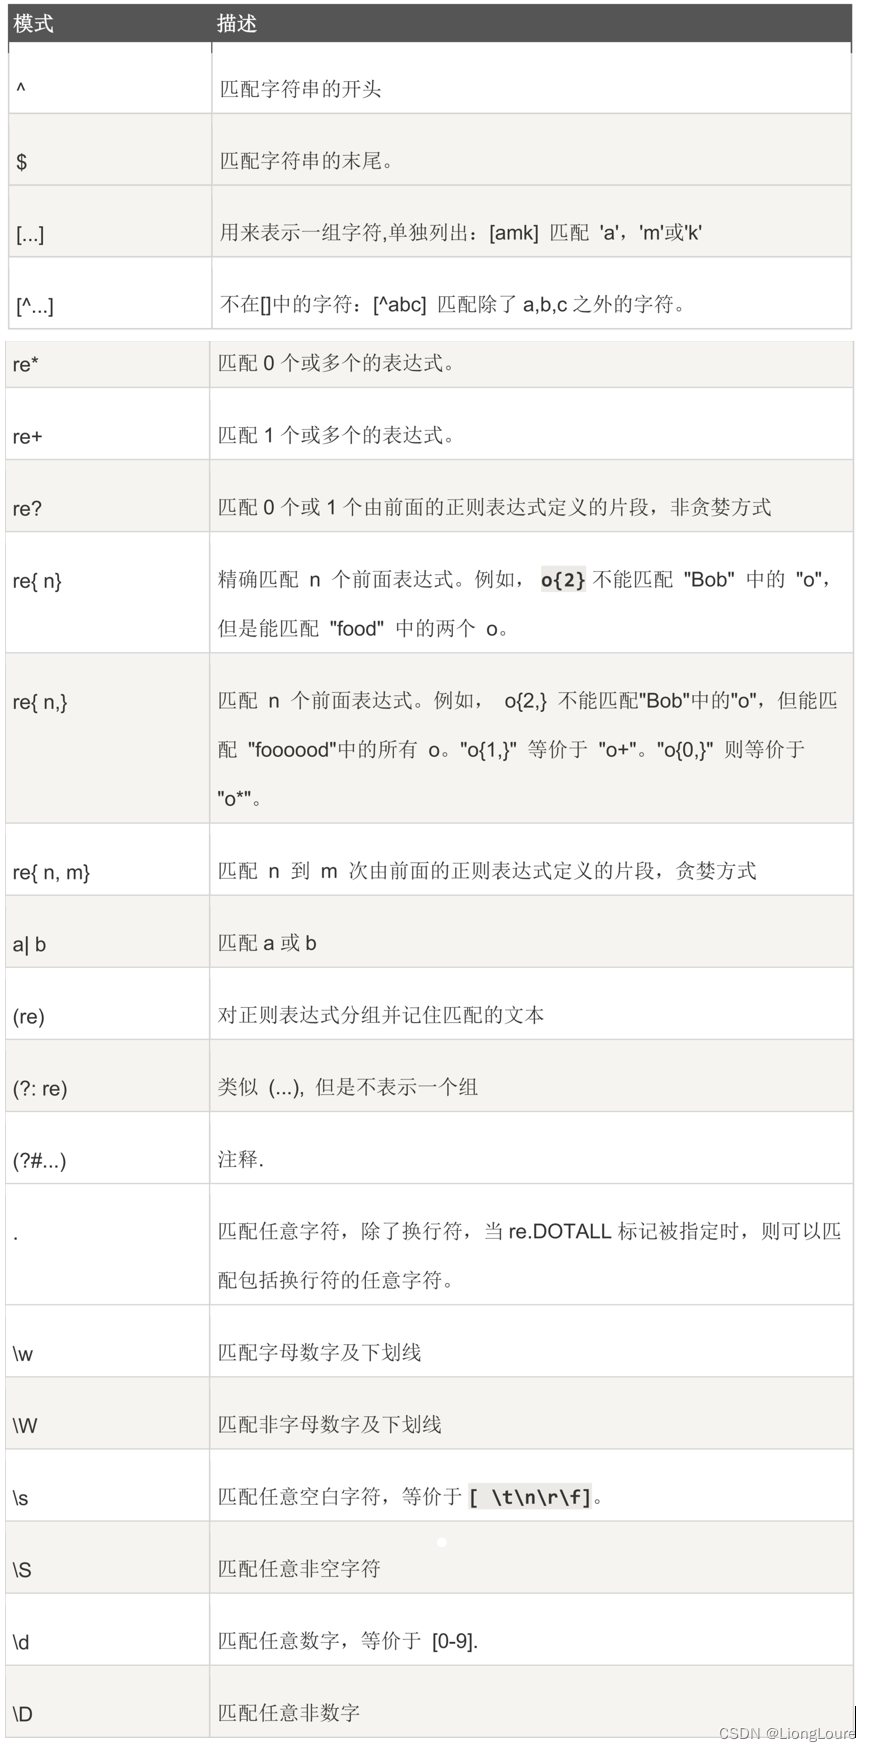
18.2.1.3 开始与结束字符
当以^开始时,要求一行字符串的开始位置匹配;当以$结束时,要求一行字符串的结束位置匹配。所以正则表达式 \w+@zhijieketang.com与 ^ \ w+@zhijieketang.com $ 是不同的
即:可以在正则表达式的开始处使用插入符号(^),表明匹配必须发生在被查找文本开始处。类似地,可以再正则表达式的末尾加上美元符号( $ ),表示该字符串必须以这个正则表达式的模式结束。可以同时使用^和$,表明整个字符串必须匹配该模式,也就是说,只匹配该字符串的某个子集是不够的。
^ 匹配字符串的开头
$ 匹配字符串的结尾
import re
email = r'koko@dlut.com'
m = re.search('dlut',email)
print(m)  # <re.Match object; span=(5, 9), match='dlut'>

m = re.search('dlut$',email)
print(m)  # None

m = re.search('^dlut','We know dlut is a school')
print(m)  # None

m = re.search('^dlut$','dlut')  # 整个字符串都要符合
print(m)  # <re.Match object; span=(0, 4), match='dlut'>
import re
rule = 't*'
string = 'stt'
res = re.findall(rule,string,re.I)
print(res)  # ['', 'tt', '']

res = re.fullmatch(rule,string,re.I)  # 必须要全部符合,相当于 '^... $'
print(res)  # None
18.2.2 字符类
正则表达式中可以使用字符类(Character class),一个字符类定义一组字符,其中的任一字符出现在输入字符串中即匹配成功。注意每次匹配只能匹配字符类中的一个字符。
18.2.2.1 定义字符类
定义一个普通的字符类需要使用" [ “和” ] "元字符类。
18.2.2.2 字符类取反
有时需要在正则表达式中指定不想出现的字符,可以在字符类前加“^”符号。
[…] 用来表示一组字符,单独列出:[amk] 匹配 ‘a’,‘m’或’k’
[^…] 不在[]中的字符:[^abc] 匹配除了 a,b,c 之外的字符。
18.2.2.3 区间
区间是用连字符(-)表示的,[0123456789]采用区间表示为[0-9],[^ 0123456789]采用区间表示为[^0-9]。区间还可以表示连续的英文字母字符类,例如[a-z]表示所有小写字母字符类,[A-Z]表示所有大写字母字符类。
[A-Za-z0-9]表示所有因为字母和数值字符类,[0-25-7]表示0、1、2、5、6、7几个字符组成的字符类。
import re

m = re.search(r'[A-Za-z0-9]','A10.3')
print(m)  # <re.Match object; span=(0, 1), match='A'>

m = re.search(r'[0-7308]','A3489C')
print(m)  # <re.Match object; span=(1, 2), match='3'>
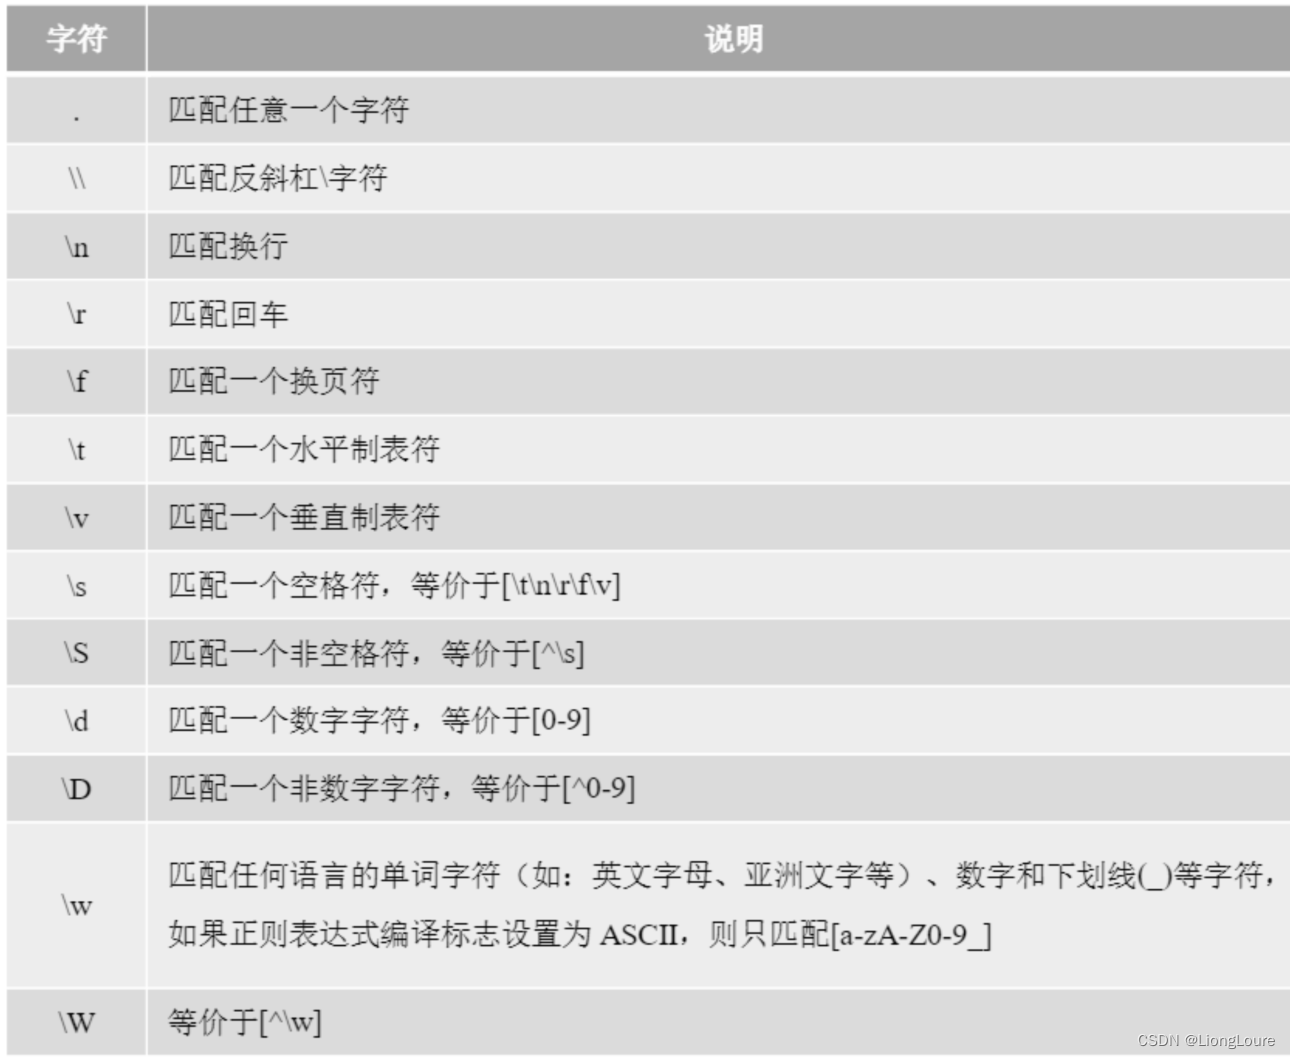
18.2.2.4 预定义字符类
有些字符类很常用,例如[0-9]等,为了书写方便正则表达式提供了预定义的字符类,例如预定义字符类\d等价于[0-9]字符类。
import re
p = r'\d' # [0-9]

m = re.search(p, '1000')
print(m)  # <re.Match object; span=(0, 1), match='1'>

m = re.search(p, 'Pyhon 3')
print(m)  # <re.Match object; span=(6, 7), match='3'>

m = re.search(p, 'A_你好Hello')
print(m)  # None

p = r'\w' # 任意语言的单词字符 数字 下划线
m = re.search(p, ' A_你好Hello')
print(m)  # <re.Match object; span=(0, 1), match='A'>

#与量词结合
p = r'\d+' # 任意语言的单词字符 数字 下划线
m = re.search(p, ' A_你好33Hello')
print(m)  # <re.Match object; span=(5, 7), match='33'>

p = r'\d{1}' # 任意语言的单词字符 数字 下划线
m = re.search(p, ' A_你好33Hello')
print(m)  # <re.Match object; span=(5, 6), match='3'>
18.3 量词
18.3.1 使用量词
量词是表示字符或者字符串重复的次数
18.3.2 贪婪量词和懒惰量词
量词还可以细分为贪婪量词和懒惰量词,贪婪量词会尽可能多地匹配字符,懒惰量词会尽可能少地匹配字符。大多数计算机语言的正则表达式量词默认是贪婪的,要想使用懒惰量词(非贪婪量词)可以在量词后面加"?"即可
18.4 分组
在此之前学习量词只能重复显示一个字符,如果想让一个字符串作为整体使用量词,可将这个字符串放到一对小括号中,这就是分组(也称子表达式)。
18.4.1 使用分组
对正则表达式进行分组不仅可以对一个字符串整体使用量词,还可以在正则表达式中引用已经存在的分组。
(re) 对正则表达式分组并记住匹配的文本
import re
p = r'\w\d{2}' # [0-9]
m = re.search(p, 'F1000_光轮')
print(m)  # <re.Match object; span=(0, 3), match='F10'>

p = r'(\w\d){2}' # [0-9]
m = re.search(p, 'F1000_光轮')
print(m)  # <re.Match object; span=(0, 4), match='F100'>

p = r'(0){2}' # [0-9]
m = re.search(p, 'F1000_光轮')
print(m)  # <re.Match object; span=(2, 4), match='00'>
18.4.2 命名分组
在 Python 程序中访问分组时,除了可以通过组编号进行访问,还可以通过组名进行访问,前提是要在正则表达式中为组命名。组命名语法是在分组的左小括号后添加 ?P<分组名> 实现。
import re
p = r'(\w+).*\1'
m = re.search(p, 'title>abc<title')
print(m)  # <re.Match object; span=(0, 15), match='title>abc<title'>

p = r'(\w+)\d{3}\1'
m = re.search(p, 'title123title')
print(m)  # <re.Match object; span=(0, 13), match='title123title'>
p = r'(\w+).*\1'
m = re.search(p, 'title>123<title')
print(m)  # <re.Match object; span=(0, 13), match='title123title'>
m = re.search(p, 'aa>123<ab')
print(m)  # <re.Match object; span=(0, 8), match='aa>123<a'>

#findall使用分组
#返回的结果为组内容,如果想要整个表达式的匹配字符串,需要非捕获分组

p = r'(\w\d)123'
m = re.search(p, 'aa1123<ab')
print(m)  # <re.Match object; span=(1, 6), match='a1123'>
m = re.findall(p, 'aa1123<ab')
print(m)  # ['a1']

p = r'(\w\d)(123)'
m = re.findall(p, 'aa1123<ab')
print(m)  # [('a1', '123')]

p = r'(?:\w\d)(?:123)'
m = re.findall(p, 'aa1123<ab')
print(m)  # ['a1123']

p = r'(\d{3,4})-(\d{7,8})'
m = re.search(p, '0411-84708110')
print(m.group(0))  # 0411-84708110
# 0 或者 空,表示获取匹配到的整个结果
print(m.group(1))  # 第一组  0411
print(m.group(2))  # 第二组  84708110

result = re.findall(r'(\w+)=(\d+)','set width=20 and height=10')
print(result)  # ['width=20', 'height=10']

result = re.search(r'(?P<left>\w+)=(\1)','set width=width1 and height=height')
print(result)  # <re.Match object; span=(4, 15), match='width=width'>
print(result.group('left'))  # width
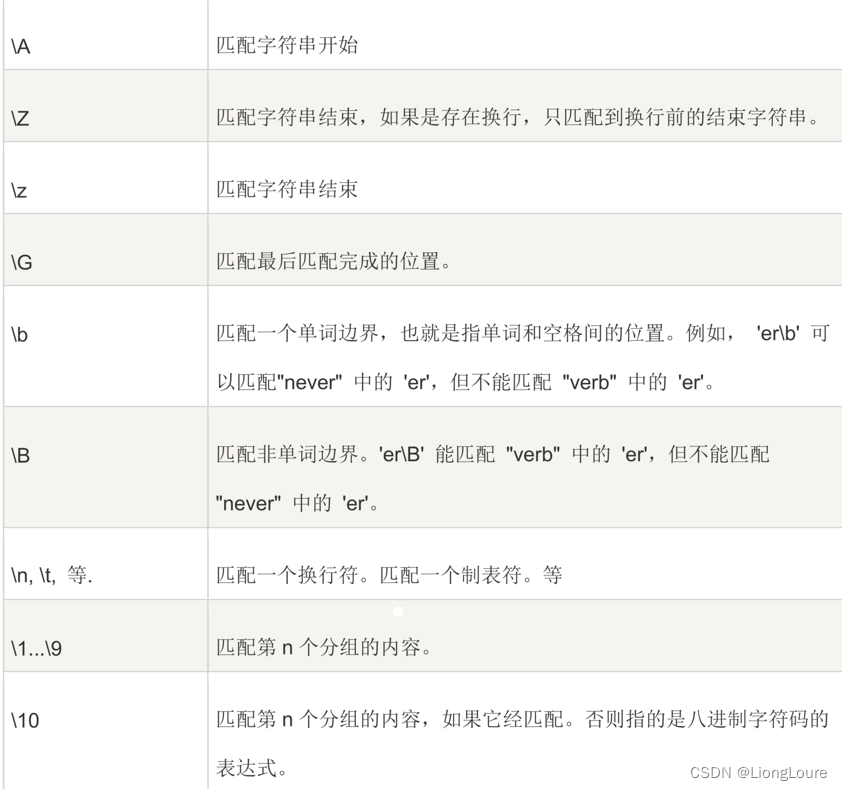
18.4.3 反向引用分组
除了可以在程序代码中访问正则表达式匹配之后的分组内容,还可以在正则表达式内部引用之前的分组。
\1…\9 匹配第 n 个分组的内容。
\10 匹配第 n 个分组的内容,如果它经匹配,否则指的是八进制字符码的表达式。
import re
result = re.findall(r'(\w+)=(\d+)','set width=20 and height=10')
print(result)  # [('width', '20'), ('height', '10')]

result = re.findall(r'(?:\w+)=(?:\d+)','set width=20 and height=10')
print(result)  # ['width=20', 'height=10']

result = re.findall(r'(\w+)=(\d+)','set width=20 and height=10')
print(result)  # [('width', '20'), ('height', '10')]

result = re.findall(r'(\w+)=(\1)','set width=width1 and height=height')
print(result)  # [('width', 'width'), ('height', 'height')]
'''
使用正则表达式将电话号码13811119999变成138****9999
'''
str1 = '13811119999'
p = r'(\d{3})(\d{4})(\d{3})'
print(re.sub(p,r'\1****\3',str1))  # 引用分组
18.4.4 非捕获分组
前面介绍的分组称为捕获分组,就是匹配子表达式结果被暂时保存到内存中,以备表达式或其他程序引用,这称之为"捕获",捕获结果可以通过组编号或组名进行引用。但是有时并不想引用子表达式的匹配结果,不想捕获匹配结果,只是将小括号作为一个整体进行匹配,此时可以使用非捕获分组,非捕获分组在组开头使用"?∶"实现。
p = r'(\d{3,4})-(\d{7,8})'
m = re.findall(p, '0411-84708110')
print(m)  # [('0411', '84708110')]

p = r'(?:\d{3,4})-(?:\d{7,8})'
m = re.findall(p, '0411-84708110')
print(m)  # ['0411-84708110']
# print(m.group(1)) # baocuo
注意:作为 findall()方法的返回结果的总结,请记住下面两点:
- 如果调用在一个没有分组的正则表达式上,例如\d\d\d-\d\d\d-\d\d\d\d,方法 findall()将返回一个匹配字符串的列表,例如[‘415-555-9999’, ‘212-555-0000’]。
- 如果调用在一个有分组的正则表达式上,例如(\d\d\d)-(\d\d\d)-(\d\d\d\d),方法 findall()将
返回一个字符串的元组的列表(每个分组对应一个字符串),例如[(‘415’, ‘555’, ‘1122’), (‘212’,
‘555’, ‘0000’)]。
phoneNumRegex.findall(‘Cell: 415-555-9999 Work: 212-555-0000’)
18.5 模式汇总
中文正则模式[\u4E00-\u9FA5]
'''
使用正则表达式将字符串中的标点符号、数字和字母删除
string=”据悉,这次发运的4台蒸汽冷凝罐属于国际热核聚变实验堆(ITER)项目的核二级压力设备,先后完成了压力试验、真空试验、氦气检漏试验、千斤顶试验、吊耳载荷试验、叠装试验等验收试验。”
'''
# string = '据悉,这次发运的4台蒸汽冷凝罐属于国际热核聚变实验堆(ITER)项目的核二级压力设备,先后完成了压力试验、真空试验、氦气检漏试验、千斤顶试验、吊耳载荷试验、叠装试验等验收试验。'
# p = r'[,()、。0-9a-zA-Z]'
# print(re.sub(p, '', string))
string = '据悉,这次发运的4台蒸汽冷凝罐属于国际热核聚变实验堆(ITER)项目的核二级压力设备,先后完成了压力试验、真空试验、氦气检漏试验、千斤顶试验、吊耳载荷试验、叠装试验等验收试验。'
p = r'[^\u4E00-\u9FA5]'
print(re.sub(p, '', string))

'''
判断以下字符是否全是中文(中文正则模式[\u4E00-\u9FA5])
str='广东省广州市'
'''
# p = r'^[\u4E00-\u9FA5]$'
# str='广东省广州市'
# print(re.findall(p, str))

string='广东省广州市'
pattern = r'[\u4E00-\u9FA5]'
sub_str = re.sub(pattern, '', string)
result = False
if not sub_str:
    result = True

print('%s是否是中文的结果:%s'%(string, result))
18.6 编译正则表达式
但是为了提高效率,还可以对Python 正则表达式进行编译。编译的正则表达式可以重复使用,减少正则表达式解析和验证,提高效率。
在 re模块中的compile() 函数可以编译正则表达式,compile() 函数语法如下∶
re.compile(pattern[, flags=0])
18.6.1 已编译正则表达式对象
regex.sub
(function)
sub(pattern: str | Pattern[str], repl: str | ((Match[str]) -> str), string: str, count: int = …, flags: _FlagsType = …) -> str
返回通过替换 repl 替换字符串中最左侧的模式的非重叠实例而获得的字符串。repl 可以是字符串,也可以是可调用的;如果字符串,则处理其中的反斜杠转义。如果它是可调用的,则它传递 Match 对象,并且必须返回要使用的替换字符串。
import re
p = r'(\d{3,4})-(\d{7,8})'
m = '0411-84708110'
regx = re.compile(p)  # 表达式重复编译的次数较多,可以提前编译成一个对象,再使用
regx.search(m)

result = re.findall(r'(\w+)=(\d+)','set width=20 and height=10')
print(result)  # [('width', '20'), ('height', '10')]

result = re.findall(r'(?:\w+)=(?:\d+)','set width=20 and height=10')
print(result)  # ['width=20', 'height=10']
18.6.2 编译标志
compile() 函数编译正则表达式对象时,还可以设置编译标志。编译标志可以改变正则表达式引擎行为。本节详细介绍几个常用的编译标志。
- ASCII和 Unicode
- 忽略大小写
- 点(.)元字符匹配换行符
- 多行模式
- 详细模式
19. Python常用模块——NumPy
NumPy、Scipy、pandas、matplotlib简介:
NumPy(Numerical Python) 是 Python 语言的一个扩展程序库,支持大量的维度数组与矩阵运算,此外也针对数组运算提供大量的数学函数库。
numPy 的前身 Numeric 最早是由 Jim Hugunin 与其它协作者共同开发,2005 年,Travis Oliphant 在 Numeric 中结合了另一个同性质的程序库 Numarray 的特色,并加入了其它扩展 而开发了 NumPy。NumPy 为开放源代码并且由许多协作者共同维护开发。
NumPy 是一个运行速度非常快的数学库,主要用于数组计算,包含:
• 一个强大的N维数组对象 ndarray
• 广播功能函数
• 整合 C/C++/Fortran 代码的工具
• 线性代数、傅里叶变换、随机数生成等功能
19.1 NumPy介绍
19.1.1 NumPy介绍NumPy历史:
• 1995年Jim HugUNin开发了Numeric
• 随后Numarray包诞生
• Travis Oliphants整合Numeric和Numarray,开发NumPy,2006 年第一个版本诞生
• 使用Anaconda发行版的Python,已经安装好NumPy模块,所以可以不用再安装NumPy模块了。
• 依照标准的NumPy标准,习惯使用import numpy as np的方式导入该模块。
19.1.2 NumPy模块:
Numerical Python,即数值Python包,是Python进行科学计算的一个基础包,所以是一个掌握 其他Scipy库中模块的基础模块,一定需要先掌握该包的主要使用方式。
安装: pip install numpy scipy matplotlib
19.1.3 NumPy核心数据结构:ndarray
NumPy 最重要的一个特点是其 N 维数组对象 ndarray,它是一系列同类型数据的集合,以 0 下标为开始进行集合中元素的索引。 ndarray 对象是用于存放同类型元素的多维数组。ndarray 中的每个元素在内存中都有相同存储大小的区域。
ndarray 内部由以下内容组成:
- 一个指向数据(内存或内存映射文件中的一块数据)的指针。
- 数据类型或 dtype,描述在数组中的固定大小 值的格子。
- 一个表示数组形状(shape)的元组,表示各维度大小的元组。
- 一个跨度元组(stride),其中的整数指的是为了前进到当前维度下一个元素需要"跨过"的字节数

19.2 ndarray
NumPy 的数组中比较重要 ndarray 对象属性有:
| 对象属性 | 说明 |
|---|---|
| ndarray.ndim | 秩(弱的概念),即轴的数量或维度的数量 |
| ndarray.shape | 数组的维度,对于矩阵,n 行 m 列 |
| ndarray.size | 数组元素的总个数,相当于 .shape 中 n*m 的值 |
| ndarray.dtype | ndarray对象的元素类型 |
| ndarray.itemsize | ndarray对象中每个元素的大小,以字节为单位 |
| ndarray.flags | ndarray对象的内存信息 |
| ndarray.real | ndarray元素的实部 |
| ndarray.imag | ndarray元素的虚部 |
| ndarray.data | 包含实际数组元素的缓冲区,由于一般通过数组的索引获取元素,所以通常不 需要使用这个属性。 |
import numpy as np
a = np.array([[1,2,3],[4,5,6]])
print (a.ndim)  # 2
print (a.shape) # (2, 3)
print (a.size)  # 6

# 数组的 dtype 为 int8(一个字节)
x = np.array([1,2,3,4,5], dtype = np.int8)
print (x.itemsize)  # 1

# 数组的 dtype 现在为 float64(八个字节)
y = np.array([1,2,3,4,5], dtype = np.float64)
print (y.itemsize)  # 8
19.2.1 ndarray 的创建
- 使用列表创建
import numpy as np
lis = [1, 2, 3]
lis2 = [[1, 2, 3], [1, 2, 3]]
arr1 = np.array(lis)
arr2 = np.array(lis2)

print(type(arr1))  # <class 'numpy.ndarray'>
print('arr1:', arr1) # arr1: [1 2 3]
print('arr2:', arr2) # arr2: [[1 2 3]  [1 2 3]]

a = np.array([[1, 2], [3, 4]])
print (a)
'''
[[1 2]
 [3 4]]
'''
print (a.itemsize,a.dtype)  # 4 int32
a = a.astype(np.float64)
print (a.itemsize,a.dtype)  # 8 float64
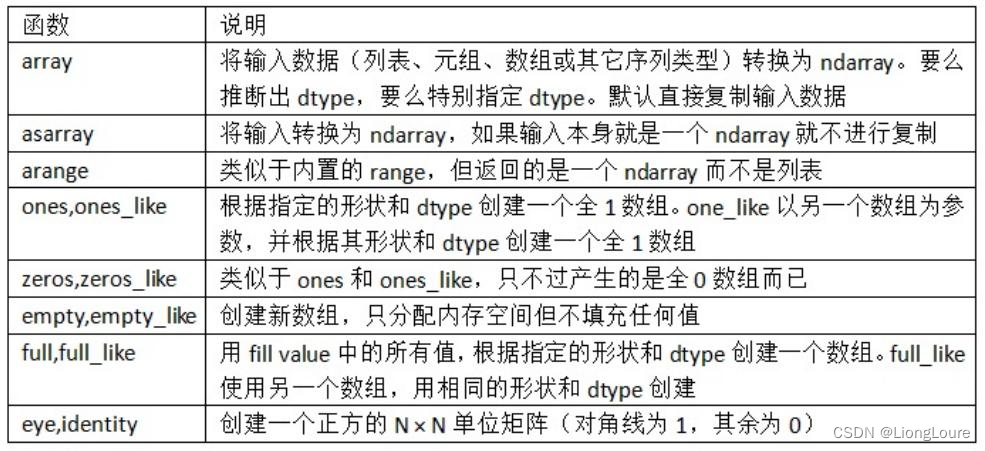
- 快速创建
np.empty(size -> tuple, [dtype])
返回给定形状和类型的新数组,而不初始化条目。
arange函数: 类似python的range函数,通过指定开始值、终值和步长来创建一个一维数组,注意:最终创 建的数组不包含终值
np.full
返回给定形状和类型的新数组,其中填充了fill_value。
import numpy as np
# 快速创建
arr1 = np.ones((3, 3))  # 全1  传入元组
arr2 = np.zeros((3, 3))  # 全0  传入元组
arr3 = np.eye(4)  # 4*4的单位矩阵  传入int
arr4 = np.arange(9)  # 创建一个一维数组
arr5 = np.arange(9).reshape(3,-1)  # 创建一个一维数组

print('arr1:', arr1)
print('arr2:', arr2)
print('arr3:', arr3)
print('arr4:', arr4)
print('arr5:', arr5)
'''
arr1: [[1. 1. 1.]
 [1. 1. 1.]
 [1. 1. 1.]]
arr2: [[0. 0. 0.]
 [0. 0. 0.]
 [0. 0. 0.]]
arr3: [[1. 0. 0. 0.]
 [0. 1. 0. 0.]
 [0. 0. 1. 0.]
 [0. 0. 0. 1.]]
arr4: [0 1 2 3 4 5 6 7 8]
arr5: [[0 1 2]
 [3 4 5]
 [6 7 8]]
'''
x = np.empty((3,2), dtype = int)
print (x)
'''
[[1599229779 1163281740]
 [   3554636 1129271888]
 [1330860869 1163026258]]
'''
y = np.zeros((5,), dtype = int)
print (y)  # [0 0 0 0 0]
x = np.ones([1,2], dtype = int)
print (x)  # [[1 1]]
b = [(1,2,3),(4,5)]
a = np.asarray(b)  # 不推荐——VisibleDeprecationWarning
print (a)  # [(1, 2, 3) (4, 5)]

print(np.asarray([1, 2, 3, 4]).reshape((2,2)) )
'''[[1 2]
 [3 4]]'''
x = np.arange(5, dtype = float)
print(x)  # [0. 1. 2. 3. 4.]
- 其他方式:
linspace函数:通过指定开始值、终值和元素个数来创建一个一维数组,数组的数据元素符合等差数列,可 以通过endpoint关键字指定是否包含终值,默认包含终值
logspace函数:和linspace函数类似,不过创建的是等比数列数组
使用随机数填充数组,即使用numpy.random中的random()函数来创建0-1之间的随机元素,数组包含的元素数量由参数决定
import numpy as np
print(np.linspace(1,10,10, dtype = int)) # [ 1  2  3  4  5  6  7  8  9 10]
print(np.logspace(1,5,5, dtype = int))  # 10**1 ~ 10**5 的等比数列  [    10    100   1000  10000 100000]
print(np.logspace(1,5,5,base = 2, dtype = int))  # 2**1 ~ 2**5 的等比数列  [ 2  4  8 16 32]
print(np.random.random((5,)))  # [0.41314034 0.40066512 0.07242052 0.96087116 0.66801133]  指定数组大小
repeat函数:重复数组的元素。
np.repeat (a, repeats, [axis])
a :输入数组。
repeats:整数或整数数组每个元素的重复次数。广播repeats以适合给定轴的形状。
axis: 整型, 可选要沿其重复值的轴。默认情况下,使用平展输入数组,并返回平面输出数组。
import numpy as np
print(np.repeat(3, 4))  # [3 3 3 3]
print(x := np.array([[1,2],[3,4]]))
'''
[[1 2]
 [3 4]]
'''
print(np.repeat(x, 2))  # [1 1 2 2 3 3 4 4]
print(np.repeat(x, 3, axis=1))
'''[[1 1 1 2 2 2]
 [3 3 3 4 4 4]]
'''
print(np.repeat(x, [1, 2], axis=0))
'''
[[1 2]
 [3 4]
 [3 4]]
'''
np.tile(a,(x,y,z))
表示将数组a在行上重复x次,在列上重复y次,在第三维度重复z次(假设数组a是一维的)
import numpy as np
a = np.array([1,2,3])
print(a)  # [1 2 3]
print(b1 := np.repeat(a,3))  # [1 1 1 2 2 2 3 3 3]
print(b2 := np.tile(a,3))  # [1 2 3 1 2 3 1 2 3]
print(c :=np.r_[b1,b2])  # [1 1 1 2 2 2 3 3 3 1 2 3 1 2 3 1 2 3]
random函数
np.set_printoptions():确定数组和其他NumPy对象的方式的浮点数
import numpy as np
#创建一个包含5到10之间的随机浮点数的2D数组
# 方法 1:
rand_arr = np.random.randint(low=5, high=10, size=(5,3)) + np.random.random((5,3))
print(rand_arr)

# 方法 2:
rand_arr = np.random.uniform(5,10, size=(5,3))
print(rand_arr)

# 仅打印3个小数位
np.set_printoptions(precision=3)
print(rand_arr)

# 抑制科学计数法
rand_arr = np.random.random([3,3])/1e3
print(rand_arr)
np.set_printoptions(suppress=True, precision=6)  # precision is optional
print(rand_arr)

# 限制numpy数组打印输出中的项目数
a = np.arange(15)
np.set_printoptions(threshold = 6)
print(a)  # [ 0  1  2 ... 12 13 14]
# 打印完整的numpy数组a而不被截断
# 1
a = np.arange(15)
np.set_printoptions(edgeitems=3, infstr='inf',
   linewidth=75, nanstr='nan', precision=8,
   suppress=False, threshold=1000, formatter=None)  # 恢复默认的设置
print(a)
np.set_printoptions(threshold = 6)
print(a)
# 2
import sys
np.set_printoptions(threshold=sys.maxsize)
print(a)
- np.tolist
tolist是将数组转为list的格式,等同于np.array的反向,由于np.ndarray是不可序列化的,当需要序列化的时候(serialization),将其转换成列表形式
# 创建按类别变量分组的行号
import numpy as np

url = 'https://archive.ics.uci.edu/ml/machine-learning-databases/iris/iris.data'
species = np.genfromtxt(url, delimiter=',', dtype='str', usecols=4)
np.random.seed(100)
species_small = np.sort(np.random.choice(species, size=20))

# 基于给定的分类变量创建组ID
uniqs = np.unique(species_small)
out = []
for species in species_small:
    for uniq in uniqs:
        if species == uniq:
            out.append(np.argwhere(uniqs==species).tolist()[0][0])
print(out)
19.2.2 属性
import numpy as np
lis = [1, 2, 3]
lis2 = [[1, 2, 3], [1, 2, 3]]
arr1 = np.array(lis)
arr2 = np.array(lis2)

print('arr1.shape:', arr1.shape)  # (3,)
print('arr2.shape:', arr2.shape)  # (2, 3)
# 形状:元组,元组的元素个数代表数组的维数,元素数值的大小代表该维度数组的个数
print(arr2.size)  # 数组的大小,一共多少个元素,等于shape所有元素的乘积。
print(arr2.ndim)  # 2  与数学上的秩概念不完全相同
print(arr2.dtype)  # int32
19.2.3 基本操作
- 改变形状reshape(),参数:tuple or int
对于一个已经存在的ndarray数组对象而言,可以通过修改形状相关的参数/方法从而改 变数组的形状。
· 直接修改数组ndarray的shape值, 要求修改后乘积不变。
· 直接使用reshape函数创建一个改变尺寸的新数组,原数组的shape保持不变,但是 新数组和原数组共享一个内存空间,也就是修改任何一个数组中的值都会对另外一个 产生影响,另外要求新数组的元素个数和原数组一致。
import numpy as np
lis = [1, 2, 3]
lis2 = [[1, 2, 3], [1, 2, 3]]
arr1 = np.array(lis)
arr2 = np.array(lis2)
# 数组的size得相同
new_shape = (3, 2)
arr3 = arr2.reshape(new_shape)# 参数:tuple
arr4 = arr2.reshape(1, 6) # 参数是多个int
# arr5 = arr2.reshape(1, 3)# 不可以,数组的size得相同
arr6 = arr2.reshape(1, -1)# -1表示自动算该轴/维度的元素个数,此时-1代表6
arr7 = arr2.reshape(1, 2, -1)# -1代表3
print('arr3:', arr3)
print('arr4:', arr4)
print('arr6.shape:', arr6.shape)
print('arr7.shape:', arr7.shape)
print('arr6:', arr6)
print('arr7:', arr7)
'''
arr3: [[1 2]
 [3 1]
 [2 3]]
arr4: [[1 2 3 1 2 3]]
arr6.shape: (1, 6)
arr7.shape: (1, 2, 3)
'''
import numpy as np

a_2d = np.array([[3,3,3],[4,4,4],[5,5,5]])
b_1d = np.array([1,2,3])
print(b_1d.reshape(-1,1))
'''
[[1]
 [2]
 [3]]
'''
print(a_2d - b_1d.reshape(-1,1))

print(b_1d[:,None])
'''
[[1]
 [2]
 [3]]
'''
print(a_2d - b_1d[:,None])
ravel and flatten
ravel(散开,解开),flatten(变平)。两者的区别在于返回拷贝(copy)还是返回视图(view),numpy.flatten()返回一份拷贝,对拷贝所做的修改不会影响(reflects)原始矩阵,而numpy.ravel()返回的是视图,会影响(reflects)原始矩阵
import numpy as np

#  flatten
x = np.array([[1,2], [3,4]])
res = x.flatten()  # 按行展开
print(res)  # [1 2 3 4]
print(res[1])  # 2
res[1] = 10
print(res)  # [1 10 3 4]
print(x)
'''
[[1 2]
 [3 4]]
'''

#  ravel
res = x.ravel()  # 按行展开
print(res)  # [1 2 3 4]
print(res[1])  # 2
res[1] = 10
print(res)  # [1 10 3 4]
print(x)
'''
[[ 1 10]
 [ 3  4]]
'''

# 传入参数F,按列展开:
res = x.flatten('F')  # 按行展开
print(res)  # [1 3 2 4]
res = x.ravel('F')  # 按行展开
print(res)  # [1 3 2 4]


#  对多维数组中的项目进行排名
np.random.seed(10)
a = np.random.randint(20, size=[2,5])
print(a)
'''
[[ 9  4 15  0 17]
 [16 17  8  9  0]]
'''
print(a.ravel().argsort().argsort().reshape(a.shape))
'''
[[4 2 6 0 8]
 [7 9 3 5 1]]
'''
- 改变数据类型astype(np.dtype)
创建numpy数组的时候可以通过属性dtype显示指定数据类型,如果不指定的情况下,numpy会自动推断出 适合的数据类型,所以一般不需要显示给定数据类型。
如果需要更改一个已经存在的数组的数据类型,可以通过astype方法进行修改从而得到一个新数组。
import numpy as np
lis = [1, 2, 3]
lis2 = [[1, 2, 3], [1, 2, 3]]
arr1 = np.array(lis)
arr2 = np.array(lis2)

arr8 = arr2.astype(np.float32)
print(arr2.dtype)  # int32
print(arr8.dtype)  # float32
可改变的类型:np.
| 数据类型 | 说明 |
|---|---|
| bool_ | 布尔型数据类型(True 或者 False) |
| int_ | 默认的整数类型(类似于 C 语言中的 long,int32 或 int64) |
| intc | 与 C 的 int 类型一样,一般是 int32 或 int 64 intp 用于索引的整数类型(类似于 C 的 ssize_t,一般情况下仍然是 int32 或 int64) |
| int8 | 字节(-128 to 127) |
| int16 | 整数(-32768 to 32767) |
| int32 | 整数(-2147483648 to 2147483647) |
| int64 | 整数(-9223372036854775808 to 9223372036854775807) |
| uint8 | 无符号整数(0 to 255) |
| uint16 | 无符号整数(0 to 65535) |
| uint32 | 无符号整数(0 to 4294967295) |
| uint64 | 无符号整数(0 to 18446744073709551615) |
| float_ | float64 类型的简写 float16 半精度浮点数,包括:1 个符号位,5 个指数位,10 个尾数位 |
| float64 | 双精度浮点数,包括:1 个符号位,11 |
- where
np.where(condition, [x, y])
np.where函数是三元表达式x if condition else y的矢量化版本,np.where() 函数返回输入数组中满足 给定条件的元素的索引。
根据条件返回从 x 或 y 中选择的元素。
import numpy as np

arr = np.array([0, 1, 2, 3, 4, 5, 6, 7, 8, 9])
print(np.where(arr%2!=0))  # (array([1, 3, 5, 7, 9], dtype=int64),)

arr = np.arange(10)
out = np.where(arr%2!=0,-1,arr)
print(arr)  # [0 1 2 3 4 5 6 7 8 9]
print(out)  # [ 0 -1  2 -1  4 -1  6 -1  8 -1]
import numpy as np
from icecream import ic

# 常用函数 np.where()
arr1 = np.arange(9)
arr1[0] = 6
ic(arr1)
ic(np.where(arr1>3))# 返回符合条件的索引号
arr2 = np.where(arr1>3, 3, arr1) # 3 if condition else arr1
ic(arr2)

#使用布尔数组索引赋值
arr2 = arr1.copy()
arr2[arr2>3] = 3
ic(arr2)
- 数组堆叠
concatenate((a1, a2, …), axis=0, out=None, dtype=None, casting=“same_kind”)
沿现有轴连接数组序列。
import numpy as np
a = np.arange(10).reshape(2,-1)
b = np.repeat(1, 10).reshape(2,-1)
print(a)
'''
[[0 1 2 3 4]
 [5 6 7 8 9]]
'''
print(b)
'''
[[1 1 1 1 1]
 [1 1 1 1 1]]
'''
c = np.concatenate([a,b],axis=0)
print(c)
'''
[[0 1 2 3 4]
 [5 6 7 8 9]
 [1 1 1 1 1]
 [1 1 1 1 1]]
'''
d = np.concatenate([a,b],axis=1)
print(d)
'''
[[0 1 2 3 4 1 1 1 1 1]
 [5 6 7 8 9 1 1 1 1 1]]
'''
stack:(arrays: Sequence[ArrayLike], axis: SupportsIndex = …, out: None = …)
沿新轴连接数组序列
import numpy as np
a=[[1,2,3],
   [4,5,6]]
print(a)  # [[1, 2, 3], [4, 5, 6]]

c=np.stack(a,axis=0)
print(c)
'''
[[1 2 3]
 [4 5 6]]
'''
c=np.stack(a,axis=1)
print(c)
'''
[[1 4]
 [2 5]
 [3 6]]
'''

b = np.repeat(1,6).reshape(2,3)
print(b)  # [[1, 2, 3], [4, 5, 6]]

c = np.stack((a,b),axis = 1)
print(c)
'''
[[[1 2 3]
  [1 1 1]]

 [[4 5 6]
  [1 1 1]]]
'''
c = np.stack((a,b),axis = 0)
print(c)
'''
[[[1 2 3]
  [4 5 6]]

 [[1 1 1]
  [1 1 1]]]
'''
c = np.stack((a,b),axis = 2)
print(c)
'''
[[[1 1]
  [2 1]
  [3 1]]

 [[4 1]
  [5 1]
  [6 1]]]
'''
hstack: (tup: Sequence[ArrayLike])
按水平(按列)顺序堆叠数组。
vstack: (tup: Sequence[ArrayLike])
按垂直(按行)顺序堆叠数组。
np.c_:按行连接两个矩阵,就是把两矩阵上下相加,要求列数相等。
np.r_ :按列连接两个矩阵,就是把两矩阵左右相加,要求行数相等。
import numpy as np
a = np.arange(10).reshape(2,-1)
b = np.repeat(1, 10).reshape(2,-1)

c = np.r_[a, b]
print(c)
'''
[[0 1 2 3 4]
 [5 6 7 8 9]
 [1 1 1 1 1]
 [1 1 1 1 1]]
'''
c = np.c_[a, b]
print(c)
'''
[[0 1 2 3 4 1 1 1 1 1]
 [5 6 7 8 9 1 1 1 1 1]]
'''
19.2.4 索引和切片
import numpy as np

arr1 = np.arange(9)# 创建一个一维数组
print('1', arr1[0])  # 0
print('1', arr1[1])  # 1
print('1', arr1[0:5])  # [0 1 2 3 4]
print('1', arr1[0:])  # [0 1 2 3 4 5 6 7 8]
print('1', arr1[:])  # [0 1 2 3 4 5 6 7 8]
print('1', arr1[1:4])  # [1 2 3]
print('1', arr1[1:4:2])# 步长为2  # [1 3]

#轴1
arr2 = np.arange(9).reshape((3,3))# 创建一个二维数组
print('2:', arr2)
print('2:', arr2[0])  # 0轴
'''
[[0 1 2]
 [3 4 5]
 [6 7 8]]
'''
print('2:', arr2[1])  # 1轴 [0 1 2]
print('2:', arr2[2])  # 2轴 [3 4 5]
print('2:', arr2[0:])  # quanbu
print('2:', arr2[:])  # quanbu
print('2:', arr2[1:2])
'''
[[3 4 5]
 [6 7 8]]
'''
print('2:', arr2[0:4:2])# 步长为2
'''
[[0 1 2]
 [6 7 8]]
'''

# 多维度切片——  # 轴1 + 轴2
print('3:', arr2[:, 0:1])  # 分别对各个维度进行切片 常用
'''
[[0]
 [3]
 [6]]
 '''
print('3:', arr2[1:3, 1:3])  # [[4, 5],[7 ,8]]
print('3:', arr2[0:1, 0:1])  # 等维度的切片不降维 常用 [[0]]
print('3:', arr2[0:1, 0])  # int索引会降维 [0]
print('3:', arr2[0, 0])  # int索引会降维 0
print('3:', arr2[0, 0:1])  # int索引会降维 [0]

# 多维度索引——  # 轴1 + 轴2
print('4:', arr2[0, 0])# 0
print('4:', arr2[1, 2])# 5
数组索引:
import numpy as np

arr2 = np.arange(9).reshape((3,3))# 创建一个二维数组
print('1:', arr2[[1,0,2]])
'''
1: [[3 4 5]
 [0 1 2]
 [6 7 8]]
'''
print('1:', arr2[[0,1,2],[0,1,2]])  # 1: [0 4 8]
print('1:', arr2[[0,1,2],0])  # 1: [0 3 6]   广播 [[0, 1, 2], [0, 0, 0]]
print('1:', arr2[1,[0,1,2]])  # 1: [3 4 5]   广播 [[0,0,0], [0, 1, 2]]
# print(arr4[[0, 1, 2], [0, 1]])# 无法广播 with shapes (3,) (2,)
剩余轴的索引:
import numpy as np

# 剩余轴的索引/全索引的简写
arr1 = np.arange(18).reshape(3, 3, 2)
print('arr1:', arr1)
'''
[[ 0  2  4]
 [ 6  8 10]
 [12 14 16]]
'''
print(arr1[:, :, 0])
print(arr1[..., 0])  # 同[:,:,0]
print(arr1[0, ...])  # 同[0,:,:]
''''
[[0 1]
 [2 3]
 [4 5]]
'''
print(arr1[...])  # 同[:,:,:]   arr1
print(arr1[0, ..., 0])  # 同[0,:,0]  [0 2 4]
布尔索引:
# 布尔数组索引
import numpy as np

arr2 = np.arange(9)
print('arr2:', arr2)
condition = arr2 < 3
print(condition)  # [ True  True  True False False False False False False]
print(arr2[condition])  # [0 1 2]
print(arr2[arr2 == 5])# 使用判断表达式进行布尔索引  [5]
19.2.5 广播:
广播(Broadcast)是 numpy 对不同形状(shape)的数组进行数值计算的方式, 对数组的算术运算通 常在相应的元素上进行。如果两个数组 a 和 b 形状相同,即满足 a.shape == b.shape,那么 a*b 的结果就是 a 与 b 数组对应位相乘。这要求维数相同,且各维度的长度相同。
import numpy as np
a = np.array([[ 0, 0, 0], [10,10,10], [20,20,20], [30,30,30]])  # (4,3)
b = np.array([1,2,3])  # (3,1)  ——> (4,3)
print(a + b)
广播机制:为了解决两个数组在进行对应元素的操作时,即使形状不同也可以操作
广播的规则:
- 维度不同时,最高维为输出的最终维度
- 不够最终维度的数组,要往前面扩维度
- 同维度的元素个数,要么相同,要么其中一个为1,那就可以进行广播,否则就不可以,广播的时候,为1的将复制。
(2,3) 与(3,) 扩充维度-> (1, 3) 复制->(2, 3)
(3, )与(2, ) 不可以
(2, 3)与(2,) 不可以
快速判断能否广播:
- 看形状:从右往左看而且只需要看最短的
- 对应位置的元素要么相同,要么其中一个为1
(2,3,5,7) 与 (5,7) 可以
(2,3,5,7) 与 (5,) 不可以
(5,7)与(7,5) 不可以
(1,7)与(7,1) 可以
(2,3) 与 0 可以,任何形状跟标量都可以
import numpy as np
# 对应元素的运算,也会有广播机制
arr6_1 = np.arange(210).reshape(2,3,5,7)
arr6_2 = np.arange(35).reshape(5,7)
print(arr6_1 + arr6_2)

arr7_1 = np.arange(210).reshape(2,3,5,7)
arr7_2 = np.arange(5)
# print(arr7_1 - arr7_2)# could not be broadcast together with shapes (2,3,5,7) (5,)
arr8_1 = np.arange(35).reshape(5, 7)
arr8_2 = np.arange(35).reshape(7, 5)
# print(arr8_1 * arr8_2)# could not be broadcast together with shapes (5,7) (7,5)
arr9_1 = np.arange(7).reshape(1, 7)
print(arr9_1)
arr9_2 = np.arange(7).reshape(7, 1)
#print(arr9_2)
print(arr9_1 + arr9_2)
'''
[[ 0  1  2  3  4  5  6]
 [ 1  2  3  4  5  6  7]
 [ 2  3  4  5  6  7  8]
 [ 3  4  5  6  7  8  9]
 [ 4  5  6  7  8  9 10]
 [ 5  6  7  8  9 10 11]
 [ 6  7  8  9 10 11 12]]
'''

arr910_1 = 1
print(arr9_1+arr910_1)
# 切片+数组
import numpy as np
arr4 = np.arange(9).reshape((3,3))# 创建一个二维数组
print(arr4[:, [0]])# 维度不变 [[0] [3] [6]]  常用
print(arr4[:, 0])# 降维 [0 3 6]
print(arr4[:, [1, 0]])
'''
[[1 0]
 [4 3]
 [7 6]]
'''
print(arr4[[0, 1, 2], [0]])# [arr4[0][0] ,arr4[1][0] , arr4[2][0]]   [0 3 6]
19.2.6 数组元素的修改
import numpy as np

arr3 = np.zeros((3, 3))
print('arr3:', arr3)
print('arr3.dtype:', arr3.dtype)
print(arr3[0][0])

# 单个元素的修改
arr3[0][0] = 4.  # arr3[0, 0] = 3.
print(arr3)

#多个元素的修改
# 全部数组进行相同的修改
arr3[:, :] = 1  # arr3[...] = 1
print(arr3)
# 指定元素修改成指定数组的值
arr4 = np.arange(9).reshape(3, 3)
print('arr4:', arr4)
arr3[...] = arr4  # 不开辟新内存,直接修改arr3的数据,不改变数据类型
# arr3 = arr4  arr3指向新的地址,即arr4,其数据类型随之改变
print(arr3)

# 多元素修改,赋值号左右两边形状不同时,会触发广播机制:
# 赋值号左边的shape是输出的形状,赋值号右边会按照左边进行广播
# 然后将广播之后的结果,进行对应元素的赋值
arr5 = np.ones(3)
arr6 = np.array([2])  # [2] shape:(1,)
arr3[0] = arr5
arr3[1] = arr6
# arr3[1]:[0. 0. 0.], shape:(3,)
# arr6进行广播成(3,): [2 2 2]
# arr3[1] = [2. 2. 2.]
print(arr3)
数组的转置与轴的转换:
transpose: (a: ArrayLike, axes: Sequence[int] )
转置是重塑的一种特殊形式,它返回的是源数据的视图(不会进行任何复制操 作)。数组 不仅有transpose方法,还有一个特殊的T属性:
# ======数组的转置和轴转换==============
from icecream import ic
import numpy as np


arr1 = np.arange(8).reshape(4, 2)
ic(arr1)
arr1_t = np.transpose(arr1, [1, 0])  # [1, 0]为轴的索引号列表
arr1__T = arr1.T  # 矩阵的转置
ic(arr1_t)
ic(arr1__T)
ic(arr1.T)
arr1_r = arr1.reshape((2,4))
print('arr1_r:', arr1_r)  # 与转置结果不同
print(arr1_t.shape)  # (2, 4)
#arr2 = np.arange(24).reshape(4, 3, 2) # (4, 3, 2)  # (c, h, w)  -> (h, w, c)
#arr2_t_1 = np.transpose(arr2, [1, 2, 0]) # (3, 2, 4)
ndarray.transpose()
ndarray.swapaxes()
ic(arr := np.arange(15).reshape((3, 5)) )
ic(np.dot(arr.T, arr))  # (5, 5)
ic(arr := np.arange(16).reshape((2, 2, 4)))
ic(arr.transpose((1, 0, 2)))
ic(arr)
ic(arr.swapaxes(1, 2))  # transpose(0,2,1)
19.2.7 矩阵的运算
import numpy as np
from icecream import ic
#矩阵运算
arr1 = np.arange(8).reshape(4, 2)  # (4, 2) (2, 4)
arr2 = arr1.T  # (2, 4)
arr3 = np.ones((2, ))
res1 = arr1 @ arr2  # (4, 4)  矩阵的乘法
res2 = arr1 * arr3  # 对应元素相乘 不同形状会触发广播,如果不能广播就会报错
ic(res1)
ic(res2)

#使用函数
res3 = np.dot(arr1, arr2)  # 同 @
res4 = np.multiply(arr1, arr3)  # 同 *
ic(res3)
ic(res4)

# 高维的 看后面两个能否矩阵,其余位置看能否广播
arr4 = np.random.random((2, 3, 4))
arr5 = np.random.random((2, 4, 3))
ic(arr4.shape)
ic(arr5.shape)
res5 = arr4 @ arr5
ic(res5.shape)  # ic| res5.shape: (2, 3, 3)

#(1,2,3,4) 与 (2, 1, 4, 3) 矩阵结果:(2,2,3,3)
19.3 通用函数/常用函数
ufunc:numpy模块中对ndarray中数据进行快速元素级运算的函数,也可以看做是简单的函数(接受一个或 多个标量值,并产生一个或多个标量值)的矢量化包装器。
主要包括一元函数和二元函数:
19.3.1 一元函数
| 函数 | 说明 |
|---|---|
| abs、fabs | 计算整数、浮点数或复数的绝对值。对于非复数值,可以使用更快的fabs |
| sqrt | 计算各元素的平方。相当于arr**2 |
| exp | 计算各元素的指数e* |
| log、log10、log2、log1p | 分别为自然对数(底数为e)、底数为10的log、底数为2的log、log(1+x) |
| sign | 计算各元素的正负号∶1(正数)、0(零)、一1(负数) |
| ceil | 计算各元素的ceiling值,即大于等于该值的最小整数 |
| floor | 计算各元素的floor值,即小于等于该值的最大整数 |
| rint | 将各元素值四舍五入到最接近的整数,保留dtype |
| modf | 将数组的小数和整数部分以两个独立数组的形式返回 |
| isnan | 返回一个表示"哪些值是NaN(这不是一个数字)"的布尔型数组 |
| isfinite、isinf | 分别返回一个表示"哪些元素是有穷的(非inf,非NaN)"或"哪些元素是无穷的"的布尔型数组 |
| cos、cosh、sin、sinh、tan、tanh | 普通型和双曲型三角函数 |
| arccos、arccosh、arcsin、arcsinh、arctan、arctanh | 反三角函数 |
| logical_not | 计算各元素not x的真值。相当于-arr |
import numpy as np
from icecream import ic
# 一元函数
arr1 = np.arange(8).reshape(2, 4)
arr1[0][2] = -1

arr1_abs = np.abs(arr1)
ic(arr1)
ic(arr1_abs)
arr1_exp = np.exp(arr1)
ic(arr1_exp)
arr1_sqrt = np.sqrt(arr1)# arr1 ** 0.5
ic(arr1_sqrt)
arr1_log = np.log(arr1)
ic(arr1_log)

#计算中出现 nan/inf
isnan = np.isnan(arr1_log)
ic(isnan)
isinf = np.isinf(arr1_log)
ic(isinf)
#将nan/inf的值处理,比如修改成0
res1 = np.where(isinf, 0, arr1_log)
ic(res1)
arr1_log[isinf] = 0
ic(arr1_log)
# 计算给定数组中每一行的最大值
import numpy as np

np.random.seed(100)
a = np.random.randint(1,10, [5,3])
print(a)

print(np.max(a,axis=1))
print(np.amax(a, axis=1))
print(np.apply_along_axis(np.max, arr=a, axis=1))

np.random.seed(100)
a = np.random.randint(1,10, [5,3])
print(a)

# 计算一个2维numpy数组的每一行的最小值与最大值之比
print(np.apply_along_axis(lambda x:np.min(x)/np.max(x), arr=a, axis=1))
# 在二维numpy数组中找到按类别列分组的数字列的均值
import numpy as np

url = 'https://archive.ics.uci.edu/ml/machine-learning-databases/iris/iris.data'
iris = np.genfromtxt(url, delimiter=',', dtype='object')

numeric_column = iris[:, 1].astype('float')  # sepalwidth
grouping_column = iris[:, 4]  # species

out = []
for group_value in np.unique(grouping_column):
    print([group_value,numeric_column[grouping_column==group_value].mean()])
'''
[b'Iris-setosa', 3.418]
[b'Iris-versicolor', 2.7700000000000005]
[b'Iris-virginica', 2.974]
'''
# 从numpy数组中删除所有缺少的值
arr = np.array([1,2,3,np.nan,5,6,7,np.nan])
arr[~np.isnan(arr)]
# 计算给定的一维数组的窗口大小3的移动平均值
import numpy as np

np.random.seed(100)
z = np.random.randint(10, size=10)
print(z)
n = 3
res = []
for i in np.arange(len(z)-(n-1)):
    j = i+n
    res.append(np.mean(z[i:j]))
print(res)

def moving_average(a, n=3) :
    ret = np.cumsum(a, dtype=float)
    ret[n:] = ret[n:] - ret[:-n]
    return ret[n - 1:] / n

np.random.seed(100)
Z = np.random.randint(10, size=10)
print('array: ', Z)

moving_average(Z, n=3).round(2)

np.convolve(Z, np.ones(3)/3, mode='valid')
19.3.2 二元函数
| 函数 | 说明 |
|---|---|
| add | 将数组中对应的元素相加 |
| subtract | 从第一个数组中减去第二个数组中的元素 |
| multiply | 数组元素相乘 |
| divide、floor_divide | 除法或向下圆整除法(丢弃余数) |
| power | 对第一个数组中的元素A,根据第二个数组中的相应元素B,计算A^B |
| maximum、fmax | 元素级的最大值计算。fmax将忽略NaN |
| minimum、fmin | 元素级的最小值计算。fmin将忽略NaN |
| mod | 元素级的求模计算(除法的余数) |
| copysign | 将第二个数组中的值的符号复制给第一个数组中的值 |
| greater、greater_equal、less、less_equal、equal、not_equal | 执行元素级的比较运算,最终产生布尔型数组。相当于中缀运算符>、>=、<、<=、==、!= |
| logical_and、logical_or、logical_xor | 执行元素级的真值逻辑运算。相当于中缀运算符&、| 、^ |
import numpy as np
from icecream import ic

# 二元函数 常使用符号
arr1 = np.arange(8).reshape(2, 4)
arr1[0][2] = -1
arr1[1][3] = -99
arr2 = np.random.random((1, 4)).astype(np.int16)
ic(arr2)
res = np.add(arr1, arr2)  # arr1 + arr2
ic(res)
res = np.power(arr1, 2)  # arr1的2次方 # arr1 ** 2
ic(res)

# 逻辑运算
res = np.greater(arr1, arr2)# arr1 > arr2
ic(res)
res = np.greater_equal(arr1, arr2)# arr1 >= arr2
ic(res)
a = np.array([2, 6, 1, 9, 10, 3, 27])
print(type(a))

#方法1:
index = np.isin(a, np.arange(5,11))
a[index]

# 方法3:
index = np.where((a >= 5) & (a <= 10))
a[index]

# 方法3:
index = np.where(np.logical_and(a>=5, a<=10))
a[index]


# 方法4: (thanks loganzk!)
a[(a >= 5) & (a <= 10)]
19.3.3 统计函数
聚合函数是对一组值(eg:一个数组)进行操作,返回一个单一值作为结果的函数。当然聚合函数也可 以指定对某个具体的轴进行数据聚合操作;常将的聚合操作有:平均值、最大值、最小值、方差等 等
numpy.argmax() 和 numpy.argmin()函数分别沿给定轴返回最大和最小元素的索引
import numpy as np
from icecream import ic


arr1 = np.arange(8).reshape(2, 4)

#统计函数
arr1_mean = np.mean(arr1, axis=1, keepdims=True)  # keepdims=True:保持维度不变
ic(arr1_mean)  # ([[1.5],[5.5]])
arr1_mean = np.mean(arr1, axis=0, keepdims=True)  # keepdims=True:保持维度不变
ic(arr1_mean)  # ([[2., 3., 4., 5.]])
arr1_mean = np.mean(arr1)# 求所有元素的均值
ic(arr1_mean)  # 3.5

arr1_min = np.amin(arr1)# 求所有元素的最小值
ic(arr1_min)  # 0
arr1_min = np.amin(arr1, axis=1, keepdims=True)
ic(arr1_min)  # ([[0],[4]])
arr1_min = np.amin(arr1, axis=0, keepdims=True)
ic(arr1_min)  # ([[0, 1, 2, 3]])

arr1_max = np.amax(arr1)
ic(arr1_max)  # 7
arr1_argmax = np.argmax(arr1, axis=0)  # 返回沿轴的最大值的索引
ic(arr1_argmax)  # array([1, 1, 1, 1], dtype=int64)
arr1_max = np.amax(arr1, axis=0)
ic(arr1_max)  # array([4, 5, 6, 7])

arr1_sum = np.sum(arr1)
ic(arr1_sum)  # 28
arr1_sum = np.sum(arr1, axis=1, keepdims=True)
ic(arr1_sum)  # ([[6],[22]])
numpy.intersect1d(ar1, ar2, assume_unique=False, return_indices=False)
求两个数组的交集。
import numpy as np
a = np.array([1,4,3,2,3,4,3,4,5,6])
b = np.array([7,4,10,2,7,2,9,4,9,8])
print(np.intersect1d(a,b))  # [2 4]
numpy.setdiff1d(ar1, ar2, assume_unique=False)
求两个数组的差集,返回在ar1中不在ar2中的唯一值,一维数组
如果 assume_unique=False,则对返回值去重,从小到大进行排序。
如果 assume_unique=True,则假定输入数组无重复的值,不对结果进行排序。
import numpy as np
a = np.array([1,4,3,2,3,4,3,4,5,6])
b = np.array([7,4,10,2,7,2,9,4,9,8])
print(np.setdiff1d(a,b))  # [1 3 5 6]
np.isin(a,b) 用于判定a中的元素在b中是否出现过,如果出现过返回True,否则返回False,最终结果为一个形状和a一模一样的数组。
当参数invert被设置为True时,情况恰好相反,如果a中元素在b中没有出现则返回True,如果出现了则返回False.
import numpy as np

a = np.array([1,3,7]).reshape(3,1)
b = np.arange(9).reshape(3,3)

# a 中的元素是否在b中,如果在b中显示True
Np_No_invert=np.isin(a, b, invert=False)
print("Np_No_invert\n",Np_No_invert)
'''
Np_No_invert
 [[ True]
 [ True]
 [ True]]
'''
# a 中的元素是否在b中,如果设置了invert=True,则情况恰恰相反,即a中元素在b中则返回False
Np_invert=np.isin(a, b, invert=True)
print("Np_invert\n",Np_invert)
'''
Np_invert
 [[False]
 [False]
 [False]]
'''
排序函数:
numpy.sort() 函数返回输入数组的排序副本;
numpy.argsort() 函数返回的是数组值从小到大的索引值
import numpy as np
from icecream import ic

arr1 = np.arange(8).reshape(2, 4)
#排序
# sort():返回排序值 argsort():返回索引号
arr1_sort = np.sort(arr1, axis=1)
arr1_argsort = np.argsort(arr1, axis=1)
ic(arr1_sort)  # ([[0, 1, 2, 3], [4, 5, 6, 7]])
ic(arr1_argsort)  # ([[0, 1, 2, 3],[0, 1, 2, 3]], dtype=int64)
np.random.seed(10)
a = np.random.randint(20, size=10)
print(a)  # [ 9  4 15  0 17 16 17  8  9  0]
print(a.argsort().argsort())  # [4 2 6 0 8 7 9 3 5 1]
19.3.4 其他函数
numpy.nonzero() 函数返回输入数组中非零元素的索引。
import numpy as np
from icecream import ic

arr1 = np.arange(8).reshape(2, 4)

nonzidxs = np.nonzero(arr1)  # 获取非0值的索引数组
ic(nonzidxs)
'''
(array([0, 0, 0, 1, 1, 1, 1], dtype=int64),
 array([1, 2, 3, 0, 1, 2, 3], dtype=int64))
'''
ic(arr1[nonzidxs])  # array([1, 2, 3, 4, 5, 6, 7])
np.unique函数的主要作用是将数组中的元素进行去重操作(也就是只保存不重复的数据)
import numpy as np
from icecream import ic

arr1 = np.arange(8).reshape(2, 4)

arr1[:, 0] = -1000
ic(arr1)
arr1[:, 1] = -1000
ic(arr1)

res = np.unique(arr1, axis=1)
ic(res)
'''
array([[-1000,     2,     3],
       [-1000,     6,     7]])
'''
# 创建按类别变量分组的行号
import numpy as np

url = 'https://archive.ics.uci.edu/ml/machine-learning-databases/iris/iris.data'
species = np.genfromtxt(url, delimiter=',', dtype='str', usecols=4)
np.random.seed(100)
species_small = np.sort(np.random.choice(species, size=20))
print(species_small)
'''
['Iris-setosa' 'Iris-setosa' 'Iris-setosa' 'Iris-setosa' 'Iris-setosa'
 'Iris-versicolor' 'Iris-versicolor' 'Iris-versicolor' 'Iris-versicolor'
 'Iris-versicolor' 'Iris-versicolor' 'Iris-versicolor' 'Iris-versicolor'
 'Iris-versicolor' 'Iris-virginica' 'Iris-virginica' 'Iris-virginica'
 'Iris-virginica' 'Iris-virginica' 'Iris-virginica']
'''
print([i for val in np.unique(species_small) for i, grp in enumerate(species_small[species_small==val])])
# 在给定的numpy数组中找到重复的条目(第二次出现),并将其标记为True。第一次出现应该是False。
import numpy as np

np.random.seed(100)
a = np.random.randint(0, 5, 10)
print(a)  # [0 0 3 0 2 4 2 2 2 2]


out = np.full(a.shape[0], True)
print(out)  # [ True  True  True  True  True  True  True  True  True  True]

unique_positions = np.unique(a, return_index=True)[1]
print(unique_positions)  # [0 4 2 5]


out[unique_positions] = False
print(out)  # [False  True False  True False False  True  True  True  True]
np.vectorize(pyfunc, otypes=None, doc=None, excluded=None, cache=False, signature=None)
pyfunc :python函数或方法
otypes : 输出数据类型。必须将其指定为一个typecode字符串或一个数据类型说明符列表。每个输出应该有一个数据类型说明符。
doc : 函数的docstring。如果为None,则docstring将是 pyfunc.doc。
excluded : 表示函数不会向量化的位置或关键字参数的字符串或整数集。这些将直接传递给未经修改的pyfunc
cache :如果为True,则缓存第一个函数调用,该函数调用确定未提供otype的输出数。
signature : 广义通用函数签名,例如,(m,n),(n)->(m)用于矢量化矩阵 - 向量乘法。如果提供的话,pyfunc将调用(并期望返回)具有由相应核心维度的大小给出的形状的数组。默认情况下,pyfunc假定将标量作为输入和输出。
Returns:
vectorized :向量化的数组
def maxx(x, y):
    """Get the maximum of two items"""
    if x >= y:
        return x
    else:
        return y
a = np.array([5, 7, 9, 8, 6, 4, 5])
b = np.array([6, 3, 4, 8, 9, 7, 1])
pair_max = np.vectorize(maxx, otypes=[float])
print(pair_max(a, b))
计算两个numpy数组a和b之间的欧几里得距离
a = np.array([1,2,3,4,5])
b = np.array([4,5,6,7,8])

dist = np.linalg.norm(a-b)
19.3.5 应用
onehot: 类别所在的位置为1,其他位置都是0
假设分类有4类,分别是猫 狗 猪 兔,类别索引分别是 0 1 2 3
猫: [1 0 0 0]
狗: [0 1 0 0]
猪: [0 0 1 0]
兔: [0 0 0 1]
假设有5张图片,分别为:[猫, 狗, 狗, 猪, 猫]
处理结果为: [[1 0 0 0],[0 1 0 0],[0 1 0 0],[0 0 1 0],[1 0 0 0]]
导入带有数字和文本的数据集,以使numpy中的文本完整无缺:
genfromtxt(fname,dtype,comments,delimiter,skipd_header,skip_fonter,converters,missing_values,filling_values,usecols,names, autostrip,**kwarg)
fname -> str/list /IO Object 等等,表示数据源;文件路径,字符串列表、StringIO 对象都可;
dtype -> dtype,最终数组的数据类型;
comments -> str,注释标识符,加载时会自动忽略位于注释标识符后面的字符串;
delimiter -> str/int/sequence,分割符,加载时来分割字符串,比较常见的就是逗号,也可以指定 int 整形表示每一个元素最大宽度;也可以是字符列表,表示分割符可为多个字符;
skip_header -> int,数据加载时跳过文件头部的字符行数;
skip_footer -> int,数据加载时跳过文件尾部字符串行数;
converters -> variable,可以是字典形式也可以是 lambda 函数,表示将某一种数据格式转化为另一种数据格式;
missing_values -> variable,指定数组中 missing value;
filling_values -> variable,指定 filling_values,来替代 missing_value;
usercols -> sequence,指定需读取的列数, 0 表示第一列,-1 为最后一列;
import numpy as np
url = 'https://archive.ics.uci.edu/ml/machine-learning-databases/iris/iris.data'
iris  = np.genfromtxt(url,delimiter=',', dtype='object')
# dtype='object',如果不设置,则文本就会导入到nan,所以为了保持文本完整就设置成object对象
np.set_printoptions(threshold=5)
print(iris)
'''
[[b'5.1' b'3.5' b'1.4' b'0.2' b'Iris-setosa']
 [b'4.9' b'3.0' b'1.4' b'0.2' b'Iris-setosa']
 [b'4.7' b'3.2' b'1.3' b'0.2' b'Iris-setosa']
 ...
 [b'6.5' b'3.0' b'5.2' b'2.0' b'Iris-virginica']
 [b'6.2' b'3.4' b'5.4' b'2.3' b'Iris-virginica']
 [b'5.9' b'3.0' b'5.1' b'1.8' b'Iris-virginica']]
'''

# 从导入的iris一维元组数组中提取文本列species
iris_1d = np.genfromtxt(url, delimiter=',', dtype=None)
species = np.array([row[4] for row in iris_1d])
print(species)
'''
[b'Iris-setosa' b'Iris-setosa' b'Iris-setosa' ... b'Iris-virginica'
 b'Iris-virginica' b'Iris-virginica']
'''

# 通过省略文本字段species,将1Diris数组转换为2D数组iris_2d
iris_2d = np.array([row.tolist()[:4] for row in iris_1d])
print(iris_2d)
'''
[[5.1 3.5 1.4 0.2]
 [4.9 3.  1.4 0.2]
 [4.7 3.2 1.3 0.2]
 ...
 [6.5 3.  5.2 2. ]
 [6.2 3.4 5.4 2.3]
 [5.9 3.  5.1 1.8]]
'''
# 创建归一化形式的iris的sepallength,其值范围恰好0与1之间,使得最小的值为0,并且最大的值为1。
import numpy as np

url = 'https://archive.ics.uci.edu/ml/machine-learning-databases/iris/iris.data'
sepallength = np.genfromtxt(url, delimiter=',', dtype='float', usecols=[0])
smax,smin = np.max(sepallength),np.min(sepallength)
S1 = (sepallength-smin)/(smax-smin)
# or
#S = (sepallength - smin)/sepallength.ptp()
print(S1)

# 计算sepallength的softmax得分
res = np.exp(sepallength)/np.sum(np.exp(sepallength))
np.set_printoptions(threshold=10)
print(res)  # [0.00221959 0.00181724 0.00148783 ... 0.00900086 0.006668   0.00493978]

def softmax(x):
    """Compute softmax values for each sets of scores in x.
    https://stackoverflow.com/questions/34968722/how-to-implement-the-softmax-function-in-python"""
    e_x = np.exp(x - np.max(x))
    return e_x / e_x.sum(axis=0)
print(softmax(sepallength))  # [0.00221959 0.00181724 0.00148783 ... 0.00900086 0.006668   0.00493978]

# 找到iris数据sepallength列的 5% 与 95% 百分位数
sepallength = np.genfromtxt(url, delimiter=',', dtype='float', usecols=[0])
res = np.percentile(sepallength, q=[5,95])  # Compute the q-th percentile of the data along the specified axis.
print(res)  # [4.6   7.255]

# 在iris_2d数据集的20个随机位置插入值np.nan
iris_2d = np.genfromtxt(url, delimiter=',', dtype='object')
np.set_printoptions(threshold=1000)

np.random.seed(100)
iris_2d[np.random.randint(iris_2d.shape[0],size=20),np.random.randint(iris_2d.shape[1],size=20)]=np.nan
print(iris_2d[:10])
'''
[[b'5.1' b'3.5' b'1.4' b'0.2' b'Iris-setosa']
 [b'4.9' b'3.0' b'1.4' b'0.2' b'Iris-setosa']
 [b'4.7' b'3.2' b'1.3' b'0.2' b'Iris-setosa']
 [b'4.6' b'3.1' b'1.5' b'0.2' b'Iris-setosa']
 [b'5.0' b'3.6' b'1.4' b'0.2' b'Iris-setosa']
 [b'5.4' b'3.9' b'1.7' b'0.4' b'Iris-setosa']
 [b'4.6' b'3.4' b'1.4' b'0.3' b'Iris-setosa']
 [b'5.0' b'3.4' b'1.5' b'0.2' b'Iris-setosa']
 [b'4.4' b'2.9' nan b'0.2' b'Iris-setosa']
 [b'4.9' b'3.1' b'1.5' b'0.1' b'Iris-setosa']]
'''

# 在iris_2d的sepallength(第1列)中找到缺失值的数量和位置
iris_2d = np.genfromtxt(url, delimiter=',', dtype='float')
iris_2d[np.random.randint(150, size=20), np.random.randint(4, size=20)] = np.nan
print(iris_2d[:10])
'''
[[nan 3.5 1.4 0.2 nan]
 [4.9 3.  1.4 0.2 nan]
 [4.7 3.2 1.3 0.2 nan]
 [4.6 3.1 1.5 0.2 nan]
 [5.  3.6 1.4 0.2 nan]
 [5.4 3.9 1.7 0.4 nan]
 [4.6 3.4 1.4 0.3 nan]
 [5.  3.4 1.5 0.2 nan]
 [4.4 2.9 1.4 0.2 nan]
 [4.9 3.1 1.5 0.1 nan]]
'''
print("Number of missing values: \n", np.isnan(iris_2d[:, 0]).sum())
print("Position of missing values: \n", np.where(np.isnan(iris_2d[:, 0])))
'''
Number of missing values:
 6
Position of missing values:
 (array([ 0, 27, 30, 38, 68, 91], dtype=int64),)
'''

# 筛选iris_2d第3列petallength > 1.5和第1列sepallength  < 5.0 的行
iris_2d = np.genfromtxt(url, delimiter=',', dtype='float', usecols=[0,1,2,3])
#方法1:
condition = (iris_2d[:, 2] > 1.5) & (iris_2d[:, 0] < 5.0)
print(condition)  # bool
#方法2:
condition = np.where(np.logical_and((iris_2d[:,2]>1.5),(iris_2d[:,0]<5.0)))
print(condition)  # (array([ 11,  24,  29,  30,  57, 106], dtype=int64),)
print(iris_2d[condition])

# 选择没有任何nan值的iris_2d行
iris_2d[np.random.randint(150, size=20), np.random.randint(4, size=20)] = np.nan
#方法1:
any_nan_in_row  = np.array([~np.any(np.isnan(row)) for row in iris_2d])
print(iris_2d[any_nan_in_row][:10])
#方法2:
iris_2d[np.sum(np.isnan(iris_2d), axis = 1) == 0][:10]

# 在iris_2d中找到SepalLength(第一列)和PetalLength(第三列)之间的相关性
iris_2d = np.genfromtxt(url, delimiter=',', dtype='float', usecols=[0,1,2,3])
sepalLength = iris_2d[:, 0]
petalLength = iris_2d[:, 2]
print(np.corrcoef(sepalLength, petalLength)[0,1])

# 找出iris_2d是否有任何缺失值
iris_2d = np.genfromtxt(url, delimiter=',', dtype='float', usecols=[0,1,2,3])
print(np.any(np.isnan(iris_2d)))  #np.isnan(iris_2d).any()   False

# numpy数组中,所有出现nan的都替换为0
iris_2d = np.genfromtxt(url, delimiter=',', dtype='float', usecols=[0,1,2,3])
iris_2d[np.random.randint(150, size=20), np.random.randint(4, size=20)] = np.nan
iris_2d[np.isnan(iris_2d)] = 0
print(iris_2d[:5])

# 查找iris数据集species列的唯一值和唯一值的计数——去重+计数
iris = np.genfromtxt(url, delimiter=',', dtype='object')
names = ('sepallength', 'sepalwidth', 'petallength', 'petalwidth', 'species')
species = iris[:,4]  # species = np.array([row.tolist()[4] for row in iris])
print(np.unique(species, return_counts=True))
'''
(array([b'Iris-setosa', b'Iris-versicolor', b'Iris-virginica'],
      dtype=object), array([50, 50, 50], dtype=int64))
'''

# 对iris_2d的花瓣长度(第3列)进行装箱以形成文本数组
iris = np.genfromtxt(url, delimiter=',', dtype='object')
petal_length_bin = np.digitize(iris[:, 2].astype('float'), [0, 3, 5, 10])  # Bin petallength
label_map = {1: 'small', 2: 'medium', 3: 'large', 4: np.nan}  # Map it to respective category
petal_length_cat = [label_map[x] for x in petal_length_bin]  # # View
print(petal_length_cat[:10])

# 在iris_2d中创建一个新列volume,其中volume的创建方式为 (pi * petallength * sepal_length^2)/3
iris_2d = np.genfromtxt(url, delimiter=',', dtype='object')
sepallength = iris_2d[:, 0].astype('float')
petallength = iris_2d[:, 2].astype('float')
volume = (np.pi * petallength * sepallength**2)/3  # #计算volume的值
#将volume转换成2维,以匹配iris_2d的维数
#方法1:
volume_2d = np.tile(volume, (1,1)).reshape(-1,1)
#方法2:
#volume = volume[:, np.newaxis]
new = np.hstack([iris_2d, volume_2d])  # #纵向堆叠两个数组
print(new[:5])
'''
[[b'5.1' b'3.5' b'1.4' b'0.2' b'Iris-setosa' 38.13265162927291]
 [b'4.9' b'3.0' b'1.4' b'0.2' b'Iris-setosa' 35.200498485922445]
 [b'4.7' b'3.2' b'1.3' b'0.2' b'Iris-setosa' 30.0723720777127]
 [b'4.6' b'3.1' b'1.5' b'0.2' b'Iris-setosa' 33.238050274980004]
 [b'5.0' b'3.6' b'1.4' b'0.2' b'Iris-setosa' 36.65191429188092]]
'''

# 随机抽取iris的类别(species列)样本,使得setose类的数量是versicolor和virginica的和。
# 类别有:[b'Iris-setosa', b'Iris-versicolor', b'Iris-virginica']
iris = np.genfromtxt(url, delimiter=',', dtype='object')
names = ('sepallength', 'sepalwidth', 'petallength', 'petalwidth', 'species')
species = iris[:,4]
# print(species[:5])
#方法1:
a = np.array([b'Iris-setosa', b'Iris-versicolor', b'Iris-virginica'])
sample = np.random.choice(a, 150, p=[0.5, 0.25, 0.25])
# print(sample)
#方法2:
np.random.seed(100)
probs = np.r_[np.linspace(0, 0.500, num=50), np.linspace(0.501, .750, num=50), np.linspace(.751, 1.0, num=50)]
index = np.searchsorted(probs, np.random.random(150))
# print(index)
species_out = species[index]
# print(species_out)
print(np.unique(species_out, return_counts=True))


# 物种setosa的petallength第二长是多少?——当被另一个数组分组时,如何获得第二个最大值
iris = np.genfromtxt(url, delimiter=',', dtype='object')

petal_len_setosa = iris[iris[:,4] == b'Iris-setosa',[2]]
print(np.unique(petal_len_setosa)[-2])  # b'1.7'

# iris数据集第4列的花瓣宽度第一次出现的值大于1.0的位置
iris = np.genfromtxt(url, delimiter=',', dtype='object')
print(np.argwhere(iris[:, 3].astype('float') > 1.0)[0])  # [50]
从以下URL导入图像并将其转换为numpy数组
# 从以下URL导入图像并将其转换为numpy数组
from io import BytesIO
from PIL import Image
import PIL, requests

URL = r'https://gimg2.baidu.com/image_search/src=http%3A%2F%2Ftrekandmountain.com%2Fwp-content%2Fuploads%2F2017%2F04%2FDenali-Alamy-web-1014x400.jpg&refer=http%3A%2F%2Ftrekandmountain.com&app=2002&size=f9999,10000&q=a80&n=0&g=0n&fmt=jpeg?sec=1624419757&t=881a756a8ddb880cbb4ee974dbdc2ac6'
response = requests.get(URL)

# Read it as Image and resize to 150*150
img = Image.open(BytesIO(response.content)).resize([150,150])
#convert to numpy array
arr = np.asarray(img)

#convert it back to an image and show
img_back = Image.fromarray(np.uint8(arr))
Image.Image.show(img_back)
20. 文件和异常
20.1 文件的打开(创建)
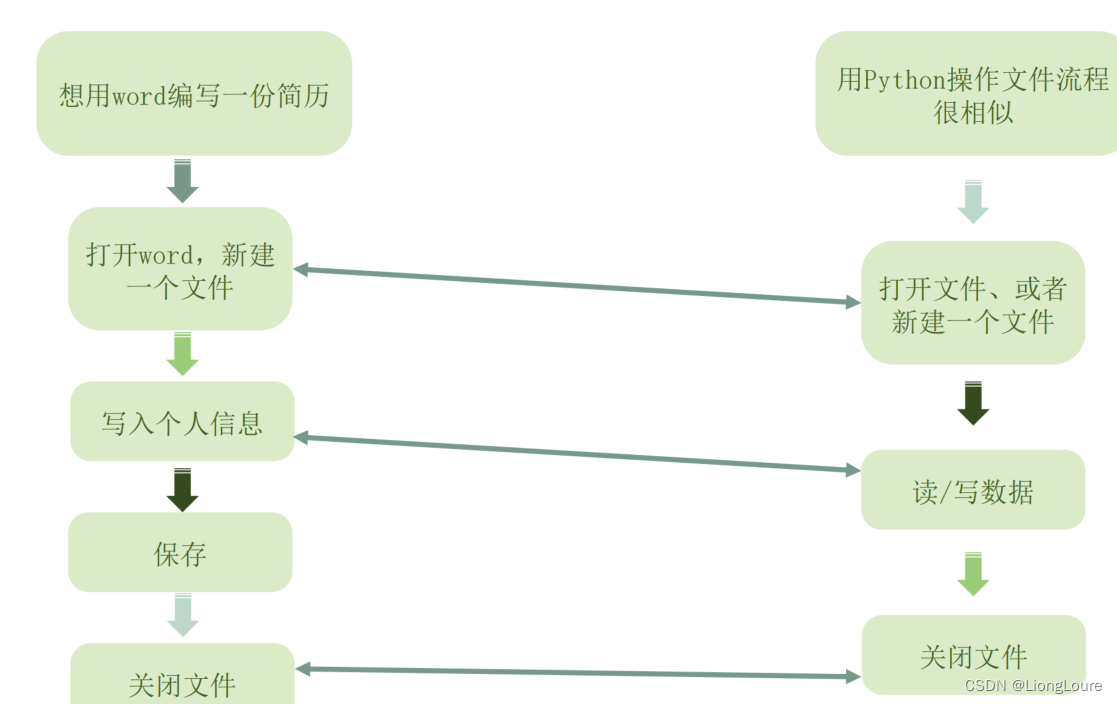
open(name[, mode[, buffering[,encoding]]])
open函数:在python中,使用open函数,打开一个已经存在的文件,或者新建一个新文件。
· name : 一个包含了你要访问的文件名称的字符串值(区分绝对路径和相对路径)。——c:/user/test.txt test.txt
· mode : mode 决定了打开文件的模式:只读,写入,追加等。所有可取值见如下的完全列表。这个参数是非强制
的,默认文件访问模式为只读®。
· buffering : 如果 buffering 的值被设为 0,就不会有寄存。如果 buffering 的值取 1,访问文件时会寄存行。如果
将 buffering 的值设为大于 1 的整数,表明了这就是的寄存区的缓冲大小。如果取负值,寄存区的缓冲大小则为系
统默认。
访问模式:
| 访问模式 | 说明 |
|---|---|
| r | 以只读方式打开文件。文件的指针将会放在文件的开头。这是默认模式。 |
| w | 打开一个文件只用于写入。如果该文件已存在则将其覆盖。如果该文件不存在,创建新文件。 |
| a | 打开一个文件用于追加。如果该文件已存在,文件指针将会放在文件的结尾。也就是说,新的内容将会被写入到已有内容之后。如果该文件不存在,创建新文件进行写入。 |
| rb | 以二进制格式打开一个文件用于只读。文件指针将会放在文件的开头。这是默认模式 |
| wb | 以二进制格式打开一个文件只用于写入。如果该文件已存在则将其覆盖。如果该文件不存在,创建新文件。 |
| ab | 以二进制格式打开一个文件用于追加。如果该文件已存在,文件指针将会放在文件的结尾。也就是说,新的内容将会被写入到已有内容之后。如果该文件不存在,创建新文件进行写入。 |
| r+ | 打开一个文件用于读写。文件指针将会放在文件的开头。(先读再写) |
| w+ | 打开一个文件用于读写。如果该文件已存在则将其覆盖。如果该文件不存在,创建新文件。 |
| a+ | 打开一个文件用于读写。如果该文件已存在,文件指针将会放在文件的结尾。文件打开时会是追加模式。如果该文件不存在,创建新文件用于读写。 |
| rb+ | 以二进制格式打开一个文件只用于写入。如果该文件已存在则将其覆盖。如果该文件不存在,创建新文件。 |
| wb+ | 以二进制格式打开一个文件用于读写。如果该文件已存在则将其覆盖。如果该文件不存在,创建新文件。 |
| ab+ | 以二进制格式打开一个文件用于追加。如果该文件已存在,文件指针将会放在文件的结尾。如果该文件不存在,创建新文件用于读写。 |
file1 = open('Test.txt','w')
20.1.1 文件的关闭
对于文件的操作结束之后,使用close()来关闭文件
文件对象.close()
file1.close()
20.1.2 文件的读取
read(num)
read(num):可以读取文件里面的内容。num表示要从文件中读取的数据的长度(单位是字节),如果没有传入num,那么就表示读取文件中所有的数据
# 读取操作
# 新建一个文件
# file1 = open('test.txt', 'w')
# file1.close()

# 文件的读取
file1 = open('test.txt')  # 文件对象实例
data1 = file1.read(5)  # 读取长度为12
print(data1)
print('==================')
data2 = file1.read()  # 有多少读取多少 ——> 指针还在读取之后的位置
print(data2)
'''
hello
==================
 world
'''

file1.close()
file1 = open('test.txt')
data1 = file1.read(5)  # 读取长度为12
print(data1)
file1.close()
file1 = open('test.txt')
print('==================')
data2 = file1.read()  # 有多少读取多少 ——> 重新打开
print(data2)
'''
hello
==================
hello world
'''
readlines()
readlines:可以按照行的方式把整个文件中的内容进行一次性读取,并且返回的是一个列表,其中每一行的数据为一个元素
#按行读取
file1 = open('test.txt')  # 文件对象实例
##======= readlines
data1 = file1.readlines()  # 返回一个列表,列表的元素是所有行的内容,一行就是一个元素。
for line in data1:
    print(line)   # hello world \n  wonderful
print(data1)  # ['hello world\n', 'wonderful']
##======= readline
file1 = open('test.txt')  # 文件对象实例
line1 = file1.readline()  # 读取一行,返回值为字符串
line2 = file1.readline()
file1 = open('test.txt')  # 文件对象实例
line3 = file1.readlines()
print('line1:', line1)  # line1: hello world
print('line2:', line2)  # line2: wonderful
print('line3:', line3)  # line3: ['hello world\n', 'wonderful']
##======= for in
file1 = open('test.txt')# 文件对象实例
for line in file1:
    print(line.replace('\n', ''))  # 否则会由于隐含的换行符多一行
'''hello world
wonderful'''
20.1.3 文件的写入
如果你要写入的文件不存在,函数open()将自动创建它。
我们使用文件对象的方法write()将一个字符串写入文件.这个程序是没有终端输出
函数write()不会在你写入的文本末尾添加换行符,需要手动添加\n
注意: Python只能将字符串写入文本文件。要将数值数据存储到文本文件中,必须先使用函数str()将其转换为字符串格式。
# 文件的写入
file2 = open('wtest.txt', 'w', encoding='utf8')# 'w':覆盖
string = 'hello python.'
file2.write(string+'\n')# 不会自动换行,可以手动换行
file2.close()

file2 = open('wtest.txt', 'a', encoding='utf8')# 'a':追加
string2 = '小明'
file2.write(string2)
file2.close()


# 二进制文件的读写
file1 = open('cat.png', 'rb')# https://gimg2.baidu.com/image_search/src=http%3A%2F%2Fp6.itc.cn%2Fimages01%2F20210927%2Fdadcc0817dc247559f14bb9f1e38c85b.jpeg&refer=http%3A%2F%2Fp6.itc.cn&app=2002&size=f9999,10000&q=a80&n=0&g=0n&fmt=auto?sec=1656041395&t=cb5b098f3d66fe684a8a0bb919a46c0b
file2 = open('cat1.png', 'wb')
data = file1.read()
file2.write(data)
file2.close()
file1.close()
# pip install request
# 如果需要下载保存 可以使用request
#file1 = open('https://gimg2.baidu.com/image_search/src=http%3A%2F%2Fp6.itc.cn%2Fimages01%2F20210927%2Fdadcc0817dc247559f14bb9f1e38c85b.jpeg&refer=http%3A%2F%2Fp6.itc.cn&app=2002&size=f9999,10000&q=a80&n=0&g=0n&fmt=auto?sec=1656041395&t=cb5b098f3d66fe684a8a0bb919a46c0b', 'rb')
# https://gimg2.baidu.com/image_search/src=http%3A%2F%2Fp6.itc.cn%2Fimages01%2F20210927%2Fdadcc0817dc247559f14bb9f1e38c85b.jpeg&refer=http%3A%2F%2Fp6.itc.cn&app=2002&size=f9999,10000&q=a80&n=0&g=0n&fmt=auto?sec=1656041395&t=cb5b098f3d66fe684a8a0bb919a46c0b
使用 with 函数,自动关闭文件:
自动关闭文件
with open(‘wtest.txt’, ‘a’, encoding=‘utf8’) as file1:
pass # file1.write(‘with.’)
# 自动关闭文件
with open('wtest.txt', 'a', encoding='utf8') as file1:
    pass

with open('test.txt') as file1:  # #file1 = open('test.txt') .... file1.close()
    #======= readlines
    data1 = file1.readlines()  # 返回一个列表,列表的元素是所有行的内容,一行就是一个元素。
    print(data1)  # ['hello world\n', 'wonderful']
    ##======= readline
    line1 = file1.readline()  # 读取一行,返回值为字符串  line1: hello world
    line2 = file1.readline()  # line2: wonderful
    line3 = file1.readline()  # line3:
    print('line1:', line1.replace('\n', ''))
    print('line2:', line2.replace('\n', ''))
    print('line3:', line3.replace('\n', ''))
    ###======= for in
    for line in file1:
        print(line.replace('\n', ''))  # hello world  wonderful
20.2 常用函数
| 函数名 | 说明 |
|---|---|
| flush() | 把缓冲区的内容写入硬盘 |
| tell() | 返回文件游标操作的当前位置,以文件的开头为原点 |
| write() | 把str写到文件中,write()并不会在str后加上一个换行符 |
| seek(offset[,whence]) | offset – 开始的偏移量,也就是代表需要移动偏移的字节whence:可选,默认值为 0。给offset参数一个定义,表示要从哪个位置开始偏移;0代表从文件开头开始算起,1代表从当前位置开始算起,2代表从文件末尾算起。 |
| truncate() | 把文件裁成规定的大小,默认的是裁到当前文件操作标记的位置。如果size比文件的大小还要大,依据系统的不同可能是不改变文件,也可能是用0把文件补到相应的大小,也可能是以一些随机的内容加上去。 |
| read(size) | size为读取的长度,打开模式有b(二进制) 就按byte为单位,无b就以字符为单位 |
| readline()/readlines() | 读取第一行/把文件每一行作为一个list的一个成员,并返回这个list。 |
| write() | 把str写到文件中,write()并不会在str后加上一个换行符 |
| writelines(seq) | 把seq的内容全部写到文件中(多行一次性写入)。这个函数也只是忠实地写入,不会在每行后面加上任何东西。 |
| close() | 关闭文件 |
20.3 异常
Python遇到错误后,会引发异常。如果异常对象并未被处理或捕捉,则程序就会用所谓的回溯(Traceback,一种错误信息)来终止执行。
异常是指在程序执行过程中发生的一个事件,会影响程序的正常运行,所以一般需要进行捕获异常并处理。
异常的捕获使用try/except/finally语句进行捕获操作,并告诉python发生异常时怎么办:
try:
<语句>
except <异常类型1>[, 异常参数名1]:
<异常处理代码1>
except <异常类型2>[, 异常参数名2]:
<异常处理代码2>
else:
<没有异常时候的处理代码>
finally:
<不管是否有异常,最终执行的代码块>
# 异常处理——直接对文件进行操作——误操作
# file1 = open('999.txt')
# file1 = close()

try:
    file1 = open('999.txt')
    data = file1.read()
    print(data)
except Exception:
    print('wrong!')
finally:
    print('close file1')
我们将导致错误的代码行open放在了一个try代码块中。如果try代码块中的代码运行起来没有问题,python将跳except代码块;
如果try代码块中的代码导致了错误,python将查找这样的except代码块,并运行其中的代码,即其中指定的错误与引发的错误相同。
异常处理:
| 异常名称 | 描述 | 异常名称 | 描述 |
|---|---|---|---|
| BaseException | 所有异常的基类 | NotImplementedError | 尚未实现的方法 |
| SystemExit | 解释器请求退出 | SyntaxError | Python 语法错误 |
| KeyboardInterrupt | 用户中断执行 | IndentationError | 缩进错误 |
| Exception | 常规错误的基类 | TabError | Tab 和空格混用 |
| StopIteration | 迭代器没有更多的值 | SystemError | 一般的解释器系统错误 |
| GeneratorExit | 生成器(generator)发生异常 | TypeError | 对类型无效的操作 |
| StandardError | 所有的内建标准异常的基类 | ValueError | 传入无效的参数 |
| ArithmeticError | 所有数值计算错误的基类 | UnicodeError | Unicode 相关的错误 |
| FloatingPointError | 浮点计算错误 | UnicodeDecodeError | Unicode 解码时的错误 |
| AssertionError | 断言语句失败 | Warning | 警告的基类 |
| AttributeError | 对象没有这个属性 | DeprecationWarning | 关于被弃用的特征的警告 |
| EOFError | 没有内建输入,到达EOF 标记 | FutureWarning | 关于构造将来语义会有改变的警告 |
| EnvironmentError | 操作系统错误的基类 | ImportError | 导入模块/对象失败 |
| IOError | 输入/输出操作失败 | LookupError | 无效数据查询的基类 |
| OSError | 操作系统错误 | IndexError | 序列中没有此索引(index) |
| WindowsError | 系统调用失败 | KeyError | 映射中没有这个键 |
| RuntimeError | 一般的运行时错误 | MemoryError | 内存溢出错误(对于Python 解释器不是致命的) |
| OverflowWarning | 旧的关于自动提升为长整型(long)的警告 | NameError | 未声明/初始化对象 (没有属性) |
| OverflowError | 数值运算超出最大限制 | UnicodeEncodeError | Unicode 编码时错误 |
| SyntaxWarning | 可疑的语法的警告 | UserWarning | 用户代码生成的警告 |
| ZeroDivisionError | 当除运算或模零在所有数值类型运算时引发 | UnicodeTranslateError | Unicode 转换时错误 |
| PendingDeprecationWarning | 关于特性将会被废弃的警告 | UnboundLocalError | 访问未初始化的本地变量 |
| RuntimeWarning | 当生成的错误不属于任何类别时引发 | ReferenceError | 弱引用试图访问已经垃圾回收了的对象 |
try:
    print('准备打开文件啦!')
    file1 = open('test.txt')
    data = file1.read()
    res = 1 / 0  # 遇到异常则跳出,后续不会进行
    data = data + 1
    #print(data)
    #raise ValueError
except Exception as e:  # if isinstance(ValueError, Exception)
    print('出错啦!', e)
except ValueError:
    print('非法字符!')  # elif isinstance(ValueError, ValueError)

finally:
    print('finished!')
总结:try语句按照如下方式工作:
- 首先,执行try子句(在关键字try和关键字except之间的语句)
- 如果没有异常发生,忽略except子句,try子句执行后结束。
- 如果在执行try子句的过程中发生了异常,那么try子句余下的部分将被忽略。如果异常的类型和 except 之后的名称相符,那么对应的except子句将被执行。最后执行 try 语句之后的代码。
- 如果一个异常没有与任何的except匹配,那么这个异常将会传递给上层的try中。
- 一个 try 语句可能包含多个except子句,分别来处理不同的特定的异常。
- 多只有一个分支会被执行。 处理程序将只针对对应的try子句中的异常进行处理,而不是其他的 try 的处理
程序中的异常。 - 一个except子句可以同时处理多个异常,这些异常将被放在一个括号里成为一个元组
20.4 文件夹的操作
python编程时,经常和文件、目录打交道,这是就离不了os模块。os模块包含普遍的操作系统功能,与具体的平台无关。
import os
| 访问模式 | 说明 |
|---|---|
| os.getcwd() | 得到当前工作的目录(拼接绝对路径时用到) |
| os.listdir() | 指定所有目录下所有的文件和目录名。以列表的形式全部列举出来,其中没有区分目录和文件。(通常采用遍历形式输出,为字符串) |
| os.remove() | 删除指定文件 |
| os.rmdir() | 删除指定目录 |
| os.mkdir() | 创建目录注意:这样只能建立一层,要想递归建立可用:os.makedirs() |
| os.path.isfile() | 判断指定对象是否为文件。是返回True,否则False |
| os.path.isdir() | 判断指定对象是否为目录。是True,否则False。 |
| os.path.exists() | 检验指定的对象是否存在。是True,否则False |
| os.path.split() | 返回路径的目录和文件名 |
| os.system() | 执行shell命令。os.system(‘cmd’) #启动dos |
| os.chdir() | 改变目录到指定目录 |
| os.path.getsize() | 获得文件的大小,如果为目录,返回0 |
| os.path.abspath() | 获得绝对路径 |
import os

root = os.getcwd()# 拼接绝对的路径的时候会使用到
print(root)
# E:\MyCourse\PythonFiles
files = os.listdir(root)  # 需要通过遍历得到指定文件夹下面的文件时需要使用到
for filename in files:  # filename 字符串
    if filename.endswith("txt"):
        # 使用绝对路径打开
        filepath_ab = root +"\\" + filename
        file = open(filepath_ab)
        print(filepath_ab)
        # 使用相对路径打开
        file = open(filename)
'''
E:\MyCourse\PythonFiles\guest.txt
E:\MyCourse\PythonFiles\learning_python.txt
E:\MyCourse\PythonFiles\test.txt
E:\MyCourse\PythonFiles\whylikeit.txt
E:\MyCourse\PythonFiles\wtest.txt
'''

# r_path = r'E:\MyCourse\PythonFiles\test.txt'
# os.remove(r_path)  # 移除指定文件
sub_root = "test"
# 判断文件是否存在:
isexit = os.path.exists(sub_root)
if not isexit:
    print('新建一个文件夹。。。')
    # 注意当文件已存在时,无法创建该文件
    os.mkdir(sub_root)  # 相对路径创建文件夹
    # os.mkdir(r"E:\MyCourse\PythonFiles\test") # 使用绝对路径创建文件夹

#res = os.path.exists(r'E:\MyCourse\PythonFiles\test')
#print(res)

# 删除指定目录-得要是空的
# path = r"E:\MyCourse\PythonFiles\test"
# os.rmdir(path)
# 删除指定目录-不空也能删除,先删除里面的内容,然后再删除

# os.system("python test.py")# 指定shell 指令
os.system("dir")
常见的DOS命令讲解:
| 命令 | 说明 |
|---|---|
| d: +回车 | 盘符切换 |
| dir(directory) | 列出当前目录下的文件以及文件夹 |
| cd(change directory) | 显示指定目录 |
| cd… | 退回到上一级目录 |
| cd\ | 退回到根目录 |
| cls ( clear screen ) | 清屏 |
| Exit | 退出dos命令行 |
| md(make directory) | 创建目录 |
| rd(remove directory) | 删除目录 |
| del(delete)*.txt | 删除文件,删除一堆后缀名一样的文件*.txt |
| notepad | 创建文件 |
| rd + /s +文件夹名称 | 删除带内容的文件,询问是否删除 |
| rd + /q + /s+文件夹名称 | 删除带内容的文件,直接删除 |
21. pandas
pandas是一种Python数据分析的利器,是一个开源的数据分析包,最初是应用于金融数据分析工具而开发 出来的,因此pandas为时间序列分析提供了很好的支持。pandas是PyData项目的一部分。
import pandas as pd
21.1 pandas简介
pandas是专门为处理表格和混杂数据设计的,而NumPy更适合处理统一的数值数组数据(运行速度更快)。
pandas主要数据结构:Series 和 DataFrame
21.2 Series
• 系列(Series)是能够保存任何类型的数据(整数,字符串,浮点数,Python对象等)的一维标记数组。轴标签统称为索引。
21.2.1 Seriesd 的创建:
- 列表创建:
import numpy as np
import pandas as pd
from icecream import ic

obj = pd.Series([4, 7, -5, 3])
ic(obj)
'''
ic| obj: 0    4
         1    7
         2   -5
         3    3
         dtype: int64
'''
print(list(obj.index))  # 查看索引列  obj.index是一个迭代器  [0, 1, 2, 3]
ic(obj.values)  # 查看数据列  ic| obj.values: array([ 4,  7, -5,  3], dtype=int64)
print(type(obj.values)) # 一维数组  <class 'numpy.ndarray'>
print(type(obj.index))  # <class 'pandas.core.indexes.range.RangeIndex'>
- 列表 + 自定义索引
• Series的字符串表现形式为:索引在左边,值在右边。由于我们没有为数据指定索引,于是会自动创建一个0到 N-1(N为数据的长度)的整数型索引。你可以通过Series 的values和index属性获取其数组表示形式和索引对象:
import numpy as np
import pandas as pd
from icecream import ic

# 使用列表+指定索引列
obj2 = pd.Series([4, 7, -5, 3], index=['d', 'b', 'a', 1 ])
ic(obj2)
'''
ic| obj2: d    4
          b    7
          a   -5
          1    3
          dtype: int64
'''

print(list(obj2.index))  # 查看索引列  ['d', 'b', 'a', 1]
ic(obj2.values)  # 查看数据列  ic| obj2.values: array([ 4,  7, -5,  3], dtype=int64)
指定索引列时:
1.长度一定要与数据相同
2.可重复
3.支持python各种数据类型,建议使用字符串和整型
- 字典创建
import numpy as np
import pandas as pd
from icecream import ic

# 使用字典
sdata = {'Ohio': 35000, 'Texas': 71000, 'Oregon': 16000, 'Utah': 5000}
obj3 = pd.Series(sdata)
ic(obj3)
'''
ic| obj3: Ohio      35000
          Texas     71000
          Oregon    16000
          Utah       5000
          dtype: int64
'''
states = ['California', 'Ohio', 'Oregon', 'Texas']
obj4 = pd.Series(sdata, index=states)
print(pd.isnull(obj4) )
'''
California     True
Ohio          False
Oregon        False
Texas         False
dtype: bool
'''
print(pd.notnull(obj4) )
'''
California    False
Ohio           True
Oregon         True
Texas          True
dtype: bool
'''
print(obj4.isnull())
'''
California     True
Ohio          False
Oregon        False
Texas         False
dtype: bool
'''
- 使用numpy数组:
import numpy as np
import pandas as pd
from icecream import ic

# 使用numpy数组 + 自定义索引
obj5 = pd.Series(np.arange(4.), index=['a', 'b', 'c', 'a'])
ic(obj5)
'''
ic| obj4: a    0.0
          b    1.0
          c    2.0
          a    3.0
          dtype: float64
'''
- 使用已有的Series对象创建:
import numpy as np
import pandas as pd
from icecream import ic

# 使用已有的Series对象创建
obj1 = pd.Series([4, 7, -5, 3], index=['a', 'b', 'c', 'd'])
obj2 = pd.Series(obj1)
obj3 = pd.Series(obj1, index=['b', 'a', 'c']) # index在obj1存在就使用obj1的值,否则就是nan
obj4 = pd.Series(obj1, index=[0, 1, 3, 7, 9, 0])
ic(obj1)
'''
ic| obj1: a    4
          b    7
          c   -5
          d    3
          dtype: int64
'''
ic(obj2)
'''
ic| obj2: a    4
          b    7
          c   -5
          d    3
          dtype: int64
'''
ic(obj3)
'''
ic| obj3: b    7
          a    4
          c   -5
          dtype: int64
'''
ic(obj4)
'''
ic| obj4: 0   NaN
          1   NaN
          3   NaN
          7   NaN
          9   NaN
          0   NaN
          dtype: float64
'''
21.2.2 索引、选取和过滤:
索引
- 如果有自定义的轴标签:
没有数值型的,则既可以通过索引号索引也可以通过轴标签索引
如果有数值型的,通过 变量名[轴标签索引] 或者 变量名.iloc[索引号]- 如果有重复的轴标签,使用该标签索引时,返回一个Series对象,否则是单个值
Series索引(obj[…])的工作方式类似于NumPy数组的索引,只不过Series的索引值不只是整数
# encoding:utf8
import numpy as np
import pandas as pd
from icecream import ic

sdata = {'Ohio': 35000, 'Texas': 71000, 'Oregon': 16000, 'Utah': 5000}
obj5 = pd.Series(sdata)
obj4 = pd.Series(np.arange(4.), index=['a', 'b', 'c', 'a'])
print("==============使用索引号=========")
print(obj4[0])  # 0.0
print(obj4[1])  # 1.0
print(obj4[2])  # 2.0
print(obj4[3])  # 3.0
print("==========使用轴标签==========")
print(type(obj4['a']))  # <class 'pandas.core.series.Series'>
print(obj4['a'])  #  如果有重复的轴标签,使用该标签索引时,返回一个Series对象,否则是单个值
'''
a    0.0
a    3.0
dtype: float64
'''
print(type(obj4['b']))  # <class 'numpy.float64'>
print(obj4['c'])  # 2.0
print("==========我是分割线============")
obj5 = pd.Series([4, 7, -5, 3])
print(list(obj5.index))
print(obj5[0])
print(obj5[1])
print(obj5[2])
print(obj5[3])
print("==========我是分割线============")
obj6 = pd.Series([4, 7, -5, 3], index=['1', '2', 4, 4])
ic(obj6)
print(list(obj6.index))
# print(obj6[0])  # KeyError
print('obj6.iloc[0]:', obj6.iloc[0])  # obj6.iloc[0]: 4
# print(obj6[1])  # KeyError 正确的应该是'1'
print(obj6['2'])  # 7
print(obj6[4])  # 或者 print(obj6.loc[4])
'''
4   -5
4    3
dtype: int64
'''
切片
索引函数也适用于一个标签或多个标签的切片
# encoding:utf8
import numpy as np
import pandas as pd
from icecream import ic

# 切片
obj1 = pd.Series(np.arange(4.), index=['a', 'b', 'c', 'd'])
ic(obj1)
'''
ic| obj1: a    0.0
          b    1.0
          c    2.0
          d    3.0
         dtype: float64
'''
ic(obj1[1:3])  # 不包含结束的索引号
'''
ic| obj1[1:3]: b    1.0
               c    2.0
               dtype: float64
'''
ic(obj1[0:4])
'''
ic| obj1[0:4]: a    0.0
               b    1.0
               c    2.0
               d    3.0
               dtype: float64
'''
ic(obj1[:4])
'''
ic| obj1[:4]: a    0.0
              b    1.0
              c    2.0
              d    3.0
              dtype: float64
'''
ic(obj1[0:])
''''
ic| obj1[0:]: a    0.0
              b    1.0
              c    2.0
              d    3.0
              dtype: float64
'''
ic(obj1[1:6])  # 索引号越界也没关系
'''
ic| obj1[1:6]: b    1.0
               c    2.0
               d    3.0
               dtype: float64
'''

print('========使用轴标签切片==========')
ic(obj1['a':'c'])  # 结束位置'c'包含在内
'''
ic| obj1['a':'c']: a    0.0
                   b    1.0
                   c    2.0
                   dtype: float64
'''
ic(obj1['a':])
'''
ic| obj1['a':]: a    0.0
                b    1.0
                c    2.0
                d    3.0
                dtype: float64
'''
ic(obj1[:'c'])  # 结束位置'c'包含在内
'''
ic| obj1[:'c']: a    0.0
                b    1.0
                c    2.0
                dtype: float64
'''

obj2 = pd.Series(np.arange(4.), index=['a', 'b', 'c', 'a'])
ic(obj2)
'''
ic| obj2: a    0.0
          b    1.0
          c    2.0
          a    3.0
          dtype: float64
'''
print('========使用轴标签切片==========')
ic(obj2['b':'c'])
'''
ic| obj2['b':'c']: b    1.0
                   c    2.0
                   dtype: float64
'''
# ic(obj2['a':])  # non-unique label: 'a' baocuo
ic(obj2[:'c'])  # 从头开始切片
'''
ic| obj2[:'c']: a    0.0
                b    1.0
                c    2.0
                dtype: float64
'''

obj3 = pd.Series(np.arange(5.), index=[1, 'b', 'c', 2, 0])
ic(obj3)
'''
ic| obj3: 1    0.0
          b    1.0
          c    2.0
          2    3.0
          0    4.0
          dtype: float64
'''
ic(obj3[0:1])
'''
ic| obj3[0:1]: 1    0.0
               dtype: float64
'''
ic(obj3[0:4:2])  # 步长为2
'''
ic| obj3[0:4:2]: 1    0.0
                 c    2.0
                 dtype: float64
'''
ic(obj3[:2])  # 索引切片
'''
ic| obj3[:2]: 1    0.0
              b    1.0
              dtype: float64
'''
ic(obj3['b':'c'])
'''
ic| obj3['b':'c']: b    1.0
                   c    2.0
                   dtype: float64
'''
ic(obj3.iloc[0:1])  # 索引号
'''
ic| obj3.iloc[0:1]: 1    0.0
                    dtype: float64
'''
ic(obj3.loc[1:0])  # 轴标签
'''
ic| obj3.loc[1:0]: 1    0.0
                   b    1.0
                   c    2.0
                   2    3.0
                   0    4.0
                   dtype: float64
'''
小结:
索引操作:
- 变量名[] :
如果index没有数值型,可以通过索引号索引,也可以通过轴标签索引,否则只能通过轴标签索引- 变量名.iloc[索引号]
- 变量名.loc[轴标签]
切片操作(返回的是series对象):
- 变量名[start:end] :
1.1 如果start和end同为数值型(或者其中一个使用默认值),通过索引号切片,不包含end
1.2 如果start和end是轴标签,包含end- 变量名.iloc[start:end]——索引号切片,不包含end
- 变量名.loc[start:end]——轴标签切片,包含end
运算:
obj1 = pd.Series([4,7,-5,3],index = ['a', 'b', 'c','d'])
obj2 = pd.Series(obj1)
# 运算
s = obj1 + obj2
ic(obj1)
'''
ic| obj1: a    4
          b    7
          c   -5
          d    3
          dtype: int64
'''
ic(obj2)
'''
ic| obj2: a    4
          b    7
          c   -5
          d    3
          dtype: int64
'''
ic(s)
'''
ic| s: a     8
       b    14
       c   -10
       d     6
       dtype: int64
'''

# 如果索引有重复 对应相加
obj1 = pd.Series([4,7,-5,3],index = ['a', 'b', 'c','a'])
obj2 = pd.Series(obj1)
s = obj1 + obj2
ic(s)
'''
ic| s: a     8
       b    14
       c   -10
       a     6
       dtype: int64
'''

# 如果索引不对齐
obj1 = pd.Series([4,7,-5,3],index = ['a', 'b', 'c','d'])
obj2 = pd.Series(obj1,index = ['b', 'a', 'c','d'])
s = obj1 + obj2
ic(s)
'''
ic| s: a     8
       b    14
       c   -10
       d     6
       dtype: int64
'''
obj1 = pd.Series([4,7,-5,3],index = ['a', 'b', 'c','d'])
obj2 = pd.Series(obj1,index = ['a', 'c','d'])
s = obj1 + obj2
ic(s)
'''
ic| s: a     8.0
       b     NaN
       c   -10.0
       d     6.0
       dtype: float64
'''
obj1 = pd.Series([4,7,-5,3],index = ['a', 'b', 'c','d'])
obj2 = pd.Series(obj1,index = ['a', 'c','a'])
s = obj1 + obj2
ic(s)
'''
ic| s: a     8.0
       a     8.0
       b     NaN
       c   -10.0
       d     NaN
       dtype: float64
'''
# baocuo
# obj1 = pd.Series([4,7,-5,3],index = ['a', 'b', 'c','a'])
# obj2 = pd.Series(obj1,index = ['a', 'b','c'])
# s = obj1 + obj2
# ic(s)

obj1 = pd.Series([4,7,-5,3],index = ['a', 'b', 'c','d'])
obj2 = pd.Series(obj1,index = ['e', 'f','a'])
s = obj1 + obj2
ic(s)
'''
ic| s: a    8.0
       b    NaN    # NaN与任何数组运算都为NaN
       c    NaN
       d    NaN
       e    NaN
       f    NaN
       dtype: float64
'''
过滤:布尔索引
import numpy as np
import pandas as pd
from icecream import ic

obj1 = pd.Series([4,7,-5,3],index = ['a', 'b', 'c','d'])
condition = obj1 > 0
obj2 = obj1[condition]
ic(obj2)  # ic(obj1[obj1 > 0])  ic(obj1[condition])
'''
ic| obj2: a    4
          b    7
          d    3
          dtype: int64
'''
apply应用方法:
import numpy as np
import pandas as pd
from icecream import ic

obj1 = pd.Series([4,7,-5,3],index = ['a', 'b', 'c','d'])
obj2 = obj1.apply(lambda x: x**2)
ic(obj2)
'''
ic| obj2: a    16
          b    49
          c    25
          d     9
          dtype: int64
'''
21.3 DataFrame
DataFrame是一个表格型的数据结构,它含有一组有序的列,每列可以是不同的值类型(数值、字符串、布尔 值等)。DataFrame既有行索引也有列索引,它可以被看做由Series组成的字典(共用同一个索引)。 DataFrame中的数据是以一个或多个二维块存放的(而不是列表、字典或别的一维数据结构)。里面的技术细节不做要求。
21.3.1 DataFrame的创建
- 采用字典创建
import numpy as np
import pandas as pd
from icecream import ic

data = {'state': ['Ohio', 'Ohio', 'Ohio', 'Nevada', 'Nevada', 'Nevada'], 'year': [2000, 2001, 2002, 2001, 2002, 2003], 'pop': [1.5, 1.7, 3.6, 2.4, 2.9, 3.2]}
frame = pd.DataFrame(data)
ic(frame)
'''
ic| frame:     state  year  pop
           0    Ohio  2000  1.5
           1    Ohio  2001  1.7
           2    Ohio  2002  3.6
           3  Nevada  2001  2.4
           4  Nevada  2002  2.9
           5  Nevada  2003  3.2
'''
pd.DataFrame(data, columns=['year', 'state', 'pop'])
- 字典 + 指定索引(columns + index)
frame2 = pd.DataFrame(data, columns=['year', 'state', 'pop'])
ic(frame2)
'''
ic| frame2:    year   state  pop
            0  2000    Ohio  1.5
            1  2001    Ohio  1.7
            2  2002    Ohio  3.6
            3  2001  Nevada  2.4
            4  2002  Nevada  2.9
            5  2003  Nevada  3.2
'''
frame3 = pd.DataFrame(data, index = ['a','b','c','d','e','f'], columns=['year', 'state', 'pop'])
ic(frame3)  # index的个数必须与字典中的列数相同
'''
ic| frame3:    year   state  pop
            a  2000    Ohio  1.5
            b  2001    Ohio  1.7
            c  2002    Ohio  3.6
            d  2001  Nevada  2.4
            e  2002  Nevada  2.9
            f  2003  Nevada  3.2
'''

frame3.columns = ['1', '2', '3']
ic(frame3)  # 修改属性
'''
ic| frame3:       1       2    3
            a  2000    Ohio  1.5
            b  2001    Ohio  1.7
            c  2002    Ohio  3.6
            d  2001  Nevada  2.4
            e  2002  Nevada  2.9
            f  2003  Nevada  3.2
'''
ic(frame3.dtypes)  # 查看属性
'''
ic| frame3.dtypes: 1      int64
                   2     object
                   3    float64
                   dtype: object
'''
- numpy创建:
import numpy as np
import pandas as pd
from icecream import ic

data = {'state': ['Ohio', 'Ohio', 'Ohio', 'Nevada', 'Nevada', 'Nevada'], 'year': [2000, 2001, 2002, 2001, 2002, 2003], 'pop': [1.5, 1.7, 3.6, 2.4, 2.9, 3.2]}
fame4 = pd.DataFrame(np.arange(9).reshape(3,3))
ic(fame4)
'''
ic| fame4:    0  1  2
           0  0  1  2
           1  3  4  5
           2  6  7  8
'''
21.3.2 DataFrame的索引与切片
- 变量名[]
索引:操作的是列
切片:操作的是行(支持索引号和标签) - 变量名.iloc[]
根据索引号进行多轴操作,用法与np基本相同,不同:数组索引
import numpy as np
import pandas as pd
from icecream import ic

data = {'state': ['Ohio', 'Ohio', 'Ohio', 'Nevada', 'Nevada', 'Nevada'], 'year': [2000, 2001, 2002, 2001, 2002, 2003], 'pop': [1.5, 1.7, 3.6, 2.4, 2.9, 3.2]}
frame4 = pd.DataFrame(data, index = ['a','b','c','d','e','f'], columns=['year', 'state', 'pop'])
ic(frame4)
'''
ic| frame4:    year   state  pop
            a  2000    Ohio  1.5
            b  2001    Ohio  1.7
            c  2002    Ohio  3.6
            d  2001  Nevada  2.4
            e  2002  Nevada  2.9
            f  2003  Nevada  3.2
'''

# ic(frame4[0])  baocuo
ic(frame4.iloc[0])
'''
ic| frame4.iloc[0]: year     2000
                    state    Ohio
                    pop       1.5
                    Name: a, dtype: object
'''
ic(frame4['year'])
'''
ic| frame4['year']: a    2000
                    b    2001
                    c    2002
                    d    2001
                    e    2002
                    f    2003
                    Name: year, dtype: int64
'''
# ic(frame4['a'])  baocuo

ic(frame4.iloc[0,1])  # ic| frame4.iloc[0,1]: 'Ohio' 行索引号为0,列索引号为1
ic(frame4.iloc[[0,1],1])
'''
ic| frame4.iloc[[0,1],1]: a    Ohio
                          b    Ohio
                          Name: state, dtype: object
'''
ic(frame4.iloc[[0,1],[0,1]])  # 数组索引,行索引为[0,1],列索引为[0,1] 行索引基础上进行列索引
'''
ic| frame4.iloc[[0,1],[0,1]]:    year state
                              a  2000  Ohio
                              b  2001  Ohio
'''
frame5 = pd.DataFrame(np.arange(9).reshape(3,3))
ic(frame5 > 3)
'''
ic| frame5 > 3:        0      1      2
                0  False  False  False
                1  False   True   True
                2   True   True   True
'''
ic(frame5.iloc[[True,False,True]])
'''
ic| frame5.iloc[[True,False,True]]:    0  1  2
                                    0  0  1  2
                                    2  6  7  8
'''
ic(frame5.iloc[[True,False,True],[True,False,True]])
'''
ic| frame5.iloc[[True,False,True],[True,False,True]]:    0  2
                                                      0  0  2
                                                      2  6  8
'''
若不加 .iloc或 .loc容易产生歧义
import numpy as np
import pandas as pd
from icecream import ic

frame5 = pd.DataFrame(np.arange(9).reshape(3,3))
ic(frame5[0])  # 认为 column 中的 0
'''
ic| frame5[0]: 0    0
               1    3
               2    6
               Name: 0, dtype: int32
'''
ic(frame5[0:2])  # 正常应该为index  不包括2
'''
ic| frame5[0:2]:    0  1  2
                 0  0  1  2
                 1  3  4  5
'''
直接采用 .iloc
import numpy as np
import pandas as pd
from icecream import ic

frame5 = pd.DataFrame(np.arange(9).reshape(3,3))

ic(frame5.iloc[0,1])  # ic| frame5.iloc[0,1]: 1 行索引号为0,列索引号为1
ic(frame5.iloc[[0,1],1])
'''
ic| frame5.iloc[[0,1],1]: 0    1
                          1    4
                          Name: 1, dtype: int32
'''
ic(frame5.iloc[[0,1],[0,1]])  # 数组索引,行索引为[0,1],列索引为[0,1] 行索引基础上进行列索引
'''
ic| frame5.iloc[[0,1],[0,1]]:    0  1
                              0  0  1
                              1  3  4
'''
切片——标签/索引
import numpy as np
import pandas as pd
from icecream import ic

# 索引
frame5 = pd.DataFrame(np.arange(9).reshape(3,3))
ic(frame5.iloc[1:])
'''
ic| frame5.iloc[1:]:    0  1  2
                     1  3  4  5
                     2  6  7  8
'''
ic(frame5.iloc[3:])
'''
ic| frame5.iloc[3:]: Empty DataFrame
                     Columns: [0, 1, 2]
                     Index: []
'''
ic(frame5.loc[:,[1,2]])
'''
ic| frame5.loc[:,[1,2]]:    1  2
                         0  1  2
                         1  4  5
                         2  7  8
'''

#标签
frame6 = pd.DataFrame(np.arange(9).reshape(3,3), index = ['a','b','c'])
ic(frame6)
ic(frame6.loc['a'])
'''
ic| frame6.loc['a']: 0    0
                     1    1
                     2    2
                     Name: a, dtype: int32
'''
ic(frame6.loc['b':'c',[1,2]])
ic(frame6.loc[['b','c'],[1,2]])
'''
ic| frame6.loc['b':'c',[1,2]]:    1  2
                               b  4  5
                               c  7  8
'''
import numpy as np
import pandas as pd
from icecream import ic

data = {'state': ['Ohio', 'Ohio', 'Ohio', 'Nevada', 'Nevada', 'Nevada'], \
        'year': [2000, 2001, 2002, 2001, 2002, 2003], \
        'pop': [1.5, 1.7, 3.6, 2.4, 2.9, 3.2]}
frame = pd.DataFrame(data)
pd.DataFrame(data, columns=['year', 'state', 'pop'])
ic(frame)

# 使用3种方法检索pop列
ic(frame['pop'])
'''
ic| frame['pop']: 0    1.5
                  1    1.7
                  2    3.6
                  3    2.4
                  4    2.9
                  5    3.2
                  Name: pop, dtype: float64
'''
ic(frame.pop)
'''
ic| frame.pop: <bound method DataFrame.pop of     state  year  pop
               0    Ohio  2000  1.5
               1    Ohio  2001  1.7
               2    Ohio  2002  3.6
               3  Nevada  2001  2.4
               4  Nevada  2002  2.9
               5  Nevada  2003  3.2>
'''
ic(frame.loc[:,'pop'])
'''
ic| frame.loc[:,'pop']: 0    1.5
                        1    1.7
                        2    3.6
                        3    2.4
                        4    2.9
                        5    3.2
                        Name: pop, dtype: float64
'''
21.3.3 其他操作
列在数据中找不到,就会在结果中产生缺失值
import numpy as np
import pandas as pd
from icecream import ic

data = {'state': ['Ohio', 'Ohio', 'Ohio', 'Nevada', 'Nevada', 'Nevada'], \
        'year': [2000, 2001, 2002, 2001, 2002, 2003], \
        'pop': [1.5, 1.7, 3.6, 2.4, 2.9, 3.2]}

frame2 = pd.DataFrame(data, columns=['year', 'state', 'pop', 'debt'], index=['one', 'two', 'three', 'four', 'five', 'six'])
ic(frame2)  # 列在数据中找不到,就会在结果中产生缺失值
'''
ic| frame2:        year   state  pop debt
            one    2000    Ohio  1.5  NaN
            two    2001    Ohio  1.7  NaN
            three  2002    Ohio  3.6  NaN
            four   2001  Nevada  2.4  NaN
            five   2002  Nevada  2.9  NaN
            six    2003  Nevada  3.2  NaN
'''
ic(frame2.columns)  # ic| frame2.columns: Index(['year', 'state', 'pop', 'debt'], dtype='object')
ic(frame2.year)
'''
ic| frame2.year: one      2000
                 two      2001
                 three    2002
                 four     2001
                 five     2002
                 six      2003
                 Name: year, dtype: int64
'''
ic(frame2.loc['three'])
'''
ic| frame2.loc['three']: year     2002
                         state    Ohio
                         pop       3.6
                         debt      NaN
                         Name: three, dtype: object
'''
重新索引
import numpy as np
import pandas as pd
from icecream import ic

obj = pd.Series([4.5, 7.2, -5.3, 3.6], index=['d', 'b', 'a', 'c'])
ic(obj)
'''
ic| obj: d    4.5
         b    7.2
         a   -5.3
         c    3.6
         dtype: float64
'''
obj2 = obj.reindex(['a', 'b', 'c', 'd', 'e'])
ic(obj2)
'''
ic| obj2: a   -5.3
          b    7.2
          c    3.6
          d    4.5
          e    NaN
          dtype: float64
'''
obj3 = obj2.reindex([1,2,3,4,'d'])
ic(obj3)
'''
ic| obj3: 1    NaN
          2    NaN
          3    NaN
          4    NaN
          d    4.5
          dtype: float64
'''
obj4 = pd.Series(['blue', 'purple', 'yellow'], index=[0, 2, 4])
ic(obj4)
'''
ic| obj4: 0      blue
          2    purple
          4    yellow
          dtype: object
'''
obj5 = obj4.reindex(range(6), method='ffill')
ic(obj5)
'''
ic| obj5: 0      blue
          1      blue
          2    purple
          3    purple
          4    yellow
          5    yellow
          dtype: object
'''
删除行或列 axis = 0行1列
import numpy as np
import pandas as pd
from icecream import ic

frame = pd.DataFrame(data, columns=['year', 'state', 'pop', 'debt'], index=['one', 'two', 'three', 'four', 'five', 'six'])
ic(frame)
# frame2 = frame.drop(['year','pop'])  baocuo 默认删除行
frame2 = frame.drop(['one','three'])
ic(frame2)
'''
ic| frame2:       year   state  pop debt
            two   2001    Ohio  1.7  NaN
            four  2001  Nevada  2.4  NaN
            five  2002  Nevada  2.9  NaN
            six   2003  Nevada  3.2  NaN
'''
frame3 = frame.drop(['year','pop'], axis = 1)
ic(frame3)
'''
ic| frame3:         state debt
            one      Ohio  NaN
            two      Ohio  NaN
            three    Ohio  NaN
            four   Nevada  NaN
            five   Nevada  NaN
            six    Nevada  NaN
'''
apply应用函数 axis = 1行0列
将指定操作(functional)应用到每一行/每一列
functional可以使用匿名函数处理
functional的返回值不同,处理结果不同
如果没有返回值 将会获取到全是None的Series
如果返回值是单个数值,result会是一个Series
如果返回值是一个Series,那result就是一个DataFrame
import numpy as np
import pandas as pd
from icecream import ic

frame = pd.DataFrame(np.arange(9).reshape((3, 3)),index=['a', 'c', 'd'], columns=['Ohio', 'Texas', 'California'])
frame2 = frame.reindex(['a', 'b', 'c', 'd'])
ic(frame2)
'''
ic| frame2:    Ohio  Texas  California
            a   0.0    1.0         2.0
            b   NaN    NaN         NaN
            c   3.0    4.0         5.0
            d   6.0    7.0         8.0
'''

# 将指定操作应用到每一行/每一列
def func(x):  # 遍历
    ic(x)

result = frame.apply(func, axis = 1)  # 行操作
'''
ic| x: Ohio          0
       Texas         1
       California    2
       Name: a, dtype: int32
ic| x: Ohio          3
       Texas         4
       California    5
       Name: c, dtype: int32
ic| x: Ohio          6
       Texas         7
       California    8
       Name: d, dtype: int32
'''
ic(result)
'''
ic| result: a    None
            c    None
            d    None
            dtype: object
'''
result = frame.apply(func, axis = 0)  # 列操作
'''
ic| x: a    0
       c    3
       d    6
       Name: Ohio, dtype: int32
ic| x: a    1
       c    4
       d    7
       Name: Texas, dtype: int32
ic| x: a    2
       c    5
       d    8
       Name: California, dtype: int32
'''
ic(result)
'''
ic| result: Ohio          None
            Texas         None
            California    None
            dtype: object
'''

def func2(x):
    res = []
    for i in x:
        if i < 3:
            i = 0
        res.append(i)
    return pd.Series(res)

ic(frame)
'''
ic| frame:    Ohio  Texas  California
           a     0      1           2
           c     3      4           5
           d     6      7           8
'''
result = frame.apply(func2, axis = 1)
ic(result)
'''
ic| result:    0  1  2
            a  0  0  0
            c  3  4  5
            d  6  7  8
'''
匿名函数
import numpy as np
import pandas as pd
from icecream import ic

frame = pd.DataFrame(np.arange(9).reshape((3, 3)),index=['a', 'c', 'd'], columns=['Ohio', 'Texas', 'California'])

result = frame.apply(lambda x : sum(x), axis = 1)
ic(result)
'''
ic| result: a     3
            c    12
            d    21
            dtype: int64
'''
result = frame.apply(lambda x: None, axis=0)  # 遍历所有的列
ic(result)
'''
ic| result: Ohio          None
            Texas         None
            California    None
            dtype: object
'''
result = frame.apply(lambda x: pd.Series(x, index=['Ohio', 'Texas']), axis=1)  # 遍历所有行
ic(result)
'''
ic| result:    Ohio  Texas
            a     0      1
            c     3      4
            d     6      7
'''
运算
import numpy as np
import pandas as pd
from icecream import ic

# 运算
# 索引对齐
frame1 = pd.DataFrame(np.arange(9).reshape((3, 3)),
                     index=['a', 'c', 'd'],
                     columns=['Ohio', 'Texas', 'California'])

frame2 = pd.DataFrame(np.arange(9, 18).reshape((3, 3)),
                     index=['a', 'c', 'd'],
                     columns=['Ohio', 'Texas', 'California'])

#索引不对齐的情况
frame3 = pd.DataFrame(np.arange(9, 15).reshape((2, 3)),
                     index=['a', 'c'],
                     columns=['Ohio', 'Texas', 'California']) # 行索引不对齐
frame4 = pd.DataFrame(np.arange(9, 15).reshape((3, 2)),
                     index=['a', 'c', 'd'],
                     columns=['Ohio', 'Texas']) # 列索引不对齐

ic(frame1)
ic(frame3)
ic(frame1+frame2)
'''
ic| frame1+frame2:    Ohio  Texas  California
                   a     9     11          13
                   c    15     17          19
                   d    21     23          25
'''
ic(frame1+frame3)
'''
ic| frame1+frame3:    Ohio  Texas  California
                   a   9.0   11.0        13.0
                   c  15.0   17.0        19.0
                   d   NaN    NaN         NaN
'''
ic(frame4)
print(frame1+frame4)
'''
   California  Ohio  Texas
a         NaN     9     11
c         NaN    14     16
d         NaN    19     21
'''
信息查看
import numpy as np
import pandas as pd
from icecream import ic

frame = pd.DataFrame(np.arange(9).reshape((3, 3)),index=['a', 'c', 'd'], columns=['Ohio', 'Texas', 'California'])
frame2 = frame.reindex(['a', 'b', 'c', 'd'])
ic(frame2)
'''
ic| frame2:    Ohio  Texas  California
            a   0.0    1.0         2.0
            b   NaN    NaN         NaN
            c   3.0    4.0         5.0
            d   6.0    7.0         8.0
'''

# 将指定操作应用到每一行/每一列
def func(x):  # 遍历
    ic(x)

result = frame.apply(func, axis = 1)  # 行操作
'''
ic| x: Ohio          0
       Texas         1
       California    2
       Name: a, dtype: int32
ic| x: Ohio          3
       Texas         4
       California    5
       Name: c, dtype: int32
ic| x: Ohio          6
       Texas         7
       California    8
       Name: d, dtype: int32
'''
ic(result)
'''
ic| result: a    None
            c    None
            d    None
            dtype: object
'''
result = frame.apply(func, axis = 0)  # 列操作
'''
ic| x: a    0
       c    3
       d    6
       Name: Ohio, dtype: int32
ic| x: a    1
       c    4
       d    7
       Name: Texas, dtype: int32
ic| x: a    2
       c    5
       d    8
       Name: California, dtype: int32
'''
ic(result)
'''
ic| result: Ohio          None
            Texas         None
            California    None
            dtype: object
'''

def func2(x):
    res = []
    for i in x:
        if i < 3:
            i = 0
        res.append(i)
    return pd.Series(res,x.index)

ic(frame)
'''
ic| frame:    Ohio  Texas  California
           a     0      1           2
           c     3      4           5
           d     6      7           8
'''
result = frame.apply(func2, axis = 1)
ic(result)
'''
ic| result:    0  1  2
            a  0  0  0
            c  3  4  5
            d  6  7  8
'''

#apply应用函数
# 将指定操作(functional)应用到每一行/每一列
# functional可以使用匿名函数处理
# functional的返回值不同,处理结果不同
# 如果没有返回值 将会获取到全是None的Series
# 如果返回值是单个数值,result会是一个Series
# 如果返回值是一个Series,那result就是一个DataFrame

result = frame.apply(lambda x : sum(x), axis = 1)
ic(result)
'''
ic| result: a     3
            c    12
            d    21
            dtype: int64
'''
result = frame.apply(lambda x: None, axis=0)  # 遍历所有的列
ic(result)
'''
ic| result: Ohio          None
            Texas         None
            California    None
            dtype: object
'''
result = frame.apply(lambda x: pd.Series(x, index=['Ohio', 'Texas']), axis=1)  # 遍历所有行
ic(result)
'''
ic| result:    Ohio  Texas
            a     0      1
            c     3      4
            d     6      7
'''


# 运算
# 索引对齐
frame1 = pd.DataFrame(np.arange(9).reshape((3, 3)),
                     index=['a', 'c', 'd'],
                     columns=['Ohio', 'Texas', 'California'])

frame2 = pd.DataFrame(np.arange(9, 18).reshape((3, 3)),
                     index=['a', 'c', 'd'],
                     columns=['Ohio', 'Texas', 'California'])

#索引不对齐的情况
frame3 = pd.DataFrame(np.arange(9, 15).reshape((2, 3)),
                     index=['a', 'c'],
                     columns=['Ohio', 'Texas', 'California'])  # 行索引不对齐
frame4 = pd.DataFrame(np.arange(9, 15).reshape((3, 2)),
                     index=['a', 'c', 'd'],
                     columns=['Ohio', 'Texas'])  # 列索引不对齐

ic(frame1.head(2))  # 查看前2行,默认查看前5行
'''
ic| frame1.head(2):    Ohio  Texas  California
                    a     0      1           2
                    c     3      4           5
'''
ic(frame1.tail(2))  # 查看后面2行,默认值为5
'''
ic| frame1.tail(2):    Ohio  Texas  California
                    c     3      4           5
                    d     6      7           8
'''
ic(frame1.describe())  # 查看数值型的统计信息 (mean,std...)
'''
ic| frame1.describe():        Ohio  Texas  California
                       count   3.0    3.0         3.0
                       mean    3.0    4.0         5.0
                       std     3.0    3.0         3.0
                       min     0.0    1.0         2.0
                       25%     1.5    2.5         3.5
                       50%     3.0    4.0         5.0
                       75%     4.5    5.5         6.5
                       max     6.0    7.0         8.0
'''
frame5 = frame1+frame4
frame5['Ohio']['c'] = np.NaN
ic(frame5)
'''
ic| frame5:    California  Ohio  Texas
            a         NaN   9.0     11
            c         NaN   NaN     16
            d         NaN  19.0     21
'''
ic(frame5.dropna(axis=1))
'''
ic| frame5.dropna(axis=1):    Texas
                           a     11
                           c     16
                           d     21
'''
ic(frame5.fillna(0))
'''
ic| frame5.fillna(0):    California  Ohio  Texas
                      a         0.0   9.0     11
                      c         0.0   0.0     16
                      d         0.0  19.0     21
'''
value_counts()
返回一个Series
import pandas as pd
from icecream import ic

data1 = {'state': ['Ohio', 'Ohio', 'Ohio', 'Nevada', 'Nevada', 'Nevada'],
        'year': [2000, 2001, 2002, 2001, 2002, 2003],
        'pop': [1.5, 1.7, 3.6, 2.4, 2.9, 3.2]} # All arrays must be of the same length
# columns作为索引
frame = pd.DataFrame(data1, index=['a', 'b', 'c', 'd', 'e', 'f'], columns=['year', 'pop', 'state'])
print(frame)
ic(frame['state'].value_counts())
22. matplotlib
Matplotlib是非常强大的python画图工具,是Python最常用的绘图库,提供了一整套十分适合交互式绘图的命令
• API,比较方便的就可以将其嵌入到GUI应用程序中。
• Matplotlib可以画图线图、散点图、等高线图、条形图、柱形图、3D图形、图形动画等。
• 官网:https://matplotlib.org/
22.1 matplotlib基本使用
- 使用import导入模块matplotlib.pyplot,并简写成plt
import matplotlib.pyplot as plt - 接下来,我们调用plot的.plot方法绘制一些坐标。 这个.plot需要许多参数,但前两个是’x’和’y’坐标,我们放入列表。 这意味着,根据这些列表我们拥有 3 个坐标:1,5 , 2,7 和 3,4。
- plt.plot在后台『绘制』这个绘图,但绘制了我们想要的一切之后,当我们准备好的时候,我们需要把它带到屏幕上。
import matplotlib.pyplot as plt
import numpy as np
plt.plot([1,2,3],[5,7,4])  # 绘图 传入两个数组,一个为x坐标,一个为y坐标
plt.show()  # 显示图形
设置在jupyter中matplotlib的显示情况
- %matplotlib tk 在GUI中显示 —— 不稳定
- %matplotlib inline 在行内显示
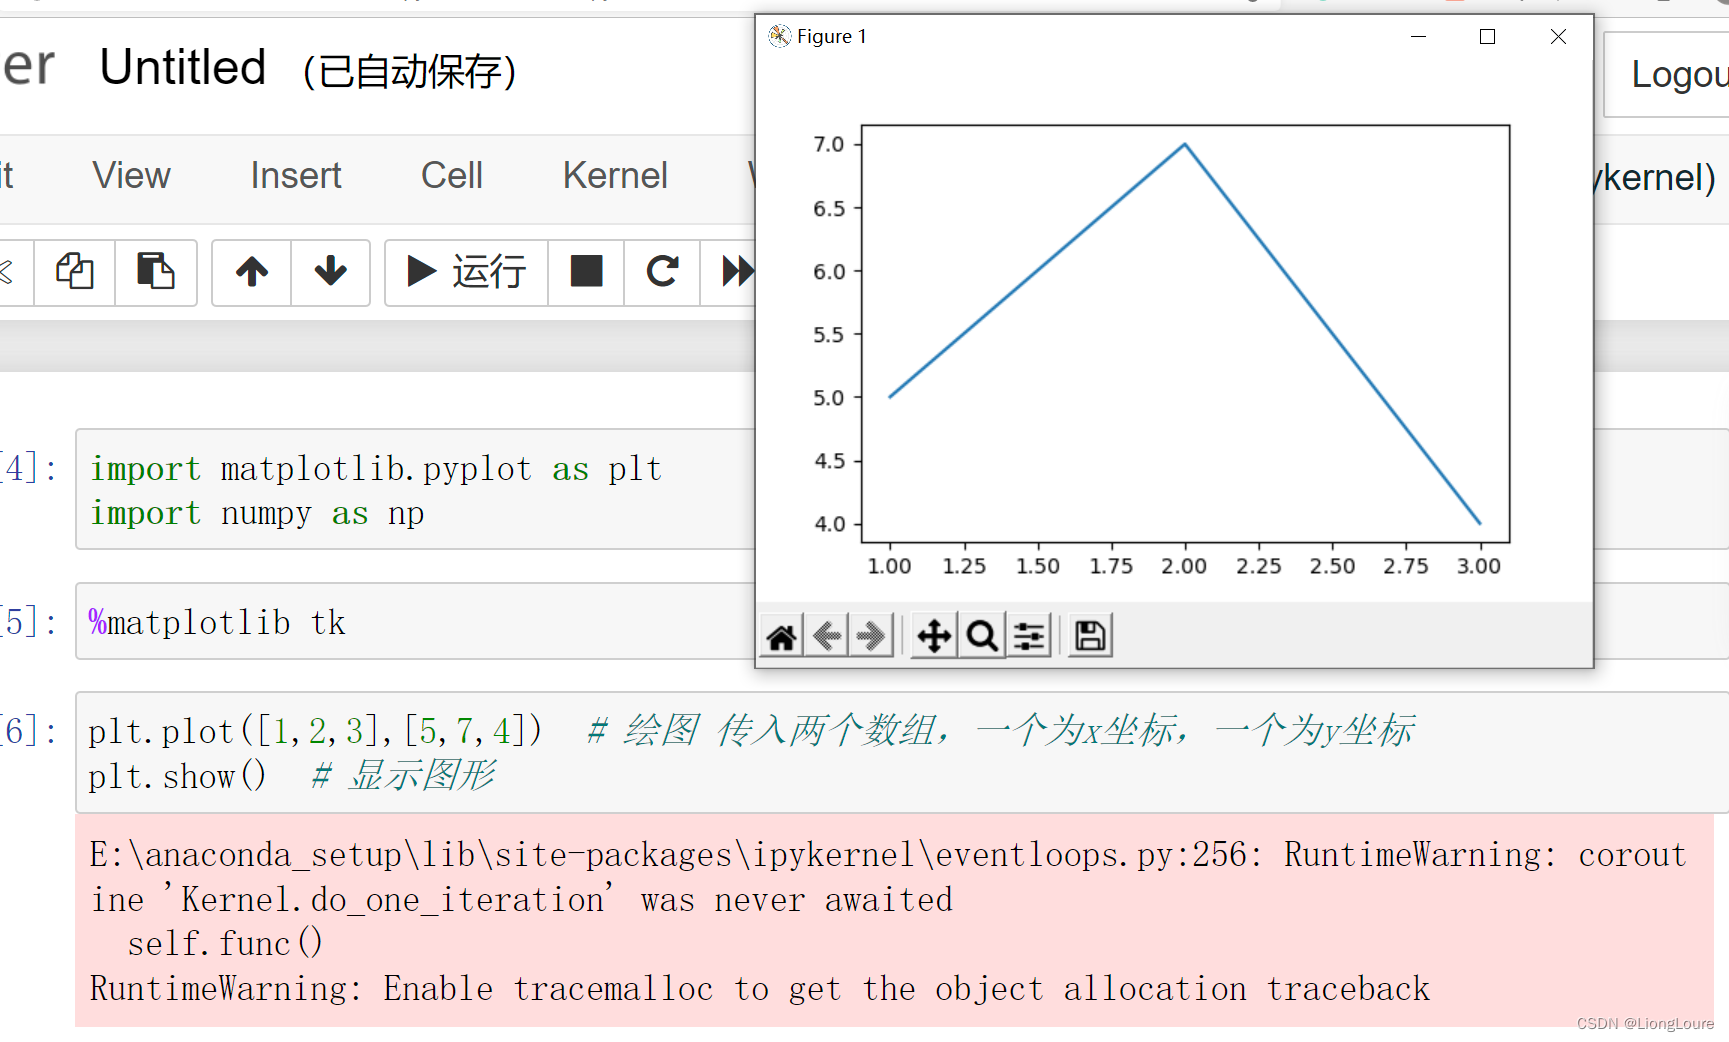
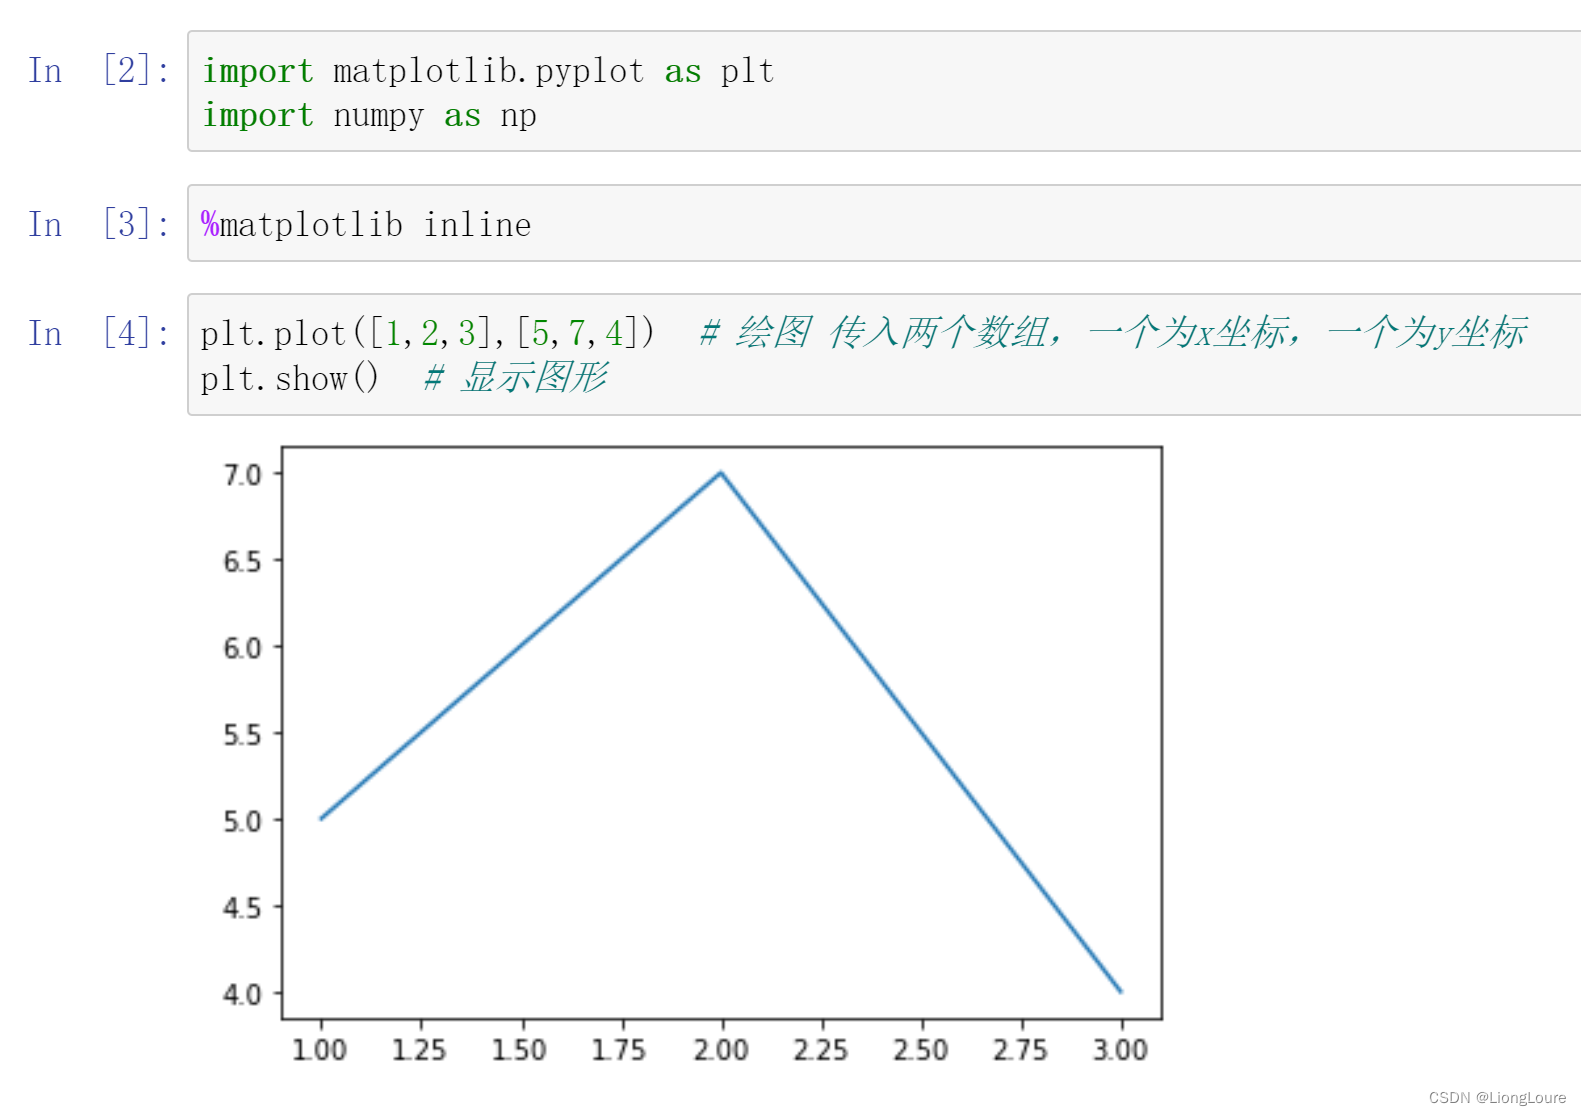
22.1.1 figure对象
想要使用matplotlib绘图,必须先要创建一个figure(画布)对象,然后还要有axes(坐标系)。但是观察上述代码,我们并没有
创建figure对象。
创建figure(画布)的两种方式:
- 隐式创建figure对象
当第一次执行plt.xxx()画图代码时,系统会去判断是否已经有了figure对象,如果没有,系统会自动创建一个figure对象,并
且在这个figure之上,自动创建一个axes坐标系(注意:默认创建一个figure对象,一个axes坐标系)。也就是说,如果我们不
设置figure对象,那么一个figure对象上,只能有一个axes坐标系,即我们只能绘制一个图形。
from matplotlib import pyplot as plt
import numpy as np

x = np.arange(1,10)
y = x**2
plt.plot(x, y)
plt.plot(x, x**3)
plt.show()
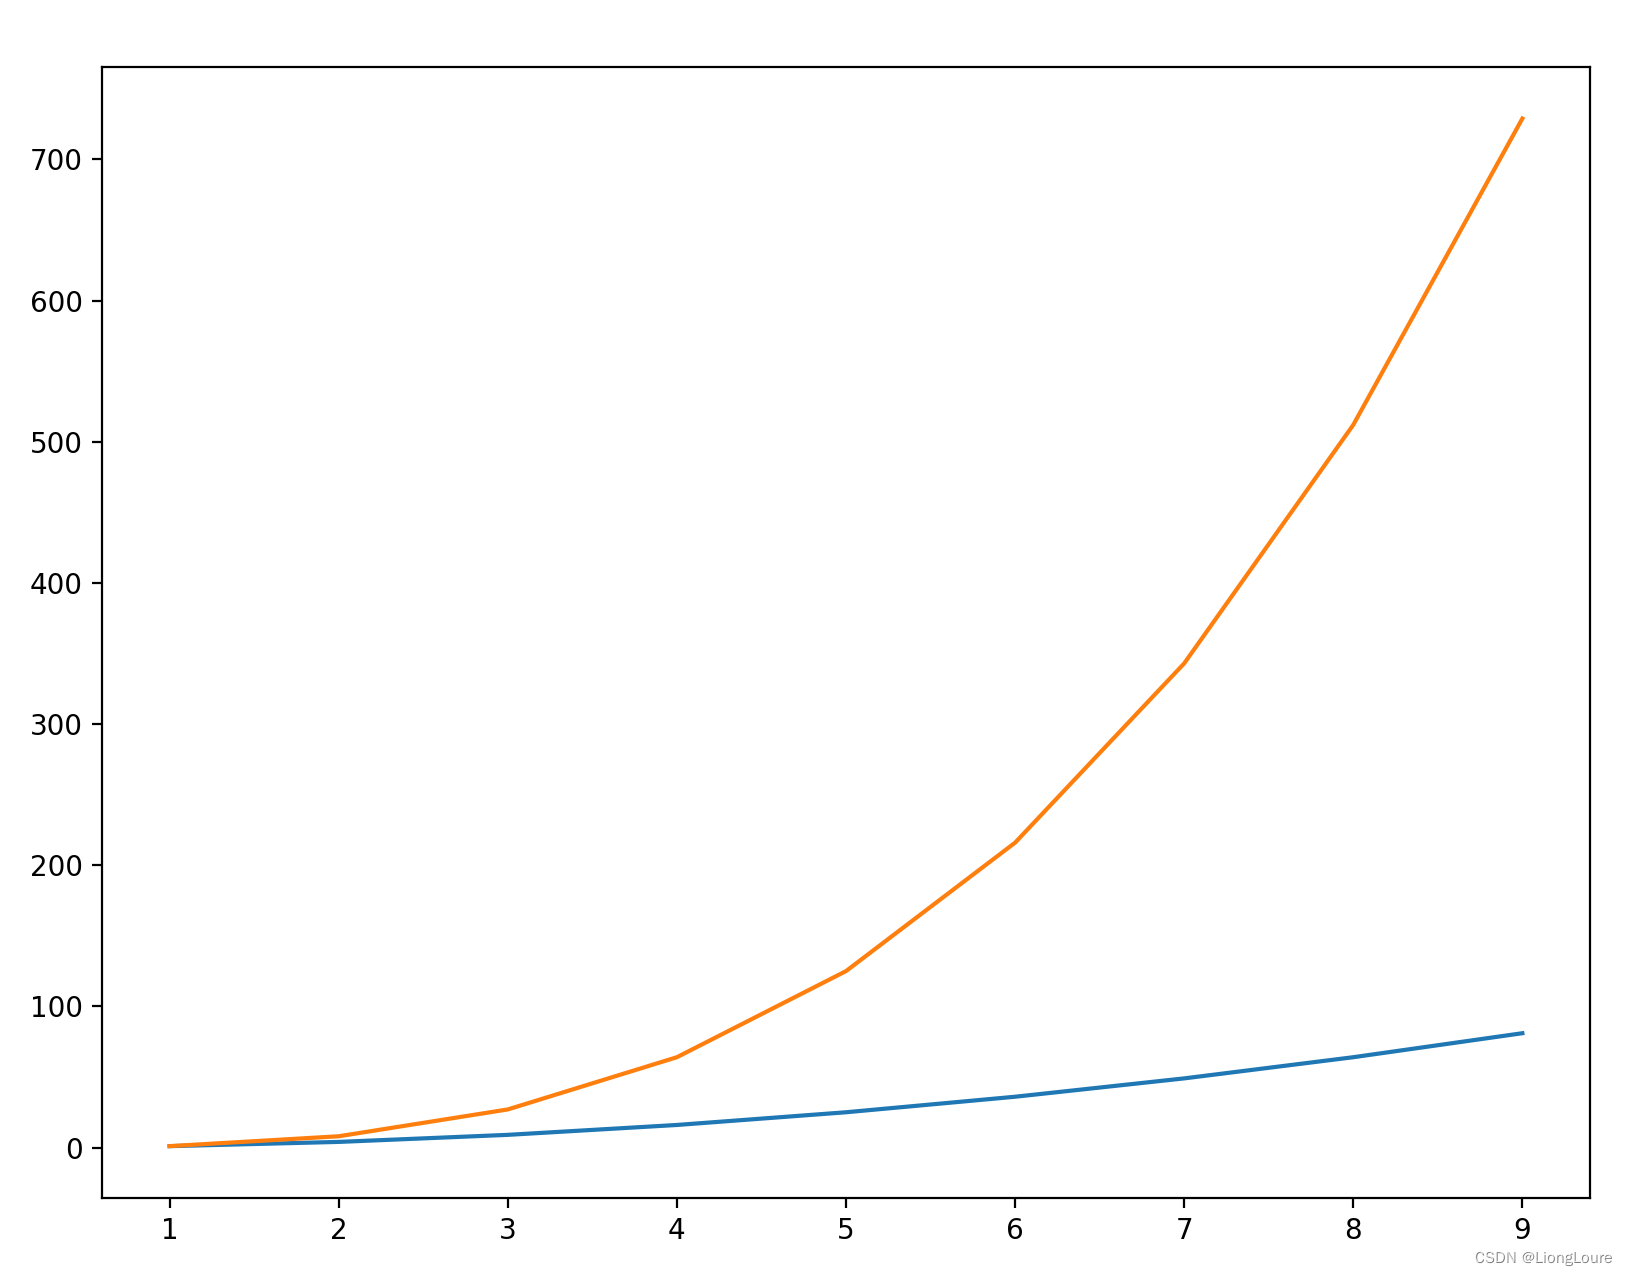
- 显式创建figure对象:
import matplotlib.pyplot as plt
import numpy as np

fig = plt.figure()
axes1 = fig.add_subplot(2,2,1)  #两行,两列,第一个位置
axes2 = fig.add_subplot(2,2,2)  #两行,两列,第二个位置
axes3 = fig.add_subplot(2,2,3)
axes4 = fig.add_subplot(2,2,4)

axes1.plot([0,3,5,7],[2,4,6,8])
axes2.plot([1,3,5,7],[2,4,6,8])
axes3.plot([2,3,5,7],[2,4,6,8])
axes4.plot([3,3,5,7],[2,4,6,8])
plt.show()
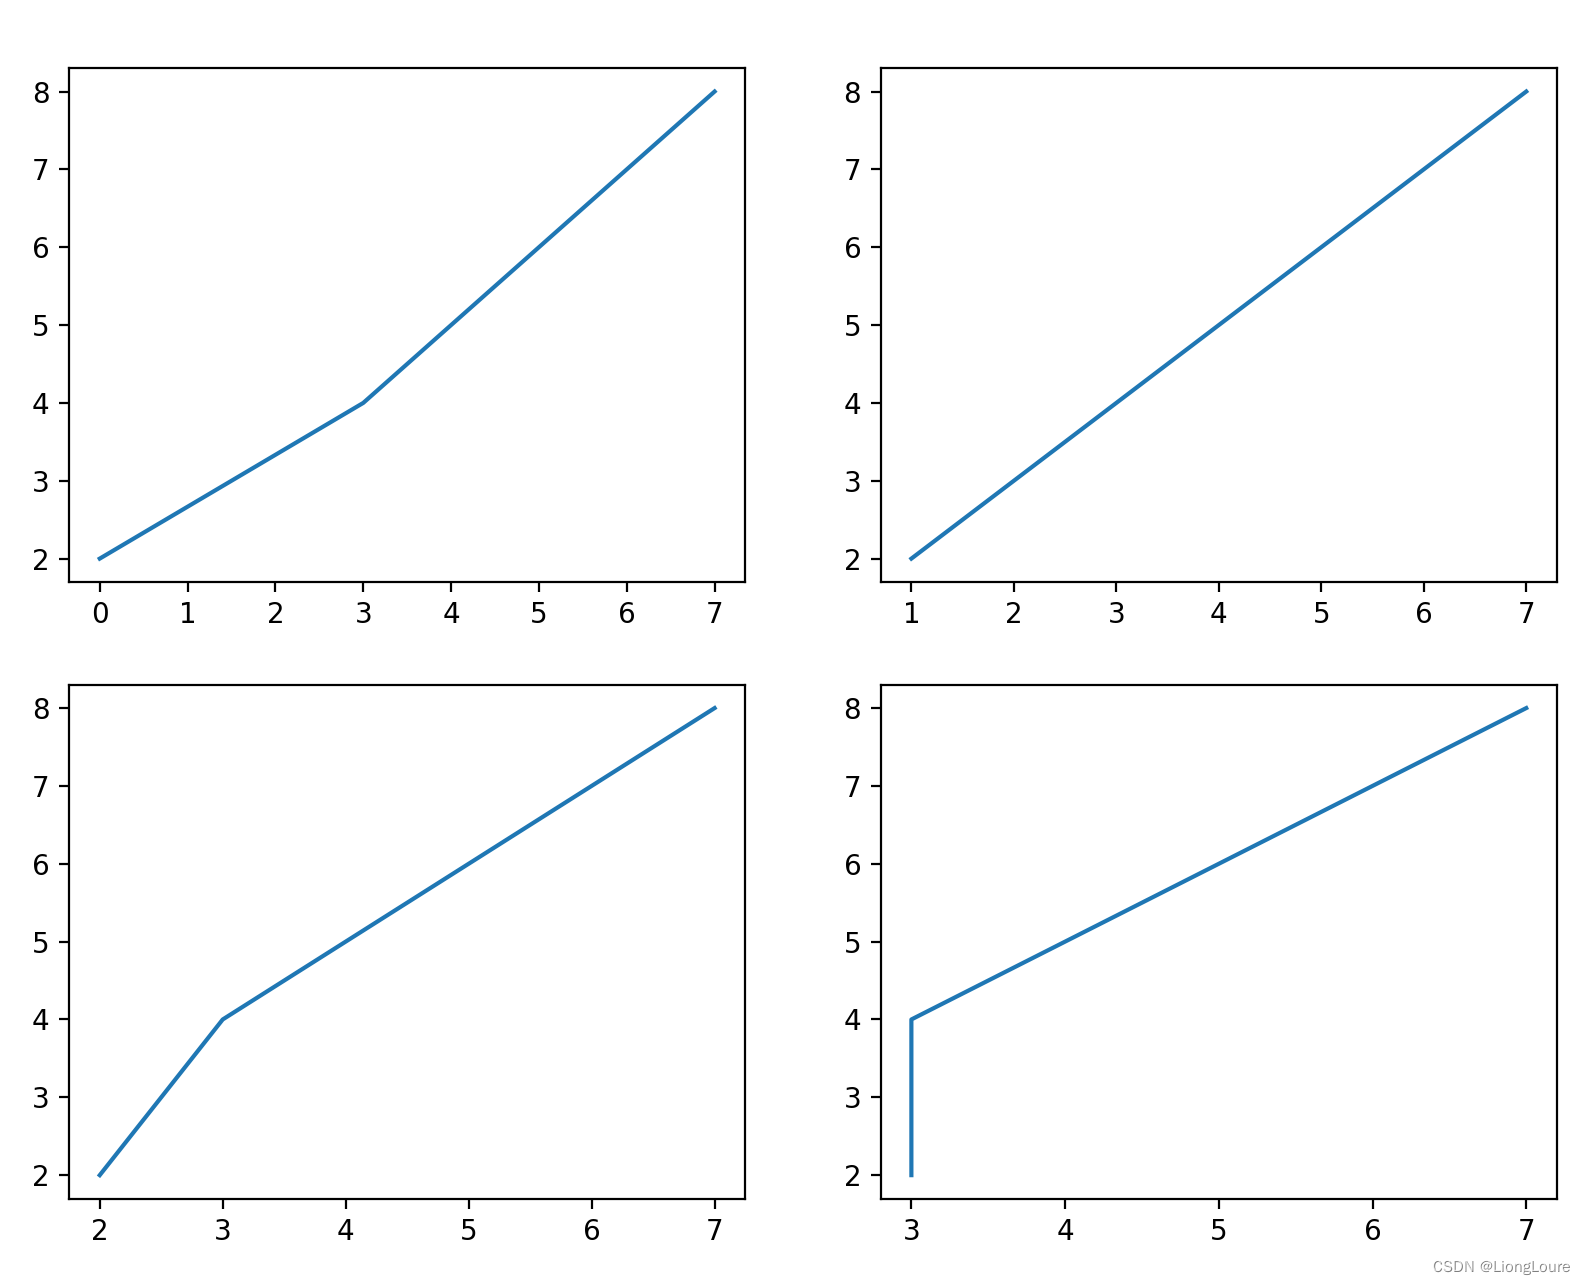
采用figure-plot函数时要注意顺序
import numpy as np
import matplotlib.pyplot as plt

# 调用figure函数创建figure(1)对象,可以省略这样plot时,它就自动建一个
plt.figure('正弦曲线')
x=np.linspace( -1,1,50)  # 定义x数据范围
y1=2*x+1  # 定义y数据范围
y2=x**2
plt.plot(x,y1)  # plot()画出曲线
plt.figure()  # 定义一个图像窗口
plt.plot(x,y2)  # plot()画出曲线
plt.show()  # 显示图像
22.1.2 figure参数
def figure(num=None, figsize=None, dpi=None, facecolor=None, edgecolor=None, frameon=True, FigureClass=Figure, clear=False, **kwargs)
#encoding:utf-8

import matplotlib.pyplot as plt
import numpy as np
"""
num=None,  画布的唯一标志# autoincrement if None, else integer from 1-N
figsize=None,  画布的大小,元组形式,单位为英寸# defaults to rc figure.figsize
dpi=None,  图形分辨率# defaults to rc figure.dpi
facecolor=None,  背景色# defaults to rc figure.facecolor
edgecolor=None,  边框色# defaults to rc figure.edgecolor
frameon=True,是否绘制边框
FigureClass=Figure,
clear=False
"""
#num
fig = plt.figure(num="画布1",figsize=(5,5),facecolor='b')  # 如果num传入string,则更改窗口命名
fi2 = plt.figure(num=3,figsize=(4,4),facecolor='r')  # 如果num传入int,则num唯一标志(Figure num)
fi3 = plt.figure(num = '画布3', figsize=(3,3),facecolor='w')

plt.xlim(0,5)  # 设置x轴的范围
plt.ylim(0,10)  # 设置y轴的范围

plt.figure(num='1')
plt.xlim(0,4)  # 设置x轴的范围
plt.ylim(0,11)  # 设置y轴的范围

plt.figure(num=2)
plt.xlim(0,4)  # 设置x轴的范围
plt.ylim(0,11)  # 设置y轴的范围

plt.show()
22.1.3 设置坐标轴
xtick(locs,[labels],**kargs)
import matplotlib.pyplot as plt
import numpy as np

x = np.linspace(-3,3,50)#50个样本数
y_1 = 2*x+1
y_2 = x**2

fig = plt.figure(num='line 1',figsize=(5,5))
plt.plot(x,y_1)
plt.plot(x,y_2)

plt.xlim(0,5)
plt.ylim(0,10)
plt.xlabel("i am x")
plt.ylabel("i am y")

plt.show()
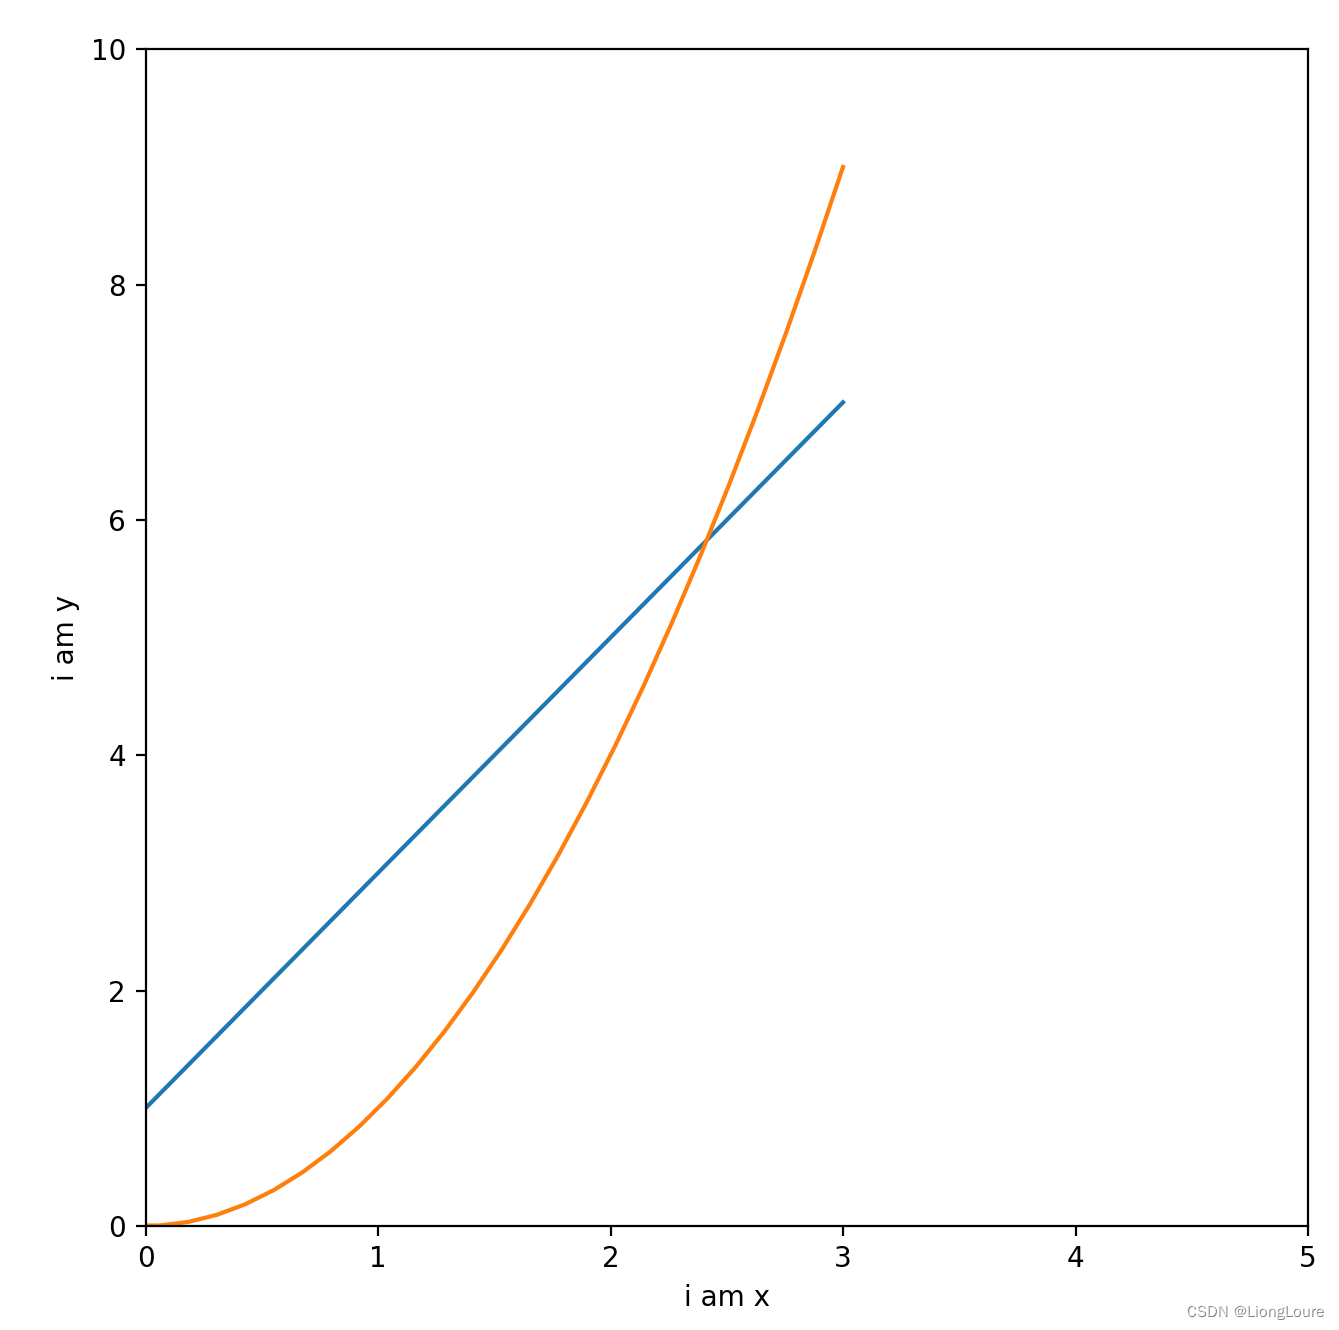
#encoding:utf-8

import matplotlib.pyplot as plt
import numpy as np

x = np.linspace(-3,3,50)#50个样本数
y_1 = 2*x+1
y_2 = x**2

fig = plt.figure(num='line 1',figsize=(5,5))
plt.plot(x,y_1)
plt.plot(x,y_2)

plt.xlim(0,5)
plt.ylim(0,10)
plt.xlabel("i am x")
plt.ylabel("i am y")

def set_ticks(num):
    plt.figure(num = num)
    plt.plot(x,y_1)
    plt.plot(x,y_2)
    plt.xlim(0,5)
    plt.ylim(0,10)
    plt.xlabel("i am x")
    plt.ylabel("i am y")
    if num == 2:
        new_ticks_x = np.linspace(-1,2,5)
        plt.xticks(new_ticks_x)
        plt.yticks([-2,-1,1,2], [r'really bad','bad','well',r'really well'], color = 'b', rotation = 60)

    # # 隐藏刻度
    # plt.xticks(())
    # plt.yticks(())

set_ticks(1)
set_ticks(2)
plt.show()
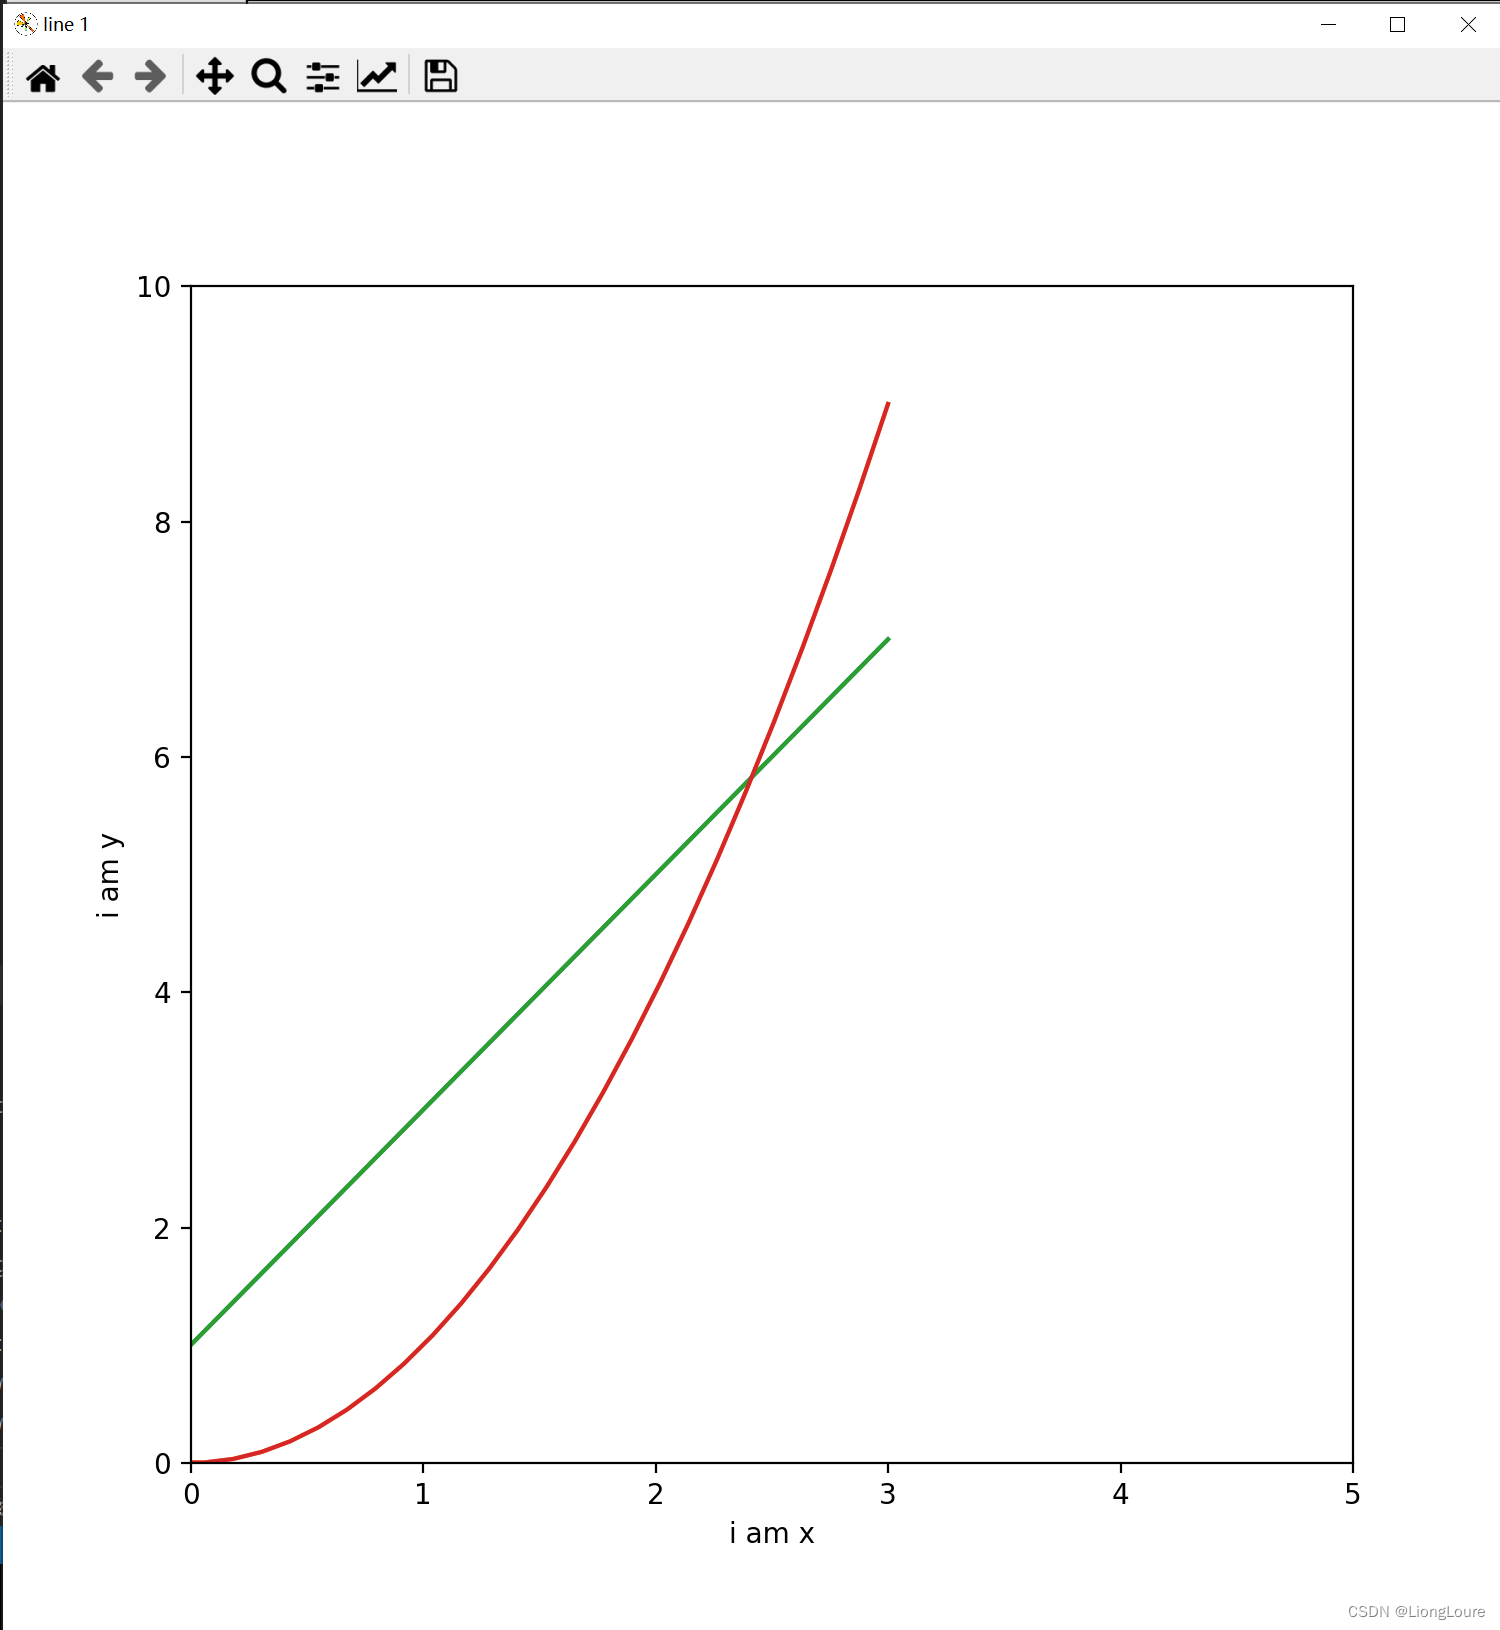
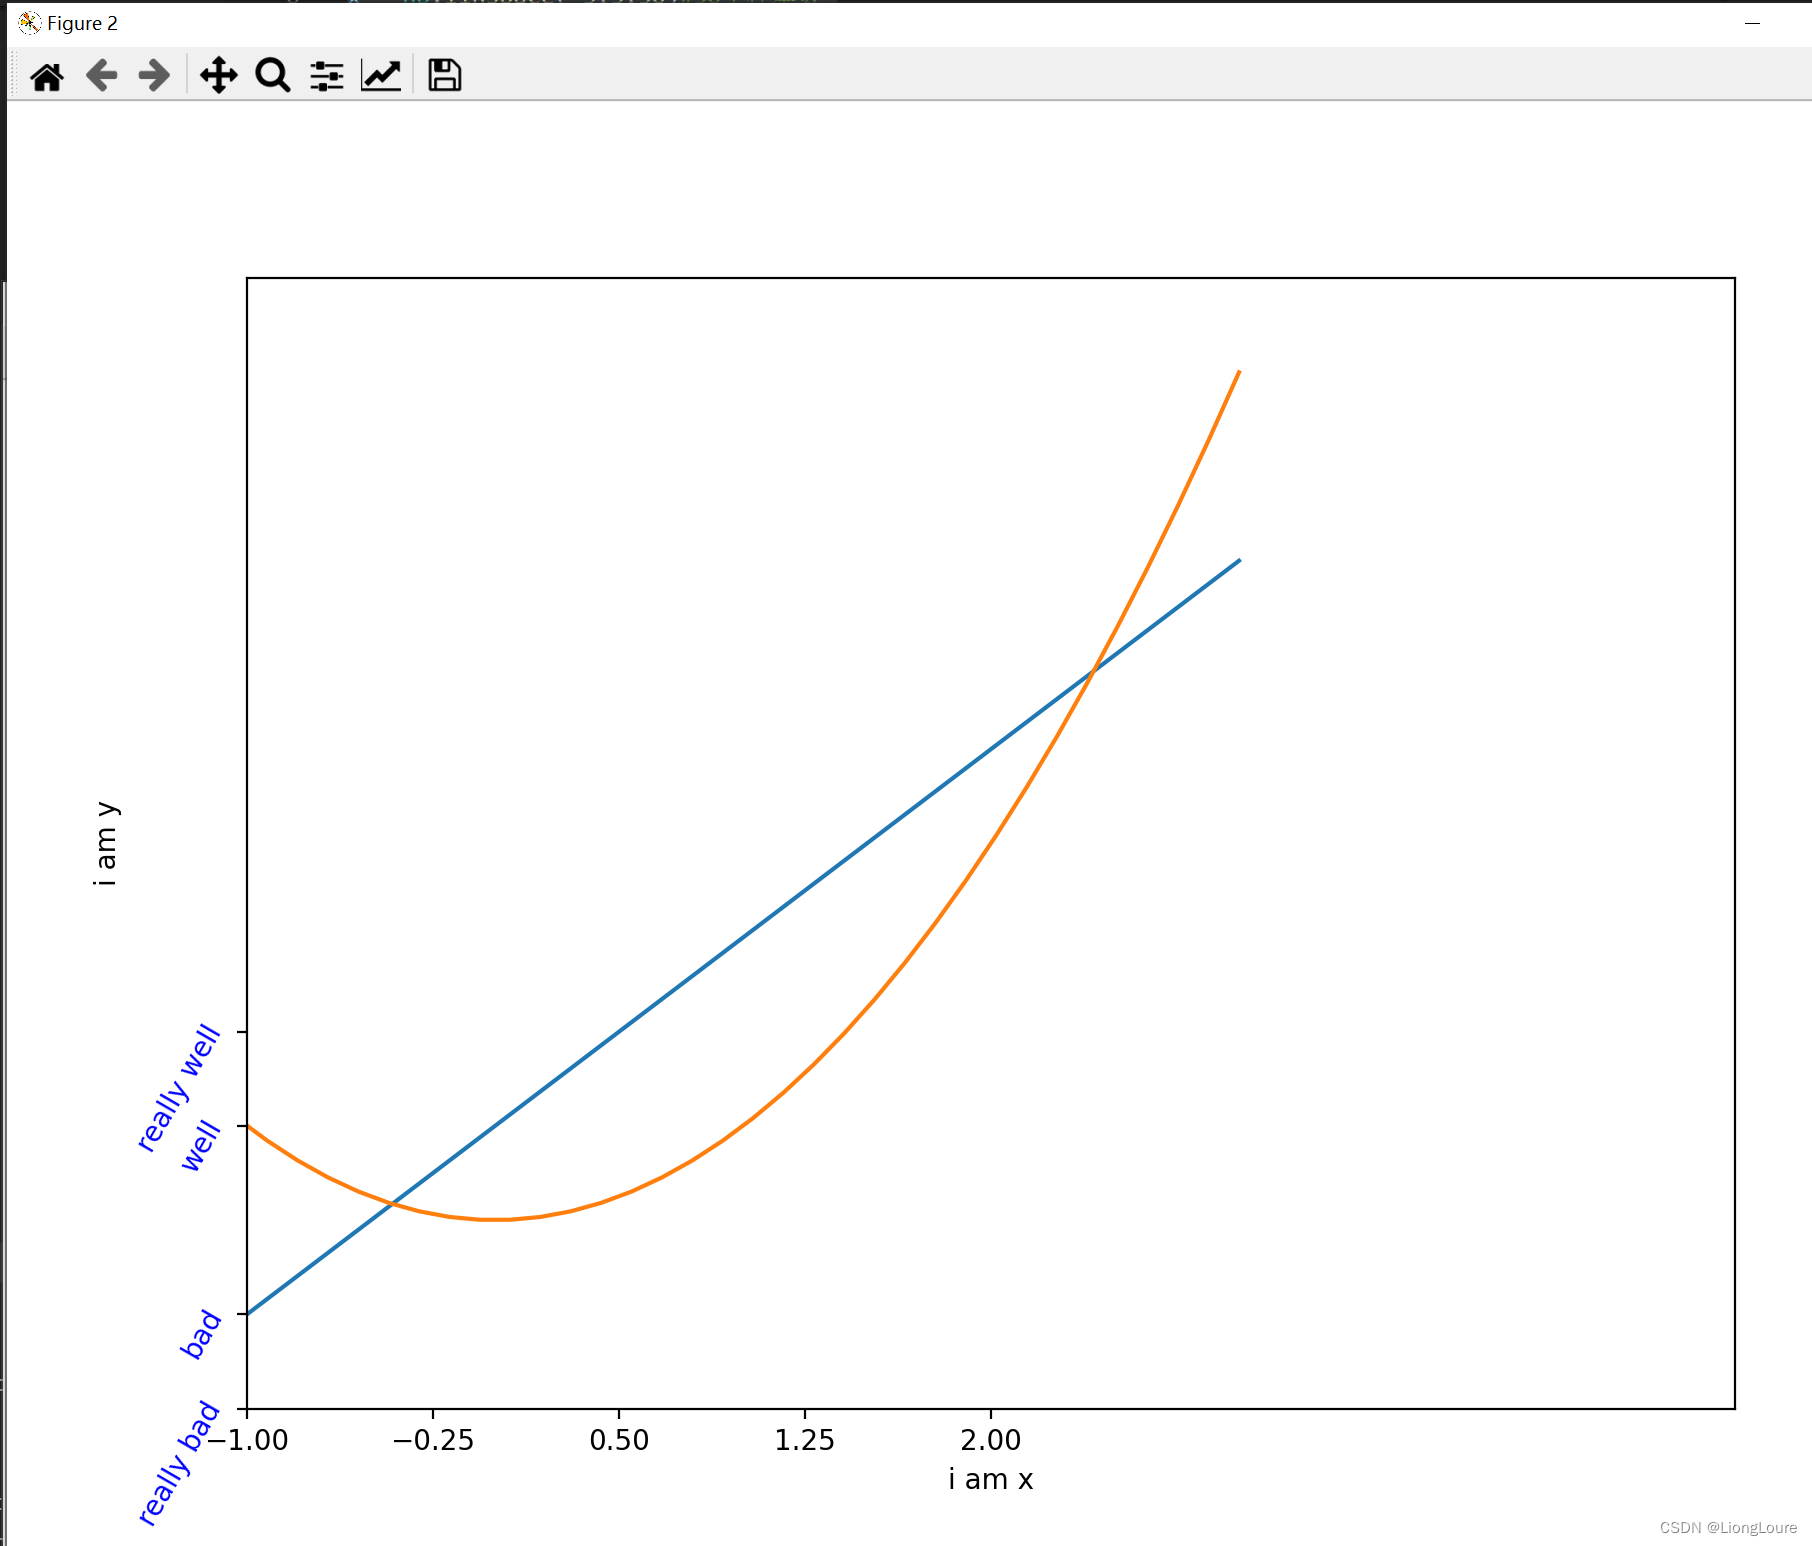
22.1.4 设置线条
import matplotlib.pyplot as plt
import numpy as np

x = np.linspace(-3,3,50)#50为生成的样本数
y_1 = 2*x+1
y_2 = x**2

fig = plt.figure(num=1,figsize=(5,5))
#plot参数:color,linewidth,linestyle,marker,markersize

plt.plot(x,y_1,color='b',linewidth=2,linestyle='--')
plt.plot(x,y_2,color='k',linewidth=2,marker='o',markersize=6,markeredgecolor='g', markerfacecolor='r')
plt.show()
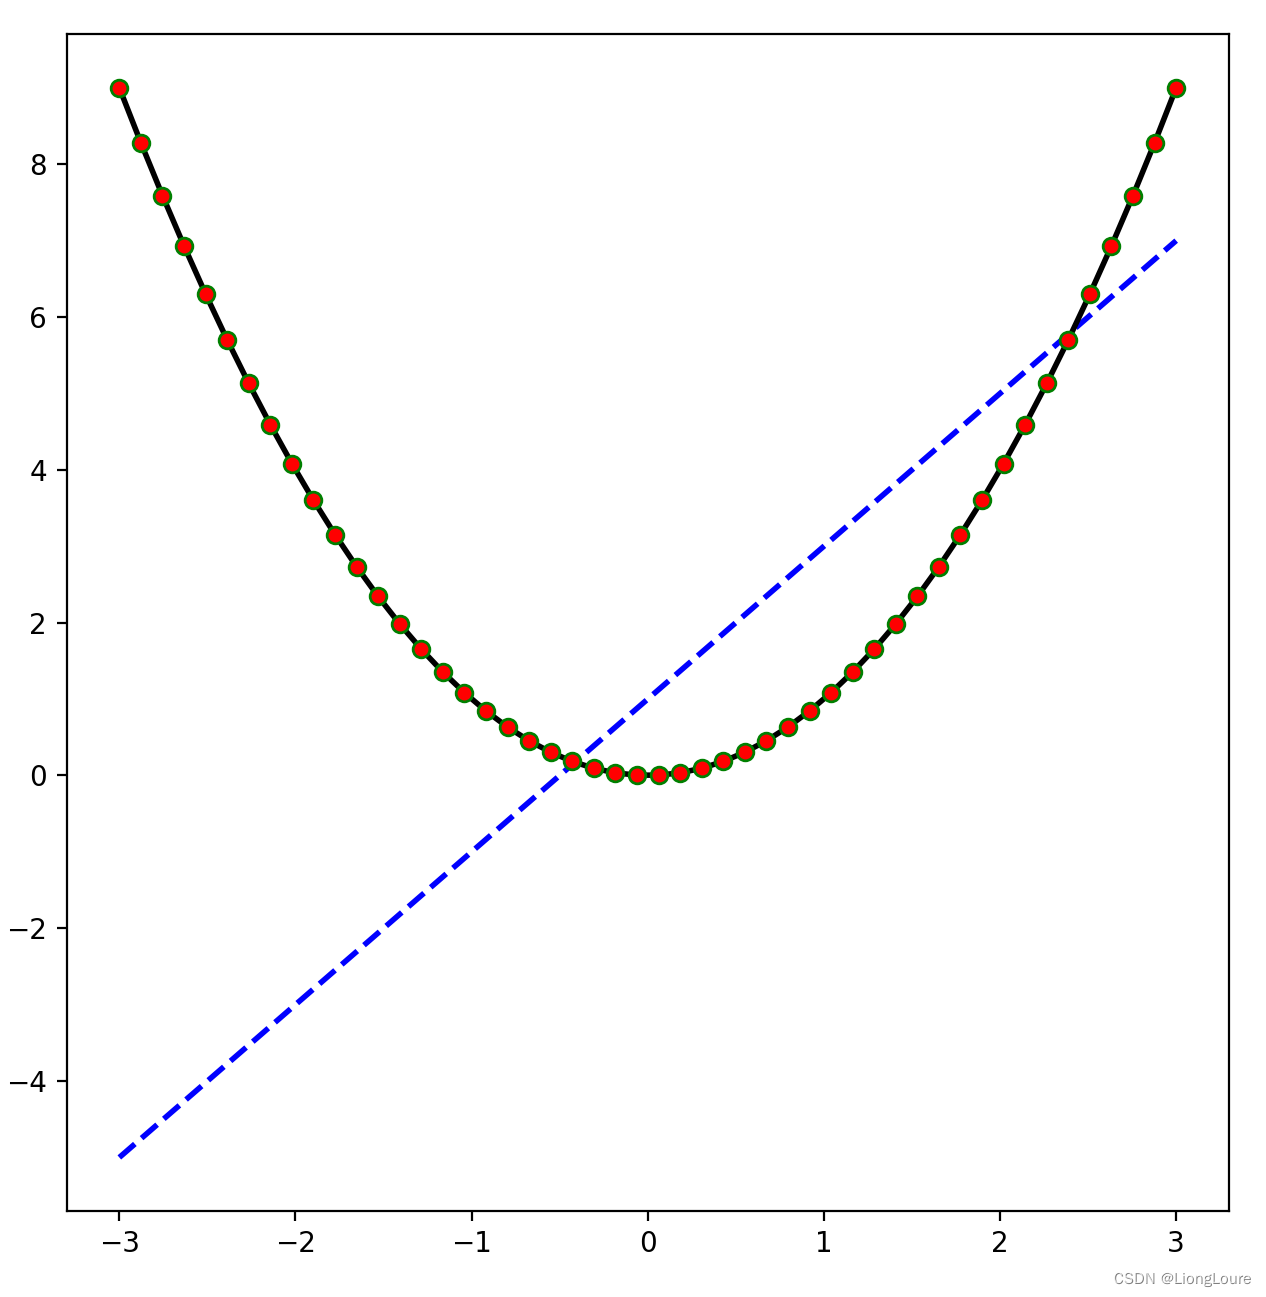
marker = ' '
| 参数 | 说明 |
|---|---|
'.' | point marker |
',' | pixel marker |
'o' | circle marker |
'v' | triangle_down marker |
'^' | triangle_up marker |
'<' | triangle_left marker |
'>' | triangle_right marker |
'1' | tri_down marker |
'2' | tri_up marker |
'3' | tri_left marker |
'4' | tri_right marker |
's' | square marker |
'*' | star marker |
'+' | plus marker |
'x' | x marker |
'D' | diamond marker |
'd' | thin_diamond marker |
color = ' '
| 别名 | 颜色 |
|---|---|
| b | 蓝色 |
| g | 绿色 |
| r | 红色 |
| y | 黄色 |
| c | 青色 |
| k | 黑色 |
| m | 洋红色 |
| w | 白色 |
linestyle = ' '
| 参数 | 说明 |
|---|---|
'-' | solid line style 实线 |
'--' | dashed line style 虚线 |
'-.' | dash-dot line style 点画线 |
':' | dotted line style 点线 |
22.1.5 设置线边框
import matplotlib.pyplot as plt
import numpy as np
import calendar
"""
xtick(locs,[labels],**kargs)
#刻度,标签,其他标签属性(颜色,旋转角度等)
"""

x = np.linspace(-3,3,50)  # 50个样本数
y_1 = 2*x+1
y_2 = x**2

fig1 = plt.figure(num='before',figsize=(8,5))
fig2 = plt.figure(num="after",figsize=(8,5))

def set_ticks(num):

    plt.figure(num=num)
    plt.plot(x,y_1)
    plt.plot(x,y_2)

    plt.xlim(-1,2)
    plt.ylim(-2,3)
    plt.xlabel("i am x")
    plt.ylabel("i am y")
    if num == 2:
        new_ticks_x = np.linspace(-1,2,5)  # 刻度从-1到2分为5个单位
        plt.xticks(new_ticks_x)  # color='b',rotation=60
        plt.yticks([-2,-1,1,2],[r'$really\ bad$','bad','well','really well'])
        axs = plt.gca()
        #边框颜色属性设置为none,则不显示
        axs.spines['top'].set_color('none')
        axs.spines['right'].set_color('none')
        axs.spines['left'].set_position(('data',0.5))  # 百分比
        axs.spines['bottom'].set_position(('data',0))

set_ticks(1)
set_ticks(2)
plt.show()
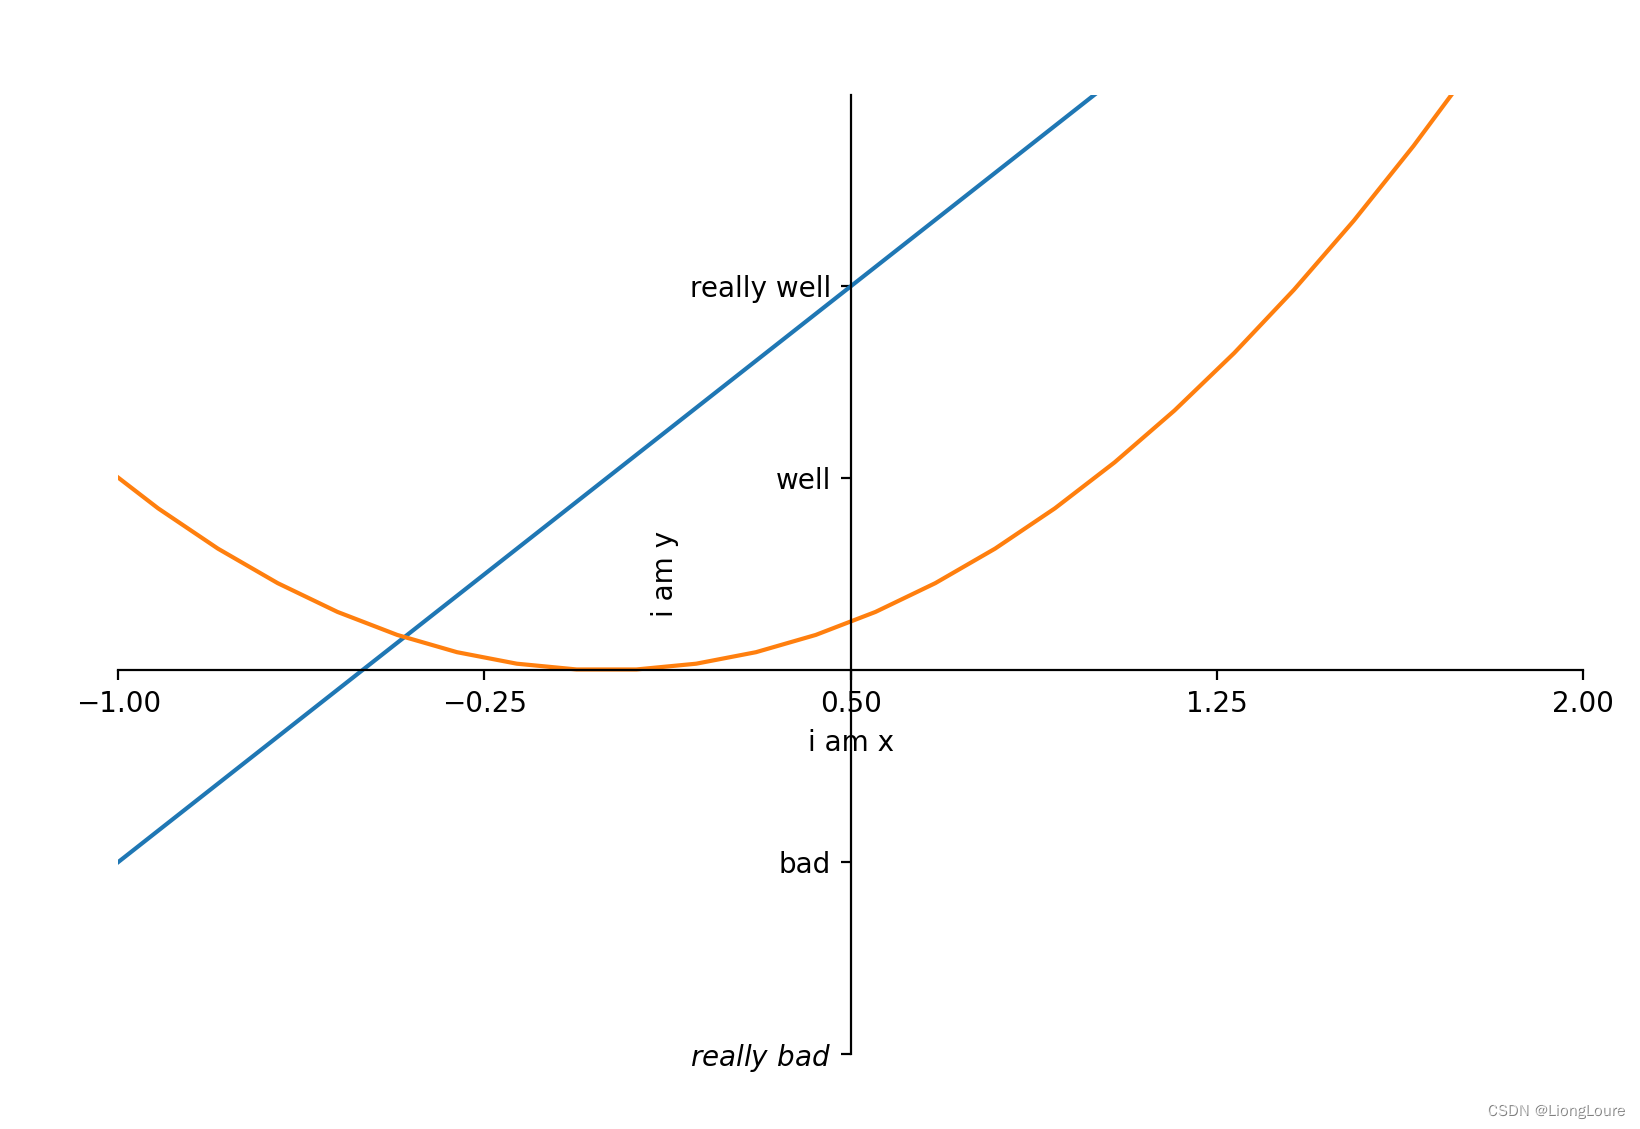
22.1.6 添加图例
#encoding:utf-8

import matplotlib.pyplot as plt
import numpy as np
import calendar

x = np.linspace(-3,3,50)#50个样本数
y_1 = 2*x+1
y_2 = x**2

fig1 = plt.figure(num='before',figsize=(8,5))
fig2 = plt.figure(num="after",figsize=(8,5))

def set_ticks(num):

    plt.figure(num=num)
    plt.plot(x,y_1,label='linear line')
    plt.plot(x,y_2,label='square line')

    plt.xlim(-1,2)
    plt.ylim(-2,3)
    plt.xlabel("i am x")
    plt.ylabel("i am y")
    if num == 2:
        new_ticks_x = np.linspace(-1,2,5)#刻度从-1到2分为5个单位
        plt.xticks(new_ticks_x)#color='b',rotation=60
        plt.yticks([-2,-1,1,2],[r'$really\ bad$','bad','well','really well'])
        plt.legend(loc = 'best')#自动计算最好的位置

set_ticks(1)
set_ticks(2)
plt.show()
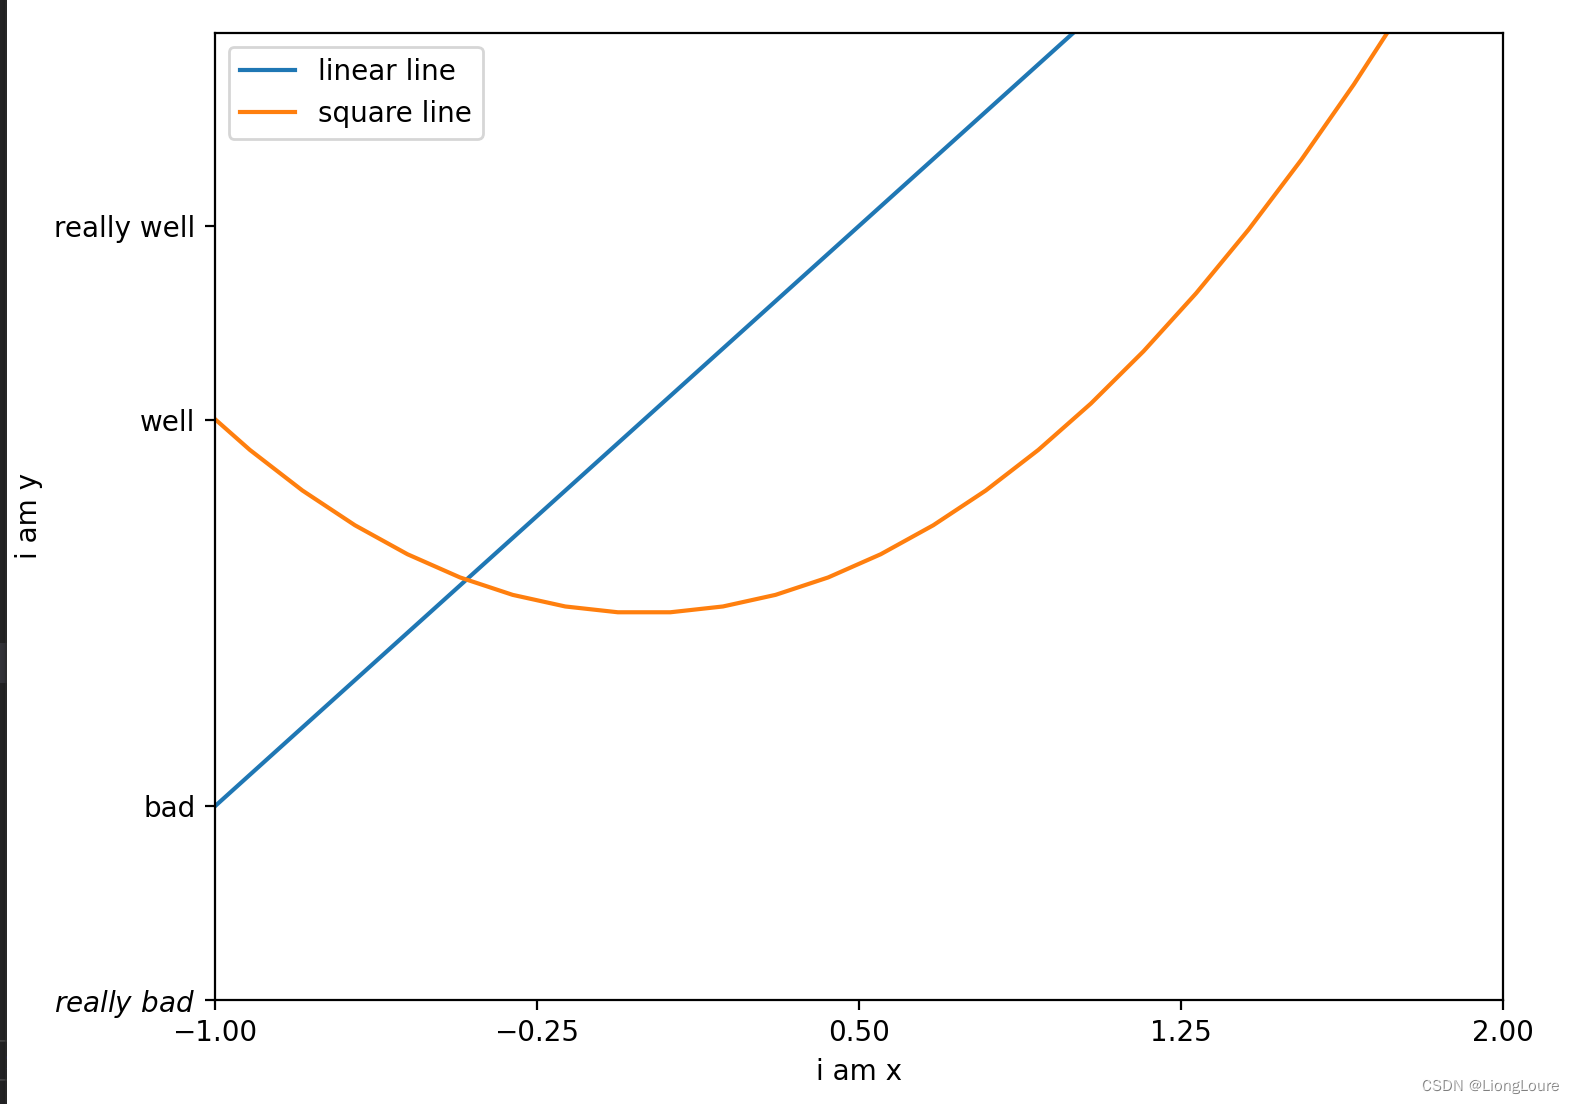
调整位置和名称,单独修改label信息,我们可以在plt.legend输入更多参数
plt.legend(handles=seq, labels=seq, loc=str)
loc有很多参数 其中best自分配最佳位置
| 参数 | 等效数字 |
|---|---|
| ‘best’ | 0 |
| ‘upper right’ | 1 |
| ‘upper left’ | 2 |
| ‘lower left’ | 3 |
| ‘’lower right’ | 4 |
| ‘’right’ | 5 |
| ‘center left’ | 6 |
| ‘center right’ | 7 |
| ‘lower center’ | 8 |
| ‘upper center’ | 9 |
22.2 绘图
22.2.1 Scatter散点图
import matplotlib.pyplot as plt
import numpy as np

n = 1024
X = np.random.normal(0,1,n)
Y = np.random.normal(0,1,n)
T = np.arctan2(Y, X)  # 返回给定的X值和Y值的反正切值
print(T)
# scatter画散点图 size=30 颜色为 T 透明度为 50% 利用xticks来隐藏X轴的刻度
plt.scatter(X, Y, s=30,c=T,alpha=0.8)
plt.xlim(-1.5,1.5)
plt.ylim(-1.5,1.5)
plt.xticks(())
plt.yticks(())

plt.show()
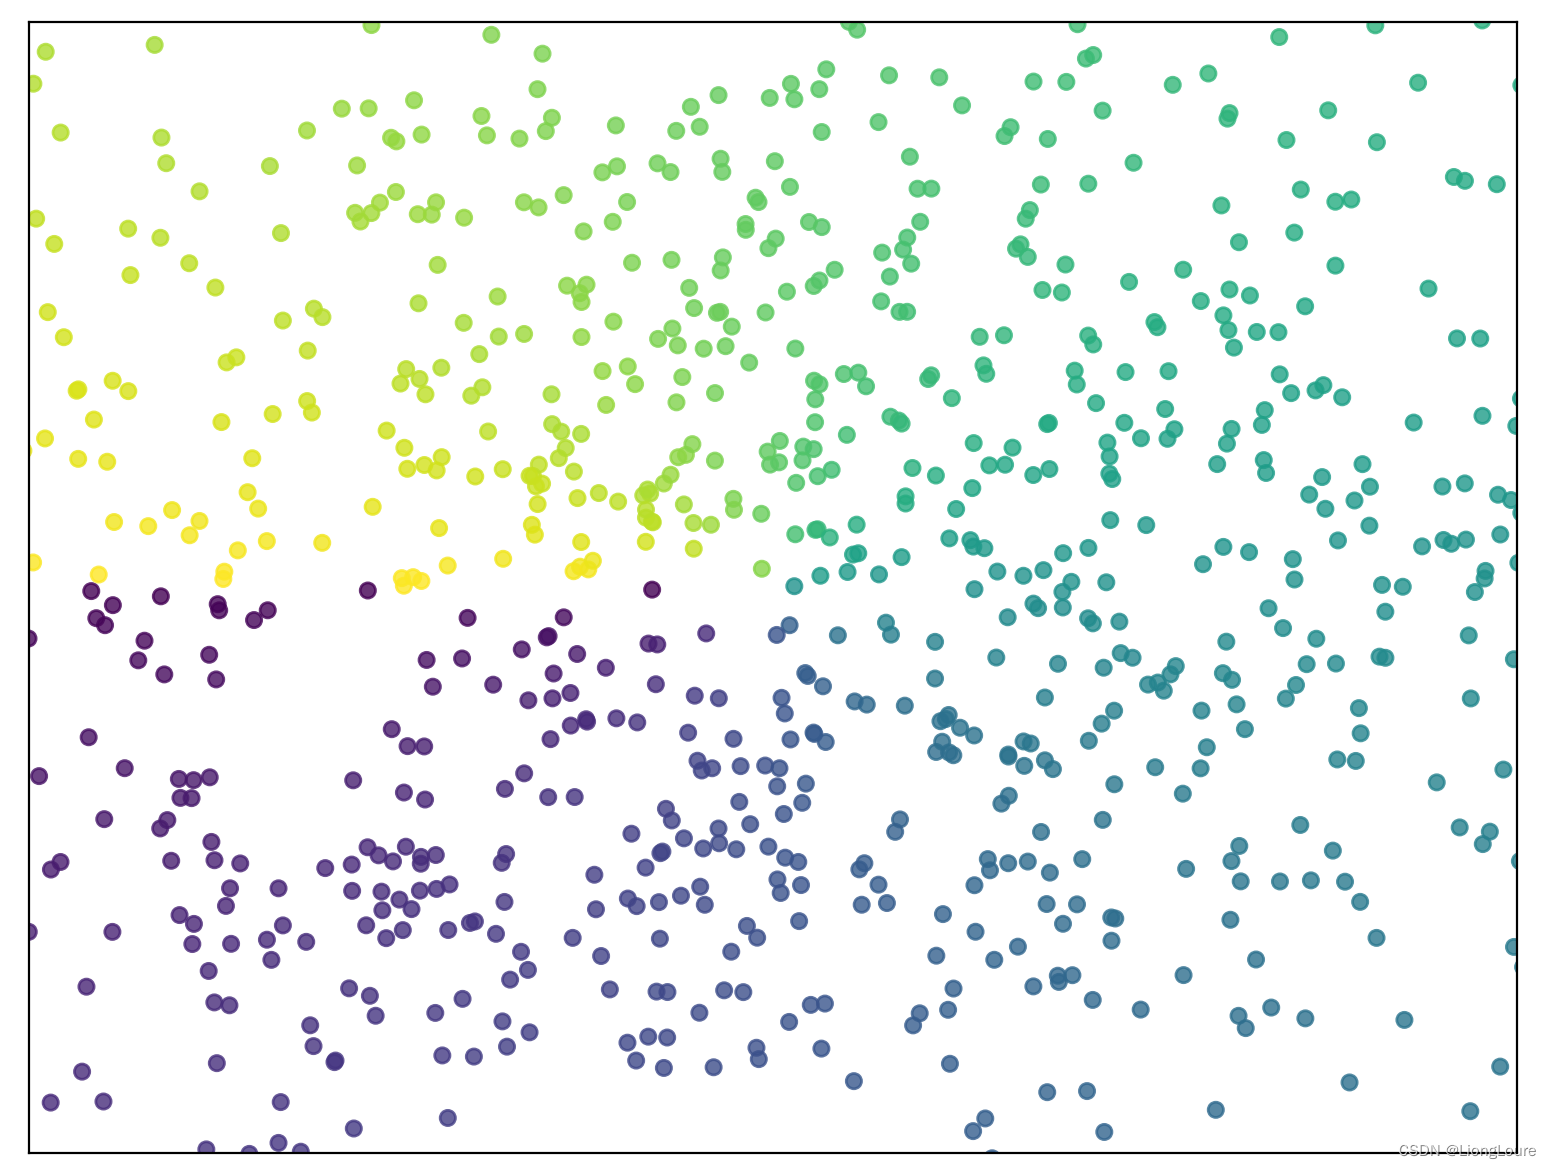
22.2.2 Bar条形图
import matplotlib.pyplot as plt
import numpy as np

n = 12
X = np.arange(n)
Y_1 = (1-X/float(n))*np.random.uniform(0.5,1,n)
Y_2 = (1-X/float(n))*np.random.uniform(0.5,1,n)

plt.bar(X, +Y_1, facecolor='b', edgecolor='w')
plt.bar(X, -Y_2, facecolor='g', edgecolor='w')

for x,y in zip(X,Y_1):
    plt.text(x+0.4, y+0.05, '%.2f'%y, ha='center',va='bottom')
for x,y in zip(X,Y_2):
    plt.text(x+0.4, -(y-0.05), '%.2f'%y, ha='center',va='top')

#plt.xlim(-0.5,n)
plt.xticks(())
#plt.ylim(-1.25,1.25)
plt.yticks(())

plt.show()

import matplotlib.pyplot as plt
import numpy as np

plt.figure(3)
x_index = np.arange(5)  # 柱的索引
x_data = ('A','B','C','D','E')
Y_1_data = (20,35,30,35,27)
Y_2_data = (25,32,34,20,25)

bar_width = 0.35  # 定义一个数字代表每个独立柱的宽度
rects1 = plt.bar(x_index,Y_1_data,width=bar_width,alpha=0.4,color='b',label='legend1')
rects2 = plt.bar(x_index+bar_width,Y_2_data,width=bar_width,alpha=0.5,color='g',label='legend2')

#关于左偏移,不用关心每根柱的中心不中心,因为只要把刻度线设置在柱的中间就可以了
plt.xticks(x_index+bar_width/2,x_data)  # x轴的刻度线
plt.legend()  # 显示图例
plt.tight_layout()  # 自动控制图像的外部边缘

plt.show()
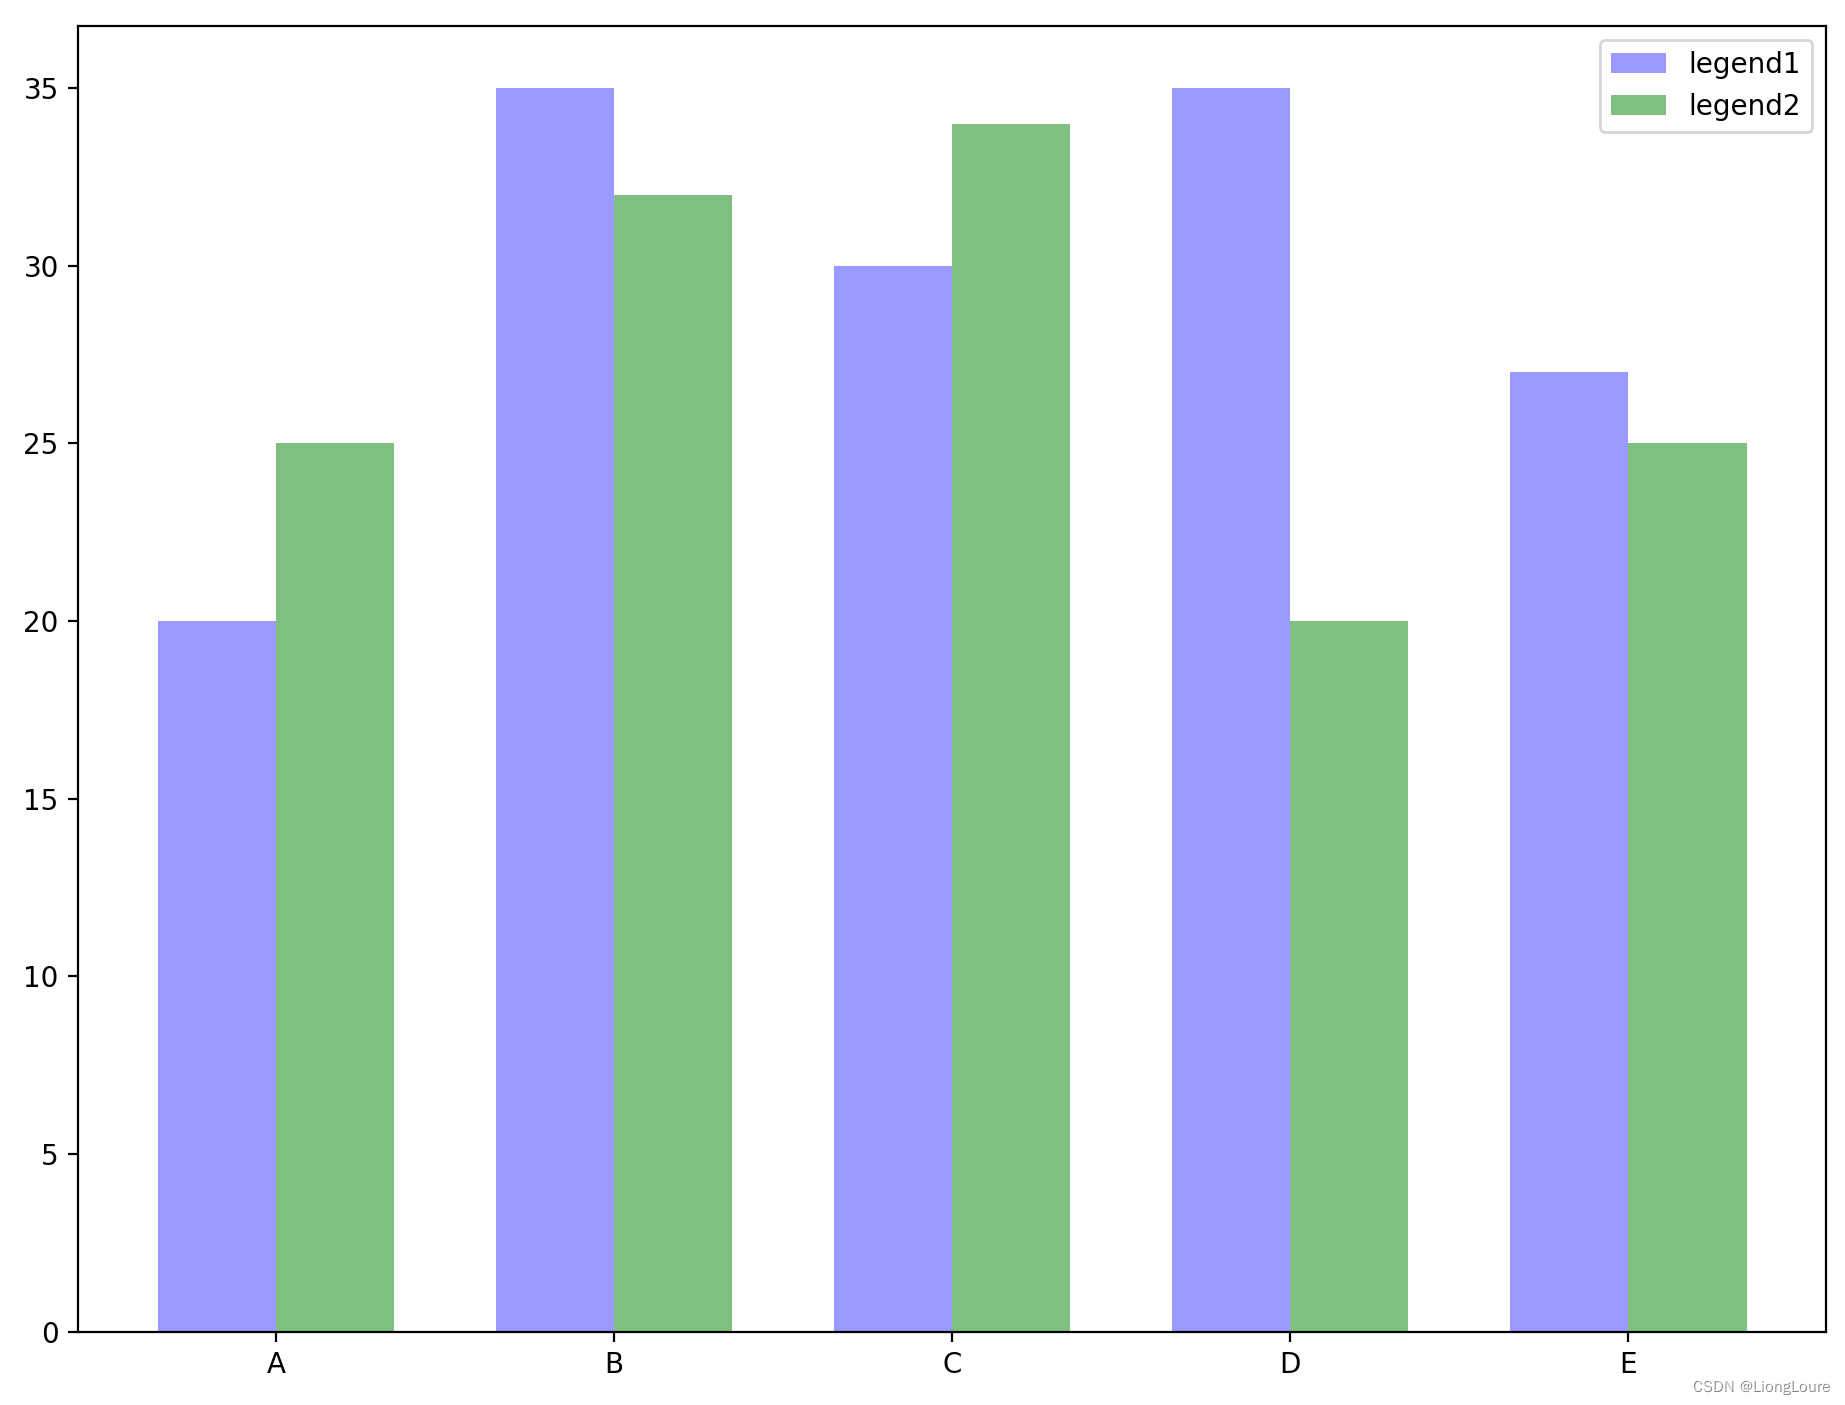
22.2.3 Contour等高线图
import matplotlib.pyplot as plt
import numpy as np

#plt.contour(x,y,f(x,y))

#f函数用来计算高度值
def f(x,y):
    return (1-x/2+x**5+y**5)*np.exp(-x**2-y**2)

n = 256
x = np.linspace(-3,3,n)
y = np.linspace(-3,3,n)

X, Y = np.meshgrid(x,y)  # meshgrid从坐标向量返回坐标矩阵

# 利用contour函数把颜色加进去,位置参数依次x,y,f(x,y),透明度为0.75,并将f(x,y)的值对应到camp之中
# plt.contour(X,Y,f(X, Y),8,alpha=0.75,cmap=plt.cm.hot)  # 8表示等高线分成多少份,alpha表示透明度,cmap表示color map
# 使用plt.contour函数进行等高线绘制 参数依次为x,y,f(x,y),颜色为黑色,线条宽度为0.5
C = plt.contour(X,Y,f(X, Y),8,colors='k',linewidth=0.5)  # 8表示等高线分成多少份,alpha表示透明度,cmap表示color map
# 使用plt.clabel添加高度数值 inline控制是否将label画在线里面,字体大小为10

plt.clabel(C,inline=True,fontsize=10)
plt.xticks(())
plt.yticks(())
plt.show()

22.3 种类
22.3.1 子图
import matplotlib.pyplot as plt
import numpy as np

#方法一
plt.figure()
plt.subplot(2,2,1)
plt.plot([0,1],[0,4])

plt.subplot(2,2,2)
plt.plot([0,1],[0,4])

plt.subplot(2,2,3)
plt.plot([0,1],[0,4])

plt.subplot(2,2,4)
plt.plot([0,1],[0,4])
plt.xlim([0,5])

plt.show()

#方法二
fig = plt.figure()
axes1 = fig.add_subplot(2,1,1)#两行,一列,第一个位置
axes2 = fig.add_subplot(212)#两行,一列,第二个位置

axes1.plot([1,3,5,7],[0,1,2,3])
axes1.set_xlim(0, 5)


axes2.plot([1,3,5,7],[2,4,6,8])

# plt.show()

#方法三
fig, [axes1, axes2] = plt.subplots(2,1, figsize=(8,8))

plt.show()
22.3.2 图中图
import matplotlib.pyplot as plt
import numpy as np

fig = plt.figure()
x = [1,2,3,4,5,6,7]
y = [1,3,4,2,5,8,6]

#绘制大图:假设大图的大小为10,那么大图被包含在由(1,1)开始,宽8高8的坐标系之中
left,bottom,width,height = 0.1,0.1,0.8,0.8
ax1 = fig.add_axes([left,bottom,width,height])
ax1.plot(x,y,'r')#绘制大图,颜色为红色
ax1.set_xlabel('x')#横坐标名称为x
ax1.set_ylabel('y')
ax1.set_title('title')

#绘制小图,注意坐标系位置和大小的改变
ax2 = fig.add_axes([0.2,0.6,0.25,0.25])
ax2.plot(x,y,'b')#颜色为蓝色|
ax2.set_xlabel('x')#横坐标名称为x
ax2.set_ylabel('y')
ax2.set_title('title inside 1')

plt.show()
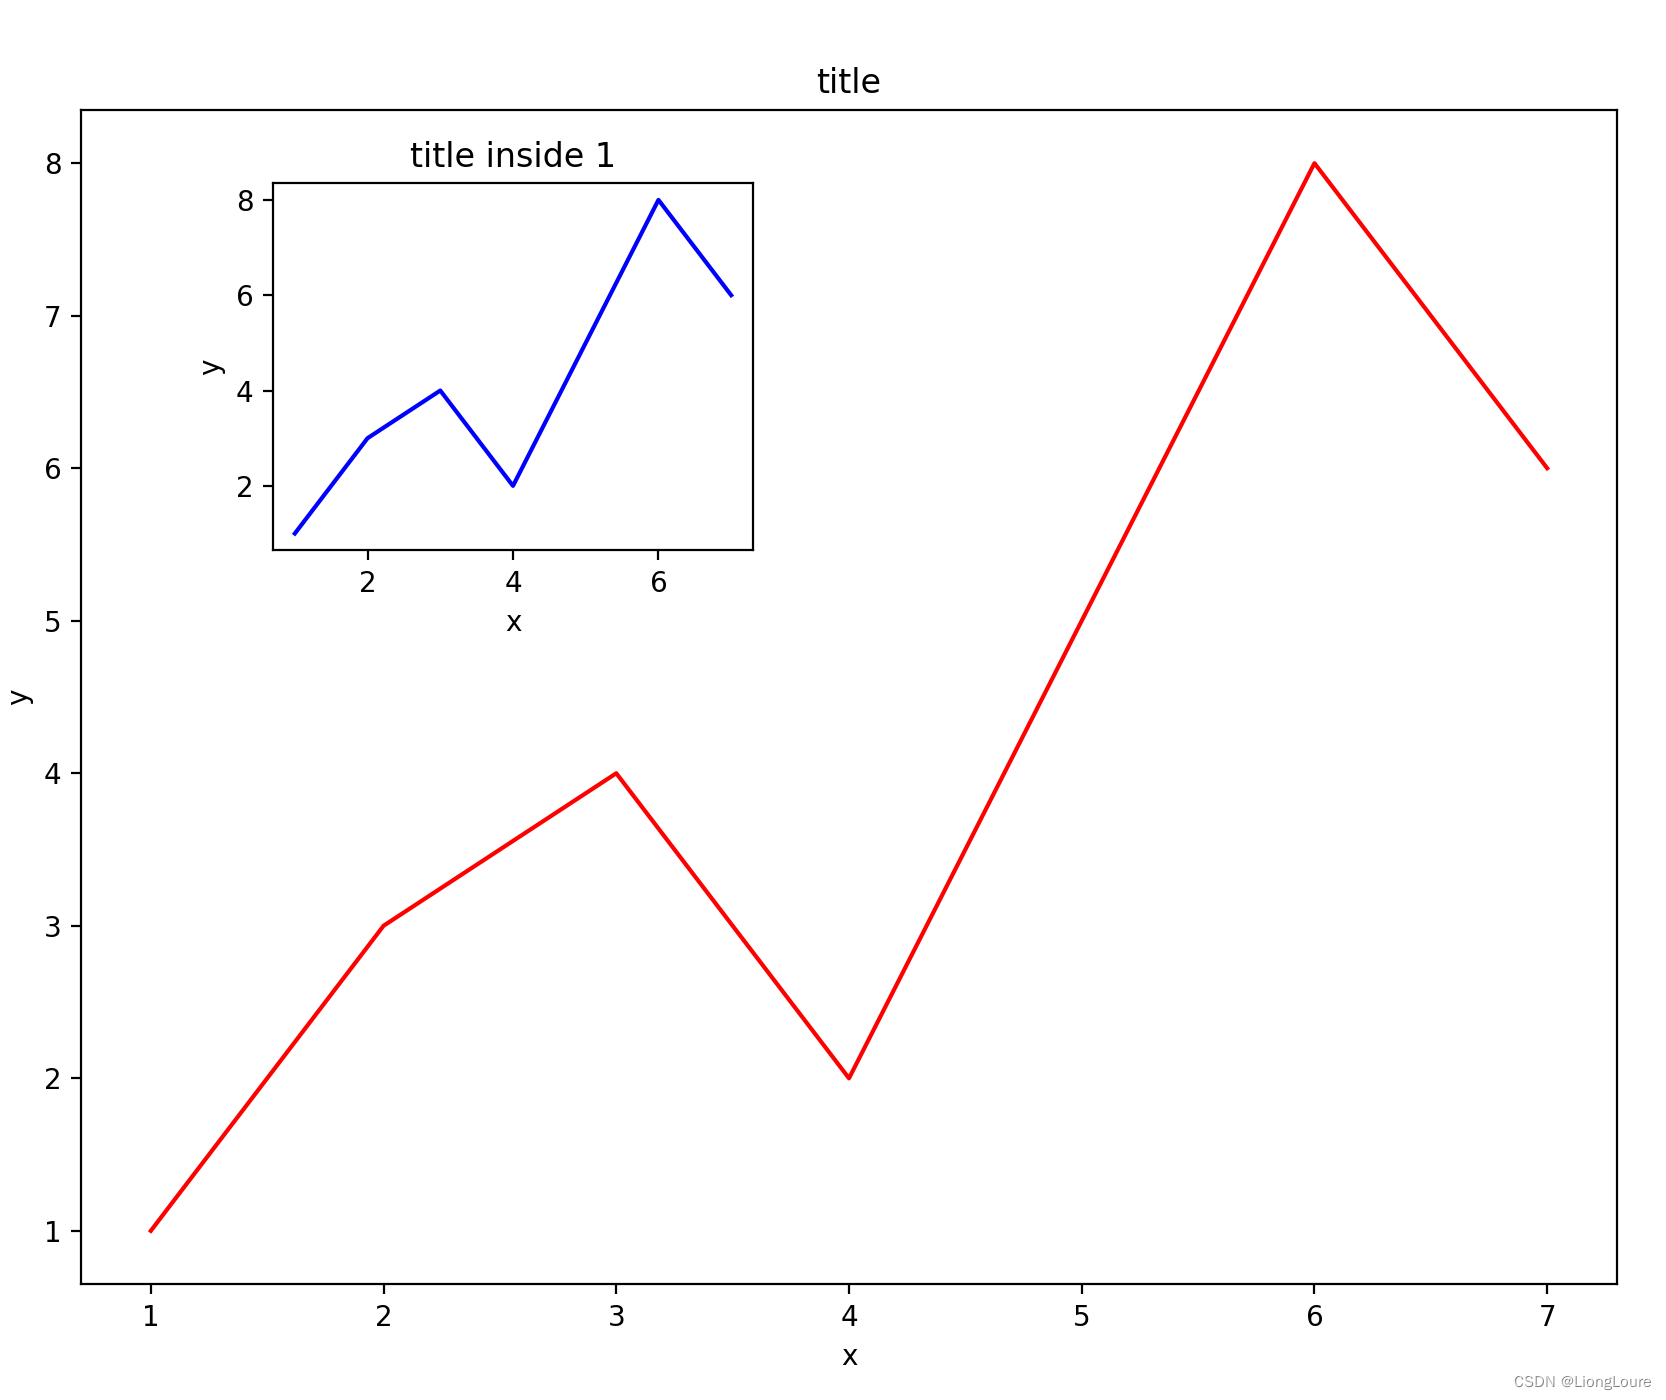
22.3.3 次坐标轴
import matplotlib.pyplot as plt
import numpy as np

x = np.arange(0,10,0.1)
y1 = 0.5*x**2
y2 = -y1
fig,ax1 = plt.subplots()

ax2 = ax1.twinx()  # 镜像显示
ax1.plot(x,y1,'g-')
ax2.plot(x,y2,'b-')

ax1.set_xlabel('X data')
ax1.set_ylabel('Y1 data',color='g')  # 第一个y坐标轴
ax2.set_ylabel('Y2 data',color='b')  # 第二个Y坐标轴

plt.show()
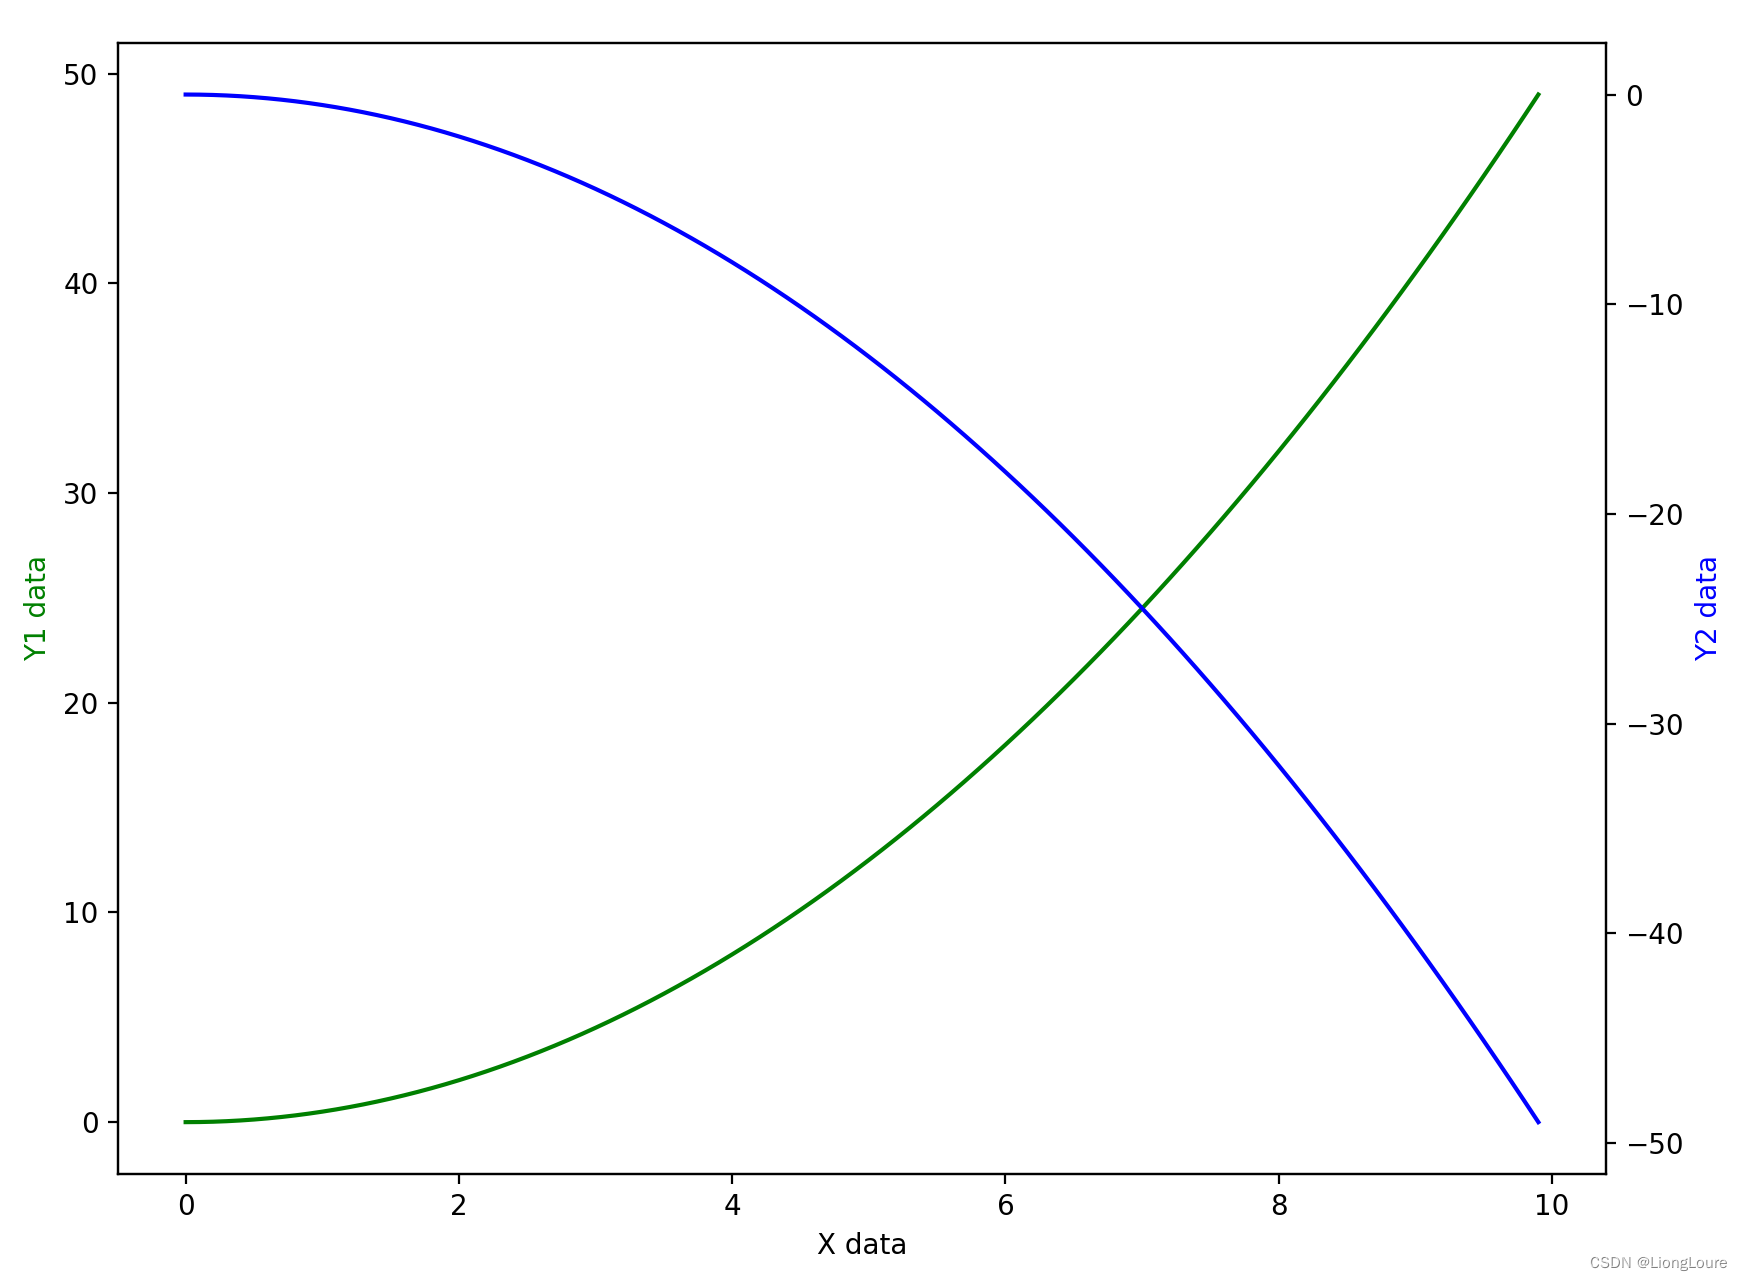


 153
153


 被折叠的 条评论
为什么被折叠?
被折叠的 条评论
为什么被折叠?
 到【灌水乐园】发言


