


具体内容以官方文档为准。
文章目录
- 0. 常用入参及函数统一解释
- 1. torch
- 2. torch.nn
- 2.1 Containers
- 2.2 Convolution Layers
- 2.3 Pooling layers
- 2.4 Padding Layers
- 2.5 Non-linear Activations (weighted sum, nonlinearity)
- 2.6 Non-linear Activations (other)
- 2.7 Normalization Layers
- 2.8 Recurrent Layers
- 2.9 Transformer Layers
- 2.10 Linear Layers
- 2.11 Dropout Layers
- 2.12 Sparse Layers
- 2.13 Distance Functions
- 2.14 Loss Functions
- 2.15 Vision Layers
- 2.16 Shuffle Layers
- 2.17 DataParallel Layers (multi-GPU, distributed)
- 2.18 Utilities
- 2.19 Quantized Functions
- 2.20 Lazy Modules Initialization
- 3. torch.nn.functional
- 4. torch.Tensor
- 5. Tensor Attributes
- 6. Tensor Views
- 7. torch.autograd
- 7.1 Functional higher level API
- 7.2 Locally disabling gradient computation
- 7.3 Default gradient layouts
- 7.4 In-place operations on Tensors
- 7.5 Variable (deprecated)
- 7.6 Tensor autograd functions
- 7.7 Function
- 7.8 Context method mixins
- 7.9 Numerical gradient checking
- 7.10 Profiler
- 7.11 Anomaly detection
- 7.12 Saved tensors default hooks
- 8. torch.cuda
- 9. torch.cuda.amp
- 10. torch.backends
- 11. torch.distributed
- 12. torch.distributions
- 13. torch.fft
- 14. torch.futures
- 15. torch.fx
- 16. torch.hub
- 17. torch.jit
- 18. torch.linalg
- 19. torch.overrides
- 20. torch.profiler
- 21. torch.nn.init
- 22. torch.onnx
- 22. torch.optim
- 23. Complex Numbers
- 24. DDP Communication Hooks
- 25. Pipeline Parallelism
- 26. Quantization
- 27. Distributed RPC Framework
- 28. torch.random
- 29. torch.sparse
- 30. torch.Storage
- 31. torch.utils.benchmark
- 32. torch.utils.bottleneck
- 33. torch.utils.checkpoint
- 34. torch.utils.cpp_extension
- 35. torch.utils.data
- 36. torch.utils.jit
- 37. torch.utils.dlpack
- 38. torch.utils.mobile_optimizer
- 39. torch.utils.model_zoo
- 40. torch.utils.tensorboard
- 41. Type Info
- 36. 没有文档,但是能用的函数
- 37. 其他正文及尾注中未提及的参考资料
0. 常用入参及函数统一解释
- 函数常见入参
- input:Tensor格式
- requires_grad:布尔值,aotugrad是否需要记录在该Tensor上的操作
- size:一般是衡量尺寸的数据,可以是多个数字或collection格式(如list或tuple等)
- device:Tensor所处的设备(cuda或CPU),可以用torch.device(见5.2部分)或直接使用字符串、数值(torch.device的入参)代替。
使用torch.device作为入参的示例:torch.randn((2,3), device=torch.device('cuda:1'))
使用字符串直接作为入参的示例:torch.randn((2,3), device='cuda:1')
使用数值直接作为入参的示例:torch.randn((2,3), device=1) dtype:取值范围见5.1torch.dtype
- 函数名前加
_是原地操作 - Parameters是可以直接按照顺序放的,Keyword Arguments则必须指定参数名(用*作为区分)
- optimizer的属性param_groups:一个list,每个元素是一个字典,包括
[‘params’, ‘lr’, ‘betas’, ‘eps’, ‘weight_decay’, ‘amsgrad’, ‘maximize’]。可参考1
1. torch
1.1 Tensors
is_tensor(obj)如果obj是Tensor,就返回True
注意:官方建议使用isinstance(obj, Tensor)作为代替
1.1.1 Creation Ops
注意:通过随机取样生成Tensor的函数放在了Random sampling部分。
tensor(data, *, dtype=None, device=None, requires_grad=False, pin_memory=False)
将data转换为Tensor。data可以是list, tuple, NumPy ndarray, scalar等呈现数组形式的数据from_numpy(ndarray)
将一个numpy.ndarray转换为Tensor。注意这一函数的两个数据对象占用同一储存空间,修改后变化也会体现在另一对象上zeros(*size, *, out=None, dtype=None, layout=torch.strided, device=None, requires_grad=False)
返回一个尺寸为size的Tensor,所有元素都为0ones(*size, *, out=None, dtype=None, layout=torch.strided, device=None, requires_grad=False)
返回一个尺寸为size的Tensor,所有元素都为1ones_like(input, *, dtype=None, layout=None, device=None, requires_grad=False, memory_format=torch.preserve_format)
返回一个与input有相同尺寸的Tensor,所有元素都为1arange(start=0, end, step=1, *, out=None, dtype=None, layout=torch.strided, device=None, requires_grad=False)
示例:
>>> torch.arange(5)
tensor([ 0,  1,  2,  3,  4])
>>> torch.arange(1, 4)
tensor([ 1,  2,  3])
>>> torch.arange(1, 2.5, 0.5)
tensor([ 1.0000,  1.5000,  2.0000])
eye(n, m=None, *, out=None, dtype=None, layout=torch.strided, device=None, requires_grad=False):返回对角矩阵,n是行数,m是列数(如无默认方阵)
>>> torch.eye(3)
tensor([[ 1.,  0.,  0.],
        [ 0.,  1.,  0.],
        [ 0.,  0.,  1.]])
empty(shape,dtype)会有误差,可能显示为一个极小数
1.1.2 Indexing, Slicing, Joining, Mutating Ops
concat():和cat()功能相同cat(tensors, dim=0, *, out=None)
串接tensors(一串Tensor,非空Tensor在非dim维度必须形状相同),返回结果reshape(input, shape)
示例:
>>> a = torch.arange(4.)
>>> torch.reshape(a, (2, 2))
tensor([[ 0.,  1.],
        [ 2.,  3.]])
>>> b = torch.tensor([[0, 1], [2, 3]])
>>> torch.reshape(b, (-1,))
tensor([ 0,  1,  2,  3])
squeeze(input, dim=None, *, out=None)
去掉input(Tensor)中长度为1的维度,返回这个Tensor。如果有dim就只对指定维度进行squeeze操作。
返回值与input共享储存空间。
示例代码:
>>> x = torch.zeros(2, 1, 2, 1, 2)
>>> x.size()
torch.Size([2, 1, 2, 1, 2])
>>> y = torch.squeeze(x)
>>> y.size()
torch.Size([2, 2, 2])
>>> y = torch.squeeze(x, 0)
>>> y.size()
torch.Size([2, 1, 2, 1, 2])
>>> y = torch.squeeze(x, 1)
>>> y.size()
torch.Size([2, 2, 1, 2])
stack(tensors, dim=0, *, out=None)
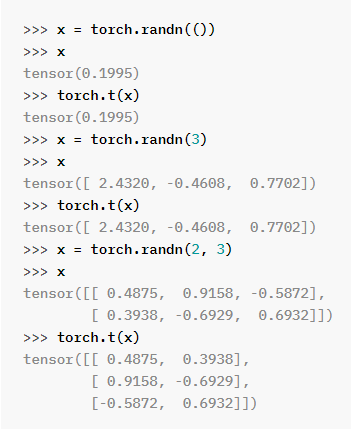
连接tensors(一串形状相同的Tensor),返回结果t(input)
零维和一维input不变,二维input转置(等如transpose(input, 0, 1)),返回结果
示例代码:
transpose(input, dim0, dim1)
返回input转置的Tensor,dim0和dim1交换。
返回值与input共享储存空间。
示例代码:
>>> x = torch.randn(2, 3)
>>> x
tensor([[ 1.0028, -0.9893,  0.5809],
        [-0.1669,  0.7299,  0.4942]])
>>> torch.transpose(x, 0, 1)
tensor([[ 1.0028, -0.1669],
        [-0.9893,  0.7299],
        [ 0.5809,  0.4942]])
unsqueeze(input, dim)
在input指定维度插入一个长度为1的维度,返回Tensor
示例代码:
>>> x = torch.tensor([1, 2, 3, 4])
>>> torch.unsqueeze(x, 0)
tensor([[ 1,  2,  3,  4]])
>>> torch.unsqueeze(x, 1)
tensor([[ 1],
        [ 2],
        [ 3],
        [ 4]])
nonzero(input, *, out=None, as_tuple=False)
①as_tuple=False:返回一个二维Tensor,每一行是一个input非零元素的索引
示例代码:
②as_tuple=True:返回一个由一维索引Tensor组成的tuple(每个元素是一个维度上的索引)>>> torch.nonzero(torch.tensor([1, 1, 1, 0, 1])) tensor([[ 0], [ 1], [ 2], [ 4]]) >>> torch.nonzero(torch.tensor([[0.6, 0.0, 0.0, 0.0], ... [0.0, 0.4, 0.0, 0.0], ... [0.0, 0.0, 1.2, 0.0], ... [0.0, 0.0, 0.0,-0.4]])) tensor([[ 0, 0], [ 1, 1], [ 2, 2], [ 3, 3]])
示例代码:>>> torch.nonzero(torch.tensor([1, 1, 1, 0, 1]), as_tuple=True) (tensor([0, 1, 2, 4]),) >>> torch.nonzero(torch.tensor([[0.6, 0.0, 0.0, 0.0], ... [0.0, 0.4, 0.0, 0.0], ... [0.0, 0.0, 1.2, 0.0], ... [0.0, 0.0, 0.0,-0.4]]), as_tuple=True) (tensor([0, 1, 2, 3]), tensor([0, 1, 2, 3])) >>> torch.nonzero(torch.tensor(5), as_tuple=True) (tensor([0]),)where()where(condition)和torch.nonzero(condition, as_tuple=True)相同
1.2 Generators
1.3 Random Sampling
manual_seed(seed)randperm(n, *, generator=None, out=None, dtype=torch.int64, layout=torch.strided, device=None, requires_grad=False, pin_memory=False):返回0-n-1整数的一个随机permutation
示例:
>>> torch.randperm(4)
tensor([2, 1, 0, 3])
1.3.1 torch.default_generator
返回默认的CPU torch.Generator
rand(*size, *, out=None, dtype=None, layout=torch.strided, device=None, requires_grad=False)
返回一个尺寸为size的Tensor,所有元素通过[0,1)的均匀分布采样生成rand_like(input, *, dtype=None, layout=None, device=None, requires_grad=False, memory_format=torch.preserve_format)
返回一个跟input有相同尺寸的Tensor,所有元素通过[0,1)的均匀分布采样生成randn_like(input, *, dtype=None, layout=None, device=None, requires_grad=False, memory_format=torch.preserve_format)
返回一个跟input有相同尺寸的Tensor,所有元素通过平均值0、方差1的正态分布采样生成
1.3.2 In-place random sampling
1.3.3 Quasi-random sampling
1.4 Serialization
save(obj, f, pickle_module=pickle, pickle_protocol=2, _use_new_zipfile_serialization=True)load(f, map_location=None, pickle_module=pickle, **pickle_load_args)
map_location:可以是函数、torch.device、字符串或字典,指定对象存储的设备位置。
如将对象放到CPU上:torch.load('tensors.pt', map_location=torch.device('cpu'))
1.5 Parallelism
1.6 Locally disabling gradient computation
torch.no_grad:上下文管理器,可以用with语句或修饰器实现。用于关闭梯度计算
示例代码:
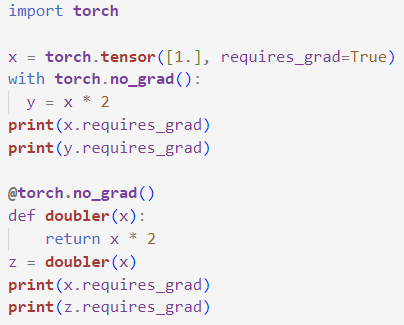
输出:

1.7 Math operations
1.7.1 Pointwise Ops
add()返回结果Tensoradd(input, other, *, out=None)
other是标量,对input每个元素加上otheradd(input, other, *, alpha=1, out=None)
other是Tensor,other先逐元素乘标量alpha再逐元素加input- 直接使用加号能起到同样的效果。示例代码:

输出:
clamp(input, min=None, max=None, *, out=None)
将input中的元素限制在[min,max]范围内。示例代码:

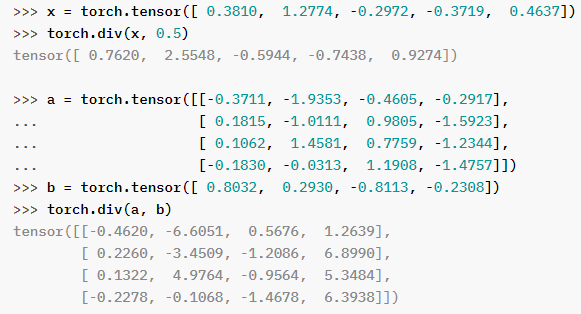
div(input, other, *, rounding_mode=None, out=None)
逐元素相除:
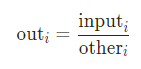
支持广播机制。
代码示例:
mul(input, other, *, out=None)
若other是标量:对input每个元素乘以other
若other是Tensor:input和other逐元素相乘(点乘)
返回结果Tensor
(和*表现相同,都是element-wise乘法)tanh(input, *, out=None)
对input逐元素做tanh运算。返回Tensor
1.7.2 Reduction Ops
-
argmax()argmax(input, dim, keepdim=False):返回对应维度最大值的索引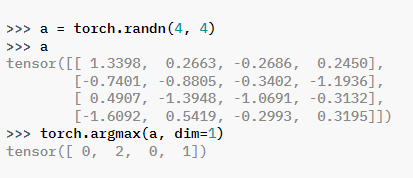
-
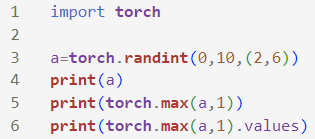
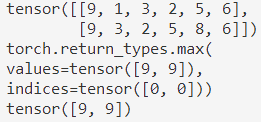
max()max(input)max(input, dim, keepdim=False, *, out=None)
示例代码和输出:
max(input, other, *, out=None)见1.7.3maximum()
-
sum(input, *, dtype=None)
返回input(Tensor)中所有元素的加和,返回Tensor
dtype是期望返回值的dtype -
mean(input)
返回input(Tensor)中所有元素的平均值,返回Tensor -
norm(input, p='fro', dim=None, keepdim=False, out=None, dtype=None)
返回input范数。
已经deprecated,建议改用:torch.linalg.norm()或torch.linalg.vector_norm()或torch.linalg.matrix_norm()- input必须是浮点或复数
- p
’fro’和2一样,就是二范数(元素平方求和开根)
-
unique(input, sorted=True, return_inverse=False, return_counts=False, dim=None)
返回input(Tensor)中的去重元素,返回Tensor或tuple(元素是Tensor)
return_counts:是否同时返回元素值的总数

-
count_nonzero(input, dim=None):计算input张量指定维度的非0值数目。如不指定维度,将计算整个张量的非0值。
>>> x = torch.zeros(3,3)
>>> x[torch.randn(3,3) > 0.5] = 1
>>> x
tensor([[0., 1., 1.],
        [0., 0., 0.],
        [0., 0., 1.]])
>>> torch.count_nonzero(x)
tensor(3)
>>> torch.count_nonzero(x, dim=0)
tensor([0, 1, 2])
1.7.3 Comparison Ops
maximum(input, other, *, out=None)
逐元素计算input和other中较大的元素
1.7.4 Spectral Ops
1.7.5 Other Operations
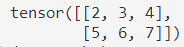
flatten(input, start_dim=0, end_dim=- 1)
示例:
>>> t = torch.tensor([[[1, 2],
...                    [3, 4]],
...                   [[5, 6],
...                    [7, 8]]])
>>> torch.flatten(t)
tensor([1, 2, 3, 4, 5, 6, 7, 8])
>>> torch.flatten(t, start_dim=1)
tensor([[1, 2, 3, 4],
        [5, 6, 7, 8]])
1.7.6 BLAS and LAPACK Operations
matmul(input, other, *, out=None)
对input和other两个Tensor做矩阵乘法(叉乘/叉积)
可以broadcastmm(input, mat2, *, out=None):对input和mat2做矩阵乘法
不能broadcast
支持部分稀疏张量,支持TensorFloat32.
1.8 Utilities
2. torch.nn
- Parameter:Tensor的子类,但是加到模型中后可以自动被分配为Module的属性,被加进parameters中
2.1 Containers
- Module
所有神经网络单元的基本类,神经网络模型应当是Module的子类。可以在Module对象里面放Module对象(以树形结构存储),在__init__方法中将这些子Module定义为属性即可add_module(name, module)
增加子mocule,可以用name当成attribute来调取eval()
将Module设置为evaluation mode,相当于self.train(False)。half():半精度,用法就是model = model.half().cuda()2,原理可参考这篇博文:【半精度】Pytorch模型加速和减少显存_model.half()_木盏的博客-CSDN博客parameters(recurse=True)
返回Module参数(一堆Tensor)的迭代器,一般都是用来传入优化器的train(mode=True)
如果入参为True,则将Module设置为training mode,training随之变为True;反之则设置为evaluation mode,training为False。zero_grad(set_to_none=False)
设置所有模型参数的梯度为0,类似于21.2 优化器的zero_grad()
- Sequential(*args)
顺序容器。Module就按照被传入构造器的顺序添加。也可以传入ordered dict
示例代码:
# Example of using Sequential
model = nn.Sequential(
          nn.Conv2d(1,20,5),
          nn.ReLU(),
          nn.Conv2d(20,64,5),
          nn.ReLU()
        )

# Example of using Sequential with OrderedDict
model = nn.Sequential(OrderedDict([
          ('conv1', nn.Conv2d(1,20,5)),
          ('relu1', nn.ReLU()),
          ('conv2', nn.Conv2d(20,64,5)),
          ('relu2', nn.ReLU())
        ]))
- ModuleList(modules=None)
以类似list的形式储存submodules。可以像标准list一样切片,但被包含的modules会自动注册,且对所有Module方法都是可见的。
示例代码:
class MyModule(nn.Module):
    def __init__(self):
        super(MyModule, self).__init__()
        self.linears = nn.ModuleList([nn.Linear(10, 10) for i in range(10)])

    def forward(self, x):
        # ModuleList can act as an iterable, or be indexed using ints
        for i, l in enumerate(self.linears):
            x = self.linears[i // 2](x) + l(x)
        return x
MyModule就是有10层线性网络的神经网络模型了。
2.2 Convolution Layers
- class Conv2d(in_channels, out_channels, kernel_size, stride=1, padding=0, dilation=1, groups=1, bias=True, padding_mode=‘zeros’)
在输入信号(由几个平面图像构成)上应用2维卷积
2.3 Pooling layers
2.4 Padding Layers
2.5 Non-linear Activations (weighted sum, nonlinearity)
- class ReLU(inplace=False)
逐元素应用修正线性单元(ReLU: R e L U ( x ) = ( x ) + = m a x ( 0 , x ) ReLU(x)=(x) ^+ =max(0,x) ReLU(x)=(x)+=max(0,x))
2.6 Non-linear Activations (other)
- class LogSoftmax(dim=None)
2.7 Normalization Layers
- class BatchNorm1d(num_features, eps=1e-05, momentum=0.1, affine=True, track_running_stats=True)
batch normalization3
2.8 Recurrent Layers
- class GRU
2.9 Transformer Layers
2.10 Linear Layers
- class Linear(in_features, out_features, bias=True)
对输入信号进行一个线性转换: y = x A T + b y = xA^T + b y=xAT+b
2.11 Dropout Layers
- class torch.nn.Dropout4(p=0.5, inplace=False)
在训练过程中,随机将input tensor以概率为p的伯努利分布置0。每一次forward call独立。
这一方法被证明对正则化和防止co-adaptation of neurons(我还不知道这是啥意思)有效,文献:Improving neural networks by preventing co-adaptation of feature detectors
此外,训练时输出会乘以 1 1 − p \frac{1}{1-p} 1−p1,则在评估模型时直接输出结果即可。
2.12 Sparse Layers
- class torch.nn.Embedding(num_embeddings, embedding_dim, padding_idx=None, max_norm=None, norm_type=2.0, scale_grad_by_freq=False, sparse=False, _weight=None)
embedding词典。相当于一个大矩阵,每一行存储一个word的embedding。Embedding.weight是这个矩阵的值(Tensor),weight.data可以改变该值。
输入是索引的列表(IntTensor或LongTensor),输出是对应的词嵌入(尺寸为 (input尺寸,embedding_dim) )。
num_embeddings是词典长度(int)。
embedding_dim是表示向量维度(int)。weight:尺寸为 (num_embeddings, embedding_dim) ,从 N ( 0 , 1 ) \mathcal{N}(0,1) N(0,1) 中初始化数据。
示例代码:
>>> # an Embedding module containing 10 tensors of size 3
>>> embedding = nn.Embedding(10, 3)
>>> # a batch of 2 samples of 4 indices each
>>> input = torch.LongTensor([[1,2,4,5],[4,3,2,9]])
>>> embedding(input)
tensor([[[-0.0251, -1.6902,  0.7172],
         [-0.6431,  0.0748,  0.6969],
         [ 1.4970,  1.3448, -0.9685],
         [-0.3677, -2.7265, -0.1685]],

        [[ 1.4970,  1.3448, -0.9685],
         [ 0.4362, -0.4004,  0.9400],
         [-0.6431,  0.0748,  0.6969],
         [ 0.9124, -2.3616,  1.1151]]])
2.13 Distance Functions
2.14 Loss Functions
2.15 Vision Layers
2.16 Shuffle Layers
2.17 DataParallel Layers (multi-GPU, distributed)
2.18 Utilities
- class
utils.rnn.PackedSequence(data, batch_sizes=None, sorted_indices=None, unsorted_indices=None) utils.rnn.pack_padded_sequence(input, lengths, batch_first=False, enforce_sorted=True):将pad后的张量打包为PackedSequence对象utils.rnn.pad_packed_sequence(sequence, batch_first=False, padding_value=0.0, total_length=None):将PackedSequence对象解压为pad后的张量utils.rnn.pad_sequence(sequences, batch_first=False, padding_value=0.0):pad张量nn.utils.rnn.pack_sequence(sequences, enforce_sorted=True):将序列打包为PackedSequence对象
2.19 Quantized Functions
2.20 Lazy Modules Initialization
3. torch.nn.functional
3.1 Convolution functions
3.2 Pooling functions
max_pool2d()
在输入信号(由几个平面图像构成)上应用2维最大池化
3.3 Non-linear activation functions
relu(input, inplace=False)
逐元素应用修正线性单元(ReLU: ReLU ( x ) = ( x ) + = max ( 0 , x ) \text{ReLU}(x)=(x) ^+ =\max(0,x) ReLU(x)=(x)+=max(0,x))log_softmax(input, dim=None, _stacklevel=3, dtype=None)
3.4 Linear functions
3.5 Dropout functions
dropout[^5](input, p=0.5, training=True, inplace=False)
如training入参置True,在训练过程中,随机将input tensor以概率为p的伯努利分布置0。详情参考nn.Dropout
4. torch.Tensor
Tensor是一个多维数组,只能包含一种类型的数据。
4.1 Data types
4.2 Initializing and basic operations
4.3 Tensor class reference
- Tensor.T:返回Tensor的转置矩阵(仅建议用于二维矩阵,更高维度的张量未来将不支持)
new_ones(size, *, dtype=None, device=None, requires_grad=False, layout=torch.strided, pin_memory=False):返回和size尺寸一样、默认dtype和device与输入Tensor相同的Tensoradd(other, *, alpha=1)见1.7.1add()add_(other, *, alpha=1)add(other, *, alpha=1)的原地版本contiguous(memory_format=torch.contiguous_format)
返回和self一样,但是在memory tensor上contiguous5的Tensor。如果self已经在指定的memory format上,将直接返回self。copy_(src, non_blocking=False)
复制src,返回结果count_nonzero(dim=None)(见torch.count_nonzero()- device Tensor所处的torch.device(见5.2)
flatten(start_dim=0, end_dim=- 1)见 torch.flatten()get_device()对于在cuda上的Tensor,返回其device ordinal;对于在CPU上的Tensor,返回RuntimeErroris_contiguous(memory_format=torch.contiguous_format):若self在存储上以memory_format定义的顺序contiguous5,则返回Trueitem():返回仅有一个元素的Tensor的元素值。这个操作是不可微的。
示例:
>>> x = torch.tensor([1.0])
>>> x.item()
1.0
long(memory_format=torch.preserve_format):等如to(torch.int64)masked_fill_(mask, value)masked_fill(mask, value)matmul(tensor2)@张量矩阵乘法(叉乘/叉积),支持广播(总之这个还挺复杂的,大概可以理解说,如果维度大于2,则最后二维进行矩阵乘法,之前的维度都是batch维度,可参考6)mean(dim=None, keepdim=False)
返回Tensor或(Tensor, Tensor),见1.7.2mean()mul(value)*见1.7.1mul()(点乘/点积)numpy()返回numpy.ndarray格式的Tensor,注意这一函数的两个数据对象占用同一储存空间,修改后变化也会体现在另一对象上repeat(*sizes)*sizes可以是torch.Size或int。如果是torch.Size的话,比较像是在torch.Size的空张量里面每个元素放一个原Tensor。
复制原始数据并返回一个新张量。
>>> x = torch.tensor([1, 2, 3])
>>> x.repeat(4, 2)
tensor([[ 1,  2,  3,  1,  2,  3],
        [ 1,  2,  3,  1,  2,  3],
        [ 1,  2,  3,  1,  2,  3],
        [ 1,  2,  3,  1,  2,  3]])
>>> x.repeat(4, 2, 1).size()
torch.Size([4, 2, 3])
reshape(*shape)见 torch.reshapescatter_(dim, index, src, reduce=None)
是gather()的反向操作
self, index和src(如是Tensor,维度数必须相同。其他要求略)
将src中的所有元素值搬到self上(具体放置方式根据reduce来定),按照index中的索引来放。
具体来说,对于src的每个元素,如果是dim维度,则按照index索引来放;如果不是dim维度,则按照原维度来放。
如对于三维张量,reduce=None的更新形式就是:
self[index[i][j][k]][j][k] = src[i][j][k]  # if dim == 0
self[i][index[i][j][k]][k] = src[i][j][k]  # if dim == 1
self[i][j][index[i][j][k]] = src[i][j][k]  # if dim == 2
reduce=‘multiply’:
self[index[i][j][k]][j][k] *= src[i][j][k]  # if dim == 0
self[i][index[i][j][k]][k] *= src[i][j][k]  # if dim == 1
self[i][j][index[i][j][k]] *= src[i][j][k]  # if dim == 2
具体示例:
>>> src = torch.arange(1, 11).reshape((2, 5))
>>> src
tensor([[ 1,  2,  3,  4,  5],
        [ 6,  7,  8,  9, 10]])
>>> index = torch.tensor([[0, 1, 2, 0]])
>>> torch.zeros(3, 5, dtype=src.dtype).scatter_(0, index, src)
tensor([[1, 0, 0, 4, 0],
        [0, 2, 0, 0, 0],
        [0, 0, 3, 0, 0]])
>>> index = torch.tensor([[0, 1, 2], [0, 1, 4]])
>>> torch.zeros(3, 5, dtype=src.dtype).scatter_(1, index, src)
tensor([[1, 2, 3, 0, 0],
        [6, 7, 0, 0, 8],
        [0, 0, 0, 0, 0]])

>>> torch.full((2, 4), 2.).scatter_(1, torch.tensor([[2], [3]]),
...            1.23, reduce='multiply')
tensor([[2.0000, 2.0000, 2.4600, 2.0000],
        [2.0000, 2.0000, 2.0000, 2.4600]])
>>> torch.full((2, 4), 2.).scatter_(1, torch.tensor([[2], [3]]),
...            1.23, reduce='add')
tensor([[2.0000, 2.0000, 3.2300, 2.0000],
        [2.0000, 2.0000, 2.0000, 3.2300]])
将数字形式的列表转换为独热编码,参考R-former的代码,可以这样:
law_targets = torch.zeros((10,72))
#labels是尺寸为[10,1]的、取值范围在[0,72)的、元素为整数的Tensor
law_targets.scatter_(1,labels, 1.0)  #每行对应非0元素的索引即为标签值
size()
返回self的size(tuple格式)squeeze(dim=None)
返回一个Tensor,见1.1.2squeeze()sum(dim=None, keepdim=False, dtype=None)
返回一个Tensor,见1.7.2sum()t()见1.1.2t()t_()t()的原地版本to(other, non_blocking=False, copy=False)返回一个和other(Tensor格式)具有相同torch.dtype和torch.device的Tensor
简单举例:- 将CPU上的Tensor移到GPU上
tensor = tensor.to('cuda') - 将Tensor的元素换成整型:
to(torch.int64)
- 将CPU上的Tensor移到GPU上
tolist():将self转换为(nested) list7。对标量则直接返回标准Python数字,和torch.item()相同。如果需要,self会被自动转移到CPU上。这个操作是不可微的。
示例:
>>> a = torch.randn(2, 2)
>>> a.tolist()
[[0.012766935862600803, 0.5415473580360413],
 [-0.08909505605697632, 0.7729271650314331]]
>>> a[0,0].tolist()
0.012766935862600803
transpose(dim0, dim1)
返回Tensor。见1.1.2transpose()tanh()
返回Tensor。见1.7.1tanh()unsqueeze(dim)
返回Tensor,见1.1.2unsqueeze()view(*shape)
返回一个和原Tensor具有相同元素,但形状为shape的Tensorzero_()
将Tensor元素全填成0
5. Tensor Attributes
5.1 torch.dtype
- 显示Tensor中数据的格式
- torch.float32 or torch.float → torch.FloatTensor
5.2 torch.device
表示Tensor的device位置,属性为device type(‘cpu’或’cuda’)和对应device type可选的device ordinal。如果没有device ordinal,则就是device type的当前位置(举例来说,‘cuda’=‘cuda:X’ ,其中X是torch.cuda.current_device() 的返回值)
用一个字符串来赋值示例:
torch.device('cuda:0')
#device(type='cuda', index=0)

torch.device('cpu')
#device(type='cpu')

torch.device('cuda')  # current cuda device
#device(type='cuda')
用字符串和device ordinal来赋值示例:
torch.device('cuda', 0)
#device(type='cuda', index=0)

torch.device('cpu', 0)
#device(type='cpu', index=0)
此外也可以直接用数值作为device ordinal来赋值cuda(这种写法不支持CPU):
torch.device(1)
#device(type='cuda', index=1)
5.3 torch.layout
5.4 torch.memory_format
表示Tensor正在或即将被分配的memory format。
可选项为:
torch.contiguous_formatdense non-overlapping memory。strides以降序表示。torch.channels_lastdense non-overlapping memory。strides以NHWC顺序(strides[0] > strides[2] > strides[3] > strides[1] == 1)表示。torch.preserve_format用于clone()等函数,保留输入Tensor的memory format。如果输入Tensor被分配了dense non-overlapping memory,输出Tensor的strides就从输入Tensor直接复制。其他情况下输出Tensor的strides和torch.contiguous_format的相同。
5.5 其他文档中没写的属性
- shape(torch.Size格式)
6. Tensor Views
7. torch.autograd
- 自动求导包。可以对任何以标量为值的函数进行求导(神经网络也可以,某个矩阵也可以)
7.1 Functional higher level API
7.2 Locally disabling gradient computation
7.3 Default gradient layouts
7.4 In-place operations on Tensors
7.5 Variable (deprecated)
7.6 Tensor autograd functions
CLASS torch.Tensor
backward(gradient=None, retain_graph=None, create_graph=False, inputs=None)
计算当前Tensor相对于图上叶节点的梯度。
对图的微分使用了链式法则。
如果当前Tensor不是一个标量且需要梯度,就需要指定参数gradient。这个gradient是和当前Tensor形状相同,且包含当前Tensor的梯度detach()
返回一个从当前图中分离下来的Tensor
用于切断反向传播8
7.7 Function
CLASS torch.autograd.Function(*args, **kwargs)
自定义autograd.Function需要subclass autograd.Function,应用forward()和backward()(调用ctx()),调用apply()(不能直接调用forward())
具体的没太看懂,以后研究研究来补充。
示例代码:
class Exp(Function):
    @staticmethod
    def forward(ctx, i):
        result = i.exp()
        ctx.save_for_backward(result)
        return result
    @staticmethod
    def backward(ctx, grad_output):
        result, = ctx.saved_tensors
        return grad_output * result
# Use it by calling the apply method:
output = Exp.apply(input)
7.8 Context method mixins
7.9 Numerical gradient checking
7.10 Profiler
7.11 Anomaly detection
CLASS torch.autograd.detect_anomaly
开启autograd引擎anomaly detection功能的上下文管理器。
功能:
- 运行前向传播时,如开启检测,在运行反向传播时,可以打印前向传播时导致反向传播崩溃的traceback。
- 生成NaN值的反向传播计算操作会raise error。
注意:这一操作仅应在debug阶段开启,因为不同的测试会导致程序运行变慢。
示例代码,不用detect_anomaly:
import torch
from torch import autograd
class MyFunc(autograd.Function):
    @staticmethod
    def forward(ctx, inp):
        return inp.clone()
    @staticmethod
    def backward(ctx, gO):
        # Error during the backward pass
        raise RuntimeError("Some error in backward")
        return gO.clone()
def run_fn(a):
    out = MyFunc.apply(a)
    return out.sum()
inp = torch.rand(10, 10, requires_grad=True)
out = run_fn(inp)
out.backward()
输出:
Traceback (most recent call last):
  File "randomly_try2.py", line 17, in <module>
    out.backward()
  File "virtual_env/lib/python3.8/site-packages/torch/_tensor.py", line 363, in backward
    torch.autograd.backward(self, gradient, retain_graph, create_graph, inputs=inputs)
  File "virtual_env/lib/python3.8/site-packages/torch/autograd/__init__.py", line 173, in backward
    Variable._execution_engine.run_backward(  # Calls into the C++ engine to run the backward pass
  File "virtual_env/lib/python3.8/site-packages/torch/autograd/function.py", line 253, in apply
    return user_fn(self, *args)
  File "randomly_try2.py", line 10, in backward
    raise RuntimeError("Some error in backward")
RuntimeError: Some error in backward
可以看到仅输出在backward()中有错。
示例代码,使用detect_anomaly:
import torch
from torch import autograd
class MyFunc(autograd.Function):
    @staticmethod
    def forward(ctx, inp):
        return inp.clone()
    @staticmethod
    def backward(ctx, gO):
        # Error during the backward pass
        raise RuntimeError("Some error in backward")
        return gO.clone()
def run_fn(a):
    out = MyFunc.apply(a)
    return out.sum()
with autograd.detect_anomaly():
    inp = torch.rand(10, 10, requires_grad=True)
    out = run_fn(inp)
    out.backward()
输出:
randomly_try2.py:15: UserWarning: Anomaly Detection has been enabled. This mode will increase the runtime and should only be enabled for debugging.
  with autograd.detect_anomaly():
virtual_env/lib/python3.8/site-packages/torch/autograd/__init__.py:173: UserWarning: Error detected in MyFuncBackward. Traceback of forward call that caused the error:
  File "randomly_try2.py", line 17, in <module>
    out = run_fn(inp)
  File "randomly_try2.py", line 13, in run_fn
    out = MyFunc.apply(a)
 (Triggered internally at  /opt/conda/conda-bld/pytorch_1646755853042/work/torch/csrc/autograd/python_anomaly_mode.cpp:104.)
  Variable._execution_engine.run_backward(  # Calls into the C++ engine to run the backward pass
Traceback (most recent call last):
  File "randomly_try2.py", line 18, in <module>
    out.backward()
  File "virtual_env/lib/python3.8/site-packages/torch/_tensor.py", line 363, in backward
    torch.autograd.backward(self, gradient, retain_graph, create_graph, inputs=inputs)
  File "virtual_env/lib/python3.8/site-packages/torch/autograd/__init__.py", line 173, in backward
    Variable._execution_engine.run_backward(  # Calls into the C++ engine to run the backward pass
  File "virtual_env/lib/python3.8/site-packages/torch/autograd/function.py", line 253, in apply
    return user_fn(self, *args)
  File "randomly_try2.py", line 10, in backward
    raise RuntimeError("Some error in backward")
RuntimeError: Some error in backward
可以看到能追溯到apply()函数。
- CLASS torch.autograd.set_detect_anomaly(mode)
设置autograd引擎anomaly detection是否开关的上下文管理器。
mode=True时开。可以作为上下文管理器或函数。异常检测功能见detect_anomaly。
参考9,使用如下代码可在NaN出现时报错,定位错误代码:
import torch
# 正向传播时:开启自动求导的异常侦测
torch.autograd.set_detect_anomaly(True)

# 反向传播时:在求导时开启侦测
with torch.autograd.detect_anomaly():
	loss.backward()
7.12 Saved tensors default hooks
8. torch.cuda
- 会自动导入
is_available()查看CUDA能不能用,返回布尔值current_device()返回当前被选device的索引
8.1 Random Number Generator
manual_seed(seed)
设置当前GPU的随机种子,如果cuda不可用会自动忽略。manual_seed_all(seed)
设置所有GPU的随机种子,如果cuda不可用会自动忽略。
9. torch.cuda.amp
10. torch.backends
10.1 torch.backends.cuda
10.2 torch.backends.cudnn
- torch.backends.cudnn.deterministic
布尔值,if True, causes cuDNN to only use deterministic convolution algorithms.
11. torch.distributed
12. torch.distributions
13. torch.fft
14. torch.futures
15. torch.fx
16. torch.hub
17. torch.jit
18. torch.linalg
19. torch.overrides
20. torch.profiler
21. torch.nn.init
这一部分的主要功能是初始化神经网络的参数。
绝大多数torch.nn中的网络层都是自带reset_parameters()函数,会自动初始化参数。
在这个问题:python 3.x - Reset parameters of a neural network in pytorch - Stack Overflow中给出了一种重置网络参数的示例代码:
for layer in model.children():
   if hasattr(layer, 'reset_parameters'):
       layer.reset_parameters()
关于神经网络参数的初始化,更多简单的细节可以参考这些博文:
【pytorch参数初始化】 pytorch默认参数初始化以及自定义参数初始化_华仔的博客-CSDN博客_pytorch参数初始化
【Pytorch】各网络层的默认初始化方法_guofei_fly的博客-CSDN博客_pytorch 默认初始化
【Pytorch】模型权重的初始化函数_guofei_fly的博客-CSDN博客_pytorch模型权重初始化
pytorch系列 – 9 pytorch nn.init 中实现的初始化函数 uniform, normal, const, Xavier, He initialization_墨氲的博客-CSDN博客_nn.init.normal_
calculate_gain(nonlinearity, param=None):返回指定非线性函数的推荐gain value。
示例代码:
>>> gain = nn.init.calculate_gain('leaky_relu', 0.2) # leaky_relu with negative_slope=0.2
输出值:1.3867504905630728
xavier_uniform_(tensor, gain=1.0):又名Glorot initialization
用Understanding the difficulty of training deep feedforward neural networks中提出的方法来进行参数初始化:使用均匀分布 U ( − a , a ) \mathcal{U}(−a,a) U(−a,a),其中 a = gain × 6 fan_in + fan_out a = \text{gain} \times \sqrt{\frac{6}{\text{fan\_in} + \text{fan\_out}}} a=gain×fan_in+fan_out6。
示例代码:
w = torch.empty(3, 5)
nn.init.xavier_uniform_(w, gain=nn.init.calculate_gain('relu'))
22. torch.onnx
22. torch.optim
22.1 How to use an optimizer
示例代码:
optimizer = optim.SGD(model.parameters(), lr=0.01, momentum=0.9)
optimizer = optim.Adam([var1, var2], lr=0.0001)
22.2 Algorithms
- class torch.optim.Optimizer(params, defaults)
优化器基类zero_grad(set_to_none=False)
设置所有被放进优化器的参数Tensor的梯度为0
- class torch.optim.SGD(params, lr=, momentum=0, dampening=0, weight_decay=0, nesterov=False)
随机梯度下降
23. Complex Numbers
24. DDP Communication Hooks
25. Pipeline Parallelism
26. Quantization
27. Distributed RPC Framework
28. torch.random
29. torch.sparse
30. torch.Storage
31. torch.utils.benchmark
32. torch.utils.bottleneck
33. torch.utils.checkpoint
34. torch.utils.cpp_extension
35. torch.utils.data
- class Dataset
表示数据集的抽象类。
需要复写__getitem__()(通过key获得一个观测),可以复写__len__() - class DataLoader
用于以mini-batch范式调用数据集
入参:- dataset
- batch_size
- shuffle:置True的话,每次调用都打乱顺序
- collate_fn:对每个batch运行的函数
- pin_memory:默认置False
- drop_last:如果置True且最后一个batch不满batch_size,将直接舍弃最后一个batch。默认置False
36. torch.utils.jit
37. torch.utils.dlpack
38. torch.utils.mobile_optimizer
39. torch.utils.model_zoo
40. torch.utils.tensorboard
41. Type Info
- CLASS torch.finfo:类似numpy.finfo,机器对浮点类型的各项限制
36. 没有文档,但是能用的函数
Tensor.new():定义一个与原Tensor的type和device一致、但没有内容的Tensor
37. 其他正文及尾注中未提及的参考资料
- pytorch的自定义拓展之(三)——torch.autograd.Function的简单定义与案例_LoveMIss-Y的博客-CSDN博客_torch自定义函数
- Debugging feature for “modified by an inplace operation” errors · Issue #15803 · pytorch/pytorch
- About torch.autograd.set_detect_anomaly(True): - autograd - PyTorch Forums
- PyTorch:常见错误 inplace operation - 知乎
- pytorch debug 整理 - 知乎
- Python PyTorch div()用法及代码示例 - 纯净天空
- torch.Tensor的4种乘法_da_kao_la的博客-CSDN博客_tensor乘法
- pytorch 中Tensor.new()的使用_页页读的博客-CSDN博客_tensor.new
- pytorch: tensor的拆分和拼接(split, chunk, cat, stack)_pytorch tensor拆分_傲笑风的博客-CSDN博客
有关optimizer.param_groups用法的示例分析_xxmy7的博客-CSDN博客_optimizer.param_groups ↩︎
batch normalization出自S. Loffe, C.Szegedy. Batch Normalization: Accelerating Deep Network Training by Reducing Internal Covariate Shift, ICML 2015
我在之前写的博文中对batch normalization做过介绍(第2部分序号9):cs224w(图机器学习)2021冬季课程学习笔记9 Graph Neural Networks 2: Design Space_诸神缄默不语的博客-CSDN博客
此外参考机器学习技巧8: 为什么要 Batch Normalization 批标准化 (深度学习)-教育-高清完整正版视频在线观看-优酷这个视频,视频中称batch normalization层需要放在神经元和激活函数之间。为什么要这么做我还没看。
其他对于batch normalization放在激活函数之前的原因,可参考ChatGPT的回答:在深度学习中,一般将批量归一化(Batch Normalization)放在激活函数之前。这是因为激活函数的输入是经过归一化的数据,可以避免激活函数输入值的变化范围过大,从而提高训练效率和准确性。此外,将批量归一化放在激活函数之后可能会破坏激活函数的非线性特性,导致模型性能下降。因此,一般建议在神经网络中,批量归一化应该放在激活函数之前。(关于batchnorm放在激活函数之前的最高指示) ↩︎dropout方法,我在之前写的博文中对batch normalization做过介绍(第2部分序号10):cs224w(图机器学习)2021冬季课程学习笔记9 Graph Neural Networks 2: Design Space_诸神缄默不语的博客-CSDN博客
关于模型处于训练阶段还是测试阶段的入参,以及对PyTorch应用dropout更深一步的介绍,可以参考我之前写的博文:PyTorch的F.dropout为什么要加self.training?_诸神缄默不语的博客-CSDN博客_dropout training
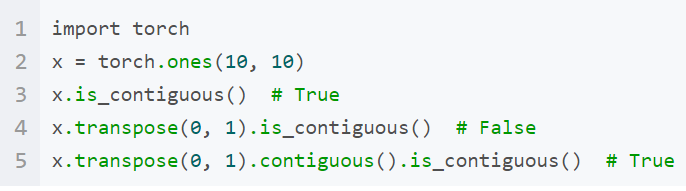
关于训练阶段和测试阶段的概率问题,我只简单浏览过相关文章,没有认真看过。以后看了再回来讲解。 ↩︎参考资料:PyTorch中的contiguous - 知乎
contiguous 本身是形容词,表示连续的。在PyTorch的Tensor上指其底层一维数组元素的存储顺序与Tensor按行优先一维展开的元素顺序是否一致。某些Tensor操作会导致Tensor不再按照行优先顺序来存储,如果需要让它重新变得连续,需要使用contiguous()函数。
view()等方法就需要Tensor连续。如果不关心底层数据是否使用了新的内存,则使用reshape()方法更方便(因为不再需要考虑contiguous问题)。
关于PyTorch为什么不在view()方法中内置contiguous()方法,感兴趣可以去看:view() after transpose() raises non contiguous error · Issue #764 · pytorch/pytorch
另一篇文章:pytorch contiguous 相关问题_learning notes-CSDN博客
给出比较清晰的示例:
上述博文中涉及的其他参考资料,我还没看:
①python - What is the difference between contiguous and non-contiguous arrays? - Stack Overflow
②c++ - What is a “cache-friendly” code? - Stack Overflow
③计算机缓存Cache以及Cache Line详解 - 知乎
④python - How to understand numpy strides for layman? - Stack Overflow
⑤python - Munging PyTorch’s tensor shape from (C, B, H) to (B, C*H) - Stack Overflow
⑥Numpy文档:Internal memory layout of an ndarray
⑦从Numpy中的ascontiguousarray说起 | Yunfeng’s Simple Blog
⑧python - PyTorch - What does contiguous() do? - Stack Overflow ↩︎ ↩︎nested list就是list嵌套list。可参考:What are nested lists in Python? ↩︎
参考资料:pytorch .detach() .detach_() 和 .data用于切断反向传播 - 慢行厚积 - 博客园 没太看懂,大概是这么回事吧
pytorch的两个函数 .detach() .detach_() 的作用和区别_python detach_LoveMIss-Y的博客-CSDN博客 ↩︎


 132
132

 被折叠的 条评论
为什么被折叠?
被折叠的 条评论
为什么被折叠?
 到【灌水乐园】发言


