


Advanced manufacturing is developing rapidly, and a large number of products use complex curved surfaces. There are urgent needs for product modeling and design, reverse search, competitive product analysis, and testing. How can manufacturers obtain high-quality 3D data efficiently and accurately for product development, design, and quality? Control, all involve the application of three-dimensional optical measurement technology.
In order to obtain better 3D data quality, you need to master some necessary skills when using 3D scanning products, so as to better improve scanning accuracy and efficiency, and improve product quality. Next, I will share with you the working skills that need to be prepared before 3D scanning .
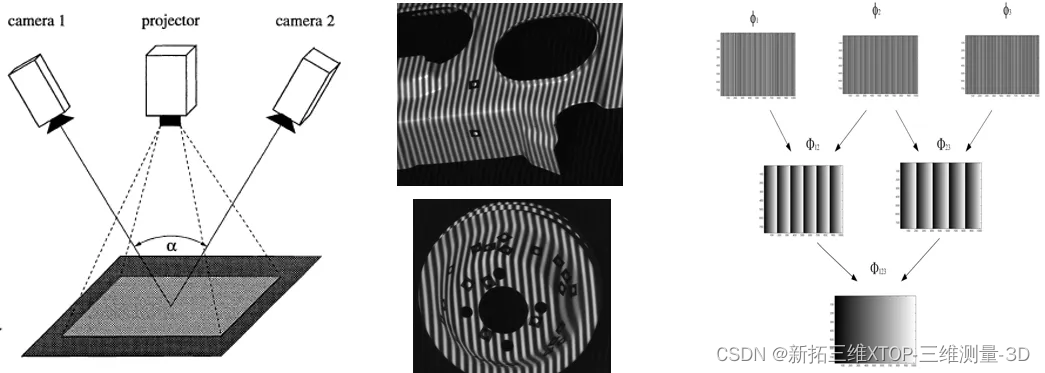
Introduction to 3D optical scanning technology
During measurement, the grating projection device projects multiple multi-frequency gratings onto the object to be measured ( multi-frequency heterodyne phase shift technology ). Two cameras at a certain angle simultaneously acquire corresponding images, and then decode and phase calculate the images. , and use stereo matching technology and triangulation principle to calculate the three-dimensional coordinates of pixels in the common view area of the two cameras.
Camera warms up when device is powered on
Three-dimensional optical surface scanning products are precision instruments. Before starting up the equipment, it is recommended to warm up the camera for 10-15 minutes . After the equipment is powered on, leave it for 10-15 minutes to heat it to a stable working temperature, and the measurement data will be more stable. and reliable.
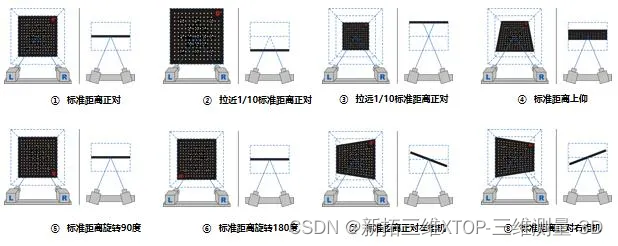
Series calibration principles and steps
Calibration is to calculate all internal and external structural parameters of the measuring head with the help of the standard calibration plate configured in the system. There are coded points and non-coded points distributed according to certain rules on the calibration board, with two scale information. The scale is the distance between the two diagonal mark points on the calibration board. The back of the calibration plate is marked with detailed scale and parameter information.
3D scan preprocessing
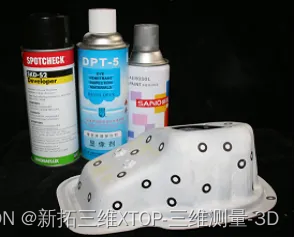
Which samples need to be powder coated?
The scanning device can receive the reflected light from the object being measured, which is a necessary condition for obtaining three-dimensional data. Generally speaking, for high scanning accuracy requirements, it is recommended to powder-spray the surface, especially the following black rusty, transparent, and reflective objects, to improve scanning accuracy.
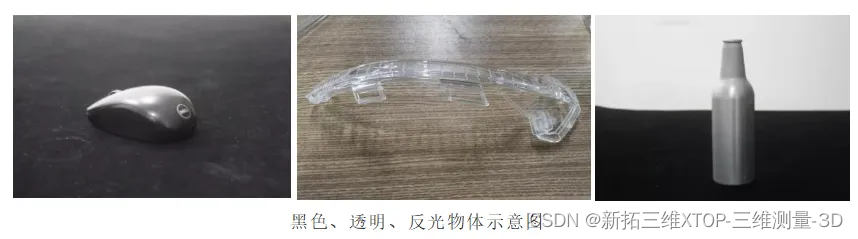
Black objects, reflective objects and light-transmitting objects cannot meet the principle requirements of reflection-reception of light. The powder spraying process can remove as many interfering factors as possible , such as color differences, reflection differences, textures, etc., resulting in higher measurement accuracy.
For powder spraying during scanning, developer must be used. The function of the developer is to attach a layer of white powder to the surface of the object being scanned, changing the surface properties of the workpiece material, which is beneficial to the acquisition of high-quality data by the scanning equipment.
Will powder spraying affect accuracy?
Workpiece inspection has strict requirements on accuracy. Does powder spraying have an impact on accuracy? In order to verify this problem, we conducted tests using DPT-5 and titanium powder. Xintuo 3D XTOM industrial-grade 3D scanner is used as the testing equipment, and the ceramic blocks are sprayed with DPT-5/titanium powder multiple times to test the impact on accuracy.
After testing, the following results were obtained:
1. Spraying different imaging agents has different effects on accuracy. Titanium powder has the least impact on the results. For samples with high scanning accuracy, it is recommended to spray titanium powder;
2. When titanium powder is sprayed, the size increases by 1~2um, and when DPT-5 is sprayed, the size increases by 5~6um.
How does powder spraying work?
Hold the developer spray bottle, press and hold the nozzle to spray the developer on the surface of the workpiece, and control the spraying effect by holding the hand angle and sliding speed.
Operation process (taking DP5-5 as an example):
1. Shake the developer evenly
2. When spraying the developer, press and hold the nozzle at a distance of about 15-20cm across the surface of the workpiece at a constant speed, and spray back and forth until the entire workpiece is covered. (Try not to touch the workpiece during the spraying process to avoid affecting the spraying effect.)
3. After spraying is completed, the developer should evenly cover the workpiece and the surface should be smooth.
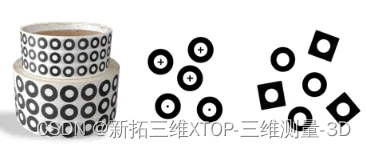
Use of measuring format mark points
The landmark points are the circular points used for coordinate conversion for automatic splicing of multi-view scans. According to the needs of the measurement project, the marker points can be made into black dots on a white background, white dots on a black background, crosshairs or small dots in the center, etc. Currently, the most commonly used marker points are white dots on a black background.
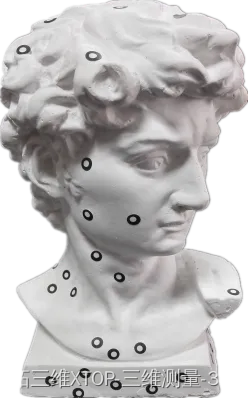
Tips for pasting points on 3D scans
In actual pasting, according to the characteristics of the workpiece, there are two main types of pasting situations we encounter. One is that the marker points can be directly pasted on the surface of the workpiece, and the other is that the marker points cannot be directly pasted and need to be " Use "post points."
the first sort
Marking points are pasted on the surface of the workpiece
For most workpiece measurements, marker points can be directly pasted. During the scanning process, the position of the marker points relative to the workpiece remains unchanged, and splicing accuracy is guaranteed. Increased spatial freedom control; ensuring the accuracy of overall coordinate splicing and matching success rate;
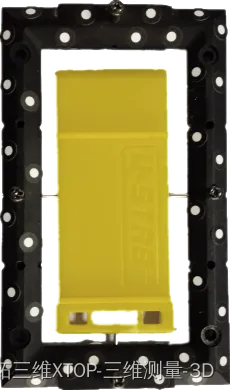
Category 2
Marking points are pasted on the outside of the workpiece
- Paste mark points on the turntable ;
for some workpieces with complex structural features and diverse contours, it is impossible to completely paste points on the model. At this time, you need to use the background or some fixtures to paste the points to achieve the purpose of splicing and scanning. It is convenient to scan objects from different angles; the landmark points arranged on the platform will be spliced as a common landmark point benchmark;

2. Rely on measurement frame marking points
For small and complex work, if it cannot be scanned completely on the turntable, the workpiece needs to be clamped in a fixture that has measured the coordinates of the global landmark points in advance. The workpiece should be fixed and the global coordinate points should be imported as the splicing reference before measurement to improve the measurement accuracy. It is clamped in a frame in which the coordinates of global landmark points have been measured in advance; global coordinate points are imported as splicing benchmarks before measurement to improve measurement accuracy;
After completing the above preparations, you can turn on the 3D scanner measuring head for scanning. Through the introduction of this article, will you have a clearer understanding of the preparation skills for 3D surface scanning? If you have anything you don’t understand about scanner operating techniques, please feel free to leave a message or email to consult our technical engineers. Thank you everyone ~


 2万+
2万+


 被折叠的 条评论
为什么被折叠?
被折叠的 条评论
为什么被折叠?
 到【灌水乐园】发言


