


 这篇博客介绍了如何在PyTorch中使用Grad-CAM和其他相关方法(如Score-CAM)来可视化卷积神经网络(CNN)和Swin Transformer的类激活图。它提供了详细的代码示例,展示了如何选择目标层,以及如何应用平滑技术以获得更好的可视化效果。此外,还特别讨论了Swin Transformer中如何选择正确的目标层和重塑变换。
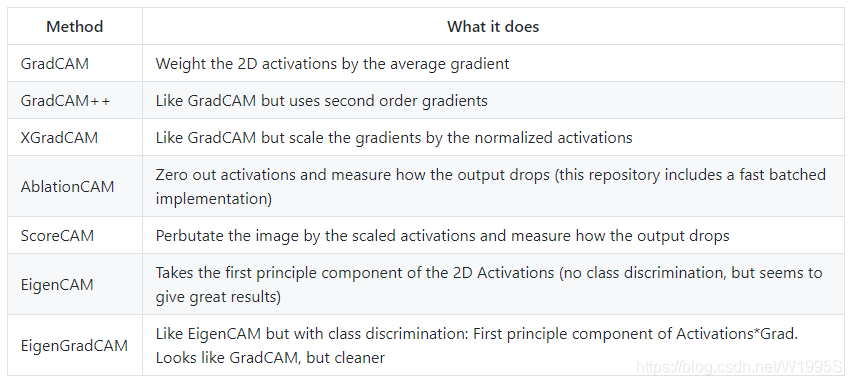
Class Activation Map methods implemented in Pytorch
https://github.com/jacobgil/pytorch-grad-cam
pip install grad-cam
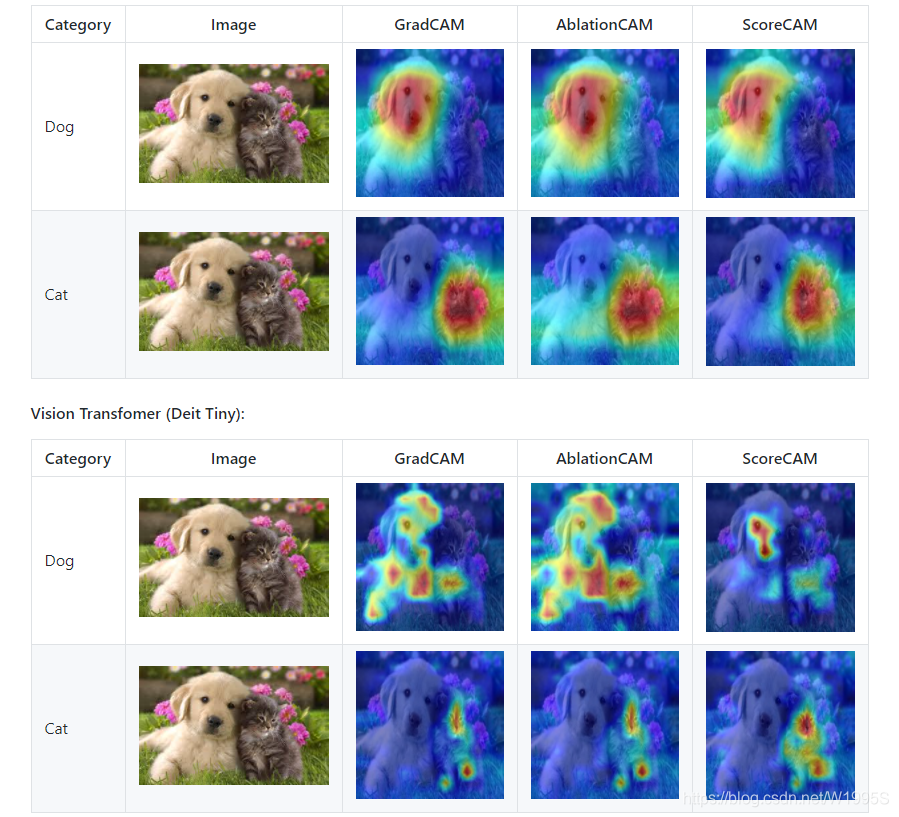
⭐在许多常见的CNN网络和视觉变压器上进行了测试。
⭐包括使CAM看起来不错的平滑方法。
⭐全面支持所有方法中的图像批处理。
More Visual Examples
选择目标层
您需要选择要为其计算CAM的目标层。 一些常见的选择是:
- Resnet18 and 50: model.layer4[-1]
- VGG and densenet161: model.features[-1]
- mnasnet1_0: model.layers[-1]
- ViT: model.blocks[-1].norm1
- SwinT: model.layers[-1].blocks[-1].norm1
Using from code as a library
from pytorch_grad_cam import GradCAM, ScoreCAM, GradCAMPlusPlus, AblationCAM, XGradCAM, EigenCAM
from pytorch_grad_cam.utils.image import show_cam_on_image
from torchvision.models import resnet50

model = resnet50(pretrained=True)
target_layer = model.layer4[-1]
input_tensor = # Create an input tensor image for your model..
# Note: input_tensor can be a batch tensor with several images!

# Construct the CAM object once, and then re-use it on many images:
cam = GradCAM(model=model, target_layer=target_layer, use_cuda=args.use_cuda)

# If target_category is None, the highest scoring category
# will be used for every image in the batch.
# target_category can also be an integer, or a list of different integers
# for every image in the batch.
target_category = 281

# You can also pass aug_smooth=True and eigen_smooth=True, to apply smoothing.
grayscale_cam = cam(input_tensor=input_tensor, target_category=target_category)

# In this example grayscale_cam has only one image in the batch:
grayscale_cam = grayscale_cam[0, :]
visualization = show_cam_on_image(rgb_img, grayscale_cam)
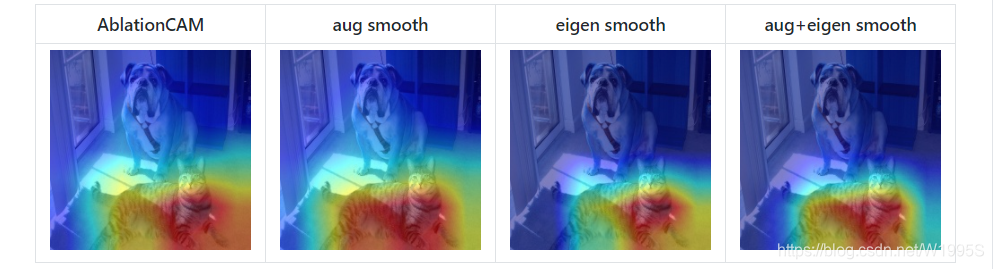
Smoothing to get nice looking CAMs
为了减少CAM中的噪声并使之更好地适合对象,支持两种平滑方法:
-
aug_smooth=True
测试时间增加:将运行时间增加x6。
应用水平翻转的组合,并以[1.0,1.1,0.9]固定图像。
这具有使CAM更好地围绕对象居中的效果。 -
eigen_smooth=True
activations*weights 的第一主要成分
这具有消除大量噪声的效果。
运行示例脚本:
用法:
python cam.py --image-path <path_to_image> --method <method>
要与CUDA一起使用:
python cam.py --image-path <path_to_image> --use-cuda
您可以选择:
GradCAM,ScoreCAM,GradCAMPlusPlus,AblationCAM,XGradCAM,EigenCAM。
诸如ScoreCAM和AblationCAM之类的某些方法需要大量的前向通过,并且具有成批实现。
您可以使用cam.batch_size =来控制批量大小
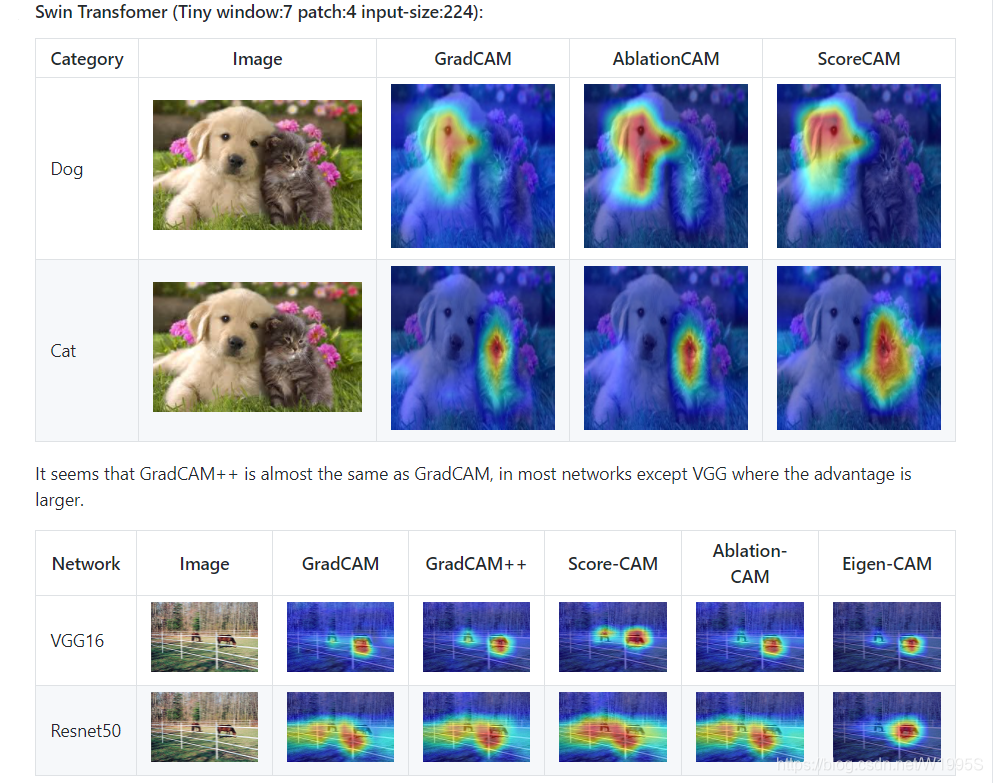
How does it work with Swin Transformers
参见usage_examples / swinT_example.py
在Swin transformer 基础中,图层的输出通常为BATCH x 49 x1024。我们可以将最后49个元素视为具有1024个通道的7x7空间图像。
为了reshape activations 和 gradients为2D空间图像,我们可以向CAM构造函数传递一个reshape_transform函数。
这也可能是将来出现的其他体系结构的起点。
GradCAM(model=model, target_layer=target_layer, reshape_transform=reshape_transform)

def reshape_transform(tensor, height=7, width=7):
    result = tensor.reshape(tensor.size(0),
        height, width, tensor.size(2))

    # Bring the channels to the first dimension,
    # like in CNNs.
    result = result.transpose(2, 3).transpose(1, 2)
    return result
Which target_layer should we chose for Swin Transformers?
由于swin transformer与ViT不同,它不包含ViT中存在的cls_token,因此我们将使用从最后一层的最后一块获得的所有7x7图像。
我们应该选择最后一个关注块之前的任何层,例如:
target_layer = model.layers[-1].blocks[-1].norm1
References
https://arxiv.org/abs/1610.02391
Grad-CAM: Visual Explanations from Deep Networks via Gradient-based Localization Ramprasaath R. Selvaraju, Michael Cogswell, Abhishek Das, Ramakrishna Vedantam, Devi Parikh, Dhruv Batra

https://arxiv.org/abs/1710.11063
Grad-CAM++: Improved Visual Explanations for Deep Convolutional Networks Aditya Chattopadhyay, Anirban Sarkar, Prantik Howlader, Vineeth N Balasubramanian

https://arxiv.org/abs/1910.01279
Score-CAM: Score-Weighted Visual Explanations for Convolutional Neural Networks Haofan Wang, Zifan Wang, Mengnan Du, Fan Yang, Zijian Zhang, Sirui Ding, Piotr Mardziel, Xia Hu

https://ieeexplore.ieee.org/abstract/document/9093360/
Ablation-cam: Visual explanations for deep convolutional network via gradient-free localization. Saurabh Desai and Harish G Ramaswamy. In WACV, pages 972–980, 2020

https://arxiv.org/abs/2008.02312
Axiom-based Grad-CAM: Towards Accurate Visualization and Explanation of CNNs Ruigang Fu, Qingyong Hu, Xiaohu Dong, Yulan Guo, Yinghui Gao, Biao Li

https://arxiv.org/abs/2008.00299
Eigen-CAM: Class Activation Map using Principal Components Mohammed Bany Muhammad, Mohammed Yeasin


 2520
2520

 被折叠的 条评论
为什么被折叠?
被折叠的 条评论
为什么被折叠?
 到【灌水乐园】发言


