


 该代码实现了一个使用OpenCV进行实时摄像头物体检测的系统,通过Canny边缘检测和轮廓分析找到矩形轮廓,计算物体的尺寸和角度,并在图像上实时显示。此外,新增功能允许用户按下'd'键保存并显示物体轮廓的坐标图。
是在检测图片的基础上进行加工的 详情可看opencv图片倾斜度检(一)对图片进行检测
打开摄像头进行实时检测矩形轮廓,实时画出坐标轴坐标点和倾斜度,并且具有保存图片和利用plot单纯画出矩形的功能
直接上全部代码 注释已经比较详细了
如下:
from matplotlib.cm import register_cmap
import matplotlib.pyplot as plt
import cv2
import numpy as np
import imutils
import time
from scipy.spatial import distance as dist

#调用摄像头 函数
def read_usb_capture():
    # 选择摄像头的编号
    cap = cv2.VideoCapture(1, cv2.CAP_DSHOW)# 0是笔记本自带摄像头
    # 添加这句是可以用鼠标拖动弹出的窗体
    cv2.namedWindow('video', cv2.WINDOW_NORMAL)
    while (cap.isOpened()):#循环
        ret, frame = cap.read()#read放回2个值,第一个是True和False 是否打开 第二个是传入图像
        lunkuo(frame)#进行轮廓检测
        cv2.imshow('video', frame)#显示出来
        k = cv2.waitKey(1) & 0xFF#监听键盘
        if k == ord('s'):# 保存键
            cv2.imwrite("1.jpg", frame)
            img = cv2.imread('1.jpg')
            cv2.imshow('img',img)
        # 按下'q'就退出
        if k == ord('q'):#退出键
            break

    # 释放画面
    cap.release()
    cv2.destroyAllWindows()
def midpoint(ptA, ptB):#计算坐标中点函数
    return ((ptA[0] + ptB[0]) * 0.5, (ptA[1] + ptB[1]) * 0.5)
def show(img):  # 显示图片函数
    cv2.imshow('img', img)
    cv2.waitKey(0)
    cv2.destroyAllWindows()

def lunkuo(img):#检测轮廓
    start = time.time()#计算检测时间
    img1_ = cv2.cvtColor(img, cv2.COLOR_BGR2GRAY)  # 转换为灰度
    img_ = cv2.GaussianBlur(img1_, (5, 5), 0)  # 高斯滤波去噪点
    img__ = cv2.Canny(img_, 75, 200)  # Canny边缘检测

    img__ = cv2.dilate(img__, None, iterations=1)#扩张
    img__ = cv2.erode(img__, None, iterations=1)#腐蚀
    # 轮廓检测
    cnts = cv2.findContours(img__.copy(), cv2.RETR_LIST, cv2.CHAIN_APPROX_SIMPLE)  # 检测出所有轮廓
    cnts = cnts[1] if imutils.is_cv3() else cnts[0]  # opencv4写法
    cnts = sorted(cnts, key=cv2.contourArea, reverse=True)[:]  # 排序得到前x个轮廓 可以根据图片自己设定

    #定义全局变量
    global screenCnt,box,rangle
    box = 0
    rangle = 0
    # 我的摄像头分辨率为640*480 在摄像头中框出最合适检测的地方
    cv2.line(img, (595, 45), (595, 435),
             (255, 0, 255), 1)
    cv2.line(img, (45, 435), (595, 435),
             (255, 0, 255), 1)
    cv2.line(img, (45, 45), (45, 435),
             (255, 0, 255), 1)
    cv2.line(img, (45, 45), (595, 45),
             (255, 0, 255), 1)
    cv2.line(img, (45, 45), (595, 45),
             (255, 0, 255), 1)
    cv2.circle(img, (45, 45), 2, (255, 0, 0), -1)#中心点
    cv2.putText(img, "(0,0)",
                (45, 435), cv2.FONT_HERSHEY_SIMPLEX,
                0.5, (0, 244, 245), 2)#摄像头的坐标轴原点是在左上角 自己设定坐标轴原点并显示
    #遍历轮廓
    for c in cnts:
        # 计算轮廓近似
        peri = cv2.arcLength(c, True)
        # C表示输入的点集
        # epsilon表示从原始轮廓到近似轮廓的最大距离,它是一个准确度参数
        # True表示封闭的
        approx = cv2.approxPolyDP(c, 0.02 * peri, True)

        # 4个点的时候就拿出来 因为物品是矩阵形状
        if len(approx) == 4:
            screenCnt = approx  # 保存下来
            rangle = cv2.minAreaRect(screenCnt)[2]  # minAreaRect()函数返回角度 是最低的边到x水平坐标轴的角度
            box = cv2.cv.BoxPoints(cv2.minAreaRect(screenCnt)) if imutils.is_cv2() else cv2.boxPoints(
                cv2.minAreaRect(screenCnt))#得到四个最小矩阵的坐标点
            cv2.drawContours(img, [box.astype("int")], -1, (0, 255, 0), 2)#在图中画出来
            box = np.array(box, dtype="int")#转换类型
            (tl, tr, br, bl) = box#得到左上 右上 左下 右下的坐标点
            #计算中点
            (tltrX, tltrY) = midpoint(tl, tr)
            (blbrX, blbrY) = midpoint(bl, br)
            (tlblX, tlblY) = midpoint(tl, bl)
            (trbrX, trbrY) = midpoint(tr, br)
            #欧几里得度量
            dA = dist.euclidean((tltrX, tltrY), (blbrX, blbrY))
            dB = dist.euclidean((tlblX, tlblY), (trbrX, trbrY))


            #固定摄像头及分辨率时 要想测出所测物品的长度 需要参照物 先使用已知宽度的矩形进行测量 得到 像素宽/实际宽 = 每宽多少像素 并保存下来
            # print('DB:',dB)
            # i = 1
            # if i == 1:
            #     pixelsPerMetric = dB / 3.4
            # print(pixelsPerMetric)
            # i += 1


            pixelsPerMetric = 35.15#得到的比率


            #分辨率除以比率可以得到摄像头测的实际范围长度
            # print('H:',640/pixelsPerMetric)
            # print('w:',480/pixelsPerMetric)


            if pixelsPerMetric != 0:#防止出现检测中没有实物得不到比例而发生除以0的错误
                #实际宽度
                dimA = dA / pixelsPerMetric
                dimB = dB / pixelsPerMetric
                #显示宽度
                cv2.putText(img, "{:.1f}cm".format(dimB),
                            (int(tltrX - 15), int(tltrY - 10)), cv2.FONT_HERSHEY_SIMPLEX,
                            0.65, (225, 190, 0), 2)
                cv2.putText(img, "{:.1f}cm".format(dimA),
                            (int(trbrX + 10), int(trbrY)), cv2.FONT_HERSHEY_SIMPLEX,
                            0.65, (225, 190, 0), 2)
            #显示角度 此角度是经过变换后的 是我定义的坐标轴的矩形的最低点与x轴的夹角
            cv2.putText(img, "r:{:.1f}".format(90 - rangle),
                        (int(tltrX + 20), int(tltrY + 20)), cv2.FONT_HERSHEY_SIMPLEX,
                        0.65, (225, 190, 0), 2)

            #画出点的坐标的直线并显示坐标点数据 容易观察夹角的位置 并且可以利用坐标计算夹角
            cv2.line(img, (int(bl[0]), int(bl[1])), (int(bl[0]), 435),
                     (0, 244, 245), 1)
            cv2.putText(img, "({},{})".format(bl[0], 640 - bl[1]),
                        (int(bl[0] - 20), 415), cv2.FONT_HERSHEY_SIMPLEX,
                        0.4, (225, 190, 0), 1)

            cv2.line(img, (int(br[0]), int(br[1])), (int(br[0]), 435),
                     (0, 244, 245), 1)
            cv2.putText(img, "({},{})".format(br[0], 640 - br[1]),
                        (int(br[0]), 435), cv2.FONT_HERSHEY_SIMPLEX,
                        0.4, (225, 190, 0), 1)

            cv2.line(img, (int(bl[0]), int(bl[1])), (int(595), int(bl[1])),
                     (0, 244, 245), 1)

            end = time.time()#时间
            print("轮廓检测所用时间:{:.3f}ms".format((end - start) * 1000))

            #得到坐标点在plot上进行绘画以及保存
            # x = [-tr[0], -tl[0], -br[0], -bl[0], -tr[0]]
            # y = [tr[1], tl[1], br[1], bl[1], tr[1]]
            # plt.plot(x, y)
            # plt.axhline(y=min(y), c="r", ls="--", lw=2)
            # plt.title("rangel = {}".format(rangle))
            # for a, b in zip(x, y):
            #     plt.text(a, b, (a, b), ha='center', va='bottom', fontsize=10)
            #plt.savefig('D:\zuobiao.png')


            return img

read_usb_capture()#开始
代码结果如下:

新增一个按下d键打开轮廓的坐标图功能
将画图部分整合成函数,使用全局变量作为触发标志
代码如下:
from matplotlib.cm import register_cmap
import matplotlib.pyplot as plt
import cv2
import numpy as np
import imutils
import time
from scipy.spatial import distance as dist
from PIL import  Image

global d#全局变量拿来判断是否按下d
d = 0
#调用摄像头 函数
def read_usb_capture():
    # 选择摄像头的编号
    cap = cv2.VideoCapture(1, cv2.CAP_DSHOW)# 0是笔记本自带摄像头
    # 添加这句是可以用鼠标拖动弹出的窗体
    cv2.namedWindow('video', cv2.WINDOW_AUTOSIZE)
    cv2.resizeWindow("video", 640, 480)  # 设置长和宽

    while (cap.isOpened()):#循环
        ret, frame = cap.read()#read放回2个值,第一个是True和False 是否打开 第二个是传入图像
        lunkuo(frame)#进行轮廓检测
        cv2.imshow('video', frame)#显示出来
        k = cv2.waitKey(1) & 0xFF  # 监听键盘
        if k == ord('s'):# 保存键
            cv2.imwrite("1.jpg", frame)
            img = cv2.imread('1.jpg')
            cv2.imshow('img',img)
        # 按下'q'就退出
        if k == ord('q'):#退出键
            break
        if k == ord('d'):
            global d
            d = 1#作为画图触发条件
    # 释放画面
    cap.release()
    cv2.destroyAllWindows()

def plot(tl,tr,bl,br):#画图并且展示函数
    # 得到坐标点在plot上进行绘画以及保存
    x = [tl[0], tr[0], br[0], bl[0], tl[0]]
    y = [640 - tl[1], 640 - tr[1], 640 - br[1], 640 - bl[1], 640 - tl[1]]
    plt.plot(x, y)
    plt.axhline(y=min(y), c="r", ls="--", lw=2)
    plt.title("rangel = {}".format(90 - rangle))
    plt.axis("equal")
    for a, b in zip(x, y):
        plt.text(a, b, (a, b), ha='center', va='bottom', fontsize=10)
    plt.savefig('zuobiao.png')#保存下来
    plt.clf()#清除
    plt.cla()
    fp = open('zuobiao.png', 'rb')
    img = Image.open(fp)#打开并且展示
    img.show()

def midpoint(ptA, ptB):#计算坐标中点函数
    return ((ptA[0] + ptB[0]) * 0.5, (ptA[1] + ptB[1]) * 0.5)
def lunkuo(img):#检测轮廓
    start = time.time()#计算检测时间
    img1_ = cv2.cvtColor(img, cv2.COLOR_BGR2GRAY)  # 转换为灰度
    img_ = cv2.GaussianBlur(img1_, (5, 5), 0)  # 高斯滤波去噪点
    img__ = cv2.Canny(img_, 75, 200)  # Canny边缘检测

    img__ = cv2.dilate(img__, None, iterations=1)#扩张
    img__ = cv2.erode(img__, None, iterations=1)#腐蚀
    # 轮廓检测
    cnts = cv2.findContours(img__.copy(), cv2.RETR_LIST, cv2.CHAIN_APPROX_SIMPLE)  # 检测出所有轮廓
    cnts = cnts[1] if imutils.is_cv3() else cnts[0]  # opencv4写法
    cnts = sorted(cnts, key=cv2.contourArea, reverse=True)[:]  # 排序得到前x个轮廓 可以根据图片自己设定

    #定义全局变量
    global screenCnt,box,rangle
    box = 0
    rangle = 0
    # 我的摄像头分辨率为640*480 在摄像头中框出最合适检测的地方
    cv2.line(img, (595, 45), (595, 435),
             (255, 0, 255), 1)
    cv2.line(img, (45, 435), (595, 435),
             (255, 0, 255), 1)
    cv2.line(img, (45, 45), (45, 435),
             (255, 0, 255), 1)
    cv2.line(img, (45, 45), (595, 45),
             (255, 0, 255), 1)
    cv2.line(img, (45, 45), (595, 45),
             (255, 0, 255), 1)
    cv2.circle(img, (45, 45), 2, (255, 0, 0), -1)#中心点
    cv2.putText(img, "(0,0)",
                (45, 435), cv2.FONT_HERSHEY_SIMPLEX,
                0.5, (0, 244, 245), 2)#摄像头的坐标轴原点是在左上角 自己设定坐标轴原点并显示
    #遍历轮廓
    for c in cnts:
        # 计算轮廓近似
        peri = cv2.arcLength(c, True)
        # C表示输入的点集
        # epsilon表示从原始轮廓到近似轮廓的最大距离,它是一个准确度参数
        # True表示封闭的
        approx = cv2.approxPolyDP(c, 0.02 * peri, True)

        # 4个点的时候就拿出来 因为物品是矩阵形状
        if len(approx) == 4:
            screenCnt = approx  # 保存下来
            rangle = cv2.minAreaRect(screenCnt)[2]  # minAreaRect()函数返回角度 是最低的边到x水平坐标轴的角度
            box = cv2.cv.BoxPoints(cv2.minAreaRect(screenCnt)) if imutils.is_cv2() else cv2.boxPoints(
                cv2.minAreaRect(screenCnt))#得到四个最小矩阵的坐标点
            cv2.drawContours(img, [box.astype("int")], -1, (0, 255, 0), 2)#在图中画出来
            box = np.array(box, dtype="int")#转换类型
            (tl, tr, br, bl) = box#得到左上 右上 左下 右下的坐标点
            #计算中点
            (tltrX, tltrY) = midpoint(tl, tr)
            (blbrX, blbrY) = midpoint(bl, br)
            (tlblX, tlblY) = midpoint(tl, bl)
            (trbrX, trbrY) = midpoint(tr, br)
            #欧几里得度量
            dA = dist.euclidean((tltrX, tltrY), (blbrX, blbrY))
            dB = dist.euclidean((tlblX, tlblY), (trbrX, trbrY))


            #固定摄像头及分辨率时 要想测出所测物品的长度 需要参照物 先使用已知宽度的矩形进行测量 得到 像素宽/实际宽 = 每宽多少像素 并保存下来
            # print('DB:',dB)
            # i = 1
            # if i == 1:
            #     pixelsPerMetric = dB / 3.4
            # print(pixelsPerMetric)
            # i += 1


            pixelsPerMetric = 35.15#得到的比率


            #分辨率除以比率可以得到摄像头测的实际范围长度
            # print('H:',640/pixelsPerMetric)
            # print('w:',480/pixelsPerMetric)


            if pixelsPerMetric != 0:#防止出现检测中没有实物得不到比例而发生除以0的错误
                #实际宽度
                dimA = dA / pixelsPerMetric
                dimB = dB / pixelsPerMetric
                #显示宽度
                cv2.putText(img, "{:.1f}cm".format(dimB),
                            (int(tltrX - 15), int(tltrY - 10)), cv2.FONT_HERSHEY_SIMPLEX,
                            0.65, (225, 190, 0), 2)
                cv2.putText(img, "{:.1f}cm".format(dimA),
                            (int(trbrX + 10), int(trbrY)), cv2.FONT_HERSHEY_SIMPLEX,
                            0.65, (225, 190, 0), 2)
            #显示角度 此角度是经过变换后的 是我定义的坐标轴的矩形的最低点与x轴的夹角
            cv2.putText(img, "r:{:.1f}".format(90 - rangle),
                        (int(tltrX + 20), int(tltrY + 20)), cv2.FONT_HERSHEY_SIMPLEX,
                        0.65, (225, 190, 0), 2)

            #画出点的坐标的直线并显示坐标点数据 容易观察夹角的位置 并且可以利用坐标计算夹角
            cv2.line(img, (int(bl[0]), int(bl[1])), (int(bl[0]), 435),
                     (0, 244, 245), 1)
            cv2.putText(img, "({},{})".format(bl[0], 640 - bl[1]),
                        (int(bl[0] - 20), 415), cv2.FONT_HERSHEY_SIMPLEX,
                        0.4, (225, 190, 0), 1)

            cv2.line(img, (int(br[0]), int(br[1])), (int(br[0]), 435),
                     (0, 244, 245), 1)
            cv2.putText(img, "({},{})".format(br[0], 640 - br[1]),
                        (int(br[0]), 435), cv2.FONT_HERSHEY_SIMPLEX,
                        0.4, (225, 190, 0), 1)

            cv2.line(img, (int(bl[0]), int(bl[1])), (int(595), int(bl[1])),
                     (0, 244, 245), 1)

            end = time.time()#时间
            print("轮廓检测所用时间:{:.3f}ms".format((end - start) * 1000))
            global d
            if d == 1:#触发条件
                plot(tl, tr, bl, br)#画图
                d = 0#清除标志

            return  img

read_usb_capture()#开始
按下 d 结果如下: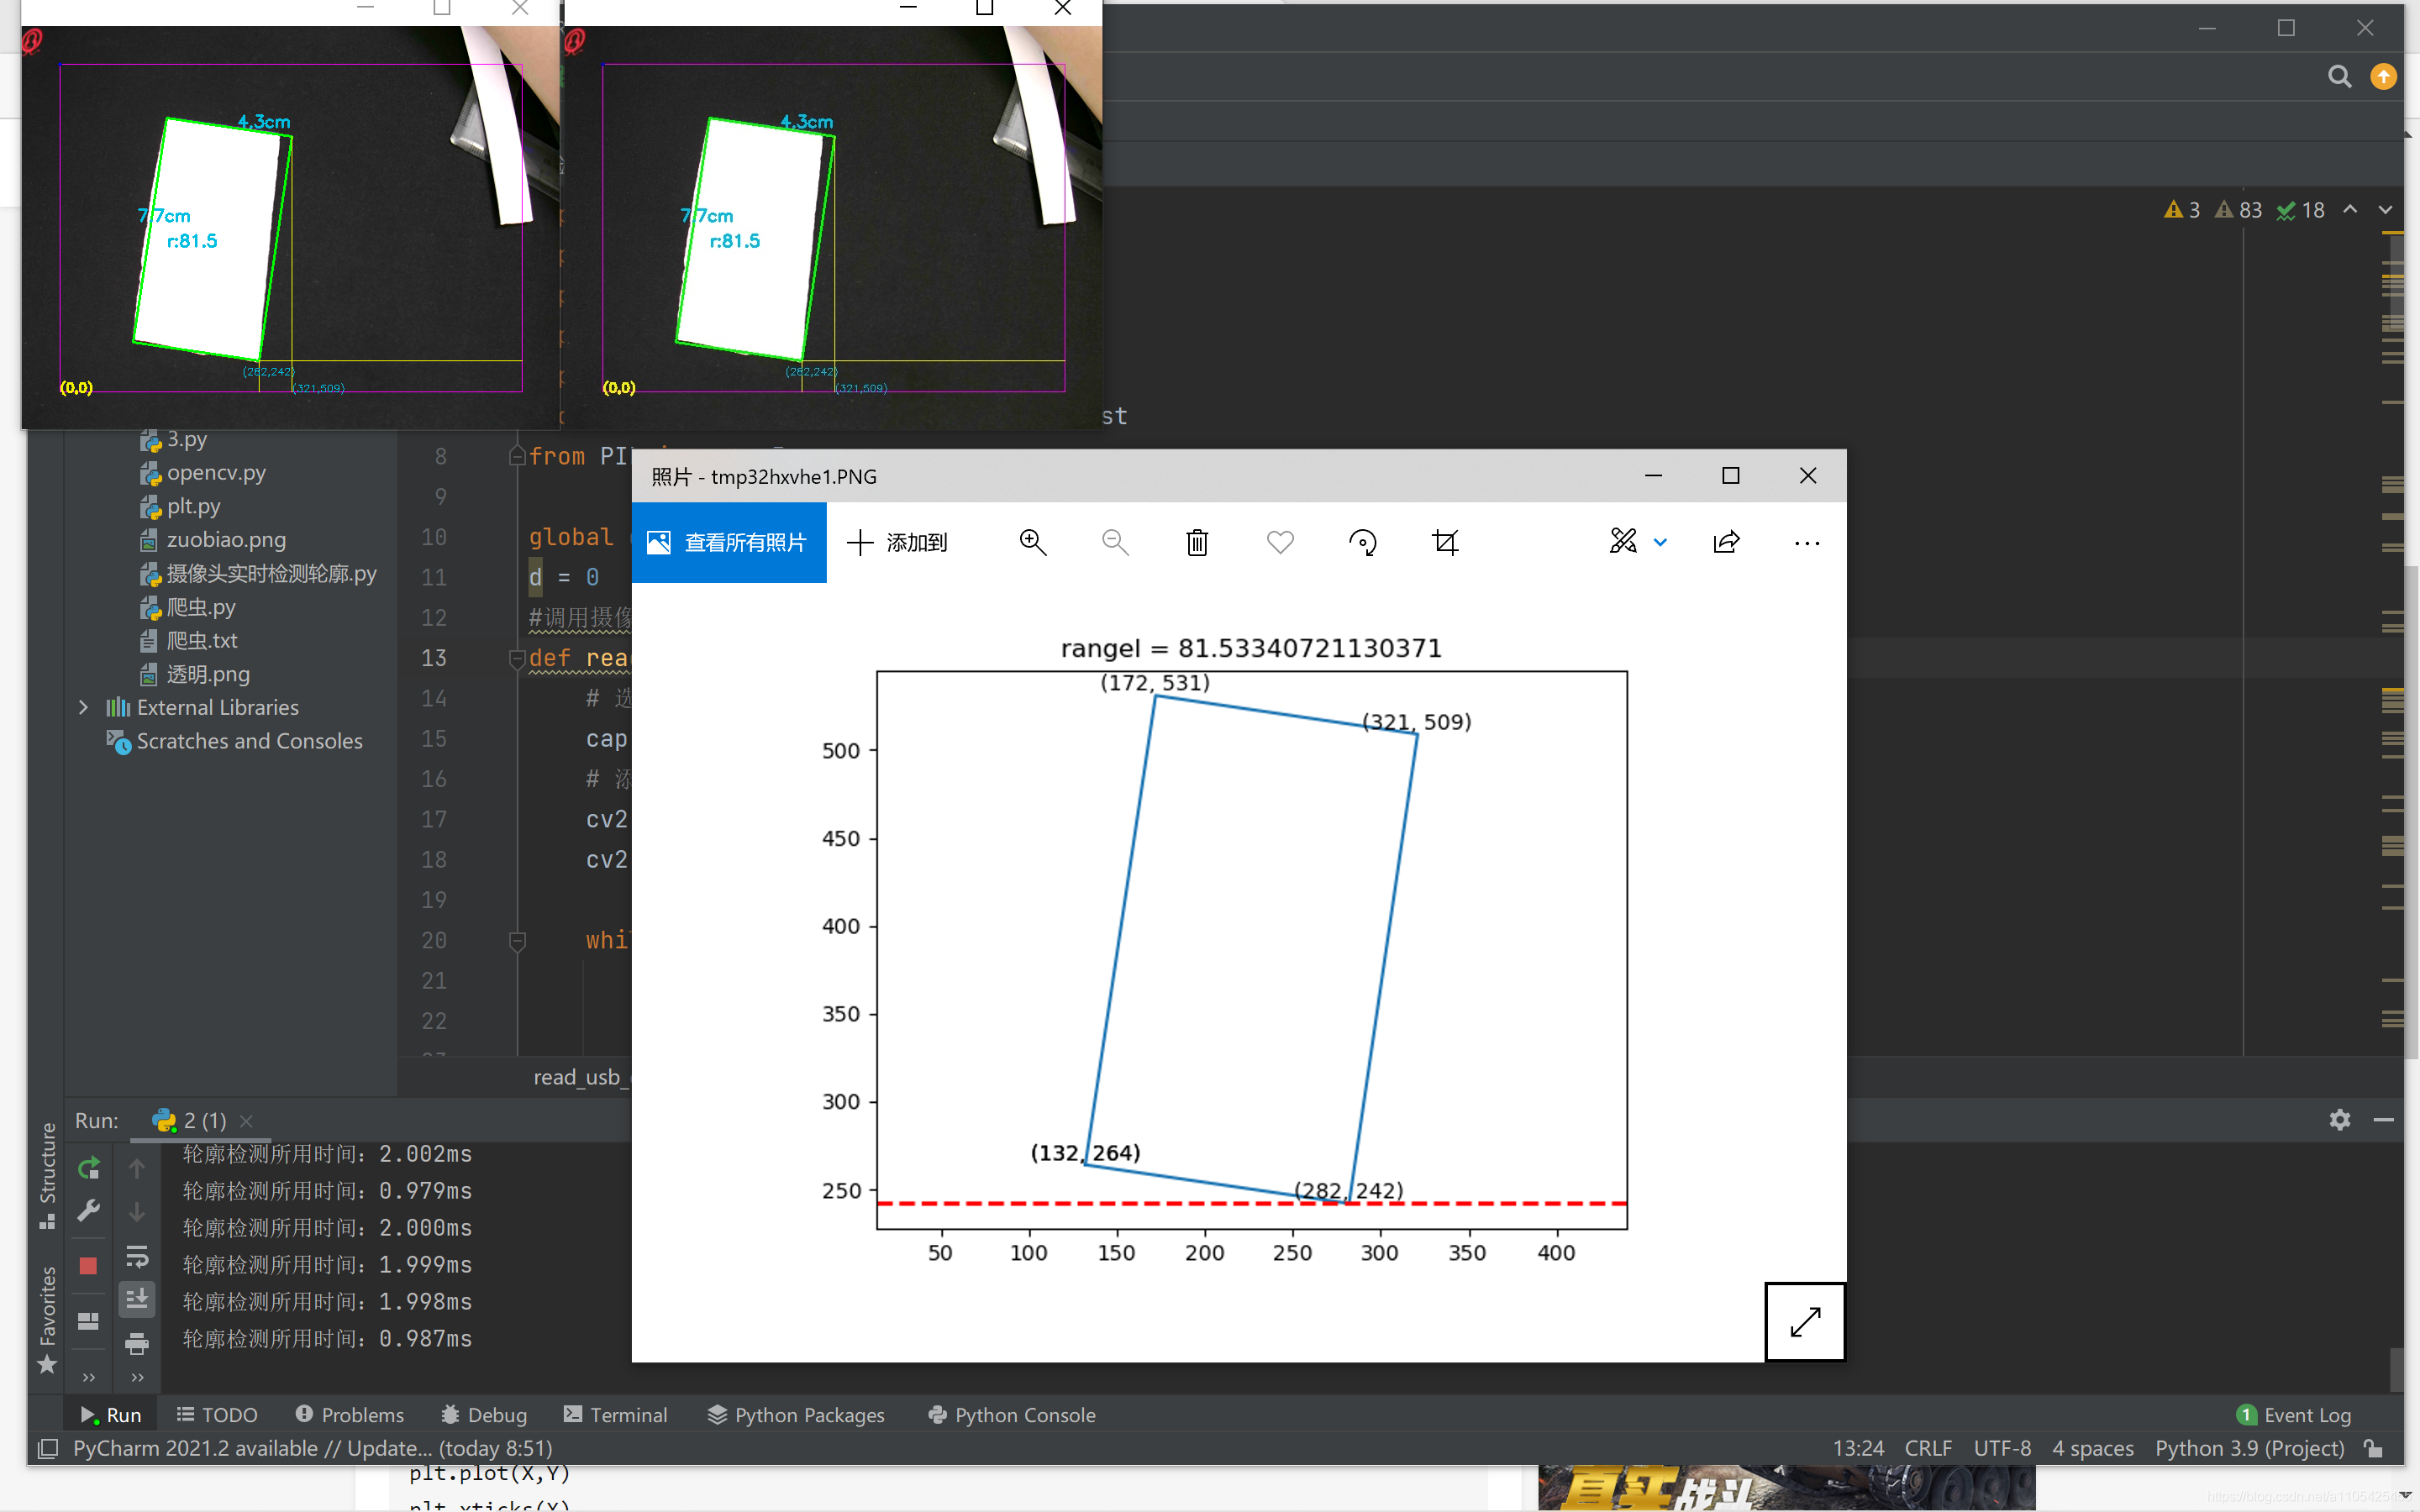


 3384
3384

 被折叠的 条评论
为什么被折叠?
被折叠的 条评论
为什么被折叠?
 到【灌水乐园】发言


