


简介:在上一节中,我们完成了单张图片车道线的检测,在最终的结果中,可以比较明确的观察出车辆相对车道线的位置,接下来,我们要把这一功能移植到ROS系统中,将小车抓取到的图像都处理成车道线数据,并发布到下一环节进行处理。
1、新建车道线识别节点 line_detect
进入工作空间目录:
$ cd ~/myros/catkin_ws/src/
创建功能包:
$ catkin_create_pkg line_detect rospy sensor_msgs duckietown_msgs geometry_msgs
新建配置文件:
$ mkdir -p line_detect/config/line_detect_node
$ touch line_detect/config/line_detect_node/default.yaml
新建启动脚本:
$ mkdir -p line_detect/launch
$ touch line_detect/launch/start.launch
新建源码文件
$ touch line_detect/src/line_detect_node.py
编辑编译配置文件:
$ gedit line_detect/CMakeLists.txt

修改为:

2、编辑配置文件
$ gedit line_detect/config/line_detect_node/default.yaml
scale: [160,120]
canny_thresholds: [80,200]
canny_aperture_size: 3
dilation_kernel_size: 3
hough_threshold: 2
hough_min_line_length: 3
hough_max_line_gap: 1
M: [-1.02032622e+00,-2.48368883e+00,6.44725345e+02,2.54332970e-16,-4.61731493e+00,9.22218319e+02,-8.37904170e-19,-7.77917189e-03,1.00000000e+00]
3、编辑源码文件
$ gedit line_detect/src/line_detect_node.py
#!/usr/bin/env python3
import rospy
import cv2
import numpy as np
import math
import time
from sensor_msgs.msg import CompressedImage
from duckietown_msgs.msg import Segment, SegmentList, FSMState, AntiInstagramThresholds
from geometry_msgs.msg import Point
from cv_bridge import CvBridge
class LineDetectNode():
def __init__(self):
rospy.init_node("line_detector_node", anonymous=False)
self.scale = rospy.get_param("~scale", default=[160,120])
#边缘检测参数设置
self.canny_thresholds = rospy.get_param("~canny_thresholds", default=[80,200])
self.canny_aperture_size = rospy.get_param("~canny_aperture_size", default=3)
self.dilation_kernel_size = rospy.get_param("~dilation_kernel_size", default=3)
#霍夫变换参数设置
self.hough_threshold = rospy.get_param("~hough_threshold", default=2)
self.hough_min_line_length = rospy.get_param("~hough_min_line_length", default=3)
self.hough_max_line_gap = rospy.get_param("~hough_max_line_gap", default=1)
#色彩平衡参数设置
self.lower_thresholds = [0, 0, 0]
self.higher_thresholds = [255, 255, 255]
#投影变换参数设置
self.M = np.array(rospy.get_param("~M"))
self.M = np.reshape(self.M, (3, 3))
self.bridge = CvBridge()
self.pub_segments = rospy.Publisher('~segments', SegmentList, queue_size=10)
self.pub_fsm = rospy.Publisher('~mode', FSMState, queue_size=10)
rospy.Subscriber("~thresholds", AntiInstagramThresholds, self.cb_thresholds, queue_size=1)
rospy.Subscriber('~image/compressed', CompressedImage, self.cb_image, queue_size=1)
#图像处理并发布车道线数据
def cb_image(self, msg):
image = self.bridge.compressed_imgmsg_to_cv2(msg)
color_banlance_img = self.prev_cb_image(image)
edge_white,edge_yellow,edge_red = self.getEdges(color_banlance_img)
white_lines = self.getLines(edge_white)
yellow_lines = self.getLines(edge_yellow)
red_lines = self.getLines(edge_red)
white_coors, yellow_coors, red_coors = self.lines_to_coors(white_lines,yellow_lines,red_lines)
segmentList = self.set_segments(white_coors, yellow_coors, red_coors)
self.pub_segments.publish(segmentList)
#车道线数据转化为segment格式
def set_segments(self, white_coors, yellow_coors, red_coors):
segmentList = SegmentList()
if white_coors is not None:
for line in white_coors:
[x1, y1, x2, y2] = line
seg = self.set_segment(x1, y1, x2, y2, Segment.WHITE)
segmentList.segments.append(seg)
if yellow_coors is not None:
for line in yellow_coors:
[x1, y1, x2, y2] = line
seg = self.set_segment(x1, y1, x2, y2, Segment.YELLOW)
segmentList.segments.append(seg)
if red_coors is not None:
for line in red_coors:
[x1, y1, x2, y2] = line
seg = self.set_segment(x1, y1, x2, y2, Segment.RED)
segmentList.segments.append(seg)
return segmentList
def set_segment(self, x1, y1, x2, y2, color):
p1 = Point()
p2 = Point()
p1.x = x1
p1.y = y1
p1.z = 0.0
p2.x = x2
p2.y = y2
p2.z = 0.0
seg = Segment()
seg.points[0] = p1
seg.points[1] = p2
seg.color = color
return seg
#处理色彩平衡参数
def cb_thresholds(self, msg):
self.lower_thresholds = msg.low
self.higher_thresholds = msg.high
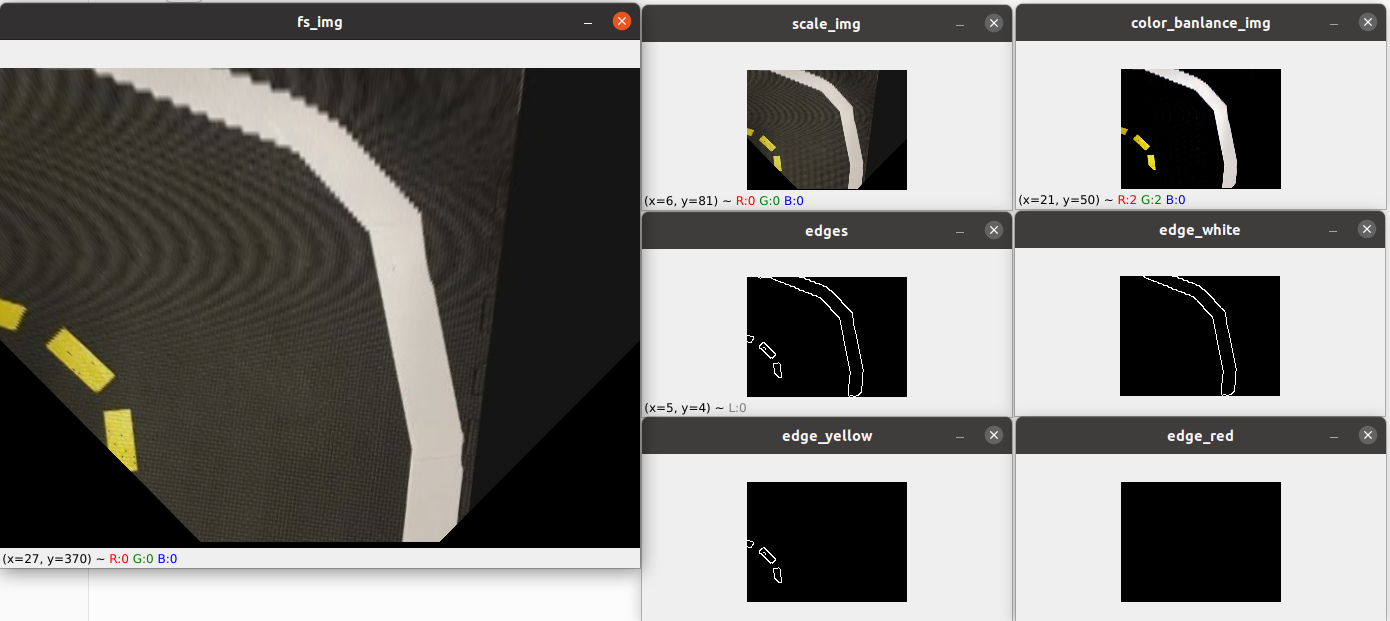
def prev_cb_image(self, image):
fs_img = cv2.warpPerspective(image,self.M,(640,480))
scale_img = cv2.resize(fs_img, (self.scale[0],self.scale[1]), interpolation=cv2.INTER_NEAREST)
color_banlance_img = self.apply_color_balance(self.lower_thresholds, self.higher_thresholds, scale_img)
#cv2.imshow("fs_img",fs_img)
#cv2.imshow("scale_img",scale_img)
#cv2.imshow("color_banlance_img",color_banlance_img)
#cv2.waitKey(1)
return color_banlance_img
def apply_color_balance(self, lower_threshold, higher_threshold, image, scale=1):
if lower_threshold is None:
return None
resized_image = cv2.resize(image, (0, 0), fx=scale, fy=scale)
channels = cv2.split(resized_image)
out_channels = []
for idx, channel in enumerate(channels):
thresholded = self.apply_threshold(channel, lower_threshold[idx], higher_threshold[idx])
normalized = cv2.normalize(thresholded, thresholded.copy(), 0, 255, cv2.NORM_MINMAX)
out_channels.append(normalized)
return cv2.merge(out_channels)
def apply_threshold(self, matrix, low_value, high_value):
low_mask = matrix < low_value
matrix = self.apply_mask(matrix, low_mask, low_value)
high_mask = matrix > high_value
matrix = self.apply_mask(matrix, high_mask, high_value)
return matrix
def apply_mask(self, matrix, mask, fill_value):
masked = np.ma.array(matrix, mask=mask, fill_value=fill_value)
return masked.filled()
def getEdges(self, image):
#图像转化为HSV格式
hsv = cv2.cvtColor(image, cv2.COLOR_BGR2HSV)
#检测图像中的边缘
edges = cv2.Canny(image,self.canny_thresholds[0],self.canny_thresholds[1],apertureSize=self.canny_aperture_size)
#cv2.imshow('edges', edges)
#cv2.waitKey(1)
#检测图像中白色、黄色、红色的区域
white_map = cv2.inRange(hsv, np.array([0,0,150]),np.array([180,30,255]))
yellow_map = cv2.inRange(hsv, np.array([26,43,100]),np.array([34,255,255]))
red_map = cv2.inRange(hsv, np.array([0,43,46]),np.array([15,255,255]))
red_map |= cv2.inRange(hsv, np.array([156,43,100]),np.array([180,255,255]))
#膨胀腐蚀内核设置,单倍内核
kernel = cv2.getStructuringElement(cv2.MORPH_ELLIPSE, (self.dilation_kernel_size, self.dilation_kernel_size))
#白色、黄色区域进行膨胀处理
white_map = cv2.dilate(white_map, kernel)
yellow_map = cv2.dilate(yellow_map, kernel)
#对红色区域特殊处理,先单核腐蚀,在双核膨胀,减少干扰
red_map = cv2.erode(red_map, kernel)
kernel = cv2.getStructuringElement(cv2.MORPH_ELLIPSE, (self.dilation_kernel_size*2, self.dilation_kernel_size*2))
red_map = cv2.dilate(red_map, kernel)
#边缘与各颜色区域求交集,即为各颜色区域的边缘数据
edge_white = cv2.bitwise_and(white_map, edges)
edge_yellow = cv2.bitwise_and(yellow_map, edges)
edge_red = cv2.bitwise_and(red_map, edges)
#cv2.imshow('edge_white', edge_white)
#cv2.imshow('edge_yellow', edge_yellow)
#cv2.imshow('edge_red', edge_red)
#cv2.waitKey(1)
return edge_white,edge_yellow,edge_red
def getLines(self, edges):
lines = cv2.HoughLinesP(edges,rho=1,theta=np.pi / 180,threshold=self.hough_threshold,minLineLength=self.hough_min_line_length,maxLineGap=self.hough_max_line_gap)
if lines is not None:
lines = lines.reshape((-1,4))
return lines
else:
return None
def lines_to_coors(self, white_lines,yellow_lines,red_lines):
white_coors = []
yellow_coors = []
red_coors = []
yellow_mean_x = np.mean(np.mean(yellow_lines, 0).reshape((2,2)), 0)[0] if yellow_lines is not None else 0
if yellow_lines is not None:
for line in yellow_lines:
[x1, y1, x2, y2] = line
yellow_coors.append(self.calcRealCoor(x1,y1,x2,y2))
white_lines_use = None
white_mean_x = 0
if white_lines is not None:
white_lines_use = []
for line in white_lines:
[x1, y1, x2, y2] = line
if (x1+x2)/2<yellow_mean_x:
continue
else:
white_coors.append(self.calcRealCoor(x1,y1,x2,y2))
white_lines_use.append([x1, y1, x2, y2])
white_lines_use = np.array(white_lines_use)
if len(white_lines_use)>0:
white_mean_x = np.mean(np.mean(white_lines_use, 0).reshape((2,2)), 0)[0]
if red_lines is not None:
for line in red_lines:
[x1, y1, x2, y2] = line
if (yellow_mean_x!=0 and (x1+x2)/2<yellow_mean_x) or (white_mean_x!=0 and (x1+x2)/2>white_mean_x):
continue
else:
red_coors.append(self.calcRealCoor(x1,y1,x2,y2))
return white_coors, yellow_coors, red_coors
def calcRealCoor(self, x1, y1, x2, y2):
X1 = (120-y1)*4/640*0.585
Y1 = (80-x1)*4/640*0.585
X2 = (120-y2)*4/640*0.585
Y2 = (80-x2)*4/640*0.585
return [X1,Y1,X2,Y2]
if __name__=='__main__':
node = LineDetectNode()
rospy.spin()4、编辑启动文件
$ gedit line_detect/launch/start.launch
<launch>
  <arg name="veh"/>
  <arg name="pkg_name" value="line_detect"/>
  <arg name="node_name" value="line_detect_node"/>
  <arg name="param_file_name" default="default" doc="Specify a param file. ex:megaman"/>
  <arg name="required" default="false" />

  <group ns="$(arg veh)">
    <remap from="line_detect_node/image/compressed" to="duckiebot_node/image/compressed"/>
    <remap from="line_detect_node/thresholds" to="anti_instagram_node/thresholds"/>
    <node name="$(arg node_name)" pkg="$(arg pkg_name)" type="$(arg node_name).py" respawn="true" respawn_delay="10" output="screen" required="$(arg required)">
      <rosparam command="load" file="$(find line_detect)/config/$(arg node_name)/$(arg param_file_name).yaml"/>
    </node>
  </group>
</launch>
5、修改多节点启动文件
$ gedit ~/myros/catkin_ws/start.launch
<launch>
  <arg name="veh" default="duckiebot"/>
  <group>
    <include file="$(find duckiebot)/launch/duckiebot.launch">
      <arg name="veh" value="$(arg veh)"/>
    </include>
    <include file="$(find anti_instagram)/launch/start.launch">
      <arg name="veh" value="$(arg veh)"/>
    </include>
    <include file="$(find line_detect)/launch/start.launch">
      <arg name="veh" value="$(arg veh)"/>
    </include>
  </group>
</launch>
6、编译
$ cd ~/myros/catkin_ws
$ catkin_make
7、运行
$ source devel/setup.bash
$ roslaunch start.launch
新建一个终端
$ source myros/catkin_ws/devel/setup.bash
$ rostopic echo /duckiebot/line_detect_node/segments
可以看到发布出来的车道线数据:


 4850
4850


 被折叠的 条评论
为什么被折叠?
被折叠的 条评论
为什么被折叠?
 到【灌水乐园】发言


