


一、资源导入
从asset store 下载 SteamVR Plugin。然后导入Unity。
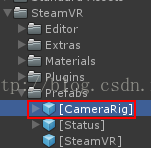
将上图中的prefab拖入场景,然后在steam上装好steamVR,就可以运行了。
二、手柄按键使用说明
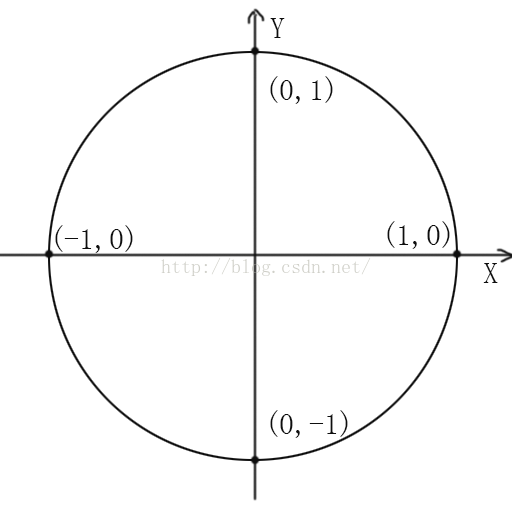
触控板的坐标如下图
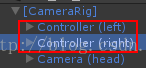
直接上代码,哪里不懂看注解就好。controller在刚才拖进场景的prefab里,如下图。
- using UnityEngine;
- using System.Collections;
- //检测手柄功能的脚本 这个脚本挂到手柄上(controller(right)和controller(left))上
- public class HTCStick : MonoBehaviour {
- //手柄
- SteamVR_TrackedObject trackdeObjec;
- void Awake ( ) {
- //获取手柄上的这个组件
- trackdeObjec = GetComponent<SteamVR_TrackedObject> ();
- }
- // Use this for initialization
- void Start ( ) {
- }
- void FixedUpdate ( ) { //获取手柄输入
- var device = SteamVR_Controller.Input ((int)trackdeObjec.index);
- //以下是api中复制出来的按键列表
- /* public class ButtonMask
- {
- public const ulong System = (1ul << (int)EVRButtonId.k_EButton_System); // reserved
- public const ulong ApplicationMenu = (1ul << (int)EVRButtonId.k_EButton_ApplicationMenu);
- public const ulong Grip = (1ul << (int)EVRButtonId.k_EButton_Grip);
- public const ulong Axis0 = (1ul << (int)EVRButtonId.k_EButton_Axis0);
- public const ulong Axis1 = (1ul << (int)EVRButtonId.k_EButton_Axis1);
- public const ulong Axis2 = (1ul << (int)EVRButtonId.k_EButton_Axis2);
- public const ulong Axis3 = (1ul << (int)EVRButtonId.k_EButton_Axis3);
- public const ulong Axis4 = (1ul << (int)EVRButtonId.k_EButton_Axis4);
- public const ulong Touchpad = (1ul << (int)EVRButtonId.k_EButton_SteamVR_Touchpad);
- public const ulong Trigger = (1ul << (int)EVRButtonId.k_EButton_SteamVR_Trigger);
- }
- */
- //每种按键都有GetTouch、GetTouchDown、GetTouchUp、GetPressDown、GetPress、GetPressUp
- //这里只有Trigger扳机键写了6种,其他的不再重复。
- //Trigger的Touch触发条件是扳机键没有按到底,此时不会触发press。触发press时必定触发touch。
- if (device.GetTouch (SteamVR_Controller.ButtonMask.Trigger)) {
- Debug.Log ("轻按了扳机键");
- //右手震动
- //拉弓类似操作应该就是按住trigger(扳机)gettouch时持续调用震动方法模拟弓弦绷紧的感觉。
- var deviceIndex2 = SteamVR_Controller.GetDeviceIndex (SteamVR_Controller.DeviceRelation.Rightmost);
- device.TriggerHapticPulse (1200);
- }
- if (device.GetTouchDown (SteamVR_Controller.ButtonMask.Trigger)) {
- Debug.Log ("轻按了扳机键");
- }
- if (device.GetTouchUp (SteamVR_Controller.ButtonMask.Trigger)) {
- Debug.Log ("松开了扳机键");
- //左手震动
- var deviceIndex = SteamVR_Controller.GetDeviceIndex (SteamVR_Controller.DeviceRelation.Leftmost);
- SteamVR_Controller.Input (deviceIndex).TriggerHapticPulse (3000);
- //右手震动
- var deviceIndex1 = SteamVR_Controller.GetDeviceIndex (SteamVR_Controller.DeviceRelation.Rightmost);
- SteamVR_Controller.Input (deviceIndex1).TriggerHapticPulse (3000);
- }
- if (device.GetPressDown (SteamVR_Controller.ButtonMask.Trigger)) {
- Debug.Log ("用press按下了trigger扳机键");
- }
- if (device.GetPress (SteamVR_Controller.ButtonMask.Trigger)) {
- Debug.Log ("用press按了trigger扳机键");
- }
- if (device.GetPressUp (SteamVR_Controller.ButtonMask.Trigger)) {
- Debug.Log ("用press松开了trigger扳机键");
- }
- //system键 圆盘下面那个键
- // reserved 为Steam系统保留,用来调出Steam系统菜单 因此自己加的功能没用 下面的打印不会出现
- if (device.GetTouchDown (SteamVR_Controller.ButtonMask.System)) {
- Debug.Log ("按下了system系统按钮");
- }
- if (device.GetPressDown (SteamVR_Controller.ButtonMask.System)) {
- Debug.Log ("用press按下了系统按钮");
- }
- //ApplicationMenu键 带菜单标志的那个按键(在方向圆盘上面)
- //ApplicationMenu键 的Touch和Press没有区别,触发都要按下去
- if (device.GetTouchDown (SteamVR_Controller.ButtonMask.ApplicationMenu)) {
- Debug.Log ("按下了 ApplicationMenu菜单键");
- }
- if (device.GetPressDown (SteamVR_Controller.ButtonMask.ApplicationMenu)) {
- Debug.Log ("用press按下了ApplicationMenu菜单键");
- }
- //Grip键 手柄两侧的按键 每个手柄左右各一且功能相同,同一手柄两个键是一个键。
- //Grip键 的Touch和Press没有区别,触发都要按下去
- if (device.GetTouchDown (SteamVR_Controller.ButtonMask.Grip)) {
- Debug.Log ("按下了 Grip");
- }
- if (device.GetPressDown (SteamVR_Controller.ButtonMask.Grip)) {
- Debug.Log ("用press按下了 Grip");
- }
- //Axis0键和Touchpad是等价的 与圆盘有关 详情看下面的TouchPad这里不再赘述
- //触摸触发
- if (device.GetTouchDown (SteamVR_Controller.ButtonMask.Axis0)) {
- Debug.Log ("按下了 Axis0");
- }
- //按动触发
- if (device.GetPressDown (SteamVR_Controller.ButtonMask.Axis0)) {
- Debug.Log ("用press按下了Axis0");
- }
- //Axis1键 等价于Trigger键详情看上面的Trigger按钮 这里不再赘述
- //触摸触发
- if (device.GetTouchDown (SteamVR_Controller.ButtonMask.Axis1)) {
- Debug.Log ("按下了Axis1");
- }
- //按动触发
- if (device.GetPressDown (SteamVR_Controller.ButtonMask.Axis1)) {
- Debug.Log ("用press按下了Axis1");
- }
- //Axis2键 目前未发现按键位置
- //触摸触发
- if (device.GetTouchDown (SteamVR_Controller.ButtonMask.Axis2)) {
- Debug.Log ("按下了 Axis2");
- }
- //按动触发
- if (device.GetPressDown (SteamVR_Controller.ButtonMask.Axis2)) {
- Debug.Log ("用press按下了Axis2");
- }
- //Axis3键 目前未发现按键位置
- //触摸触发
- if (device.GetTouchDown (SteamVR_Controller.ButtonMask.Axis3)) {
- Debug.Log ("按下了Axis3");
- }
- //按动触发
- if (device.GetPressDown (SteamVR_Controller.ButtonMask.Axis3)) {
- Debug.Log ("用press按下了Axis3");
- }
- //Axis4键 目前未发现按键位置
- //触摸触发
- if (device.GetTouchDown (SteamVR_Controller.ButtonMask.Axis4)) {
- Debug.Log ("按下了Axis4");
- }
- //按动触发
- if (device.GetPressDown (SteamVR_Controller.ButtonMask.Axis4)) {
- Debug.Log ("用press按下了Axis4");
- }
- //Touchpad键 圆盘交互
- //触摸触发
- if (device.GetTouchDown (SteamVR_Controller.ButtonMask.Touchpad)) {
- Debug.Log ("按下了 Touchpad");
- //方法返回一个坐标 接触圆盘位置
- Vector2 cc = device.GetAxis ();
- Debug.Log (cc);
- // 例子:圆盘分成上下左右
- float angle = VectorAngle (new Vector2 (1, 0), cc);
- Debug.Log (angle);
- //下
- if (angle > 45 && angle < 135) {
- Debug.Log ("下");
- }
- //上
- if (angle < -45 && angle > -135) {
- Debug.Log ("上");
- }
- //左
- if ((angle < 180 && angle > 135) || (angle < -135 && angle > -180)) {
- Debug.Log ("左");
- }
- //右
- if ((angle > 0 && angle < 45) || (angle > -45 && angle < 0)) {
- Debug.Log ("右");
- }
- }
- //按动触发
- if (device.GetPressDown (SteamVR_Controller.ButtonMask.Touchpad)) {
- Debug.Log ("用press按下了Touchpad");
- Vector2 cc = device.GetAxis ();
- Debug.Log (cc);
- }
- }
- // Update is called once per frame
- void Update ( ) {
- }
- //方向圆盘最好配合这个使用 圆盘的.GetAxis()会检测返回一个二位向量,可用角度划分圆盘按键数量
- //这个函数输入两个二维向量会返回一个夹角 180 到 -180
- float VectorAngle (Vector2 from, Vector2 to) {
- float angle;
- Vector3 cross = Vector3.Cross (from, to);
- angle = Vector2.Angle (from, to);
- return cross.z > 0 ? -angle : angle;
- }
- }


 1万+
1万+

 被折叠的 条评论
为什么被折叠?
被折叠的 条评论
为什么被折叠?
 到【灌水乐园】发言


