


本学习主要是对《UVM实践》卷Ⅰ进行简要的总结归纳,具体实现参考本书。
以下图逐步展开和封装进行UVM环境搭建学习理解。
文章目录
UVM driver
UVM driver是验证平台最基本的组件,是整个验证平台数据流的源泉。
UVM是一个库,在这个库中,几乎所有的东西使用类(class)来实现。其中: driver, monitor, referencemodel, scoreboard等组成部分都是类。类有函数(function)还有任务(task),通过这些函数和任务可以完成driver的输出激励功能。完成monitor的监测功能,完成参考模型的计算功能,完成scoreboard的比较功能。类中有成员变量,这些成员变量可以控制类的行为,如控制driver的行为验证平台中的所有组件应该派生自UVM中的类。
UVM验证平台中的driver应该派生自uvm_driver,一个简单的driver如下例所示:
'ifndef MY_DRIVER_SV
'define MY_DRIVER_SV
class my_driver extends uvm_driver;//派生
注意两点:
- 所有派生自uvm_driver的类的new函数有两个参数,一个事string类型的name,一个是uvm_component类型的parent。关于name参数,就是名字而已。至于parent。这两个参数是uvm_component的要求,每一个派生自uvm_component或其派生类的类在其new函数中药指明两个参数:name和parent ,这是uvm_component类的一大特点。而uvm_drive是派生自uvm_component类。所以也会有两个参数。
- Driver所做的事情几乎都在main_phase中,而UVM由phase来管理验证平台的运行,这些phase统一以xxxx_phase来命名,且都有一个类型为uvm_phase、名字为phase的参数。main_phase是uvm_driver中预先定义好的一个任务。几乎可以简单的认为,实现一个driver等于实现其main_phase。
my_driver.sv
`ifndef MY_DRIVER_SV
`define MY_DRIVER_SV
class my_driver extends uvm_driver;

	function new(string name = "my_driver", uvm_component parent = null);
		super.new(name, parent);
		uvm_info("my driver", "new is called", UVM_LOW);
	endfunction
	extern virtual task main_phase(uvm_phase phase);
endclass
task my_driver::main_phase(uvm_phase phase);
	uvm_info("my_driver", "main_phase is called", UVM_LOW);
	top_tb.rxd <= 8'b0;
	top_tb.rx_dv <= 1'b0;
	while(!top_tb.rst_n)
		@(posedge top_tb.clk);
	for(int i= 0; i< 256: i++)begin
		@(posedge top_tb.clk);
		top_tb.rxd <= $urandom_range(0, 255);
		top_tb.rx_dv <= 1'bl;
		uvm_info("my driver", "data is drived", UVM LOW);
	end
	@(posedge top_tb.clk);
	top_tb.rx_dv <= 1'b0;
endtask
`endif
testbench top
timescale 1ns/1ps
include "uvm macros.svh"
import uvm_pkg::*;
include "my_driver.sv"
module top_tb;
	reg clk:
	reg rstn;
	reg[7:0] rxd;
	reg rx_dv;
	wire[7:0] txd;
	wire tx_en;
    dut my_dut(.clk(clk),
               .rst_n(rst_n),
               .rxd (rxd),
               .rx_dv(rx_dv),
               .txd (txd),
               .tx_en(tx_en));
    initial begin
    	my_driver drv;
    	drv = new("drv", null);
    	drv.main_phase(null);
    	$finish();
    initial begin
    	clk = 0;
    	forever begin
    	#100 clk = ~clk;
    end
    initial begin
        rst_n = 1'b0;
        #1000;
        rst_n = 1'b1;
    end
endmodule
factory 机制
factory机制,可以将当前定义的类登记在UVM内部一张表里。在testbench中直接调用run_test(“class_name"),如果该class_name在UVM表中用factory机制注册过,即可自动例化并执行。
将my_driver类登记在UVM内部一张表中,在testbench中直接调用run_test("my_driver"),即可自动实例化并执行。
my_driver.sv
`ifndef MY_DRIVER_SV
`define MY_DRIVER_SV
class my_driver extends uvm_driver;
	uvm_component_utils(my driver) //将类登记在uvm内部一张表
	function new(string name = "my_driver", uvm_component parent = null);
		super.new(name, parent);
		uvm_info("my driver", "new is called", UVM_LOW);
	endfunction
	extern virtual task main_phase(uvm_phase phase);
endclass
task my_driver::main_phase(uvm_phase phase);
	uvm_info("my_driver", "main_phase is called", UVM_LOW);
	top_tb.rxd <= 8'b0;
	top_tb.rx_dv <= 1'b0;
	while(!top_tb.rst_n)
		@(posedge top_tb.clk);
	for(int i= 0; i< 256: i++)begin
		@(posedge top_tb.clk);
		top_tb.rxd <= $urandom_range(0, 255);
		top_tb.rx_dv <= 1'bl;
		uvm_info("my driver", "data is drived", UVM LOW);
	end
	@(posedge top_tb.clk);
	top_tb.rx_dv <= 1'b0;
endtask
`endif
testbench top
timescale 1ns/1ps
include "uvm macros.svh"
import uvm_pkg::*;
include "my_driver.sv"
module top_tb;
	reg clk;
	reg rstn;
	reg[7:0] rxd;
	reg rx_dv;
	wire[7:0] txd;
	wire tx_en;
    dut my_dut(.clk(clk),
               .rst_n(rst_n),
               .rxd (rxd),
               .rx_dv(rx_dv),
               .txd (txd),
               .tx_en(tx_en));
    initial begin
    	clk = 0;
    	forever begin
    	#100 clk = ~clk;
    end
    initial begin
        rst_n = 1'b0;
        #1000;
        rst_n = 1'b1;
    end
    initial begin
		run_test("my_driver"); //testbench调用
	end
endmodule
object机制
UVM中通过objection机制来控制验证平台的关闭。在每个phase中,UVM会检查是否有objection被提起,如果有,会等待这个objection被撤销,该phase即结束。
raise_objection语句必须在main_phase中第一个消耗仿真时间的语句之前。
my_driver.sv代码
`ifndef MY_DRIVER_SV
`define MY_DRIVER_SV
class my_driver extends uvm_driver;
	uvm_component_utils(my driver) //将类登记在uvm内部一张表
	function new(string name = "my_driver", uvm_component parent = null);
		super.new(name, parent);
		uvm_info("my driver", "new is called", UVM_LOW);
	endfunction
	extern virtual task main_phase(uvm_phase phase);
endclass
task my_driver::main_phase(uvm_phase phase);
	phase.raise_objection(this);  //和phase.drop_objection(this)配对使用
	uvm_info("my_driver", "main_phase is called", UVM_LOW);
	top_tb.rxd <= 8'b0;
	top_tb.rx_dv <= 1'b0;
	while(!top_tb.rst_n)
		@(posedge top_tb.clk);
	for(int i= 0; i< 256: i++)begin
		@(posedge top_tb.clk);
		top_tb.rxd <= $urandom_range(0, 255);
		top_tb.rx_dv <= 1'bl;
		uvm_info("my driver", "data is drived", UVM LOW);
	end
	@(posedge top_tb.clk);
	top_tb.rx_dv <= 1'b0;
	phase.drop_objection(this);
endtask
`endif
virtual interface
之前的driver中使用了绝对路径,绝对路径的使用会大大减弱验证平台的可移植性。尽量减小甚至杜绝在验证平台中使用绝对路径。
- 使用宏:这样当路径修改时,只需要修改宏的定义即可,但是加入clk的路径表位top_tb.clk_inst.clk,而rst_n的路径变为top_tb.rst_inst.rst_n,那么单纯的修改宏定义是无法起到作用的。
- 使用interface:在systemverilog中使用interface来连接验证平台与DUT的端口。
对于dut的接口信号,我们都要很好的把信号包在virtual interface里面
interface不是UVM特有的virtual my_if vif
在声明vif后,就可以在main_phase中使用如下方式驱动信号从而消除代码的绝对路径,大大提高的代码的可移植性和可重复性。
interface my_if(intput clk, input rst_n);
	logic [7:0] data;
	logic valid;
endinterface
testbench top
timescale 1ns/1ps
include "uvm macros.svh"
import uvm_pkg::*;
include "my_driver.sv"

module top_tb;
	reg clk, rstn;
	my_if input_if(clk, rst_n);
	my_if output_if(clk, rst_n);
    dut my_dut(.clk(clk),
               .rst_n(rst_n),
               .rxd (input_if.data),
               .rx_dv(input_if.valid),
               .txd (output_if.data),
               .tx_en(output_if.valid));
    initial begin
    	clk = 0;
    	forever begin
    	#100 clk = ~clk;
    end
    initial begin
        rst_n = 1'b0;
        #1000;
        rst_n = 1'b1;
    end
    initial begin
		run_test("my_driver"); //testbench调用
	end
	initial begin
		uvm_config_db#(virtual my_if)::set(null, "uvm_test_top", "vif", input_if)
endmodule
在类中无法直接申明interface的实例,UVM提供了virtual interface用以申明interface的实例
config_db的set和get用于传递数据,以及实例化成员变量。
my_driver.sv代码
`ifndef MY_DRIVER_SV
`define MY_DRIVER_SV
class my_driver extends uvm_driver;
	virtual my_if vif;
	uvm_component_utils(my driver) //将类登记在uvm内部一张表
	function new(string name = "my_driver", uvm_component parent = null);
		super.new(name, parent);
		uvm_info("my driver", "new is called", UVM_LOW);
	endfunction
	virtual function void build_phase(uvm_phase phase);
		super.build_phase(phase);
		`uvm_info("my_driver", "build phase id called", UVM_LOW);
		if(!uvm_config_deb#(virtual my_if)::get(this, "", "vif", vif))
			`uvm_fatal("my_driver", "virtual interface must be set for vif")
	endfunction
	extern virtual task main_phase(uvm_phase phase);
endclass
task my_driver::main_phase(uvm_phase phase);
	phase.raise_objection(this);  //和phase.drop_objection(this)配对使用
	uvm_info("my_driver", "main_phase is called", UVM_LOW);
	vif.data <= 8'b0;
	vif.valid <= 1'b0;
	while(!vif.rst_n)
		@(posedge vif.clk);
	for(int i= 0; i< 256: i++)begin
		@(posedge vif.clk);
		vif.data <= $urandom_range(0, 255);
		vif.valid <= 1'bl;
		uvm_info("my driver", "data is drived", UVM LOW);
	end
	@(posedge vif.clk);
	vif.valid <= 1'b0;
	phase.drop_objection(this);
endtask
`endif
transaction
- 数据流、控制流都可以抽象为transaction。
- 有相关联的数据放在一个transaction中。
- 所有transaction都派生自uvm_sequence_item。只有从uvm_sequence_item派生的transaction才可以使用后文讲述的UVM中强大的sequence机制
- 用uvm_object_utils实现transaction的factory机制注册
class my_transaction extends uvm_sequence_item;
	rand bit[47:0] dmac;
	rand bit[47:0] smac;
	rand bit[15:0] ether_type;
	rand byte	   pload[];
	rand bit[31:0] crc;
	constraint pload_cons{
		pload.size >= 46;
		pload.size <= 1500;
	}
	function bit[31:0] calc_crc();
		return 32'h0;
	endfunction
	function void post_randomize();
		crc = calc_crc;
	endfunction
	`uvm_object_utils(my_transaction)
	function new(string name = "my_transaction")
		super.new();
	endfunction
endclass
my_driver.sv 伪代码
task my_driver::main_phase(uvm_phase phase);
	my_transaction tr;
	phase.raise_objection(this);  //和phase.drop_objection(this)配对使用
	uvm_info("my_driver", "main_phase is called", UVM_LOW);
	vif.data <= 8'b0;
	vif.valid <= 1'b0;
	while(!vif.rst_n)
		@(posedge vif.clk);
	for(int i= 0; i< 2: i++)begin
		tr = new("tr");
		assert(tr.randomize() with {pload.size == 200;});
		drive_one_pkt(tr);
	end
	repeat(5) @(posedge vif.clk);
	phase.drop_objection(this);
endtask
在main_phase中,先使用randomize将tr随机化,之后通过drive_one_pkt任务将tr的内容驱动到DUT的端口上。在drive_one_pkt中,先将tr中所有的数据压入队列data_q中,之后再将data_q中所有的数据弹出并驱动。将tr中的数据压入队列data_q中的过程相当于打包成一个byte流的过程。这个过程还可以使用SystemVerlog提供的流操作符实现
task my_driver::drive_one_pkt(my_transaction tr);
	bit [47:0] tmp_data;
	bit [7:0] data_q[$];

	//push dmac to data_q
	tmp_data = tr.dmac;
	for (int i= 0;  i <  6; i++) begin
		data_q.push_back(tmp_data [7:0]);
		tmp_data = (tmp_data >>  ৪);
	end
	//push smac to data_q
	//push ether_type to data_q
	//push payload to data_q
	//push crc to data_q
	tmp_data = tr.crc;
	for (int i=0: i < 4: i++) begin
		data_q.push_back(tmp_data [7:0]);
		tmp_data = (tmp_data >>  8);
	end
	'uvm_info ("my_driver", "begin to drive one pkt", UVM_LOW);
	repeat(3) @posedge(vif.clk);

	while (data_q.size () >  0) begin
		@(posedge vif.clk);
		vif.valid <= 1'bl;
		vif.data <= data_q.pop_front();
	end
	@(posedge vif.clk);
	vif.valid <= 1'b0;
	'uvm_info ("my_driver", "end drive one pkt", UVM_LOW);
endtask
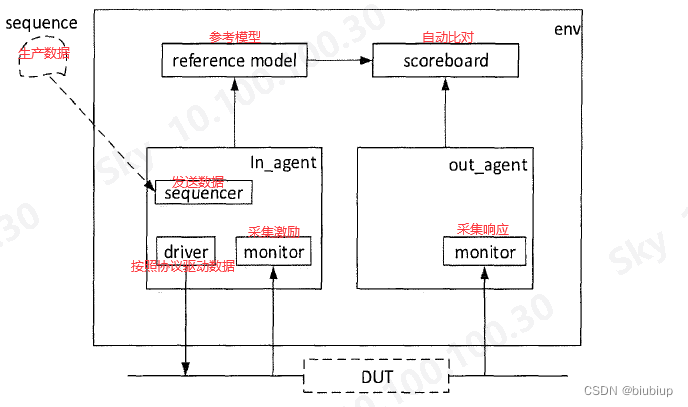
env
在验证平台中加入reference model-scoreboard等之前,思考一个问题:假设这些组件已经定义好了,那么在验证平台的什么位置对它们进行实例化呢?在top_tb中使用run_test进行实例化显然是不行的,因为run_test函数虽然强大,但也只能实例化一个实例;如果在top_tb中使用2.2.1节中实例化driver的方式显然也不可行,因为run_test相当于在top_tb结构层次之外建立一个新的结构层次,而2.2.1节的方式则是基于top_tb的层次结构,如果基于此进行实例化,那么run_test的引用也就没有太大的意义了;如果在driver中进行实例化则更加不合理
这个问题的解决方案是引入一个容器类,在这个容器类中实例化driver monitor reference-model和scoreboard等。在调用run_test时,传递的参数不再是my_driver,而是这个容器类,即让UVM自动创建这个容器类的实例。在UVM中,这个容器类称为uvm_env
class my_env extends uvm_env;
	my_driver drv;
	funciton new(string name = "my_env", uvm_component parent);
		super.new(name, parent);
	endfunction

	virtual function void build_phase(uvm_phase phase);
		super.build_phase(phase);
		drv = my_driver::type_id::create("drv",this);
	endfunction

	`uvm_component_utils(my_env)
endclass
所有的env应该派生自uvm_env ,且与my_driver一样,容器类在仿真中也是一直存在的,使用uvm_component_utils宏来实现factory的注册。
在my_env的定义中,最让人难以理解的是drv的实例化。这里没有直接调用my_driver的new函数,而是使用了一种古怪的方式。这种方式就是factory机制带来的独特的实例化方式。只有使用factory机制注册过的类才能使用这种方式实例化;只有使用这种方式实例化的实例,才能使用后文要讲述的factory机制中最为强大的重载功能。验证平台中的组件在实例化时都应该使用type_name :: type_id: : create的方式。
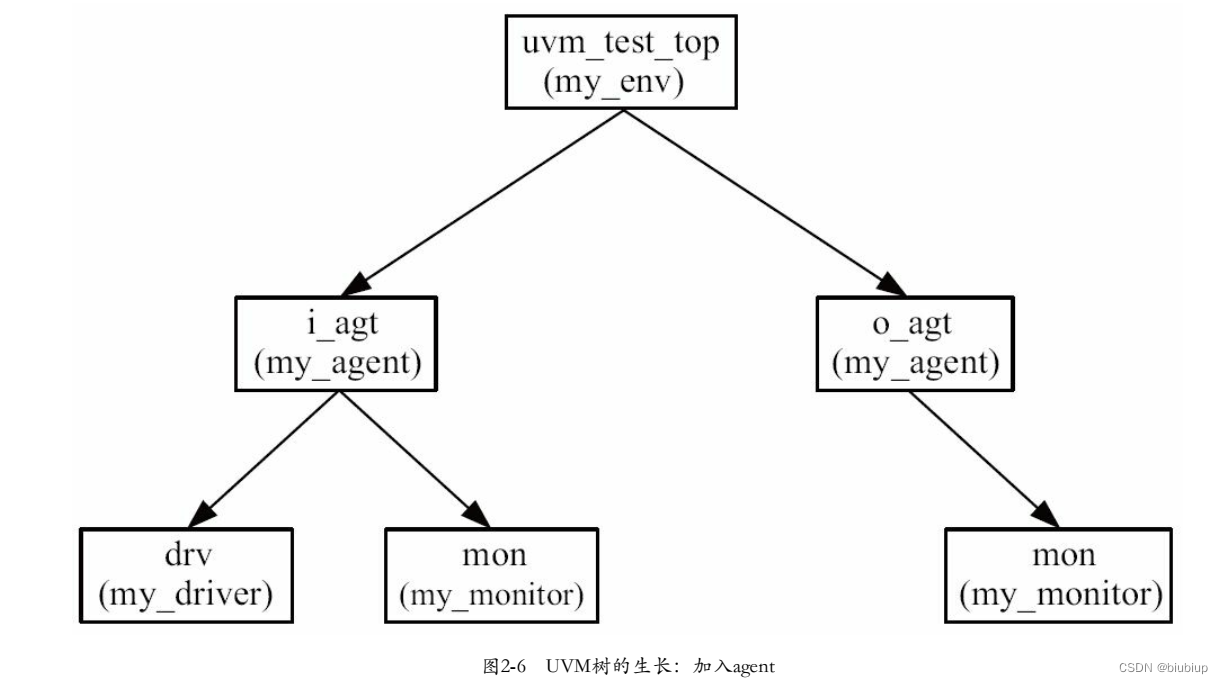
加入env前,driver是整个平台中的唯一组件,加入env后,通过parent的形式,UVM建立起了树形的组织结构。在树形的组织结构中,由于run_test创建的实例事树根(my_env )并且树根的名字是固定的,是uvm_test_top。而树根之后长出枝叶(my_driver),长出枝叶的过程需要在my_env的build_phase中手动实现。由此无论是树根( my_env, uvm_test_top )还是树叶( my_driver )都必须有uvm_component或者派生类继承而来。env作为UVM树的树根,而driver成为树叶build_phase按照从树env的build_phase到driver的build_phase执行在tb top中使用config db机制传递virtual interface时,需要改变路径。run_test的参数也从driver变成env。
当加入了my_env后,整个验证平台中存在两个build_phase,一个是my_env的,一个是my_driver的。那么这两个build_phase按照何种顺序执行呢?在UVM的树形结构中,build_phase的执行遵照从树根到树叶的顺序,即先执行my_env的build_phase,再执行my_driver的build_phase。当把整棵树的build_phase都执行完毕后,再执行后面的phase。
my_driver在验证平台中的层次结构发生了变化,它一跃从树根变成了树叶,所以在top_tb中使用config_db机制传递virtual my_if时,要改变相应的路径;同时,run_test的参数也从my_driver变为了my_env:
initial begin
	run_test ("my_env");
end

initial begin
	uvm_config_db#(virtual my_if)::set (null, "uvm_test_top.drv", "vif", input_if);
end
set函数的第二个参数从uvm_test_top变为了uvm_test_top.drv,其中uvm_test_top是UVM自动创建的树根的名字,而drv则是在my_env的build_phase中实例化drv时传递过去的名字。如果在实例化drv时传递的名字是my_drv,那么set函数的第二个参数中也应该是my_drv:
class my_env extends uvm_env
	…
	drv = my_driver::type_id::create("my_drv", this);
	…
endclass
module top_tb;
	…
	initial begin
	`uvm_config_db#(virtual my_if)::set(null, "uvm_test_top.my_drv", "vif", input_if);
	end
endmodule
加入monitor
monitor用于收集DUT的端口数据,并将其转化为transaction后交给reference-model scoreboard等
- 所有monitor都派生自uvm_monitor
- monitor中需要有一个virtual interface
- 使用uvm_component_utils宏注册
- monitor需要一直收集信息
my_monitor.sv伪代码
class my_monitor extends uvm_monitor
	virtual my_if vif;

	`uvm_component_utils(my_monitor)
	function new(string name = "my_monitor", uvm_component parnet = null);
		super.new(name, parnet);
	endfunction

	virtual function void build_phase(uvm_phase phase)
		sepur.build_phase(phase);
		if(!uvm_config_db#(virtual my_if)::get(this, "", "vif", vif))
			`uvm_fatal("my_monitor", "virtual interface must be set for vif!!!");
	endfunction

    extern task main_phase(uvm_phase phase);
    extern task collect_one_pkt(my_transaction tr);
endclass

task my_monitor::main_phase(uvm_phase phase)
	my_transaction tr;
	while(1) begin
		tr = new("tr");
		collect_one_pkt(tr);
	end
endtask

task my_monitor::collect_one_pkt(my_transaction tr);
	// todo
endtask
monitor需要在env中实例化,可以在DUT的输入口和输出口分别放置monitor。
my_env.sv伪代码
class my_env extends uvm_env;

	my_driver drv;
	my_monitor i_mon;
	my_monitor o_mon;

	function new(string name = "my _env", uvm_component parent);
		super.new(name, parent);
	endfunction

	virtual function void build phase(uvm_phase phase);
		super.build_phase(phase);
		drv= my driver::type id::create("drv", this);
		i_mon = my_monitor::type_id::create("i_mon", this); //提供给reference-model
		o_mon = my_monitor::type_id::create("o_mon", this); //提供给scoreboard
	endtunction

	`uvm_component_utils(my_env)
 endclass
在env中实例化monitor后,要在top_tb中使用config_db将input_if和output_if传递给两个monitor:
initial begin
 	uvm_config_db#(virtual my_if)::set(null, "uvm_test_top.drv", "vif", input_if);
	uvm_config_db#(virtual my_if)::set(null, "uvm_test_top.i_mon", "vif", input_if);
 	uvm_config_db#(virtual my_if)::set(null, "uvm_test_top.o_mon", "vif", output_if);
end
封装成agent
driver和monitor本质上是处理同一种协议,鉴于此,UVM把二者封装在一起,成为一个agent,同一个DUT涉及的不同协议,可以封装成不同的agent。
- 所有agent都派生于uvm_agent
- 使用uvm_component_utils宏实现factory注册
- uvm_agent有一个重要的成员is_active,用于指示dirver或者monitor是否需要实例化
my_agent.sv
class my agent extends uvm agent
	 my_driver  drv;
	 my_monitor mon;

	 function new(string name, uvm_component parent);
	 	super.new(name, parent);
	 endfunction

	 extern virtual function void build_phase(uvm_phase phase);
	 extern virtual function void connect_phase(uvm_phase phase);

	 `uvmcomponent_utils(my_agent)
endclass

function void my_agent::build_phase(uvm_phase phase);
	super.build phase(phase);
	if(is_active == UVM_ACTIVE) begin
		drv = my_driver::type_id::create("drv", this);
	end
	mon = my_monitor::type_id::create("mon", this);
endtunction

function void my_agent::connect_phase(uvm_phase phase);
	super.connect_phase(phase);
endfunction
在把driver和monitor封装成agent后, 在env中需要实例化agent, 而不需要直接实例化driver和monitor了:
class my_env extends uvm_env;

	my_agent i_agt;
    my_agent o_agt;
	…
	virtual function void build_phase(uvm_phase phase);
		super.build_phase(phase);
 		i_agt = my_agent::type_id::create("i_agt", this);
		o_agt = my_agent::type_id::create("o_agt", this);
	    i_agt.is_active = UVM_ACTIVE;
	    o_agt.is_active = UVM_PASSIVE;
	endfunction
 	`uvm_component_utils(my_env);
endclass
完成in_agent和out_agent声明以后,在my_env的build_phase中对他们进行实例化后,需要指定各自的工作模式是active还是passive模式。
由于agent的加入,driver和monitor的层次结构变化了,在top_tb中使用config_db设置virtual my_if时要注意改变路径:
initial begin
	uvm_config_db#(virtual my_if)::set(null, "uvm_test_top.i_agt.drv", "vif", input_if);
	uvm_config_db#(virtual my_if)::set(null, "uvm_test_top.i_agt.mon", "vif", input_if);
	uvm_config_db#(virtual my_if)::set(null, "uvm_test_top.o_agt.mon", "vif", output_if);
end
加入reference model
reference model用于完成和DUT相同的功能。 reference model的输出被scoreboard接收, 用于和DUT的输出相比较。 DUT如果很复杂, 那么reference model也会相当复杂。 本章的DUT很简单, 所以reference model也相当简单:
my_model.sv
class my_model extends uvm_component;

	uvm_blocking_get_port #(my_transaction) port;
	uvm_analysis_port #(my_transaction) ap;

	extern function new(string name, uvm_component parent);
	extern function void build_phase(uvm_phase phase);
	extern virtual task main_phase(uvm_phase phase);

	`uvm_component_utils(my_model)
endclass

function my_model::new(string name, uvm_component parent);
	super.new(name, parent);
endfunction

function void my_model::build_phase(uvm_phase phase);
	super.build_phase(phase);
    port = new("port", this);
    ap = new("ap", this);
endfunction

task my_model::main_phase(uvm_phase phase);
	my_transaction tr;
	my_transaction new_tr;
	super.main_phase(phase);
	while(1) begin
	port.get(tr);
	new_tr = new("new_tr");
	new_tr.my_copy(tr);
	`uvm_info("my_model", "get one transaction, copy and print it:", UVM_LOW)
	new_tr.my_print();
	ap.write(new_tr);
	end
endtask
my_model并不复杂, 这其中令人感兴趣的是my_transaction的传递方式。 my_model是从i_agt中得到my_transaction, 并把my_transaction传递给my_scoreboard。 在UVM中, 通常使用TLM(Transaction Level Modeling) 实现component之间transaction级别的通信。
要实现通信, 有两点是值得考虑的: 第一, 数据是如何发送的? 第二, 数据是如何接收的? 在UVM的transaction级别的通信中, 数据的发送有多种方式, 其中一种是使用uvm_analysis_port。
uvm_analysis_port #(my_transaction) ap;
uvm_analysis_port是一个参数化的类, 其参数就是这个analysis_port需要传递的数据的类型, 在本节中是my_transaction。write是uvm_analysis_port的一个内建函数。
UVM的transaction级别通信的数据接收方式也有多种, 其中一种就是使用uvm_blocking_get_port。 这也是一个参数化的类, 其参数是要在其中传递的transaction的类型。 在my_model的第6行中, 定义了一个端口, 并build_phase中对其进行实例化。 在main_phase中, 通过port.get任务来得到从i_agt的monitor中发出transaction。
在my_monitor和my_model中定义并实现了各自的端口之后, 通信的功能并没有实现, 还需要在my_env中使用fifo将两个端口联系在一起。 在my_env中定义一个fifo, 并在build_phase中将其实例化:
my_env.sv
uvm_tlm_analysis_fifo #(my_transaction) agt_mdl_fifo;
	…
agt_mdl_fifo = new("agt_mdl_fifo", this);
fifo的类型是uvm_tlm_analysis_fifo, 它本身也是一个参数化的类, 其参数是存储在其中的transaction的类型, 这里是my_transaction。
之后, 在connect_phase中将fifo分别与my_monitor中的analysis_port和my_model中blocking_get_port相连
my_env.sv
function void my_env::connect_phase(uvm_phase phase);
	super.connect_phase(phase);
	i_agt.ap.connect(agt_mdl_fifo.analysis_export);
	mdl.port.connect(agt_mdl_fifo.blocking_get_export);
endfunction
这里引入了connect_phase。 与build_phase及main_phase类似, connect_phase也是UVM内建的一个phase, 它在build_phase执行完成之后马上执行。 但是与build_phase不同的是, 它的执行顺序并不是从树根到树叶, 而是从树叶到树根——先执行driver和monitor的connect_phase, 再执行agent的connect_phase, 最后执行env的connect_phase。
加入scoreboard
my_scoreboard.sv
class my_scoreboard extends uvm_scoreboard;
	my_transaction expect_queue[$];
	uvm_blocking_get_port #(my_transaction) exp_port;
	uvm_blocking_get_port #(my_transaction) act_port;
	`uvm_component_utils(my_scoreboard)

	extern function new(string name, uvm_component parent = null);
	extern virtual function void build_phase(uvm_phase phase);
	extern virtual task main_phase(uvm_phase phase);
endclass

function my_scoreboard::new(string name, uvm_component parent = null);
	super.new(name, parent);
endfunction

function void my_scoreboard::build_phase(uvm_phase phase);
	super.build_phase(phase);
	exp_port = new("exp_port", this);
	act_port = new("act_port", this);
	endfunction

task my_scoreboard::main_phase(uvm_phase phase);
	my_transaction get_expect, get_actual, tmp_tran;
	bit result;

	super.main_phase(phase);
	fork
		while (1) begin
			exp_port.get(get_expect);
			expect_queue.push_back(get_expect);
		end
		while (1) begin
			act_port.get(get_actual);
			if(expect_queue.size() > 0) begin
				tmp_tran = expect_queue.pop_front();
				result = get_actual.my_compare(tmp_tran);
				if(result) begin
					`uvm_info("my_scoreboard", "Compare SUCCESSFULLY", UVM_LOW);
				end
				else begin
					`uvm_error("my_scoreboard", "Compare FAILED");
					$display("the expect pkt is");
					tmp_tran.my_print();
					$display("the actual pkt is");
					get_actual.my_print();
				end
			end
			else begin
				`uvm_error("my_scoreboard", "Received from DUT, while Expect Que ue is empty");
				$display("the unexpected pkt is");
				get_actual.my_print();
			end
	    end
	join
endtask
加入field_automation机制
UVM针对transaction定义了field_automation机制,使用uvm_field系列宏实现。
这里使用uvm_object_utils_begin和uvm_object_utils_end来实现my_transaction的factory注册, 在这两个宏中间, 使用uvm_field宏注册所有字段。 uvm_field系列宏随着transaction成员变量的不同而不同, 如上面的定义中出现了针对bit类型的uvm_field_int及针对byte类型动态数组的uvm_field_array_int。
`uvm_object_utils_begin(my_transaction)
	`uvm_field_int(smac, UVM_ALL_ON)
	`uvm_field_int(dmac, UVM_ALL_ON)
	`uvm_field_int(ether_type, UVM_ALL_ON)
	`uvm_field_array_int(pload, UVM_ALL_ON)
	`uvm_field_int(crc, UVM_ALL_ON)
`uvm_object_utils_end
加入sequencer
sequence机制用于产生激励, 它是UVM中最重要的机制之一。 在本书前面所有的例子中, 激励都是在driver中产生的, 但是在一个规范化的UVM验证平台中, driver只负责驱动transaction, 而不负责产生transaction。 sequence机制有两大组成部分, 一是sequence, 二是sequencer。 本节先介绍如何在验证平台中加入sequencer。 一个sequencer的定义如下:
my_sequencer.sv
class my_sequencer extends uvm_sequencer #(my_transaction);

	function new(string name, uvm_component parent);
		super.new(name, parent);
	endfunction

	`uvm_component_utils(my_sequencer)
endclass
sequencer的定义非常简单, 派生自uvm_sequencer, 并且使用uvm_component_utils宏来注册到factory中。 uvm_sequencer是一个参数化的类, 其参数是my_transaction, 即此sequencer产生的transaction的类型。
sequencer产生transaction, 而driver负责接收transaction。 在前文的例子中, 定义my_driver时都是直接从uvm_driver中派生:
class my_driver extends uvm_driver;
但实际上, 这种定义方法并不多见, 由于uvm_driver也是一个参数化的类, 应该在定义driver时指明此driver要驱动的transaction的类型:
class my_driver extends uvm_driver#(my_transaction);
这样定义的好处是可以直接使用uvm_driver中的某些预先定义好的成员变量, 如uvm_driver中有成员变量req, 它的类型就是传递给uvm_driver的参数, 在这里就是my_transaction, 可以直接使用req:
my_driver.sv
task my_driver::main_phase(uvm_phase phase);
	phase.raise_objection(this);
	vif.data <= 8'b0;
	vif.valid <= 1'b0;
	while(!vif.rst_n)
		@(posedge vif.clk);
	for(int i = 0; i < 2; i++) begin
		req = new("req");
		assert(req.randomize() with {pload.size == 200;});
		drive_one_pkt(req);
	end
	repeat(5) @(posedge vif.clk);
	phase.drop_objection(this);
endtask
这里依然是在driver中产生激励, 下一节中将会把激励产生的功能从driver中移除。
在完成sequencer的定义后, 由于sequencer与driver的关系非常密切, 因此要把其加入agent中:
my_agent.sv
class my_agent extends uvm_agent ;
	my_sequencer sqr;
	my_driver drv;
	my_monitor mon;

	uvm_analysis_port #(my_transaction) ap;
	…
endclass

function void my_agent::build_phase(uvm_phase phase);
	super.build_phase(phase);
	if (is_active == UVM_ACTIVE) begin
		sqr = my_sequencer::type_id::create("sqr", this);
		drv = my_driver::type_id::create("drv", this);
	end
	mon = my_monitor::type_id::create("mon", this);
endfunction

function void my_agent::connect_phase(uvm_phase phase);
	super.connect_phase(phase);
	ap = mon.ap;
endfunction
sequence机制
sequence不属于验证平台的任何一部分, 但是它与sequencer之间有密切的联系, 这点从二者的名字就可以看出来。 只有在sequencer的帮助下, sequence产生出的transaction才能最终送给driver; 同样, sequencer只有在sequence出现的情况下才能体现其价值, 如果没有sequence, sequencer就几乎没有任何作用。 sequence就像是一个弹夹, 里面的子弹是transaction, 而sequencer是一把枪。 弹夹只有放入枪中才有意义, 枪只有在放入弹夹后才能发挥威力。
除了联系外, sequence与sequencer还有显著的区别。 从本质上来说:
sequencer是一个 uvm_component, 而sequence是一个uvm_object。 与my_transaction一样, sequence也有其生命周期。 它的生命周期比my_transaction要更长一些, 其内的transaction全部发送完毕后, 它的生命周期也就结束了。 这就好比一个弹夹, 其里面的子弹用完后就没有任何意义了。 因此, 一个sequence应该使用uvm_object_utils宏注册到factory中
my_sequence.sv
class my_sequence extends uvm_sequence #(my_transaction);
	my_transaction m_trans;

	function new(string name= "my_sequence");
		super.new(name);
	endfunction

	virtual task body();
		repeat (10) begin
			`uvm_do(m_trans)
		end
		#1000;
	endtask

	`uvm_object_utils(my_sequence)
endclass
每一个sequence都应该派生自uvm_sequence, 并且在定义时指定要产生的transaction的类型, 这里是my_transaction。 每一个sequence都有一个body任务, 当一个sequence启动之后, 会自动执行body中的代码。 在上面的例子中, 用到了一个全新的宏:uvm_do。 这个宏是UVM中最常用的宏之一, 它用于: ①创建一个my_transaction的实例m_trans; ②将其随机化; ③最终将其送给sequencer。 如果不使用uvm_do宏, 也可以直接使用start_item与finish_item的方式产生transaction, 6.3.4节将讲述这种方式。 对于初学者来说, 使用uvm_do宏即可。
一个sequence在向sequencer发送transaction前, 要先向sequencer发送一个请求, sequencer把这个请求放在一个仲裁队列中。 作为sequencer, 它需做两件事情: 第一, 检测仲裁队列里是否有某个sequence发送transaction的请求; 第二, 检测driver是否申请transaction。
driver如何向sequencer申请transaction呢? 在uvm_driver中有成员变量seq_item_port, 而在uvm_sequencer中有成员变量seq_item_export, 这两者之间可以建立一个“通道”, 通道中传递的transaction类型就是定义my_sequencer和my_driver时指定的transaction类型, 在这里是my_transaction, 当然了, 这里并不需要显式地指定“通道”的类型, UVM已经做好了。 在my_agent中,使用connect函数把两者联系在一起:
my_agent.sv
function void my_agent::connect_phase(uvm_phase phase);
	super.connect_phase(phase);
	if (is_active == UVM_ACTIVE) begin
		drv.seq_item_port.connect(sqr.seq_item_export);
	end
	ap = mon.ap;
endfunction
当把二者连接好之后, 就可以在driver中通过get_next_item任务向sequencer申请新的transaction:
my_driver.sv
task my_driver::main_phase(uvm_phase phase);
	vif.data <= 8'b0;
	vif.valid <= 1'b0;
	while(!vif.rst_n)
		@(posedge vif.clk);
	while(1) begin
		seq_item_port.get_next_item(req);
		drive_one_pkt(req);
		seq_item_port.item_done();
	end
endtask
在实现了driver后, 接下来的问题是sequence如何向sequencer中送出transaction呢? 前面已经定义了sequence, 只需要在某个component( 如my_sequencer、 my_env) 的main_phase中启动这个sequence即可。 以在my_env中启动为例:
my_env.sv
task my_env::main_phase(uvm_phase phase);
	my_sequence seq;
	phase.raise_objection(this);
	seq = my_sequence::type_id::create("seq");
	seq.start(i_agt.sqr);
	phase.drop_objection(this);
endtask
首先创建一个my_sequence的实例seq, 之后调用start任务。 start任务的参数是一个sequencer指针, 如果不指明此指针, 则sequence不知道将产生的transaction交给哪个sequencer。
这里需要引起关注的是objection, 在UVM中, objection一般伴随着sequence, 通常只在sequence出现的地方才提起和撤销objection。 如前面所说, sequence是弹夹, 当弹夹里面的子弹用光之后, 可以结束仿真了。
也可以在sequencer中启动sequence:
task my_sequencer::main_phase(uvm_phase phase);
	my_sequence seq;
	phase.raise_objection(this);
	seq = my_sequence::type_id::create("seq");
	seq.start(this);
	phase.drop_objection(this);
endtask
在my_driver.sv中除了使用get_next_item之外, 还可以使用try_next_item。 get_next_item是阻塞的, 它会一直等到有新的transaction才会返回; try_next_item则是非阻塞的, 它尝试着询问sequencer是否有新的transaction, 如果有, 则得到此transaction, 否则就直接返回。
task my_driver::main_phase(uvm_phase phase);
	vif.data <= 8'b0;
	vif.valid <= 1'b0;
	while(!vif.rst_n)
		@(posedge vif.clk);
	while(1) begin
		seq_item_port.try_next_item(req);
		if(req == null)
			@(posedge vif.clk);
		else begin
			drive_one_pkt(req);
			seq_item_port.item_done();
		end
	end
endtask
相比于get_next_item, try_next_item的行为更加接近真实driver的行为: 当有数据时, 就驱动数据, 否则总线将一直处于空闲状态
default_sequence的使用
在上面内容中, sequence是在my_env的main_phase中手工启动的, 作为示例使用这种方式足够了, 但是在实际应用中,使用最多的还是通过default_sequence的方式启动sequence。
使用default_sequence的方式非常简单, 只需要在某个component( 如my_env) 的build_phase中设置如下代码即可
// my_env.sv
virtual funciton void build_phase(uvm_phase phase);

	super.build_phase(phase);
	uvm_config_db#(uvm_object_wrapper)::set(this,
											"i_agt.sqr.main_phase",
											"default_sequence",
											my_sequence::type_id::get());

endfunction
这是除了在top_tb中通过config_db设置virtual interface后再一次用到config_db的功能。 与在top_tb中不同的是, 这里set函数的第一个参数由null变成了this, 而第二个代表路径的参数则去除uvm_test_top。 事实上, 第二个参数是相对于第一个参数的相对路径, 由于上述代码是在my_env中, 而my_env本身已经是uvm_test_top了, 且第一个参数被设置为了this, 所以第二个参数中就不需要uvm_test_top了。 在top_tb中设置virtual interface时, 由于top_tb不是一个类, 无法使用this指针, 所以设置set的第一个参数为null, 第二个参数使用绝对路径uvm_test_top.xxx。
另外, 在第二个路径参数中, 出现了main_phase。 这是UVM在设置default_sequence时的要求。 由于除了main_phase外, 还存在其他任务phase, 如configure_phase、 reset_phase等, 所以必须指定是哪个phase, 从而使sequencer知道在哪个phase启动这个sequence。
至于set的第三个和第四个参数, 以及uvm_config_db#( uvm_object_wrapper) 中为什么是uvm_object_wrapper而不是uvm_sequence或者其他, 则纯粹是由于UVM的规定, 用户在使用时照做即可
其实, 除了在my_env的build_phase中设置default_sequence外, 还可以在其他地方设置, 比如top_tb:
module top_tb;
	…
	initial begin
		uvm_config_db#(uvm_object_wrapper)::set(null,
												"uvm_test_top.i_agt.sqr.main_phase",
												"default_sequence",
												my_sequence::type_id::get());
	end
endmodule
还可以在其他的component里设置, 如my_agent的build_phase里:
function void my_agent::build_phase(uvm_phase phase);
	super.build_phase(phase);
	…
	uvm_config_db#(uvm_object_wrapper)::set(this,
											"sqr.main_phase",
											"default_sequence",
											my_sequence::type_id::get());
endfunction
config_db通常都是成对出现的。 在top_tb中通过set设置virtual interface, 而在driver或者monitor中通过get函数得到virtualinterface。 那么在这里是否需要在sequencer中手工写一些get相关的代码呢? 答案是否定的。 UVM已经做好了这些, 读者无需再把时间花在这上面。
使用default_sequence启动sequence的方式取代了代码sequencer的main_phase中手工启动sequence的相关语句, 但是新的问题出现了: 在上一节启动sequence前后, 分别提起和撤销objection, 此时使用default_sequence又如何提起和撤销objection呢?
在uvm_sequence这个基类中, 有一个变量名为starting_phase, 它的类型是uvm_phase, sequencer在启动default_sequence时, 会自动做如下相关操作:
task my_sequencer::main_phase(uvm_phase phase);
	…
	seq.starting_phase = phase;
	seq.start(this);
	…
endtask
因此,可以在sequence中使用starting_phase进行提起和撤销objection:
// my_sequence.sv
class my_sequence extends uvm_sequence #(my_transaction);
	my_transaction m_trans;
	…
	virtual task body();
		if(starting_phase != null)
			starting_phase.raise_objection(this);
		repeat (10) begin
			`uvm_do(m_trans)
		end
		#1000;
		if(starting_phase != null)
		starting_phase.drop_objection(this);
	endtask

	`uvm_object_utils(my_sequence)
endclass
从而, objection完全与sequence关联在了一起, 在其他任何地方都不必再设置objection。


 197
197


 被折叠的 条评论
为什么被折叠?
被折叠的 条评论
为什么被折叠?
 到【灌水乐园】发言


