


目录
UVM Testbench Top
testbench顶层文件包含 :
- DUT instance DUT的实例
- interface instance 接口实例
- run_test() method run_test()方法
- virtual interface set config_db 配置虚接口
- clock and reset generation logic 时钟和复位逻辑
- wave dump logic 波形逻辑

module tbench_top;

  //clock and reset signal declaration
  bit clk;
  bit reset;

  //clock generation
  always #5 clk = ~clk;

  //reset Generation
  initial begin
    reset = 1;
    #5 reset =0;
  end

  //creatinng instance of interface, inorder to connect DUT and testcase
  mem_if intf(clk,reset);//接口实例

  //DUT instance, interface signals are connected to the DUT ports
  memory DUT (
    .clk(intf.clk),
    .reset(intf.reset),
    .addr(intf.addr),
    .wr_en(intf.wr_en),
    .rd_en(intf.rd_en),
    .wdata(intf.wdata),
    .rdata(intf.rdata)
   );

  //enabling the wave dump
  initial begin
    uvm_config_db#(virtual mem_if)::set(uvm_root::get(),"*","mem_intf",intf);//虚接口配置逻辑
    $dumpfile("dump.vcd"); $dumpvars;//波形dump
  end

  initial begin
    run_test();//主方法,开始执行
  end
endmodule

来看下面一个testbench顶层文件的例子:
module tb_top;
   import uvm_pkg::*;//导入uvm组件包,只有导入了这个包才能识别各个uvm组件
   import test_pkg::*;//导入包
   `include "uvm_marocs.svh"//导入宏

   // Complex testbenches will have multiple clocks and hence multiple clock
   // generator modules that will be instantiated elsewhere
   // For simple designs, it can be put into testbench top 复杂的设计会存在多个时钟
   bit clk;
   always #10 clk <= ~clk;


   // 实例化接口并把它传送给DUT
   dut_if         dut_if1  (clk);
   dut_wrapper    dut_wr0  (._if (dut_if1));


   // At start of simulation, set the interface handle as a config object in UVM
   // database. This IF handle can be retrieved in the test using the get() method
   // run_test () accepts the test name as argument. In this case, base_test will
   // be run for simulation
   initial begin
      uvm_config_db #(virtual dut_if)::set (null, "uvm_test_top", "dut_if", dut_if1);
      run_test ("base_test");
   end

endmodule
上面的例子中:
因为用到了UVM的组件,所以要导入包uvm_pkg;
因为将base_test作为run_test的参数进行传递,而base_test在包test_pkg中,所以也要导入;
定义的时钟要传递给接口dut_if1;
接口通过uvm_config_db::set ()设置为UVM数据库表中的对象,它将会在其他组件中用uvm_config_db::get ()获取;
在testbench层次机构中使用config database(配置数据库)将configuration object(配置对象)传递给选中的component(组件)是很方便的;
通过调用run_test开始进入test仿真,它可以说是UVM调用各个组件的入口.其执行的过程如下图所示:

可以在run_test()的参数中选择要启动的test,也可以在命令行窗口输入"+UVM_TESTNAME="testname" "来启动另一个test;下面在介绍test时也有叙述.
UVM Test [uvm_test]
test的作用是检查验证计划书中所列举的DUT的特点和功能,对于一个复杂的设计,通常需要很多歌test来进行验证.为了避免在多个test中编写相同的代码,我们将testbench组件全部包含进了environment,因此可以使用相同的environment和不同的配置(configuration)来编写不同的test. test中包含environment、配置属性(config property)以及覆盖类(class override)等.其次sequence的创建和启动也在test中.

编写test的步骤:
(1)继承uvm_test,在factory(工厂)中注册
// Step 1: Declare a new class that derives from "uvm_test"
// my_test is user-given name for this class that has been derived from "uvm_test"
class my_test extends uvm_test;

    // [Recommended] Makes this driver more re-usable
    `uvm_component_utils (my_test)

    // This is standard code for all components
    function new (string name = "my_test", uvm_component parent = null);
      super.new (name, parent);
    endfunction

    // Code for rest of the steps come here
endclass(2)声明environment和其他组件并用phase建立它们
// Step 2: Declare other testbench components - my_env and my_cfg are assumed to be defined
      my_env   m_top_env;              // Testbench environment that contains other agents, register models, etc
      my_cfg   m_cfg0;                 // Configuration object to tweak the environment for this test

      // Instantiate and build components declared above
      virtual function void build_phase (uvm_phase phase);
         super.build_phase (phase);

         // [Recommended] Instantiate components using "type_id::create()" method instead of new()
         m_top_env  = my_env::type_id::create ("m_top_env", this);
         m_cfg0     = my_cfg::type_id::create ("m_cfg0", this);

         // [Optional] Configure testbench components if required, get virtual interface handles, etc
         set_cfg_params ();

         // [Optional] Make the cfg object available to all components in environment/agent/etc
         uvm_config_db #(my_cfg) :: set (this, "m_top_env.my_agent", "m_cfg0", m_cfg0);
endfunction(3)如果有要求的话打印UVM topology(UVM 拓扑)
// [Recommended] By this phase, the environment is all set up so its good to just print the topology for debug
      virtual function void end_of_elaboration_phase (uvm_phase phase);
         uvm_top.print_topology ();
endfunction(4)建立一个virtual sequence (虚序列)或者普通sequence,并启动
// Start a virtual sequence or a normal sequence for this particular test
      virtual task run_phase (uvm_phase phase);

        // Create and instantiate the sequence
        my_seq m_seq = my_seq::type_id::create ("m_seq");

        // Raise objection - else this test will not consume simulation time*
        phase.raise_objection (this);

        // Start the sequence on a given sequencer
        m_seq.start (m_env.seqr);

        // Drop objection - else this test will not finish
        phase.drop_objection (this);
endtask建立test完成后就可以启动uvm_test,这通过在全局任务run_test()中来完成.例子如下:
// 将test名作为字符串参数传递给run_test
initial begin
   run_test ("base_test");
end如果run_test()的参数为空,则需要通过command-line option(命令行选项)进行描述,具体看下面.
如何运行不同的test?这就需要在仿真器中添加命令行参数,此时需要用到关键字+UVM_TESTNAME,例子如下:
// 如果命令行没有提供参数,则运行默认的test
initial begin
   run_test ("base_test");
   // Or you can leave the argument as blank
   // run_test ();
end

// 在EDA simulator输入下面的命令运行test
$> [simulator] -f list +UVM_TESTNAME=base_test
一个完整的test如下:
// Step 1: Declare a new class that derives from "uvm_test"
   class base_test extends uvm_test;

       // Step 2: Register this class with UVM Factory
      `uvm_component_utils (base_test)

      // Step 3: Define the "new" function
      function new (string name, uvm_component parent = null);
         super.new (name, parent);
      endfunction

      // Step 4: Declare other testbench components
      my_env   m_top_env;              // Testbench environment
      my_cfg   m_cfg0;                 // Configuration object


      // Step 5: Instantiate and build components declared above
      virtual function void build_phase (uvm_phase phase);
         super.build_phase (phase);

         // [Recommended] Instantiate components using "type_id::create()" method instead of new()
         m_top_env  = my_env::type_id::create ("m_top_env", this);
         m_cfg0     = my_cfg::type_id::create ("m_cfg0", this);

         // [Optional] Configure testbench components if required
         set_cfg_params ();

         // [Optional] Make the cfg object available to all components in environment/agent/etc
         uvm_config_db #(my_cfg) :: set (this, "m_top_env.my_agent", "m_cfg0", m_cfg0);
      endfunction

      // [Optional] 设置testbench配置参数,这里设置了两个参数
      virtual function void set_cfg_params ();
         // Get DUT interface from top module into the cfg object
         if (! uvm_config_db #(virtual dut_if) :: get (this, "", "dut_if", m_cfg0.vif)) begin
            `uvm_error (get_type_name (), "DUT Interface not found !")
         end

         // Assign other parameters to the configuration object that has to be used in testbench
         m_cfg0.m_verbosity    = UVM_HIGH;
         m_cfg0.active         = UVM_ACTIVE;
      endfunction

    // [Recommended] By this phase, the environment is all set up so its good to just print the topology for debug
      virtual function void end_of_elaboration_phase (uvm_phase phase);
         uvm_top.print_topology ();
      endfunction

      function void start_of_simulation_phase (uvm_phase phase);
         super.start_of_simulation_phase (phase);

         // [Optional] Assign a default sequence to be executed by the sequencer or look at the run_phase ...
         uvm_config_db#(uvm_object_wrapper)::set(this,"m_top_env.my_agent.m_seqr0.main_phase",
                                          "default_sequence", base_sequence::type_id::get());

      endfunction

      // or.. start a sequence for this particular test
      virtual task run_phase (uvm_phase phase);
        my_seq m_seq = my_seq::type_id::create ("m_seq");
        phase.raise_objection (this);
        m_seq.start (m_env.seqr);
        phase.drop_objection (this);
      endtask
   endclass
关于上面的例子:
base_test继承了uvm_test,并且在工厂中注册;
在test中声明了environment m_top_env 和一个配置对象 m_cfg0 ,该配置对象包含两个配置参数;
在build_phase() 中建立了m_top_env和m_cfg0对象,m_cfg0进行了初始化,并将该对象通过uvm_config_db::set 设置为UVM数据库表的一个变量;
只有顶层模块m_top_env中的agent对象 my_agent 才可以引用配置对象 m_cfg0;
UVM Environment [uvm_env]
一个environment(环境)包括多个可重用的验证组件,比如可以包含多个带有不同接口的agent、一个公共的scoreboard、一个功能覆盖收集器(functional coverage collector)等.
为什么不将这些组件直接放在test中?主要有以下几点原因:
(1)test的编写需要了解如何配置environment;
(2)改变testbench的拓扑结构(topology)将会使的test需要改很多的地方;
(3)直接将组件放在test中,会导致test无法重用,因为这样就依赖于特定的环境结构;
一个环境允许多次在test中实例化,这样就可以通过改变环境的拓扑结构来创建不同的test,从而构建testbench.

uvm_env是环境的基类,由它可以构成一个完整的环境.创建UVM环境的步骤如下:
(1)继承uvm_env并在工厂中注册
// my_env is user-given name for this class that has been derived from "uvm_env"
class my_env extends uvm_env;

    // [Recommended] Makes this driver more re-usable
    `uvm_component_utils (my_env)

    // This is standard code for all components
    function new (string name = "my_env", uvm_component parent = null);
      super.new (name, parent);
    endfunction

    // Code for rest of the steps come here
endclass
(2)声明并创建验证组件
// apb_agnt and other components are assumed to be user-defined classes that already exist in TB
  apb_agnt  m_apb_agnt;//agent
  func_cov   m_func_cov;//功能覆盖组件
  scbd     m_scbd;//scoreboard
  env_cfg   m_env_cfg;//环境配置组件

  // Build components within the "build_phase"
  virtual function void build_phase (uvm_phase phase);//在build_phase中创建对象
    super.build_phase (phase);
    m_apb_agnt = apb_agnt::type_id::create ("m_apb_agnt", this);
    m_func_cov = func_cov::type_id::create ("m_func_cov", this);
    m_scbd     = scbd::type_id::create ("m_scbd", this);

    // [Optional] Collect configuration objects from the test class if applicable
    //从test中获得配置对象
    if (uvm_config_db #(env_cfg)::get(this, "", "env_cfg", m_env_cfg))
      `uvm_fatal ("build_phase", "Did not get a configuration object for env")

    // [Optional] Pass other configuration objects to sub-components via uvm_config_db
  endfunction
(3)连接验证组件
virtual function void connect_phase (uvm_phase phase);
    // A few examples:
    // Connect analysis ports from agent to the scoreboard
    // Connect functional coverage component analysis ports
    // ...
  endfunction
下面来看一个完整环境的例子,包括两个agent和3个子环境 :
class my_top_env extends uvm_env;
   `uvm_component_utils (my_env)

   agent_apb          m_apb_agt;
   agent_wishbone     m_wb_agt;

   env_register       m_reg_env;
   env_analog         m_analog_env [2];

   scoreboard         m_scbd;

   function new (string name = "my_env", uvm_component parent);
      super.new (name, parent);
   endfunction

   virtual function void build_phase (uvm_phase phase);//创建agent和子环境的对象
      super.build_phase (phase);
      // Instantiate different agents and environments here
      m_apb_agt = agent_apb::type_id::create ("m_apb_agt", this);
      m_wb_agt  = agent_wishbone::type_id::create ("m_wb_agt", this);

      m_reg_env = env_register::type_id::create ("m_reg_env", this);
      foreach (m_analog_env[i])
        m_analog_env[i] = env_analog::type_id::create ($sformatf("m_analog_env%0d",m_analog_env[i]), this);

      m_scbd = scoreboard::type_id::create ("m_scbd", this);
   endfunction

   virtual function void connect_phase (uvm_phase phase);
        // Connect between different environments, agents, analysis ports, and scoreboard here
   endfunction
endclass子环境中可以包含其他agent和自己的子环境.再来看下面一个简单的例子:

class my_env extends uvm_env ;

   `uvm_component_utils (my_env)

   my_agent             m_agnt0;
   my_scoreboard        m_scbd0;

   function new (string name, uvm_component parent);
      super.new (name, parent);
   endfunction : new

   virtual function void build_phase (uvm_phase phase);
      super.build_phase (phase);
      m_agnt0 = my_agent::type_id::create ("my_agent", this);
      m_scbd0 = my_scoreboard::type_id::create ("my_scoreboard", this);
   endfunction : build_phase

   virtual function void connect_phase (uvm_phase phase);
      // 连接scoreboard和agent,注意是在connect_phase函数中进行连接
      m_agnt0.m_mon0.item_collected_port.connect (m_scbd0.data_export);
   endfunction

endclass
UVM Driver [uvm_driver]
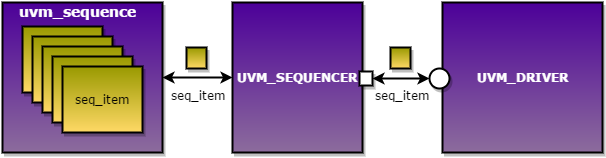
driver的作用主要是驱动信号到对应的接口.例如,为了驱动APB总线,driver需要知道信号何时被采样.所有的drver都继承与uvm_driver.从sequencer获得传输级对象(transaction level object) ,然后通过driver驱动它们通过接口进入到DUT中.
创建driver的步骤:
(1)继承uvm_driver并在工厂中注册
// my_driver is user-given name for this class that has been derived from "uvm_driver"
class my_driver extends uvm_driver;

    // [Recommended] Makes this driver more re-usable
    `uvm_component_utils (my_driver)

    // This is standard code for all components
    function new (string name = "my_driver", uvm_component parent = null);
      super.new (name, parent);
    endfunction

    // Code for rest of the steps come here
endclass(2)声明虚接口句柄,并在build_phase中获取testbench顶层配置的虚接口
// Actual interface object is later obtained by doing a get() call on uvm_config_db
    virtual if_name vif;

    virtual function void build_phase (uvm_phase phase);
      super.build_phase (phase);
       if (! uvm_config_db #(virtual if_name) :: get (this, "", "vif", vif)) begin
          `uvm_fatal (get_type_name (), "Didn't get handle to virtual interface if_name")
       end
endfunction(3)编辑run_phase
// This is the main piece of driver code which decides how it has to translate
  // transaction level objects into pin wiggles at the DUT interface
  virtual task run_phase (uvm_phase phase);//驱动任务
    // Loop the following steps
    // 1. Get next item from the sequencer
    // 2. Assign data from the received item into DUT interface
    // 3. Finish driving transaction
endtask 
driver与sequencer之间的握手(handshake)
driver是参数化(parameterized)的类,可以驱动不同类型的传输对象(transaction object).driver有一个uvm_seq_item_pull_port类型的TLM端口,它可以接收来自uvm_sequencer的参数化对象,同时给uvm_sequencer提供一个反馈对象(response object).通常没有明确定义的话,接收对象和反馈对象时同一种类型的.
driver利用下面的方法与sequencer进行交互:

driver与sequencer之间的握手机制是为了将sequencer中的传输对象发送到driver,同时反馈一个对象回sequencer;接着driver再接收下一个传输对象.具体工作模式有两种方式:
(1)get_next_item followed by item_done
virtual task run_phase (uvm_phase phase);
    my_data req_item;

    forever begin
      // 1.接收下一个传输对象
      seq_item_port.get_next_item (req_item);

      // 2. 驱动对象到接口
      @(posedge vif.clk);
      vif.en <= 1;
      // Drive remaining signals, put write data/get read data

      // 3. 告诉sequencer,driver已完成当前对象的接收和发送
      seq_item_port.item_done();
end(2)get followed by put
virtual task run_phase (uvm_phase phase);
    my_data req_item;

    forever begin
      // 1. finish_item in sequence is unblocked  获得传输对象的过程是非阻塞的,这是与上面方法的不同
      seq_item_port.get (req_item);

      // 2. Drive signals to the interface
      @(posedge vif.clk);
      vif.en = 1;
      // Drive remaining signals

      // 3. Finish item
      seq_item_port.put (rsp_item);
    end
  endtask
下面来看一个完整的driver例子:
class my_driver extends uvm_driver #(my_data);
  `uvm_component_utils (my_driver)

   virtual  dut_if   vif;

   function new (string name, uvm_component parent);
      super.new (name, parent);
   endfunction

   virtual function void build_phase (uvm_phase phase);
      super.build_phase (phase);
      if (! uvm_config_db #(virtual dut_if) :: get (this, "", "vif", vif)) begin
         `uvm_fatal (get_type_name (), "Didn't get handle to virtual interface dut_if")
      end
   endfunction

   task run_phase (uvm_phase phase);
      super.run_phase (phase);
      forever begin
         `uvm_info (get_type_name (), $sformatf ("Waiting for data from sequencer"), UVM_MEDIUM)
         seq_item_port.get_next_item (data_obj);
         drive_item (data_obj);//驱动传输对象
         seq_item_port.item_done ();
      end
   endtask

   virtual task drive_item (my_data data_obj);
      // Drive based on bus protocol
   endtask
endclass
再来一个例子:
class mem_driver extends uvm_driver #(mem_seq_item);

  // Virtual Interface
  virtual mem_if vif;

  `uvm_component_utils(mem_driver)

  //uvm_analysis_port #(mem_seq_item) Drvr2Sb_port;

  // Constructor
  function new (string name, uvm_component parent);
    super.new(name, parent);
  endfunction : new

  function void build_phase(uvm_phase phase);
    super.build_phase(phase);
     if(!uvm_config_db#(virtual mem_if)::get(this, "", "vif", vif))
       `uvm_fatal("NO_VIF",{"virtual interface must be set for: ",get_full_name(),".vif"});
  endfunction: build_phase

  // run phase
  virtual task run_phase(uvm_phase phase);
    forever begin
    seq_item_port.get_next_item(req);
    //respond_to_transfer(req);
    drive();
    seq_item_port.item_done();
    end
  endtask : run_phase

  // drive
  virtual task drive();
    req.print();
      `DRIV_IF.wr_en <= 0;
      `DRIV_IF.rd_en <= 0;
      @(posedge vif.DRIVER.clk);
      `DRIV_IF.addr <= req.addr;
    if(req.wr_en) begin
        `DRIV_IF.wr_en <= req.wr_en;
        `DRIV_IF.wdata <= req.wdata;
      //$display("\tADDR = %0h \tWDATA = %0h",req.addr,trans.wdata);
        @(posedge vif.DRIVER.clk);
      end
    if(req.rd_en) begin
        `DRIV_IF.rd_en <= req.rd_en;
        @(posedge vif.DRIVER.clk);
        `DRIV_IF.rd_en <= 0;
        @(posedge vif.DRIVER.clk);
        req.rdata = `DRIV_IF.rdata;
       // $display("\tADDR = %0h \tRDATA = %0h",trans.addr,`DRIV_IF.rdata);
      end
      $display("-----------------------------------------");
  endtask : drive

endclass : mem_driver注意事项:
(1)上面提到所driver是参数化的,所谓的参数化指的是driver的run_phase()中接收的传输对象类型(request)和响应类型(response)可以是在类名后定义的.如下例:
class uvm_driver #(type REQ = uvm_sequence_item, type RSP = REQ) extends uvm_component;
//REQ表示required对象,RSP表示response对象
(2) driver有一个seq_item_port类型的TLM port,而sequencer中有一个seq_item_export类型的TLM port,两者通过这两个TLM port在environment或agent的connnect_phase( )中连接.如下例:
virtual function void connect_phase ();
   m_drv0.seq_item_port.connect (m_seqr0.seq_item_export);
   //driver名.seq_item_port.connect(sequencer名.seq_item_export);
endfunction
Sequencer [uvm_sequencer]
sequencer控制着sequence和driver之间的response sequence item(RSP响应事务)和request sequence item(REQ请求事务)的流动。sequencer由继承uvm_sequencer而来,sequencer处理的请求事务和响应事务类型决定了uvm_sequencer是参数化的 .

默认情况下,REQ类型与RSP类型是相同的,如果要求两者不同,可以在第二个参数指定;除非有其他的特殊端口需要声明,否则应该在继承的开头声明两种对象的类型。如下所示:
// class uvm_sequencer #(type REQ = uvm_sequence_item, RSP = REQ) extends uvm_sequencer_param_base #(REQ, RSP);
#后的括号里面的内容表示REQ和RSP的类型,也就是sequence item的类型

uvm_sequencer #(my_data, data_rsp) seqr0;            // with    RSP
uvm_sequencer #(my_data) seqr0; // without RSP在sequencer中实例化对象会使得灵活性和可重用性受到限制,这个问题可以通过sequence来解决.
sequencer和driver分别定义有seq_item_export and seq_item_port类型的TLM端口,两者之间通过这两个端口连接,如下所示:
driver.seq_item_port.connect(sequencer.seq_item_export);
一个完整的sequencer例子如下:
class mem_sequencer extends uvm_sequencer#(mem_seq_item);//只有一个参数,表示REQ和RSP的类型都是 mem_seq_item

   `uvm_sequencer_utils(mem_sequencer)

  function new (string name, uvm_component parent);
    super.new(name, parent);
  endfunction : new

endclass : mem_sequencersequencer分为m_sequencer 和 p_sequencer,来看两者的不同:
(1)m_sequencer
所有的sequence都要在sequencer中启动:如tr_seq.start(env.vsqr)。当sequence启动的时候,m_sequencer 句柄就指向了env.vsqr. m_sequencer 就是这样一个指向执行当前sequence的sequencer句柄;
(2)p_sequencer
所有的sequence 都有一个m_sequencer 句柄,但是m_squencer变量是个内部实现变量,而且由于参数类型的原型,通过这一句柄通常不能直接调用sequencer里的变量,任何以m_开的变量和方法也都是如此 ;
这时候为了方便,就使用了p_seuencer。但是任意sequence 并不会自动凭空就有p_sequencer。P_seuencer没有被自动声明,但是可以使用`uvm_declare_p_sequencer宏声明。当调用这一宏时,在virtual sequence 开启时,P_sequencer就会被自动声明、赋值,并正确的指向正在执行这一virtual sequence的virtual sequencer..格式如下:
`uvm_declare_p_sequencer(sequencer_name);`uvm_declare_p_sequencer宏实际上完成了这两步:
- 声明了一个sequencer类型的句柄p_sequencer
- 这个宏将m_sequencer句柄转化为p_sequencer 类型的句柄
UVM Sequence [uvm_sequence]
sequence产生一系列的sequence item,并通过sequencer发送到driver.sequence由继承uvm_sequence而来
sequence是参数化的,参数是sequence item的类型,参数类型也分为REQ和RSQ,uvm_sequence的定义如下所示:
virtual class uvm_sequence #( type REQ = uvm_sequence_item,
                               type RSP = REQ ) extends uvm_sequence_base


class write_sequence extends uvm_sequence #(mem_seq_item);
....//REQ和RSP的类型都是 mem_seq_item
....
endclassREQ是driver所需要的事务对象,它是由sequence产生的;而RSP是driver反馈给sequence的事务对象,它是由DUT产生的,表示接收事务对象完成;
sequence中主要包括两个重要的成员:
(1)body method:主体方法,主要表示sequence的运行;
(2)m_sequencer handle:指向sequencer的句柄,sequence在sequencer上执行
在test中调用start()方法,sequence就会开始执行,格式如下:
sequence_name.start(sequencer_name);//注意第二个是sequencer名下图显示了在开始执行sequence后,sequence中各方法的执行顺序:
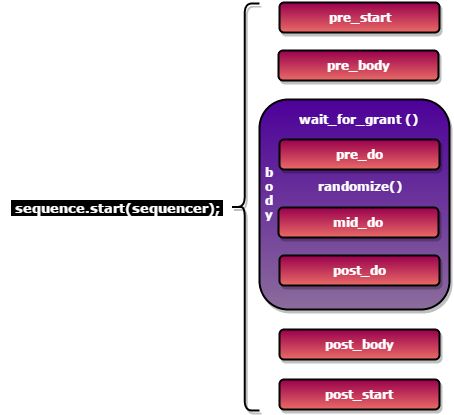
在uvm_sequence中存在许多方法、宏和预定义的回调方法,用户可以在sequence中自定义这些回调方法;注意,这些回调方法不能直接被调用,它们只会在执行sequence时自动调用;
下面的图表示了sequence、sequencer和driver、DUT之间的交互:
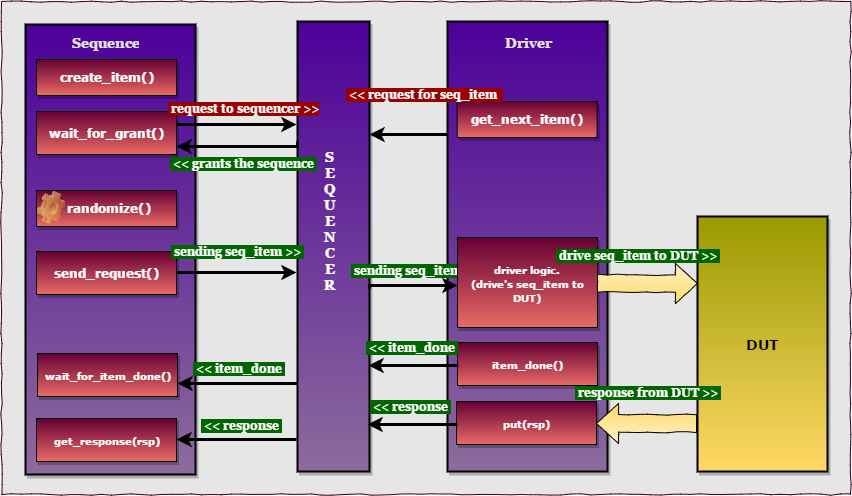
产生和发送sequence item的过程写在sequence的主题方法body()中,各个组件之间的交互步骤如下:
(1)产生REQ对象;
(2)wait_for_grant();
(3)随机化REQ;
(4)发送REQ;
(5)wait_for item_done;
(6)sequence得到RSP;
其中步骤5和6是可选的;
步骤中涉及的方法如下表所示:

完整的sequence如下:
class mem_sequence extends uvm_sequence#(mem_seq_item);

  `uvm_object_utils(mem_sequence)

  //Constructor
  function new(string name = "mem_sequence");
    super.new(name);
  endfunction

  virtual task body();

    req = mem_seq_item::type_id::create("req");  //创建mem_seq_item类型对象req
    wait_for_grant();                            //wait for grant
    assert(req.randomize());                     //randomize the req
    send_request(req);                           //发送REQ
    wait_for_item_done();                        //wait for item done from driver
    get_response(rsp);                           //接收来自DUT的RSP

  endtask
endclassuvm_sequence的宏(宏既可以用来执行sequence item也可以执行sequence)如下表所示:

下面是几个使用宏来代替上面6个步骤的例子:
`uvm_do() 执行上面的6个步骤
class mem_sequence extends uvm_sequence#(mem_seq_item);

  `uvm_object_utils(mem_sequence)

  //Constructor
  function new(string name = "mem_sequence");
    super.new(name);
  endfunction

  virtual task body();
    `uvm_do(req)
  endtask

endclass
`uvm_create() and `uvm_send()
class mem_sequence extends uvm_sequence#(mem_seq_item);

  `uvm_object_utils(mem_sequence)

  //Constructor
  function new(string name = "mem_sequence");
    super.new(name);
  endfunction

  virtual task body();
    `uvm_create(req)
    assert(req.randomize());
    `uvm_send(req);
  endtask

endclass
`uvm_rand_send()
class mem_sequence extends uvm_sequence#(mem_seq_item);

  `uvm_object_utils(mem_sequence)

  //Constructor
  function new(string name = "mem_sequence");
    super.new(name);
  endfunction

  virtual task body();
    `uvm_create(req)
    `uvm_rand_send(req)
  endtask

endclass
`uvm_do_with() 带约束
class write_sequence extends uvm_sequence#(mem_seq_item);

  `uvm_object_utils(write_sequence)

  //Constructor
  function new(string name = "write_sequence");
    super.new(name);
  endfunction

  virtual task body();
    `uvm_do_with(req,{req.wr_en == 1;})
  endtask

endclass
`uvm_rand_send_with()
class read_sequence extends uvm_sequence#(mem_seq_item);

  `uvm_object_utils(read_sequence)

  //Constructor
  function new(string name = "read_sequence");
    super.new(name);
  endfunction

  virtual task body();
    `uvm_create(req)
    `uvm_rand_send_with(req,{req.rd_en == 1;})
  endtask

endclass
也可以在sequence的内部调用其他的sequence,如下:
class wr_rd_seq extends uvm_sequence#(mem_seq_item);

  write_sequence wr_seq;
  read_sequence  rd_seq;

  `uvm_object_utils(wr_rd_seq)

  //Constructor
  function new(string name = "wr_rd_seq");
    super.new(name);
  endfunction

  virtual task body();
    `uvm_do(wr_seq)
    `uvm_do(rd_seq)
  endtask

endclass
UVM Monitor [uvm_monitor]
monitor的作用是捕获DUT的接口数据,并将这些数据转换为发送级数据对象(transaction level data object),以便能发送到testbench的其他组件.也就是说monitor只负责数据的采样而不用驱动!
因此,monitor中包括一个TLM分析端口(TLM analysis port)用于将捕获的数据传送出去;以及一个指向DUT的虚接口句柄.

创建monitor的步骤如下:
(1)继承uvm_monitor,并在工厂中注册
// my_monitor is user-given name for this class that has been derived from "uvm_monitor"
class my_monitor extends uvm_monitor;

  // [Recommended] Makes this monitor more re-usable
  `uvm_component_utils (my_monitor)

  // This is standard code for all components
  function new (string name = "my_monitor", uvm_component parent = null);
    super.new (name, parent);
  endfunction

  // Rest of the steps come here
endclass
(2)声明虚接口和TLM分析端口
// Actual interface object is later obtained by doing a get() call on uvm_config_db
  virtual if_name vif;

  // my_data is a custom class object used to encapsulate signal information
  // and can be sent to other components
uvm_analysis_port #(my_data) mon_analysis_port;(3)在build_phase()中获取虚接口和实例化TLM分析端口
virtual function void build_phase (uvm_phase phase);
      super.build_phase (phase);

      // Create an instance of the declared analysis port
      mon_analysis_port = new ("mon_analysis_port", this);

      // Get virtual interface handle from the configuration DB
      if (! uvm_config_db #(virtual if_name) :: get (this, "", "vif", vif)) begin
         `uvm_error (get_type_name (), "DUT interface not found")
      end
   endfunction
(4)编辑run_phase()
run_phase()是monitor的主体方法.
// This is the main piece of monitor code which decides how it has to decode
  // signal information. For example, AXI monitors need to follow AXI protocol
  virtual task run_phase (uvm_phase phase);


    // Fork off multiple threads "if" required to monitor the interface,  for example:
    fork
      // Thread 1: Monitor address channel
      // Thread 2: Monitor data channel, populate "obj" data object
      // Thread 3: Monitor control channel, decide if transaction is over

      // Thread 4: When data transfer is complete, send captured information
       // through the declared analysis port
      mon_analysis_port.write(obj);
    join_none
  endtask
一个完整的monitor如下所示:
class my_monitor extends uvm_monitor;
   `uvm_component_utils (my_monitor)

   virtual dut_if   vif;
   bit              enable_check = 1;

   uvm_analysis_port #(my_data)   mon_analysis_port;

   function new (string name, uvm_component parent= null);
      super.new (name, parent);
   endfunction

   virtual function void build_phase (uvm_phase phase);
      super.build_phase (phase);

      // Create an instance of the analysis port
      mon_analysis_port = new ("mon_analysis_port", this);

      // Get virtual interface handle from the configuration DB
      if (! uvm_config_db #(virtual dut_if) :: get (this, "", "vif", vif)) begin
         `uvm_error (get_type_name (), "DUT interface not found")
      end
   endfunction

   virtual task run_phase (uvm_phase phase);
      my_data  data_obj = my_data::type_id::create ("data_obj", this);
      forever begin
         @ ([Some event when data at DUT port is valid]);
         data_obj.data = vif.data;//获取总线上的数据到本地类中
         data_obj.addr = vif.addr;

         // monitor的run_phase()中可以带协议检查模块,如果使能
         if (enable_check)
            check_protocol ();

         // Sample functional coverage if required. Data packet class is assumed
         // to have functional covergroups and bins
         //也可以带采样覆盖率的检查
         data_obj.cg_trans.sample();

         // Send data object through the analysis port 发送数据对象到其他组件
         mon_analysis_port.write (data_obj);
      end
   endtask

   virtual function void check_protocol ();
      // Function to check basic protocol specs
   endfunction
endclass
对于上面的例子:
虚接口的句柄被定义为vif,通过uvm_config_db::get()分配到uvm的数据库;
在run_phase()中添加了用于协议检查和覆盖率检查的模块,这可以通过使能信号enable_check和enable_coverage来实现;
数据对象通过TLM分析端口传送到其他的组件;
UVM Agent [uvm_agent]
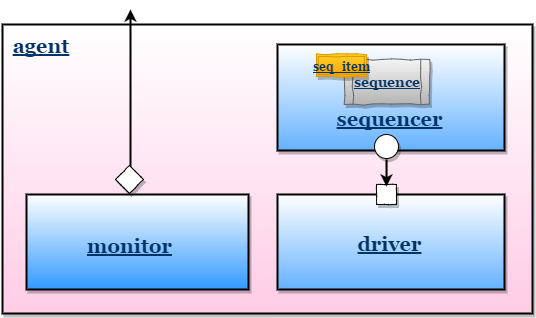
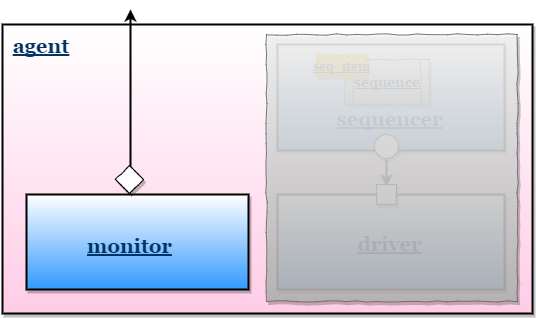
用户定义的agent继承于uvm_agent,而uvm_agent继承于uvm_component.一般来说,一个激活(active)的agent包括:monitor、sequencer、driver三部分,各个组件之间通过TLM接口进行连接.agent可以配置成active和passive。
uvm_agent内部有内建的is_active,所以用户自定义agent在继承uvm_agent后只需要直接调用即可.uvm_agent的内部定义如下:
virtual class uvm_agent extends uvm_component;
  uvm_active_passive_enum  is_active = UVM_ACTIVE;

  ...
  function void build_phase (uvm_phase phase);
    int active;
    super.build_phase (phase);
    if (get_config_int ("is_active", active)) is_active = uvm_active_passive_enum'(active);
  endfunction
  ...
endclass
(1)Active agent
agent产生激励,并将激励驱动给DUT.所以active agent包括上面的三个组件.
(2)Passive agent
agent仅从DUT采样而不驱动采样数据,所以passive agent只包括monitor.

默认的agent都是active的,agent可以通过设置配置方法(set config method)来配置成active/passive。设置配置方法可以在environment或test中,格式如下:
set_config_int("path_to_agent 路径", "is_active", UVM_ACTIVE);
set_config_int("path_to_agent 路径", "is_active", UVM_PASSIVE);

或者

// Set the configuration called "is_active" to the agent's path to mark the given agent as passive
  uvm_config_db #(int) :: set (this, "path_to_agent", "is_active", UVM_PASSIVE);

  // Set the configuration called "is_active" to the agent's path to mark the given agent as active
  uvm_config_db #(int) :: set (this, "path_to_agent", "is_active", UVM_ACTIVE);
在agent定义中可以通过get_is_active() 方法来获取配置的情况,以便agent决定是实例化1个组件还是3个组件.如果配置为active,则方法返回UVM_ACTIVE,否则返回UVM_PASSIVE.
创建agent的步骤:
(1)继承uvm_agent并在工厂中注册
class mem_agent extends uvm_agent;

  // UVM automation macros for general components
  `uvm_component_utils(mem_agent)

  // constructor
  function new (string name, uvm_component parent);
    super.new(name, parent);
  endfunction : new

endclass : mem_agent
(2)声明monitor、driver和sequencer的句柄
//declaring agent components
mem_driver    driver;
mem_sequencer sequencer;
mem_monitor   monitor;
(3)在build_phase()中根据agent的类型创建3个组件的对象
// build_phase
function void build_phase(uvm_phase phase);
  super.build_phase(phase);

  if(get_is_active() == UVM_ACTIVE) begin//如果为active,则需要创建sequencer和driver
    driver = mem_driver::type_id::create("driver", this);
    sequencer = mem_sequencer::type_id::create("sequencer", this);
  end

  monitor = mem_monitor::type_id::create("monitor", this);
endfunction : build_phase
(4)在connect_phase()中连接sequencer和driver
// connect_phase
function void connect_phase(uvm_phase phase);
  if(get_is_active() == UVM_ACTIVE) begin
    driver.seq_item_port.connect(sequencer.seq_item_export);
  end
endfunction : connect_phase
一个完整的agent例子:
class mem_agent extends uvm_agent;
  //declaring agent components
  mem_driver    driver;
  mem_sequencer sequencer;
  mem_monitor   monitor;

  // UVM automation macros for general components
  `uvm_component_utils(mem_agent)

  // constructor
  function new (string name, uvm_component parent);
    super.new(name, parent);
  endfunction : new

  // build_phase
  function void build_phase(uvm_phase phase);
    super.build_phase(phase);

    if(get_is_active() == UVM_ACTIVE) begin
      driver = mem_driver::type_id::create("driver", this);
      sequencer = mem_sequencer::type_id::create("sequencer", this);
    end

    monitor = mem_monitor::type_id::create("monitor", this);
  endfunction : build_phase

  // connect_phase
  function void connect_phase(uvm_phase phase);
    if(get_is_active() == UVM_ACTIVE) begin
      driver.seq_item_port.connect(sequencer.seq_item_export);
    end
  endfunction : connect_phase

endclass : mem_agent每一个agent都可以包含一个配置对象(config object),该对象中包含一个dirver和monitor可使用的虚接口句柄,也可以包含影响agent中的组件配置和行为的成员.一般来说,这些行为包括:
(1)收集协议信息(protocol information)的功能覆盖monitor;
(2)检查协议数据(protocol data)的scoreboard;
(3)API sequence
来看下面一个例子:
class my_agent extends uvm_agent;
      `uvm_component_utils (my_agent)

      my_driver                  m_drv0;
      my_monitor                 m_mon0;
      uvm_sequencer #(my_data)   m_seqr0;
      agent_cfg                  m_agt_cfg;//配置对象句柄

      function new (string name = "my_agent", uvm_component parent=null);
         super.new (name, parent);
      endfunction

      // If Agent is Active, create Driver and Sequencer, else skip
      // Always create Monitor regardless of Agent's nature

      virtual function void build_phase (uvm_phase phase);
         super.build_phase (phase);

     uvm_config_db #(agent_cfg) :: get (this, "*", "agt_cfg", m_agt_cfg);//从配置数据库中获取配置对象

         if (get_is_active()) begin
            m_seqr0 = uvm_sequencer#(my_data)::type_id::create ("m_seqr0", this);
            m_drv0 = my_driver::type_id::create ("m_drv0", this);
            m_drv0.vif = m_agt_cfg.vif;//获取配置对象中的接口
         end
         m_mon0 = my_monitor::type_id::create ("m_mon0", this);

         m_mon0.vif = m_agt_cfg.vif;//获取配置对象中的接口
      endfunction

    // Connect Sequencer to Driver, if the agent is active

      virtual function void connect_phase (uvm_phase phase);
         if (get_is_active())
            m_drv0.seq_item_port.connect (m_seqr0.seq_item_export);
      endfunction
   endclass
一个environment可以包括多个agent,每个agent与DUT之间的接口可以不同

UVM Scoreboard
scoreboard中包含检查器(checker)和参考模型(reference model),它通过TLM analysis端口与monitor通信,接收来自DUT的输出,将输出与参考模型中的期望值(expected value)比较,看两者是否匹配.

创建scoreboard的步骤:
(1)继承uvm_scoreboard,并在工厂中注册
// my_scoreboard is user-given name for this class that has been derived from "uvm_scoreboard"
class my_scoreboard extends uvm_scoreboard;

    // [Recommended] Makes this scoreboard more re-usable
    `uvm_component_utils (my_scoreboard)

    // This is standard code for all components
    function new (string name = "my_scoreboard", uvm_component parent = null);
      super.new (name, parent);
    endfunction

    // Code for rest of the steps come here
endclass
(2)声明TLM analysis端口,并在build_phase()中创建
// Step2: Declare and create a TLM Analysis Port to receive data objects from other TB components
  uvm_analysis_imp #(apb_pkt, my_scoreboard) apb_export;

  // Instantiate the analysis port, because afterall, its a class object
  function void build_phase (uvm_phase phase);
    apb_export = new ("apb_export", this);
  endfunction
(3)从monitor接收到数据后,定义数据执行的操作
// Step3: Define action to be taken when a packet is received via the declared analysis port
  virtual function void write (apb_pkt data);//apb_pkt为接收的数据类,data为对象
    // What should be done with the data packet received comes here - let's display it
    `uvm_info ("write", $sformatf("Data received = 0x%0h", data), UVM_MEDIUM)
  endfunction
(4)执行检查(check)
检查不一定要在check_phase()中进行,也可以在run_phase()中
// Step4: [Optional] Perform any remaining comparisons or checks before end of simulation
  virtual function void check_phase (uvm_phase phase);
    ...
endfunction 注意,要在environement的connect_phase()中连接agent中的monitor和scoreboard,例子如下:
class my_env extends uvm_env;
  ...

  // Step5: Connect the analysis port of the scoreboard with the monitor so that
  // the scoreboard gets data whenever monitor broadcasts the data.
  virtual function void connect_phase (uvm_phase phase);
    super.connect_phase (phase);
    m_apb_agent.m_apb_mon.analysis_port.connect (m_scbd.apb_export);
  endfunction
endclass
下面来看一个完整例子:
// Step1 : Create a new class that extends from uvm_scoreboard
class my_scoreboard extends uvm_scoreboard;
  `uvm_component_utils (my_scoreboard)

  function new (string name = "my_scoreboard", uvm_component parent);
    super.new (name, parent);
  endfunction

  // Step2a: Declare and create a TLM Analysis Port to receive data objects from other TB components
  uvm_analysis_imp #(apb_pkt, my_scoreboard) apb_export;//注意到接收数据的TLM端口都为export类型,而发送数据的都为port类型
//这里表示从my_scoreboard 接收一个类名为apb_pkt的对象

  // Step2b: Instantiate the analysis port, because afterall, its a class object
  function void build_phase (uvm_phase phase);
    apb_export = new ("apb_export", this);
  endfunction

  // Step3: Define action to be taken when a packet is received via the declared analysis port
  virtual function void write (apb_pkt data);
    // What should be done with the data packet received comes here - let's display it
    `uvm_info ("write", $sformatf("Data received = 0x%0h", data), UVM_MEDIUM)
  endfunction

  // Step3: Define other functions and tasks that operate on the data and call them
  // Remember, this is the main task that consumes simulation time in UVM
  virtual task run_phase (uvm_phase phase);
    ...
  endtask

  // Step4: [Optional] Perform any remaining comparisons or checks before end of simulation
  virtual function void check_phase (uvm_phase phase);
    ...
  endfunction
endclass
Subscriber [uvm_subscriber]
subscriber是TLM分析接口的接收者(listener),其通常与一个TLM analysis port相连,该port任何时候广播(broadcast)数据都会被subscriber接收.一个uvm_component类并不存在内建的分析端口(analysis port),但是uvm_subscriber却存在一个名为anylysis_export的分析端口.
subscriber的创建如下:
virtual class uvm_subscriber #(type T=int) extends uvm_component;
  typedef uvm_subscriber #(T) this_type;

  uvm_analysis_imp #(T, this_type) analysis_export;

  function new (string name, uvm_component parent);
    super.new (name, parent);
    analysis_export = new ("analysis_imp", this);
  endfunction

  pure virtual function void write (T, t);
endclass
agent中的monitor有一个向外部组件发送数据的TLM analysis port,所以用户可以自定义一个继承subscriber的类,使用内建的analysis_export端口来连接到monitor的TLM analysis port。在这个继承的类中,可以包含覆盖组和覆盖点,并且可以获取来自monitor的数据.看下面的例子:
class my_coverage extends uvm_subscriber #(bus_pkt);

  covergroup cg_bus;//覆盖组
    ...
  endgroup

  virtual function void write (bus_pkt pkt);
    cg_bus.sample ();
  endfunction
endclass

class my_env extends uvm_env;
  ...
  virtual function void connect_phase (uvm_phase phase);
    super.connect_phase (phase);
    my_agent.custom_ap.connect (my_cov.analysis_export);
  endfunction
endclass
没有要求说这个包含覆盖组的类一定要继承uvm_subscriber,但是这样继承提供了一种获取agent数据的方式.


 132
132

 被折叠的 条评论
为什么被折叠?
被折叠的 条评论
为什么被折叠?
 到【灌水乐园】发言


