


 本文详细对比了openVX与VPI在数据对象处理、执行模型、目标分配及边框模式上的区别,重点介绍了VPI中图像、金字塔、数组的创建与使用,以及复杂的执行模型和临时内存需求。
openVX到VPI的迁移
本文主要介绍一下openVX迁移到VPI的一些注意事项,主要包含一些数据结构,以及如何初始化这些数据结构。数据结构包含object,images,pyramids,arrays
第一部分 Data Object Differences
OpenVx objects是半透明的,应用程序可以获取对不透明数据对象的引用,openvx实现管理object memory (数据内容可以在给定时间驻留在系统中的任何位置),并且显式地请求的对象的数据内容可以直接访问。
VPI objects是以C结构体的方式对外展示的。应用程序分配和初始化object控制结构和Cuda内存,应用程序管理 CPU-GPU之间的同步。
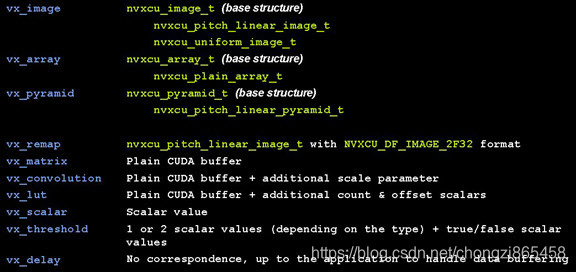
下面显示VX-VPI数据类型对应关系。
下面看一下VPI API 复杂数据对象的方法
| Data Object | Description |
|---|---|
| nvxcu__t | 是基类,包含一些共有的信息 |
| nvxcu_<object> _<property>_t | 子类,我们要实例化的就是这些, |
cv基元函数使用指向基结构的指针作为参数。不需要前缀/后缀原语函数,因为单个函数可以支持同一类的多种类型的数据对象。原语很容易扩展。说白了就是定义的函数使用的参数都是父类,使用的时候可以传入子类作为参数。
例如:
<primitive>(nvxcu_<object>_t *input, nvxcu_<object>_t *output)
VPI Images
下面来看一下nvxcu_image_t这个基类里面包含哪些共有的数据参数:
| 参数 | 描述 |
|---|---|
| image_type | 指定image变体类型 |
| format | 指定image类型 |
| width,height | 指定图像的大小 |
nv_cv_pitch_linear_image_t是使用pitch linear的cuda buffer实现的一个image,有以下成员:
| 成员 | 描述 |
|---|---|
| base | The base image structure (nvxcu_image_t)base.image.type must be NVXCU_PITCH_LINEAR_IMAGE. |
| planes | Plan descriptor array. Must be consistent with base.format. |
| dev_ptr | CUDA buffer的指针 |
| pitch_in_bytes | Specifies the pitch of the CUDA buffer, in bytes. |
nvxcu__uniform_image_t实现所有像素值相同的图像。它有以下成员:
| Member | Description |
|---|---|
| base | The base image structure (nvxcu_image_t). base.image.type must be NVXCU_UNIFORM_IMAGE. |
| uniform_value | Specifies the value of the pixel (nvxcu_pixel_value_t). Must be consistent with base.format. |
创建一个Image
使用openVX创建:
vx_image im = vxCreateImage(context, 1920,1080, VX_DF_IMAGE_U8);
使用VPI创建一个image:
void *dev_ptr = NULL;
size_t pitch =0;
cudaMallocPitch(&dev_ptr,&pitch, 1920*sizeof(uint8_t),1080);
nvxcu_pitch_linear_image_t image;
image.base.image_type = NVXCU_PITCH_LINEAR_IMAGE;
image.base.format = NVXCU_DF_IMAGE_U8;
image.base.width = 1920;
image.base.height = 1080;
image.planes[0].dev_ptr = dev_ptr;
image.planes[0].pitch_in_bytes = pitch;
看一下VPI创建还是比较麻烦的,不过为了效率也不要怕麻烦,毕竟人家快。
image使用示例
下面比较OpenVX和VPI之间的图像使用情况OpenVX中的图像使用
vx_image in = vxCreateImage(...);
vx_image_out = vxCreateImage(...);
vxuBox3x3(context, in, out);
使用VPI使用image usage
nvxcu_pitch_linear_image_t in = { ... } ;
nvxcu_pitch_linear_image_t out = { ... } ;
nvxcu_border_t border_mode = { ... } ;
nvxcu_stream_exec_target_t target =  { ... } ;
nvxcuBox3x3(&in.base, &out.base, &border_mode, &target.base);
VPI pyramids
nvxcu_pyramid_t 包含以下参数:
| Parameter | Description |
|---|---|
| pyramid_type | 指定金字塔变体类型. |
| num_levels | 指定 金字塔有几层. |
| scale | 指定层级间的缩放因子. |
nvxcu_pitch_linear_pyramid_t 使用pitch linear的cuda buffer实现的一个pyramid.
| Member | Description |
|---|---|
| base | The base pyramid structure (nvxcu_pyramid_t). base.pyramid_type must be NVXCU_PITCH_LINEAR_PYRAMID. |
| levels | A pointer to an array of base.num_levels image descriptors of type nvxcu_pitch_linear_image_t. Images must be consistent in terms of type and dimensions. levels[0] is the base of the pyramid (largest dimension). |
创建一个pyramid
使用openVX创建一个pyramid
vx_pyramid pyr = vxCreatePyramid(context, num_levels, VX_SCALE_PYRAMID_HALF, 1920, 1080, VX_DF_IMAGE_U8);
使用VPI创建一个VPI:
nvxcu_pitch_linear_pyramid_t pyr;
pyr.base.pyramid_type = NVXCU_PITCH_LINEAR_PYRAMID;
pyr.base.num_levels = num_levels;
pyr.base.scale = NVXCU_SCALE_PYRAMID_HALF;
pyr.levels = malloc(num_levels * sizeof(nxcu_pitch_linear_image_t));
uint32_t cur_width = width, cur_height = height; float cur_scale = NVXCU_SCALE_PYRAMID_HALF;
for (uint32_t i = 0; i < num_levels; ++i) {
    cudaMallocPitch(&pyr.levels[i].planes[0].dev_ptr,
                &pyr.levels[i].planes[0].pitch_in_bytes,
                cur_width * sizeof(uint8_t), cur_height);
    pyr.levels[i].base.image_type = NVXCU_PITCH_LINEAR_IMAGE;
pyr.levels[i].base.format = NVXCU_DF_IMAGE_U8;
pyr.levels[i].base.width = cur_width;
pyr.levels[i].base.height = cur_height;
    cur_scale *= pyr.base.scale;
cur_width = (uint32_t)ceilf(width * cur_scale);
cur_height = (uint32_t)ceilf(height * cur_scale);
}
VPI arrays
nvxcu_array_t is the base image structure. It includes the following parameters:
| Parameter | Description |
|---|---|
| array_type | Specifies the variant of the array. |
| item_type | Specifies the type of elements in the array. |
| capacity | Specifies the maximum number of elements in the array. |
nvxcu_plan_array_t array implementation uses plain linear CUDA memory. It has the following members:
| Member | Description |
|---|---|
| base | The base array structure (nvxcu_array_t). base.array_type must be NVXCU_PLAIN_ARRAY. |
| dev_ptr | A pointer to a CUDA buffer that can store at least base.capacity elements. |
| num_items_dev_ptr | A pointer to the element counter in CUDA memory. |
创建一个array
使用openVX:
vx_array array = vxCreateArray(context, NVX_TYPE_POINT2F, 1000);
使用VPI:
void * dev_ptr = NULL;
cudaMalloc(&dev_ptr, 1000 * sizeof(nvxcu_point2f_t));
uint32_t * num_items_dev_ptr = NULL;
cudaMalloc((void **)&num_items_dev_ptr, sizeof(uint32_t));
cudaMemset(num_items_dev_ptr, 0, sizeof(uint32_t));
nvxcu_plain_array_t array;
array.base.array_type = NVXCU_PLAIN_ARRAY;
array.base.item_type = NVXCU_TYPE_POINT2F;
array.base.capacity = 1000;
array.dev_ptr = dev_ptr;
array.num_items_dev_ptr = num_items_dev_ptr;
第二部分 OpenVX和VPI Primitives
提供一个OpenVX和VPI执行模型,target assignments和border mode
执行模型比较
下面看一下OpenVX和VPI执行模型的比较
OpenVX
openVX提供两个可选的执行模型。
- 立即执行模式
立即模式有一个类似于opencv的同步执行模型。这一切都是在运行时完成的,包括临时内存分配。
vx_status status = vxu<Primitive>(context, <params>);
- Graph模式
在图形模式下,先把如参数检查、内存分配和优化等先于执行。它执行异步节点执行和同步图形执行。
// Ahead of time
vx_graph vxCreateCraph(context);
vx_node node = vx<Primitive>Node(graph, <params>);
vx_status verif_status = vxVerifyGraph(graph);
// Data process time
vx_status exec_status = vxProcessGraph(graph);
VPI模式
VPI执行模型包含三步:
- 查询临时内存中的需求(仅限复杂原语)。
nvxcu_tmp_buf_size_t tmp_size;
tmp_size = nvxcu<Primitive> GetBuff(<param metadata>, const struct cudaDeviceProp*);
- 分配临时内存这可以是CUDA和主机内存,并且可以提前完成
nvxcu_tmp_buf_t tmp_buf = {NULL, NULL};
cudaMalloc(&tmp_buf.dev_ptr, tmp_size.dev_buf_size);
cudaMallocHost(&tmp_buf.host_ptr, tmp_size.host_buf_size);
- 异步原语执行
nvxcu_tmp_buf_size_t tmp_size;
tmp_size = nvxcu<Primitive>(<params, including tmp bufs>);
VPI执行模型例子
nvxcu_border_t              border = { ... } ;
nvxcu_stream_exec_target_t  target = { ... } ;
// Query for needed temporary memory
nvxcu_tmp_buf_size_t gauss_pyr_buf_size_ =
          nvxcuGaussianPyramid_GetBufSize(width, height, nb_levels, &border, &exec_target_.dev_prop);
// Allocate required buffers
nvxcu_tmp_buf_t tmp_buf = {NULL, NULL};
if (tmp_size.dev_buf_size > 0)
    cudaMalloc(&tmp_buf.dev_ptr, tmp_size.dev_buf_size);
if (tmp_size.host_buf_size > 0)
   cudaMallocHost(&tmp_buf.host_ptr, tmp_size.host_buf_size)
// Process data
nvxcu_pitch_linear_pyramid_t pyr = { /* must be width x height with nb_levels*/ }
nvxcuGaussianPyramid(&pyr.base, tmp_buf, &border, &exec_target_.base) );
// Synchronize the stream to get results
cudaStreamSynchronize(exec_target_.stream)
目标分配比较
Border Mode 比较
openvx中的目标分配是可选的,默认情况下是自动分配的。您可以使用以下选项手动将原语分配给GPU或CPU:
vxSetNodeTarget, vxSetImmediateModeTarget(...)
VPI中的运行在哪个设备上是固定好的,必须在每个基元执行调用(nvxcu_exec_target_t参数)处提供目标CUDA流
VPI 目标指定
nvxcu_exec_target_t是基本执行目标结构,包括以下参数:
| Parameter | Description |
|---|---|
| exec_target_type | 这是当前支持的唯一CUDA流目标。 |
nvxcu_stream_exec_target_t array实现使用普通线性CUDA内存它包括下列成员:
| Member | Description |
|---|---|
| base | The base target structure (nvxcu_exec_target_t). base.exec_target_type must be NVXCU_STREAM_EXEC_TARGET. |
| stream | Specifies the CUDA stream. |
| dev_prop | Specifies the CUDA device property for the stream (cudaDeviceProp). |


 3466
3466

 被折叠的 条评论
为什么被折叠?
被折叠的 条评论
为什么被折叠?
 到【灌水乐园】发言


